
? ? 在上一篇文章《系統調用分析(2)》中介紹和分析了32位和64位的快速系統調用指令——sysenter/sysexit和syscall/sysret,以及內核對快速系統調用部分的相關代碼,并追蹤了一個用戶態下的系統調用程序運行過程。
????本篇中將基于最新的Linux-5.0內核,添加一個系統調用,完成一個“系統調用日志收集系統”; 并對這三篇文章進行一個總結。
?加前兩篇文章在這里:
https://mp.weixin.qq.com/s/3Dvd2dy0l6OYFVGzfEvOcg
https://mp.weixin.qq.com/s/7uXVXXqzN8wMqgxqrN_5og
加一個系統調用
//? 單純添加一個系統調用會顯得有些單調,出于既是作業又是學習角度,將系統調用、工作隊列、修改內核、內核編譯和內核模塊編寫插入等結合起來,通過完成一個系統調用日志收集系統。
1
系統調用日志收集系統的目的
? 系統調用是用戶程序與系統打交道的入口,系統調用的安全直接關系到系統的安全,如果一個用戶惡意地不斷調用fork()將導致系統負載增加,所以如果能收集到是誰調用了一些有危險的系統調用,以及系統調用的時間和其他信息,將有助于系統管理員進行事后追蹤,從而提高系統的安全性。
2
系統調用日志收集系統概述
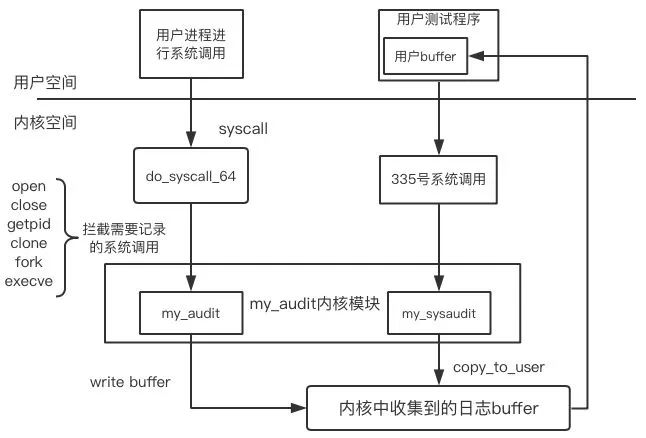
圖3-1?系統調用日志收集系統示意圖
? 根據示意圖,系統調用日志收集系統所做工作為:當用戶進程執行系統調用,運行到內核函數do_syscall_64時,進行判斷是否為我們需要記錄的系統調用,如果是我們需要記錄的系統調用則通過my_audit這一函數將記錄內容寫入內核中的buffer里;同時編寫用戶態測試程序調用335號系統調用(myaudit),這一系統調用調用my_sysaudit這一函數將內核buffer中數據copy到用戶buffer中并顯示日志內容;其中我們調用的my_audit和my_sysaudit都是鉤子函數,具體實現使用內核模塊完成并插入,方便調試。
3
系統調用日志收集系統實現
?(1)增加系統調用表的表項
? 打開arch/x86/entry/syscalls/syscall_64.tbl,添加一個系統調用表項:
335 common ?myaudit ? ? ? ? __x64_sys_myaudit? (2)添加系統調用函數
??在arch/x86/kernel/目錄下添加myaudit.c文件完成系統調用函數:
#include
#include
#include
#include
#include
#include
#include
#include
void (*my_audit) (int, int) = 0;
int (*my_sysaudit)(u8, u8 *, u16, u8) = 0;
SYSCALL_DEFINE4(myaudit, u8, type, u8 *, us_buf, u16, us_buf_size, u8, reset)
{ ? ?
????if (my_sysaudit) { ? ? ? ?
????????return (*my_sysaudit)(type, us_buf, us_buf_size, reset);
? ? ? ?printk("IN KERNEL: my system call sys_myaudit() working\n"); ? ?} else ? ?????printk("my_sysadit is not exist\n"); ? ?return 1;
}
EXPORT_SYMBOL(my_audit);
EXPORT_SYMBOL(my_sysaudit);
? ?這里可以看到實際上定義兩個鉤子函數,在我們系統調用里去調用這兩個鉤子函數,這樣可以以模塊的方式添加這兩個函數的具體內容,方便調試。
??(3)修改Makefile
??修改arch/x86/kernel/Makefile,將myaduit.c文件加入內核編譯:
obj-y ? ? ? ? ? += myaudit.o? (4)增加函數聲明
? 在include/linux/syscalls.h最后的endif前添加函數聲明:
??????????asmlink long sys_myaudit(u8, u8 *, u16, u8);
extern void (*my_audit)(int, int);
? (5)攔截相關系統調用
正如前面對syscall執行的分析,修改do_syscall_64()函數(在/arch/x86/entry/common.c中),對系統調用號nr進行判斷,如果是我們日志收集系統需要記錄的系統調用,就調用我們的記錄函數進行記錄:
__visible void do_syscall_64(unsigned long nr, struct pt_regs *regs)
{
? ?... ? ?
????nr = syscall_trace_enter(regs);
? ?nr &= __SYSCALL_MASK;
? ?if (likely(nr < NR_syscalls)) {
? ? ? ?nr = array_index_nospec(nr, NR_syscalls);
? ? ? ?regs->ax = sys_call_table[nr](regs);
? ? ? ?if (nr == 57 || nr == 2 || nr == 3 || nr == 59 || nr == 39 || nr == 56) { ? ? ? ? ? ?
????????????if (my_audit)
? ? ? ? ? ? ? ?(*my_audit)(nr, regs->ax);
? ? ? ?????else
? ? ? ? ? ? ? ?printk("my_audit is not exist.\n"); ? ? ? ?} ? ?} ? ?syscall_return_slowpath(regs); }? ?可以看到要記錄的系統調用有:2:open;3:close;39:getpid;56:clone;57:fork;59:execve。
? (6)重新編譯內核
#提前把原來內核版本的.config拷貝到5.0內核源碼根目錄下
cd linux-5.0的路徑
sudo cp /usr/src/內核版本/.config ./ ?
#進入menuconfig后按照 load->OK->save->OK->exit->exit執行
sudo make menuconfig ?
sudo make olddefconfig
#編譯內核
sudo make bzImage -j2sudo make modules
#安裝內核修改引導
sudo make modules_install sudo make installsudo update-grub2
#重啟
sudo reboot?(7)添加實現鉤子函數的內核模塊
? my_audit.c:#include
#include
#include
#include
#include
#define COMM_SIZE 16
#define AUDIT_BUF_SIZE 100
MODULE_LICENSE("GPL v2");
struct syscall_buf {
u32 serial; u64 ts_sec; u64 ts_micro; u32 syscall; u32 status;
????????pid_t pid;
????????uid_t uid;
u8 comm[COMM_SIZE]; };DECLARE_WAIT_QUEUE_HEAD(buffer_wait);
static struct syscall_buf audit_buf[AUDIT_BUF_SIZE];
static int current_pos = 0;
static u32 serial = 0;
void syscall_audit(int syscall, int return_status)
{
????????struct syscall_buf *ppb_temp;
struct timespec64 nowtime; ktime_get_real_ts64(&nowtime);
????????if (current_pos < AUDIT_BUF_SIZE) {
ppb_temp = &audit_buf[current_pos]; ppb_temp->serial = serial++; ppb_temp->ts_sec = nowtime.tv_sec; ppb_temp->ts_micro = nowtime.tv_nsec; ppb_temp->syscall = syscall; ppb_temp->status = return_status; ppb_temp->pid = current->pid; ppb_temp->uid = current->tgid;
memcpy(ppb_temp->comm, current->comm, COMM_SIZE);
if (++current_pos == AUDIT_BUF_SIZE * 8 / 10)
{ printk("IN MODULE_audit: yes, it near full\n"); wake_up_interruptible(&buffer_wait); } }}
int sys_audit(u8 type, u8 *us_buf, u16 us_buf_size, u8 reset)
{
????int ret = 0;
if (!type) {
????if (clear_user(us_buf, us_buf_size)) {
printk("Error:clear_user\n");
return 0;
????????????}
????printk("IN MODULE_systemcall:starting...\n"); ????ret = wait_event_interruptible(buffer_wait, current_pos >= AUDIT_BUF_SIZE * 8 / 10); ????printk("IN MODULE_systemcall:over, current_pos is %d\n", current_pos);
????if(copy_to_user(us_buf, audit_buf, (current_pos)*sizeof(struct syscall_buf))) {
????????printk("Error: copy error\n");
return 0;
????} ????ret = current_pos; ????current_pos = 0; }
????return ret;
}
static int __init audit_init(void)
{
????my_sysaudit = sys_audit; ????my_audit = ?syscall_audit;????printk("Starting System Call Auditing\n");
????return 0;
}module_init(audit_init);
static void __exit audit_exit(void)
{
my_audit = NULL; my_sysaudit = NULL; printk("Exiting System Call Auditing\n");
return ;
} module_exit(audit_exit);? ?(8)實現用戶空間收集日志進程程序
? ? test_syscall.c:
#include
#include
#include
#include
#include
#include
#include
#include
#define COMM_SIZE 16
typedef unsigned char u8;
typedef unsigned int u32;
typedef unsigned long long u64;
struct syscall_buf {
? ?u32 serial; ? ?u64 ts_sec; ? ?u64 ts_micro; ? ?u32 syscall; ? ?u32 status; ? ?
????pid_t pid; ? ?
????uid_t uid;
? ?u8 comm[COMM_SIZE];};
#define AUDIT_BUF_SIZE (20 * sizeof(struct syscall_buf))
int main(int argc, char *argv[]){
? ?u8 col_buf[AUDIT_BUF_SIZE];
? ?unsigned char reset = 1;
? ?int num = 0;
? ?int i, j;
? ?struct syscall_buf *p;
? ?while(1) { ? ? ? ?num = syscall(335, 0, col_buf, AUDIT_BUF_SIZE, reset); ? ? ? ?printf("num: %d\n", num); ? ? ? ?p = (struct syscall_buf *)col_buf;
? ? ? ?for(i = 0; i < num; i++) {
? ? ? ? ? ?printf("num [%d], serial: %d,\t syscall: %d,\t pid: %d,\t comm: %s,\t ts_sec: %ld\n", i, p[i].serial, p[i].syscall, p[i].pid, p[i].comm, ctime(&p[i].ts_sec));
? ? ? ?} ? ?} ? ?return 1; }? ? (9)測試系統
? 運行用戶空間收集日志進程程序,隨著OS系統的運行,不斷從內核里記錄相關系統調用日志的buffer中取出打印在屏幕上:
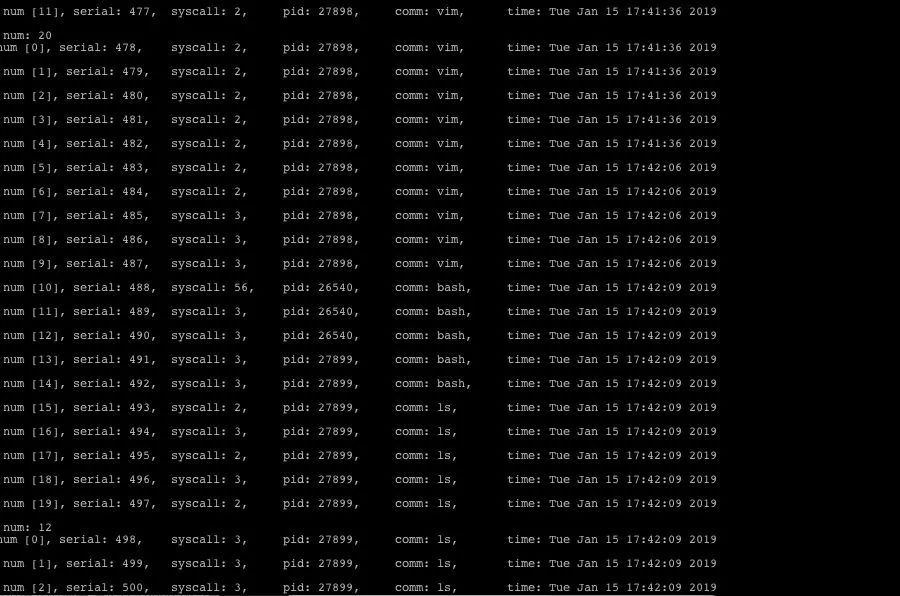
圖3-2?系統測試截圖
總結
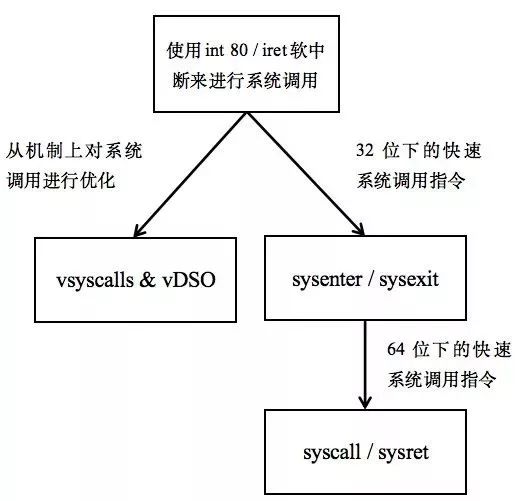
圖?4-1?系統調用總結圖
《系統調用分析》一共三篇文章,先從最早的系統調用方法——(int 80)開始,基于Linux-2.6.39內核開始分析,對用軟中斷系統調用的初始化、處理流程和系統調用表進行了學習探究。隨后,基于Linux-4.20內核分析學習了從機制上對系統調用進行優化的方法——vsyscalls和vDSO。之后對32位下的快速系統調用指令——sysenter/sysexit進行指令學習和對相關Linux源碼分析。然后在Linux-4.20內核下編寫調用系統調用的程序,使用gdb進行調試跟蹤并分析出最后使用syscall指令執行系統調用,再對64位下的快速系統調用指令syscall/sysret進行指令學習和對相關Linux源碼分析。最后在Linux-5.0內核上完成一個系統調用日志收集系統,其中包含著添加系統調用,編譯內核,修改內核代碼,添加內核模塊,編寫用戶態程序測試。
參考文獻
[1]?英特爾?64和IA-32架構軟件開發人員手冊合并卷.?https://software.intel.com/sites/default/files/managed/39/c5/325462-sdm-vol-1-2abcd-3abcd.pdf
[2]?The Definitive Guide to Linux System Calls.?https://blog.packagecloud.io/eng/2016/04/05/the-definitive-guide-to-linux-system-calls/#32-bit-fast-system-calls
[3] Linux 2.6 對新型 CPU 快速系統調用的支持.?https://www.ibm.com/developerworks/cn/linux/kernel/l-k26ncpu/index.html
[4] vsyscalls and vDSO.?https://0xax.gitbooks.io/linux-insides/content/SysCall/linux-syscall-3.html
[5] Linux系統調用過程分析.?https://www.binss.me/blog/the-analysis-of-linux-system-call/
[6] Fix-Mapped Addresses and ioremap.?https://0xax.gitbooks.io/linux-insides/content/MM/linux-mm-2.html
[7] 王宗濤. Linux快速系統調用實現機制分析. TP316.81
[8] linux下系統調用的實現.?https://www.pagefault.info/2010/10/09/implementation-of-system-call-under-linux.html
)


)


