按照官網 的提示,我開始安裝faster rcnn,但是出現了很多問題,我將其匯總了起來,并提出了解決辦法。
先說明一下我的配置:
- python : anaconda2
- linux: centos 6.9
安裝faster rcnn請先參考:《cuda8+cudnn4 Faster R-CNN安裝塈運行demo》
與 《使用cuDNN5編譯py-faster-rcnn錯誤:cudnn.hpp(126): error: argument of type “int” is incompatible …》 ,要先合一下版本。
問題及解決方法
1.第三步Build the Cython modules 出現如下錯誤:

解決方法:
這個問題困擾了我好久,經過不斷查閱資料,我終于解決了此問題。該問題主要是anaconda的 distutils.extension 在編譯nms.gpu_nms出現的問題。
我的解決方法:
先定位到$FRCN_ROOT/lib,再打開setup.py,注釋掉nms.gpu_nms模塊:
#    Extension('nms.gpu_nms',
#        ['nms/nms_kernel.cu', 'nms/gpu_nms.pyx'],
#        library_dirs=[CUDA['lib64']],
#        libraries=['cudart'],
#        language='c++',
#        runtime_library_dirs=[CUDA['lib64']],
#         # this syntax is specific to this build system
#         # we're only going to use certain compiler args with nvcc and not with
#         # gcc the implementation of this trick is in customize_compiler() below
#        extra_compile_args={'gcc': ["-Wno-unused-function"],
#                            'nvcc': ['-arch=sm_35',
#                                     '--ptxas-options=-v',
#                                     '-c',
#                                     '--compiler-options',
#                                     "'-fPIC'"]},
#        include_dirs = [numpy_include, CUDA['include']]
#    ),
然后先編譯其他三個模塊bbox,nms.cpu_nms,pycocotools._mask。
等到編譯結束后,再回過來將上面的注釋去掉,重新編譯,會發現出現剛才的問題,此時,直接復制出錯的命令,將其中的“-R”換成“-Wl,-rpath=”(已驗證)或者”-Wl,-R”(已驗證)**,再直接運行修改后的命令(如下):
g++ -pthread -shared -B /data1/caiyong.wang/bin/anaconda2/compiler_compat -L/data1/caiyong.wang/bin/anaconda2/lib -Wl,-rpath=/data1/caiyong.wang/bin/anaconda2/lib,--no-as-needed build/temp.linux-x86_64-2.7/nms/nms_kernel.o build/temp.linux-x86_64-2.7/nms/gpu_nms.o -L/usr/local/cuda/lib64 -L/data1/caiyong.wang/bin/anaconda2/lib -Wl,-rpath=/usr/local/cuda/lib64 -lcudart -lpython2.7 -o /data1/caiyong.wang/program/faster_rcnn/py-faster-rcnn/lib/nms/gpu_nms.so
最后我們再重新運行一下make命令(注意此時setup.py恢復與以前一樣),發現所有的模塊都已經編譯完成。
【result:】
[caiyong.wang@localhost lib]$ make
python setup.py build_ext --inplace
running build_ext
skipping 'utils/bbox.c' Cython extension (up-to-date)
skipping 'nms/cpu_nms.c' Cython extension (up-to-date)
skipping 'nms/gpu_nms.cpp' Cython extension (up-to-date)
skipping 'pycocotools/_mask.c' Cython extension (up-to-date)
rm -rf build
也有人建議直接將anaconda換成Anaconda3-4.4.0-Linux-x86_64.sh 可以避免出現這個錯誤。
參考文獻:
- https://github.com/cupy/cupy/issues/599
- https://stackoverflow.com/questions/12629042/g-4-6-real-error-unrecognized-option-r
- http://www.cnblogs.com/jianyingzhou/p/7722570.html
- https://github.com/rbgirshick/py-faster-rcnn/issues/706
2. src/caffe/test/test_smooth_L1_loss_layer.cpp:11:35: fatal error: caffe/vision_layers.hpp: No such file or directory
解決方案:直接刪除這一行就好了
###3. 運行 make runtest -j8 出現了找不到so的問題,分別如下 :
1). libcudart.so.8.0: cannot open shared object file: No such file or directory
解決方法:
在home目錄下,打開.bashrc,輸入:
export LD_LIBRARY_PATH=/usr/local/cuda-8.0/lib64:$LD_LIBRARY_PATH
export PATH=/usr/local/cuda-8.0/bin:$PATH
然后執行source ~/.bashrc
2).error while loading shared libraries: libglog.so.0: cannot open shared object file: No such file or directory
解決方法:
首先發現libglog.so.0在/usr/local/lib/,因此只需要加入環境變量即可。
在home目錄下,打開.bashrc,輸入:
export LD_LIBRARY_PATH=/usr/local/lib/:$LD_LIBRARY_PATH
然后執行source ~/.bashrc
3). error while loading shared libraries: libhdf5_hl.so.100
解決方法:
如果已經安裝了hdf5,則同理如上將lib路徑加入到path中。否則安裝hdf5.
安裝hdf5,可以直接sudo裝,默認裝在=/usr/local/hdf5**, 即:
sudo yum install hdf5-devel如果沒有sudo權限,則可以使用源碼安裝:
在官網下載源代碼,然后根據提示安裝。
這里需要注意的是, 當運行到
./configure --prefix=/**/hdf5-X.Y.Z/ <more configure_flags>
需要將/**/hdf5-X.Y.Z/替換到自己可以讀寫的目錄下,另外如果出現Syntax error near unexpected token `newline’,可以參考
《Syntax error near unexpected token `newline’ while installing Predictionio》解決,或者直接將要安裝的HDF5文件拷貝到安裝路徑下,使用hdf5默認的路徑,一般為當前拷貝的路徑下面。可以通過運行命令
./configure --enable-cxx
查看。
完整的安裝代碼為:
$ gunzip < hdf5-X.Y.Z.tar.gz | tar xf -
$ cd hdf5-X.Y.Z
$ ./configure --prefix= /**/hdf5-X.Y.Z/ <more configure_flags>
$ make
$ make check                # run test suite.
$ make install
$ make check-install        # verify installation.
最后在makefile.conf中加入:
INCLUDE_DIRS := $(PYTHON_INCLUDE) /usr/local/include  /**/hdf5-X.Y.Z/hdf5/include
LIBRARY_DIRS := $(PYTHON_LIB) /usr/local/lib /usr/lib /**/hdf5-X.Y.Z/hdf5/lib
【注意:】
如果安裝過 anaconda 的話,那 libhdf5-serial-dev 可以不裝。如果編譯時提示找不到 hdf5 的庫。就把 anaconda/lib 加到 ld.so.conf 中去。$ sudo vim /etc/ld.so.conf添加一行,用戶名改為你自己的:
/home/your_username/anaconda/lib
關閉并保存文件。$ sudo ldconfig
參考文獻:
- 在Matlab中使用Caffe出現HDF5 library version mismatched error的解決辦法
- 在centos7上配置caffe所遇到的一些問題
- http://coldmooon.github.io/2015/08/03/caffe_install/
4).error while loading shared libraries: libpython2.7.so.1.0: cannot open shared object file: No such file or directory
解決方案:
同理找到python lib(我這里是anaconda)的位置,將其加入環境變量即可。
4. libprotobuf error in “make runtest”
運行make runtest時出現如下錯誤:
[ RUN ] SGDSolverTest/1.TestLeastSquaresUpdateLROneHundredth
libprotobuf ERROR google/protobuf/text_format.cc:169] Error parsing text-format caffe.SolverParameter: 1:23: Expected identifier.
F1018 01:39:16.016651 8291 test_gradient_based_solver.cpp:56] Check failed: google::protobuf::TextFormat::ParseFromString(proto, ¶m)
*** Check failure stack trace: ***@ 0x7f66fa250a5d google::LogMessage::Fail()@ 0x7f66fa254ef7 google::LogMessage::SendToLog()@ 0x7f66fa252d59 google::LogMessage::Flush()@ 0x7f66fa25305d google::LogMessageFatal::~LogMessageFatal()@ 0x8fb1c1 caffe::GradientBasedSolverTest<>::InitSolverFromProtoString()@ 0x8e6a93 caffe::GradientBasedSolverTest<>::RunLeastSquaresSolver()@ 0x8f16db caffe::GradientBasedSolverTest<>::TestLeastSquaresUpdate()@ 0x966cc3 testing::internal::HandleExceptionsInMethodIfSupported<>()@ 0x95eac7 testing::Test::Run()@ 0x95eb6e testing::TestInfo::Run()@ 0x95ec75 testing::TestCase::Run()@ 0x960f08 testing::internal::UnitTestImpl::RunAllTests()@ 0x961197 testing::UnitTest::Run()@ 0x5257af main@ 0x3d21a1ed1d (unknown)@ 0x525355 (unknown)
make: *** [runtest] Aborted (core dumped)原因是 yum install protobuf-devel的版本太低了,使用protoc --version ,發現我的版本是:
$ protoc --version
libprotoc 2.3.0
而caffe-master使用的protobuf版本是2.5.0及以上,因此更新protobuf可以解決。
但是實際上通過anaconda的pip安裝時會安裝protobuf的python版本,發現我的版本是3.4.0,而caffe編譯時卻鏈接的是yum install安裝的protobuf,版本太低,因此需要在本地目錄下安裝與anaconda匹配的protobuf 3.4.0,
另外似乎caffe支持2.6.1更好,而且更重要的是2.6.1版本的protobuf在手動安裝的時候出錯很少,因此先pip uninstall protobuf,再pip安裝指定的protobuf,即pip install protobuf==2.6.1 . 此為python的版本。
接下來手動安裝protobuf。
解決方法:
從http://download.csdn.net/download/liangyihuai/9534593下載protobuf-2.6.1或從其他地方下載protobuf-2.6.1·.tar.gz。
認真閱讀gitHub上給出的安裝教程。
$./autogen.sh(在csdn下載的可以省略)
$./configure --prefix=/home/**/protobuf (自己的目錄下)
$ make
$ make check
$ make install編譯成功后將export PATH=/home/**/protobuf/bin:$PATH加入到環境變量中最后輸入 protoc --version命令,如顯示protobuf-**則安裝成功。
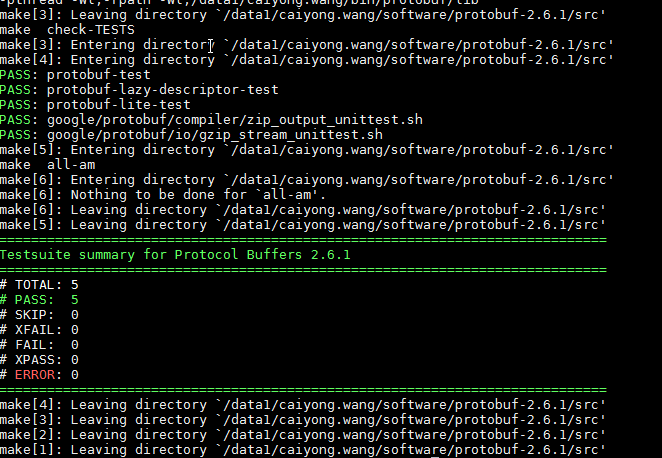
make check的結果:
此時protobuf安裝成功,我們進入caffe目錄下進行make clean,再重新編譯安裝。
5. cannot find -lopencv_dep_cudart
參考: https://github.com/opencv/opencv/issues/6542
- caffe編譯報錯:build_release/lib/libcaffe.so: undefined reference to `cv::imread(cv::String const&, int)等
https://blog.csdn.net/weixin_41770169/article/details/90413895
解決步驟:
(1)查看opencv類型:
pkg-config opencv --modversion
2.4.9.1
因此,不能通過放開makefile.config中的opencv_version:=3的方式
(2)修改makefile.config和makefile
makefile文件:
LIBRARIES += opencv_core opencv_highgui opencv_imgproc 后加上:opencv_imagecodecs
makefile.config文件添加:
LINKFLAGS := -Wl,-rpath,/home/xuqiong/anaconda2/lib
(3)重新編譯成功
sudo make clean
sudo make all -j8
參考:
https://github.com/BVLC/caffe/issues/2348#issuecomment-286491394

)


)


)
