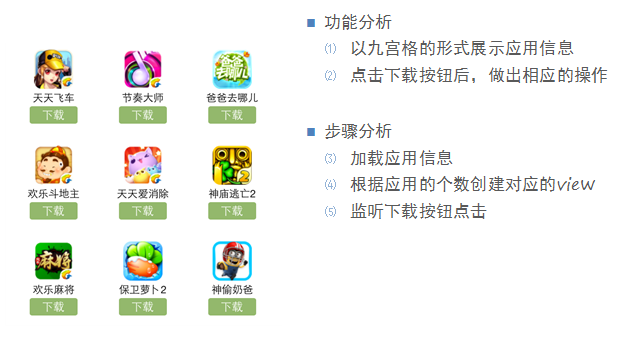
iOS開發UI篇—九宮格坐標計算
一、要求
完成下面的布局
?
?
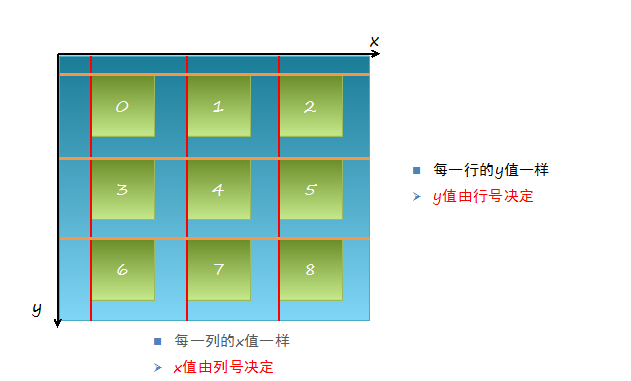
二、分析
尋找左邊的規律,每一個uiview的x坐標和y坐標。
 三、實現思路
?
(1)明確每一塊用得是什么view
(2)明確每個view之間的父子關系,每個視圖都只有一個父視圖,擁有很多的子視圖。
(3)可以先嘗試逐個的添加格子,最后考慮使用for循環,完成所有uiview的創建
(4)加載app數據,根據數據長度創建對應個數的格子
(5)添加格子內部的子控件
(6)給內部的子控件裝配數據
四、代碼示例
 1 //
  2 //  YYViewController.m3 //  九宮格練習4 //
  5 //  Created by 孔醫己 on 14-5-22.6 //  Copyright (c) 2014年 itcast. All rights reserved.7 //
  8 9 #import "YYViewController.h"10 11 @interface YYViewController ()12 @property(nonatomic,strong)NSArray *apps;13 @end14 15 @implementation YYViewController16 17 18 //1.加載數據19 - (NSArray *)apps20 {21     if (!_apps) {22         NSString *path=[[NSBundle mainBundle]pathForResource:@"app.plist" ofType:nil];23         _apps=[NSArray arrayWithContentsOfFile:path];24     }25     return _apps;26 }27 28 - (void)viewDidLoad29 {30     [super viewDidLoad];31     NSLog(@"%d",self.apps.count);32     33     //2.完成布局設計34     35     //三列36     int totalloc=3;37     CGFloat appvieww=80;38     CGFloat appviewh=90;39     40     CGFloat margin=(self.view.frame.size.width-totalloc*appvieww)/(totalloc+1);41     int count=self.apps.count;42     for (int i=0; i<count; i++) {43         int row=i/totalloc;//行號44         //1/3=0,2/3=0,3/3=1;45         int loc=i%totalloc;//列號46         47         CGFloat appviewx=margin+(margin+appvieww)*loc;48         CGFloat appviewy=margin+(margin+appviewh)*row;49         50         51         //創建uiview控件52         UIView *appview=[[UIView alloc]initWithFrame:CGRectMake(appviewx, appviewy, appvieww, appviewh)];53         //[appview setBackgroundColor:[UIColor purpleColor]];54         [self.view addSubview:appview];55         56         57         //創建uiview控件中的子視圖58         UIImageView *appimageview=[[UIImageView alloc]initWithFrame:CGRectMake(0, 0, 80, 50)];59         UIImage *appimage=[UIImage imageNamed:self.apps[i][@"icon"]];60         appimageview.image=appimage;61         [appimageview setContentMode:UIViewContentModeScaleAspectFit];62        // NSLog(@"%@",self.apps[i][@"icon"]);63         [appview addSubview:appimageview];64         65         //創建文本標簽66         UILabel *applable=[[UILabel alloc]initWithFrame:CGRectMake(0, 50, 80, 20)];67         [applable setText:self.apps[i][@"name"]];68         [applable setTextAlignment:NSTextAlignmentCenter];69         [applable setFont:[UIFont systemFontOfSize:12.0]];70         [appview addSubview:applable];71         72         //創建按鈕73         UIButton *appbtn=[UIButton buttonWithType:UIButtonTypeCustom];74         appbtn.frame= CGRectMake(10, 70, 60, 20);75         [appbtn setBackgroundImage:[UIImage imageNamed:@"buttongreen"] forState:UIControlStateNormal];76         [appbtn setBackgroundImage:[UIImage imageNamed:@"buttongreen_highlighted"] forState:UIControlStateHighlighted];77         [appbtn setTitle:@"下載" forState:UIControlStateNormal];78         appbtn.titleLabel.font=[UIFont systemFontOfSize:12.0];79         [appview addSubview:appbtn];80         81         [appbtn addTarget:self action:@selector(click) forControlEvents:UIControlEventTouchUpInside];82     }83 84 }85 86 -(void)click87 {88     //動畫標簽89     UILabel *animalab=[[UILabel alloc]initWithFrame:CGRectMake(self.view.center.x-100, self.view.center.y+20, 200, 40)];90     [animalab setText:@"下載成功"];91     animalab.font=[UIFont systemFontOfSize:12.0];92     [animalab setBackgroundColor:[UIColor brownColor]];93     [animalab setAlpha:0];94     [self.view addSubview:animalab];95     96 //    [UIView beginAnimations:Nil context:Nil];97 //    [animalab setAlpha:1];98 //    [UIView setAnimationDuration:4.0];99 //    [UIView commitAnimations];
100
101     //執行完之后,還得把這給刪除了,推薦使用block動畫
102
103     [UIView animateWithDuration:4.0 animations:^{
104     [animalab setAlpha:1];
105     } completion:^(BOOL finished) {
106         //[self.view re];
107     }];
108 }
109
110 - (void)didReceiveMemoryWarning
111 {
112     [super didReceiveMemoryWarning];
113 }
114
?
執行效果:


——總結)

![[C++] Nested Radical Constant](http://pic.xiahunao.cn/[C++] Nested Radical Constant)
新服務網關 - 網關請求攔截檢查)


