1、前言
最近寫代碼需用到鏈表結構,正好公共庫有關于鏈表的。第一眼看時,覺得有點新鮮,和我之前見到的鏈表結構不一樣,只有前驅和后繼指針,而沒有數據域。后來看代碼注釋發現該代碼來自linux內核,在linux源代碼下include/Lish.h下。這個鏈表具備通用性,使用非常方便。只需要在結構定義一個鏈表結構就可以使用。
2、鏈表介紹
鏈表是非常基本的數據結構,根據鏈個數分為單鏈表、雙鏈表,根據是否循環分為單向鏈表和循環鏈表。通常定義定義鏈表結構如下:
typedef struct node
{ElemType data;      //數據域struct node *next; //指針域 }node, *list;
鏈表中包含數據域和指針域。鏈表通常包含一個頭結點,不存放數據,方便鏈表操作。單向循環鏈表結構如下圖所示:

雙向循環鏈表結構如下圖所示:
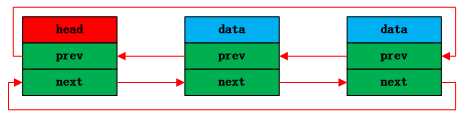
這樣帶數據域的鏈表降低了鏈表的通用性,不容易擴展。linux內核定義的鏈表結構不帶數據域,只需要兩個指針完成鏈表的操作。將鏈表節點加入數據結構,具備非常高的擴展性,通用性。鏈表結構定義如下所示:
struct list_head {struct list_head *next, *prev;
};
鏈表結構如下所示:

需要用鏈表結構時,只需要在結構體中定義一個鏈表類型的數據即可。例如定義一個app_info鏈表,

1 typedef struct application_info
2 { 3  uint32_t app_id; 4  uint32_t up_flow; 5  uint32_t down_flow; 6 struct list_head app_info_head; //鏈表節點 7 }app_info;
定義一個app_info鏈表,app_info app_info_list;通過app_info_head進行鏈表操作。根據C語言指針操作,通過container_of和offsetof,可以根據app_info_head的地址找出app_info的起始地址,即一個完整ap_info結構的起始地址。可以參考:http://www.cnblogs.com/Anker/p/3472271.html。
3、linux內核鏈表實現
內核實現的是雙向循環鏈表,提供了鏈表操作的基本功能。
(1)初始化鏈表頭結點
#define LIST_HEAD_INIT(name) { &(name), &(name) }#define LIST_HEAD(name) \struct list_head name = LIST_HEAD_INIT(name)static inline void INIT_LIST_HEAD(struct list_head *list) { list->next = list; list->prev = list; } LIST_HEAD宏創建一個鏈表頭結點,并用LIST_HEAD_INIT宏對頭結點進行賦值,使得頭結點的前驅和后繼指向自己。
INIT_LIST_HEAD函數對鏈表進行初始化,使得前驅和后繼指針指針指向頭結點。
(2)插入節點
1 static inline void __list_add(struct list_head *new, 2 struct list_head *prev, 3 struct list_head *next) 4 { 5 next->prev = new; 6 new->next = next; 7 new->prev = prev; 8 prev->next = new; 9 } 10 11 static inline void list_add(struct list_head *new, struct list_head *head) 12 { 13 __list_add(new, head, head->next); 14 } 15 16 static inline void list_add_tail(struct list_head *new, struct list_head *head) 17 { 18 __list_add(new, head->prev, head); 19 } 插入節點分為從鏈表頭部插入list_add和鏈表尾部插入list_add_tail,通過調用__list_add函數進行實現,head->next指向之一個節點,head->prev指向尾部節點。
(3)刪除節點
1 static inline void __list_del(struct list_head * prev, struct list_head * next) 2 { 3 next->prev = prev; 4 prev->next = next; 5 } 6 7 static inline void list_del(struct list_head *entry) 8 { 9 __list_del(entry->prev, entry->next); 10 entry->next = LIST_POISON1; 11 entry->prev = LIST_POISON2; 12 } 從鏈表中刪除一個節點,需要改變該節點前驅節點的后繼結點和后繼結點的前驅節點。最后設置該節點的前驅節點和后繼結點指向LIST_POSITION1和LIST_POSITION2兩個特殊值,這樣設置是為了保證不在鏈表中的節點項不可訪問,對LIST_POSITION1和LIST_POSITION2的訪問都將引起頁故障
/** These are non-NULL pointers that will result in page faults* under normal circumstances, used to verify that nobody uses* non-initialized list entries.*/
#define LIST_POISON1  ((void *) 0x00100100 + POISON_POINTER_DELTA)
#define LIST_POISON2 ((void *) 0x00200200 + POISON_POINTER_DELTA)
(4)移動節點
 1 /**
 2  * list_move - delete from one list and add as another's head  3  * @list: the entry to move  4  * @head: the head that will precede our entry  5 */  6 static inline void list_move(struct list_head *list, struct list_head *head)  7 {  8 __list_del(list->prev, list->next);  9  list_add(list, head); 10 } 11 12 /** 13  * list_move_tail - delete from one list and add as another's tail 14  * @list: the entry to move 15  * @head: the head that will follow our entry 16 */ 17 static inline void list_move_tail(struct list_head *list, 18 struct list_head *head) 19 { 20 __list_del(list->prev, list->next); 21  list_add_tail(list, head); 22 }
move將一個節點移動到頭部或者尾部。
(5)判斷鏈表
 1 /**
 2  * list_is_last - tests whether @list is the last entry in list @head  3  * @list: the entry to test  4  * @head: the head of the list  5 */  6 static inline int list_is_last(const struct list_head *list,  7 const struct list_head *head)  8 {  9 return list->next == head; 10 } 11 12 /** 13  * list_empty - tests whether a list is empty 14  * @head: the list to test. 15 */ 16 static inline int list_empty(const struct list_head *head) 17 { 18 return head->next == head; 19 }
list_is_last函數判斷節點是否為末尾節點,list_empty判斷鏈表是否為空。
(6)遍歷鏈表
 1 /**
 2  * list_entry - get the struct for this entry  3  * @ptr: the &struct list_head pointer.  4  * @type: the type of the struct this is embedded in.  5  * @member: the name of the list_struct within the struct.  6 */  7 #define list_entry(ptr, type, member) \  8  container_of(ptr, type, member)  9 10 /** 11  * list_first_entry - get the first element from a list 12  * @ptr: the list head to take the element from. 13  * @type: the type of the struct this is embedded in. 14  * @member: the name of the list_struct within the struct. 15  * 16  * Note, that list is expected to be not empty. 17 */ 18 #define list_first_entry(ptr, type, member) \ 19 list_entry((ptr)->next, type, member) 20 21 /** 22  * list_for_each - iterate over a list 23  * @pos: the &struct list_head to use as a loop cursor. 24  * @head: the head for your list. 25 */ 26 #define list_for_each(pos, head) \ 27 for (pos = (head)->next; prefetch(pos->next), pos != (head); \ 28 pos = pos->next)
宏list_entity獲取鏈表的結構,包括數據域。list_first_entry獲取鏈表第一個節點,包括數據源。list_for_each宏對鏈表節點進行遍歷。
4、測試例子
編寫一個簡單使用鏈表的程序,從而掌握鏈表的使用。
自定義個類似的list結構如下所示:mylist.h
 1 # define POISON_POINTER_DELTA 0
 2
 3 #define LIST_POISON1 ((void *) 0x00100100 + POISON_POINTER_DELTA)  4 #define LIST_POISON2 ((void *) 0x00200200 + POISON_POINTER_DELTA)  5  6 //計算member在type中的位置  7 #define offsetof(type, member) (size_t)(&((type*)0)->member)  8 //根據member的地址獲取type的起始地址  9 #define container_of(ptr, type, member) ({ \ 10 const typeof(((type *)0)->member)*__mptr = (ptr); \ 11 (type *)((char *)__mptr - offsetof(type, member)); }) 12 13 //鏈表結構 14 struct list_head 15 { 16 struct list_head *prev; 17 struct list_head *next; 18 }; 19 20 static inline void init_list_head(struct list_head *list) 21 { 22 list->prev = list; 23 list->next = list; 24 } 25 26 static inline void __list_add(struct list_head *new, 27 struct list_head *prev, struct list_head *next) 28 { 29 prev->next = new; 30 new->prev = prev; 31 new->next = next; 32 next->prev = new; 33 } 34 35 //從頭部添加 36 static inline void list_add(struct list_head *new , struct list_head *head) 37 { 38 __list_add(new, head, head->next); 39 } 40 //從尾部添加 41 static inline void list_add_tail(struct list_head *new, struct list_head *head) 42 { 43 __list_add(new, head->prev, head); 44 } 45 46 static inline void __list_del(struct list_head *prev, struct list_head *next) 47 { 48 prev->next = next; 49 next->prev = prev; 50 } 51 52 static inline void list_del(struct list_head *entry) 53 { 54 __list_del(entry->prev, entry->next); 55 entry->next = LIST_POISON1; 56 entry->prev = LIST_POISON2; 57 } 58 59 static inline void list_move(struct list_head *list, struct list_head *head) 60 { 61 __list_del(list->prev, list->next); 62  list_add(list, head); 63 } 64 65 static inline void list_move_tail(struct list_head *list, 66 struct list_head *head) 67 { 68 __list_del(list->prev, list->next); 69  list_add_tail(list, head); 70 } 71 #define list_entry(ptr, type, member) \ 72  container_of(ptr, type, member) 73 74 #define list_first_entry(ptr, type, member) \ 75 list_entry((ptr)->next, type, member) 76 77 #define list_for_each(pos, head) \ 78 for (pos = (head)->next; pos != (head); pos = pos->next)
mylist.c如下所示:
1 /**@brief 練習使用linux內核鏈表,功能包括:
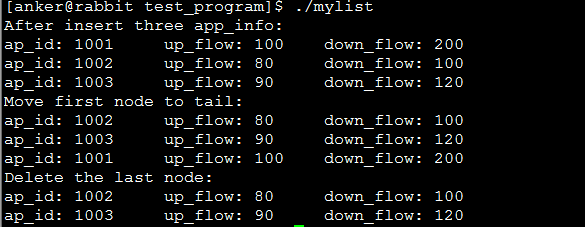
2 * 定義鏈表結構,創建鏈表、插入節點、刪除節點、移動節點、遍歷節點 3 * 4 *@auther Anker @date 2013-12-15 5 **/ 6 #include <stdio.h> 7 #include <inttypes.h> 8 #include <stdlib.h> 9 #include <errno.h> 10 #include "mylist.h" 11 //定義app_info鏈表結構 12 typedef struct application_info 13 { 14 uint32_t app_id; 15 uint32_t up_flow; 16 uint32_t down_flow; 17 struct list_head app_info_node;//鏈表節點 18 }app_info; 19 20 21 app_info* get_app_info(uint32_t app_id, uint32_t up_flow, uint32_t down_flow) 22 { 23 app_info *app = (app_info*)malloc(sizeof(app_info)); 24 if (app == NULL) 25 { 26 fprintf(stderr, "Failed to malloc memory, errno:%u, reason:%s\n", 27 errno, strerror(errno)); 28 return NULL; 29 } 30 app->app_id = app_id; 31 app->up_flow = up_flow; 32 app->down_flow = down_flow; 33 return app; 34 } 35 static void for_each_app(const struct list_head *head) 36 { 37 struct list_head *pos; 38 app_info *app; 39 //遍歷鏈表 40 list_for_each(pos, head) 41 { 42 app = list_entry(pos, app_info, app_info_node); 43 printf("ap_id: %u\tup_flow: %u\tdown_flow: %u\n", 44 app->app_id, app->up_flow, app->down_flow); 45 46 } 47 } 48 49 void destroy_app_list(struct list_head *head) 50 { 51 struct list_head *pos = head->next; 52 struct list_head *tmp = NULL; 53 while (pos != head) 54 { 55 tmp = pos->next; 56 list_del(pos); 57 pos = tmp; 58 } 59 } 60 61 62 int main() 63 { 64 //創建一個app_info 65 app_info * app_info_list = (app_info*)malloc(sizeof(app_info)); 66 app_info *app; 67 if (app_info_list == NULL) 68 { 69 fprintf(stderr, "Failed to malloc memory, errno:%u, reason:%s\n", 70 errno, strerror(errno)); 71 return -1; 72 } 73 //初始化鏈表頭部 74 struct list_head *head = &app_info_list->app_info_node; 75 init_list_head(head); 76 //插入三個app_info 77 app = get_app_info(1001, 100, 200); 78 list_add_tail(&app->app_info_node, head); 79 app = get_app_info(1002, 80, 100); 80 list_add_tail(&app->app_info_node, head); 81 app = get_app_info(1003, 90, 120); 82 list_add_tail(&app->app_info_node, head); 83 printf("After insert three app_info: \n"); 84 for_each_app(head); 85 //將第一個節點移到末尾 86 printf("Move first node to tail:\n"); 87 list_move_tail(head->next, head); 88 for_each_app(head); 89 //刪除最后一個節點 90 printf("Delete the last node:\n"); 91 list_del(head->prev); 92 for_each_app(head); 93 destroy_app_list(head); 94 free(app_info_list); 95 return 0; 96 } 測試結果如下所示:
參考網址:
https://www.ibm.com/developerworks/cn/linux/kernel/l-chain/
?
?
?
深入分析 Linux 內核鏈表
一、 鏈表數據結構簡介
鏈表是一種常用的組織有序數據的數據結構,它通過指針將一系列數據節點連接成一條數據鏈,是線性表的一種重要實現方式。相對于數組,鏈表具有更好的動態性,建立鏈表時無需預先知道數據總量,可以隨機分配空間,可以高效地在鏈表中的任意位置實時插入或刪除數據。鏈表的開銷主要是訪問的順序性和組織鏈的空間損失。
通常鏈表數據結構至少應包含兩個域:數據域和指針域,數據域用于存儲數據,指針域用于建立與下一個節點的聯系。按照指針域的組織以及各個節點之間的聯系形式,鏈表又可以分為單鏈表、雙鏈表、循環鏈表等多種類型,下面分別給出這幾類常見鏈表類型的示意圖:
1. 單鏈表
圖1 單鏈表

單鏈表是最簡單的一類鏈表,它的特點是僅有一個指針域指向后繼節點(next),因此,對單鏈表的遍歷只能從頭至尾(通常是NULL空指針)順序進行。
2. 雙鏈表
圖2 雙鏈表

通過設計前驅和后繼兩個指針域,雙鏈表可以從兩個方向遍歷,這是它區別于單鏈表的地方。如果打亂前驅、后繼的依賴關系,就可以構成"二叉樹";如果再讓首節點的前驅指向鏈表尾節點、尾節點的后繼指向首節點(如圖2中虛線部分),就構成了循環鏈表;如果設計更多的指針域,就可以構成各種復雜的樹狀數據結構。
3. 循環鏈表
循環鏈表的特點是尾節點的后繼指向首節點。前面已經給出了雙循環鏈表的示意圖,它的特點是從任意一個節點出發,沿兩個方向的任何一個,都能找到鏈表中的任意一個數據。如果去掉前驅指針,就是單循環鏈表。
在Linux內核中使用了大量的鏈表結構來組織數據,包括設備列表以及各種功能模塊中的數據組織。這些鏈表大多采用在[include/linux/list.h]實現的一個相當精彩的鏈表數據結構。本文的后繼部分就將通過示例詳細介紹這一數據結構的組織和使用。
二、 Linux 2.6內核鏈表數據結構的實現
盡管這里使用2.6內核作為講解的基礎,但實際上2.4內核中的鏈表結構和2.6并沒有什么區別。不同之處在于2.6擴充了兩種鏈表數據結構:鏈表的讀拷貝更新(rcu)和HASH鏈表(hlist)。這兩種擴展都是基于最基本的list結構,因此,本文主要介紹基本鏈表結構,然后再簡要介紹一下rcu和hlist。
鏈表數據結構的定義很簡單(節選自[include/linux/list.h],以下所有代碼,除非加以說明,其余均取自該文件):
struct list_head {????struct list_head *next, *prev;};list_head結構包含兩個指向list_head結構的指針prev和next,由此可見,內核的鏈表具備雙鏈表功能,實際上,通常它都組織成雙循環鏈表。
和第一節介紹的雙鏈表結構模型不同,這里的list_head沒有數據域。在Linux內核鏈表中,不是在鏈表結構中包含數據,而是在數據結構中包含鏈表節點。
在數據結構課本中,鏈表的經典定義方式通常是這樣的(以單鏈表為例):
struct list_node {????struct list_node *next;????ElemType??? data;};因為ElemType的緣故,對每一種數據項類型都需要定義各自的鏈表結構。有經驗的C++程序員應該知道,標準模板庫中的<list>采用的是C++ Template,利用模板抽象出和數據項類型無關的鏈表操作接口。
在Linux內核鏈表中,需要用鏈表組織起來的數據通常會包含一個struct list_head成員,例如在[include/linux/netfilter.h]中定義了一個nf_sockopt_ops結構來描述Netfilter為某一協議族準備的getsockopt/setsockopt接口,其中就有一個(struct list_head list)成員,各個協議族的nf_sockopt_ops結構都通過這個list成員組織在一個鏈表中,表頭是定義在[net/core/netfilter.c]中的nf_sockopts(struct list_head)。從下圖中我們可以看到,這種通用的鏈表結構避免了為每個數據項類型定義自己的鏈表的麻煩。Linux的簡捷實用、不求完美和標準的風格,在這里體現得相當充分。
圖3 nf_sockopts鏈表示意圖

三、 鏈表操作接口
1. 聲明和初始化
實際上Linux只定義了鏈表節點,并沒有專門定義鏈表頭,那么一個鏈表結構是如何建立起來的呢?讓我們來看看LIST_HEAD()這個宏:
#define LIST_HEAD_INIT(name) { &(name), &(name) }#define LIST_HEAD(name) struct list_head name = LIST_HEAD_INIT(name)當我們用LIST_HEAD(nf_sockopts)聲明一個名為nf_sockopts的鏈表頭時,它的next、prev指針都初始化為指向自己,這樣,我們就有了一個空鏈表,因為Linux用頭指針的next是否指向自己來判斷鏈表是否為空:
static inline int list_empty(const struct list_head *head){????????return head->next == head;}除了用LIST_HEAD()宏在聲明的時候初始化一個鏈表以外,Linux還提供了一個INIT_LIST_HEAD宏用于運行時初始化鏈表:
#define INIT_LIST_HEAD(ptr) do { \????(ptr)->next = (ptr); (ptr)->prev = (ptr); \} while (0)我們用INIT_LIST_HEAD(&nf_sockopts)來使用它。
2. 插入/刪除/合并
a) 插入
對鏈表的插入操作有兩種:在表頭插入和在表尾插入。Linux為此提供了兩個接口:
static inline void list_add(struct list_head *new, struct list_head *head);static inline void list_add_tail(struct list_head *new, struct list_head *head);因為Linux鏈表是循環表,且表頭的next、prev分別指向鏈表中的第一個和最末一個節點,所以,list_add和list_add_tail的區別并不大,實際上,Linux分別用
__list_add(new, head, head->next);和
__list_add(new, head->prev, head);來實現兩個接口,可見,在表頭插入是插入在head之后,而在表尾插入是插入在head->prev之后。
假設有一個新nf_sockopt_ops結構變量new_sockopt需要添加到nf_sockopts鏈表頭,我們應當這樣操作:
list_add(&new_sockopt.list, &nf_sockopts);從這里我們看出,nf_sockopts鏈表中記錄的并不是new_sockopt的地址,而是其中的list元素的地址。如何通過鏈表訪問到new_sockopt呢?下面會有詳細介紹。
b) 刪除
static inline void list_del(struct list_head *entry);當我們需要刪除nf_sockopts鏈表中添加的new_sockopt項時,我們這么操作:
list_del(&new_sockopt.list);被剔除下來的new_sockopt.list,prev、next指針分別被設為LIST_POSITION2和LIST_POSITION1兩個特殊值,這樣設置是為了保證不在鏈表中的節點項不可訪問--對LIST_POSITION1和LIST_POSITION2的訪問都將引起頁故障。與之相對應,list_del_init()函數將節點從鏈表中解下來之后,調用LIST_INIT_HEAD()將節點置為空鏈狀態。
c) 搬移
Linux提供了將原本屬于一個鏈表的節點移動到另一個鏈表的操作,并根據插入到新鏈表的位置分為兩類:
static inline void list_move(struct list_head *list, struct list_head *head);static inline void list_move_tail(struct list_head *list, struct list_head *head);例如list_move(&new_sockopt.list,&nf_sockopts)會把new_sockopt從它所在的鏈表上刪除,并將其再鏈入nf_sockopts的表頭。
d) 合并
除了針對節點的插入、刪除操作,Linux鏈表還提供了整個鏈表的插入功能:
static inline void list_splice(struct list_head *list, struct list_head *head);假設當前有兩個鏈表,表頭分別是list1和list2(都是struct list_head變量),當調用list_splice(&list1,&list2)時,只要list1非空,list1鏈表的內容將被掛接在list2鏈表上,位于list2和list2.next(原list2表的第一個節點)之間。新list2鏈表將以原list1表的第一個節點為首節點,而尾節點不變。如圖(虛箭頭為next指針):
圖4 鏈表合并list_splice(&list1,&list2)

當list1被掛接到list2之后,作為原表頭指針的list1的next、prev仍然指向原來的節點,為了避免引起混亂,Linux提供了一個list_splice_init()函數:
static inline void list_splice_init(struct list_head *list, struct list_head *head);該函數在將list合并到head鏈表的基礎上,調用INIT_LIST_HEAD(list)將list設置為空鏈。
3. 遍歷
遍歷是鏈表最經常的操作之一,為了方便核心應用遍歷鏈表,Linux鏈表將遍歷操作抽象成幾個宏。在介紹遍歷宏之前,我們先看看如何從鏈表中訪問到我們真正需要的數據項。
a) 由鏈表節點到數據項變量
我們知道,Linux鏈表中僅保存了數據項結構中list_head成員變量的地址,那么我們如何通過這個list_head成員訪問到作為它的所有者的節點數據呢?Linux為此提供了一個list_entry(ptr,type,member)宏,其中ptr是指向該數據中list_head成員的指針,也就是存儲在鏈表中的地址值,type是數據項的類型,member則是數據項類型定義中list_head成員的變量名,例如,我們要訪問nf_sockopts鏈表中首個nf_sockopt_ops變量,則如此調用:
list_entry(nf_sockopts->next, struct nf_sockopt_ops, list);
這里"list"正是nf_sockopt_ops結構中定義的用于鏈表操作的節點成員變量名。
list_entry的使用相當簡單,相比之下,它的實現則有一些難懂:
#define list_entry(ptr, type, member) container_of(ptr, type, member)container_of宏定義在[include/linux/kernel.h]中:#define container_of(ptr, type, member) ({????????? \????????const typeof( ((type *)0)->member ) *__mptr = (ptr); \????????(type *)( (char *)__mptr - offsetof(type,member) );})offsetof宏定義在[include/linux/stddef.h]中:#define offsetof(TYPE, MEMBER) ((size_t) &((TYPE *)0)->MEMBER)size_t最終定義為unsigned int(i386)。
這里使用的是一個利用編譯器技術的小技巧,即先求得結構成員在與結構中的偏移量,然后根據成員變量的地址反過來得出屬主結構變量的地址。
container_of()和offsetof()并不僅用于鏈表操作,這里最有趣的地方是((type *)0)->member,它將0地址強制"轉換"為type結構的指針,再訪問到type結構中的member成員。在container_of宏中,它用來給typeof()提供參數(typeof()是gcc的擴展,和sizeof()類似),以獲得member成員的數據類型;在offsetof()中,這個member成員的地址實際上就是type數據結構中member成員相對于結構變量的偏移量。
如果這么說還不好理解的話,不妨看看下面這張圖:
圖5 offsetof()宏的原理

對于給定一個結構,offsetof(type,member)是一個常量,list_entry()正是利用這個不變的偏移量來求得鏈表數據項的變量地址。
b) 遍歷宏
在[net/core/netfilter.c]的nf_register_sockopt()函數中有這么一段話:
??????? ……struct list_head *i;……????list_for_each(i, &nf_sockopts) {????????struct nf_sockopt_ops *ops = (struct nf_sockopt_ops *)i;????????……????}????……函數首先定義一個(struct list_head *)指針變量i,然后調用list_for_each(i,&nf_sockopts)進行遍歷。在[include/linux/list.h]中,list_for_each()宏是這么定義的:
??????? #define list_for_each(pos, head) \for (pos = (head)->next, prefetch(pos->next); pos != (head); \????????pos = pos->next, prefetch(pos->next))它實際上是一個for循環,利用傳入的pos作為循環變量,從表頭head開始,逐項向后(next方向)移動pos,直至又回到head(prefetch()可以不考慮,用于預取以提高遍歷速度)。
那么在nf_register_sockopt()中實際上就是遍歷nf_sockopts鏈表。為什么能直接將獲得的list_head成員變量地址當成struct nf_sockopt_ops數據項變量的地址呢?我們注意到在struct nf_sockopt_ops結構中,list是其中的第一項成員,因此,它的地址也就是結構變量的地址。更規范的獲得數據變量地址的用法應該是:
struct nf_sockopt_ops *ops = list_entry(i, struct nf_sockopt_ops, list);大多數情況下,遍歷鏈表的時候都需要獲得鏈表節點數據項,也就是說list_for_each()和list_entry()總是同時使用。對此Linux給出了一個list_for_each_entry()宏:
#define list_for_each_entry(pos, head, member)????? ……與list_for_each()不同,這里的pos是數據項結構指針類型,而不是(struct list_head *)。nf_register_sockopt()函數可以利用這個宏而設計得更簡單:
……struct nf_sockopt_ops *ops;list_for_each_entry(ops,&nf_sockopts,list){????……}……某些應用需要反向遍歷鏈表,Linux提供了list_for_each_prev()和list_for_each_entry_reverse()來完成這一操作,使用方法和上面介紹的list_for_each()、list_for_each_entry()完全相同。
如果遍歷不是從鏈表頭開始,而是從已知的某個節點pos開始,則可以使用list_for_each_entry_continue(pos,head,member)。有時還會出現這種需求,即經過一系列計算后,如果pos有值,則從pos開始遍歷,如果沒有,則從鏈表頭開始,為此,Linux專門提供了一個list_prepare_entry(pos,head,member)宏,將它的返回值作為list_for_each_entry_continue()的pos參數,就可以滿足這一要求。
4. 安全性考慮
在并發執行的環境下,鏈表操作通常都應該考慮同步安全性問題,為了方便,Linux將這一操作留給應用自己處理。Linux鏈表自己考慮的安全性主要有兩個方面:
a) list_empty()判斷
基本的list_empty()僅以頭指針的next是否指向自己來判斷鏈表是否為空,Linux鏈表另行提供了一個list_empty_careful()宏,它同時判斷頭指針的next和prev,僅當兩者都指向自己時才返回真。這主要是為了應付另一個cpu正在處理同一個鏈表而造成next、prev不一致的情況。但代碼注釋也承認,這一安全保障能力有限:除非其他cpu的鏈表操作只有list_del_init(),否則仍然不能保證安全,也就是說,還是需要加鎖保護。
b) 遍歷時節點刪除
前面介紹了用于鏈表遍歷的幾個宏,它們都是通過移動pos指針來達到遍歷的目的。但如果遍歷的操作中包含刪除pos指針所指向的節點,pos指針的移動就會被中斷,因為list_del(pos)將把pos的next、prev置成LIST_POSITION2和LIST_POSITION1的特殊值。
當然,調用者完全可以自己緩存next指針使遍歷操作能夠連貫起來,但為了編程的一致性,Linux鏈表仍然提供了兩個對應于基本遍歷操作的"_safe"接口:list_for_each_safe(pos, n, head)、list_for_each_entry_safe(pos, n, head, member),它們要求調用者另外提供一個與pos同類型的指針n,在for循環中暫存pos下一個節點的地址,避免因pos節點被釋放而造成的斷鏈。
四、 擴展
1. hlist
圖6 list和hlist

精益求精的Linux鏈表設計者(因為list.h沒有署名,所以很可能就是Linus Torvalds)認為雙頭(next、prev)的雙鏈表對于HASH表來說"過于浪費",因而另行設計了一套用于HASH表應用的hlist數據結構--單指針表頭雙循環鏈表,從上圖可以看出,hlist的表頭僅有一個指向首節點的指針,而沒有指向尾節點的指針,這樣在可能是海量的HASH表中存儲的表頭就能減少一半的空間消耗。
因為表頭和節點的數據結構不同,插入操作如果發生在表頭和首節點之間,以往的方法就行不通了:表頭的first指針必須修改指向新插入的節點,卻不能使用類似list_add()這樣統一的描述。為此,hlist節點的prev不再是指向前一個節點的指針,而是指向前一個節點(可能是表頭)中的next(對于表頭則是first)指針(struct list_head **pprev),從而在表頭插入的操作可以通過一致的"*(node->pprev)"訪問和修改前驅節點的next(或first)指針。
2. read-copy update
在Linux鏈表功能接口中還有一系列以"_rcu"結尾的宏,與以上介紹的很多函數一一對應。RCU(Read-Copy Update)是2.5/2.6內核中引入的新技術,它通過延遲寫操作來提高同步性能。
我們知道,系統中數據讀取操作遠多于寫操作,而rwlock機制在smp環境下隨著處理機增多性能會迅速下降(見參考資料4)。針對這一應用背景,IBM Linux技術中心的Paul E. McKenney提出了"讀拷貝更新"的技術,并將其應用于Linux內核中。RCU技術的核心是寫操作分為寫-更新兩步,允許讀操作在任何時候無阻訪問,當系統有寫操作時,更新動作一直延遲到對該數據的所有讀操作完成為止。Linux鏈表中的RCU功能只是Linux RCU的很小一部分,對于RCU的實現分析已超出了本文所及,有興趣的讀者可以自行參閱本文的參考資料;而對RCU鏈表的使用和基本鏈表的使用方法基本相同。
五、 示例
附件中的程序除了能正向、反向輸出文件以外,并無實際作用,僅用于演示Linux鏈表的使用。
為了簡便,例子采用的是用戶態程序模板,如果需要運行,可采用如下命令編譯:
gcc -D__KERNEL__ -I/usr/src/linux-2.6.7/include pfile.c -o pfile因為內核鏈表限制在內核態使用,但實際上對于數據結構本身而言并非只能在核態運行,因此,在筆者的編譯中使用"-D__KERNEL__"開關"欺騙"編譯器。

![bzoj1084: [SCOI2005]最大子矩陣](http://pic.xiahunao.cn/bzoj1084: [SCOI2005]最大子矩陣)


 must be from the same graph as Tensor(“R)


)


