?
大綱:
一、簡介
二、Logstash
三、Redis
四、Elasticsearch
五、Kinaba
一、簡介
1、核心組成
ELK由Elasticsearch、Logstash和Kibana三部分組件組成;
Elasticsearch是個開源分布式搜索引擎,它的特點有:分布式,零配置,自動發現,索引自動分片,索引副本機制,restful風格接口,多數據源,自動搜索負載等。
Logstash是一個完全開源的工具,它可以對你的日志進行收集、分析,并將其存儲供以后使用
kibana 是一個開源和免費的工具,它可以為 Logstash 和 ElasticSearch 提供的日志分析友好的 Web 界面,可以幫助您匯總、分析和搜索重要數據日志。
2、四大組件
Logstash: logstash server端用來搜集日志;
Elasticsearch: 存儲各類日志;
Kibana: web化接口用作查尋和可視化日志;
Logstash Forwarder: logstash client端用來通過lumberjack 網絡協議發送日志到logstash server;
3、ELK工作流程
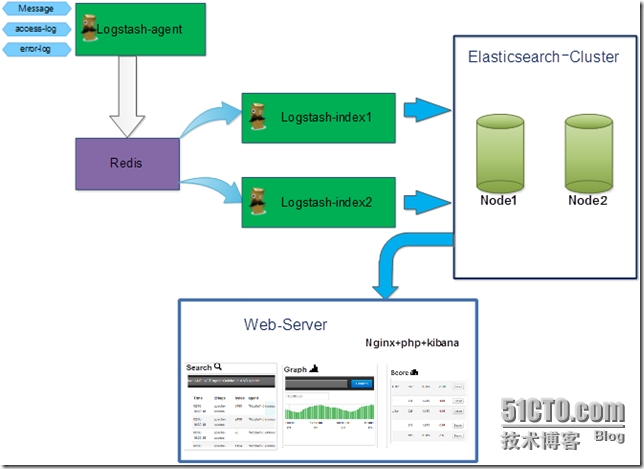
在需要收集日志的所有服務上部署logstash,作為logstash agent(logstash shipper)用于監控并過濾收集日志,將過濾后的內容發送到Redis,然后logstash indexer將日志收集在一起交給全文搜索服務ElasticSearch,可以用ElasticSearch進行自定義搜索通過Kibana 來結合自定義搜索進行頁面展示。

4、ELK的幫助手冊
ELK官網:https://www.elastic.co/
ELK官網文檔:https://www.elastic.co/guide/index.html
ELK中文手冊:http://kibana.logstash.es/content/elasticsearch/monitor/logging.html
?
注釋
ELK有兩種安裝方式
(1)集成環境:Logstash有一個集成包,里面包括了其全套的三個組件;也就是安裝一個集成包。
(2)獨立環境:三個組件分別單獨安裝、運行、各司其職。(比較常用)
本實驗也以第二種方式獨立環境來進行演示;單機版主機地址為:192.168.1.104
?
二、Logstash
1、安裝jdk
| 1 2 3 4 5 6 | Logstash的運行依賴于Java運行環境。#?yum?-y?install?java-1.8.0#?java?-versionopenjdk?version?"1.8.0_51"OpenJDK?Runtime?Environment?(build?1.8.0_51-b16)OpenJDK?64-Bit?Server?VM?(build?25.51-b03,?mixed?mode) |
2、安裝logstash
| 1 2 3 4 5 6 | #?wget?https://download.elastic.co/logstash/logstash/logstash-1.5.4.tar.gz#?tar?zxf?logstash-1.5.4.tar.gz?-C?/usr/local/配置logstash的環境變量#?echo?"export?PATH=\$PATH:/usr/local/logstash-1.5.4/bin"?>?/etc/profile.d/logstash.sh#?.?/etc/profile |
3、logstash常用參數
| 1 2 | -e?:指定logstash的配置信息,可以用于快速測試;-f?:指定logstash的配置文件;可以用于生產環境; |
4、啟動logstash
4.1 通過-e參數指定logstash的配置信息,用于快速測試,直接輸出到屏幕。
| 1 2 3 4 5 | #?logstash?-e?"input?{stdin{}}?output?{stdout{}}"???????????? my?name?is?zhengyansheng.????//手動輸入后回車,等待10秒后會有返回結果Logstash?startup?completed2015-10-08T13:55:50.660Z?0.0.0.0?my?name?is?zhengyansheng.這種輸出是直接原封不動的返回... |
4.2 通過-e參數指定logstash的配置信息,用于快速測試,以json格式輸出到屏幕。
| 1 2 3 4 5 6 7 8 9 10 | #?logstash?-e?'input{stdin{}}output{stdout{codec=>rubydebug}}'my?name?is?zhengyansheng.????//手動輸入后回車,等待10秒后會有返回結果Logstash?startup?completed{???????"message"?=>?"my?name?is?zhengyansheng.",??????"@version"?=>?"1",????"@timestamp"?=>?"2015-10-08T13:57:31.851Z",??????????"host"?=>?"0.0.0.0"}這種輸出是以json格式的返回... |
5、logstash以配置文件方式啟動
5.1 輸出信息到屏幕
| 1 2 3 4 5 6 7 8 9 10 11 12 13 14 15 16 17 18 19 20 | #?vim?logstash-simple.conf?input?{?stdin?{}?}output?{???stdout?{?codec=>?rubydebug?}}#?logstash?-f?logstash-simple.conf????//普通方式啟動Logstash?startup?completed#?logstash?agent?-f?logstash-simple.conf?--verbose //開啟debug模式Pipeline?started?{:level=>:info}Logstash?startup?completedhello?world.????//手動輸入hello?world.{???????"message"?=>?"hello?world.",??????"@version"?=>?"1",????"@timestamp"?=>?"2015-10-08T14:01:43.724Z",??????????"host"?=>?"0.0.0.0"}效果同命令行配置參數一樣... |
5.2 logstash輸出信息存儲到redis數據庫中
剛才我們是將信息直接顯示在屏幕上了,現在我們將logstash的輸出信息保存到redis數據庫中,如下
| 1 2 3 4 5 6 7 8 9 10 11 12 13 | 前提是本地(192.168.1.104)有redis數據庫,那么下一步我們就是安裝redis數據庫.#?cat?logstash_to_redis.confinput?{?stdin?{?}?}output?{????stdout?{?codec?=>?rubydebug?}????redis?{????????host?=>?'192.168.1.104'????????data_type?=>?'list'????????key?=>?'logstash:redis'????}}如果提示Failed?to?send?event?to?Redis,表示連接Redis失敗或者沒有安裝,請檢查... |
6、 查看logstash的監聽端口號
| 1 2 3 | #?logstash?agent?-f?logstash_to_redis.conf?--verbose#?netstat?-tnlp?|grep?javatcp????????0??????0?:::9301?????????????????????:::*????????????????????????LISTEN??????1326/java |
?
三、Redis
1、安裝Redis
| 1 2 3 4 5 6 7 8 9 10 11 12 13 14 15 16 17 18 19 20 21 22 23 24 25 26 27 28 29 30 31 32 33 34 35 36 | wget?http://download.redis.io/releases/redis-2.8.19.tar.gzyum?install?tcl?-ytar?zxf?redis-2.8.19.tar.gzcd?redis-2.8.19make?MALLOC=libcmake?test????//這一步時間會稍久點...make?installcd?utils/./install_server.sh???? //腳本執行后,所有選項都以默認參數為準即可Welcome?to?the?redis?service?installerThis?script?will?help?you?easily?set?up?a?running?redis?serverPlease?select?the?redis?port?for?this?instance:?[6379]?Selecting?default:?6379Please?select?the?redis?config?file?name?[/etc/redis/6379.conf]?Selected?default?-?/etc/redis/6379.confPlease?select?the?redis?log?file?name?[/var/log/redis_6379.log]?Selected?default?-?/var/log/redis_6379.logPlease?select?the?data?directory?for?this?instance?[/var/lib/redis/6379]?Selected?default?-?/var/lib/redis/6379Please?select?the?redis?executable?path?[/usr/local/bin/redis-server]?Selected?config:Port???????????:?6379Config?file????:?/etc/redis/6379.confLog?file???????:?/var/log/redis_6379.logData?dir???????:?/var/lib/redis/6379Executable?????:?/usr/local/bin/redis-serverCli?Executable?:?/usr/local/bin/redis-cliIs?this?ok??Then?press?ENTER?to?go?on?or?Ctrl-C?to?abort.Copied?/tmp/6379.conf?=>?/etc/init.d/redis_6379Installing?service...Successfully?added?to?chkconfig!Successfully?added?to?runlevels?345!Starting?Redis?server...Installation?successful! |
2、查看redis的監控端口
| 1 2 3 4 | #?netstat?-tnlp?|grep?redistcp????????0??????0?0.0.0.0:6379????????????????0.0.0.0:*???????????????????LISTEN??????3843/redis-server?*?tcp????????0??????0?127.0.0.1:21365?????????????0.0.0.0:*???????????????????LISTEN??????2290/src/redis-serv?tcp????????0??????0?:::6379?????????????????????:::*????????????????????????LISTEN??????3843/redis-server?* |
3、測試redis是否正常工作
| 1 2 3 4 5 6 7 8 9 | #?cd?redis-2.8.19/src/#?./redis-cli?-h?192.168.1.104?-p?6379 //連接redis192.168.1.104:6379>?pingPONG192.168.1.104:6379>?set?name?zhengyanshengOK192.168.1.104:6379>?get?name"zhengyansheng"192.168.1.104:6379>?quit |
4、redis服務啟動命令
| 1 2 | #?ps?-ef?|grep?redisroot??????3963?????1??0?08:42??????????00:00:00?/usr/local/bin/redis-server?*:6379 |
5、redis的動態監控
| 1 2 | #?cd?redis-2.8.19/src/#?./redis-cli?monitor???? //reids動態監控 |
6、logstash結合redis工作
6.1 首先確認redis服務是啟動的
| 1 2 3 4 | #?netstat?-tnlp?|grep?redistcp????????0??????0?0.0.0.0:6379????????????????0.0.0.0:*???????????????????LISTEN??????3843/redis-server?*?tcp????????0??????0?127.0.0.1:21365?????????????0.0.0.0:*???????????????????LISTEN??????2290/src/redis-serv?tcp????????0??????0?:::6379?????????????????????:::*????????????????????????LISTEN??????3843/redis-server?* |
6.2 啟動redis動態監控
| 1 2 3 | #?cd?redis-2.8.19/src/#?./redis-cli?monitorOK |
6.3 基于入口redis啟動logstash
| 1 2 3 4 5 6 7 8 9 10 11 12 13 14 15 16 17 18 19 20 | #?cat?logstash_to_redis.confinput?{?stdin?{?}?}output?{????stdout?{?codec?=>?rubydebug?}????redis?{????????host?=>?'192.168.1.104'????????data_type?=>?'list'????????key?=>?'logstash:redis'????}}#?logstash?agent?-f?logstash_to_redis.conf?--verbosePipeline?started?{:level=>:info}Logstash?startup?completeddajihao?linux{???????"message"?=>?"dajihao?linux",??????"@version"?=>?"1",????"@timestamp"?=>?"2015-10-08T14:42:07.550Z",??????????"host"?=>?"0.0.0.0"} |
6.4 查看redis的監控接口上的輸出
| 1 2 3 4 5 | #?./redis-cli?monitorOK1444315328.103928?[0?192.168.1.104:56211]?"rpush"?"logstash:redis"?"{\"message\":\"dajihao?linux\",\"@version\":\"1\",\"@timestamp\":\"2015-10-08T14:42:07.550Z\",\"host\":\"0.0.0.0\"}"如果redis的監控上也有以上信息輸出,表明logstash和redis的結合是正常的。 |
?
四、Elasticsearch
1、安裝Elasticsearch
| 1 2 | #?wget?https://download.elastic.co/elasticsearch/elasticsearch/elasticsearch-1.7.2.tar.gz#?tar?zxf?elasticsearch-1.7.2.tar.gz?-C?/usr/local/ |
2、修改elasticsearch配置文件elasticsearch.yml并且做以下修改.
| 1 2 3 4 5 | #?vim?/usr/local/elasticsearch-1.7.2/config/elasticsearch.ymldiscovery.zen.ping.multicast.enabled:?false??????? #關閉廣播,如果局域網有機器開9300?端口,服務會啟動不了network.host:?192.168.1.104??? #指定主機地址,其實是可選的,但是最好指定因為后面跟kibana集成的時候會報http連接出錯(直觀體現好像是監聽了:::9200?而不是0.0.0.0:9200)http.cors.allow-origin:?"/.*/"http.cors.enabled:?true??????? #這2項都是解決跟kibana集成的問題,錯誤體現是?你的?elasticsearch?版本過低,其實不是 |
3、啟動elasticsearch服務
| 1 2 3 | #?/usr/local/elasticsearch-1.7.2/bin/elasticsearch???? #日志會輸出到stdout#?/usr/local/elasticsearch-1.7.2/bin/elasticsearch?-d #表示以daemon的方式啟動#?nohup?/usr/local/elasticsearch-1.7.2/bin/elasticsearch?>?/var/log/logstash.log?2>&1?& |
4、查看elasticsearch的監聽端口
| 1 2 3 | #?netstat?-tnlp?|grep?javatcp????????0??????0?:::9200?????????????????????:::*????????????????????????LISTEN??????7407/java???????????tcp????????0??????0?:::9300?????????????????????:::*????????????????????????LISTEN??????7407/java |
5、elasticsearch和logstash結合
| 1 2 3 4 5 6 7 | 將logstash的信息輸出到elasticsearch中#?cat?logstash-elasticsearch.conf?input?{?stdin?{}?}output?{????elasticsearch?{?host?=>?"192.168.1.104"?}????????stdout?{?codec=>?rubydebug?}} |
6、基于配置文件啟動logstash
| 1 2 3 4 5 6 7 8 9 10 | #?/usr/local/logstash-1.5.4/bin/logstash?agent?-f?logstash-elasticsearch.confPipeline?started?{:level=>:info}Logstash?startup?completedpython?linux?java?c++????//手動輸入{???????"message"?=>?"python?linux?java?c++",??????"@version"?=>?"1",????"@timestamp"?=>?"2015-10-08T14:51:56.899Z",??????????"host"?=>?"0.0.0.0"} |
7、curl命令發送請求來查看elasticsearch是否接收到了數據
| 1 2 3 4 5 6 7 8 9 10 11 12 13 14 15 16 17 18 19 20 21 | #?curl?http://localhost:9200/_search?pretty{??"took"?:?28,??"timed_out"?:?false,??"_shards"?:?{????"total"?:?5,????"successful"?:?5,????"failed"?:?0??},??"hits"?:?{????"total"?:?1,????"max_score"?:?1.0,????"hits"?:?[?{??????"_index"?:?"logstash-2015.10.08",??????"_type"?:?"logs",??????"_id"?:?"AVBH7-6MOwimSJSPcXjb",??????"_score"?:?1.0,??????"_source":{"message":"python?linux?java?c++","@version":"1","@timestamp":"2015-10-08T14:51:56.899Z","host":"0.0.0.0"}????}?]??}} |
8、安裝elasticsearch插件
| 1 2 3 4 5 6 7 8 9 10 11 12 13 14 15 16 17 18 19 | #Elasticsearch-kopf插件可以查詢Elasticsearch中的數據,安裝elasticsearch-kopf,只要在你安裝Elasticsearch的目錄中執行以下命令即可:#?cd?/usr/local/elasticsearch-1.7.2/bin/#?./plugin?install?lmenezes/elasticsearch-kopf->?Installing?lmenezes/elasticsearch-kopf...Trying?https://github.com/lmenezes/elasticsearch-kopf/archive/master.zip...Downloading?.............................................................................................Installed?lmenezes/elasticsearch-kopf?into?/usr/local/elasticsearch-1.7.2/plugins/kopf執行插件安裝后會提示失敗,很有可能是網絡等情況...->?Installing?lmenezes/elasticsearch-kopf...Trying?https://github.com/lmenezes/elasticsearch-kopf/archive/master.zip...Failed?to?install?lmenezes/elasticsearch-kopf,?reason:?failed?to?download?out?of?all?possible?locations...,?use?--verbose?to?get?detailed?information解決辦法就是手動下載該軟件,不通過插件安裝命令...cd?/usr/local/elasticsearch-1.7.2/pluginswget?https://github.com/lmenezes/elasticsearch-kopf/archive/master.zipunzip?master.zipmv?elasticsearch-kopf-master?kopf以上操作就完全等價于插件的安裝命令 |
9、瀏覽器訪問kopf頁面訪問elasticsearch保存的數據
| 1 2 3 4 | #?netstat?-tnlp?|grep?javatcp????????0??????0?:::9200?????????????????????:::*????????????????????????LISTEN??????7969/java???????????tcp????????0??????0?:::9300?????????????????????:::*????????????????????????LISTEN??????7969/java???????????tcp????????0??????0?:::9301?????????????????????:::*????????????????????????LISTEN??????8015/java |

10、從redis數據庫中讀取然后輸出到elasticsearch中
| 1 2 3 4 5 6 7 8 9 10 11 12 13 14 15 16 17 | #?cat?logstash-redis.confinput?{????redis?{????????host?=>?'192.168.1.104'??#?我方便測試沒有指定password,最好指定password????????data_type?=>?'list'????????port?=>?"6379"????????key?=>?'logstash:redis'?#自定義????????type?=>?'redis-input'???#自定義????}}output?{????elasticsearch?{????????host?=>?"192.168.1.104"????????codec?=>?"json"????????protocol?=>?"http"??#版本1.0+?必須指定協議http????}} |
五、Kinaba
1、安裝Kinaba
| 1 2 | #?wget?https://download.elastic.co/kibana/kibana/kibana-4.1.2-linux-x64.tar.gz#?tar?zxf?kibana-4.1.2-linux-x64.tar.gz?-C?/usr/local |
2、修改kinaba配置文件kinaba.yml
| 1 2 | #?vim?/usr/local/kibana-4.1.2-linux-x64/config/kibana.ymlelasticsearch_url:?"http://192.168.1.104:9200" |
3、啟動kinaba
| 1 2 3 4 5 6 | /usr/local/kibana-4.1.2-linux-x64/bin/kibana輸出以下信息,表明kinaba成功.{"name":"Kibana","hostname":"localhost.localdomain","pid":1943,"level":30,"msg":"No?existing?kibana?index?found","time":"2015-10-08T00:39:21.617Z","v":0}{"name":"Kibana","hostname":"localhost.localdomain","pid":1943,"level":30,"msg":"Listening?on?0.0.0.0:5601","time":"2015-10-08T00:39:21.637Z","v":0}kinaba默認監聽在本地的5601端口上 |
4、瀏覽器訪問kinaba
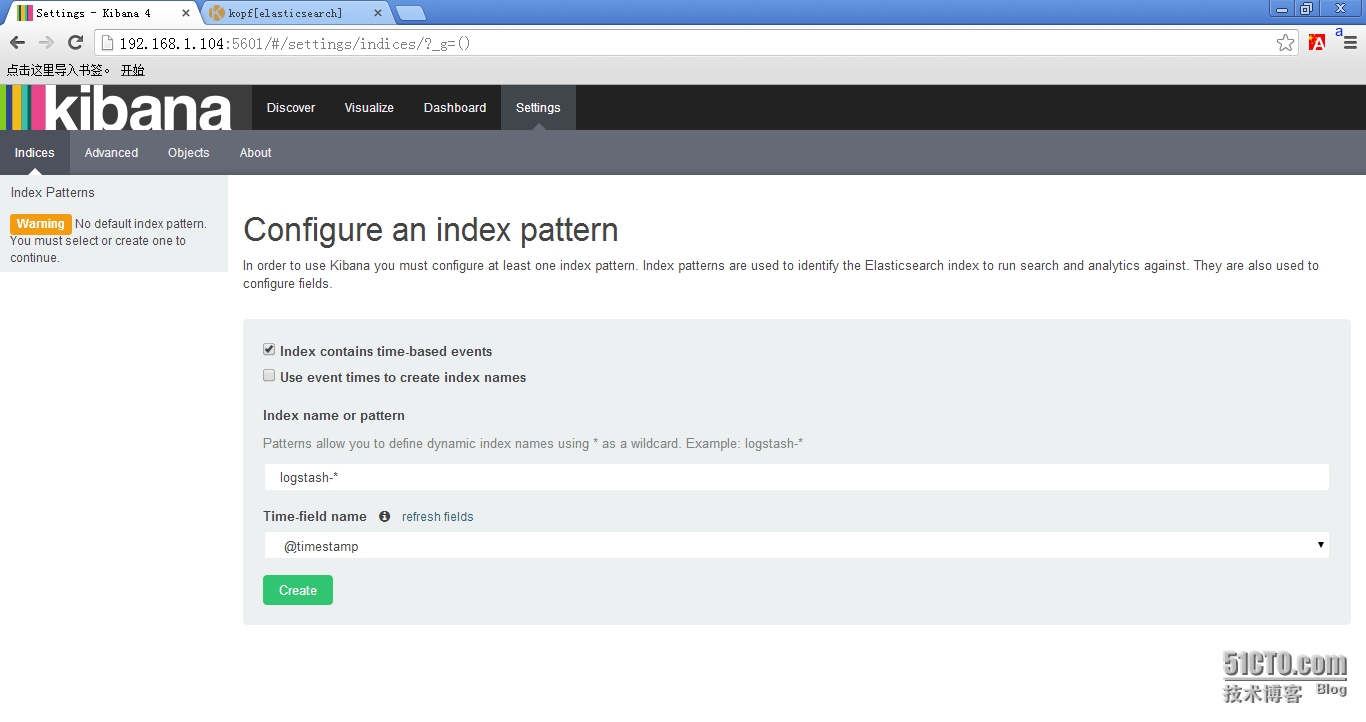
4.1?使用默認的logstash-*的索引名稱,并且是基于時間的,點擊“Create”即可。

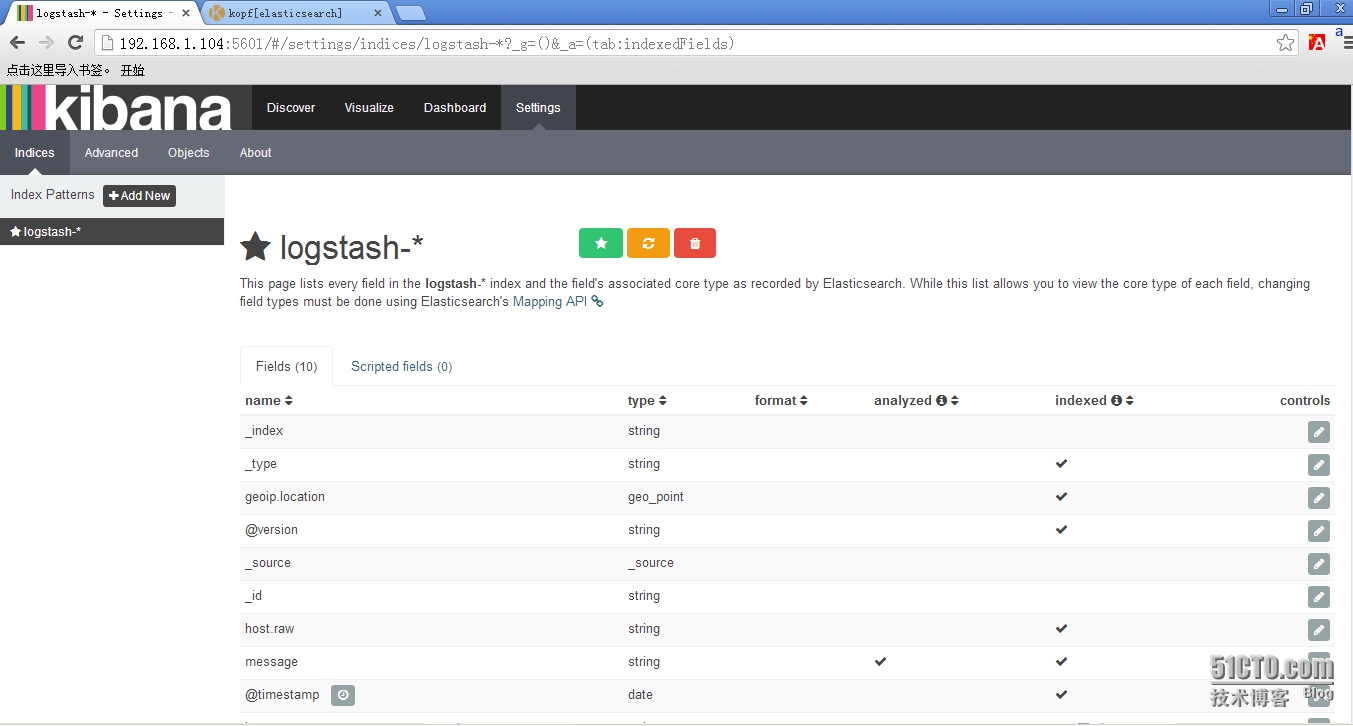
4.2?看到如下界面說明索引創建完成。

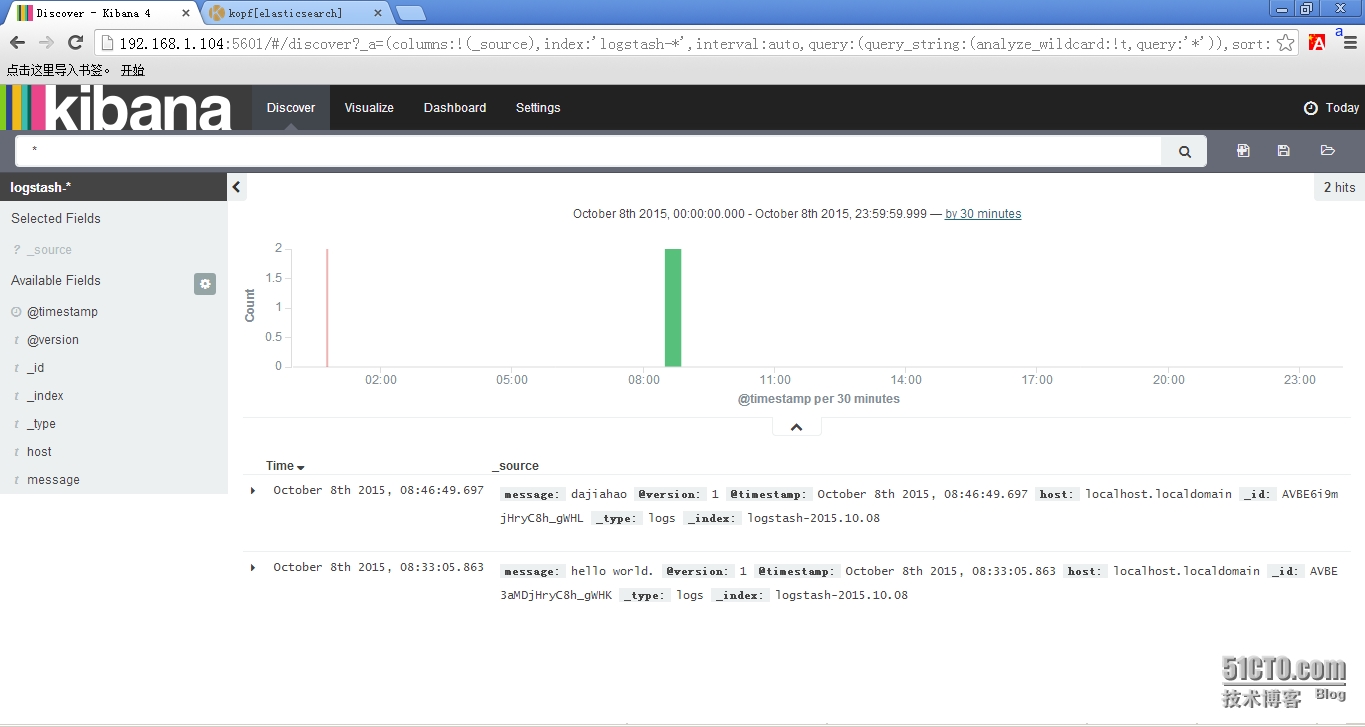
4.3?點擊“Discover”,可以搜索和瀏覽Elasticsearch中的數據。

?
>>>結束<<<
| 1 2 3 4 5 6 7 8 9 10 11 12 13 | 1、ELK默認端口號elasticsearch:9200?9300logstash?????:?9301kinaba???????:?56012、錯誤匯總(1)java版本過低[2015-10-07?18:39:18.071]??WARN?--?Concurrent:?[DEPRECATED]?Java?7?is?deprecated,?please?use?Java?8.(2)Kibana提示Elasticsearch版本過低...This?version?of?Kibana?requires?Elasticsearch?2.0.0?or?higher?on?all?nodes.?I?found?the?following?incompatible?nodes?in?your?cluster:?Elasticsearch?v1.7.2?@?inet[/192.168.1.104:9200]?(127.0.0.1)解決辦法: |
?
軟件包以打包上傳:http://pan.baidu.com/s/1hqfeFvY
?
本文出自 “鄭彥生” 博客,請務必保留此出處http://467754239.blog.51cto.com/4878013/1700828


)
——轉載圖片...)


的使用示例)


