在salesforce的classic中,我們使用{!expresion}在前臺頁面展示信息,在lightning中,上一篇我們也提及了,如果展示attribute的值,可以使用{!v.expresion}展示信息。
lightning在component中解析動態值的時候,會將{!} 這個里面的變量進行動態的解析以及展示。當然這個變量可以是基礎類型,自定義類型,數組集合等等,當然如果表達式為空字符串或者是空格則不會解析。偶爾特殊的要求為需要輸出‘{!}’這個字符串,官方文檔說可以使用<aura:text/>進行展示,因為這個標簽不會將‘{!’作為頭進行解析。當然,不要被這句話所欺騙,正常的理解應該為當value的值非tag或者attribute值的情況下,才會被解析成平滑的字符串。這里做個demo看一下渲染效果:
 1 <aura:component>
 2     <aura:attribute name="test" type="String" default="testValue"/>
 3     {!v.test}
 4     <br/>
 5     <aura:text value="{!v.test}"/>
 6     <br/>
 7     {!}
 8     <br/>
 9     <aura:text value="{!}"/>
10     <br/>
11     <aura:text value="{!v.test2}"/>
12     <br/>
13     <aura:text value="{!test2}"/>
14 </aura:component>
demo中分了幾種情況:輸出正常的attribute值、通過aura:text輸出attribute值、輸出{!}值、輸出一個不存在的屬性的值、輸出一個不存在的變量的值。結果展示如下圖所示。
通過結果我們可以看出來,aura:text并不是不解析{!開頭的內容,而是如果{!}不包含任何表達式情況下,會默認作為文本進行輸出,其實不是用aura:text 直接輸出{!}也可以作為文本進行輸出。如果解析的內容不存在情況下,則默認返回null。

使用{!}方式標簽僅能用于在.cmp 以及.app文件中,即只能用在lightning component以及lightning application中。
表達式除了簡單的通過{!v.attribute} 展示attribute的內容或者{!123}等展示字面內容的內容外,還可以使用條件表達式這種方式展示內容,通常有兩種常用的方式:三目運算和使用<aura:if>。
三目運算:下面的代碼為當attribute xxx的值為xxx的情況下,這個classs設置為'xxx',否則,class為空。
<a class="{!v.xxx == 'xxx' ? 'xxx' : ''}" >test </a>
?<aura:if>:此標簽通常和aura:set一起用。當aura:if判斷部分為true,顯示aura:if為true的邏輯,否則使用aura:set設置attribute為else,走false的邏輯。下面的例子為如果有edit權限則展示Edit的Button,否則展示'You can't edit this'的文字。
1 <aura:attribute name="edit" type="Boolean" default="true"/>
2 <aura:if isTrue="{!v.edit}">
3     <ui:button label="Edit"/>
4     <aura:set attribute="else">
5        You can’t edit this.
6     </aura:set>
7 </aura:if>
?我們在項目中會經常用到lightning component中嵌套其他的子的lightning component情況,比如列表中包含<aura:iterator> 標簽嵌套item的lightning component從而實現一個自定義列表展示。
嵌套lightning component就會涉及到attribute 賦值的部分,針對attribute賦值,可以賦值一個寫死的值,比如賦值‘123’等。lightning也提供了兩種動態方式賦值:{!attributeValue}以及{#attributeValue}。兩者賦值區別還是很大的,具體如下:
一.? ?!方式:此種方式又可以理解為綁定的表達式,即對attribute的賦值非一次性的,改變會貫穿著始終。子項如果修改了這個attribute的賦值,也會影響到父中此attribute的值;同樣的,如果父中對此attribute有更改,也會作用到子component中的引用上。
這里做一個例子:
1.boundSonComponent.cmp:聲明一個attribute名稱為sonAttribute,使用一個aura:text展示這個值,點擊按鈕后更新這個sonAttribute的value。
<aura:component><aura:attribute type="String" name="sonAttribute"/>son attribute : <aura:text value="{!v.sonAttribute}"/><br/><lightning:button onclick="{!c.handleSonClick}" label="son button"/>
</aura:component>
2.boundSonComponentController.js : 更新sonAttribute的value。
({handleSonClick : function(component, event, helper) {var sonAttributeValue = 'Updated Son Attribute';component.set('v.sonAttribute', sonAttributeValue);}
})
3.boundParentComponent.cmp :聲明一個attribute名稱為parentAttribute,展示此attribute的值并且提供按鈕可以修改值,在這個基礎上引入了一個boundSonComponent,并且將parentAttribute的值傳給了sonAttribute。注意,這里通過‘!’方式進行傳遞值。
<aura:component><aura:attribute name="parentAttribute" type="String" default="parentAttributeValue"/>parentAttribute : <aura:text value="{!v.parentAttribute}"/><br/><lightning:button label="parent button" onclick="{!c.handleParentClick}" /><br/><c:boundSonComponent sonAttribute = '{!v.parentAttribute}'/>
</aura:component>
4.boundParentComponentController.js :更新parentAttribute的value。
({handleParentClick : function(component, event, helper) {component.set('v.parentAttribute', 'updated parent attribute');}
})
?因為lightning無法直接運行lightning:component,所以需要將lightning:component放在 lightning app builder視圖中或者放在Lightning application中,lightning app builder 可以重新定義 page layout,分為App Page, Home Page 和Record Page。這個和page layout 很像,需要注意的一點為顯示在不同類型的頁面需要實現不同的接口,具體可以查看上一篇內容,感興趣的可以自己玩一玩。

demo以創建Lightning application為主。
5.創建boundApplication.app 用來包含boundParentComponent從而展示。
<aura:application><c:boundParentComponent/>
</aura:application>
運行lightning application可以通過developer console -> File -> Opening Lighting Resource 找到此bundle,然后Open Selected,打開后點擊Preview便可以看到顯示方式。

結果展示:
1.默認進來情況:因為parentAttribute的值作為了sonAttribute的值,所以二者顯示相同的值。

?
?
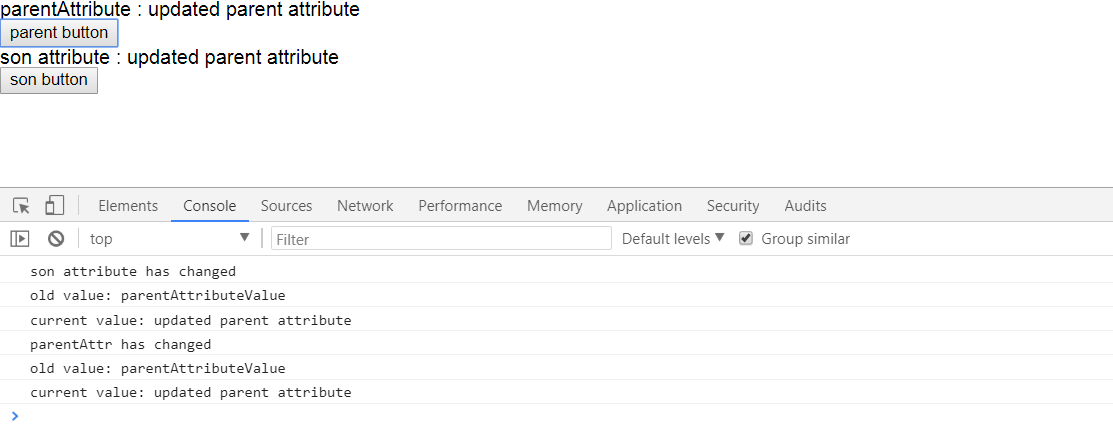
?2.點擊 parent button:點擊parent button后,后臺會更新parentAttribute的value。由于sonAttribute傳遞的值通過parentAttribute值傳遞,并且是通過!(bound)方式,所以當更改了parentAttribute后,sonAttribute也同樣的改變成了parentAttribute的值。

?
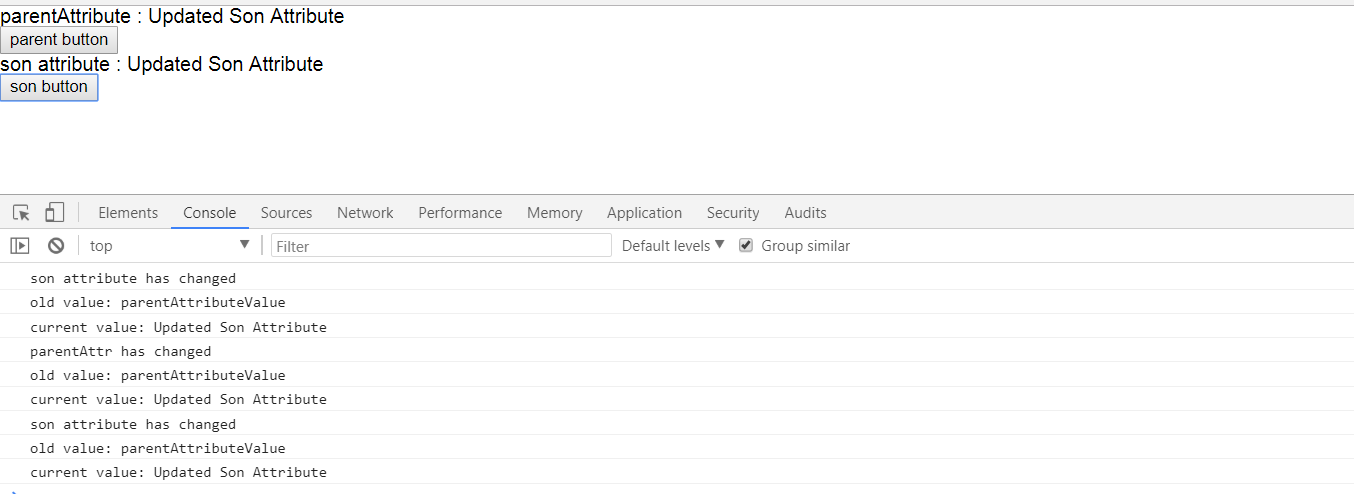
?3. 點擊son button:點擊son button后,后臺會更新sonAttribute的值。由于sonAttribute是通過parentAttribute值傳遞,并且是通過!(bound)方式,所以當更改了sonAttribute后,parentAttribute也同樣的受到了改變。

?這種操作結果可能讓人感到意外,因為我們有的時候只是想將attribute的值作為一個一次性初始化的值傳遞給子的component 的attribute,針對父或者針對子的改動并不希望后期在影響當前component外的其他的父或者子的component attribute。接下來的方式即可以做到非綁定表達式,即使用 # 方式進行值的傳遞。
二.? ?# 方式:可以理解成非綁定的表達式,即有嵌套的lightning component,父對子傳值僅初始化有效,后期父對這個attribute value的變化不會影響到子,同樣子對這個attribute value的變化同樣不會影響到父。
?在這里重用boundSonComponent,新建unboundParentComponent,使用#方式傳遞值。
1.unboundParentComponent:和boundParentComponent唯一的區別為在對boundSonComponent傳值的時候,將! 修改成了 # .?
<aura:component><aura:attribute name="parentAttribute" type="String" default="parentAttributeValue"/>parentAttribute : <aura:text value="{!v.parentAttribute}"/><br/><lightning:button label="parent button" onclick="{!c.handleParentClick}" /><br/><c:boundSonComponent sonAttribute = '{#v.parentAttribute}'/>
</aura:component>
結果展示:
1.當點擊parent button時,僅更改了parentAttribute的值,sonAttribute值不會受到影響。

2.當點擊son button時,金更改了sonAttribute的值,parentAttribute的值同樣不會受到影響。

上一篇我們有簡單的提到過lightning 提供了一些標準的事件,比如init,change。這里我們對change事件進行一個思考。如果aura:handler針對sonAttribute綁定了一個change事件,使用! 和使用# 是否會有上述的影響。
我們在boundSonComponent以及boundParentComponent添加一下change handler內容。監聽一下使用!情況下屬性值改變造成的change的影響。
1.boundSonComponent.cmp
<aura:component><aura:attribute type="String" name="sonAttribute"/><aura:handler name="change"  value="{!v.sonAttribute}" action="{!c.onSonAttributeChange}"/>son attribute : <aura:text value="{!v.sonAttribute}"/><br/><lightning:button onclick="{!c.handleSonClick}" label="son button"/>
</aura:component>
2.boundSonComponentController.js
({handleSonClick : function(component, event, helper) {var sonAttributeValue = 'Updated Son Attribute';component.set('v.sonAttribute', sonAttributeValue);},onSonAttributeChange : function(component,event,helper) {console.log("son attribute has changed");console.log("old value: " + event.getParam("oldValue"));console.log("current value: " + event.getParam("value"));}
})
boundParentComponent改動和上述內容相似,都是在component中添加了aura:handler聲明,后臺添加了函數輸出內容。
結果展示:
1.先點擊son Button,通過輸出結果可以看到,先執行了son Attribute的更新,因為采用的是!(綁定表達式方式),所以更新了parentAttribute的更新事件,當更新了parentAttribute后,又重新執行了一下子的component中的事件更新。
2.點擊parent button,更新了屬性值以后先執行了parentAttribute change的事件,然后又執行了他的子component的事件。
使用#方式就不會級聯的對事件進行調用,只會調用到自己的那層change事件。這里就不做實驗。
總結: 通過上述的兩個例子的展示結果可以看出來:對子component的attribute進行動態賦值時, !(綁定表達式) 與 #(非綁定表達式)差距還是很大的。使用!方式關系貫穿始終,無論父還是子對attribute改動都會對其關聯的受到影響,而且使用change handler也會有綁定關系,貫穿始終。使用#方式僅在初始化時有效,后期針對引用的attribute的值進行任何修改,都不會同步修改引用的地方。具體使用哪種方式看項目中用到的場景,同步操作則使用!方式傳值;僅需要其傳值作為初始化,后期改動無關則選擇#方式傳值。篇中有錯誤地方歡迎指出,有問題歡迎留言。
?

![JavaScript --- [學習筆記] 原型模式](http://pic.xiahunao.cn/JavaScript --- [學習筆記] 原型模式)

問題解決方法)

——解碼(2):封裝和界面設計)


)


方法)

![node --- [express項目] 開發環境下使用morgan控制臺輸出訪問信息](http://pic.xiahunao.cn/node --- [express項目] 開發環境下使用morgan控制臺輸出訪問信息)


![node --- [express] cookie/session 機制與 中間件的使用(路由守衛)](http://pic.xiahunao.cn/node --- [express] cookie/session 機制與 中間件的使用(路由守衛))