問題一
開發過程中,經常會遇到動態計算行高的問題,?
- (CGRect)boundingRectWithSize:(CGSize)size options:(NSStringDrawingOptions)options attributes:(nullableNSDictionary<NSString?*,?id> *)attributes context:(nullable?NSStringDrawingContext?*)contextNS_AVAILABLE(10_11,?7_0);
是蘋果推薦的計算方法,顯然會遇到段落格式問題,例如行間距、縮進等格式設置需求,attributes傳進來的字典中,包含我們設置的字體及格式,其中NSParagraphStyleAttributeName是設置段落風格,NSFontAttributeName是設置字體。
ok,具體來看一下NSParagraphStyleAttributeName的功能。
- ??
- ????NSMutableParagraphStyle?*paragraphStyle?=?[[NSMutableParagraphStyle?alloc]?init];????
- ????paragraphStyle.lineSpacing?=?10;??
- ????paragraphStyle.firstLineHeadIndent?=?20.0f;??
- ????paragraphStyle.alignment?=?NSTextAlignmentJustified;??
- ????paragraphStyle.lineBreakMode?=?NSLineBreakByTruncatingTail;??
- ????paragraphStyle.headIndent?=?20;??
- ????paragraphStyle.tailIndent?=?20;??
- ????paragraphStyle.minimumLineHeight?=?10;??
- ????paragraphStyle.maximumLineHeight?=?20;??
- ????paragraphStyle.paragraphSpacing?=?15;??
- ????paragraphStyle.paragraphSpacingBefore?=?22.0f;??
- ????paragraphStyle.baseWritingDirection?=?NSWritingDirectionLeftToRight;??
- ????paragraphStyle.lineHeightMultiple?=?15;????
- ????paragraphStyle.hyphenationFactor?=?1;??
好了,現在就可以很輕松的計算某一段落高度,例如:
- _descAtt?=?[[NSMutableAttributedString?alloc]?initWithString:_model.desc];??
- ???????UIFont?*descFont?=?[UIFont?PingFangSC_Regular_WithSize:12];??
- ?????????
- ???????NSMutableParagraphStyle?*descStyle?=?[[NSMutableParagraphStyle?alloc]init];??
- ???????[descStyle?setLineSpacing:1];??
- ?????????
- ???????CGSize?descSize?=?[_model.desc?boundingRectWithSize:CGSizeMake(w,?MAXFLOAT)??
- ???????????????????????????????????????????????????options:NSStringDrawingUsesLineFragmentOrigin??
- ????????????????????????????????????????????????attributes:@{NSFontAttributeName:descFont,??
- ?????????????????????????????????????????????????????????????NSParagraphStyleAttributeName?:descStyle}??
- ???????????????????????????????????????????????????context:nil].size;??
另外,再介紹幾個富文本處理的屬性:
- ??
- ??
- ??
- ??
- ??
- ??
- ??
- ??
- ??
- ??
- ??
- ??
- ??
- ??
- ??
- ??
- ??
- ??
- ??
- ??
- ??
——————————————————————————————————————————————————————————————————
問題二
一、設置textView的行間距
1.如果只是靜態顯示textView的內容為設置的行間距,執行如下代碼:
// textview 改變字體的行間距 NSMutableParagraphStyle *paragraphStyle = [[NSMutableParagraphStyle alloc] init]; paragraphStyle.lineSpacing = 10;// 字體的行間距 NSDictionary *attributes = @{ NSFontAttributeName:[UIFont systemFontOfSize:15], NSParagraphStyleAttributeName:paragraphStyle }; textView.attributedText = [[NSAttributedString alloc] initWithString:@"輸入你的內容" attributes:attributes];2.如果是想在輸入內容的時候就按照設置的行間距進行動態改變,那就需要將上面代碼放到textView的delegate方法里-(void)textViewDidChange:(UITextView *)textView{// textview 改變字體的行間距NSMutableParagraphStyle *paragraphStyle = [[NSMutableParagraphStyle alloc] init];paragraphStyle.lineSpacing = 20;// 字體的行間距NSDictionary *attributes = @{NSFontAttributeName:[UIFont systemFontOfSize:15],NSParagraphStyleAttributeName:paragraphStyle};textView.attributedText = [[NSAttributedString alloc] initWithString:textView.text attributes:attributes];}一、設置textView的placeholderUITextView上如何加上類似于UITextField的placeholder呢,其實在UITextView上加上一個UILabel或者UITextView,如果用UILable的話,會出現一個問題就是當placeholder的文字過長導致換行的時候就會出現問題,而用UITextView則可以有效避免此問題。- (BOOL)textView:(UITextView *)textView shouldChangeTextInRange:(NSRange)range replacementText:(NSString *)text{ if (![text isEqualToString:@""]){_placeholderLabel.hidden = YES;}if ([text isEqualToString:@""] && range.location == 0 && range.length == 1){_placeholderLabel.hidden = NO;}return YES;}說明如下:(1) _placeholderLabel 是加在UITextView后面的UITextView,_placeholderLabel要保證和真正的輸入框的設置一樣,字體設置成淺灰色,然后[_placeholderLabel setEditable:NO];真正的輸入框要設置背景色透明,保證能看到底部的_placeholderLabel。(2) [text isEqualToString:@""] 表示輸入的是退格鍵(3) range.location == 0 && range.length == 1 表示輸入的是第一個字符
————————————————————————————————————————————————————————————————————
問題三
?
UITextView富文本、插入圖片
直接看代碼 ?
_textView ?是定義的成員變量
- _textView?=?[[UITextView?alloc]init];??
- ???_textView.font?=?[UIFont?systemFontOfSize:13];??
- ???_textView.backgroundColor?=?[UIColor?lightGrayColor];??
- ???_textView.text?=?[NSString?stringWithFormat:@"settttttttttt?:%@",self.countStr];??
- ???_textView.frame?=?CGRectMake(20,?100,?200,?130);??
- ???_textView.delegate?=?self;??
- ???[self.view?addSubview:_textView];??
通過代理方法 ?得到選中文字的起始位置和長度 ?通過定義成員變量的方式保存起來 ?代碼如下 - -?(void)textViewDidChangeSelection:(UITextView?*)textView?{??
- ??????
- ?????
- ?
- ??
- ????_loc?=?(int)textView.selectedRange.location;??
- ????_len?=?(int)textView.selectedRange.length;??
- ??????
- }??
富文本 ? 讓選中的字體加粗或者改變顏色都可以 ?代碼中是點擊按鈕觸發字體選中改變方法 - -?(void)btnClick{??
- ??????
- ????if?(_len)?{????
- ??????????
- ??????????
- ????????NSMutableAttributedString?*AttributedStr?=?[[NSMutableAttributedString?alloc]initWithString:_textView.text];??
- ????????[AttributedStr?addAttribute:NSFontAttributeName??
- ???????????
- ??????????????????????????????value:[UIFont?boldSystemFontOfSize:15.0]??
- ???????????
- ??????????????????????????????range:NSMakeRange(_loc,?_len)];??
- ??????????
- ????????_textView.attributedText?=?AttributedStr;??
- ??????????
- ??????????
- ??????????
- ????}??
- ??????
- }??
圖片插入 ?代碼中也是通過按鈕觸發方法 ?點擊按鈕 復制一張圖片到光標位置 - -?(void)copyBtnClick{??
- ??????
- ????NSMutableAttributedString?*string?=?[[NSMutableAttributedString?alloc]?initWithAttributedString:_textView.attributedText];??
- ??????
- ????NSTextAttachment?*textAttachment?=?[[NSTextAttachment?alloc]?initWithData:nil?ofType:nil]?;??
- ????textAttachment.image?=?[UIImage?imageNamed:@"111"];???
- ??????
- ????NSAttributedString?*textAttachmentString?=?[NSAttributedString?attributedStringWithAttachment:textAttachment]?;??
- ??????
- ????[string?insertAttributedString:textAttachmentString?atIndex:_textView.selectedRange.location];??
- ????_textView.attributedText?=?string;??
- ??
- }??
————————————————————————————————————————
問題四
繼承UITextView
1.定制選中文字的菜單
首先新建一個類,繼承自UITextView,假設類名為MyTextView,關鍵代碼如下:
- ??
- -?(BOOL)canBecameFirstResponder?{??
- ????return?YES;??
- }??
- ??
- ??
- -?(BOOL)canPerformAction:(SEL)action?withSender:(id)sender?{??
- ????if?(action?==?@selector(copy:))?{???
- ????????return?NO;??
- ????}??
- ????else?if?(action?==?@selector(selectAll:))?{???
- ????????return?NO;??
- ????}??
- ??????
- ??????
- ????return?NO;??
- }??
以上第一個方法用來確保我們選中文字后的菜單可以彈出,第二個方法用來關閉菜單中所有系統的菜單項,如copy, select, select all等。
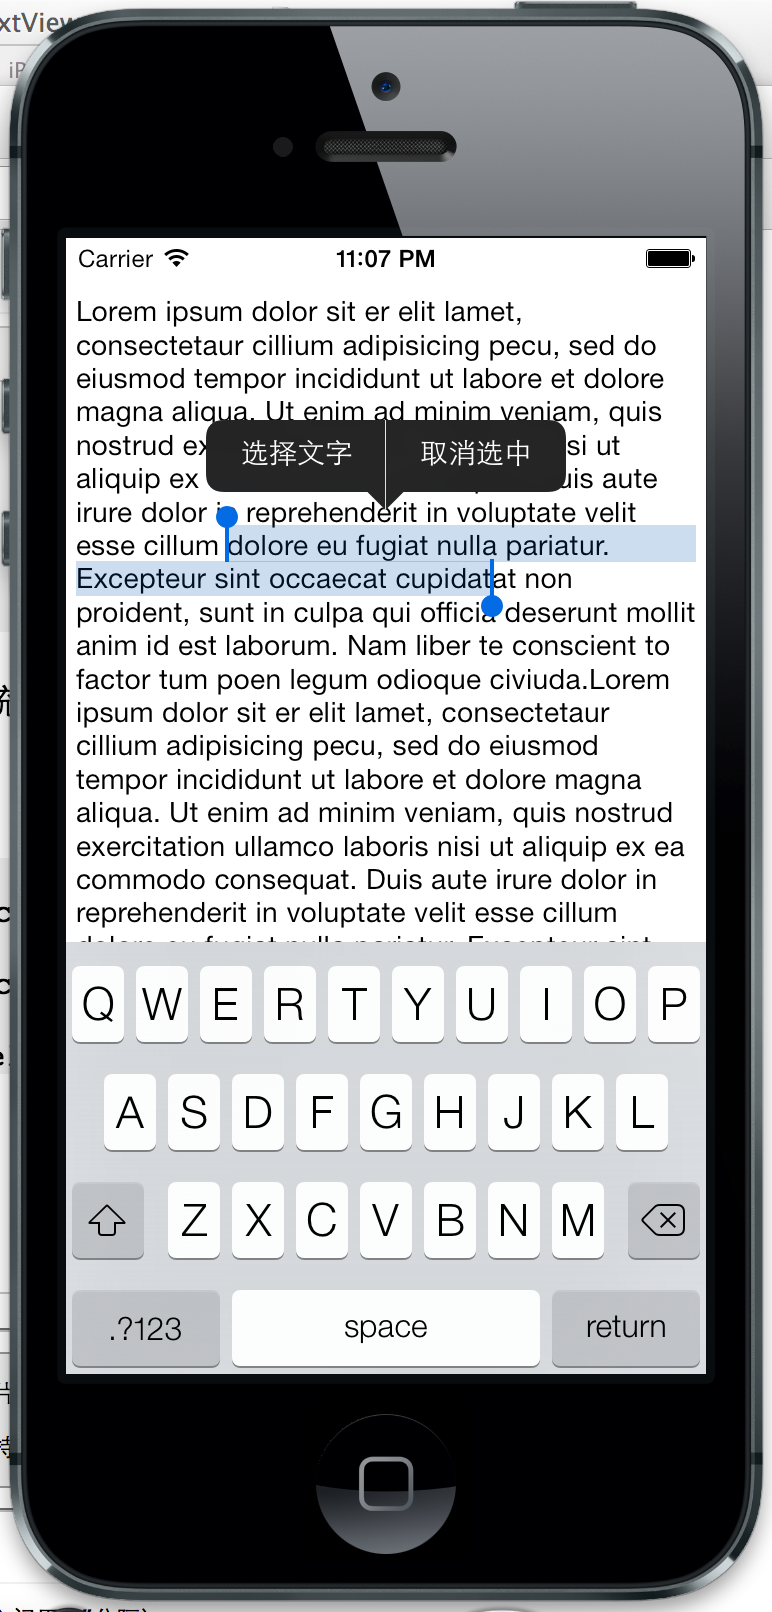
然后使用UIMenuController定制菜單:
- ??
- UIMenuItem?*selectItem?=?[[UIMenuItem?alloc]?initWithTitle:@"選擇文字"?action:@selector(callSelectText:)];??
- UIMenuItem?*cancelItem?=?[[UIMenuItem?alloc]?initWithTitle:@"取消選中"?action:@selector(cancelSelection:)];??
- [UIMenuController?sharedMenuController].menuItems?=?@[selectItem,?cancelItem];??
注意必須實現兩個MenuItem的響應方法才能顯示出菜單:
- #pragma?mark?-?Menu?Item?Actions??
- ??
- -?(void)callSelectText:(id)sender?{??
- ????self.currentSelection_?=?self.myTextView.selectedRange;??
- ????self.selectOptionView.hidden?=?NO;??
- ????[self.location_inputTextField?becomeFirstResponder];??
- }??
- ??
- -?(void)cancelSelection:(id)sender?{??
- ????self.myTextView.selectedRange?=?NSRangeZero;??
- }??
最終效果如下:
之前的項目沒有要求定制菜單項的圖像,直接看SDK的內容的話貌似也沒有Image之類的屬性或方法,所以深層次定制菜單項的內容不得而知了。
2.通過代碼選中一段文字
這個很簡單,直接改變UITextView的selectedRange屬性的值就可以了:
- @property(nonatomic)?NSRange?selectedRange;??
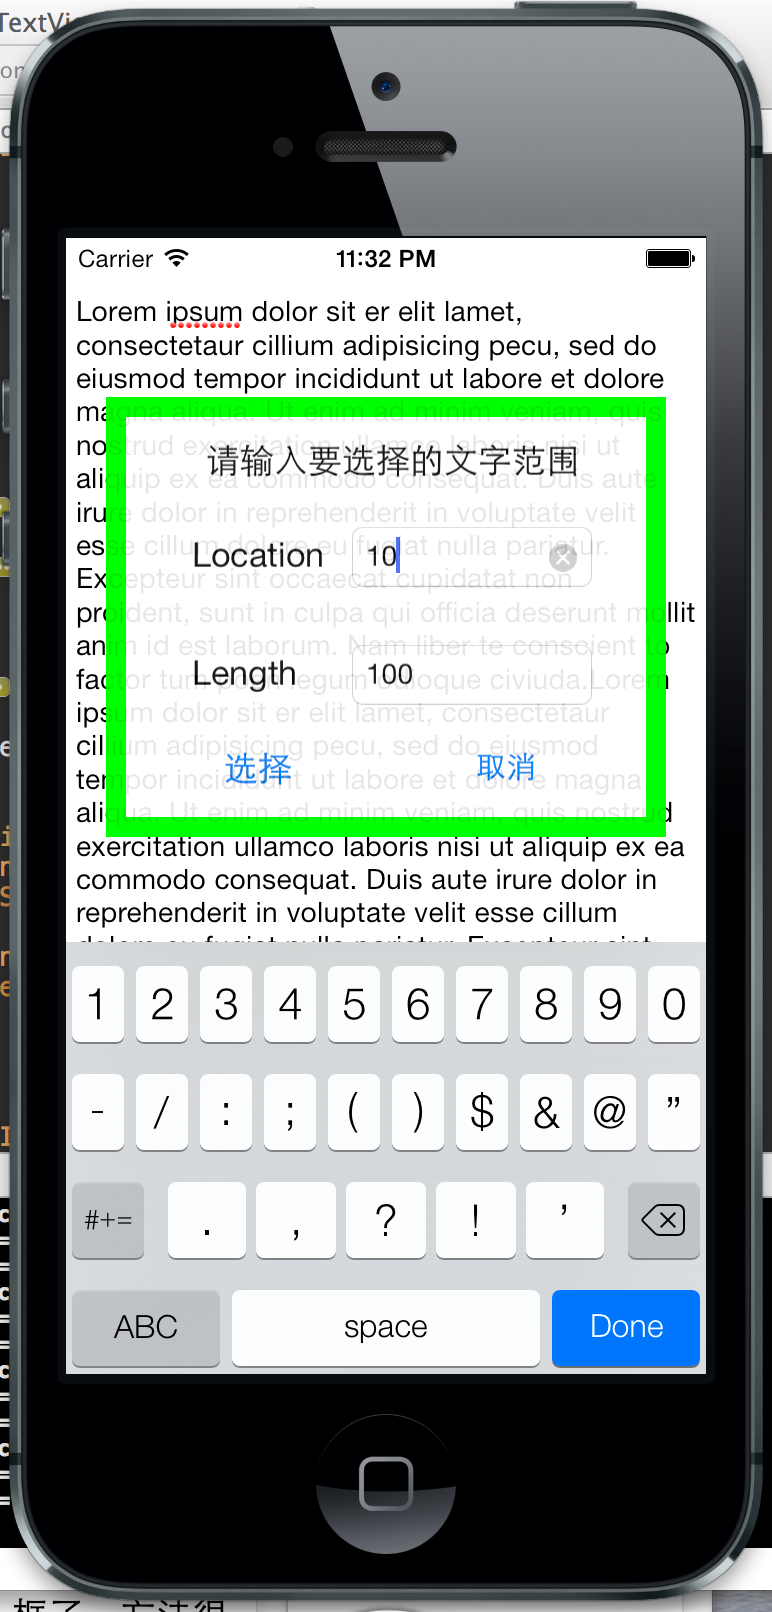
例如我們點擊選擇文字后彈出一個文字選擇的輸入視圖,這個我用一個XIB文件定制:
小心了,將xib中的UI組件和View Controller中的Outlet連接時,在代碼中要先從xib文件中加載視圖,才能使用其中的UI組件,例如:
- NSArray?*nibViews?=?[[NSBundle?mainBundle]?loadNibNamed:@"SelectOptionView"?owner:self?options:nil];??
- self.selectOptionView?=?nibViews[0];??
- self.selectOptionView.center?=?CGPointMake(self.view.center.x,?self.view.bounds.size.height?/?3);??
- self.selectOptionView.hidden?=?YES;??
- [self.view?addSubview:self.selectOptionView];??
- ??
- ??
- self.location_inputTextField.delegate?=?self;??
- self.length_inputTextField.delegate???=?self;??
如果將
? ??self.location_inputTextField.delegate?=self;
? ??self.length_inputTextField.delegate?? =self;
這兩行代碼置于loadNibNamed方法之前,那么兩個文本輸入框的delegate將為空(因為他們本身都是空,還沒有加載)。
選擇文字的Action代碼為:
- #pragma?mark?-?Select?View?Actions??
- ??
- -?(IBAction)selectText:(id)sender?{??
- ????NSInteger?loc?=?self.location_inputTextField.text.integerValue;??
- ????NSInteger?len?=?self.length_inputTextField.text.integerValue;??
- ????NSUInteger?textLength?=?self.myTextView.text.length;??
- ????if?(loc?<?0?||?len?<?0?||?loc?>?textLength?||?len?>?textLength)?{??
- ????????UIAlertView?*alerView?=?[[UIAlertView?alloc]?initWithTitle:@"錯誤"??
- ???????????????????????????????????????????????????????????message:@"輸入出錯,輸入的數不能小于0和大于文本長度"??
- ??????????????????????????????????????????????????????????delegate:nil??
- ?????????????????????????????????????????????????cancelButtonTitle:@"確定"?otherButtonTitles:nil,?nil?nil];??
- ????????[alerView?show];??
- ????????return;??
- ????}??
- ????self.currentSelection_?=?NSMakeRange(loc,?len);??
- ????[self?finishSelectingText];??
- }??
- ??
- -?(IBAction)cancelSelectText:(id)sender?{??
- ????[self?finishSelectingText];??
- }??
- ??
- -?(void)finishSelectingText?{??
- ????[self.location_inputTextField?resignFirstResponder];??
- ????[self.length_inputTextField?resignFirstResponder];??
- ????self.selectOptionView.hidden?=?YES;??
- ??????
- ????[self.myTextView?becomeFirstResponder];??
- ????self.myTextView.selectedRange?=?self.currentSelection_;??
- }??
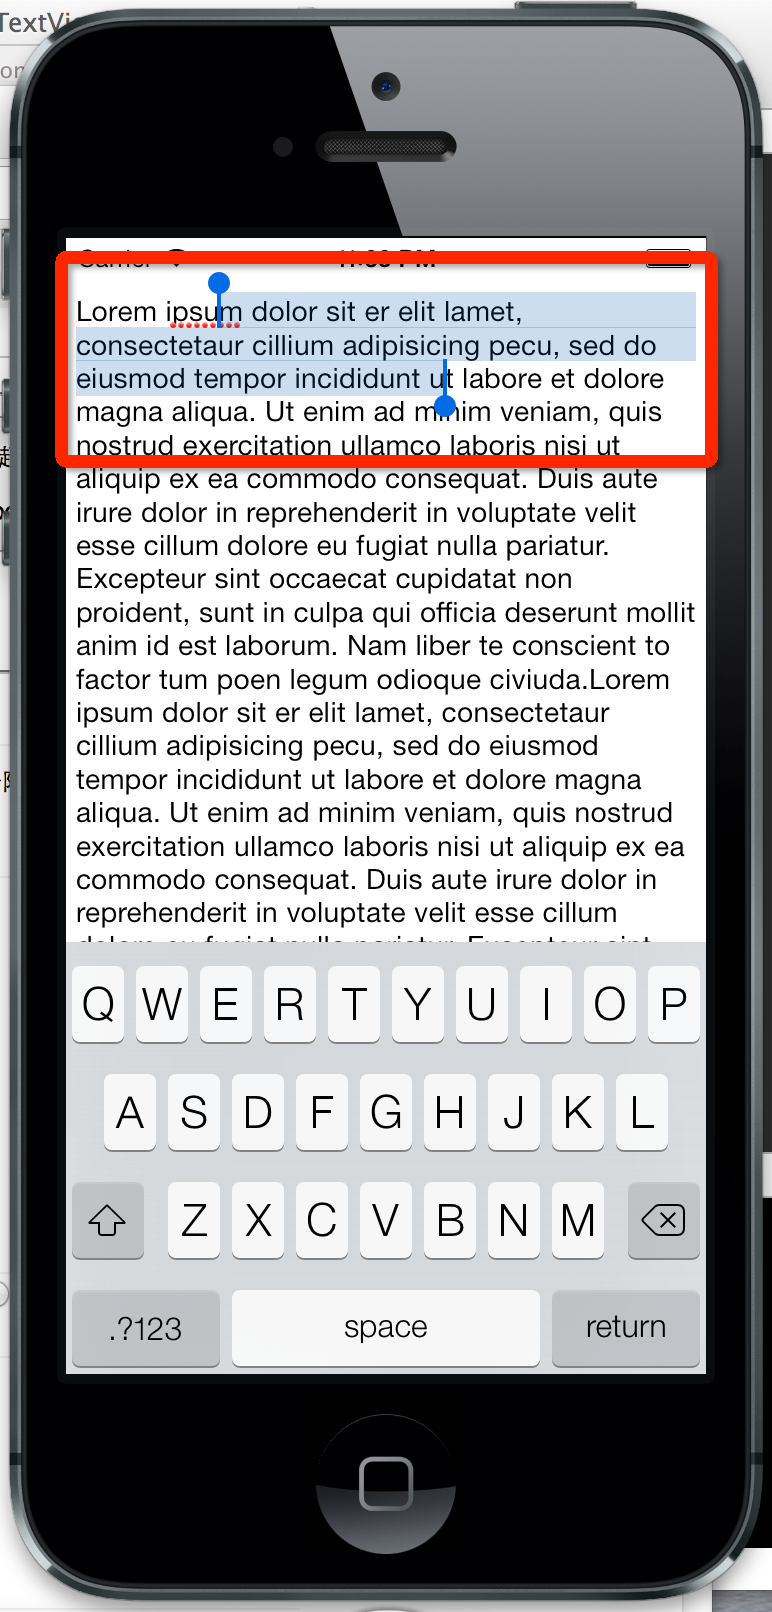
沒錯,只要一句self.myTextView.selectedRange?=self.currentSelection_;就可以了。
另外,我們可以在UITextView的以下方法中監聽到某段文字被選中:
- #pragma?mark?-?UITextView?Delegate??
- ??
- -?(void)textViewDidChangeSelection:(UITextView?*)textView?{??
- ????NSLog(@"Selection?changed");??
- ??????
- ????NSLog(@"loc?=?%d",?self.myTextView.selectedRange.location);??
- ????NSLog(@"len?=?%d",?self.myTextView.selectedRange.length);??
- }??
運行結果:
控制臺輸出如下:
- 2014-02-16?23:33:56.197?MyTextView[4890:70b]?Selection?changed??
- 2014-02-16?23:33:56.198?MyTextView[4890:70b]?loc?=?507??
- 2014-02-16?23:33:56.198?MyTextView[4890:70b]?len?=?0??
- 2014-02-16?23:33:56.334?MyTextView[4890:70b]?Selection?changed??
- 2014-02-16?23:33:56.335?MyTextView[4890:70b]?loc?=?507??
- 2014-02-16?23:33:56.335?MyTextView[4890:70b]?len?=?5??
- 2014-02-16?23:34:05.291?MyTextView[4890:70b]?Selection?changed??
- 2014-02-16?23:34:05.292?MyTextView[4890:70b]?loc?=?10??
- 2014-02-16?23:34:05.292?MyTextView[4890:70b]?len?=?100??
3.讓鍵盤主動出現
為了讓用戶更省心,我們可以在一個帶輸入框的視圖出現時就讓鍵盤彈出來,而不用用戶再點一下輸入框了。方法很簡單,就一行代碼:
- [self.location_inputTextField?becomeFirstResponder];??
4.兩個輸入框按return時仿回車功能
有多個輸入框,在一個輸入框中按了return,然后好像在網站輸入框中按了回車,直接跳到下一個輸入框,這個也非常簡單,就是resignFirstResponder和becomeFirstResponder方法結合使用而已,在UITextField的委托方法中實現:
- #pragma?mark?-?UITextField?Delegate??
- ??
- -?(BOOL)textFieldShouldReturn:(UITextField?*)textField?{??
- ????if?([self.location_inputTextField?isFirstResponder])?{??
- ????????[self.location_inputTextField?resignFirstResponder];??
- ????????[self.length_inputTextField?becomeFirstResponder];??
- ????}??
- ????else?if?([self.length_inputTextField?isFirstResponder])?{??
- ????????[self.length_inputTextField?resignFirstResponder];??
- ????}??
- ????return?YES;??
- }??
Demo已經上傳,有興趣的可以下載看看:點此進入下載頁


)
)

)


)


)


