Props深入
children
- 作用 : 獲取組件標簽的 子節點
- 獲取方式 :
this.props.children
<App>此處的內容,就是組件的 children,將來通過組件的 props.children 就可以獲取到這些子節點了
</App>
props 校驗
-
作用:規定組件props的類型約束, 減少開發中的錯誤
-
prop-types 校驗規則
-
安裝 :
yarn add prop-types -
導入 :
import Propypes from 'prop-types' -
給組件添加校驗規則
// 要對某個組件里的某個屬性進行校驗
Child.propTypes = {// age 表示要校驗的屬性名稱// number 表示類型是數字// isRequied 表示必填項age : PropTypes.number.isRequired,name : PropTypes.string,arr : PropTypes.array,fn : PropTypes.func,isOK : PropTypes.bool,// 任何可被渲染的元素(包括數字、字符串、元素或數組)// (或 Fragment) 也包含這些類型。optionalNode: PropTypes.node,// 你可以讓你的 prop 只能是特定的值,指定它為 枚舉類型。num : PropTypes.oneOf(['News', 'Photos']).isRequired,// 一個對象可以是幾種類型中的任意一個類型optionalUnion: PropTypes.oneOfType([PropTypes.string,PropTypes.number]).isRequired,
}
props的默認值
- 可以通過
組件.defaultProps = {}這樣的方式來給組件添加默認值 - 默認值在用戶沒有傳遞該組件時會生效,如果用戶傳遞了該屬性,那么就會使用用戶傳遞的屬性了
// 默認值
Child.defaultProps = {age : 10
}
生命周期
- 生命周期圖譜
- 圖示:
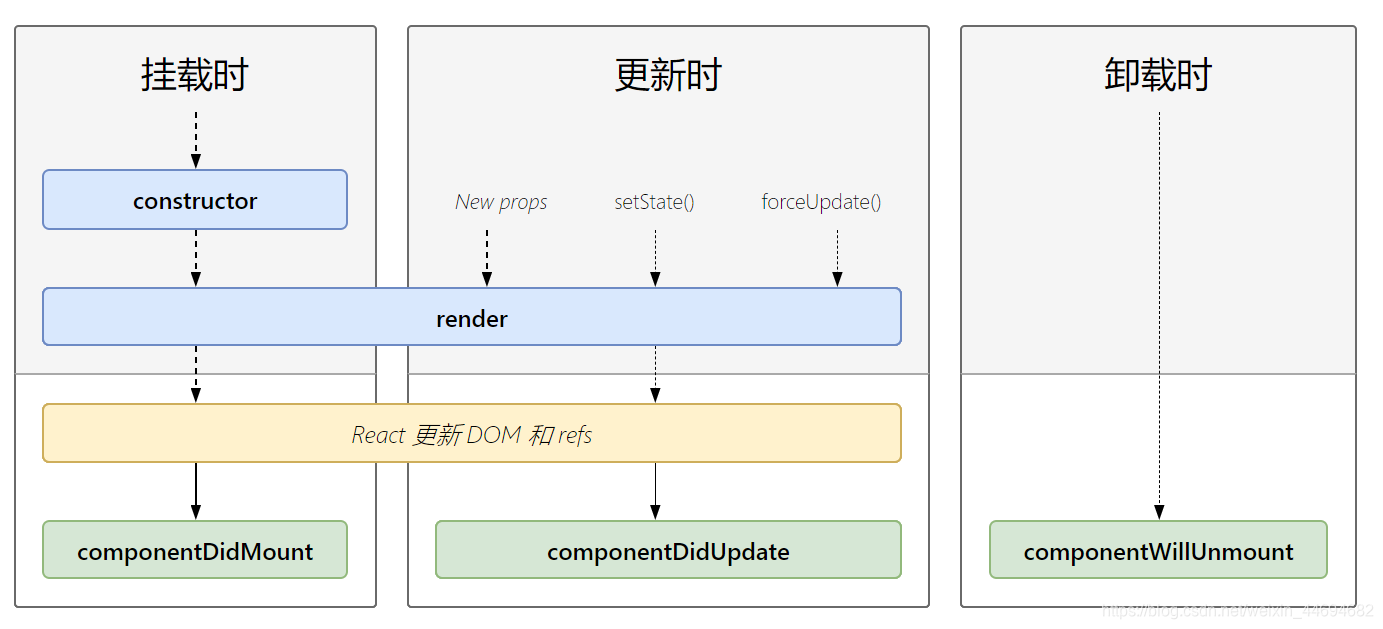
第一階段 : 掛載階段
- 觸發時機 : 組件第一次被渲染的時候, 進入頁面的時候觸發
- 三個鉤子函數
- constructor() : 初始化state
- render() : 渲染UI
- componentDidMount() : 1.操作DOM 2. 發送ajax請求
- 觸發順序 : constructor --> render --> componentDidMount
// 類組件class Child extends React.Component {//1.1. 構造函數// 初始化數據constructor() { super()this.state = {name :'zs'}console.warn('constructor');}//1.2. 渲染UI render () {console.warn('render');return (<div><p>哈哈 {this.state.name}</p></div>)}//1.3. 掛載之后 渲染之后// 操作DOM ,發送ajaxcomponentDidMount () {console.warn('componentDidMount');}}
第二階段 : 更新階段
- 執行順序 : render --> componentDidUpdate
- 三種觸發組件更新的方式
- setState() : 修改 state 的值
- new Props : 表示組件接收到一個新的 props 值。在父子組件關系中,當父組件中狀態更新時,最新的 props 會自動傳入到子組件中,從而觸發子組件的重新渲染。不管是函數組件還是class組件,都會觸發重新渲染
- forceUpdate() : 表示強制組件重新渲染 (一般不會用 知道就好)
- 注意點:
- 注意1 : componentDidUpdate 鉤子函數中獲取到的是 更新后的 DOM 內容
- 想獲取之前的, 使用
componentDidUpdate (preProps,preState) { - 參數是
之前的props 和 state
- 想獲取之前的, 使用
- 注意2 : 在 componentDidUpdate 鉤子函數中,不能直接調用 setState() 否則,會遞歸渲染,造成死循環。如果要調用 setState(),應該放在一個 條件判斷 中
class Parent extends React.Component { state = {pmsg :'撩妹'}render () { return <div><button onClick={this.updateProps2Child}>按鈕修改props</button><Child msg={ this.state.pmsg }></Child></div>}updateProps2Child = () => { // 演示2 : 修改父的state 其實就是修改 child 的props , 重新調用 child 的renderthis.setState({pmsg : '撩漢'})}
}//2. 類組件class Child extends React.Component {state = {name :'zs'}//2.1. 渲染UI render () {console.warn('render');return (<div><p>哈哈 {this.state.name}</p><p>父傳過來的 : { this.props.msg }</p><button onClick={this.updateName}>按鈕</button></div>)}//更新state 的name 數據updateName = () => { // 演示1 : setState 重新調用 renderthis.setState({name : 'ls'})// 演示3 : forceUpdate 重新調用 renderthis.forceUpdate()}// 2.2 組件更新// 上一次的 props 和  上一次的state componentDidUpdate (preProps,preState) { console.warn('組件更新之前的數據', preState);// this.state 當前最新的state console.warn('組件更新之后的數據',this.state); // 有條件的渲染 不然會造成死循環if(this.state.name !== preState.name) {this.setState({name : this.state.name})}}}
第三階段 : 卸載階段
componentWillUnmount:在組件卸載時會觸發,也就是 組件從頁面中消失的時候- 作用:執行清理工作
- 比如:清理掉 定時器、解綁手動綁定的事件 等
// 第一步 : 在父組件里 點擊按鈕, 把 子組件給銷毀
class Parent extends React.Component { ...render () { return <div><button onClick={this.changeShow}>按鈕修改props</button>{ this.state.isShow && (<Child msg={ this.state.pmsg }></Child>) }</div>}changeShow = () => { // 點擊按鈕 子組件被銷毀卸載this.setState({isShow : false})}
}// 第二步 :  在 Child 組件里
componentDidMount () {//1. 開始定時器this.timerId = setInterval(() => {console.log('好嗨喲');}, 1000);//2. 給window注冊鼠標觸摸事件window.addEventListener('mousemove', this.handleMouseMove)
}// 觸摸事件處理函數
handleMouseMove = (e) => { console.log(e.clientX);
}// 第三步 :  在將要卸載的鉤子函數里 清除定時器和 移除鼠標移動事件
// 將要卸載
componentWillUnmount () { //1. 清除定時器clearInterval(this.timerId)//2. 移除鼠標觸摸事件window.removeEventListener('mousemove',this.handleMouseMove)
}
render-props 和 高階組件 的介紹
-
什么情況下 會使用這兩種模式 ? 復用
-
當兩個組件或者多個組件有一部分
state和操作 state 的方法相同或者相似的時候, 就可以將這些代碼邏輯使用這兩種模式來實現復用 -
目的 : 狀態邏輯復用 ==> 通俗點說 : 另一種封裝形式
-
要復用的內容為 :
- state
- 操作 state 的方法
-
注意
- 不管是高階組件還是 render-props 模式, 都要將
狀態邏輯封裝在一個組件中 - 并且這個組件只提供狀態和操作狀態的方法邏輯
- 這個組件不提供要渲染的UI結構, 因為要渲染的內容不確定
- 不管是高階組件還是 render-props 模式, 都要將
-
學習注意 :
- 思想重于代碼
render-props 的使用
拷貝 Mouse.js 并簡單介紹
- state : {x,y} 鼠標坐標
- 注冊鼠標移動事件和移除 事件
- 移動事件吹函數 保存鼠標位置
演示1 : 鼠標位置
// 位置
// 1. 使用 mouse組件 添加一個render屬性, 值類型為一個函數
// 2. 可以得到一個mouse 位置坐標
// 3. 通過return 什么, 頁面就會顯示什么
ReactDOM.render(<Mouse render={(mouse) => { console.log(mouse);return <h1>{mouse.x} - {mouse.y}</h1>
}}/>,document.getElementById('root'))
演示2 :移動貓
// 引入圖片
import cat from './images/cat.png'// 渲染
ReactDOM.render(<Mouse render={mouse => { return <img style={{ position : "absolute", left:mouse.x-64, top:mouse.y-64 }} src={cat} alt=''/>} }/>,document.getElementById('root'))
總結使用共同步驟
- 1.給 Mouse 組件傳遞
render 屬性( render屬性的值 是一個函數 ) - 2.通過 render 函數屬性的參數 來獲取組件內部復用的狀態 (比如 : 鼠標位置數據)
- 3 通過render函數屬性的返回值來指定最終要渲染在 頁面中的內容
####分析Mouse 組件內容
- Mouse 組件 只負責
- 提供 鼠標位置 state
- 提供操作數據位置的邏輯代碼
- 注意 : Mouse 組價 自身不指定要渲染的內容, 因為 Mouse 組件自身要渲染的什么內容
- 實際上是由用戶在使用該組件時指定的
- 思想 : Mouse 組件通過調用 props.render() 方法, 將組件內部的狀態暴露到組件外部, 這樣, 用戶在使用該組件時, 就可以通過 render 屬性的參數來獲取到組件內部的狀態了
// 封裝 Mouse 組件 Mouse.js,
// 實現鼠標位置的復用
// 狀態邏輯復用:1 state 2 操作狀態
class Mouse extends React.Component {// 提供鼠標位置的狀態state = {x: 0,y: 0}// 監聽鼠標位置componentDidMount() {window.addEventListener('mousemove', this.handleMouseMove)}// 組件卸載時執行清理工作:解綁事件componentWillUnmount() {window.removeEventListener('mousemove', this.handleMouseMove)}// 更新鼠標位置handleMouseMove = e => {this.setState({x: e.clientX,y: e.clientY})}render() {// 通過 props 來獲取到傳遞給組件的屬性 render// 因為 render 是一個函數,所以,就可以調用// 在調用 render 函數時,將組件內部的狀態,傳遞給 render 函數// 最終,通過 render 的形參,就可以在組件外部獲取到組件內部的狀態了// this.props.render(this.state)// return null// 通過 render 函數的返回值來指定要渲染的內容// 所以,在組件內部直接使用 render 函數的返回值來作為該組件要渲染的內容return this.props.render(this.state)}
}
使用 children 代替 render 屬性
- 注意 : 不是該模式叫 render-props 模式, 就必須使用render 屬性
- 實際上, 只要有一個屬性來告訴組件要渲染什么內容, 其實這就是 render-props 模式了
- 推薦 : 使用 children 代替 render 屬性
- 使用 children 演示位置和貓
// 1 . 位置
ReactDOM.render(<Mouse>{(mouse) => { return <p>{mouse.x} - { mouse.y }</p>        # +} }
</Mouse>, document.getElementById('root'))
// 2 . 貓
ReactDOM.render(<Mouse>{mouse => { return <img style={{ position:'absolute', left:mouse.x-64, top:mouse.y-64 }} src={cat} alt=""/>  											        # +}  }
</Mouse>, document.getElementById('root'))// 3. Mouse.js 內部
render() {// 改為 children return this.props.children(this.state)
}
使用場景
- 場景1 : 之前的 Context 使用的就是這個模式
// 提供數據
<Provider value={ this.color } ></Provider>// 消費數據/使用數據
<Consumer>
{ data => <span>--{data} </span>}
</Consumer>
- 場景2 : 動畫插件 react-spring
- github地址
- 安裝 :
yarn add react-spring - 使用 :
Render-props api ==> spring
// 引入
import {Spring} from 'react-spring/renderprops'// 使用
ReactDOM.render(<Springconfig={{ duration:4000 }}from={{ opacity: 0 }}to={{ opacity: 1 }}>{props => { console.log(props);return <div style={props}>hello</div>}}
</Spring>, document.getElementById('root'))
高階組件的使用
- render-props 模式 和 高階組件 都是 用來做復用的 : state 和 操作 state 的方法
高階組件介紹
-
高階組件 : HOC : High-Order Component
-
實際上就是一個函數, 這個函數能夠接受一個參數組件, 然后,返回一個增強后的組件
-
參數組件 : 就是需要被包裝的組件
-
返回的組件 : 增強后的組件, 這個組件中就是通過Props來接收到復用的狀態邏輯的
-
思想 : 就是組件在增強的過程中, 傳入了一些數據給 組件的 props
const 增強后的組件 = 高階組件(被包裝組件)
高階組件使用演示
- 高階組件的代碼
// 這就是一個高階組件
// 職責 : 1 提供鼠標位置狀態 2 提供鼠標位置的方法
const withMouse = WrappedComponent => {class Mouse extends React.Component {// 鼠標位置狀態state = {x: 0,y: 0}// 進入頁面時,就綁定事件componentDidMount() {window.addEventListener('mousemove', this.handleMouseMove)}// 鼠標移動的事件處理程序handleMouseMove = e => {this.setState({x: e.clientX,y: e.clientY})}// 移除事件componentWillUnmount() {window.removeEventListener('mousemove', this.handleMouseMove)}render() {return <WrappedComponent {...this.state} />// return <WrappedComponent x={this.state.x} y={this.state.y} />}}return Mouse
}
演示1:創建位置組件
//1. 演示1 位置組件
const Position = props => { console.log(props) // 增強之前props是沒有值的return <p>x:{props.x} y:{props.y}</p>
}// 如何使用?
// 增強后 = withMouse(增強前)
HOC_Position =   withMouse(Position)// 渲染
ReactDOM.render(<HOC_Position/>, document.getElementById('root'))
演示2 : 創建移動貓組件
//2.演示2 : 移動貓
const Cat = props => {console.log(props);return <img style={{ position:"absolute", left:props.x-64, top:props.y-64 }} src={cat} alt=""/>
}// 使用高階組件增強一下
HOC_Cat = withMouse(Cat)// 渲染
ReactDOM.render(<HOC_Cat/>, document.getElementById('root'))
高階組件分析
- 高階組件名稱 約定 以 with 開頭
- 指定函數參數,參數應該以大寫字母開頭(作為要被包裝的組件)
- 在函數內部創建一個類組件,提供復用的狀態邏輯代碼,并返回
- 在該組件中,渲染參數組件,同時將狀態通過prop傳遞給參數組件
- 調用該高階組件,傳入要增強的組件,通過返回值拿到增強后的組件,并將其渲染到頁面中
const withMouse = (WrappedComponent) => {class Mouse extends React.Component {    ... 省略鼠標位置狀態 和 操作鼠標位置的方法邏輯render() {return <WrappedComponent {...this.state} />      #  核心}}return Mouse
}
給高階組件添加displayName (我們自己封裝高階組件)
- displayName:用于設置 react-dev-tools (瀏覽器中的react插件) 中組件的展示名稱
- 注意:該屬性僅僅用于設置展示名稱,并不會對組件功能產生影響,所以,如果不想再 react-dev-tools 中進行區分,實際上,可以省略該設置。
- 演示 : 效果
// 同時渲染多個高階組件的時候
ReactDOM.render(<div><HocPosition/><HocCat/>
</div>, document.getElementById('root'))// 在 react-dev-tools 上面顯示的是這樣的
<Mouse>...</Mouse>
<Mouse>...</Mouse>// 這樣很不容易區分,所有需要添加displayName
- 如何 設置 displayName ?
const withMouse = (WrappedComponent) => {class Mouse extends React.Component {... 省略鼠標位置狀態 和 操作鼠標位置的方法邏輯}// 給高階組件設置名稱,將來在 react-dev-tools 工具中,能夠區分到底是哪一個高階組件包裝的組件function getDisplayName(WrappedComponent) {                          # +return WrappedComponent.displayName || WrappedComponent.name }Mouse.displayName = getDisplayName(WrappedComponent)                 # +// 如果還想體現出來是高階組價,就加個前綴Mouse.displayName = `WithMouse_${getDisplayName(WrappedComponent)}`  # +return Mouse
}
- 補充:
- 先獲取被包裝組件的 displayName ,如果沒有就獲取它的名字,如果再沒有來個默認的最起碼不會報錯或者返回undefined
- WrappedComponent.displayName || WrappedComponent.name
給高階組件傳遞屬性 (我們自己封裝高階組件)
- 問題 : 如果給 高級組件傳屬性, 發現會丟失,
- 原因 : 高級組件內部給創建的Mouse組件內沒有賦值屬性. 即 高階組件沒有往下傳遞 Props
- 解決辦法 : 渲染 WrappedComponent時, 將 state 和 this.props 一起傳遞給 Mouse組件
- 傳遞方法
// 如果多加了屬性
<HocPosition name='jack'/>// 高階組價內部 :
const withMouse = (WrappedComponent) => {class Mouse extends React.Component {... 省略鼠標位置狀態 和 操作鼠標位置的方法邏輯render() { // 之前這里只傳遞給包裝組件 state ,并沒有傳遞propsreturn <WrappedComponent {...this.state}  {...this.props}  />    # ++++}}return Mouse
}// 使用
const Position = props => {// 通過 props 就可以獲取到傳遞給高階組件的屬性了// ... 省略其他代碼
}
setState() 的說明
異步更新數據
- setState() 是異步更新數據的
- 為什么是異步的 ?
- 因為 setState() 可能同時被調用多次,如果是同步的話,狀態就會更新多次,
- 也就是頁面要發生多次渲染,也就是發生多次重繪和重排,這樣的話,會降低應用的性能。
state = { count: 0
}  console.log('前 :',this.state.count) // 0
this.setState({count: this.state.count + 1
})// for (var i = 0; i < 1000; i++) {//   this.setState({//     count: i//   })// }
console.log('后 :',this.state.count) // 0
setState 的第一種格式 : setState(stateChange, [callback])
-
格式 : setState( 對象, 回調 )
-
[官] : callback 它將在
setState完成合并并重新渲染組件后執行。 -
通常,我們建議使用
componentDidUpdate()來代替此方式。
this.setState({count : this,state.count + 1
},() => {console.log('這個回調函數會在狀態更新后立即執行',this.state.count)
})
演示問題
- 代碼
console.log('前', this.state.count) // 0
// 異步更新
this.setState({count: this.state.count + 1  // 以為是 1
})
// 異步更新  + 獲取 結果
this.setState({count: this.state.count + 1 // 以為是 2},() => {console.log(this.state.count) // 以為是 2 但是結果是1}
)
// 兩次更新 發現結果還都是 1 ,
- 分析
# [官] 這種形式的 setState() 也是異步的,并且在同一周期內會對多個 setState 進行批處理。
# [官] 后調用的 setState() 將覆蓋同一周期內先調用 setState 的值,因此商品數僅增加一次。
let newObj = Object.assign({}, obj, { age: 20 }, { age: 30 })# [官] 如果后續狀態取決于當前狀態,我們建議使用 updater 函數的形式代替:
setState 的第二種格式 : setState(updater, [callback])
- 格式 : setState(函數式, 回調)
- 函數式 : 函數里面返回一個對象
 // 異步更新
// 這個為什么就可以了, 因為是通過參數獲取的, 是 React 控制 的,,返回的就是上次更新的
this.setState((state, props) => {return {count: state.count + 1  // 拿到最新的 0 + 1 = 1}
})
// 異步更新  + 獲取 結果
// 這個為什么就可以了, 因為是通過參數獲取的, 是 React 控制 的,,返回的就是上次更新的
this.setState((state, props) => {return {count: state.count + 1 //拿到最新的1 + 1 = 2}},() => {console.log(this.state.count) // 結果是2}
)
- 簡寫
// 也可以簡寫
this.setState((state) => ({count: state.count + 1  // 以為是 1}))
總結
// 第一種格式 :  setState(stateChnage, [callback])  ★setSrare(對象, 回調)// 第二種格式 :setState(updater, [callback])  ★setSrare(函數式, 回調)// 最常用的還是 第一種格式的簡化操作  setState(stateChange)   ★★★
this.setState({count : this.state.count + 1
})
{
return {
count: state.count + 1 // 拿到最新的 0 + 1 = 1
}
})
// 異步更新 + 獲取 結果
// 這個為什么就可以了, 因為是通過參數獲取的, 是 React 控制 的,返回的就是上次更新的
this.setState(
(state, props) => {
return {
count: state.count + 1 //拿到最新的1 + 1 = 2
}
},
() => {
console.log(this.state.count) // 結果是2
}
)
- 簡寫```js
// 也可以簡寫
this.setState((state) => ({count: state.count + 1  // 以為是 1}))
總結
// 第一種格式 :  setState(stateChnage, [callback])  ★setSrare(對象, 回調)// 第二種格式 :setState(updater, [callback])  ★setSrare(函數式, 回調)// 最常用的還是 第一種格式的簡化操作  setState(stateChange)   ★★★
this.setState({count : this.state.count + 1
})


)


常見筆試面試題)


)
