文章目錄?
- 環境
- 前言
- 項目復現
- 特征提取
- 工程下載
- 參考資料
環境
- ubuntu 18.04 64位
- yolov5
- deepsort
- fastreid
前言
基于YOLOv5和DeepSort的目標跟蹤 介紹過針對行人的檢測與跟蹤。本文介紹另一個項目,結合 FastReid 來實現行人的檢測、跟蹤和重識別。作者給出的2個主要實例,也是非常的實用,包括行人流量的統計、人群中特定目標的查找與跟蹤。
項目復現
首先,創建個全新的虛擬環境
conda create -n pytorch1.6 python=3.7
conda activate pytorch1.6
然后安裝下其它的依賴包
# 如果沒有gpu的話,就按照requirements.txt安裝即可
pip install torch==1.6.0+cu101 torchvision==0.7.0+cu101 -f https://download.pytorch.org/whl/torch_stable.html
# 編輯requirements.txt,注釋掉torch和torchvision
pip install -r requirements.txt
# 使用cython加速
pip install cython
cd fast_reid/fastreid/evaluation/rank_cylib
make all
cd ../../../../先來跑個行人計數的demo
python person_count.py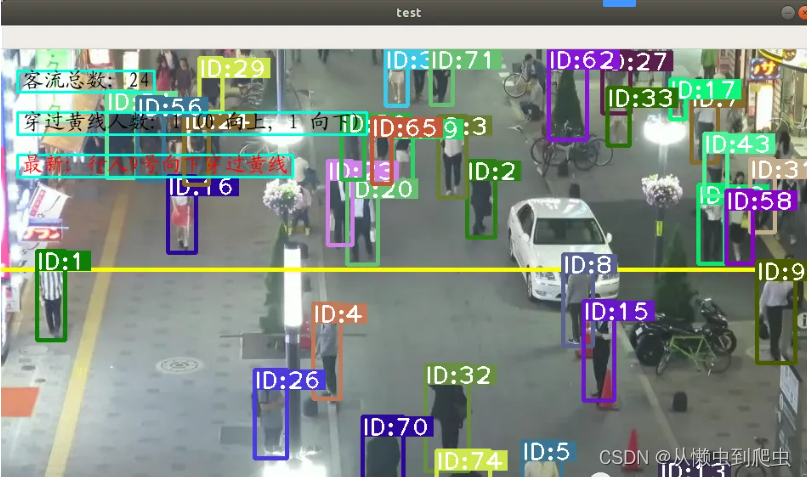
如果你在運行過程中出現下面的錯誤
2021-07-13 14:22:20 [INFO]: Loading weights from ./deep_sort/deep/checkpoint/ckpt.t7... Done!
Traceback (most recent call last):File "person_count.py", line 244, in <module>yolo_reid.deep_sort()File "person_count.py", line 121, in deep_sortbbox_xywh, cls_conf, cls_ids, xy = self.person_detect.detect(video_path, img, ori_img, vid_cap)File "/home/xugaoxiang/Works/Yolov5-Deepsort-Fastreid/person_detect_yolov5.py", line 95, in detectpred = self.model(img, augment=self.augment)[0]File "/home/xugaoxiang/anaconda3/envs/pytorch1.6/lib/python3.7/site-packages/torch/nn/modules/module.py", line 722, in _call_implresult = self.forward(*input, **kwargs)File "/home/xugaoxiang/Works/Yolov5-Deepsort-Fastreid/models/yolo.py", line 111, in forwardreturn self.forward_once(x, profile) # single-scale inference, trainFile "/home/xugaoxiang/Works/Yolov5-Deepsort-Fastreid/models/yolo.py", line 131, in forward_oncex = m(x) # run這個就是模型的問題,建議使用源碼中自帶的?shell?腳本進行下載
sh weights/download_weights.sh另外,依賴模塊?apex,不可以通過?pip install apex?來安裝,否則會報錯

?如果安裝的?pyyaml?版本較高的話,會出現下面的錯誤

只需要將?utils/parses.py?中的
self.update(yaml.load(fo.read()))改為
self.update(yaml.safe_load(fo.read()))我們來看看這個行人流量統計的基本原理:
首先,作者將?yolov5?的目標檢測封裝成了一個類?Person_detect,通過它的?detect?方法可以檢測到視頻中的每一個行人目標
然后,在畫面中設定一條基準線,給定線條兩端的坐標即可
line = [(0, int(0.48 * ori_img.shape[0])), (int(ori_img.shape[1]), int(0.48 * ori_img.shape[0]))]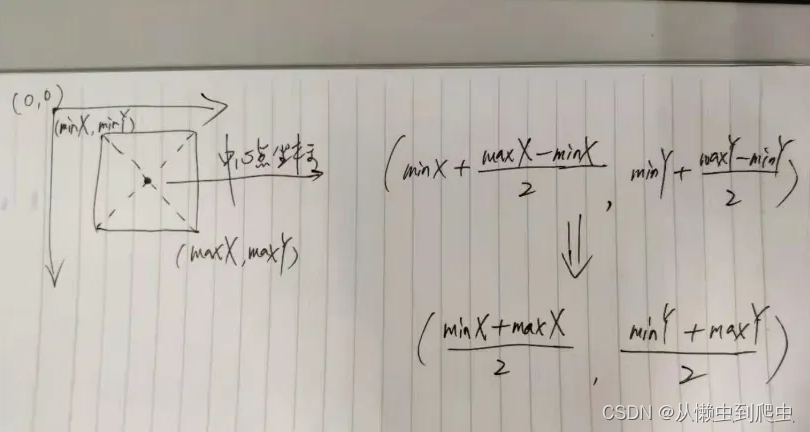
cv2.line(ori_img, line[0], line[1], (0, 255, 255), 4)接著,創建跟蹤器,開始對?yolov5?檢測出的每一個目標進行跟蹤。這里以目標預測框的中心點為基準,下圖是它的計算方法
如果前后幀的中心點所連成的直線和預先設定的基準線相交,則判定為越線,但是這里還有個方向的問題,向上還是向下?來看另一張圖

作者利用了三角形的正切與反正切原理,使用?math?模塊中的?degrees?方法來判斷,如果這個角度?>0,說明是向上走,反之則為向下走
def vector_angle(midpoint, previous_midpoint):x = midpoint[0] - previous_midpoint[0]y = midpoint[1] - previous_midpoint[1]return math.degrees(math.atan2(y, x))看完行人計數的示例,我們再來看看特定目標的重識別示例
python person_search_reid.py報錯了
Fusing layers...
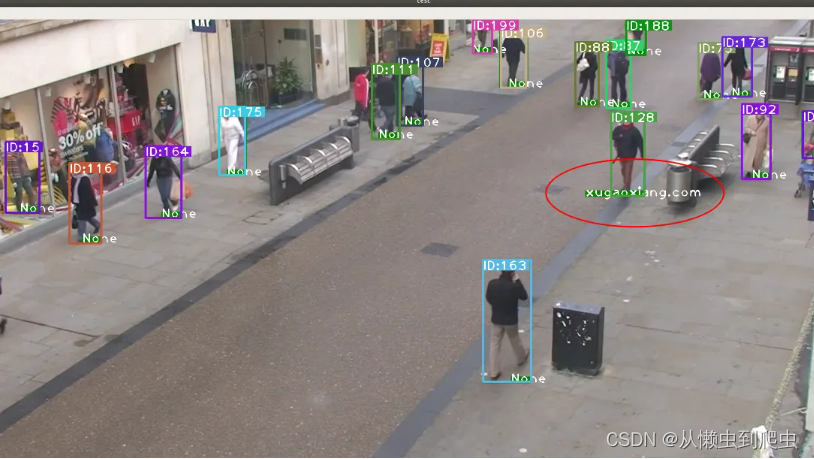
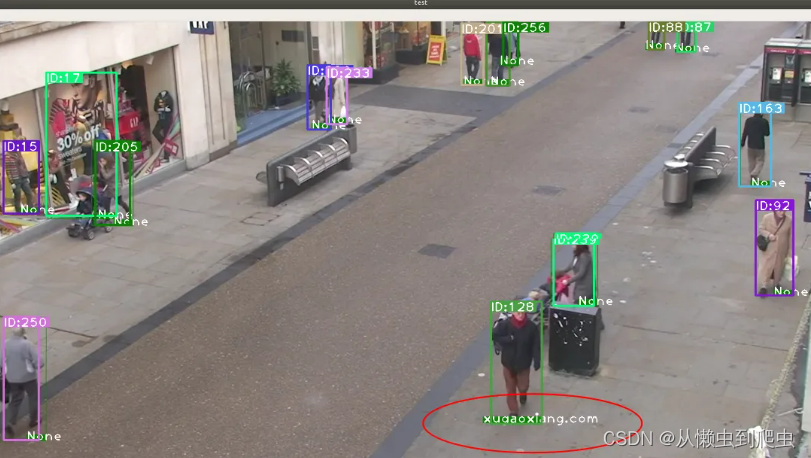
Traceback (most recent call last):File "person_search_reid.py", line 120, in <module>yolo_reid = yolo_reid(cfg, args, path=args.video_path)File "person_search_reid.py", line 35, in __init__self.deepsort = build_tracker(cfg, args.sort, use_cuda=use_cuda)File "/home/xugaoxiang/Works/Yolov5-Deepsort-Fastreid/deep_sort/__init__.py", line 18, in build_trackermax_age=cfg.DEEPSORT.MAX_AGE, n_init=cfg.DEEPSORT.N_INIT, nn_budget=cfg.DEEPSORT.NN_BUDGET, use_cuda=use_cuda)File "/home/xugaoxiang/Works/Yolov5-Deepsort-Fastreid/deep_sort/deep_reid.py", line 29, in __init__self.extractor = Reid_feature()File "./fast_reid/demo/demo.py", line 84, in __init__cfg = setup_cfg(args)File "./fast_reid/demo/demo.py", line 35, in setup_cfgcfg.merge_from_file(args.config_file)File "./fast_reid/fastreid/config/config.py", line 107, in merge_from_filecfg_filename, allow_unsafe=allow_unsafeFile "./fast_reid/fastreid/config/config.py", line 50, in load_yaml_with_basewith PathManager.open(filename, "r") as f:File "./fast_reid/fastreid/utils/file_io.py", line 357, in openpath, mode, buffering=buffering, **kwargsFile "./fast_reid/fastreid/utils/file_io.py", line 251, in _open然后再次運行腳本?person_search_reid.py,可以得到
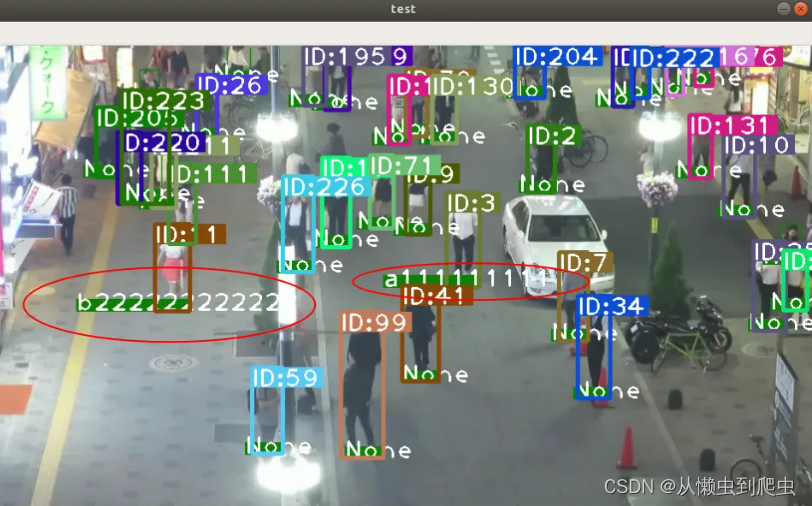
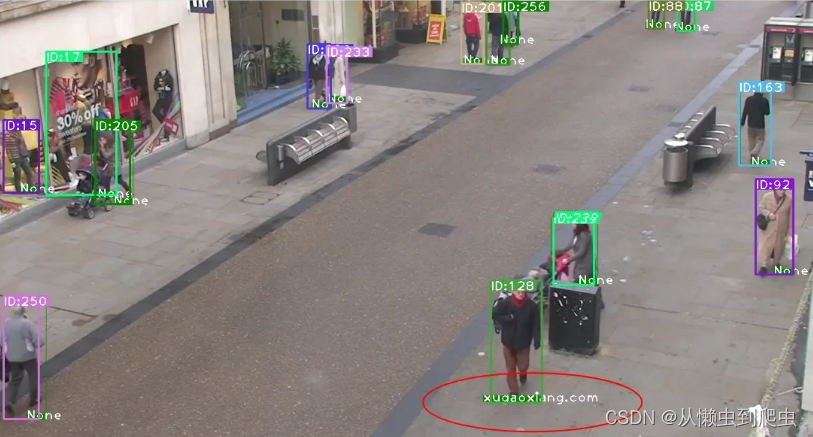
可以看到,由于事先已經提了2位行人(?a1111111111?和?b222222222222?)的特征,所以,畫面中能夠識別出這2個人并進行跟蹤。默認,特征文件保存在?fast_reid/query?下
如果你也想要制作一個特征文件,可以按照下面的步驟進行
特征提取
首先,需要截取目標人物的圖片,存放在某個以特定目標命名的文件夾下,如我這里的?xugaoxiang.com,這樣,后面進行識別的時候,就顯示?xugaoxiang.com?這個名字了。把這個文件夾拷貝到?fast_reid/query?目錄下,目錄結構如下
(pytorch1.6) xugaoxiang@1070Ti:~/Works/Yolov5-Deepsort-Fastreid/fast_reid/query$ tree
.
├── names.npy
├── query_features.npy
└── xugaoxiang.com├── 10.png├── 11.png├── 12.png├── 13.png├── 14.png├── 15.png├── 1.png├── 2.png├── 3.png├── 4.png├── 5.png├── 6.png├── 7.png├── 8.png└── 9.png
接下來執行
cd fast_reid/demo
python person_bank.py執行完畢后,query?目錄下的?query_features.npy?和?names.npy?就被更新了
最后,找個包含目標的視頻測試下效果
QQ767172261?


)


)


