繼續跟著@老陳打碼學習!!!支持!!!??
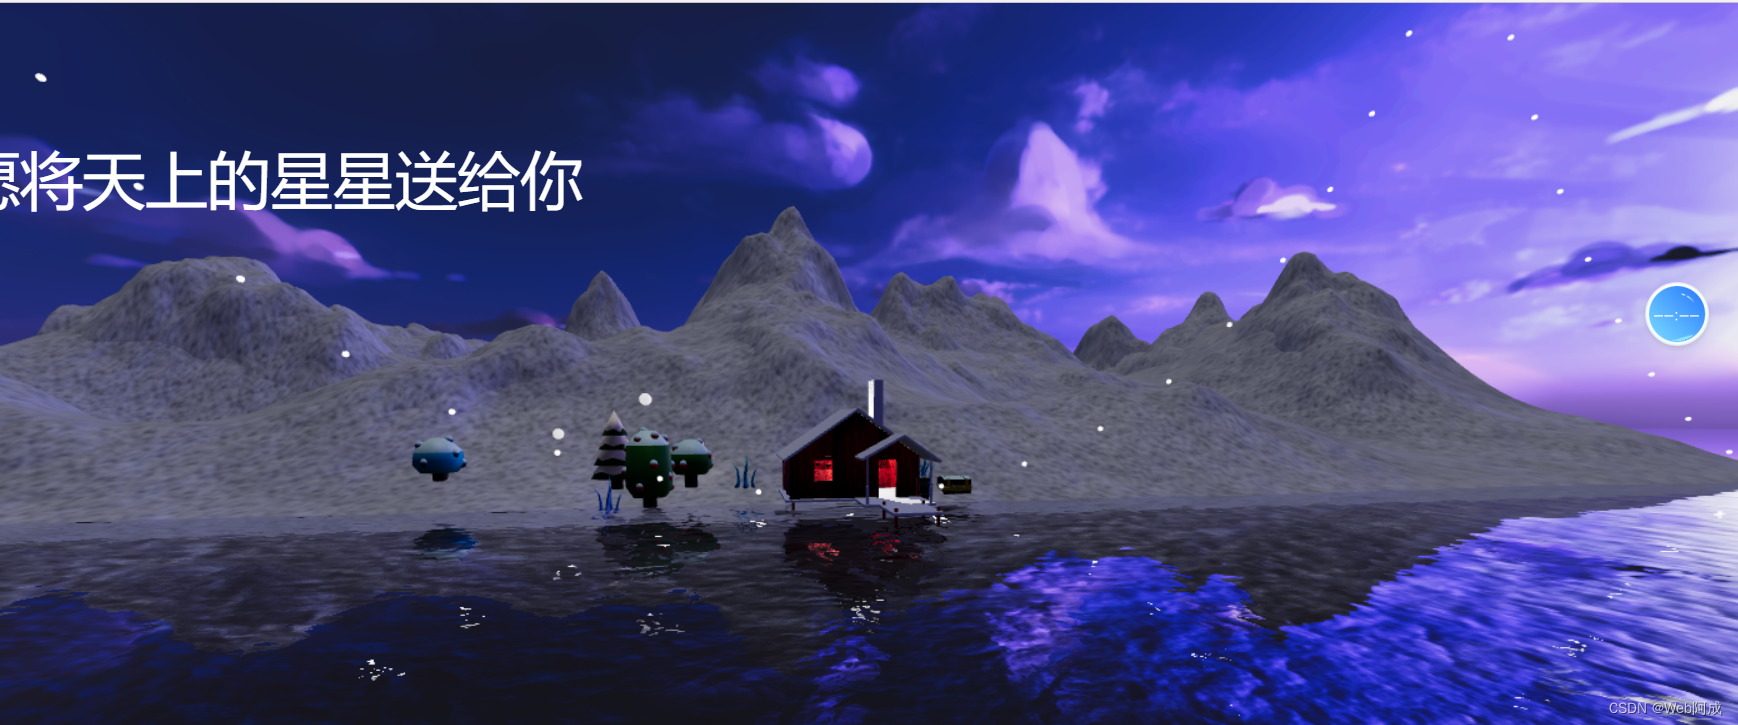
效果圖
鏈接:https://pan.baidu.com/s/1Ft8U2HTeqmpyAeesL31iUg?
提取碼:6666?
使用到的 模型文件和資源等都為@老陳打碼提供!!!!!!!!!!!
如何做出這樣的一個效果呢?
1.構建項目文件
這里使用了vue3+vite的寫法。代碼是腳手架直接生成的,安裝一個gsap和three就行了
{"name": "threejs-vue","version": "0.0.0","private": true,"scripts": {"dev": "vite","build": "vite build","preview": "vite preview"},"dependencies": {"gsap": "^3.12.2","three": "^0.158.0","vue": "^3.3.4"},"devDependencies": {"@vitejs/plugin-vue": "^4.4.0","vite": "^4.4.11"}
}
2.引入相關依賴
引入我們threejs項目相關的依賴,控制器啊,gltf加載器啊,還有解壓工具,補間動畫庫等。
import { ref } from "vue";
import * as THREE from "three";
import { OrbitControls } from "three/examples/jsm/controls/OrbitControls.js";
import { GLTFLoader } from "three/examples/jsm/loaders/GLTFLoader";
import { DRACOLoader } from "three/examples/jsm/loaders/DRACOLoader";
import { RGBELoader } from "three/examples/jsm/loaders/RGBELoader";
import { Water } from "three/examples/jsm/objects/Water2";
import gsap from "gsap/gsap-core";
3.初始化場景
threejs的第一步,初始化一個場景,創建相機,引入控制器等。其中相機的位置等參數都是實現測好的,所以直接就寫好了。
//初始化場景
const scene = new THREE.Scene();
//初始化相機
const camera = new THREE.PerspectiveCamera(75,window.innerWidth / window.innerHeight,0.1,1000
);
camera.position.set(-3.23, 2.98, 4.06);
camera.updateProjectionMatrix();
//初始化渲染器
const renderer = new THREE.WebGLRenderer({//設置抗鋸齒antialias: true,
});
renderer.setSize(window.innerWidth, window.innerHeight);
document.body.appendChild(renderer.domElement);//初始化控制器
const controls = new OrbitControls(camera, renderer.domElement);
controls.target.set(-8, 2, 0);
//
controls.enableDamping = true;// 渲染函數
function render() {requestAnimationFrame(render);renderer.render(scene, camera);controls.update();
}render();
4.添加模型
?1.初始化解壓模型
我們要用的模型文件是一個壓縮的文件,所以使用的時候,需要全局引用解壓模型。
//初始化解壓模型
const dracoLoader = new DRACOLoader();
dracoLoader.setDecoderPath("/public/draco/");
const gltfLoader = new GLTFLoader();
gltfLoader.setDRACOLoader(dracoLoader);
注意!!!! 這里面的("/public/draco/") draco后面必須要有這個/ 沒有的話會報錯。
?2.加載模型
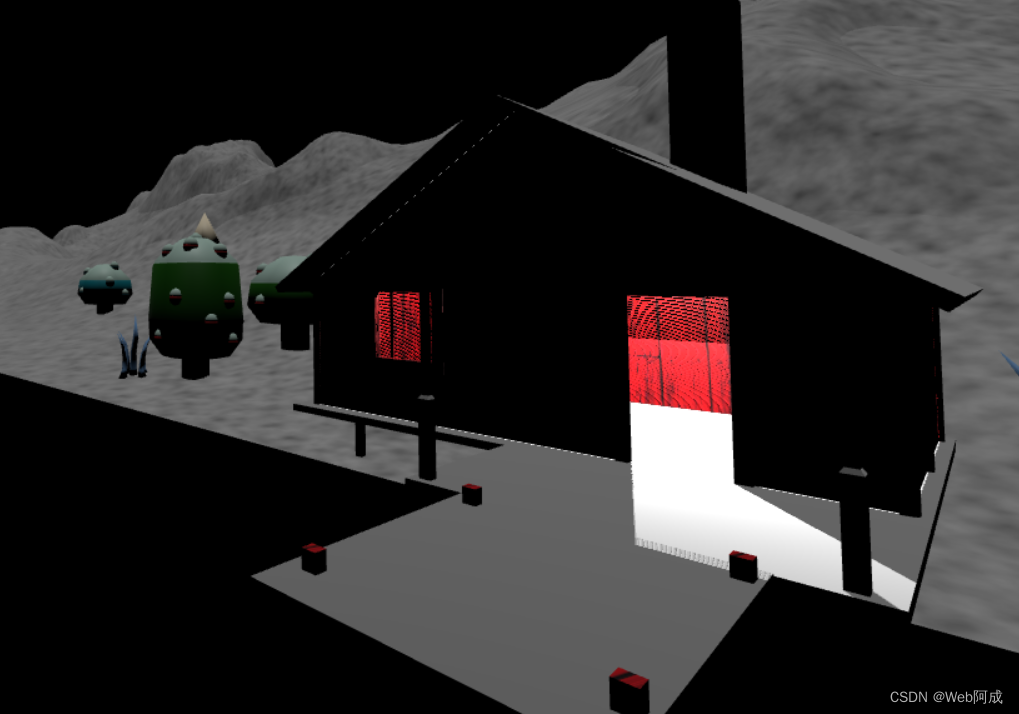
將我們的模型加載,但是這時候我們運行發現,仍然是一片漆黑,所以我們需要加入我們的光源。
//加載模型
gltfLoader.load("/public/model/scene.glb", (gltf) => {const model = gltf.scene;model.traverse((child) => {if (child.name == "Plane") {child.visible = false;}if (child.isMesh) {child.castShadow = true;child.receiveShadow = true;}});scene.add(model);
});
5.添加光源
//初始化光源
const light = new THREE.DirectionalLight(0xffffff, 1);
light.position.set(0, 50, 0);
scene.add(light);
添加光源以后,一個基本的效果就出現了。
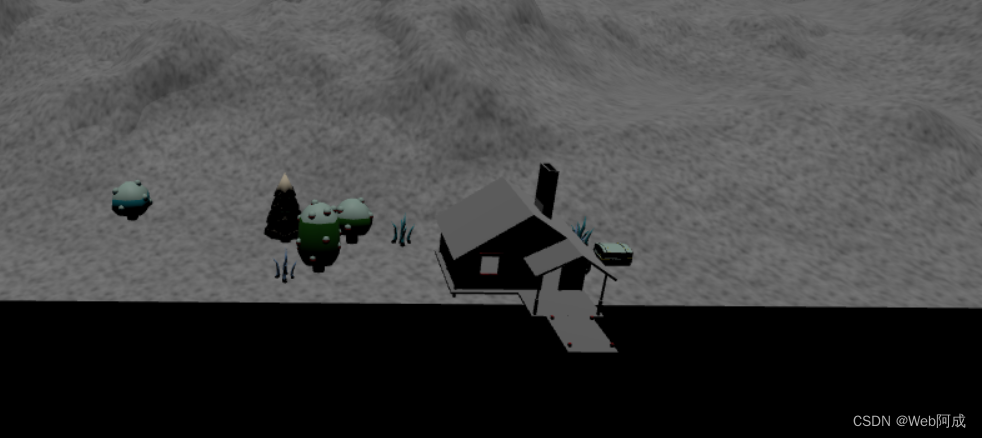
我們的效果圖里面,房間里是有燈光的,所以我們在房間里放入一個點光源,位置已經提前測好了,并且,房子的門口部分應該是要有陰影的,所以我們加入陰影。
//允許陰影
renderer.shadowMap.enabled = true;
// 設置物理的光照效果
renderer.physicallyCorrectLights = true;// 添加點光源
const pointLight = new THREE.PointLight(0xffffff, 100);
pointLight.position.set(0.1, 2.4, 0);
pointLight.castShadow = true;
scene.add(pointLight);
?
6.添加天空水面
1.創建水面
水面我們直接使用的threejs提供的水面效果,然后給他的position專門設置了一下,出現了這樣的效果。
//創建水面
const waterGeometry = new THREE.CircleGeometry(300, 32);
const water = new Water(waterGeometry, {textureWidth: 1024,textureHeight: 1024,color: 0xeeeeff,flowDirection: new THREE.Vector2(1, 1),scale: 100,
});
water.rotation.x = -Math.PI / 2;
water.position.y = -0.4;
scene.add(water);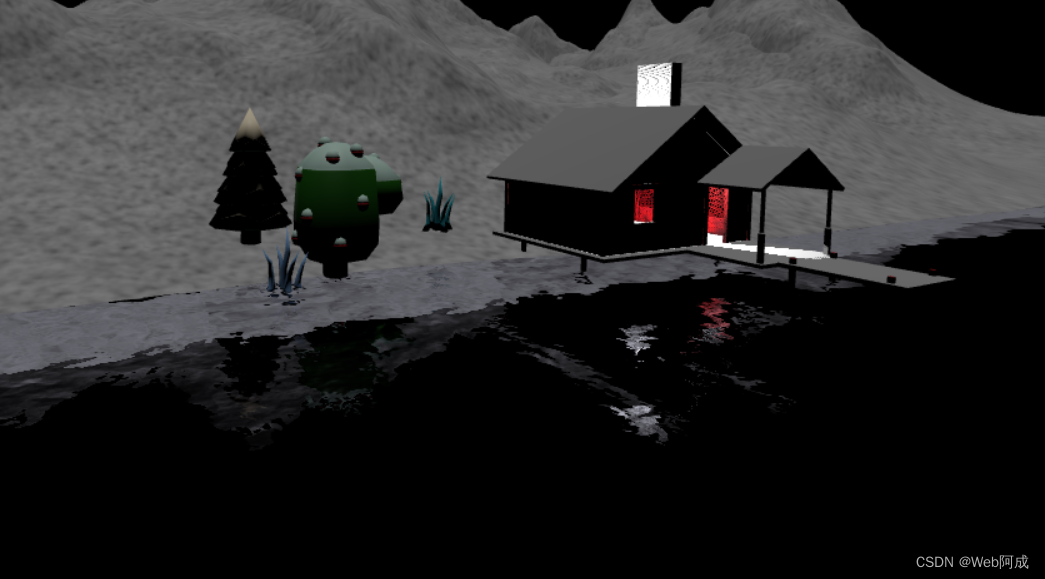
2.添加天空紋理
//加載環境紋理(天空、水面)
let rgbeLoader = new RGBELoader();
rgbeLoader.load("/public/textures/sky.hdr", (textures) => {//由于天空是一個全景圖,所以給他加一個球體的映射 讓他包裹住整個場景textures.mapping = THREE.EquirectangularReflectionMapping;scene.background = textures;scene.environment = textures;
});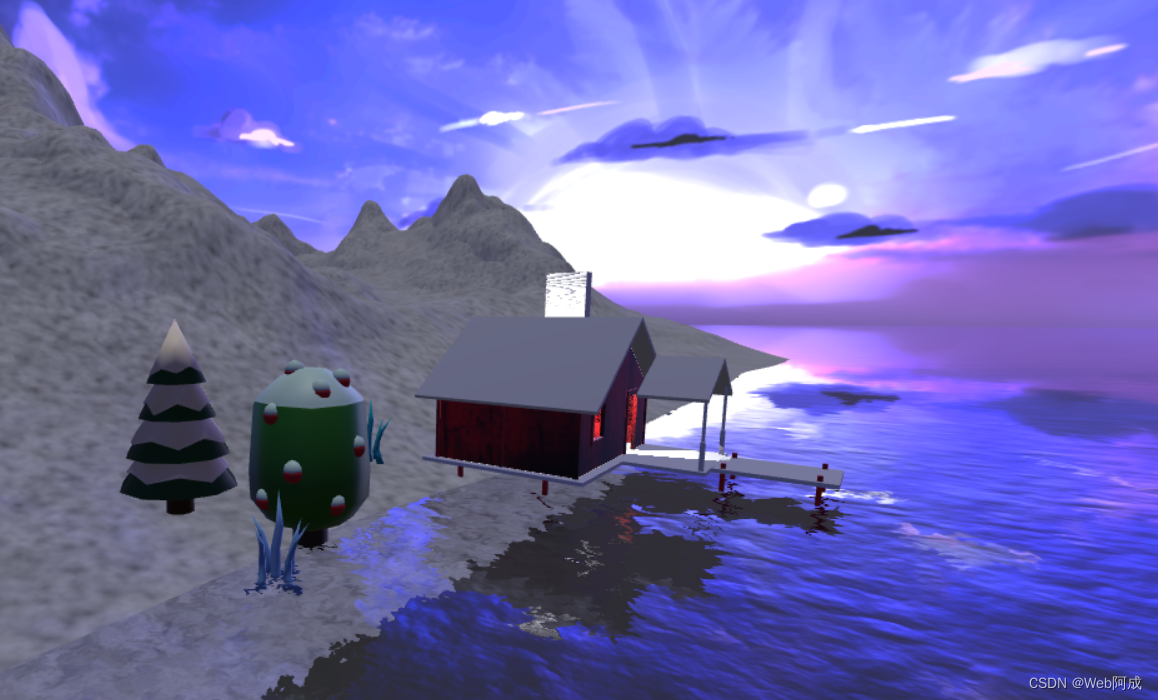 ?天空的感覺已經出現了,但是會發現這個天空給我們的感覺有點不一樣,我們需要調節一下色調。
3.調節色調映射?
// 設置色調映射
renderer.toneMapping = THREE.ACESFilmicToneMapping;
// 設置色調映射輸出
renderer.outputEncoding = THREE.sRGBEncoding;
// 設置色調映射曝光
renderer.toneMappingExposure = 0.75;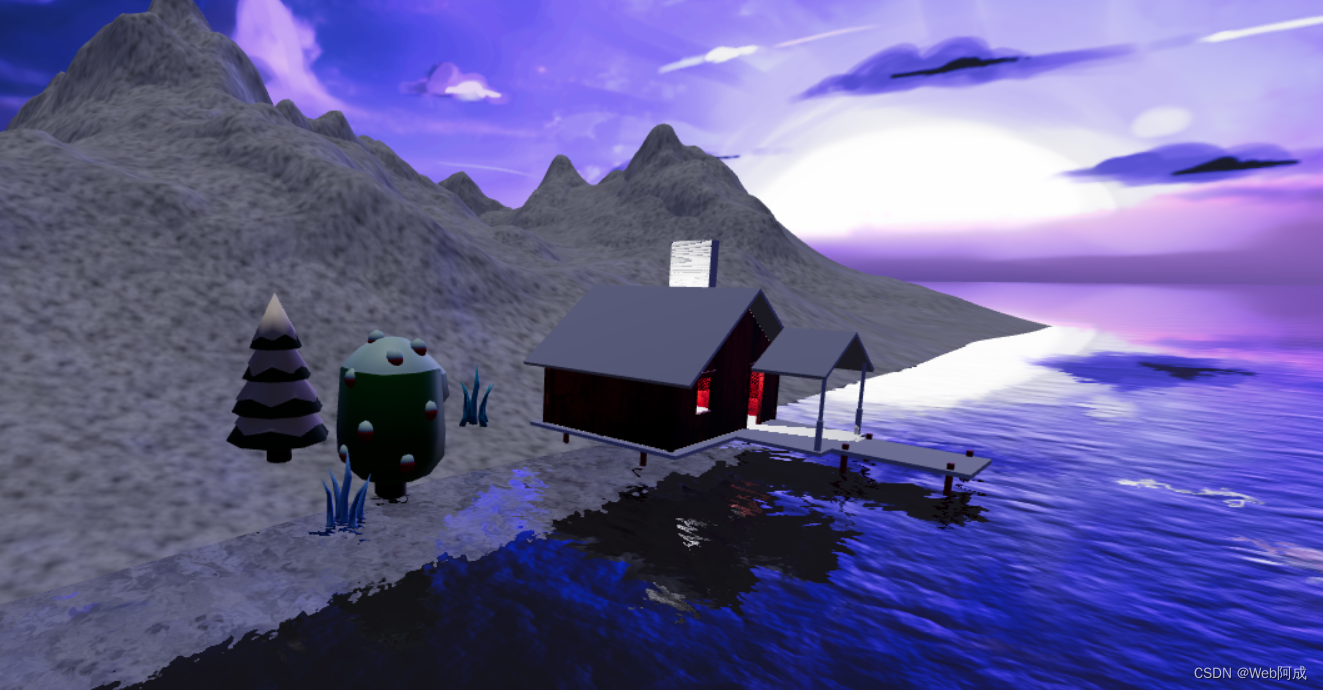
現在感覺就還好一些
7.小樹燈光
在我們的效果圖中,三棵小樹旁邊是有燈光在跳動的,所以我們開始做小樹燈的效果。
1.創建點光源組,循環做創建
我們使用for循環 循環構建小球,并且各自設置他們的位置,實現小球的效果。
const pointLightGroup = new THREE.Group();
pointLightGroup.position.set(-8, 2.5, -1.5);
let radius = 3;
let pointLightArr = [];for (let i = 0; i < 3; i++) {// 創建球體 當燈泡const sphereGeometry = new THREE.SphereGeometry(0.2, 32, 32);const sphereMaterial = new THREE.MeshStandardMaterial({color: 0xffffff,emissive: 0xffffff,emissiveIntensity: 1,});const sphere = new THREE.Mesh(sphereGeometry, sphereMaterial);pointLightArr.push(sphere);sphere.position.set(radius * Math.cos((i * 2 * Math.PI) / 3),Math.cos((i * 2 * Math.PI) / 3),radius * Math.sin((i * 2 * Math.PI) / 3));let pointLight = new THREE.PointLight(0xffffff, 1);sphere.add(pointLight);pointLightGroup.add(sphere);
}scene.add(pointLightGroup);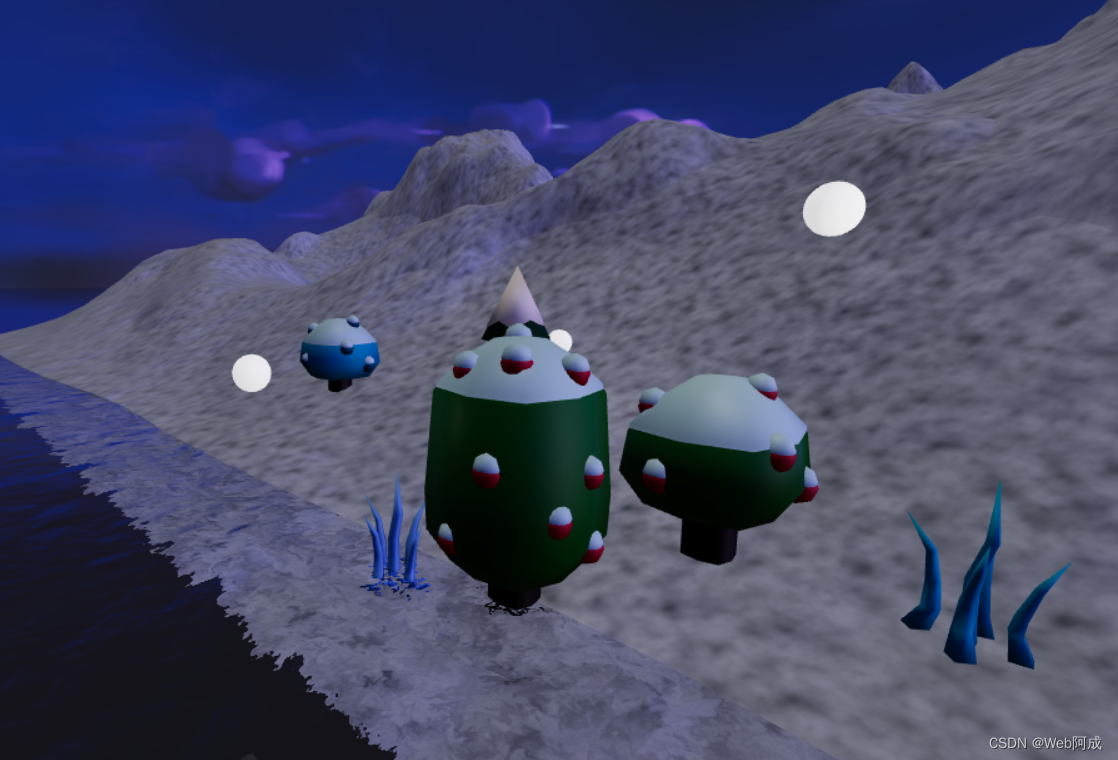
2.點光源組旋轉效果實現
效果圖中的點光源組是有旋轉的效果的,我們可以使用補間函數,結合數學公式進行點光源小球旋轉的實現。
// 使用補間函數 從0到2π 旋轉
let options = {angle: 0,
};
gsap.to(options, {//角度angle: Math.PI * 2,//周期duration: 10,repeat: -1,//線性ease: "linear",onUpdate: () => {pointLightGroup.rotation.y = options.angle;pointLightArr.forEach((item, index) => {item.position.set(radius * Math.cos((index * 2 * Math.PI) / 3),Math.cos((index * 2 * Math.PI) / 3 + options.angle * 5),radius * Math.sin((index * 2 * Math.PI) / 3));});},
});
8.滑輪滾動切換場景
在效果圖中,我們滾動滑輪的時候,場景就會隨之切換,相機的視角不是固定的,如何做到呢?
1.定義補間動畫移動相機函數
我們需要定義一個函數,用來移動相機的位置,方便我們真聽到滾輪事件的時候觸發。我們使用補間動畫來完成。
// 使用補間動畫移動相機
let timeLine1 = new gsap.timeline();
let timeLine2 = new gsap.timeline();// 定義相機移動函數
function translateCamera(position, target) {// 通過補間函數移動相機timeLine1.to(camera.position, {x: position.x,y: position.y,z: position.z,duration: 1,ease: "power2.inout",});// 聚焦到哪一點timeLine2.to(controls.target, {x: target.x,y: target.y,z: target.z,duration: 1,ease: "power2.inout",});
}
2.制作場景文字和相機位置
我們使用一個scenes數組來制作我們的幾個不同的視角場景和文字。
// 鼠標滑輪切換效果
let scenes = [{text: "圣誕快樂",callback: () => {// 執行函數切換位置translateCamera(new THREE.Vector3(-3.23, 3, 4.06),new THREE.Vector3(-8, 2, 0));},},{text: "感謝在這么大的世界里遇到了你",callback: () => {// 執行函數切換位置translateCamera(new THREE.Vector3(7, 0, 23), new THREE.Vector3(0, 0, 0));},},{text: "愿與你探尋世界的每一個角落",callback: () => {// 執行函數切換位置translateCamera(new THREE.Vector3(10, 3, 0), new THREE.Vector3(5, 2, 0));},},{text: "愿將天上的星星送給你",callback: () => {// 執行函數切換位置translateCamera(new THREE.Vector3(7, 0, 23), new THREE.Vector3(0, 0, 0));//makeHeart();},},{text: "加油~",callback: () => {// 執行函數切換位置translateCamera(new THREE.Vector3(-20, 1.3, 6.6),new THREE.Vector3(5, 2, 0));},},
];
3.鼠標滾輪事件
我們需要一個index 來做場景的記錄,方便我們知道我們移動到了哪個場景,為了后面的判斷。并且我們還需要一個防抖函數,來控制切換場景。不能一直切換。做一個短暫的開關,來保證我們的視覺感受。
// 用來做場景的記錄
const index = ref(0);// 防抖函數
let isAnimte = false;// 偵聽鼠標滾輪事件
window.addEventListener("wheel",(e) => {if (isAnimte) return;isAnimte = true;// 判斷滾輪的方向if (e.deltaY > 0) {index.value++;if (index.value > scenes.length - 1) {index.value = 0;// restoreHeart();}}scenes[index.value].callback();setTimeout(() => {isAnimte = false;}, 1000);},false
);
9.祝福文字顯示
使用css樣式進行文字的顯示,用定位的方式將他固定在左邊,使用transform進行高度的移動,來看到想看的內容。
<template><divclass="scenes"style="position: fixed;left: 0;top: 0;z-index: 10;pointer-events: none;transition: all 1s;":style="{ transform: `translate3d(0,${-index * 100}vh,0)` }"><div v-for="item in scenes" style="width: 100vw; height: 100vh"><h1 style="padding: 100px 50px; font-size: 50px; color: #fff">{{ item.text }}</h1></div></div>
</template>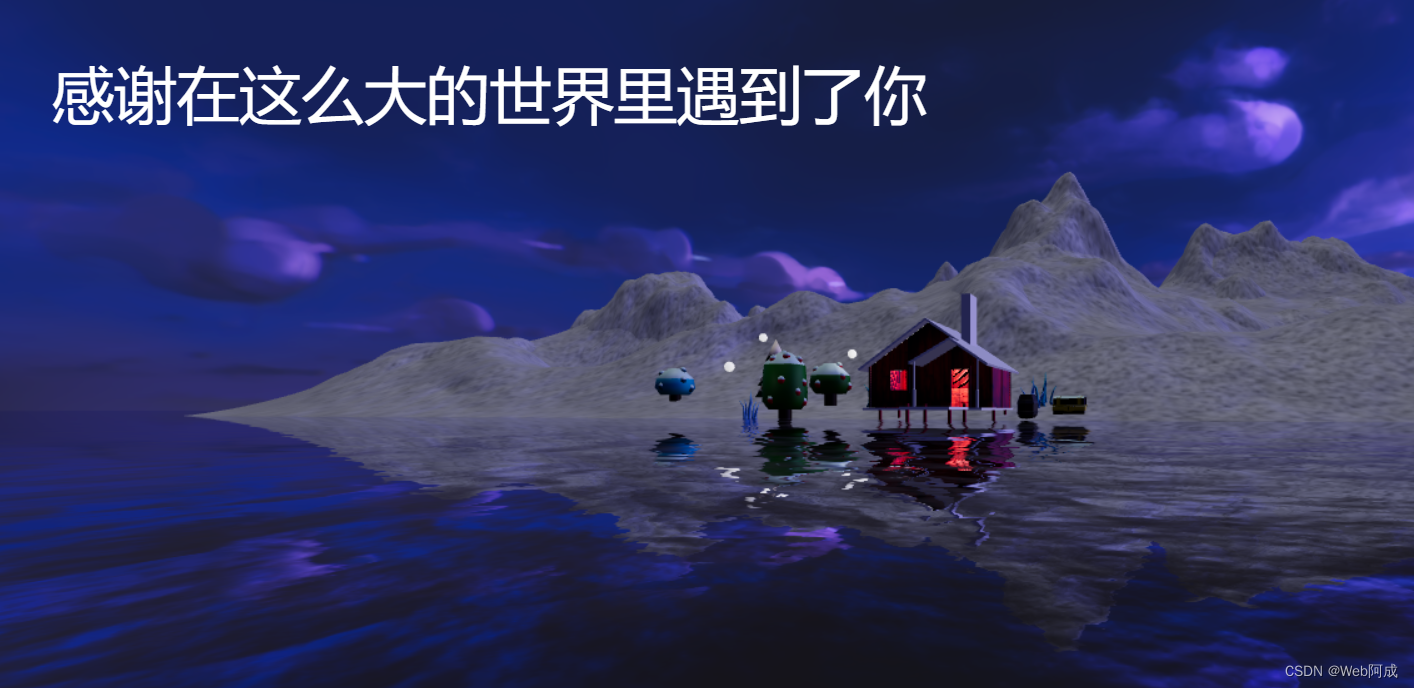
10.滿天星星
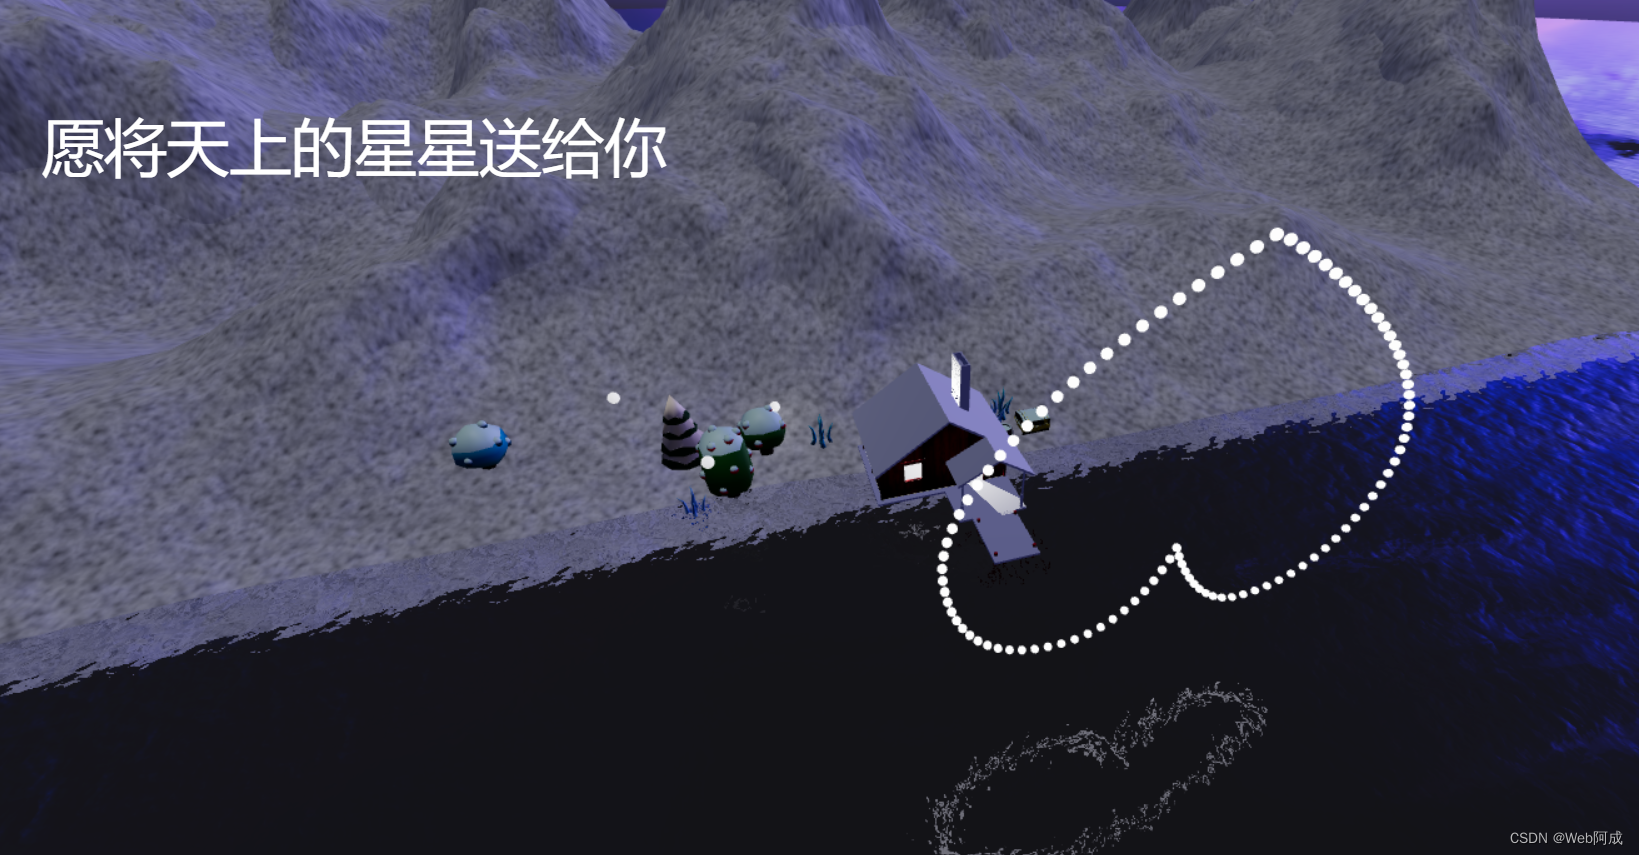
我們來做最后一個效果,滿天星星,并且在文字切換到星星送給你的時候,匯聚成一個心形
1.創建星星群體
// 實例化創建漫天星星
let starsInstance = new THREE.InstancedMesh(new THREE.SphereGeometry(0.1, 32, 32),new THREE.MeshStandardMaterial({color: 0xffffff,emissive: 0xffffff,emissiveIntensity: 10,}),100
);
2.隨機分布到天空中
// 隨機分布到天空
let startArr = [];
let endArr = [];
for (let i = 0; i < 100; i++) {let x = Math.random() * 100 - 50;let y = Math.random() * 100 - 50;let z = Math.random() * 100 - 50;startArr.push(new THREE.Vector3(x, y, z));// endArr.push(new THREE.Vector3(x, y, z));let matrix = new THREE.Matrix4();matrix.setPosition(x, y, z);// i第幾個 matrix矩陣starsInstance.setMatrixAt(i, matrix);
}
scene.add(starsInstance);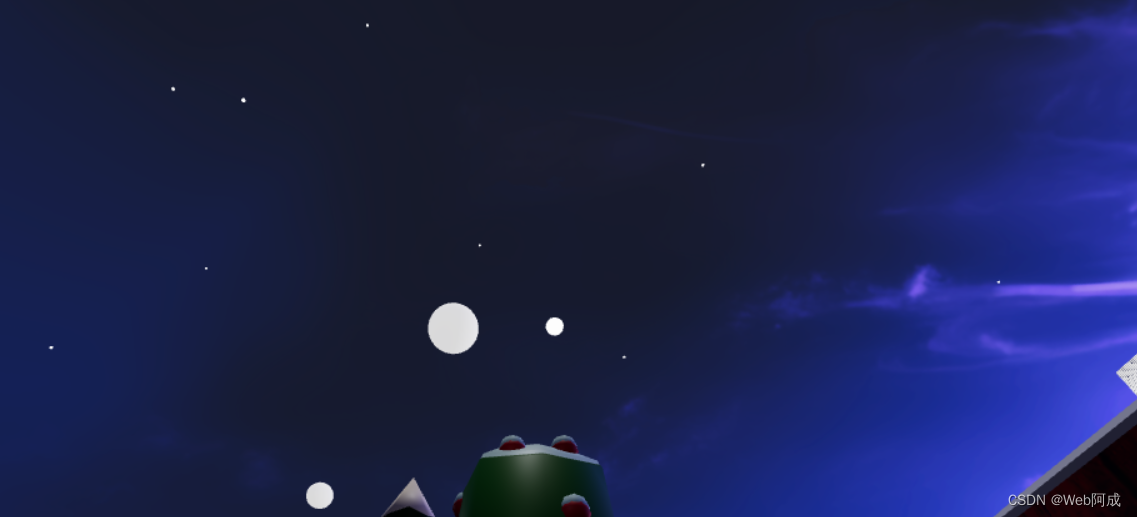
3.使用貝塞爾曲線構建一個心形
?至于這個代碼為什么最后變成的是心形,涉及到canvas的內容,即將跟著@老陳打碼學習。
// 創建愛心路徑 貝塞爾曲線創建
let heartShape = new THREE.Shape();
heartShape.moveTo(25, 25);
heartShape.bezierCurveTo(25, 25, 20, 0, 0, 0);
heartShape.bezierCurveTo(-30, 0, -30, 35, -30, 35);
heartShape.bezierCurveTo(-30, 55, -10, 77, 25, 95);
heartShape.bezierCurveTo(60, 77, 80, 55, 80, 35);
heartShape.bezierCurveTo(80, 35, 80, 0, 50, 0);
heartShape.bezierCurveTo(35, 0, 25, 25, 25, 25);
?4.設置點的坐標
for (let i = 0; i < 100; i++) {// threejs的方法let point = heartShape.getPoint(i / 100);endArr.push(new THREE.Vector3(point.x, point.y, point.z));
}
5.構建星星函數
// 創建愛心動畫
function makeHeart() {// 創建一個愛心let params = {time: 0,};gsap.to(params, {time: 1,duration: 1,onUpdate: () => {let time = params.time;for (let i = 0; i < 100; i++) {let x = startArr[i].x + (endArr[i].x - startArr[i].x) * time;let y = startArr[i].y + (endArr[i].y - startArr[i].y) * time;let z = startArr[i].z + (endArr[i].z - startArr[i].z) * time;let matrix = new THREE.Matrix4();matrix.setPosition(x, y, z);starsInstance.setMatrixAt(i, matrix);}starsInstance.instanceMatrix.needsUpdate = true;},});
}
?我們會發現效果上面,圖形很大,所以我們對其進行縮小處理
// 根據愛心路徑獲取點
// 設置中心
let center = new THREE.Vector3(0, 2, 10);
for (let i = 0; i < 100; i++) {let point = heartShape.getPoint(i / 100);endArr.push(new THREE.Vector3(point.x * 0.1 + center.x,point.y * 0.1 + center.y,center.z));
}
?6.重置心形函數
我們也需要在過去這個場景之后,將這個原型還原為之前的樣子。
function restoreHeart() {let params = {time: 0,};gsap.to(params, {time: 1,duration: 1,onUpdate: () => {let time = params.time;for (let i = 0; i < 100; i++) {let x = endArr[i].x + (startArr[i].x - endArr[i].x) * time;let y = endArr[i].y + (startArr[i].y - endArr[i].y) * time;let z = endArr[i].z + (startArr[i].z - endArr[i].z) * time;let matrix = new THREE.Matrix4();matrix.setPosition(x, y, z);starsInstance.setMatrixAt(i, matrix);}starsInstance.instanceMatrix.needsUpdate = true;},});
}
我們要在偵聽函數中,當index == 0 的時候 調用這個
// 偵聽鼠標滾輪事件
window.addEventListener("wheel",(e) => {if (isAnimte) return;isAnimte = true;// 判斷滾輪的方向if (e.deltaY > 0) {index.value++;if (index.value > scenes.length - 1) {index.value = 0;restoreHeart();}}scenes[index.value].callback();setTimeout(() => {isAnimte = false;}, 1000);},false
);
我們的作品基本上就完成了。

全部代碼
App.vue
<template><divclass="scenes"style="position: fixed;left: 0;top: 0;z-index: 10;pointer-events: none;transition: all 1s;":style="{ transform: `translate3d(0,${-index * 100}vh,0)` }"><div v-for="item in scenes" style="width: 100vw; height: 100vh"><h1 style="padding: 100px 50px; font-size: 50px; color: #fff">{{ item.text }}</h1></div> </div>
</template><script setup>
import { ref } from "vue";
import * as THREE from "three";
import { OrbitControls } from "three/examples/jsm/controls/OrbitControls.js";
import { GLTFLoader } from "three/examples/jsm/loaders/GLTFLoader";
import { DRACOLoader } from "three/examples/jsm/loaders/DRACOLoader";
import { RGBELoader } from "three/examples/jsm/loaders/RGBELoader";
import { Water } from "three/examples/jsm/objects/Water2";
import gsap from "gsap/gsap-core";//初始化場景
const scene = new THREE.Scene();
//初始化相機
const camera = new THREE.PerspectiveCamera(75,window.innerWidth / window.innerHeight,0.1,1000
);
camera.position.set(-3.23, 2.98, 4.06);
camera.updateProjectionMatrix();
//初始化渲染器
const renderer = new THREE.WebGLRenderer({//設置抗鋸齒antialias: true,
});
renderer.setSize(window.innerWidth, window.innerHeight);
document.body.appendChild(renderer.domElement);// 設置色調映射
renderer.toneMapping = THREE.ACESFilmicToneMapping;
// 設置色調映射輸出
renderer.outputEncoding = THREE.sRGBEncoding;
// 設置色調映射曝光
renderer.toneMappingExposure = 0.75;
//允許陰影
renderer.shadowMap.enabled = true;
// 設置物理的光照效果
renderer.physicallyCorrectLights = true;//初始化控制器
const controls = new OrbitControls(camera, renderer.domElement);
controls.target.set(-8, 2, 0);
//
controls.enableDamping = true;//初始化解壓模型
const dracoLoader = new DRACOLoader();
dracoLoader.setDecoderPath("/public/draco/");
const gltfLoader = new GLTFLoader();
gltfLoader.setDRACOLoader(dracoLoader);//加載環境紋理(天空、水面)
let rgbeLoader = new RGBELoader();
rgbeLoader.load("/public/textures/sky.hdr", (textures) => {//由于天空是一個全景圖,所以給他加一個球體的映射 讓他包裹住整個場景textures.mapping = THREE.EquirectangularReflectionMapping;scene.background = textures;scene.environment = textures;
});//加載模型
gltfLoader.load("/public/model/scene.glb", (gltf) => {const model = gltf.scene;model.traverse((child) => {if (child.name == "Plane") {child.visible = false;}if (child.isMesh) {child.castShadow = true;child.receiveShadow = true;}});scene.add(model);
});//創建水面
const waterGeometry = new THREE.CircleGeometry(300, 32);
const water = new Water(waterGeometry, {textureWidth: 1024,textureHeight: 1024,color: 0xeeeeff,flowDirection: new THREE.Vector2(1, 1),scale: 100,
});
water.rotation.x = -Math.PI / 2;
water.position.y = -0.4;
scene.add(water);//初始化光源
const light = new THREE.DirectionalLight(0xffffff, 1);
light.position.set(0, 50, 0);
scene.add(light);// 添加點光源
const pointLight = new THREE.PointLight(0xffffff, 100);
pointLight.position.set(0.1, 2.4, 0);
pointLight.castShadow = true;
scene.add(pointLight);// 創建點光源組
const pointLightGroup = new THREE.Group();
pointLightGroup.position.set(-8, 2.5, -1.5);
let radius = 3;
let pointLightArr = [];for (let i = 0; i < 3; i++) {// 創建球體 當燈泡const sphereGeometry = new THREE.SphereGeometry(0.2, 32, 32);const sphereMaterial = new THREE.MeshStandardMaterial({color: 0xffffff,emissive: 0xffffff,emissiveIntensity: 1,});const sphere = new THREE.Mesh(sphereGeometry, sphereMaterial);pointLightArr.push(sphere);sphere.position.set(radius * Math.cos((i * 2 * Math.PI) / 3),Math.cos((i * 2 * Math.PI) / 3),radius * Math.sin((i * 2 * Math.PI) / 3));let pointLight = new THREE.PointLight(0xffffff, 1);sphere.add(pointLight);pointLightGroup.add(sphere);
}
// 使用補間函數 從0到2π 旋轉
let options = {angle: 0,
};
gsap.to(options, {//角度angle: Math.PI * 2,//周期duration: 10,repeat: -1,//線性ease: "linear",onUpdate: () => {pointLightGroup.rotation.y = options.angle;pointLightArr.forEach((item, index) => {item.position.set(radius * Math.cos((index * 2 * Math.PI) / 3),Math.cos((index * 2 * Math.PI) / 3 + options.angle * 5),radius * Math.sin((index * 2 * Math.PI) / 3));});},
});scene.add(pointLightGroup);
// 渲染函數
function render() {requestAnimationFrame(render);renderer.render(scene, camera);controls.update();
}render();// 使用補間動畫移動相機
let timeLine1 = new gsap.timeline();
let timeLine2 = new gsap.timeline();// 定義相機移動函數
function translateCamera(position, target) {// 通過補間函數移動相機timeLine1.to(camera.position, {x: position.x,y: position.y,z: position.z,duration: 1,ease: "power2.inout",});// 聚焦到哪一點timeLine2.to(controls.target, {x: target.x,y: target.y,z: target.z,duration: 1,ease: "power2.inout",});
}// 鼠標滑輪切換效果
let scenes = [{text: "圣誕快樂",callback: () => {// 執行函數切換位置translateCamera(new THREE.Vector3(-3.23, 3, 4.06),new THREE.Vector3(-8, 2, 0));},},{text: "感謝在這么大的世界里遇到了你",callback: () => {// 執行函數切換位置translateCamera(new THREE.Vector3(7, 0, 23), new THREE.Vector3(0, 0, 0));},},{text: "愿與你探尋世界的每一個角落",callback: () => {// 執行函數切換位置translateCamera(new THREE.Vector3(10, 3, 0), new THREE.Vector3(5, 2, 0));},},{text: "愿將天上的星星送給你",callback: () => {// 執行函數切換位置translateCamera(new THREE.Vector3(7, 0, 23), new THREE.Vector3(0, 0, 0));makeHeart();},},{text: "加油~",callback: () => {// 執行函數切換位置translateCamera(new THREE.Vector3(-20, 1.3, 6.6),new THREE.Vector3(5, 2, 0));},},
];// 用來做場景的記錄
const index = ref(0);// 防抖函數
let isAnimte = false;// 偵聽鼠標滾輪事件
window.addEventListener("wheel",(e) => {if (isAnimte) return;isAnimte = true;// 判斷滾輪的方向if (e.deltaY > 0) {index.value++;if (index.value > scenes.length - 1) {index.value = 0;restoreHeart();}}scenes[index.value].callback();setTimeout(() => {isAnimte = false;}, 1000);},false
);// 實例化創建漫天星星
let starsInstance = new THREE.InstancedMesh(new THREE.SphereGeometry(0.1, 32, 32),new THREE.MeshStandardMaterial({color: 0xffffff,emissive: 0xffffff,emissiveIntensity: 10,}),100
);// 隨機分布到天空
let startArr = [];
let endArr = [];
for (let i = 0; i < 100; i++) {let x = Math.random() * 100 - 50;let y = Math.random() * 100 - 50;let z = Math.random() * 100 - 50;startArr.push(new THREE.Vector3(x, y, z));// endArr.push(new THREE.Vector3(x, y, z));let matrix = new THREE.Matrix4();matrix.setPosition(x, y, z);// i第幾個 matrix矩陣starsInstance.setMatrixAt(i, matrix);
}
scene.add(starsInstance);// 創建愛心路徑 貝塞爾曲線創建
let heartShape = new THREE.Shape();
heartShape.moveTo(25, 25);
heartShape.bezierCurveTo(25, 25, 20, 0, 0, 0);
heartShape.bezierCurveTo(-30, 0, -30, 35, -30, 35);
heartShape.bezierCurveTo(-30, 55, -10, 77, 25, 95);
heartShape.bezierCurveTo(60, 77, 80, 55, 80, 35);
heartShape.bezierCurveTo(80, 35, 80, 0, 50, 0);
heartShape.bezierCurveTo(35, 0, 25, 25, 25, 25);// 根據愛心路徑獲取點
// 設置中心
let center = new THREE.Vector3(0, 2, 10);
for (let i = 0; i < 100; i++) {let point = heartShape.getPoint(i / 100);endArr.push(new THREE.Vector3(point.x * 0.1 + center.x,point.y * 0.1 + center.y,center.z));
}for (let i = 0; i < 100; i++) {// threejs的方法let point = heartShape.getPoint(i / 100);endArr.push(new THREE.Vector3(point.x, point.y, point.z));
}// 創建愛心動畫
function makeHeart() {// 創建一個愛心let params = {time: 0,};gsap.to(params, {time: 1,duration: 1,onUpdate: () => {let time = params.time;for (let i = 0; i < 100; i++) {let x = startArr[i].x + (endArr[i].x - startArr[i].x) * time;let y = startArr[i].y + (endArr[i].y - startArr[i].y) * time;let z = startArr[i].z + (endArr[i].z - startArr[i].z) * time;let matrix = new THREE.Matrix4();matrix.setPosition(x, y, z);starsInstance.setMatrixAt(i, matrix);}starsInstance.instanceMatrix.needsUpdate = true;},});
}function restoreHeart() {let params = {time: 0,};gsap.to(params, {time: 1,duration: 1,onUpdate: () => {let time = params.time;for (let i = 0; i < 100; i++) {let x = endArr[i].x + (startArr[i].x - endArr[i].x) * time;let y = endArr[i].y + (startArr[i].y - endArr[i].y) * time;let z = endArr[i].z + (startArr[i].z - endArr[i].z) * time;let matrix = new THREE.Matrix4();matrix.setPosition(x, y, z);starsInstance.setMatrixAt(i, matrix);}starsInstance.instanceMatrix.needsUpdate = true;},});
}
</script><style>
* {margin: 0;padding: 0;
}
canvas {width: 100vw;height: 100vh;position: fixed;left: 0;top: 0;
}
</style>


)


