
?哈嘍~大家好,這篇來看看多級緩存。
?🥇個人主頁:個人主頁?????? ? ? ? ? ? ?
🥈?系列專欄:【微服務】? ? ? ?
🥉與這篇相關的文章:? ? ? ? ? ??
JAVA進程和線程 JAVA進程和線程-CSDN博客 HttpClient 入門使用示例 HttpClient 入門使用示例-CSDN博客 Spring Task 快速入門 Spring Task 快速入門-CSDN博客
目錄
一、前言
1、什么是多級緩存?
2、集群模式
3、前期準備
二、Caffeine
1、什么是Caffeine?
2、緩存使用的基本API
2.1、基于大小設置驅逐策略
2.2、基于時間設置驅逐策略
三、實現多級緩存
1、前期準備
2、反向代理流程
3、OpenResty監聽請求
4、代碼解析
4.1、獲取參數的API
4.2、查詢Tomcat
4.3、CJSON工具類
4.4、基于ID負載均衡
4.5、Redis緩存預熱
四、緩存同步
1、數據同步策略
2、監聽Canal
一、前言
1、什么是多級緩存?
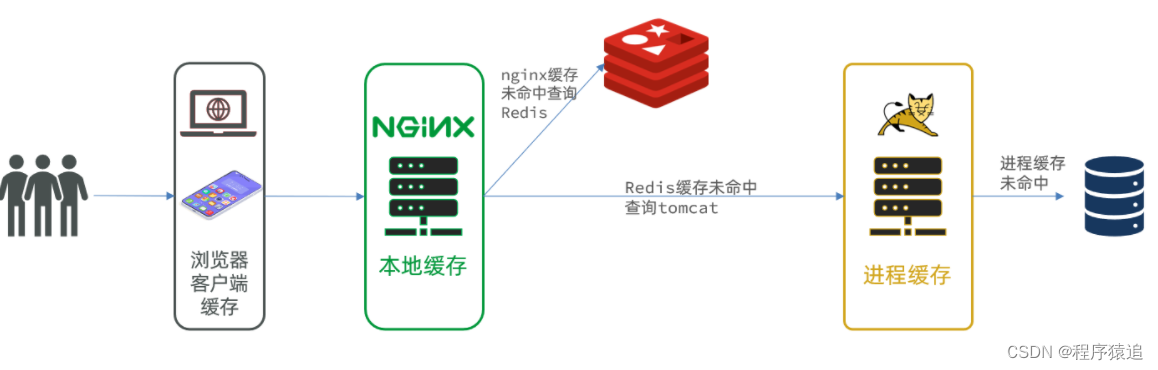
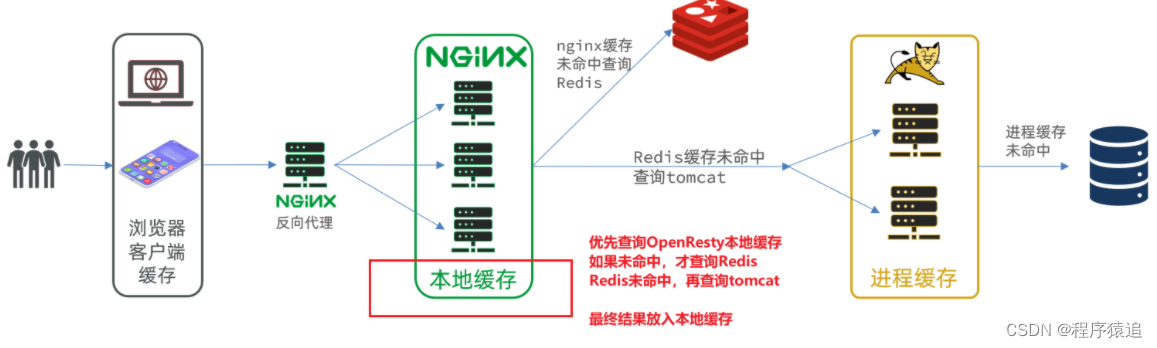
傳統的緩存策略一般是請求到達Tomcat后,先查詢Redis,如果未命中則查詢數據庫,這個是沒有問題的,但是這存在一些問題(請求要經過Tomcat處理,Tomcat的性能成為整個系統的瓶頸 ;Redis緩存失效時,大量的數據操作會對數據庫產生沖擊 )。
那么多級緩存就是充分利用請求處理的每個環節,分別添加緩存,減輕Tomcat壓力,提升服務性能。
-
瀏覽器訪問靜態資源時,優先讀取瀏覽器本地緩存
-
訪問非靜態資源(ajax查詢數據)時,訪問服務端
-
請求到達Nginx后,優先讀取Nginx本地緩存
-
如果Nginx本地緩存未命中,則去直接查詢Redis(不經過Tomcat)
-
如果Redis查詢未命中,則查詢Tomcat
-
請求進入Tomcat后,優先查詢JVM進程緩存
-
如果JVM進程緩存未命中,則查詢數據庫
 ?
?
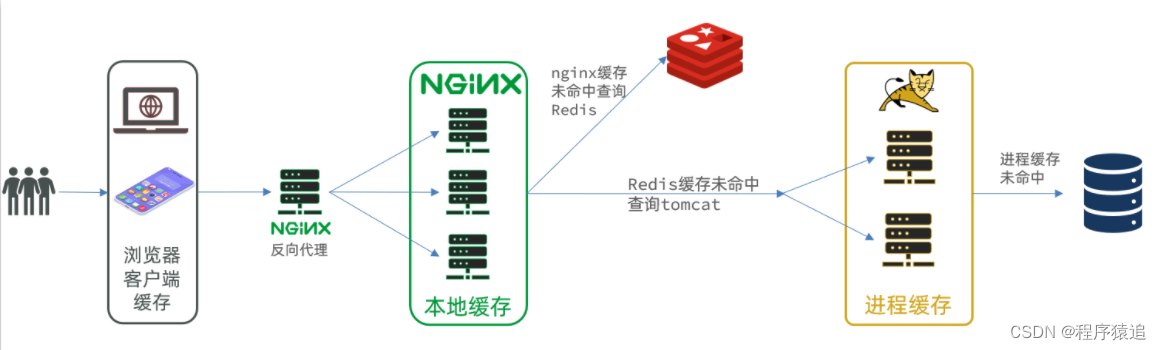
在多級緩存架構中,nginx是一個編寫業務的Web服務器,不是作為反向代理的服務器了。
2、集群模式
也就是說,nginx與tomcat服務要部署為集群模式。
 ?
?
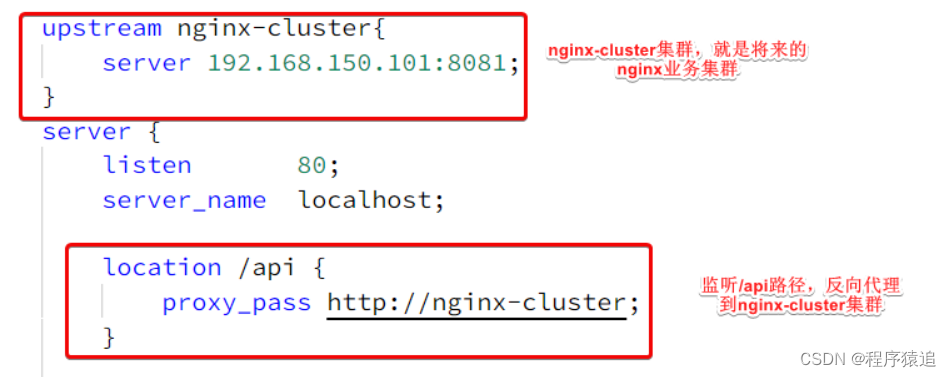
3、前期準備
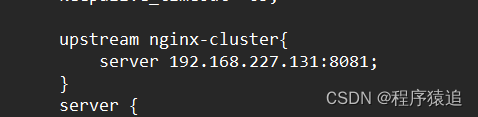
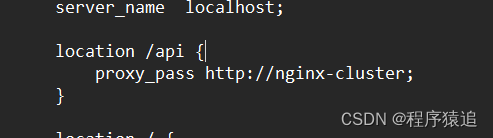
準備好需要的素材,部署好nginx(注:將其拷貝到一個非中文目錄下 ),打開conf里面的nginx.conf配置文件,編寫好關鍵配置(nginx集群的ip地址:端口號;監聽/api路徑,反向代理到nginx集群)。
 ?
?
 ?
?
 ?
?
此時?192.168.227.131 是我虛擬機的ip地址(這里你寫的時候記得換上自己的)
二、Caffeine
1、什么是Caffeine?
Caffeine是一個基于Java8開發的,提供了近乎最佳命中率的高性能的本地緩存庫。目前Spring內部的緩存使用的就是Caffeine。GitHub地址:GitHub - ben-manes/caffeine: A high performance caching library for Java
緩存在日常開發中啟動至關重要的作用 ,能大量減少對數據庫的訪問,減少數據庫的壓力 ,我們把緩存分為兩類:
-
分布式緩存,例如Redis:
-
優點:存儲容量更大、可靠性更好、可以在集群間共享
-
缺點:訪問緩存有網絡開銷
-
場景:緩存數據量較大、可靠性要求較高、需要在集群間共享
-
-
進程本地緩存,例如HashMap、GuavaCache:
-
優點:讀取本地內存,沒有網絡開銷,速度更快
-
缺點:存儲容量有限、可靠性較低、無法共享
-
場景:性能要求較高,緩存數據量較小
-
我們的思路是:當我們的請求到nginx中,首先先查詢本地緩存,當本地緩存沒有時,再去查詢redis,redis沒有時,再去查詢jvm進程,當這些都沒有命中時,再最后查數據庫。
 ?
?
2、緩存使用的基本API
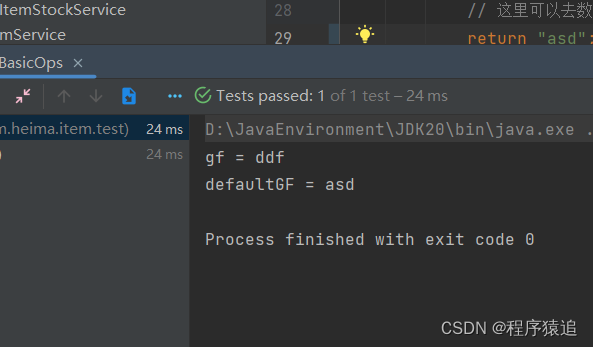
@Test
void testBasicOps() {// 構建cache對象Cache<String, String> cache = Caffeine.newBuilder().build();// 存數據cache.put("gf", "ddf");// 取數據String gf = cache.getIfPresent("gf");System.out.println("gf = " + gf);// 取數據,包含兩個參數:// 參數一:緩存的key// 參數二:Lambda表達式,表達式參數就是緩存的key,方法體是查詢數據庫的邏輯// 優先根據key查詢JVM緩存,如果未命中,則執行參數二的Lambda表達式String defaultGF = cache.get("defaultGF", key -> {// 根據key去數據庫查詢數據return "asdSystem.out.println("defaultGF = " + defaultGF);
}
?
?
Caffeine提供了三種緩存驅逐策略:
-
基于容量:設置緩存的數量上限
// 創建緩存對象 Cache<String, String> cache = Caffeine.newBuilder().maximumSize(1) // 設置緩存大小上限為 1.build(); -
基于時間:設置緩存的有效時間
// 創建緩存對象 Cache<String, String> cache = Caffeine.newBuilder()// 設置緩存有效期為 10 秒,從最后一次寫入開始計時 .expireAfterWrite(Duration.ofSeconds(10)) .build(); -
基于引用:設置緩存為軟引用或弱引用,利用GC來回收緩存數據。性能較差,不建議使用。
2.1、基于大小設置驅逐策略
@Testvoid testEvictByNum() throws InterruptedException {// 創建緩存對象Cache<String, String> cache = Caffeine.newBuilder()// 設置緩存大小上限為 1.maximumSize(1).build();// 存數據cache.put("gf1", "a");cache.put("gf2", "b");cache.put("gf3", "c");// 延遲10ms,給清理線程一點時間Thread.sleep(10L);// 獲取數據System.out.println("gf1: " + cache.getIfPresent("gf1"));System.out.println("gf2: " + cache.getIfPresent("gf2"));System.out.println("gf3: " + cache.getIfPresent("gf3"));}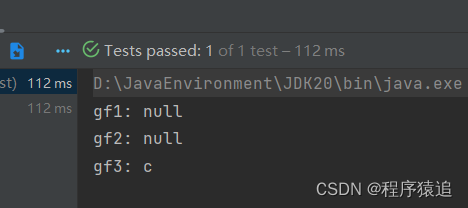 ?
?
2.2、基于時間設置驅逐策略
@Testvoid testEvictByTime() throws InterruptedException {// 創建緩存對象Cache<String, String> cache = Caffeine.newBuilder().expireAfterWrite(Duration.ofSeconds(1)) // 設置緩存有效期為 10 秒.build();// 存數據cache.put("gf", "aaa");// 獲取數據System.out.println("gf: " + cache.getIfPresent("gf"));// 休眠一會兒Thread.sleep(1200L);System.out.println("gf: " + cache.getIfPresent("gf"));}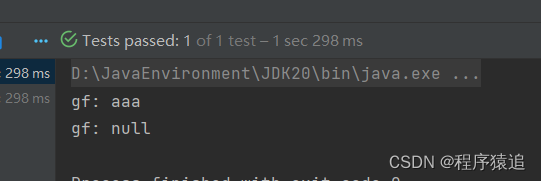 ?
?
三、實現多級緩存
1、前期準備
多級緩存的實現離不開Nginx編程,而Nginx編程又離不開OpenResty。
下載與安裝步驟這里就不做過多的描述了,OpenResty底層是基于Nginx的,查看OpenResty目錄的nginx目錄,所以運行方式與nginx基本一致:
# 啟動nginx
nginx
# 重新加載配置
nginx -s reload
# 停止
nginx -s stop修改/usr/local/openresty/nginx/conf/nginx.conf文件,內容如下:
#user  nobody;
worker_processes  1;
error_log  logs/error.log;events {worker_connections  1024;
}http {include       mime.types;default_type  application/octet-stream;sendfile        on;keepalive_timeout  65;server {listen       8081;server_name  localhost;location / {root   html;index  index.html index.htm;}error_page   500 502 503 504  /50x.html;location = /50x.html {root   html;}}
}
2、反向代理流程
打開案例,他的請求路徑是這個:【微服務】? ? ? ?
 ?
?
請求地址是localhost,端口是80,就被windows上安裝的Nginx服務給接收到了。然后代理給了OpenResty集群,這就是ip為:192.168.227.131。
3、OpenResty監聽請求
OpenResty的很多功能都依賴于其目錄下的Lua庫,需要在nginx.conf中指定依賴庫的目錄,
修改/usr/local/openresty/nginx/conf/nginx.conf文件,在其中的http下面,添加下面代碼:
#lua 模塊
lua_package_path "/usr/local/openresty/lualib/?.lua;;";
#c模塊
lua_package_cpath "/usr/local/openresty/lualib/?.so;;";
監聽/api/item路徑
修改/usr/local/openresty/nginx/conf/nginx.conf文件,在nginx.conf的server下面,添加對/api/item這個路徑的監聽:
location  /api/item {# 默認的響應類型default_type application/json;# 響應結果由lua/item.lua文件來決定content_by_lua_file lua/item.lua;
}這個監聽,就類似于SpringMVC中的@GetMapping("/api/item")做路徑映射,而返回類型就是json。
而content_by_lua_file lua/item.lua則相當于調用item.lua這個文件,執行其中的業務,把結果返回給用戶。相當于java中調用service。
在/usr/loca/openresty/nginx目錄創建文件夾:lua;在/usr/loca/openresty/nginx/lua文件夾下,新建文件:item.lua。
item.lua代碼
-- 導入common函數庫
local common = require('common')
local read_http = common.read_http
local read_redis = common.read_redis
-- 導入cjson庫
local cjson = require('cjson')
-- 導入item_cache
local item_cache = ngx.shared.item_cache-- 封裝查詢函數
function read_data(key, expire,  path, params)local var = item_cache:get(key)if not var thenngx.log(ngx.ERR, "本地緩存查詢失敗,嘗試查詢redis, key: ", key)-- 查詢redis緩存var = read_redis("127.0.0.1", 6379, key)-- 判斷查詢結果if not var thenngx.log(ngx.ERR, "redis查詢失敗,嘗試查詢http, key: ", key)-- redis查詢失敗,去查詢httpvar = read_http(path, params)endend-- 查詢成功,根據不同的數據設置不同的緩存時間,并且寫入到本地緩存item_cache:set(key, var, expire)-- 返回數據return var
end-- 獲取路徑參數
local id = ngx.var[1]-- 查詢商品信息
local itemJSON = read_data("item:id:" .. id, 1800,  "/item/" .. id, nil)
-- 查詢庫存信息
local stockJSON = read_data("item:stock:id:" .. id, 60, "/item/stock/" .. id, nil)-- JSON轉化為lua的table
local item = cjson.decode(itemJSON)
local stock = cjson.decode(stockJSON)
-- 組合數據
item.stock = stock.stock
item.sold = stock.sold-- 把item序列化為json 返回結果
ngx.say(cjson.encode(item))
在nginx.cpnf里面添加
# 添加反向代理,到windows的Java服務# 該指令是用來設置代理服務器的地址,可以是主機名稱,IP地址加端口號等形式。location /item {proxy_pass http://tomcat-cluster;} upstream tomcat-cluster{hash $request_uri;server 192.168.177.196:8081;server 192.168.177.196:8082;}common.lua 代碼
-- 導入redis
local redis = require("resty.redis")
-- 初始化 redis
local red = redis:new()
red:set_timeouts(1000, 1000, 1000)-- 關閉redis連接的工具方法,其實是放入連接池
local function close_redis(red)local pool_max_idle_time = 10000 -- 連接的空閑時間,單位是毫秒local pool_size = 100 --連接池大小local ok, err = red:set_keepalive(pool_max_idle_time, pool_size)if not ok thenngx.log(ngx.ERR, "放入redis連接池失敗: ", err)end
end-- 查詢redis的方法 ip和port是redis地址,key是查詢的key
local function read_redis(ip, port, key)-- 獲取一個連接local ok, err = red:connect(ip, port)if not ok thenngx.log(ngx.ERR, "連接redis失敗 : ", err)return nilend-- 查詢redislocal resp, err = red:get(key)-- 查詢失敗處理if not resp thenngx.log(ngx.ERR, "查詢Redis失敗: ", err, ", key = " , key)end--得到的數據為空處理if resp == ngx.null thenresp = nilngx.log(ngx.ERR, "查詢Redis數據為空, key = ", key)endclose_redis(red)return resp
end-- 封裝函數,發送http請求,并解析響應( ngx.location.capture)
local function read_http(path, params)local resp = ngx.location.capture(path,{method = ngx.HTTP_GET,args = params,})if not resp then-- 記錄錯誤信息,返回404ngx.log(ngx.ERR, "http請求查詢失敗, path: ", path , ", args: ", args)ngx.exit(404)endreturn resp.body
end
-- 將方法導出
local _M = {  read_http = read_http,read_redis = read_redis
}
return _M
然后重新加載配置:nginx -s reload。
4、代碼解析
4.1、獲取參數的API
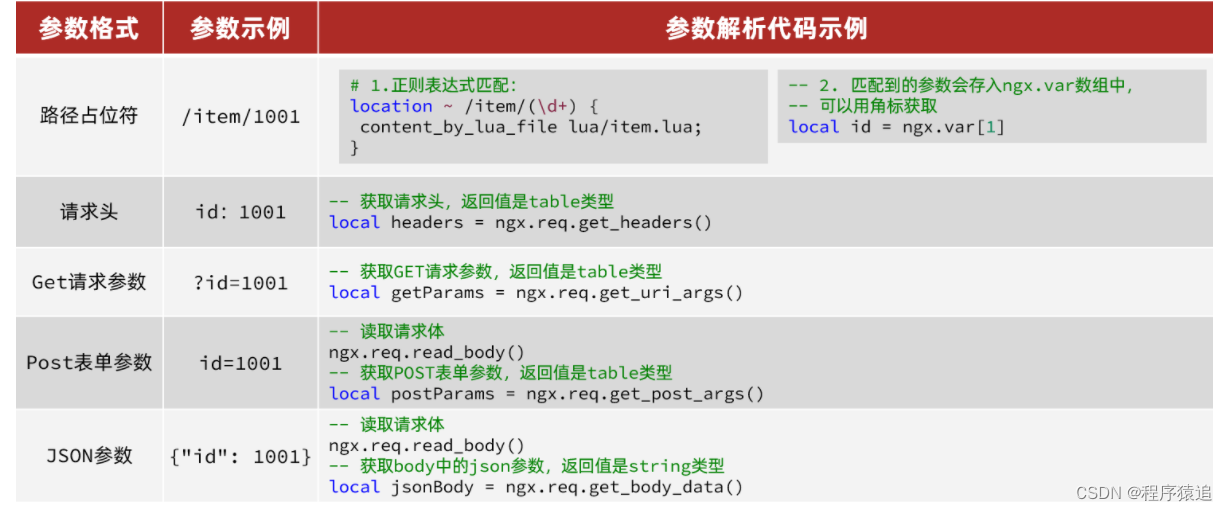
OpenResty中提供了一些API用來獲取不同類型的前端請求參數:
 ?
?
location ~ /api/item/(\d+) {
? ? # 默認的響應類型
? ? default_type application/json;
? ? # 響應結果由lua/item.lua文件來決定
? ? content_by_lua_file lua/item.lua;
}
里面的??~ /api/item/(\d+) 對應的就是 http://localhost/api/item/10003 (前端發來的路徑,這里拿到了商品的id)
4.2、查詢Tomcat
拿到商品ID后,本應去緩存中查詢商品信息,不過目前我們還未建立nginx、redis緩存。因此,這里我們先根據商品id去tomcat查詢商品信息。
 ?
?
發送http請求的API
舉個例子:
local resp = ngx.location.capture("/path",{method = ngx.HTTP_GET,   -- 請求方式args = {a=1,b=2},  -- get方式傳參數
})
返回的響應內容包括:
-
resp.status:響應狀態碼
-
resp.header:響應頭,是一個table
-
resp.body:響應體,就是響應數據
注意:這里的path是路徑,并不包含IP和端口。這個請求會被nginx內部的server監聽并處理。
但是我們希望這個請求發送到Tomcat服務器,所以還需要編寫一個server來對這個路徑做反向代理:
location /path {# 這里是windows電腦的ip和Java服務端口,需要確保windows防火墻處于關閉狀態proxy_pass http://你自己的ip:8081; }在item.lua文件當中,有這一串:
-- 引入自定義common工具模塊,返回值是common中返回的 _M
local common = require("common")
-- 從 common中獲取read_http這個函數
local read_http = common.read_http
-- 獲取路徑參數
local id = ngx.var[1]
-- 根據id查詢商品
local itemJSON = read_http("/item/".. id, nil)
-- 根據id查詢商品庫存
local itemStockJSON = read_http("/item/stock/".. id, nil)
ngx.say(itemStockJSON )
他的作用是接受到請求路徑,然后根據id來查詢數據庫,返回json數據。
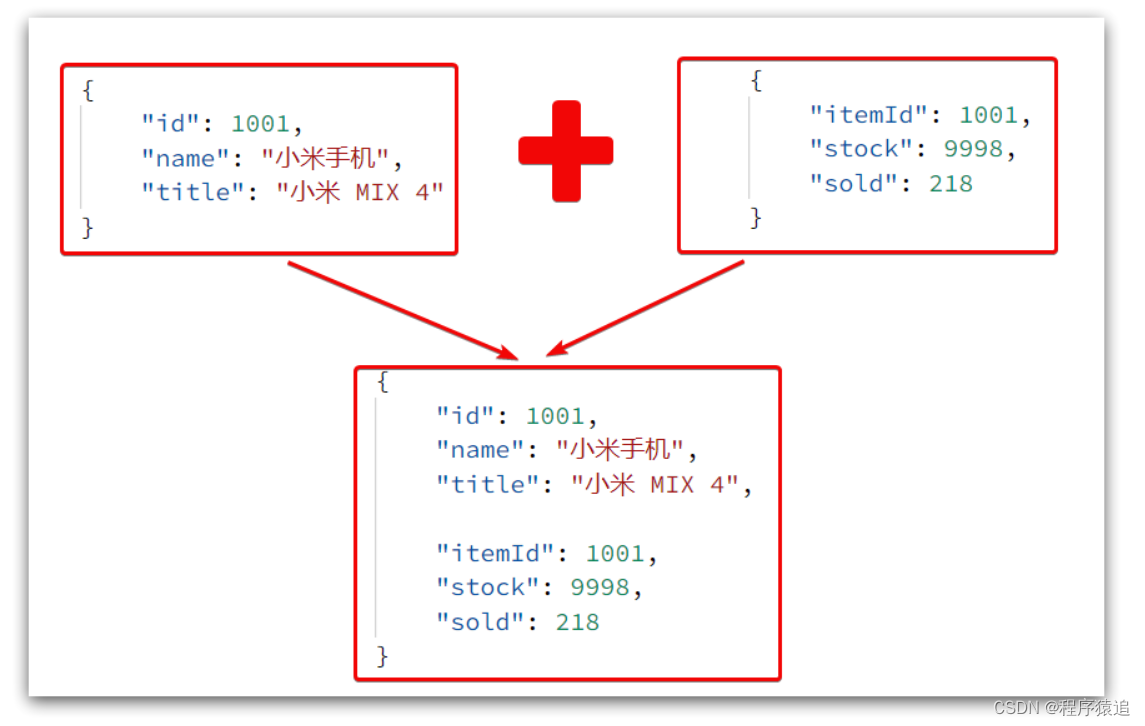
里查詢到的結果是json字符串,并且包含商品、庫存兩個json字符串,頁面最終需要的是把兩個json拼接為一個json:
 ?
?
這就需要我們先把JSON變為lua的table,完成數據整合后,再轉為JSON(序列化與反序列化)。
4.3、CJSON工具類
OpenResty提供了一個cjson的模塊用來處理JSON的序列化和反序列化。
舉個例子:
引入cjson模塊:
local cjson = require "cjson"序列化:
local obj = {name = 'jack',age = 21
}
-- 把 table 序列化為 json
local json = cjson.encode(obj)
反序列化:
local json = '{"name": "jack", "age": 21}'
-- 反序列化 json為 table
local obj = cjson.decode(json);
print(obj.name)
那么實現Tomcat'查詢是:
-- 導入common函數庫
local common = require('common')
local read_http = common.read_http
-- 導入cjson庫
local cjson = require('cjson')-- 獲取路徑參數
local id = ngx.var[1]
-- 根據id查詢商品
local itemJSON = read_http("/item/".. id, nil)
-- 根據id查詢商品庫存
local itemStockJSON = read_http("/item/stock/".. id, nil)-- JSON轉化為lua的table
local item = cjson.decode(itemJSON)
local stock = cjson.decode(stockJSON)-- 組合數據
item.stock = stock.stock
item.sold = stock.sold-- 把item序列化為json 返回結果
ngx.say(cjson.encode(item))
4.4、基于ID負載均衡
剛才的代碼中,我們的tomcat是單機部署。而實際開發中,tomcat一定是集群模式,因此,OpenResty需要對tomcat集群做負載均衡。
如何做?
如果能讓同一個商品,每次查詢時都訪問同一個tomcat服務,那么JVM緩存就一定能生效了。
也就是說,我們需要根據商品id做負載均衡,而不是輪詢。
思路
nginx根據請求路徑做hash運算,把得到的數值對tomcat服務的數量取余,余數是幾,就訪問第幾個服務,實現負載均衡。
舉個例子
-
我們的請求路徑是 /item/10001
-
tomcat總數為2臺(8081、8082)
-
對請求路徑/item/1001做hash運算求余的結果為1
-
則訪問第一個tomcat服務,也就是8081
只要id不變,每次hash運算結果也不會變,那就可以保證同一個商品,一直訪問同一個tomcat服務,確保JVM緩存生效。
在nginx.conf文件里面添加這一段(hash $request_uri;)
upstream tomcat-cluster{hash $request_uri;server 192.168.177.196:8081;server 192.168.177.196:8082;}然后,修改對tomcat服務的反向代理,目標指向tomcat集群:
location /item {proxy_pass http://tomcat-cluster;
}
重新加載OpenResty
nginx -s reload4.5、Redis緩存預熱
Redis緩存會面臨冷啟動問題:
冷啟動:服務剛剛啟動時,Redis中并沒有緩存,如果所有商品數據都在第一次查詢時添加緩存,可能會給數據庫帶來較大壓力。
緩存預熱:在實際開發中,我們可以利用大數據統計用戶訪問的熱點數據,在項目啟動時將這些熱點數據提前查詢并保存到Redis中。
由于數據較少所以這里將所有的數據都存入緩存中。
具體代碼
@Component
public class RedisHandler implements InitializingBean {@Autowiredprivate StringRedisTemplate redisTemplate;@Autowiredprivate IItemService itemService;@Autowiredprivate IItemStockService itemStockService;/*** Jackson提供了ObjectMapper來供程序員“定制化控制”序列化、反序列化的過程。* objectMapper在調用writeValue()序列化 或 調用readValue()反序列化方法之前,* 往往需要設置 ObjectMapper 的相關配置信息,這些配置信息作用在 java 對象的所有屬性上,* 表示在進行序列化和反序列化時進行一些特殊的處理。*/private static final ObjectMapper MAPPER = new ObjectMapper();@Overridepublic void afterPropertiesSet() throws Exception {// 查詢商品List<Item> itemList = itemService.list();// 商品集合序列化,存入redisfor (Item item : itemList) {String itemJson = MAPPER.writeValueAsString(item);redisTemplate.opsForValue().set("item:id:" + item.getId(), itemJson);}// 查詢庫存List<ItemStock> stockList = itemStockService.list();// 庫存集合序列化,存入redisfor (ItemStock stock : stockList) {String stockJson = MAPPER.writeValueAsString(stock);redisTemplate.opsForValue().set("item:stock:id:" + stock.getId(), stockJson);}}public void save(Item item){try {String itemJson = MAPPER.writeValueAsString(item);redisTemplate.opsForValue().set("item:id:" + item.getId(), itemJson);} catch (JsonProcessingException e) {throw new RuntimeException(e);}}public void delete(Long id){redisTemplate.delete("item:id:" + id);}}
InitializingBean接口為bean提供了初始化方法的方式,它只包括afterPropertiesSet方法,凡是繼承該接口的類,在初始化bean的時候都會執行該方法。
ObjectMapper:Jackson提供了ObjectMapper來供程序員“定制化控制”序列化、反序列化的過程。objectMapper在調用writeValue()序列化 或 調用readValue()反序列化方法之前,往往需要設置 ObjectMapper 的相關配置信息,這些配置信息作用在 java 對象的所有屬性上,表示在進行序列化和反序列化時進行一些特殊的處理。
四、緩存同步
大多數情況下,瀏覽器查詢到的都是緩存數據,當我們管理員修改數據時,緩存沒有及時更新,這就會出大問題了。
所以我們必須保證數據庫數據、緩存數據的一致性,這就是緩存與數據庫的同步。
1、數據同步策略
設置有效期:給緩存設置有效期,到期后自動刪除。再次查詢時更新
-
優勢:簡單、方便
-
缺點:時效性差,緩存過期之前可能不一致
-
場景:更新頻率較低,時效性要求低的業務
同步雙寫:在修改數據庫的同時,直接修改緩存
-
優勢:時效性強,緩存與數據庫強一致
-
缺點:有代碼侵入,耦合度高;
-
場景:對一致性、時效性要求較高的緩存數據
異步通知:修改數據庫時發送事件通知,相關服務監聽到通知后修改緩存數據
-
優勢:低耦合,可以同時通知多個緩存服務
-
缺點:時效性一般,可能存在中間不一致狀態
-
場景:時效性要求一般,有多個服務需要同步
這里我們使用Canal(基于Canal的通知 )
2、監聽Canal
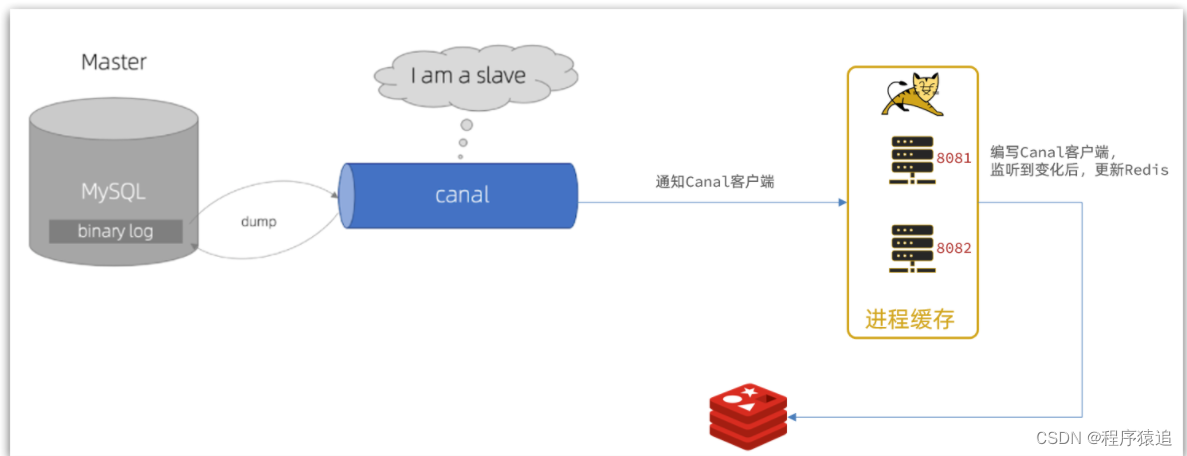
Canal提供了各種語言的客戶端,當Canal監聽到binlog變化時,會通知Canal的客戶端。
 ?
?
我們可以利用Canal提供的Java客戶端,監聽Canal通知消息。當收到變化的消息時,完成對緩存的更新。
引入依賴
<dependency><groupId>top.javatool</groupId><artifactId>canal-spring-boot-starter</artifactId><version>1.2.1-RELEASE</version>
</dependency>
編寫配置
canal:destination: heima # canal的集群名字,要與安裝canal時設置的名稱一致server: 192.168.150.101:11111 # canal服務地址修改實體類
@Data
@TableName("tb_item")
public class Item {@TableId(type = IdType.AUTO)@Idprivate Long id;//商品id@Column(name = "name")private String name;//商品名稱private String title;//商品標題private Long price;//價格(分)private String image;//商品圖片private String category;//分類名稱private String brand;//品牌名稱private String spec;//規格private Integer status;//商品狀態 1-正常,2-下架private Date createTime;//創建時間private Date updateTime;//更新時間@TableField(exist = false)@Transientprivate Integer stock;@TableField(exist = false)@Transientprivate Integer sold;
}
@TableName("tb_item"):要監聽的表名
@Id:告訴他誰是id(主鍵)
@Column(name = "name"):當DB里面的字段與實體類對應不上時,用name對應。
@Transient:告訴它,誰不是表中的字段。
編寫監聽器
通過實現EntryHandler<T>接口編寫監聽器,監聽Canal消息。注意兩點:
-
實現類通過
@CanalTable("tb_item")指定監聽的表信息 -
EntryHandler的泛型是與表對應的實體類
@CanalTable("tb_item")
@Component
public class ItemHandler implements EntryHandler<Item> {@Autowiredprivate RedisHandler redisHandler;@Autowiredprivate Cache<Long, Item> itemCache;@Overridepublic void insert(Item item) {// 寫數據到JVM進程緩存itemCache.put(item.getId(), item);// 寫數據到redisredisHandler.saveItem(item);}@Overridepublic void update(Item before, Item after) {// 寫數據到JVM進程緩存itemCache.put(after.getId(), after);// 寫數據到redisredisHandler.saveItem(after);}@Overridepublic void delete(Item item) {// 刪除數據到JVM進程緩存itemCache.invalidate(item.getId());// 刪除數據到redisredisHandler.deleteItemById(item.getId());}
}
不積跬步無以至千里,趁年輕,使勁拼,給未來的自己一個交代!向著明天更好的自己前進吧!
?

:使用 Aircrack-ng 破解 WEP 密碼)
)
)用法解析)


)


