文章目錄
- 前言
- 一、WorkQueues模型
- 消息發送
- 消息接收
- 能者多勞
- 二、交換機類型
- 1.Fanout交換機
- 消息發送
- 消息接收
- 2.Direct交換機
- 消息接收
- 消息發送
- 3.Topic交換機
- 消息發送
- 消息接收
- 三、編程式聲明隊列和交換機
- fanout示例
- direct示例
- 基于注解
- 四、消息轉換器
- 總結
前言
WorkQueues模型、Fanout交換機、Direct交換機、Topic交換機、基于SpringBoot注解聲明隊列和交換機、消息轉換器。
一、WorkQueues模型
- Work queues,任務模型。簡單來說就是讓多個消費者綁定到一個隊列,共同消費隊列中的消息。
- 當消息處理比較耗時的時候,可能生產消息的速度會遠遠大于消息的消費速度。長此以往,消息就會堆積越來越多,無法及時處理。此時就可以使用work 模型,多個消費者共同處理消息處理,消息處理的速度就能大大提高了。

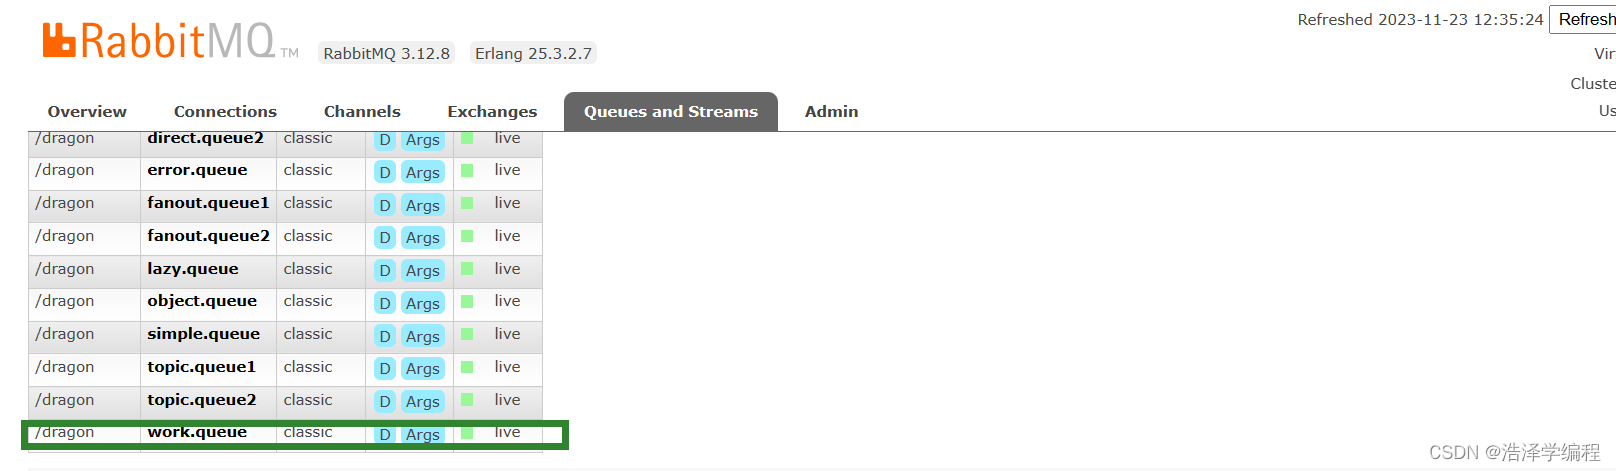
在控制臺創建一個work.queue的隊列:
消息發送
循環發送,模擬大量消息堆積現象。
/*** workQueue* 向隊列中不停發送消息,模擬消息堆積。*/
@Test
public void testWorkQueue() throws InterruptedException {// 隊列名稱String queueName = "simple.queue";// 消息String message = "hello, message_";for (int i = 0; i < 50; i++) {// 發送消息,每20毫秒發送一次,相當于每秒發送50條消息rabbitTemplate.convertAndSend(queueName, message + i);Thread.sleep(20);}
}
消息接收
模擬多個消費者綁定同一個隊列,我們添加2個方法,并且設置不同睡眠時間模擬不同性能讀取
@RabbitListener(queues = "work.queue")
public void listenWorkQueue1(String msg) throws InterruptedException {System.out.println("消費者1接收到消息:【" + msg + "】" + LocalTime.now());Thread.sleep(20);
}@RabbitListener(queues = "work.queue")
public void listenWorkQueue2(String msg) throws InterruptedException {System.err.println("消費者2........接收到消息:【" + msg + "】" + LocalTime.now());Thread.sleep(200);
}

- 消費者1很快完成了自己的25條消息
- 消費者2卻在緩慢的處理自己的25條消息。
也就是說
消息是平均分配給每個消費者,并沒有考慮到消費者的處理能力。導致1個消費者空閑,另一個消費者忙的不可開交。沒有充分利用每一個消費者的能力,最終消息處理的耗時遠遠超過了1秒。這樣顯然是有問題的。
能者多勞
在spring中有一個簡單的配置,可以解決這個問題。我們修改consumer服務的application.yml文件,添加配置:
spring:rabbitmq:listener:simple:prefetch: 1 # 每次只能獲取一條消息,處理完成才能獲取下一個消息
再次測試,發現結果如下:

可以發現,由于消費者1處理速度較快,所以處理了更多的消息;消費者2處理速度較慢,只處理了6條消息。而最終總的執行耗時也在1秒左右,大大提升。
正所謂能者多勞,這樣充分利用了每一個消費者的處理能力,可以有效避免消息積壓問題。
Work模型的使用:
- 多個消費者綁定到一個隊列,同一條消息只會被一個消費者處理
- 通過設置prefetch來控制消費者預取的消息數量
二、交換機類型
1.Fanout交換機
發送流程:
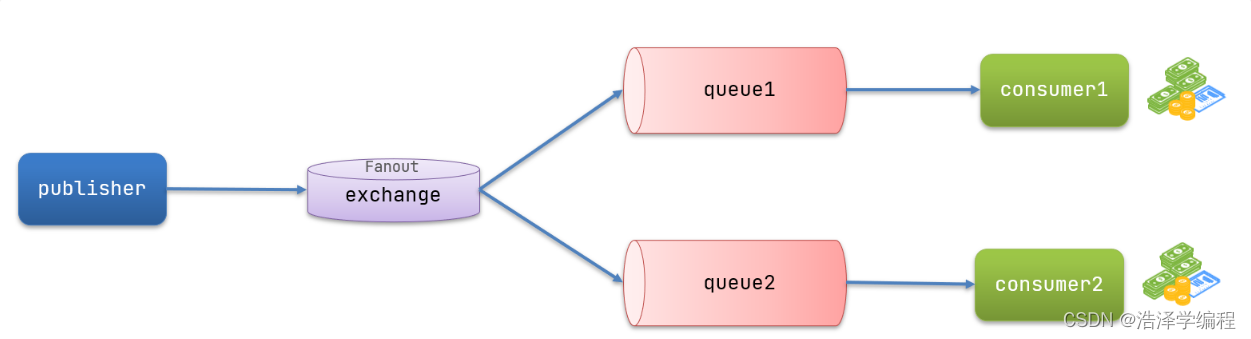
- 可以有多個隊列
- 每個隊列都要綁定到Exchange(交換機)
- 生產者發送的消息,只能發送到交換機
- 交換機把消息發送給綁定過的所有隊列
- 訂閱隊列的消費者都能拿到消息
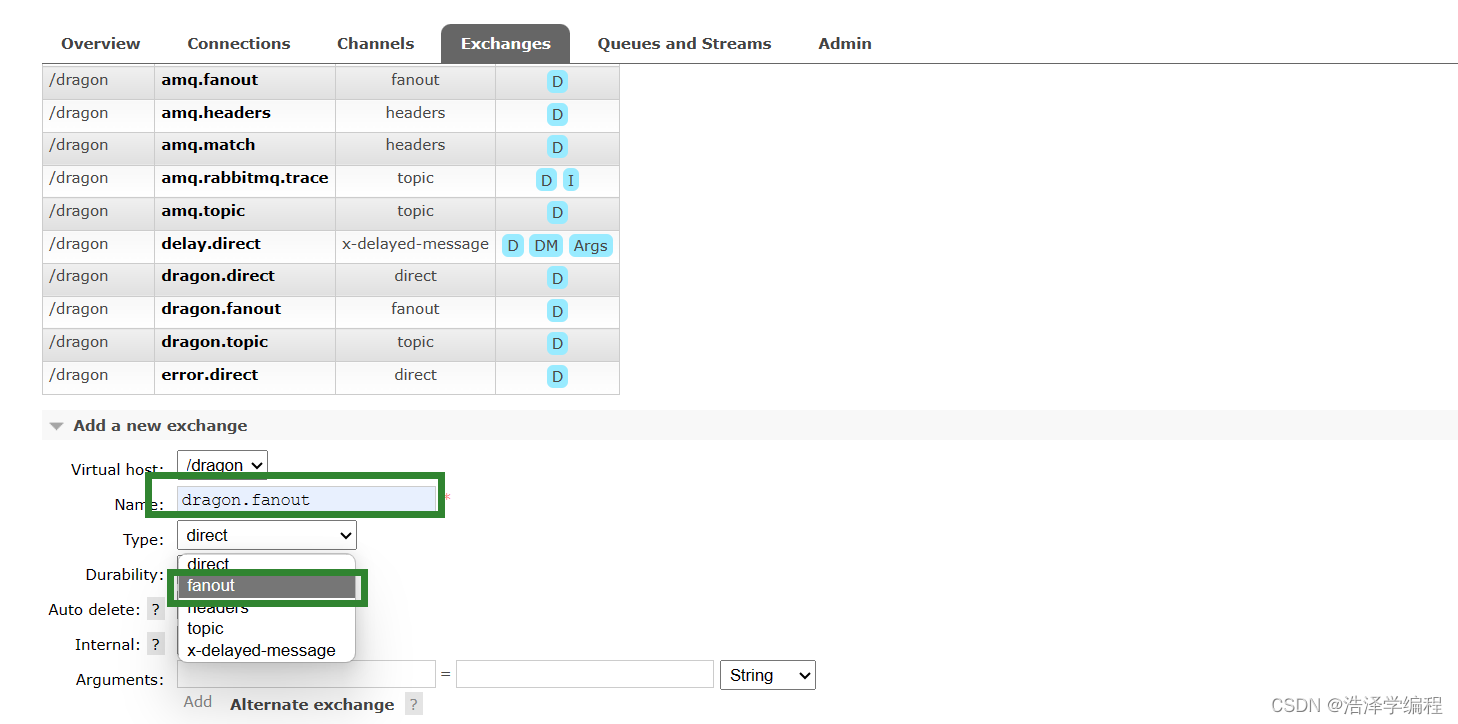
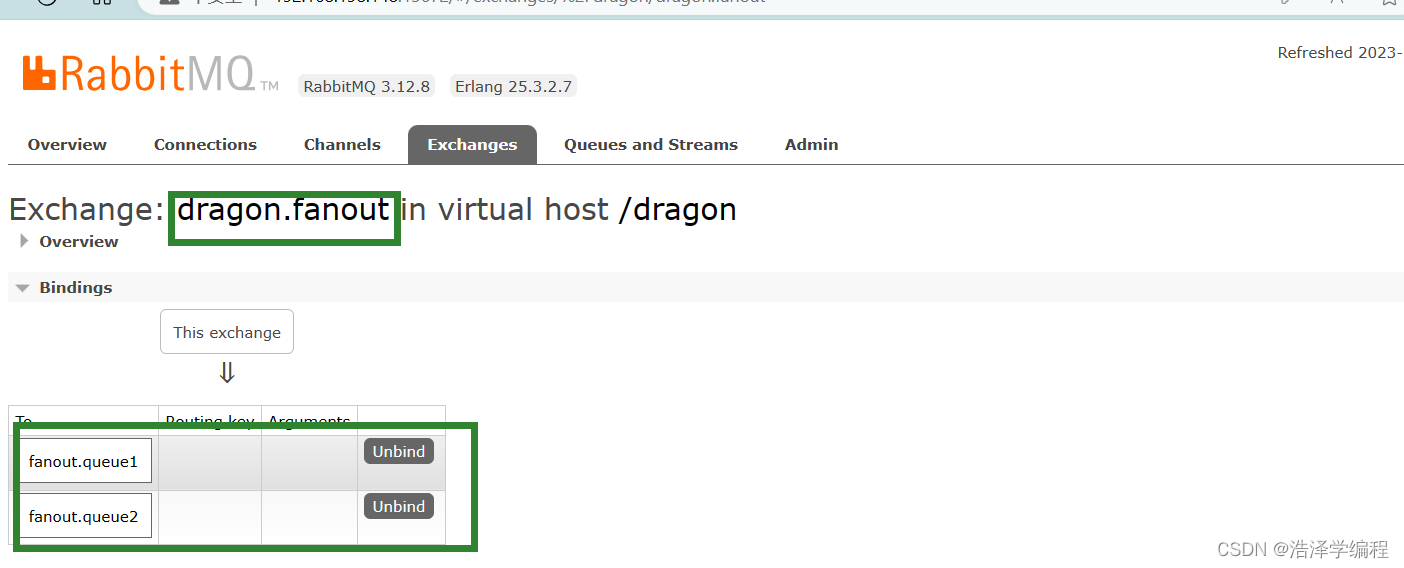
在控制臺創建fanout.queue1、fanoutqueue2隊列和dragon.fanout交換機,并將隊列綁定到交換機:
消息發送
@Test
public void testFanoutExchange() {// 交換機名稱String exchangeName = "dragon.fanout";// 消息String message = "hello, everyone!";rabbitTemplate.convertAndSend(exchangeName, "", message);
}
消息接收
@RabbitListener(queues = "fanout.queue1")
public void listenFanoutQueue1(String msg) {System.out.println("消費者1接收到Fanout消息:【" + msg + "】");
}@RabbitListener(queues = "fanout.queue2")
public void listenFanoutQueue2(String msg) {System.out.println("消費者2接收到Fanout消息:【" + msg + "】");
}
交換機的作用是什么?
- 接收publisher發送的消息
- 將消息按照規則路由到與之綁定的隊列
- 不能緩存消息,路由失敗,消息丟失
- FanoutExchange的會將消息路由到每個綁定的隊列
2.Direct交換機
在Fanout模式中,一條消息,會被所有訂閱的隊列都消費。但是,在某些場景下,我們希望不同的消息被不同的隊列消費。這時就要用到Direct類型的Exchange。
在Direct模型下:
- 隊列與交換機的綁定,不能是任意綁定了,而是要指定一個RoutingKey(路由key)
- 消息的發送方在 向 Exchange發送消息時,也必須指定消息的 RoutingKey。
- Exchange不再把消息交給每一個綁定的隊列,而是根據消息的Routing Key進行判斷,只有隊列的Routingkey與消息的 Routing key完全一致,才會接收到消息
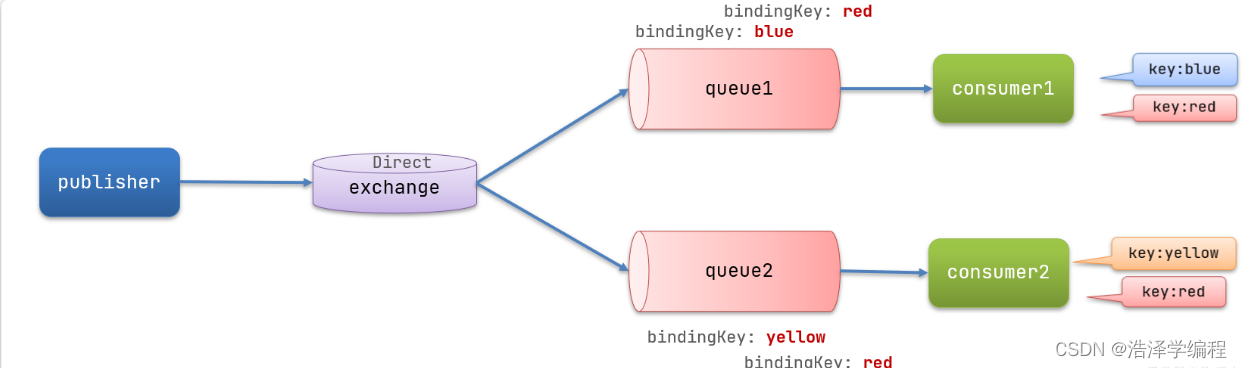
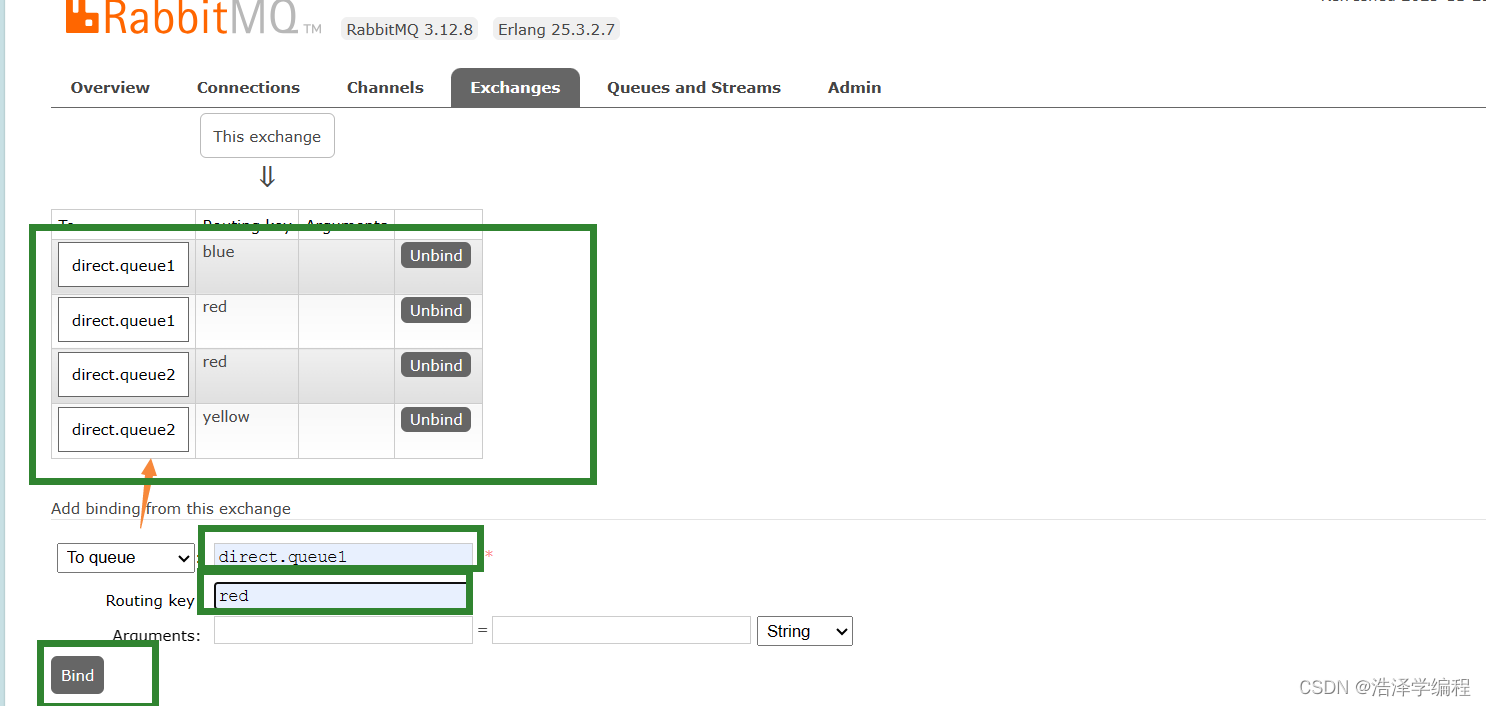
在控制臺聲明兩個隊列direct.queue1和direct.queue2,然后聲明一個direct類型的交換機,綁定隊列和交換機(使用red和blue作為key,綁定direct.queue1到dragon.direct;使用red和yellow作為key,綁定direct.queue2到dragon.direct):

消息接收
@RabbitListener(queues = "direct.queue1")
public void listenDirectQueue1(String msg) {System.out.println("消費者1接收到direct.queue1的消息:【" + msg + "】");
}@RabbitListener(queues = "direct.queue2")
public void listenDirectQueue2(String msg) {System.out.println("消費者2接收到direct.queue2的消息:【" + msg + "】");
}
消息發送
@Test
public void testSendDirectExchange() {// 交換機名稱String exchangeName = "dragon.direct";// 消息String message = "紅色警報!日本亂排核廢水,導致海洋生物變異,驚現哥斯拉!";// 發送消息rabbitTemplate.convertAndSend(exchangeName, "red", message);
}
綁定紅色的都會接收到信息:

描述下Direct交換機與Fanout交換機的差異?
- Fanout交換機將消息路由給每一個與之綁定的隊列
- Direct交換機根據RoutingKey判斷路由給哪個隊列
- 如果多個隊列具有相同的RoutingKey,則與Fanout功能類似
3.Topic交換機
- Topic類型的Exchange與Direct相比,都是可以根據RoutingKey把消息路由到不同的隊列。
只不過Topic類型Exchange可以讓隊列在綁定BindingKey 的時候使用通配符!- BindingKey 一般都是有一個或多個單詞組成,多個單詞之間以.分割,例如: item.insert
- 通配符規則:
- #:匹配一個或多個詞
- *:匹配不多不少恰好1個詞
- 舉例:
dragon.#:能夠匹配dragon.stu.insert 或者 dragon.stu
dragon.*:只能匹配dragon.stu
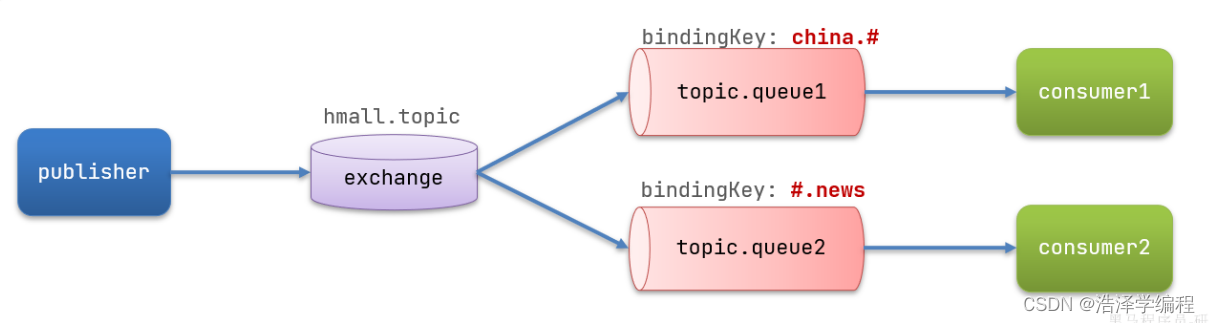
假如此時publisher發送的消息使用的RoutingKey共有四種:
- china.news 代表有中國的新聞消息;
- china.weather 代表中國的天氣消息;
- japan.news 則代表日本新聞
- japan.weather 代表日本的天氣消息;
解釋:
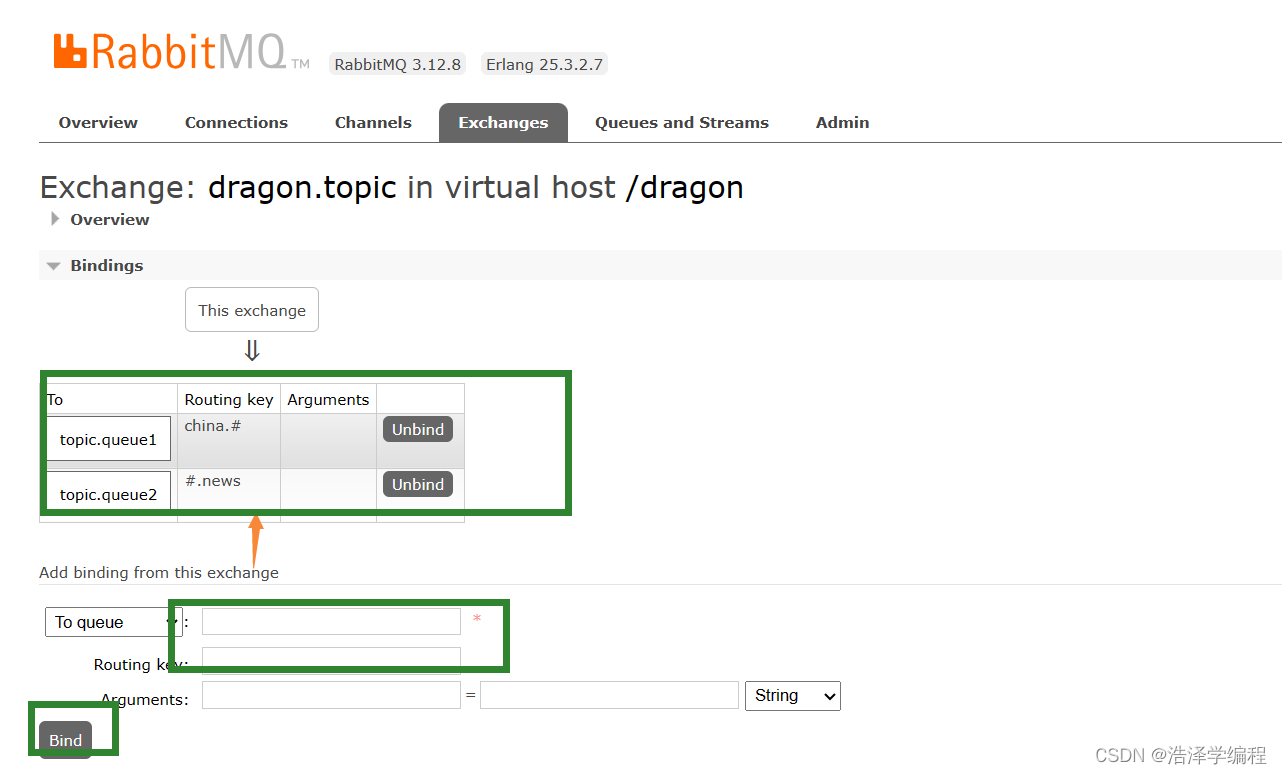
- topic.queue1:綁定的是china.# ,凡是以 china.開頭的routing key 都會被匹配到,包括:
- china.news
- china.weather
- topic.queue2:綁定的是#.news ,凡是以 .news結尾的 routing key 都會被匹配。包括:
- china.news
- japan.news
消息發送
/*** topicExchange*/
@Test
public void testSendTopicExchange() {// 交換機名稱String exchangeName = "dragon.topic";// 消息String message = "喜報!孫悟空大戰哥斯拉,勝!";// 發送消息rabbitTemplate.convertAndSend(exchangeName, "china.news", message);
}
消息接收
@RabbitListener(queues = "topic.queue1")
public void listenTopicQueue1(String msg){System.out.println("消費者1接收到topic.queue1的消息:【" + msg + "】");
}@RabbitListener(queues = "topic.queue2")
public void listenTopicQueue2(String msg){System.out.println("消費者2接收到topic.queue2的消息:【" + msg + "】");
}
描述下Direct交換機與Topic交換機的差異?
- Topic交換機接收的消息RoutingKey必須是多個單詞,以 . 分割
- Topic交換機與隊列綁定時的bindingKey可以指定通配符
- #:代表0個或多個詞
- *:代表1個詞
三、編程式聲明隊列和交換機
SpringAMQP提供了一個Queue類,用來創建隊列:
fanout示例
@Configuration
public class FanoutConfiguration {/*** 聲明交換機* @return Fanout類型交換機*/@Beanpublic FanoutExchange fanoutExchange(){
//    還可以是  return  ExchangeBuilder.fanoutExchange("dragon.fanout").build();return new FanoutExchange("dragon.fanout");}/*** 第1個隊列*/@Beanpublic Queue fanoutQueue1(){
//   還可以是  return  QueueBuilder.durable("fanout.queue1").build();return new Queue("fanout.queue1");}/*** 綁定隊列和交換機*/@Beanpublic Binding bindingQueue1(Queue fanoutQueue1, FanoutExchange fanoutExchange){return BindingBuilder.bind(fanoutQueue1).to(fanoutExchange);}/*** 第2個隊列*/@Beanpublic Queue fanoutQueue2(){return new Queue("fanout.queue2");}/*** 綁定隊列和交換機*/@Beanpublic Binding bindingQueue2(Queue fanoutQueue2, FanoutExchange fanoutExchange){return BindingBuilder.bind(fanoutQueue2).to(fanoutExchange);}
//綁定隊列和交換機的另一方法
//    @Bean
//    public Binding bindingQueue2(){
//        return BindingBuilder.bind(fanoutQueue2()).to(fanoutExchange());
//    }
}
direct示例
@Configuration
public class DirectConfiguration {/*** 聲明交換機* @return Direct類型交換機*/@Beanpublic DirectExchange directExchange(){return ExchangeBuilder.directExchange("dragon.direct").build();}/*** 第1個隊列*/@Beanpublic Queue directQueue1(){return new Queue("direct.queue1");}/*** 綁定隊列和交換機*/@Beanpublic Binding bindingQueue1WithRed(Queue directQueue1, DirectExchange directExchange){return BindingBuilder.bind(directQueue1).to(directExchange).with("red");}/*** 綁定隊列和交換機*/@Beanpublic Binding bindingQueue1WithBlue(Queue directQueue1, DirectExchange directExchange){return BindingBuilder.bind(directQueue1).to(directExchange).with("blue");}/*** 第2個隊列*/@Beanpublic Queue directQueue2(){return new Queue("direct.queue2");}/*** 綁定隊列和交換機*/@Beanpublic Binding bindingQueue2WithRed(Queue directQueue2, DirectExchange directExchange){return BindingBuilder.bind(directQueue2).to(directExchange).with("red");}/*** 綁定隊列和交換機*/@Beanpublic Binding bindingQueue2WithYellow(Queue directQueue2, DirectExchange directExchange){return BindingBuilder.bind(directQueue2).to(directExchange).with("yellow");}
}
基于注解
上面的代碼還是很多的,基于注解的方式也能夠代替上面的繁雜配置,下面演示direct和topic交換機,隊列的代碼
@RabbitListener(bindings = @QueueBinding(value = @Queue(name = "direct.queue1"),exchange = @Exchange(name = "dragon.direct", type = ExchangeTypes.DIRECT),key = {"red", "blue"}
))
public void listenDirectQueue1(String msg){System.out.println("消費者1接收到direct.queue1的消息:【" + msg + "】");
}@RabbitListener(bindings = @QueueBinding(value = @Queue(name = "direct.queue2"),exchange = @Exchange(name = "dragon.direct", type = ExchangeTypes.DIRECT),key = {"red", "yellow"}
))
public void listenDirectQueue2(String msg){System.out.println("消費者2接收到direct.queue2的消息:【" + msg + "】");
}
@RabbitListener(bindings = @QueueBinding(value = @Queue(name = "topic.queue1"),exchange = @Exchange(name = "hmall.topic", type = ExchangeTypes.TOPIC),key = "china.#"
))
public void listenTopicQueue1(String msg){System.out.println("消費者1接收到topic.queue1的消息:【" + msg + "】");
}@RabbitListener(bindings = @QueueBinding(value = @Queue(name = "topic.queue2"),exchange = @Exchange(name = "hmall.topic", type = ExchangeTypes.TOPIC),key = "#.news"
))
public void listenTopicQueue2(String msg){System.out.println("消費者2接收到topic.queue2的消息:【" + msg + "】");
}
四、消息轉換器
隨便創建一個隊列,然后發送Map對象,你會發現消息格式很不友好
@Test
public void testSendMap() throws InterruptedException {// 準備消息Map<String,Object> msg = new HashMap<>();msg.put("name", "柳巖");msg.put("age", 21);// 發送消息rabbitTemplate.convertAndSend("object.queue", msg);
}
控制臺查看:

- Spring的消息發送代碼接收的消息體是一個Object,而在數據傳輸時,它會把你發送的消息序列化為字節發送給MQ,接收消息的時候,還會把字節反序列化為Java對象。
- 只不過,默認情況下Spring采用的序列化方式是JDK序列化。眾所周知,JDK序列化存在下列問題:
- 數據體積過大
有安全漏洞
可讀性差- 根據上面測試,顯然,JDK序列化方式并不合適。我們希望消息體的體積更小、可讀性更高,因此可以使用JSON方式來做序列化和反序列化。
j解決:
引入依賴:
<dependency><groupId>com.fasterxml.jackson.dataformat</groupId><artifactId>jackson-dataformat-xml</artifactId><version>2.9.10</version>
</dependency>
注意,如果項目中引入了spring-boot-starter-web依賴,則無需再次引入Jackson依賴。其轉換器配置。
添加配置:
@Bean
public MessageConverter messageConverter(){// 1.定義消息轉換器Jackson2JsonMessageConverter jackson2JsonMessageConverter = new Jackson2JsonMessageConverter();// 2.配置自動創建消息id,用于識別不同消息,也可以在業務中基于ID判斷是否是重復消息jackson2JsonMessageConverter.setCreateMessageIds(true);return jackson2JsonMessageConverter;
}
總結
以上就是所有講解。


)

)


![BUUCTF [SWPU2019]我有一只馬里奧 1](http://pic.xiahunao.cn/BUUCTF [SWPU2019]我有一只馬里奧 1)


)