目錄
介紹
一、獲取授權碼
二、前端代碼修改
三、后端代碼修改
①pom依賴
②yml配置
③控制層
④業務層
⑤工具類
介紹
本文介紹了QQ郵箱驗證碼登錄功能的實現步驟:
- 獲取QQ郵箱授權碼并配置;
- 前端修改登錄頁面,增加驗證碼發送接口調用和登錄邏輯;
- 后端實現包括:添加郵件依賴、配置郵件參數、開發驗證碼發送接口(使用隨機4位數字)、登錄驗證邏輯(自動注冊新用戶)、郵件發送服務等。
? ? ? ?重點使用了Spring Boot Mail組件實現郵件發送,通過Session存儲驗證碼進行校驗,并提供了完整的工具類生成隨機驗證碼。系統實現了基于手機號和郵箱驗證碼的登錄功能,包含自動注冊新用戶的能力。
一、獲取授權碼
QQ郵箱
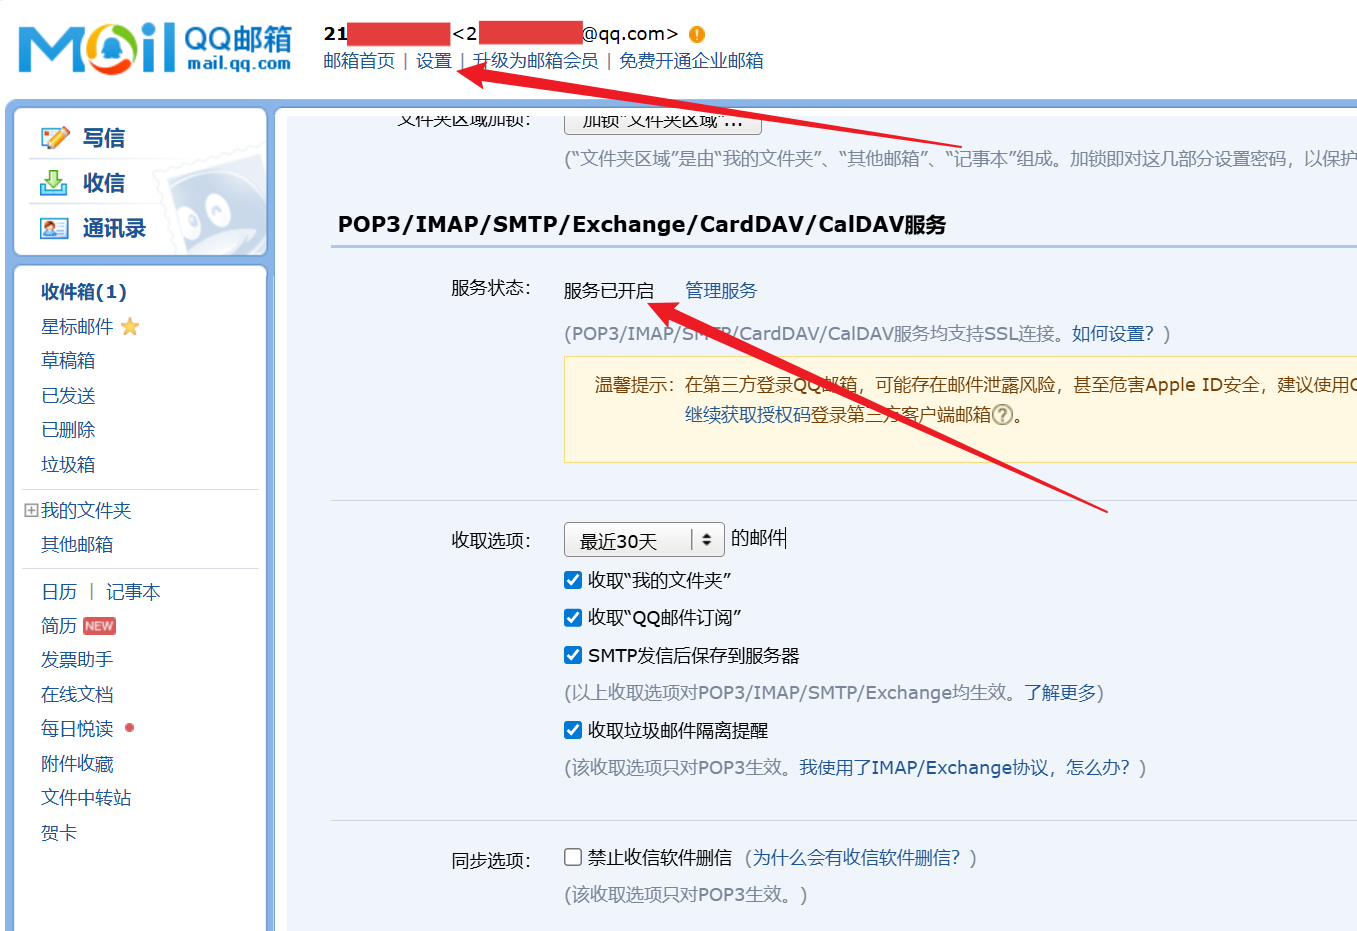
生成授權碼如下,最好截圖保存,后續要用到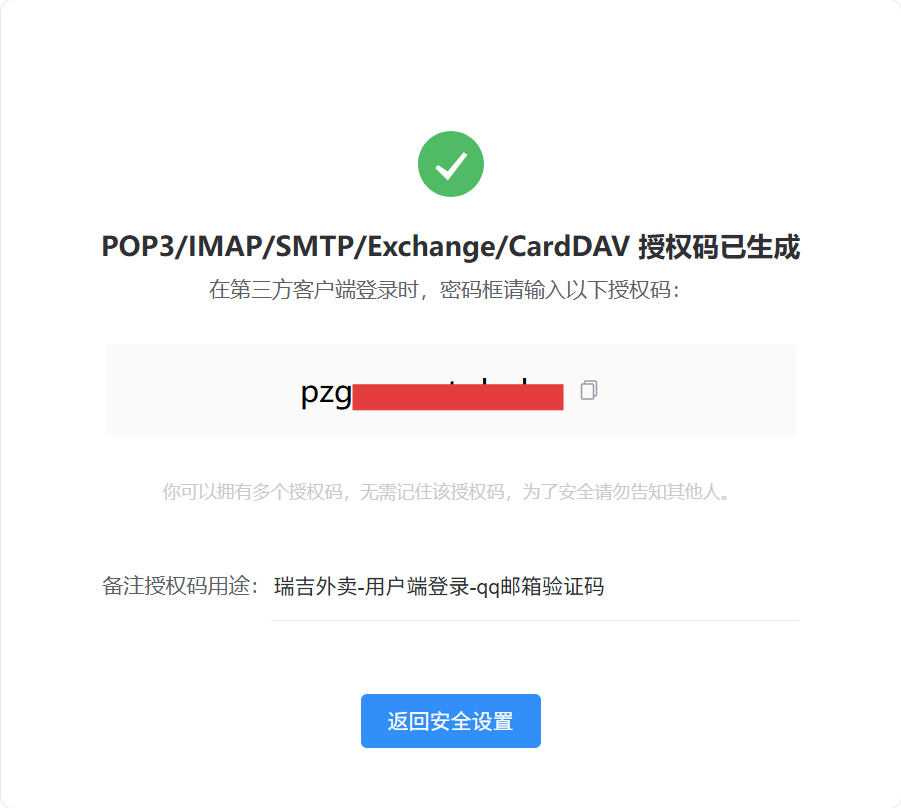
二、前端代碼修改
2.1 調用發送驗證碼API接口,并取消自動填充驗證碼。代碼位置:front/page/login.html
methods:{getCode(){this.form.code = ''// const regex = /^(13[0-9]{9})|(15[0-9]{9})|(17[0-9]{9})|(18[0-9]{9})|(19[0-9]{9})$/;// 修復后的正則表達式const regex = /^(13[0-9]{9}|15[0-9]{9}|17[0-9]{9}|18[0-9]{9}|19[0-9]{9})$/; if (regex.test(this.form.phone)) {this.msgFlag = false// this.form.code = (Math.random()*1000000).toFixed(0)sendMsgApi({phone:this.form.phone})}else{this.msgFlag = true}},async btnLogin(){if(this.form.phone && this.form.code){this.loading = true// const res = await loginApi({phone:this.form.phone})const res = await loginApi({phone:this.form.phone,code:this.form.code})this.loading = falseif(res.code === 1){sessionStorage.setItem("userPhone",this.form.phone)window.requestAnimationFrame(()=>{window.location.href= '/front/index.html'}) }else{this.$notify({ type:'warning', message:res.msg});}}else{this.$notify({ type:'warning', message:'請輸入手機號碼'});}}2.2 增加一個發送驗證碼API。代碼位置:front/api/login.js
function loginApi(data) {return $axios({'url': '/employee/login','method': 'post',data})
}
三、后端代碼修改
①pom依賴
<!--mail短信依賴-->
<dependency><groupId>org.springframework.boot</groupId><artifactId>spring-boot-starter-mail</artifactId>
</dependency>
②yml配置
這里需要配置【郵箱】和剛剛獲取的【授權碼】
spring:mail:host: smtp.qq.com#發送驗證碼的郵箱username: xxxxxxxxxxx@qq.com# 你的QQ郵箱授權碼password: xxxxxxxxxxxssl:enabled: true③控制層
@RestController
@RequestMapping("/user")
@Slf4j
public class UserController {@Autowiredprivate IUserService userService;//獲取驗證碼@PostMapping("/sendMsg")public R<String> sendMsg(HttpSession session, @RequestBody User user){//獲取郵箱號//相當于發送短信定義的String toString phone = user.getPhone();String subject = "瑞吉外賣";//StringUtils.isNotEmpty字符串非空判斷if (StringUtils.isNotEmpty(phone)) {//發送一個四位數的驗證碼,把驗證碼變成String類型String code = ValidateCodeUtils.generateValidateCode(4).toString();String text = "【瑞吉外賣】您好,您的登錄驗證碼為:" + code + ",請盡快登錄";log.info("驗證碼為:" + code);//發送短信userService.sendMsg(subject,text);//將驗證碼保存到session當中session.setAttribute(phone,code);return R.success("驗證碼發送成功");}return R.error("驗證碼發送異常,請重新發送");}//登錄@PostMapping("/login")//Map存JSON數據public R<User> login(HttpSession session,@RequestBody Map map){//獲取郵箱,用戶輸入的String phone = map.get("phone").toString();//獲取驗證碼,用戶輸入的String code = map.get("code").toString();//獲取session中保存的驗證碼Object sessionCode = session.getAttribute(phone);//如果session的驗證碼和用戶輸入的驗證碼進行比對,&&同時if (sessionCode != null && sessionCode.equals(code)) {//要是User數據庫沒有這個郵箱則自動注冊,先看看輸入的郵箱是否存在數據庫LambdaQueryWrapper<User> queryWrapper = new LambdaQueryWrapper<>();queryWrapper.eq(User::getPhone,phone);//獲得唯一的用戶,因為手機號是唯一的User user = userService.getOne(queryWrapper);//要是User數據庫沒有這個郵箱則自動注冊if (user == null) {user = new User();user.setPhone(phone);user.setStatus(1);//取郵箱的前五位為用戶名user.setName(phone.substring(0,6));userService.save(user);}//不保存這個用戶名就登不上去,因為過濾器需要得到這個user才能放行,程序才知道你登錄了session.setAttribute("user", user.getId());return R.success(user);}return R.error("登錄失敗");}
}
④業務層
接口
public interface IUserService extends IService<User> {void sendMsg(String subject,String text);
}
實現類
@Service
public class UserServiceImpl extends ServiceImpl<UserMapper,User> implements IUserService {//把yml配置的郵箱號賦值到from@Value("${spring.mail.username}")private String email;//發送郵件需要的對象@Autowiredprivate JavaMailSender javaMailSender;//郵件發送人@Overridepublic void sendMsg(String subject, String text) {//發送簡單郵件,簡單郵件不包括附件等別的SimpleMailMessage message = new SimpleMailMessage();message.setFrom(email);message.setTo(email);message.setSubject(subject);message.setText(text);//發送郵件javaMailSender.send(message);}
}
⑤工具類
ValidateCodeUtils.java,黑馬給了此代碼;不用 SMSUtils.java
package com.itheima.reggie.utils;import java.util.Random;/*** 隨機生成驗證碼工具類*/
public class ValidateCodeUtils {/*** 隨機生成驗證碼* @param length 長度為4位或者6位* @return*/public static Integer generateValidateCode(int length){Integer code =null;if(length == 4){code = new Random().nextInt(9999);//生成隨機數,最大為9999if(code < 1000){code = code + 1000;//保證隨機數為4位數字}}else if(length == 6){code = new Random().nextInt(999999);//生成隨機數,最大為999999if(code < 100000){code = code + 100000;//保證隨機數為6位數字}}else{throw new RuntimeException("只能生成4位或6位數字驗證碼");}return code;}/*** 隨機生成指定長度字符串驗證碼* @param length 長度* @return*/public static String generateValidateCode4String(int length){Random rdm = new Random();String hash1 = Integer.toHexString(rdm.nextInt());String capstr = hash1.substring(0, length);return capstr;}
}


)


內繪制一個內切橢圓)
![洛谷 P2052 [NOI2011] 道路修建-普及/提高-](http://pic.xiahunao.cn/洛谷 P2052 [NOI2011] 道路修建-普及/提高-)


》免費中文翻譯 (第6章) --- scripts and projects)


