1. 你擅長處理哪類問題
推薦回答:
"我比較擅長處理以下幾類前端問題:
性能優化:包括加載優化(代碼分割、懶加載)、運行時優化(減少重排重繪)等
復雜組件開發:如表單聯動、可視化圖表等交互復雜的組件
工程化問題:Webpack配置優化、自動化部署等
跨平臺兼容:解決不同瀏覽器和設備下的兼容性問題
2. 數組 for in 和 for of 區別
const arr = ['a', 'b', 'c'];
arr.customProp = 'd';// for in (遍歷鍵名)
for (let key in arr) {console.log(key); // 輸出: 0, 1, 2, 'customProp'console.log(typeof key); // 'string'
}// for of (遍歷值)
for (let value of arr) {console.log(value); // 輸出: 'a', 'b', 'c'
}區別總結:
| 特性 | for...in | for...of |
|---|---|---|
| 遍歷內容 | 可枚舉屬性(包括原型鏈) | 可迭代對象的值 |
| 適用對象 | 對象/數組 | 數組/Map/Set等可迭代對象 |
| 順序保證 | 不保證順序 | 保證迭代順序 |
| 原型屬性 | 會遍歷原型鏈上的屬性 | 只遍歷對象自身值 |
3. 數組截取方法
常用方法:
const arr = [1, 2, 3, 4, 5];// 1. slice (不改變原數組)
arr.slice(1, 3); // [2, 3]// 2. splice (改變原數組)
arr.splice(1, 2); // 返回[2, 3], arr變為[1, 4, 5]// 3. 擴展運算符
const [first, ...rest] = arr; // first=1, rest=[2,3,4,5]// 4. filter (條件截取)
arr.filter(x => x > 2); // [3,4,5]對比選擇:
需要原數組不變 →?
slice需要修改原數組 →?
splice需要條件篩選 →?
filter
4. 數組包含方法
檢測方法:
const arr = [1, 2, 3];// 1. includes (ES7)
arr.includes(2); // true// 2. indexOf
arr.indexOf(2) !== -1; // true// 3. some (復雜條件)
arr.some(x => x > 2); // true// 4. find/findIndex (對象數組)
const objArr = [{id:1}, {id:2}];
objArr.find(o => o.id === 2); // {id:2}性能建議:
簡單值判斷用?
includes?最直觀對象數組用?
some/find需要索引值時用?
indexOf/findIndex
5. 類型檢測的方法
全面方案:
// 1. typeof (基本類型)
typeof 'str'; // 'string'
typeof 123; // 'number'
typeof true; // 'boolean'
typeof undefined; // 'undefined'
typeof Symbol(); // 'symbol'
typeof 123n; // 'bigint'
typeof function(){}; // 'function'// 局限性
typeof null; // 'object'
typeof []; // 'object'// 2. instanceof (對象類型)
[] instanceof Array; // true
new Date() instanceof Date; // true// 3. Object.prototype.toString.call (最準確)
Object.prototype.toString.call(null); // '[object Null]'
Object.prototype.toString.call([]); // '[object Array]'// 4. Array.isArray (專用于數組)
Array.isArray([]); // true// 5. 自定義類型檢查
class MyClass {}
const obj = new MyClass();
obj.constructor === MyClass; // true最佳實踐:
基本類型 →?
typeof數組 →?
Array.isArray()通用對象類型 →?
Object.prototype.toString.call()自定義類實例 →?
instanceof?或?constructor?檢查
6. Vue 路由傳參的方式
三種主要方式:
1. 動態路由
// 路由配置
{path: '/user/:id',component: User
}// 跳轉
router.push('/user/123')// 獲取
this.$route.params.id // '123'
2. query 傳參
// 跳轉
router.push({path: '/user',query: { id: '123' }
})// 獲取
this.$route.query.id // '123'// URL表現: /user?id=123
3. props 解耦
// 路由配置
{path: '/user/:id',component: User,props: true
}// 組件接收
export default {props: ['id']
}高級用法:
// 命名路由
router.push({ name: 'user', params: { id: '123' } })// 替換當前路由
router.replace({ path: '/user/123' })// 保持查詢參數
router.push({ query: { ...this.$route.query, id: '123' } })
7. 插槽怎么傳參
作用域插槽示例:
<!-- 子組件 -->
<template><div><slot name="header" :user="user"></slot><slot :data="listData"></slot></div>
</template><script>
export default {data() {return {user: { name: 'John' },listData: [1, 2, 3]}}
}
</script><!-- 父組件使用 -->
<ChildComponent><template #header="{ user }"><h1>{{ user.name }}的頭像</h1></template><template v-slot:default="slotProps"><div v-for="item in slotProps.data" :key="item">{{ item }}</div></template>
</ChildComponent>
Vue3 組合式API寫法:
<!-- 子組件 -->
<script setup>
const user = ref({ name: 'John' })
const listData = ref([1, 2, 3])
</script><template><slot name="header" :user="user"></slot><slot :data="listData"></slot>
</template>
8. 使用過哪些微前端
主流方案經驗:
1. qiankun (基于single-spa)
// 主應用
import { registerMicroApps, start } from 'qiankun';registerMicroApps([{name: 'vueApp',entry: '//localhost:7100',container: '#subapp-container',activeRule: '/vue',}
]);start();// 子應用導出生命周期
export async function bootstrap() {}
export async function mount() {}
export async function unmount() {}
2. Module Federation (Webpack5)
// webpack.config.js (主應用)
new ModuleFederationPlugin({name: 'host',remotes: {app1: 'app1@http://localhost:3001/remoteEntry.js'}
});// 使用
import('app1/Button').then(ButtonModule => {const Button = ButtonModule.default;// 渲染Button
});
3. iframe (傳統方案)
優缺點:
優點:隔離徹底,實現簡單
缺點:通信復雜,體驗不一致
選型建議:
需要快速接入 → qiankun
需要細粒度控制 → Module Federation
需要強隔離 → iframe
9. 服務端渲染
核心流程: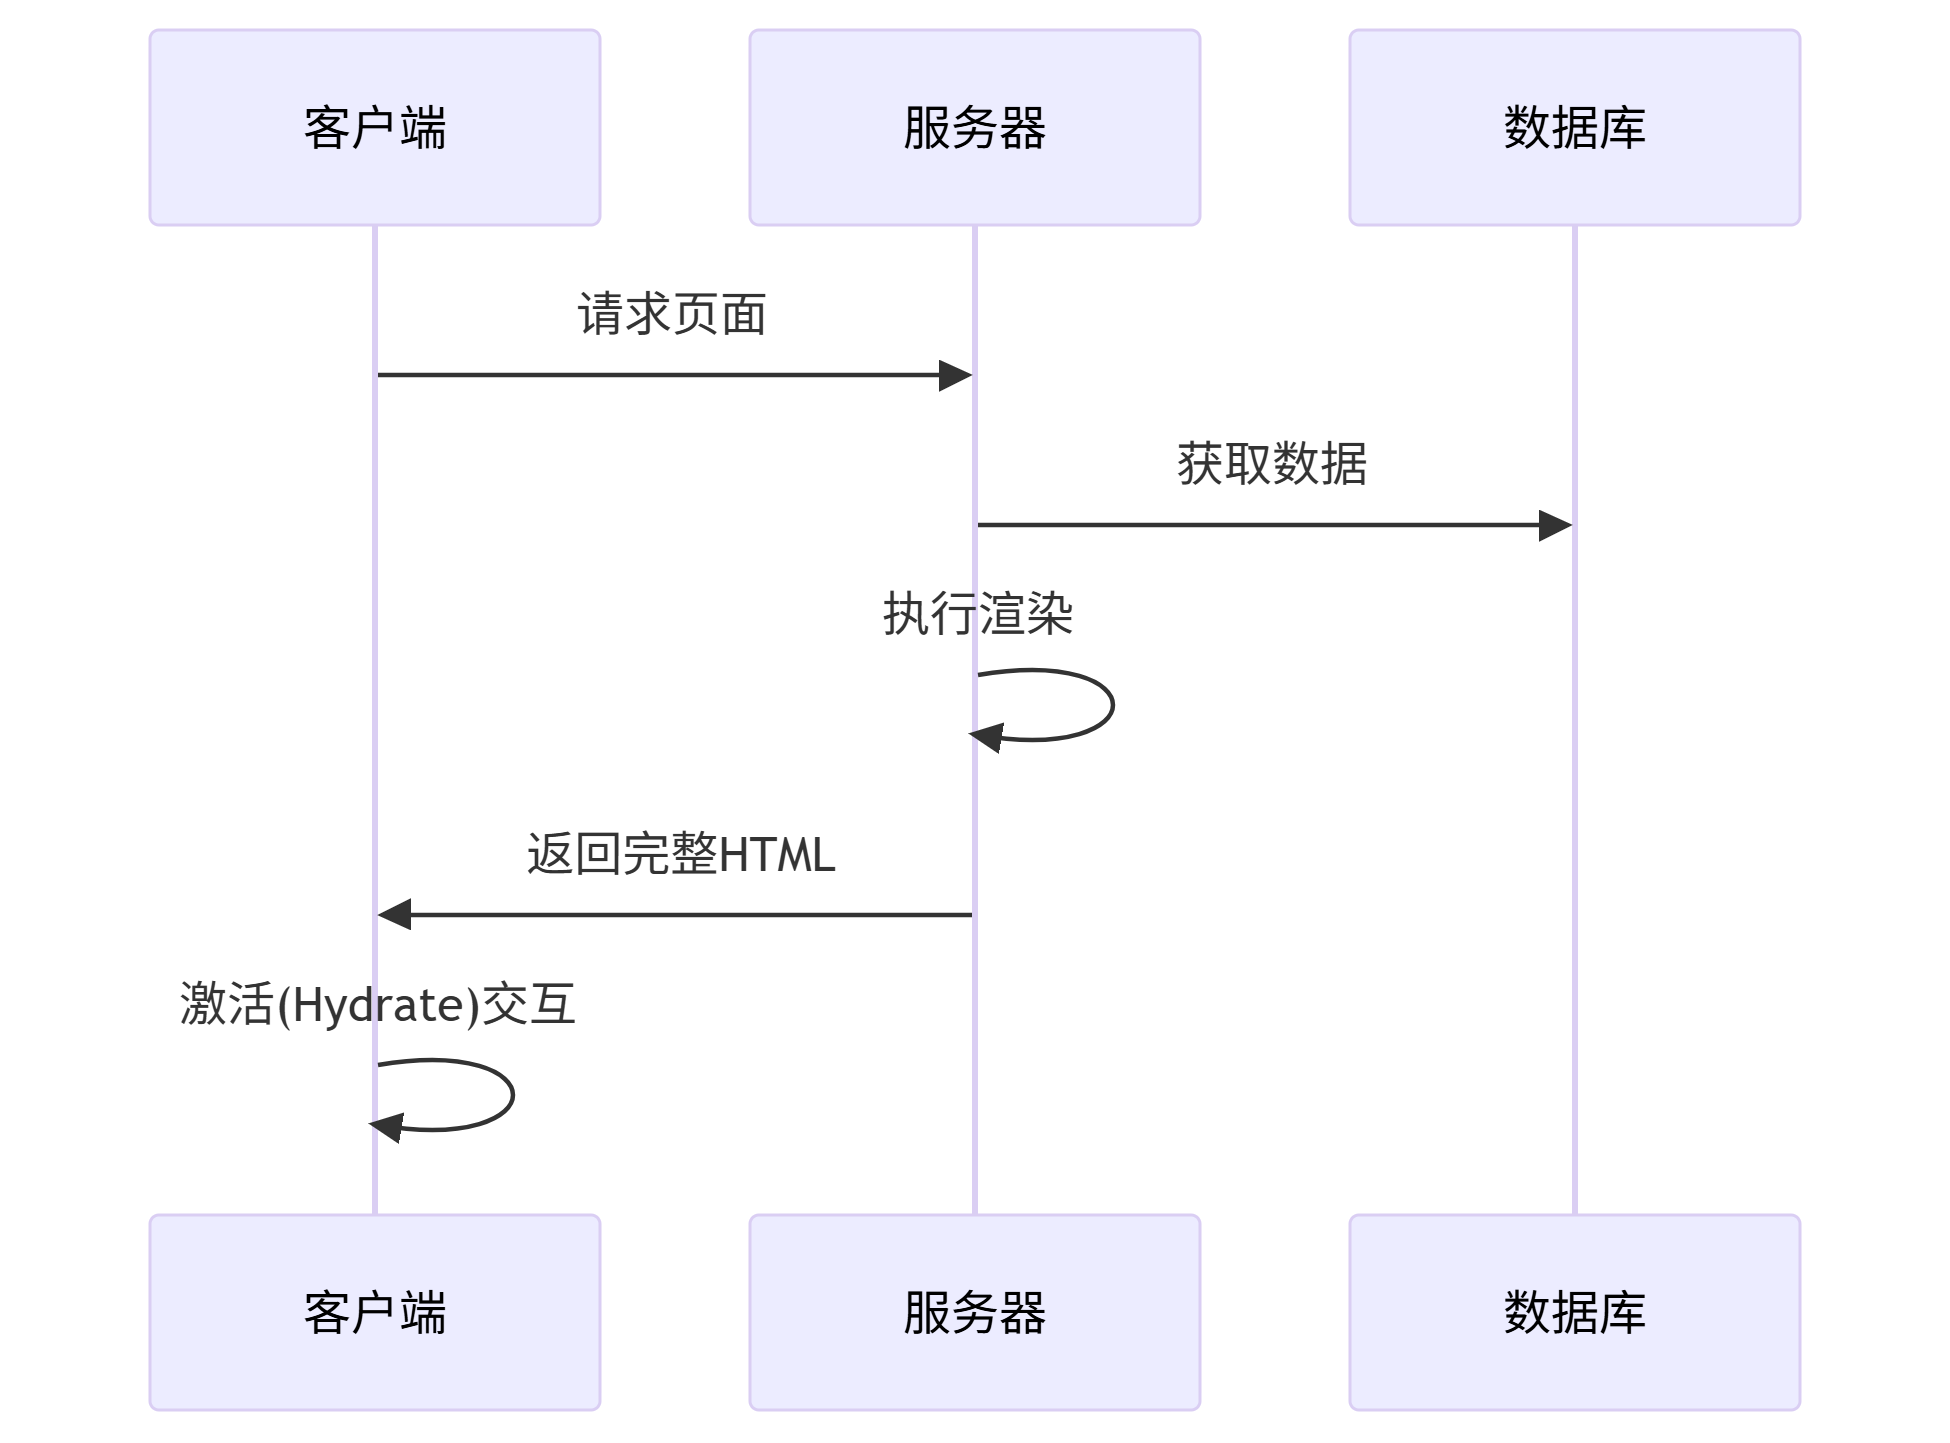
優勢:
更好的SEO
更快的首屏渲染
更好的低端設備兼容性
實現方案:
Next.js (React):開箱即用SSR支持
Nuxt.js (Vue):約定式路由SSR
自定義SSR:使用Vue Server Renderer / ReactDOMServer
10. 頁面渲染做了哪些操作
詳細渲染過程:
解析HTML:
構建DOM樹
遇到CSS/JS會并行下載
解析CSS:
構建CSSOM樹
阻塞渲染(CSS是渲染阻塞資源)
合并渲染樹:
結合DOM和CSSOM
排除
display:none等不可見元素
布局計算:
計算每個節點的確切位置和大小
也稱為"回流"(Reflow)
繪制:
將渲染樹轉換為屏幕像素
分層(Layer)繪制,使用GPU加速
合成:
將各層合并為最終頁面
處理transform/opacity等屬性
優化點:
減少重排重繪
使用will-change提示瀏覽器
關鍵渲染路徑優化
11. 服務器端渲染和客戶端渲染的區別
對比表格:
| 特性 | 服務端渲染 (SSR) | 客戶端渲染 (CSR) |
|---|---|---|
| 渲染位置 | 服務器端 | 瀏覽器端 |
| 首次響應內容 | 完整HTML | 空HTML骨架+JS |
| SEO友好性 | 優秀 | 較差(需額外處理) |
| 首屏時間 | 快(立即顯示內容) | 慢(需等待JS執行) |
| 服務器壓力 | 高(每次請求需渲染) | 低(靜態文件托管) |
| 交互響應速度 | 需等待JS加載完成 | 后續交互更快 |
| 技術復雜度 | 高(需處理同構等) | 低 |
選型建議:
需要SEO/首屏速度 → SSR
復雜交互/后臺系統 → CSR
混合方案 → 關鍵頁面SSR + 其他CSR
12. 開發中配置跨域和上線后配置跨域
開發環境配置
Vue CLI:
// vue.config.js
module.exports = {devServer: {proxy: {'/api': {target: 'http://backend:8080',changeOrigin: true,pathRewrite: { '^/api': '' }}}}
}Vite:
// vite.config.js
export default defineConfig({server: {proxy: {'/api': {target: 'http://backend:8080',changeOrigin: true,rewrite: path => path.replace(/^\/api/, '')}}}
})
生產環境Nginx配置
server {listen 80;server_name yourdomain.com;location /api/ {proxy_pass http://backend-server/;# CORS配置add_header 'Access-Control-Allow-Origin' '$http_origin';add_header 'Access-Control-Allow-Methods' 'GET, POST, OPTIONS';add_header 'Access-Control-Allow-Headers' 'Content-Type, Authorization';# 預檢請求處理if ($request_method = 'OPTIONS') {add_header 'Access-Control-Max-Age' 1728000;return 204;}}# 前端靜態資源location / {root /usr/share/nginx/html;try_files $uri $uri/ /index.html;}
}高級配置:
# 多環境配置
map $env $backend {default "http://default-server";staging "http://staging-server";prod "http://prod-server";
}# HTTPS配置
server {listen 443 ssl;ssl_certificate /path/to/cert.pem;ssl_certificate_key /path/to/key.pem;location /api/ {proxy_pass $backend;# ...其他配置同上}
}

)


進程、線程)


文本預處理:NLP 版 “給數據洗澡” 指南)


