一、項目介紹
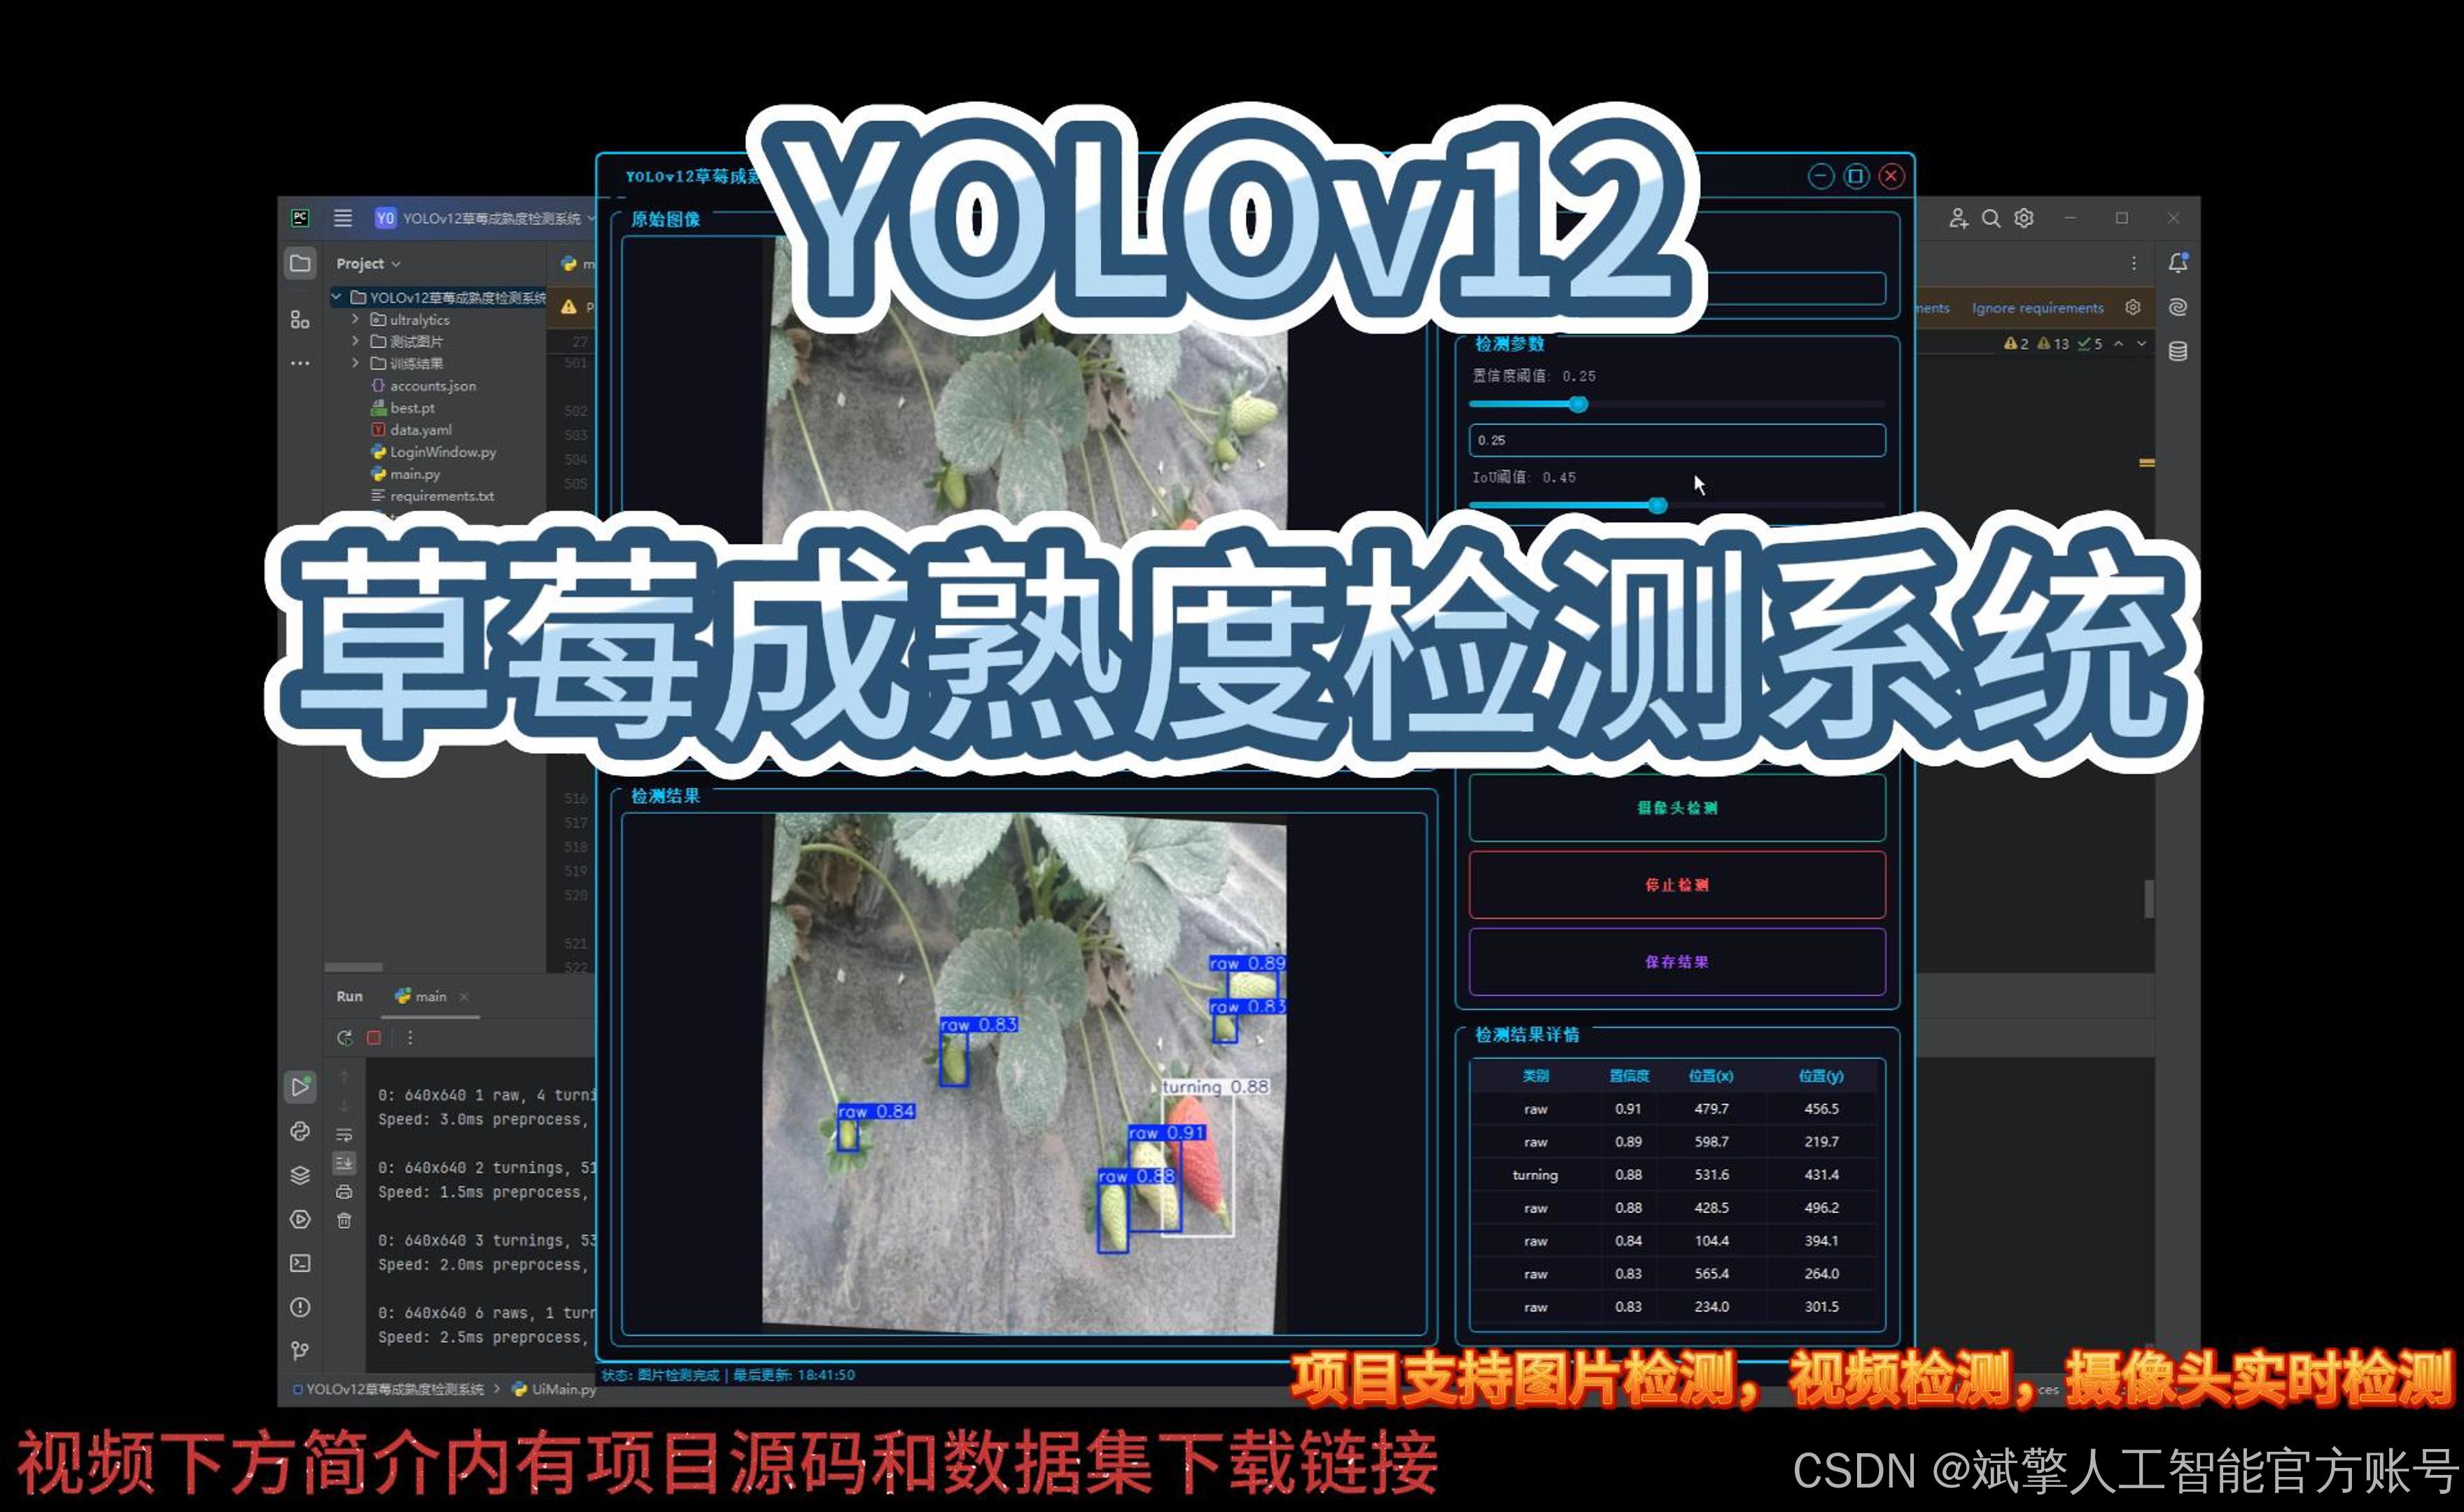
本項目構建了一套基于深度學習 YOLOv12 的草莓成熟度識別檢測系統,旨在實現對草莓在不同成熟階段的高精度、實時檢測與分類。系統采用 YOLO 格式數據集,將草莓分為 3 個類別:生(raw)、半熟(turning)及成熟(ripe),并使用 2939 張訓練集與 774 張驗證集圖片進行模型訓練與驗證。模型在 YOLOv12 框架下結合多尺度特征提取與優化的錨框機制,實現了對不同大小、不同角度草莓的精準識別。
系統前端提供了 UI 圖形界面,支持 實時檢測 與 結果可視化,并集成 用戶登錄與注冊功能,便于權限管理和個性化使用。后端以 Python 為主要開發語言,配合訓練好的 YOLOv12 模型,實現了高效推理與檢測結果輸出。本系統可廣泛應用于草莓采摘自動化、質量分級、智能農業監測等領域,為農業智能化管理提供可靠的技術支撐。
基于深度學習YOLOv12的草莓成熟度檢測系統(YOLOv12+YOLO數據集+UI界面+登錄注冊界面+Python項目源碼+模型)_嗶哩嗶哩_bilibili
基于深度學習YOLOv12的草莓成熟度檢測系統(YOLOv12+YOLO數據集+UI界面+登錄注冊界面+Python項目源碼+模型)
目錄
一、項目介紹
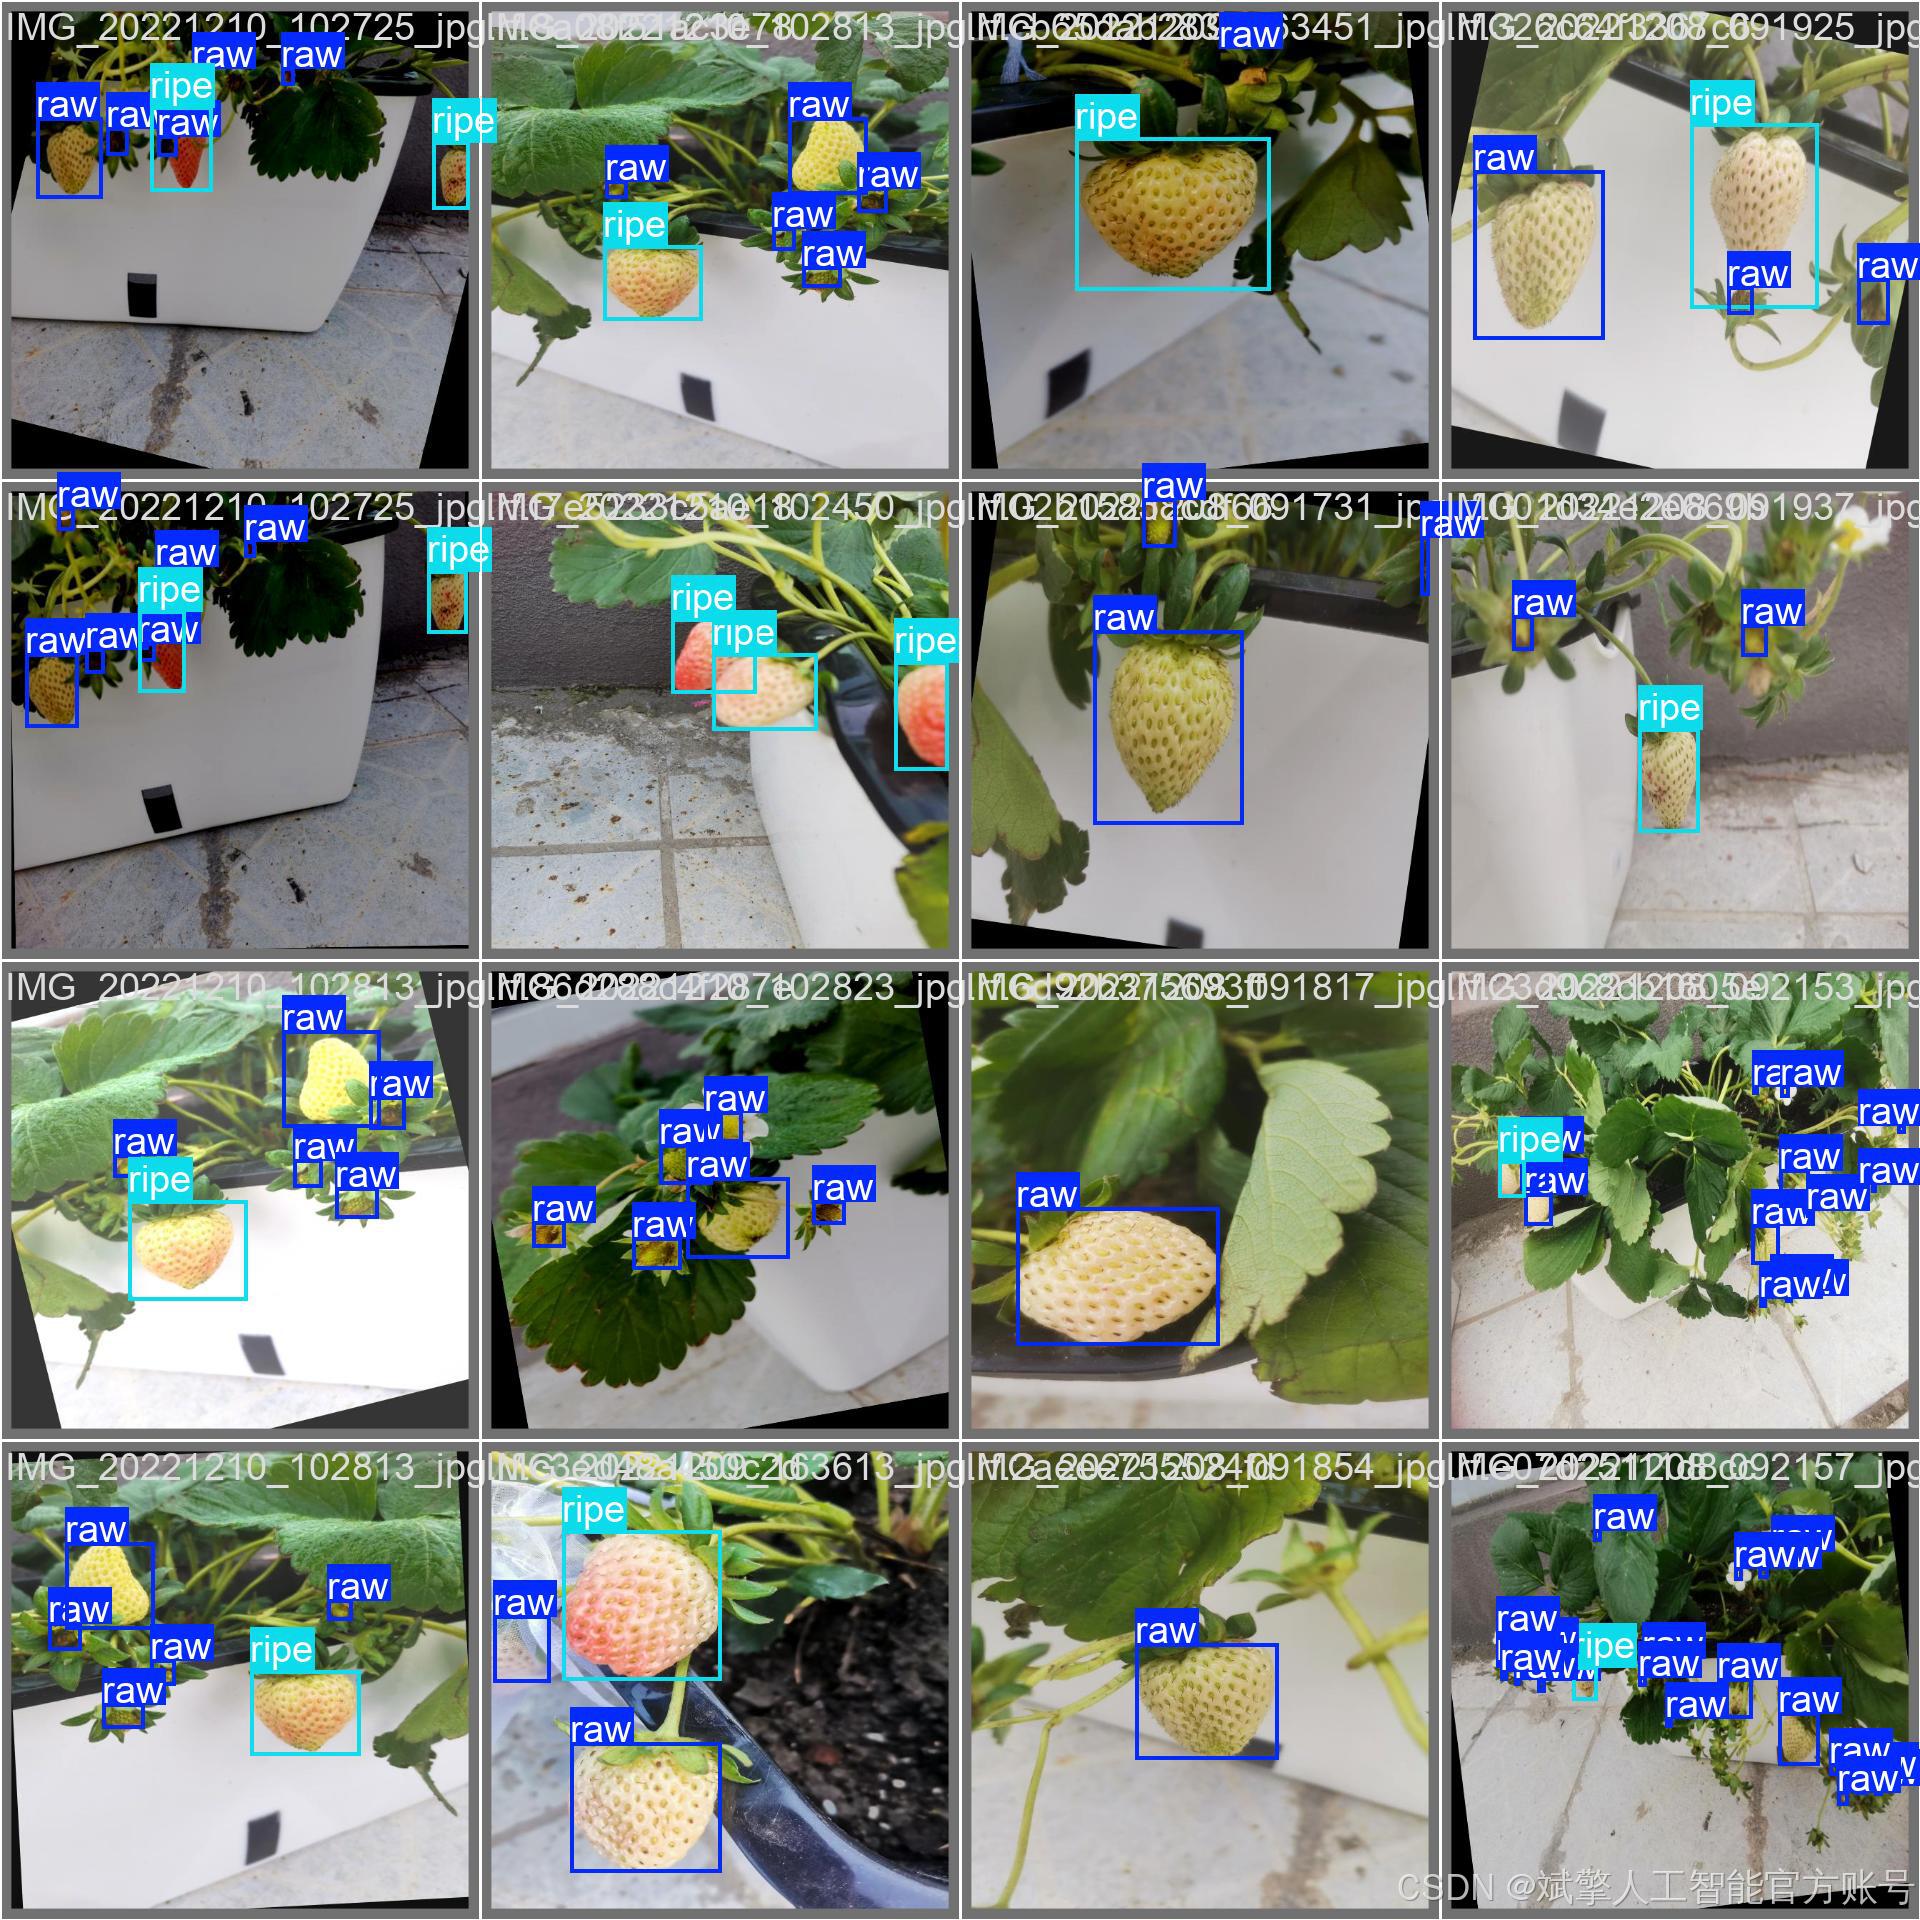
二、項目功能展示
2.1 用戶登錄系統
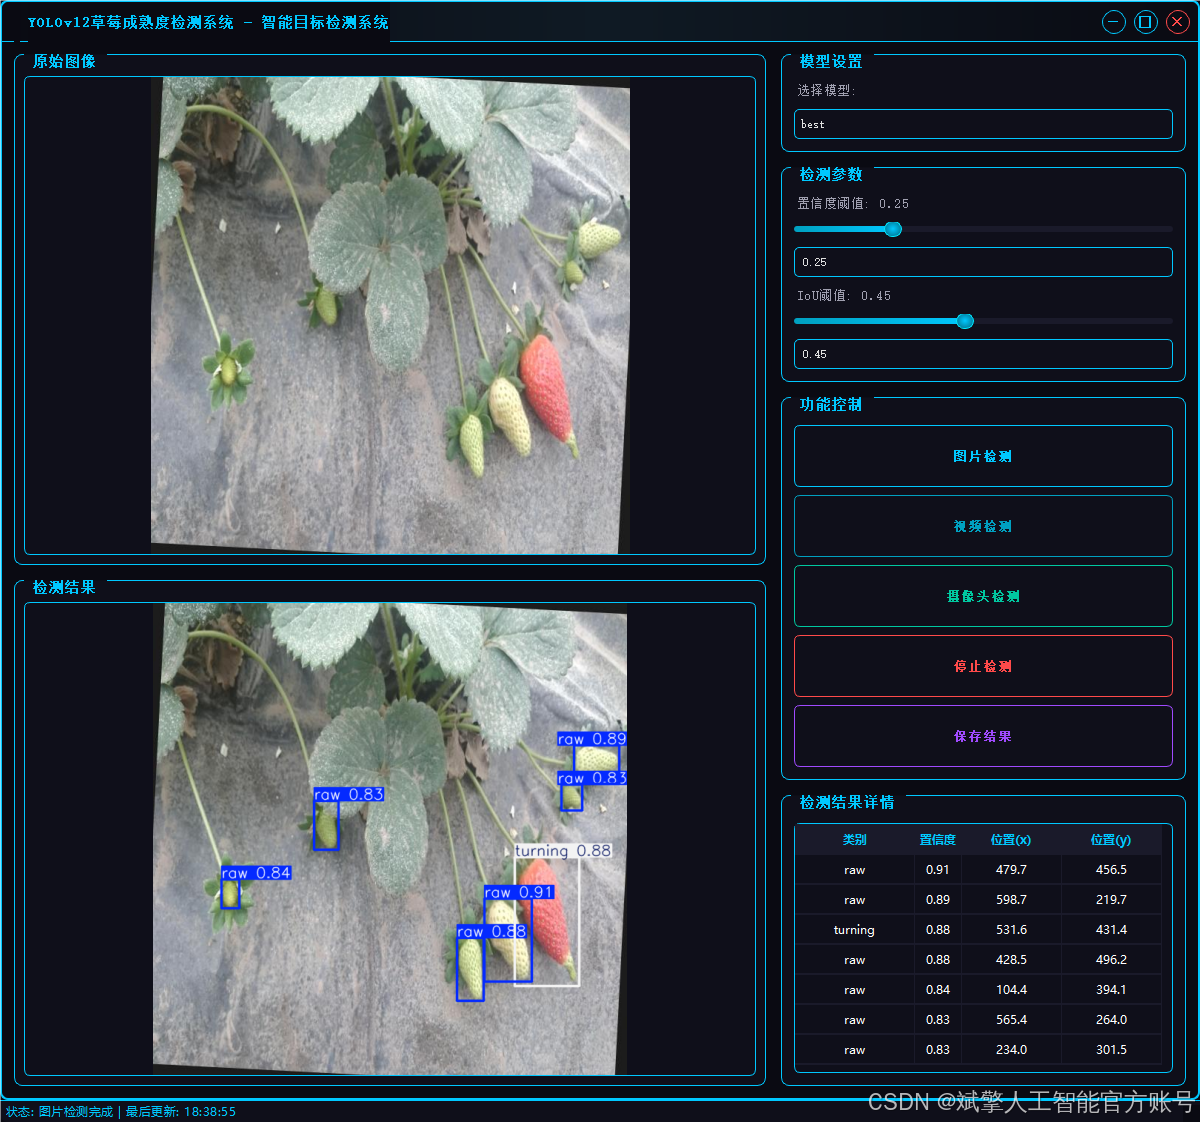
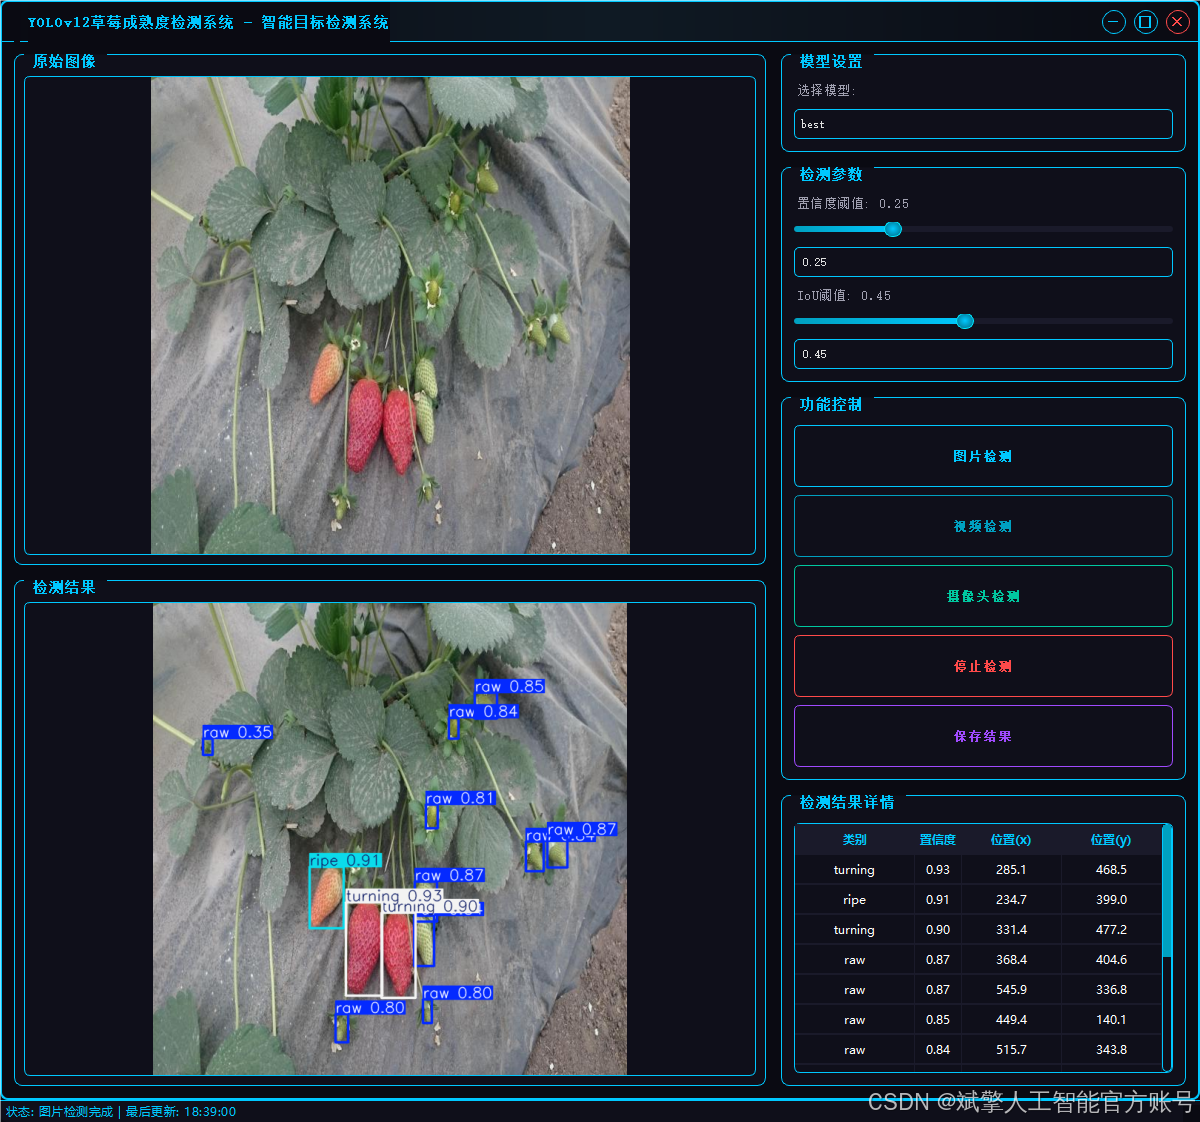
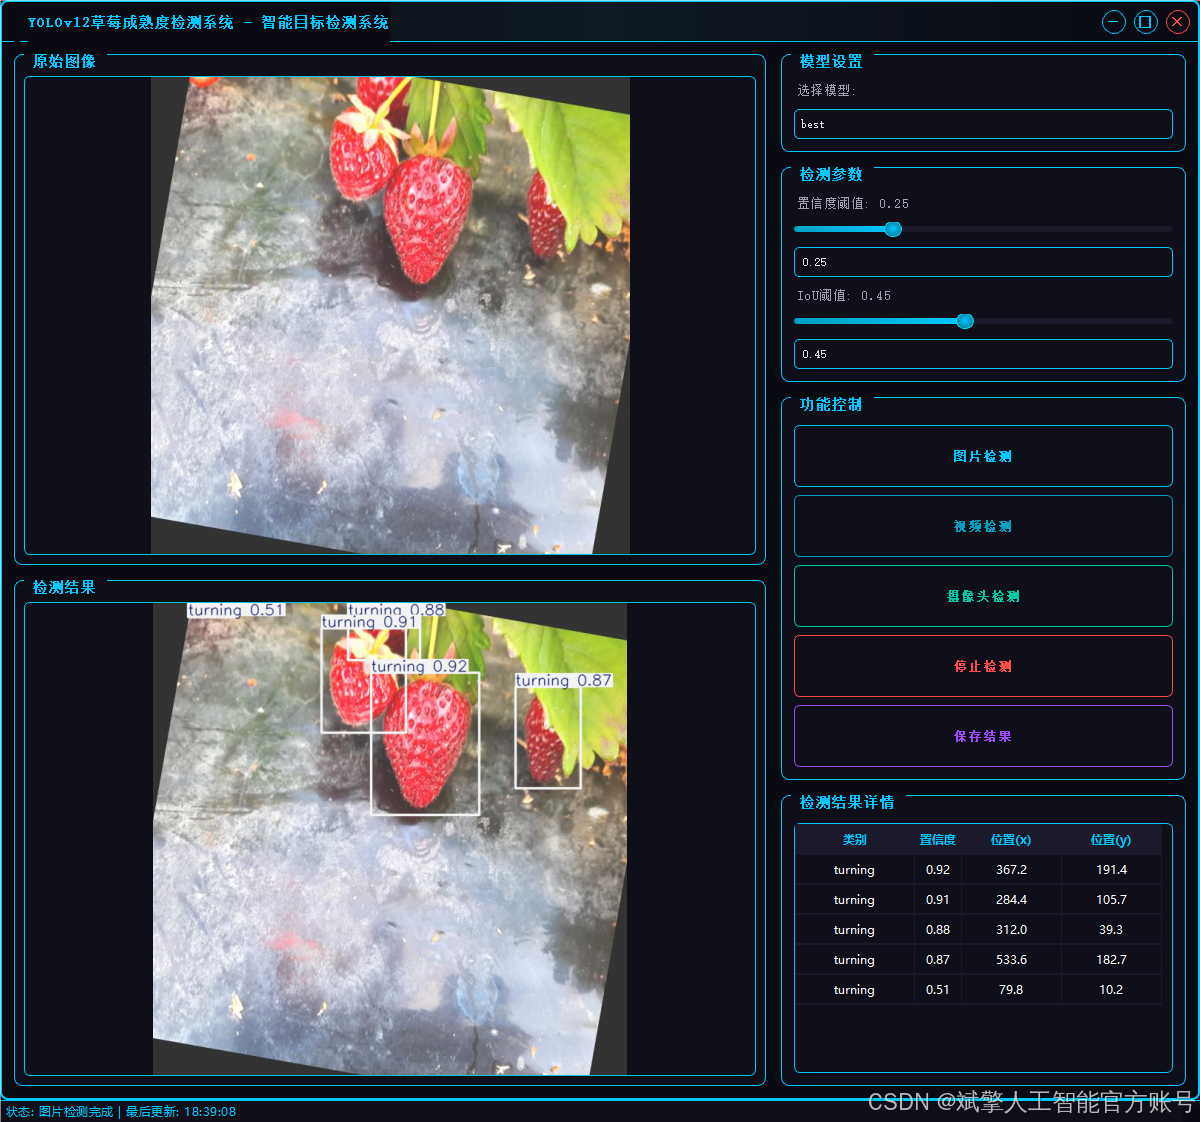
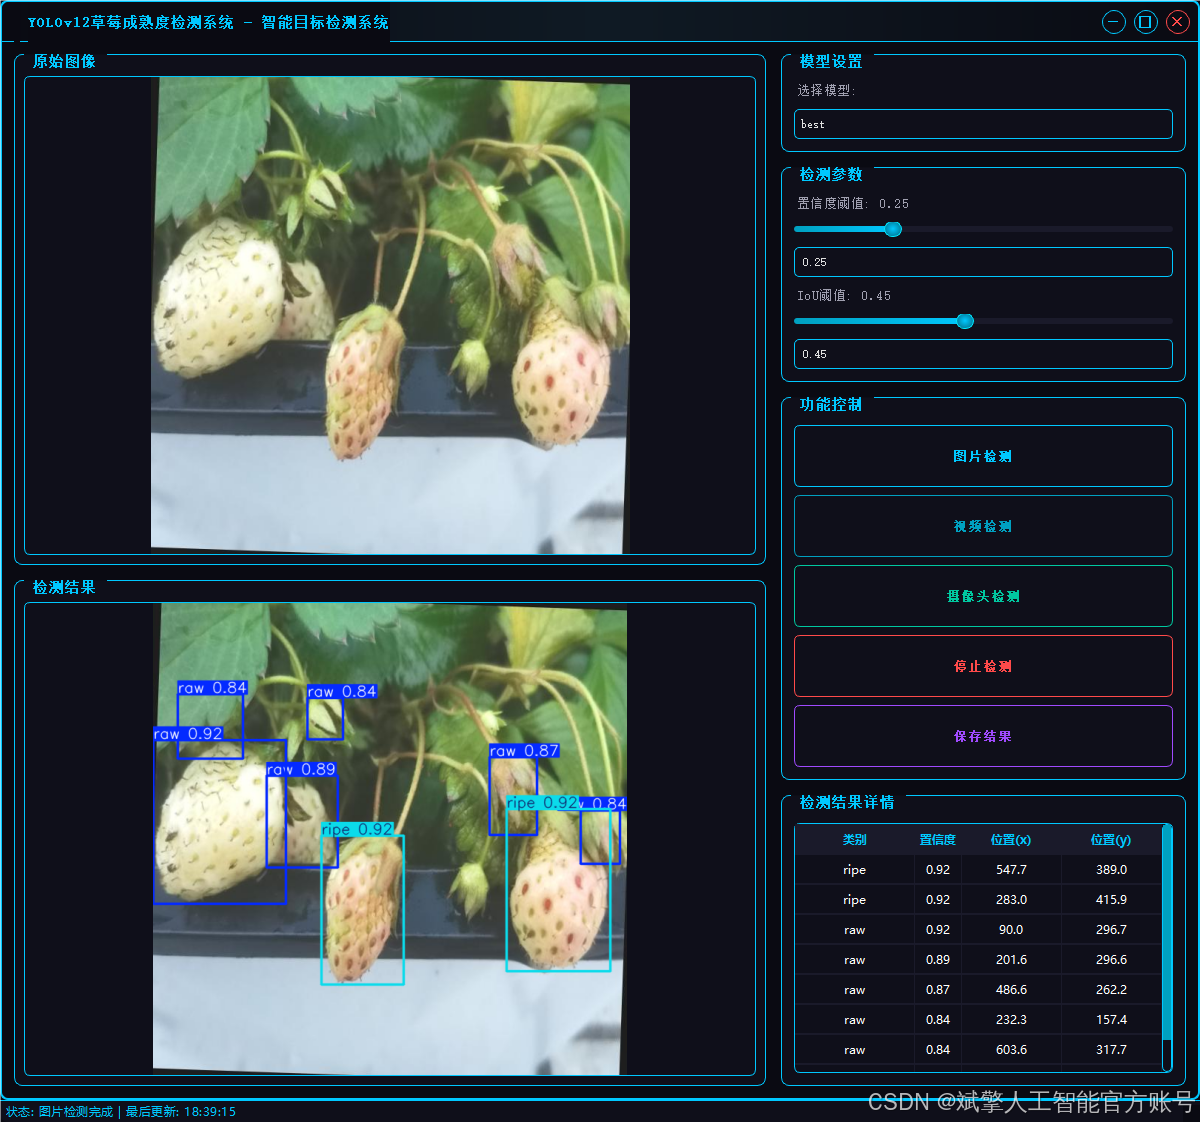
2.2 檢測功能
2.3 檢測結果顯示
2.4 參數配置
2.5 其他功能
3. 技術特點
4. 系統流程
三、數據集介紹
數據集配置文件
四、項目環境配置
創建虛擬環境
安裝所需要庫
五、模型訓練
訓練代碼
訓練結果
六、核心代碼
🔐登錄注冊驗證
🎯?多重檢測模式
🖼??沉浸式可視化
???參數配置系統
??UI美學設計
🔄?智能工作流
七、項目源碼(視頻簡介)
二、項目功能展示
??用戶登錄注冊:支持密碼檢測和安全性驗證。
??三種檢測模式:基于YOLOv12模型,支持圖片、視頻和實時攝像頭三種檢測,精準識別目標。
??雙畫面對比:同屏顯示原始畫面與檢測結果。
??數據可視化:實時表格展示檢測目標的類別、置信度及坐標。
?智能參數調節:提供置信度滑塊,動態優化檢測精度,適應不同場景需求。
?科幻風交互界面:深色主題搭配動態光效,減少視覺疲勞,提升操作體驗。
?多線程高性能架構:獨立檢測線程保障流暢運行,實時狀態提示,響應迅速無卡頓。
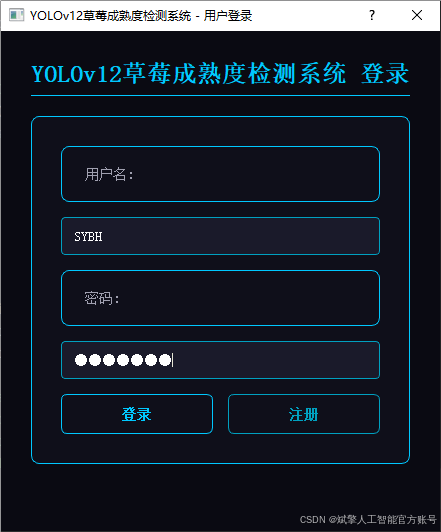

2.1 用戶登錄系統
-
提供用戶登錄和注冊功能
-
用戶名和密碼驗證
-
賬戶信息本地存儲(accounts.json)
-
密碼長度至少6位的安全要求
2.2 檢測功能
-
圖片檢測:支持JPG/JPEG/PNG/BMP格式圖片的火焰煙霧檢測
-
視頻檢測:支持MP4/AVI/MOV格式視頻的逐幀檢測
-
攝像頭檢測:實時攝像頭流檢測(默認攝像頭0)
-
檢測結果保存到"results"目錄
2.3 檢測結果顯示
-
顯示原始圖像和檢測結果圖像
-
檢測結果表格展示,包含:
-
檢測到的類別
-
置信度分數
-
物體位置坐標(x,y)、
-
2.4 參數配置
-
模型選擇
-
置信度閾值調節(0-1.0)
-
IoU(交并比)閾值調節(0-1.0)
-
實時同步滑塊和數值輸入框
2.5 其他功能
-
檢測結果保存功能
-
視頻檢測時自動保存結果視頻
-
狀態欄顯示系統狀態和最后更新時間
-
無邊框窗口設計,可拖動和調整大小
3. 技術特點
-
采用多線程處理檢測任務,避免界面卡頓
-
精美的UI設計,具有科技感的視覺效果:
-
發光邊框和按鈕
-
懸停和按下狀態效果
-
自定義滑塊、表格和下拉框樣式
-
-
檢測結果保存機制
-
響應式布局,適應不同窗口大小
4. 系統流程
-
用戶登錄/注冊
-
選擇檢測模式(圖片/視頻/攝像頭)
-
調整檢測參數(可選)
-
開始檢測并查看結果
-
可選擇保存檢測結果
-
停止檢測或切換其他模式
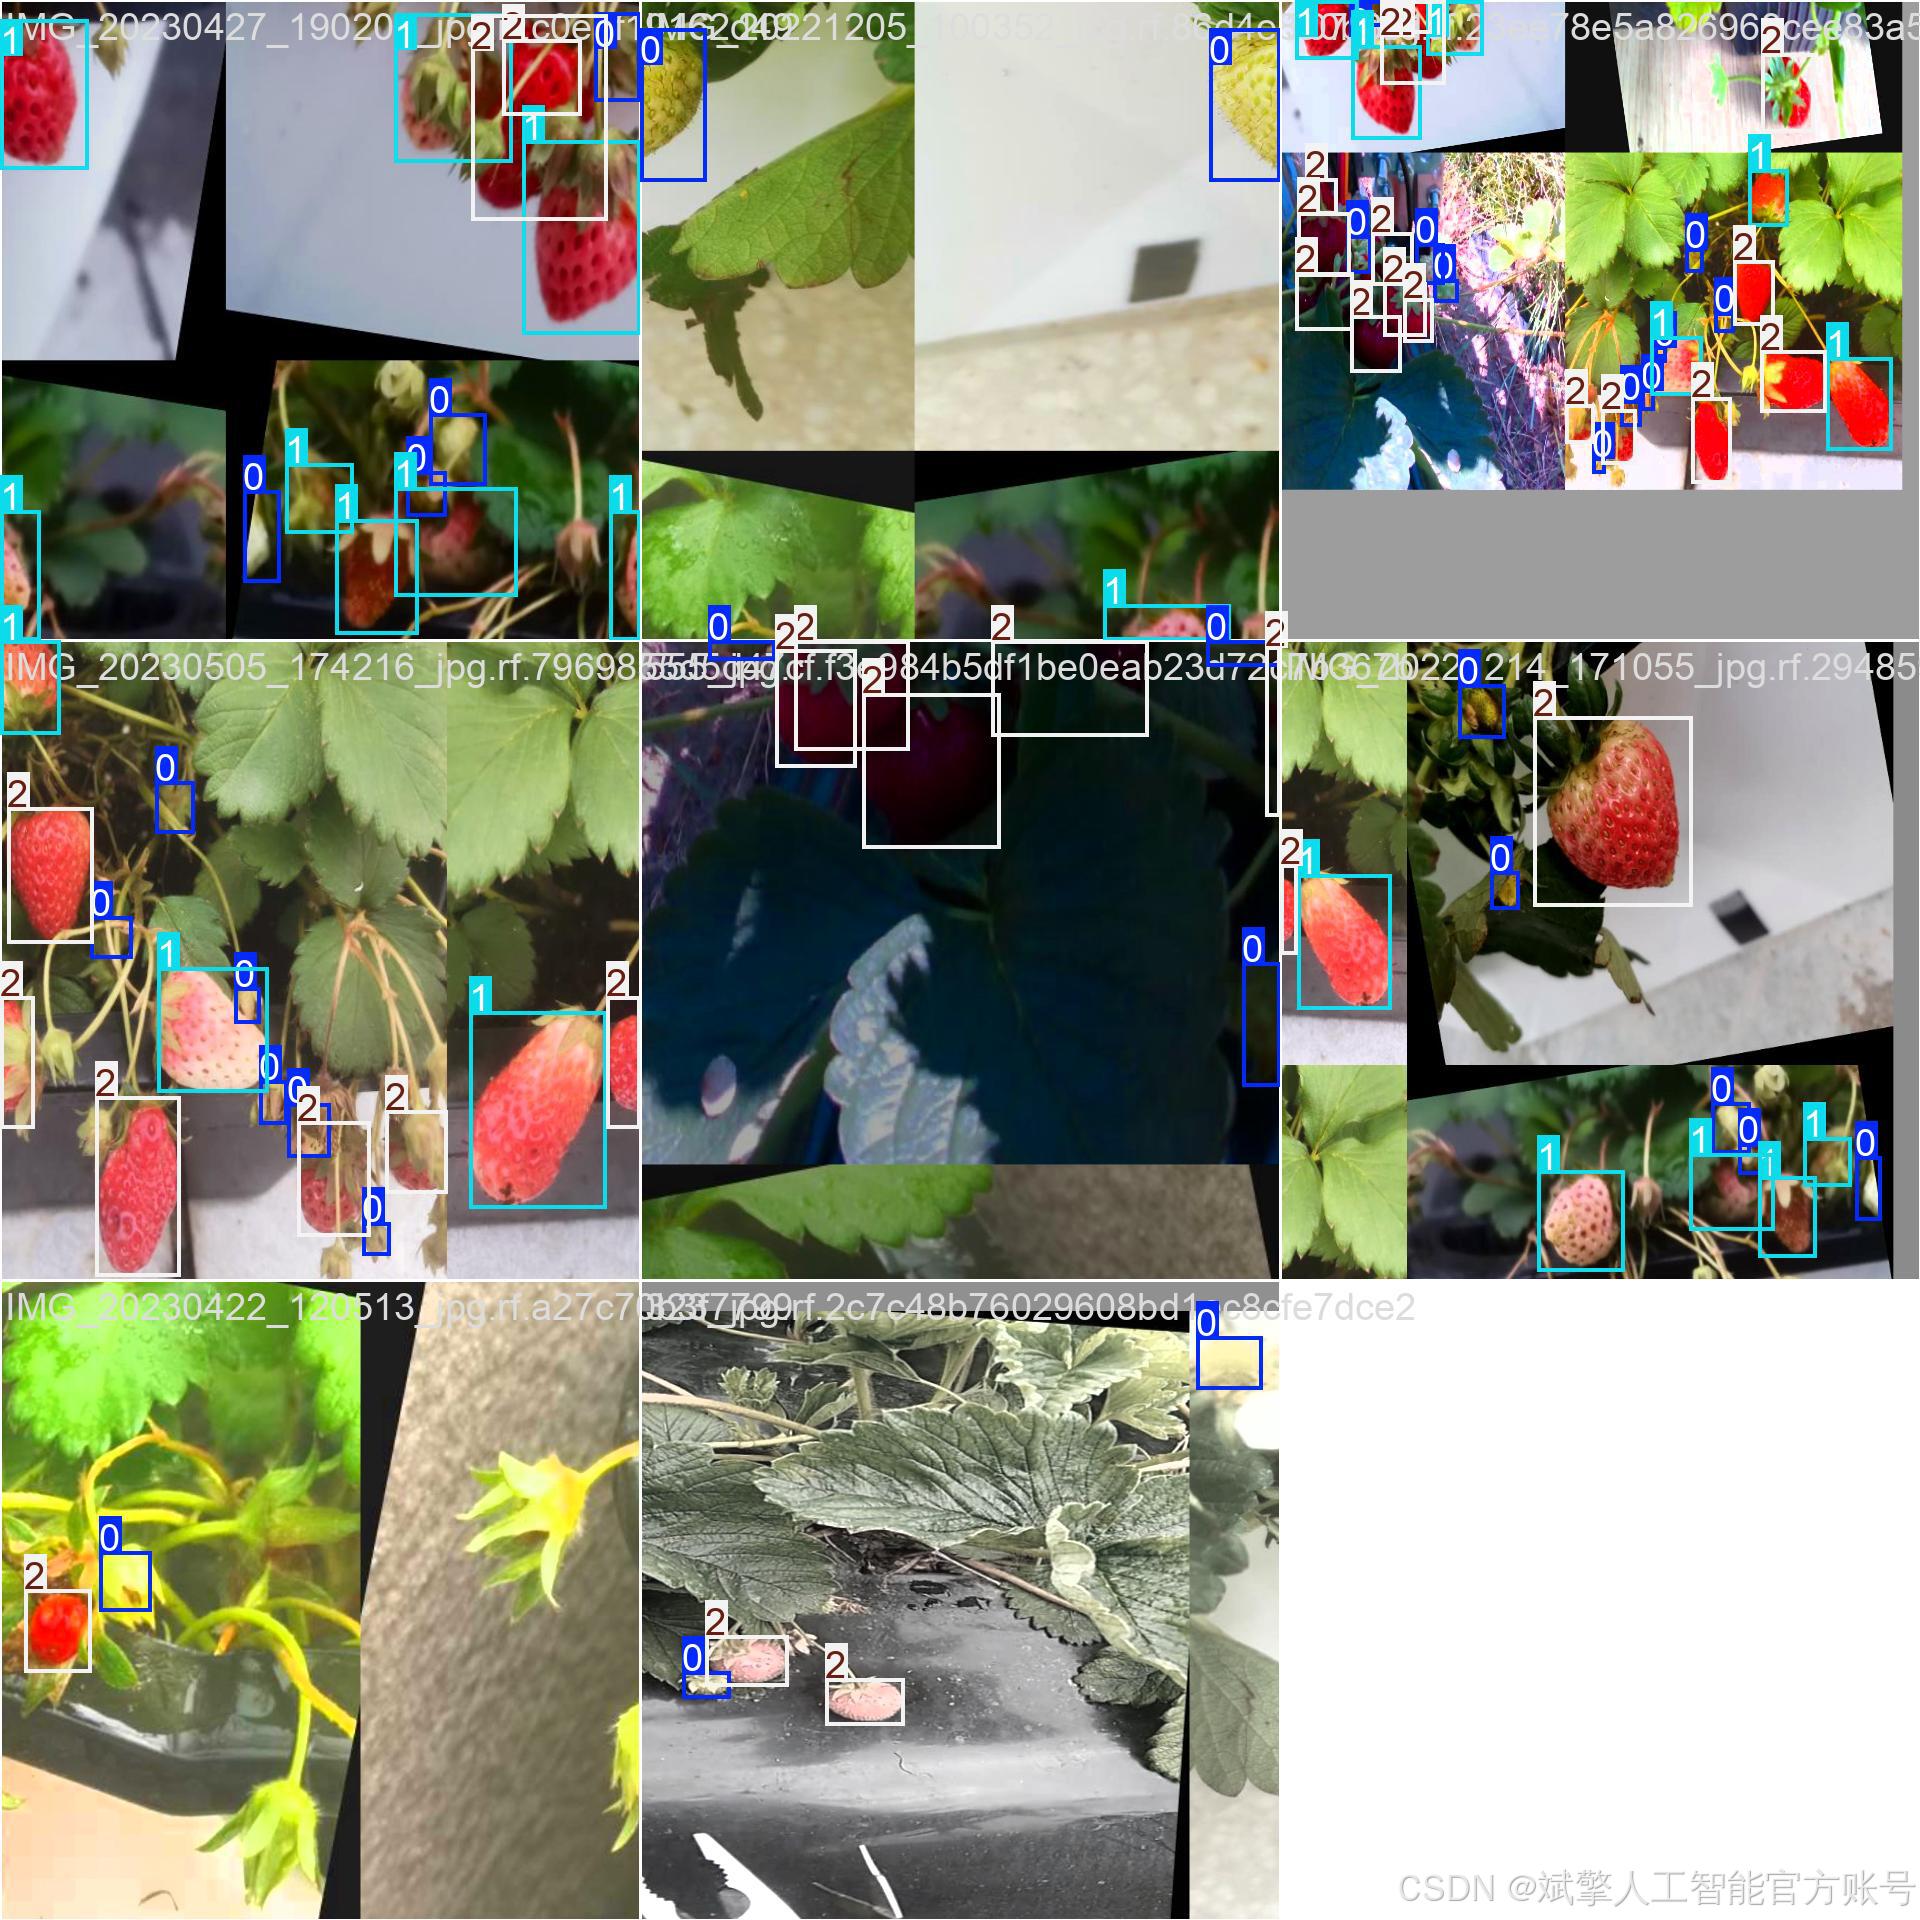
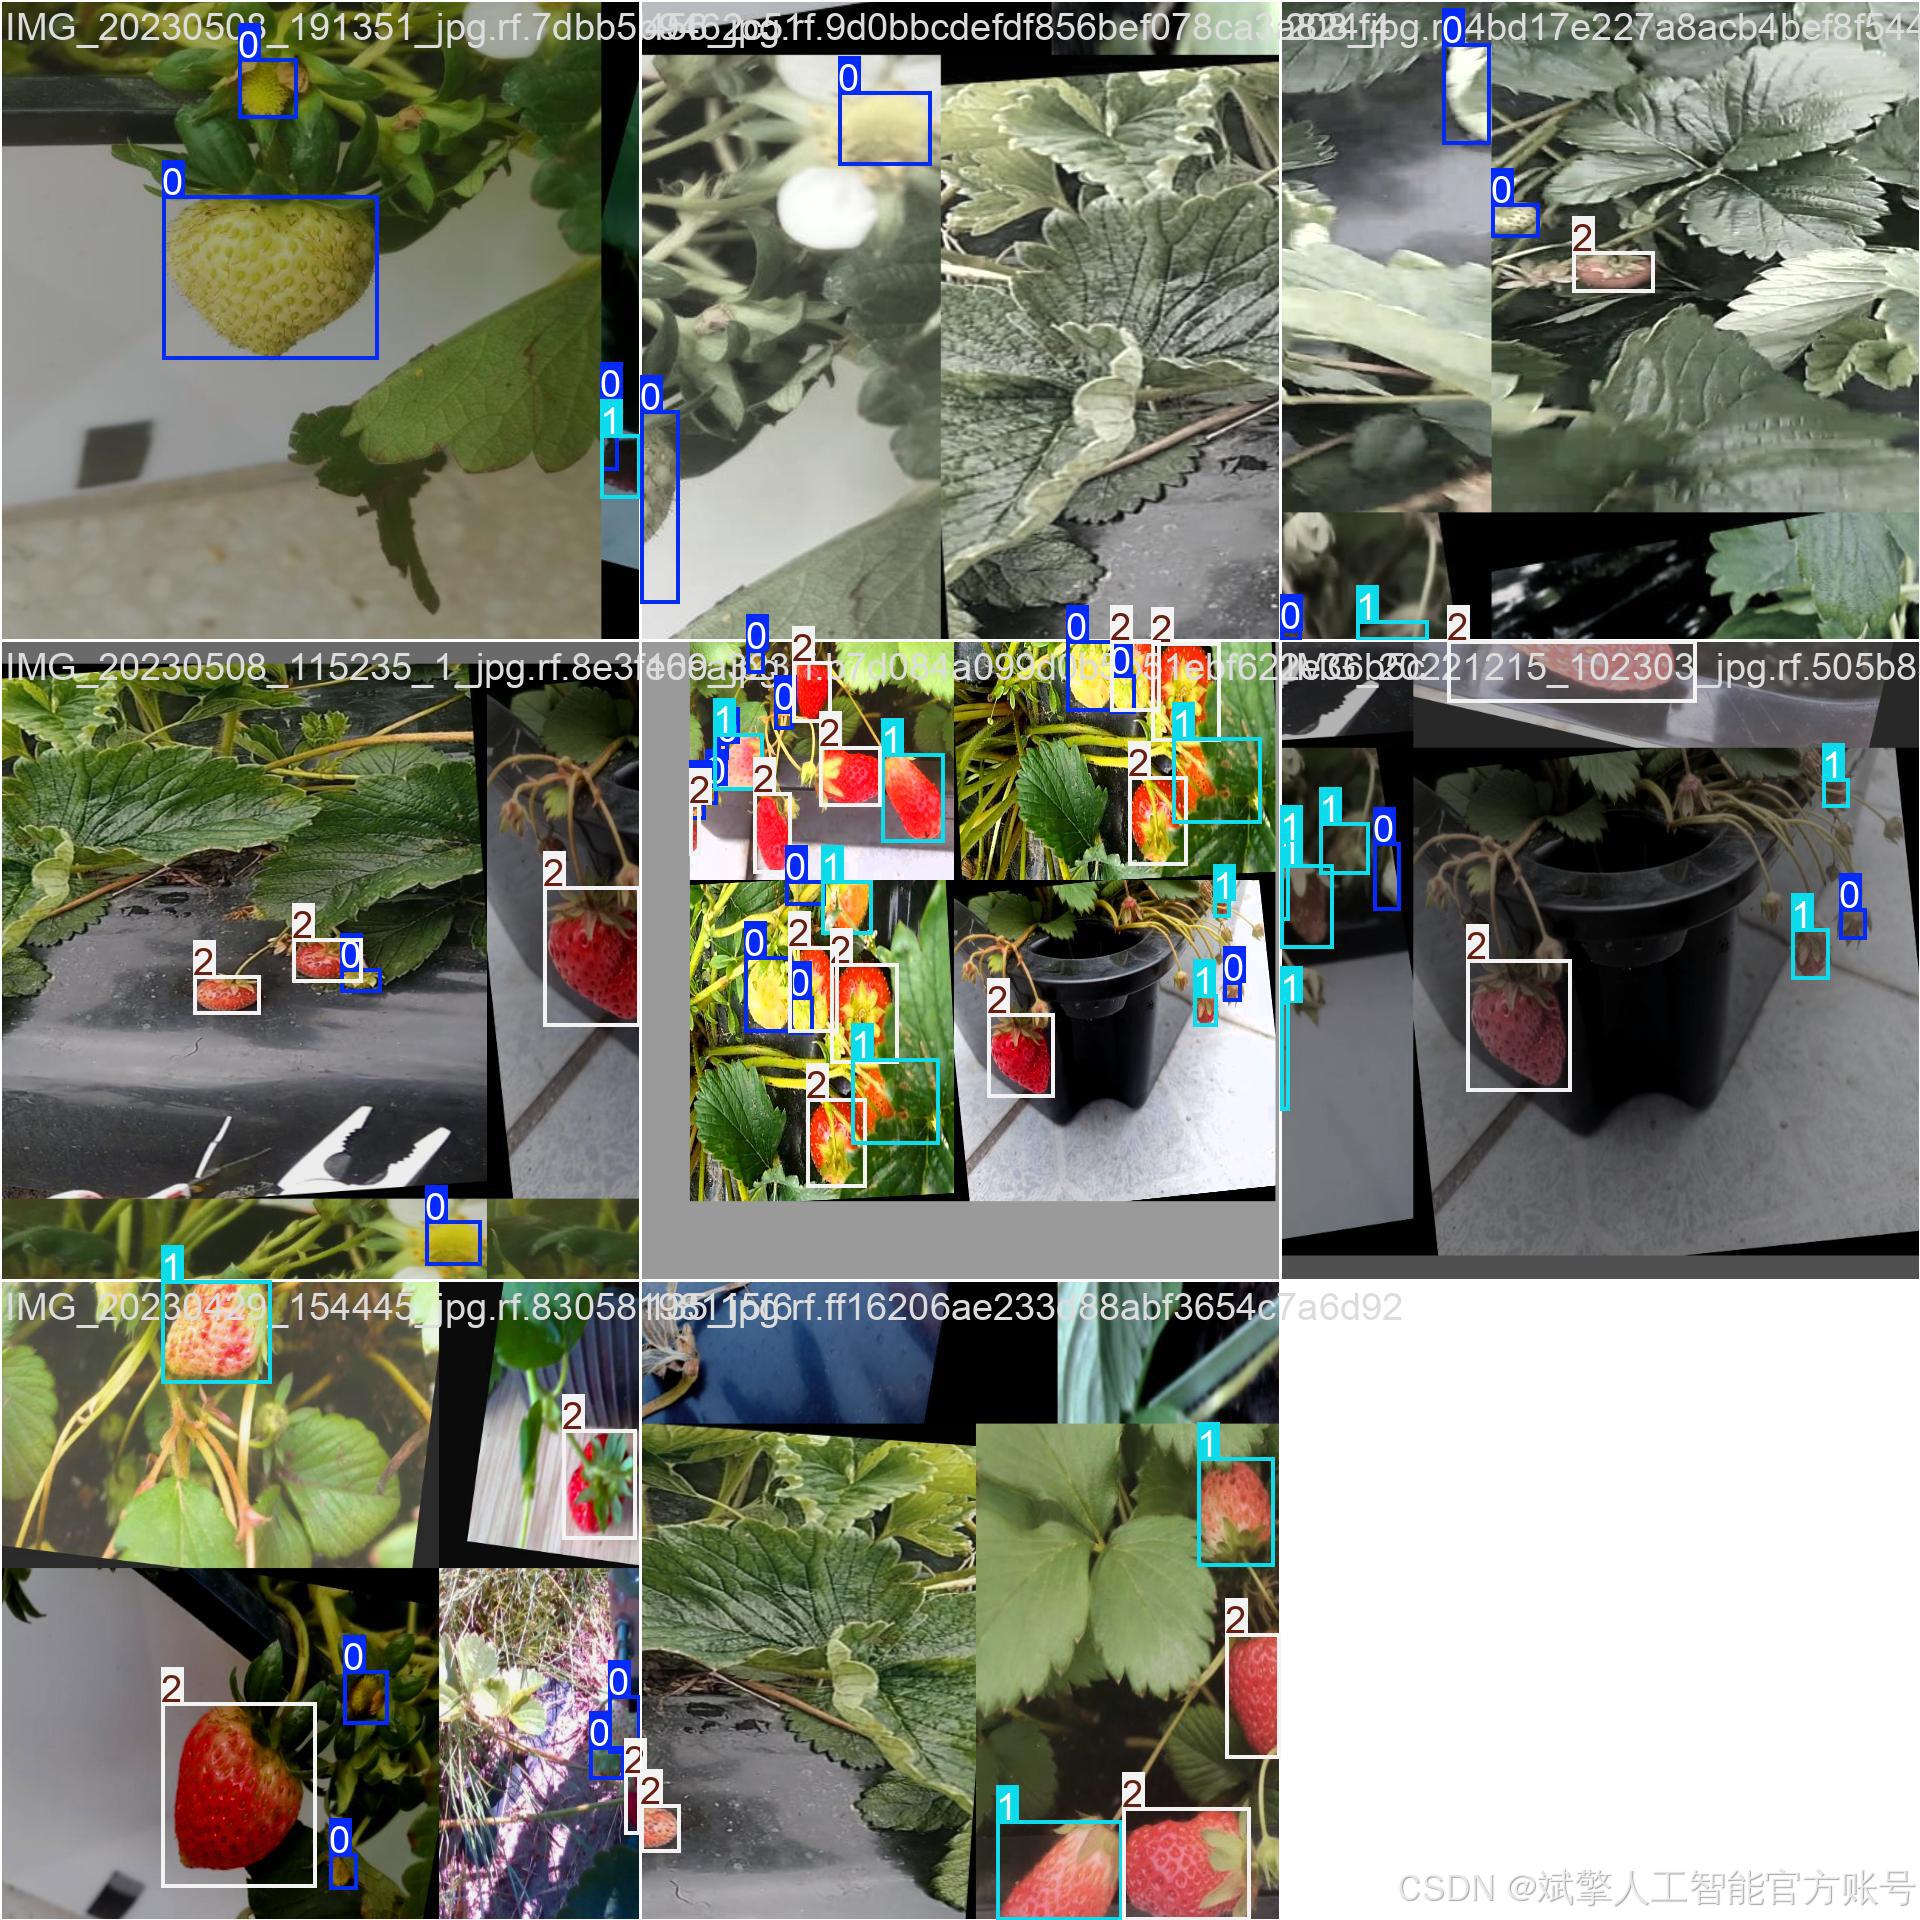
三、數據集介紹
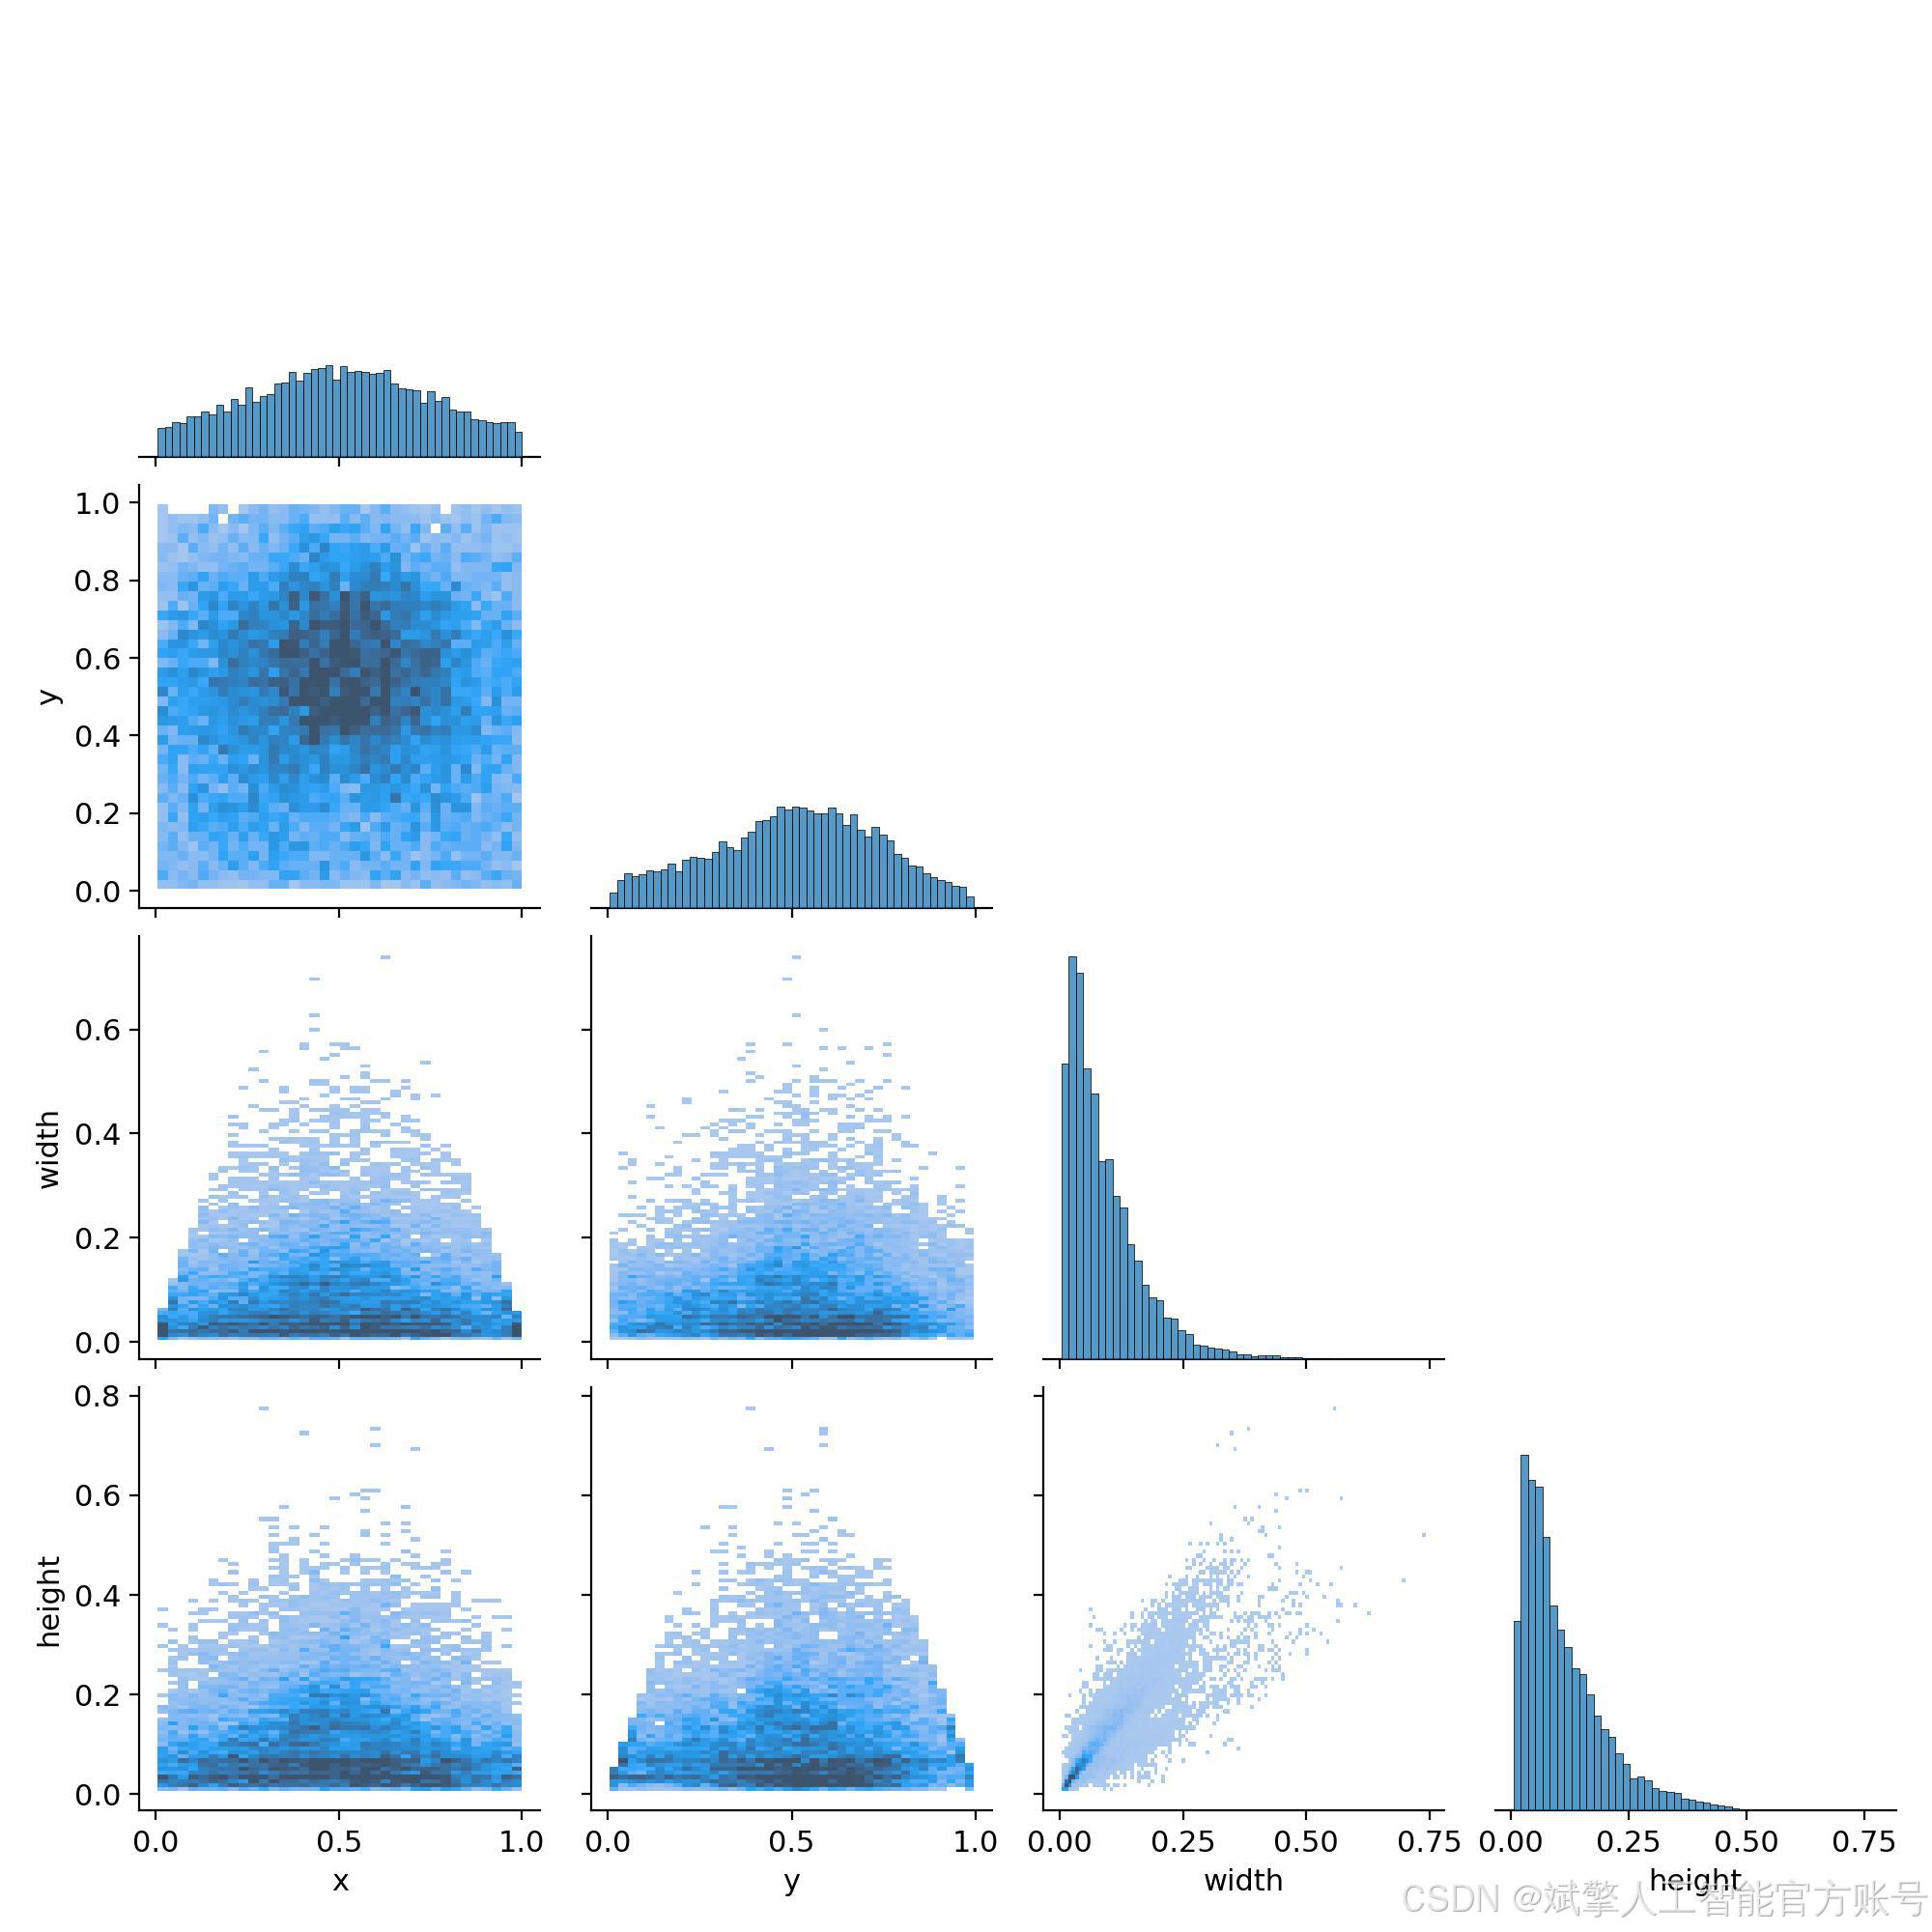
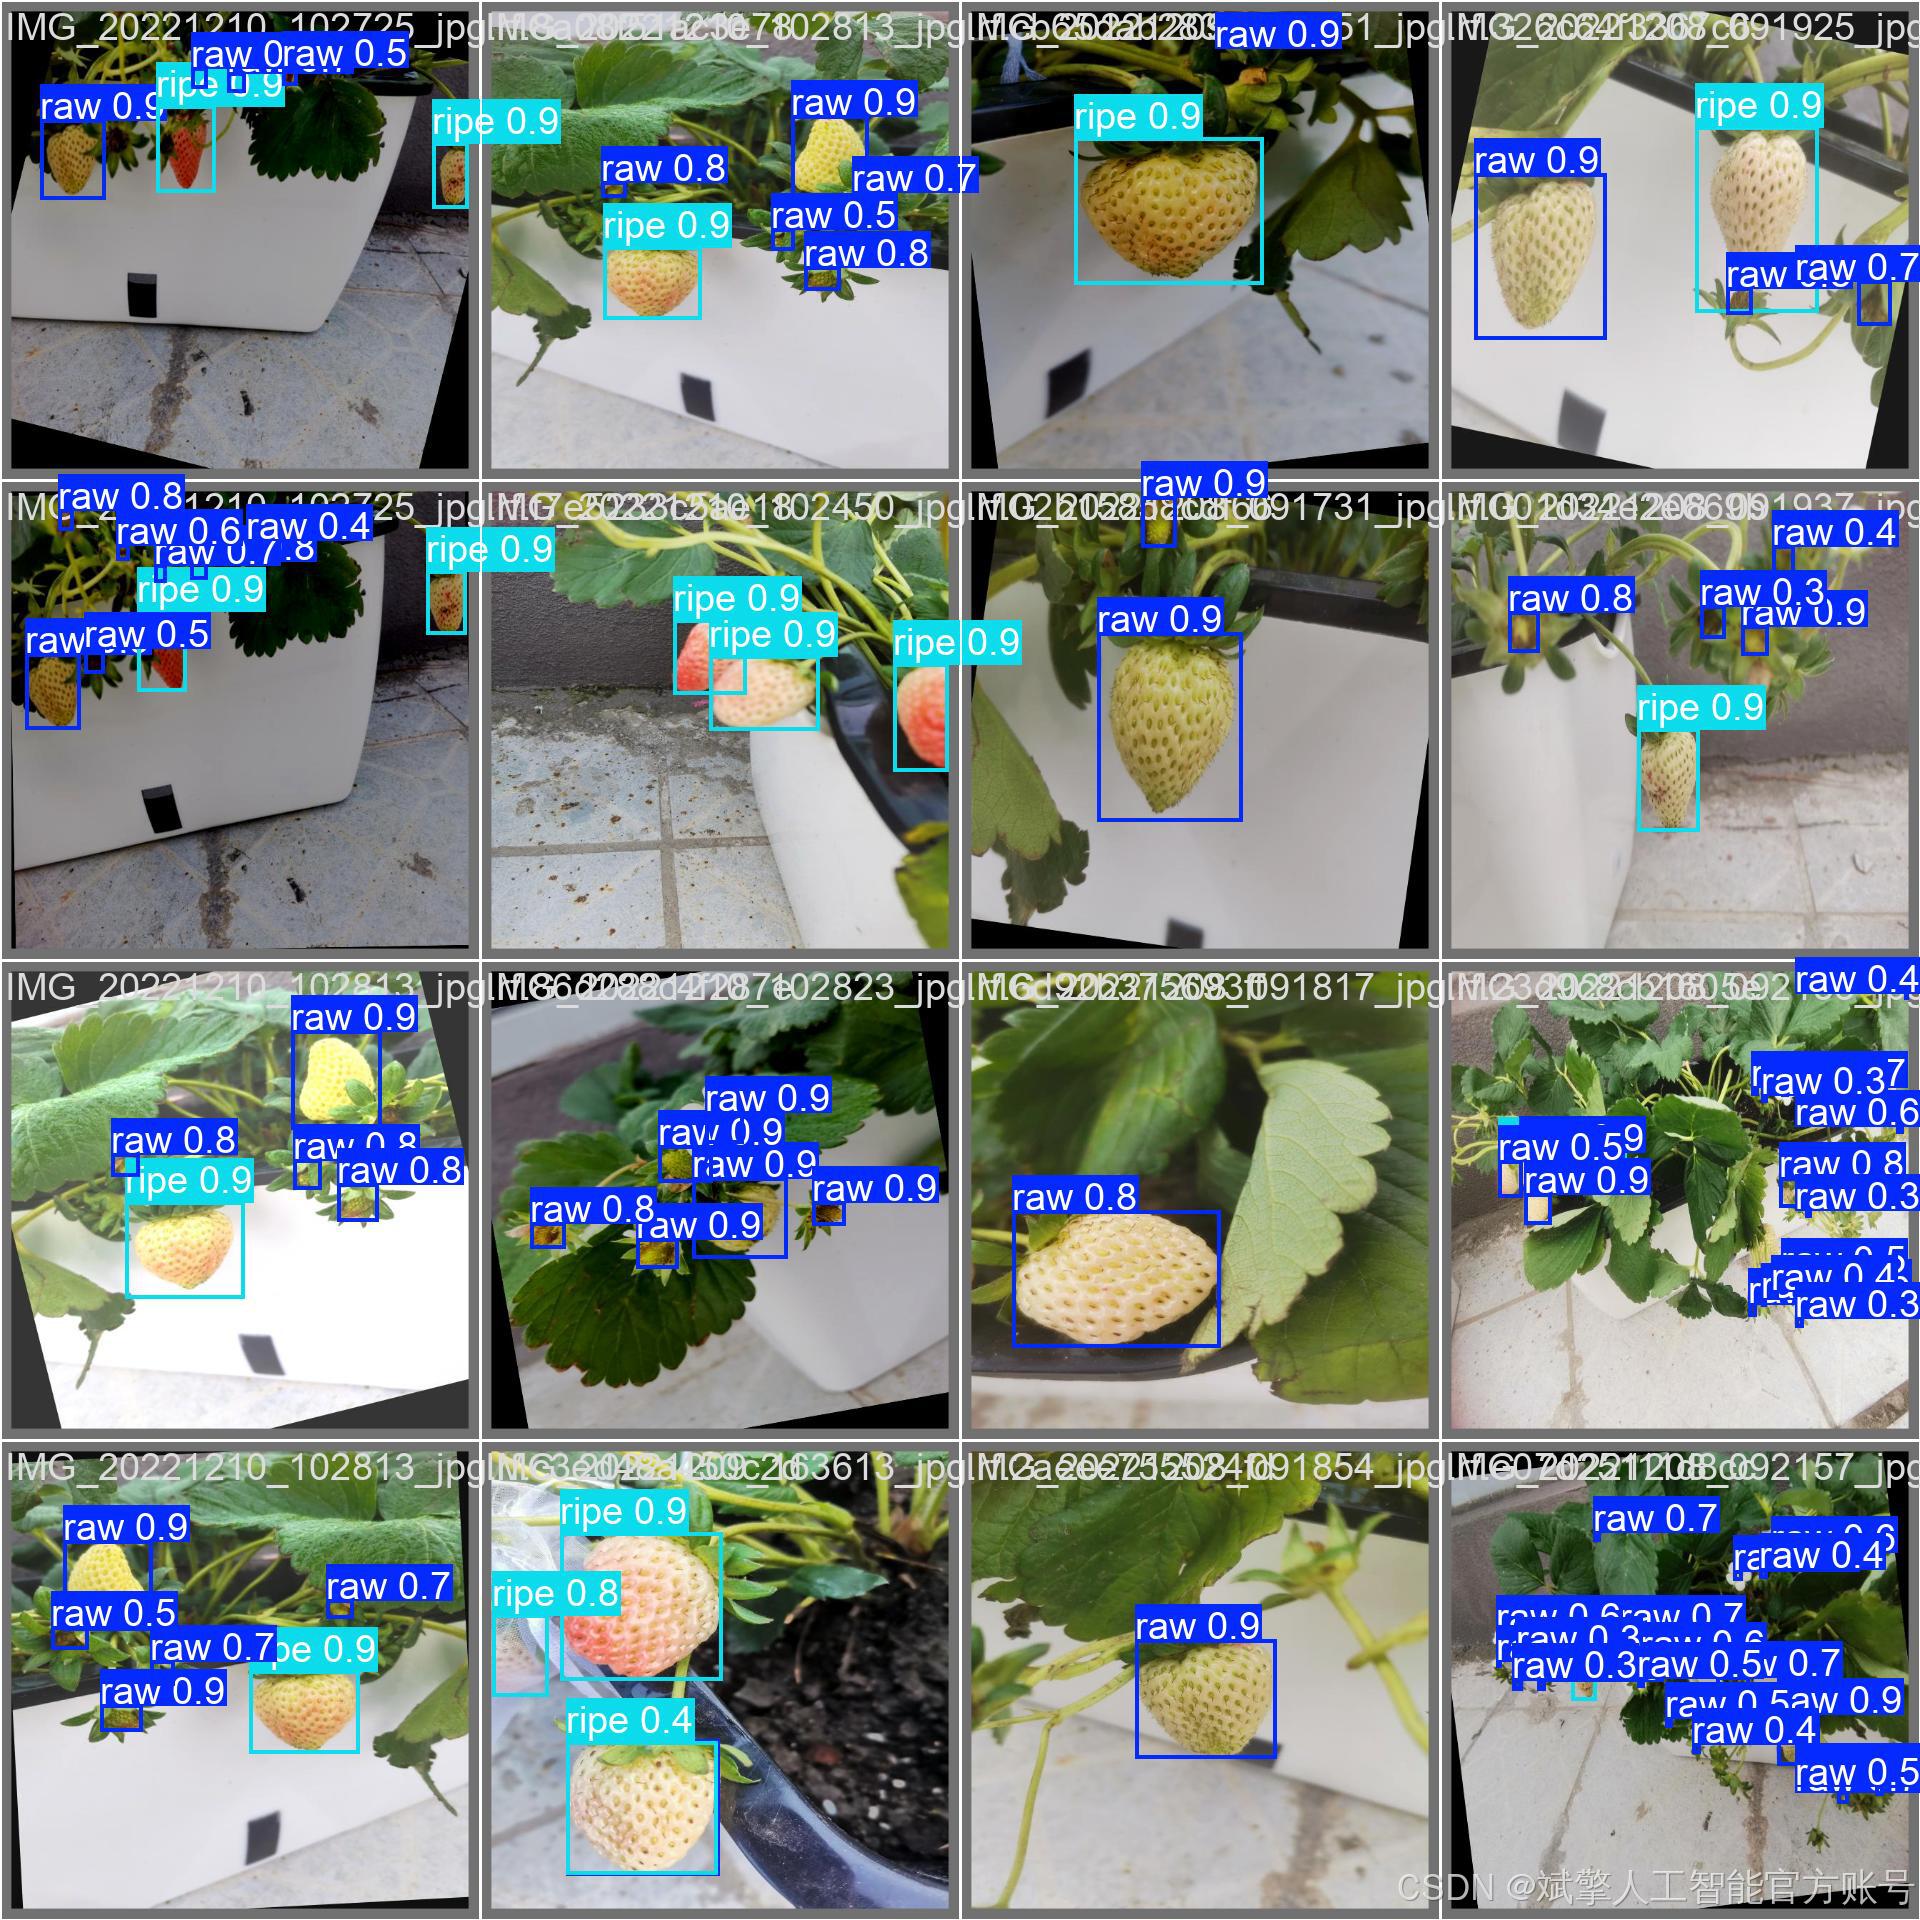
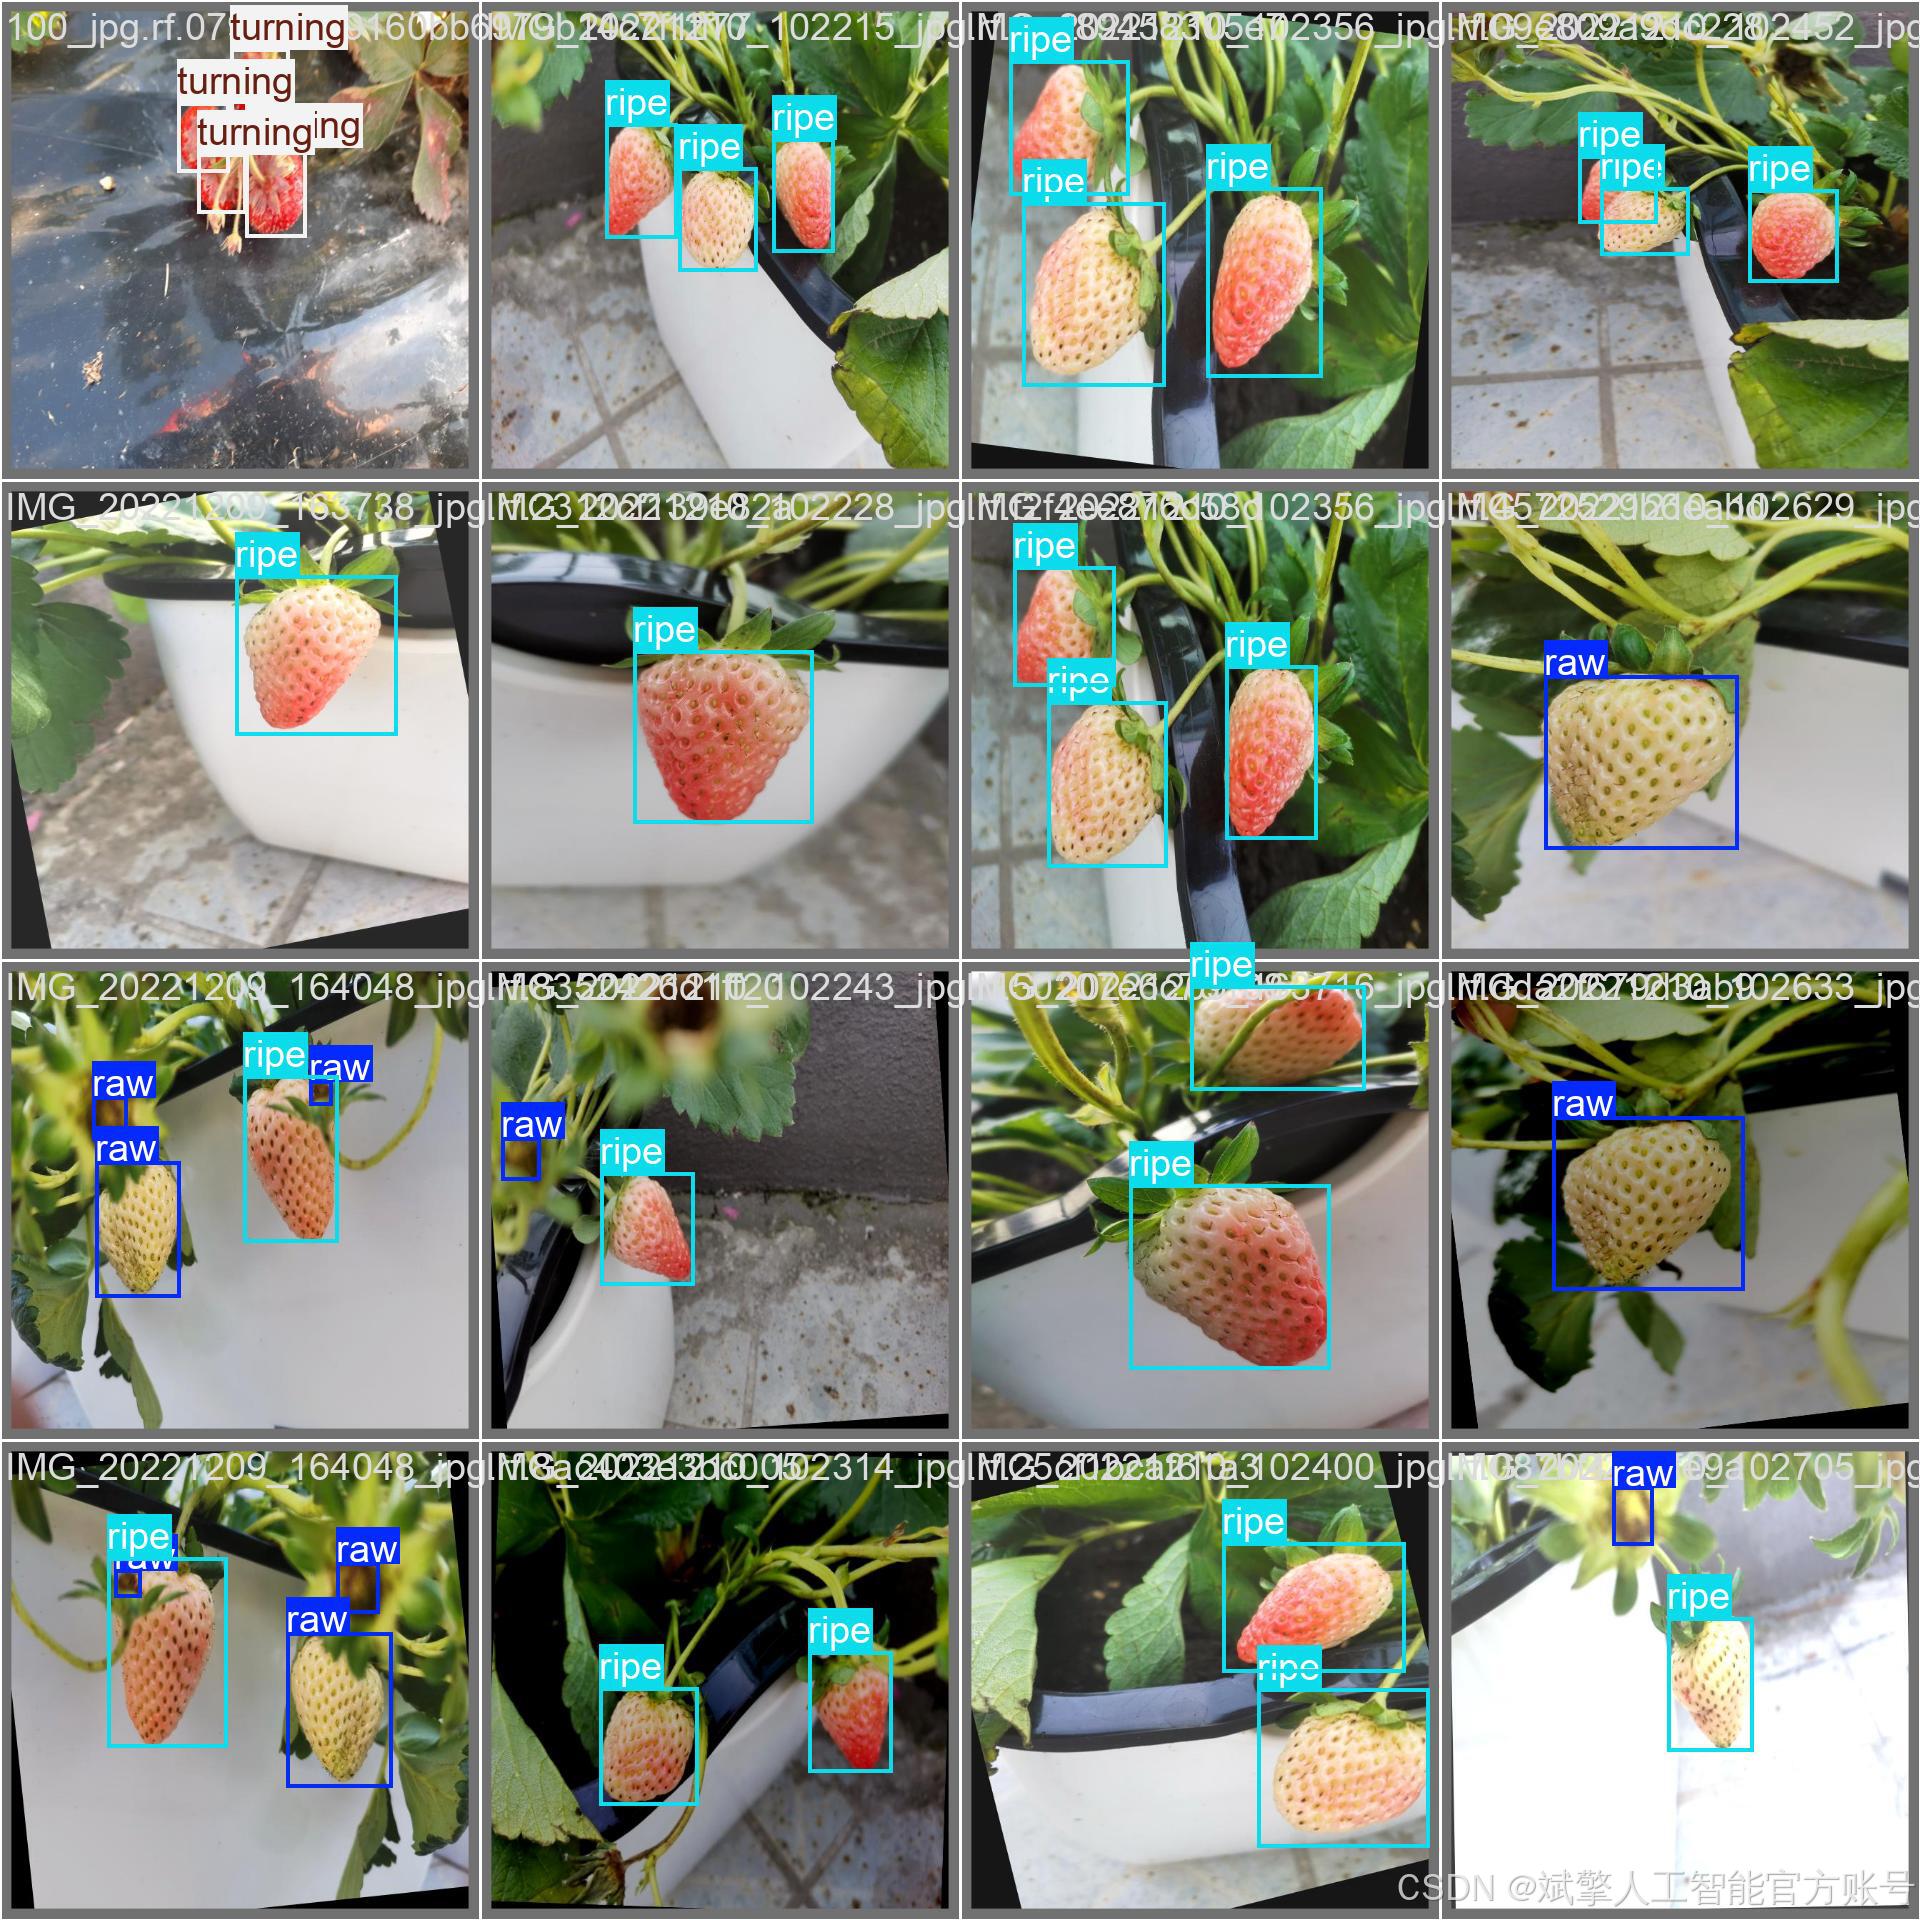
本研究所使用的數據集由實地采集與公開數據結合構成,涵蓋了室內溫室種植、戶外果園采摘及市場售賣等多種場景。拍攝設備包括高清單反相機與工業攝像頭,保證了樣本的清晰度與細節表現。同時,為增強模型的泛化能力,數據集中包含了不同光照條件(晴天、陰天、室內補光)、多種拍攝角度(俯視、平視、仰視)以及復雜背景(葉片、果枝、采摘籃等)下的草莓圖片。
類別定義
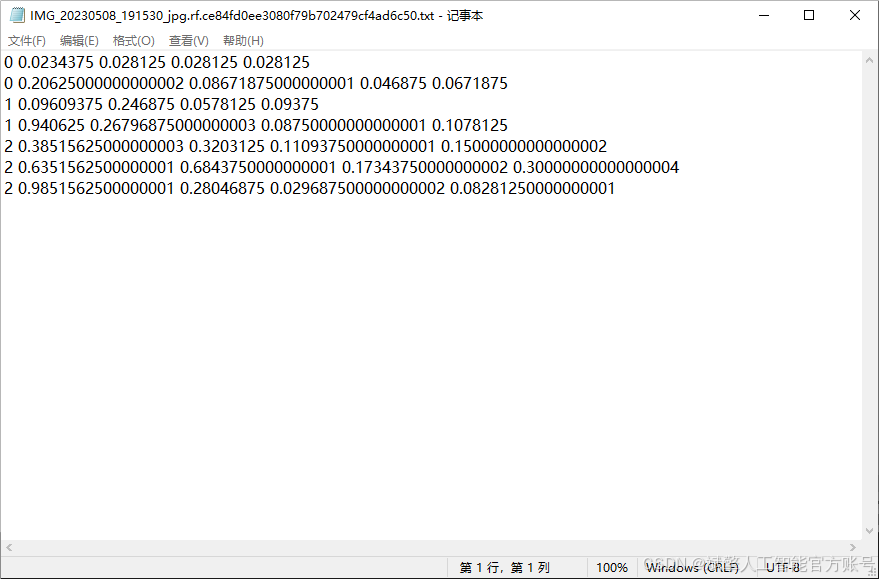
數據集采用 YOLO 格式標注,共分為三類:
-
raw(未成熟):果實表面以綠色為主,糖分積累不足,不適合采摘;
-
turning(半成熟):果實顏色由綠向紅過渡,表面呈現部分紅色斑塊,口感略酸;
-
ripe(成熟):果實整體呈鮮紅色,糖分充足,適宜采摘與銷售。
?數據標注
標注工作采用 LabelImg 與 Roboflow 工具完成,使用 YOLO 標注格式(class x_center y_center width height),其中坐標與尺寸均進行歸一化處理。每張圖片均由兩名標注員獨立標注,并經第三方審核,以確保標簽的準確性與一致性。
?數據規模與分布
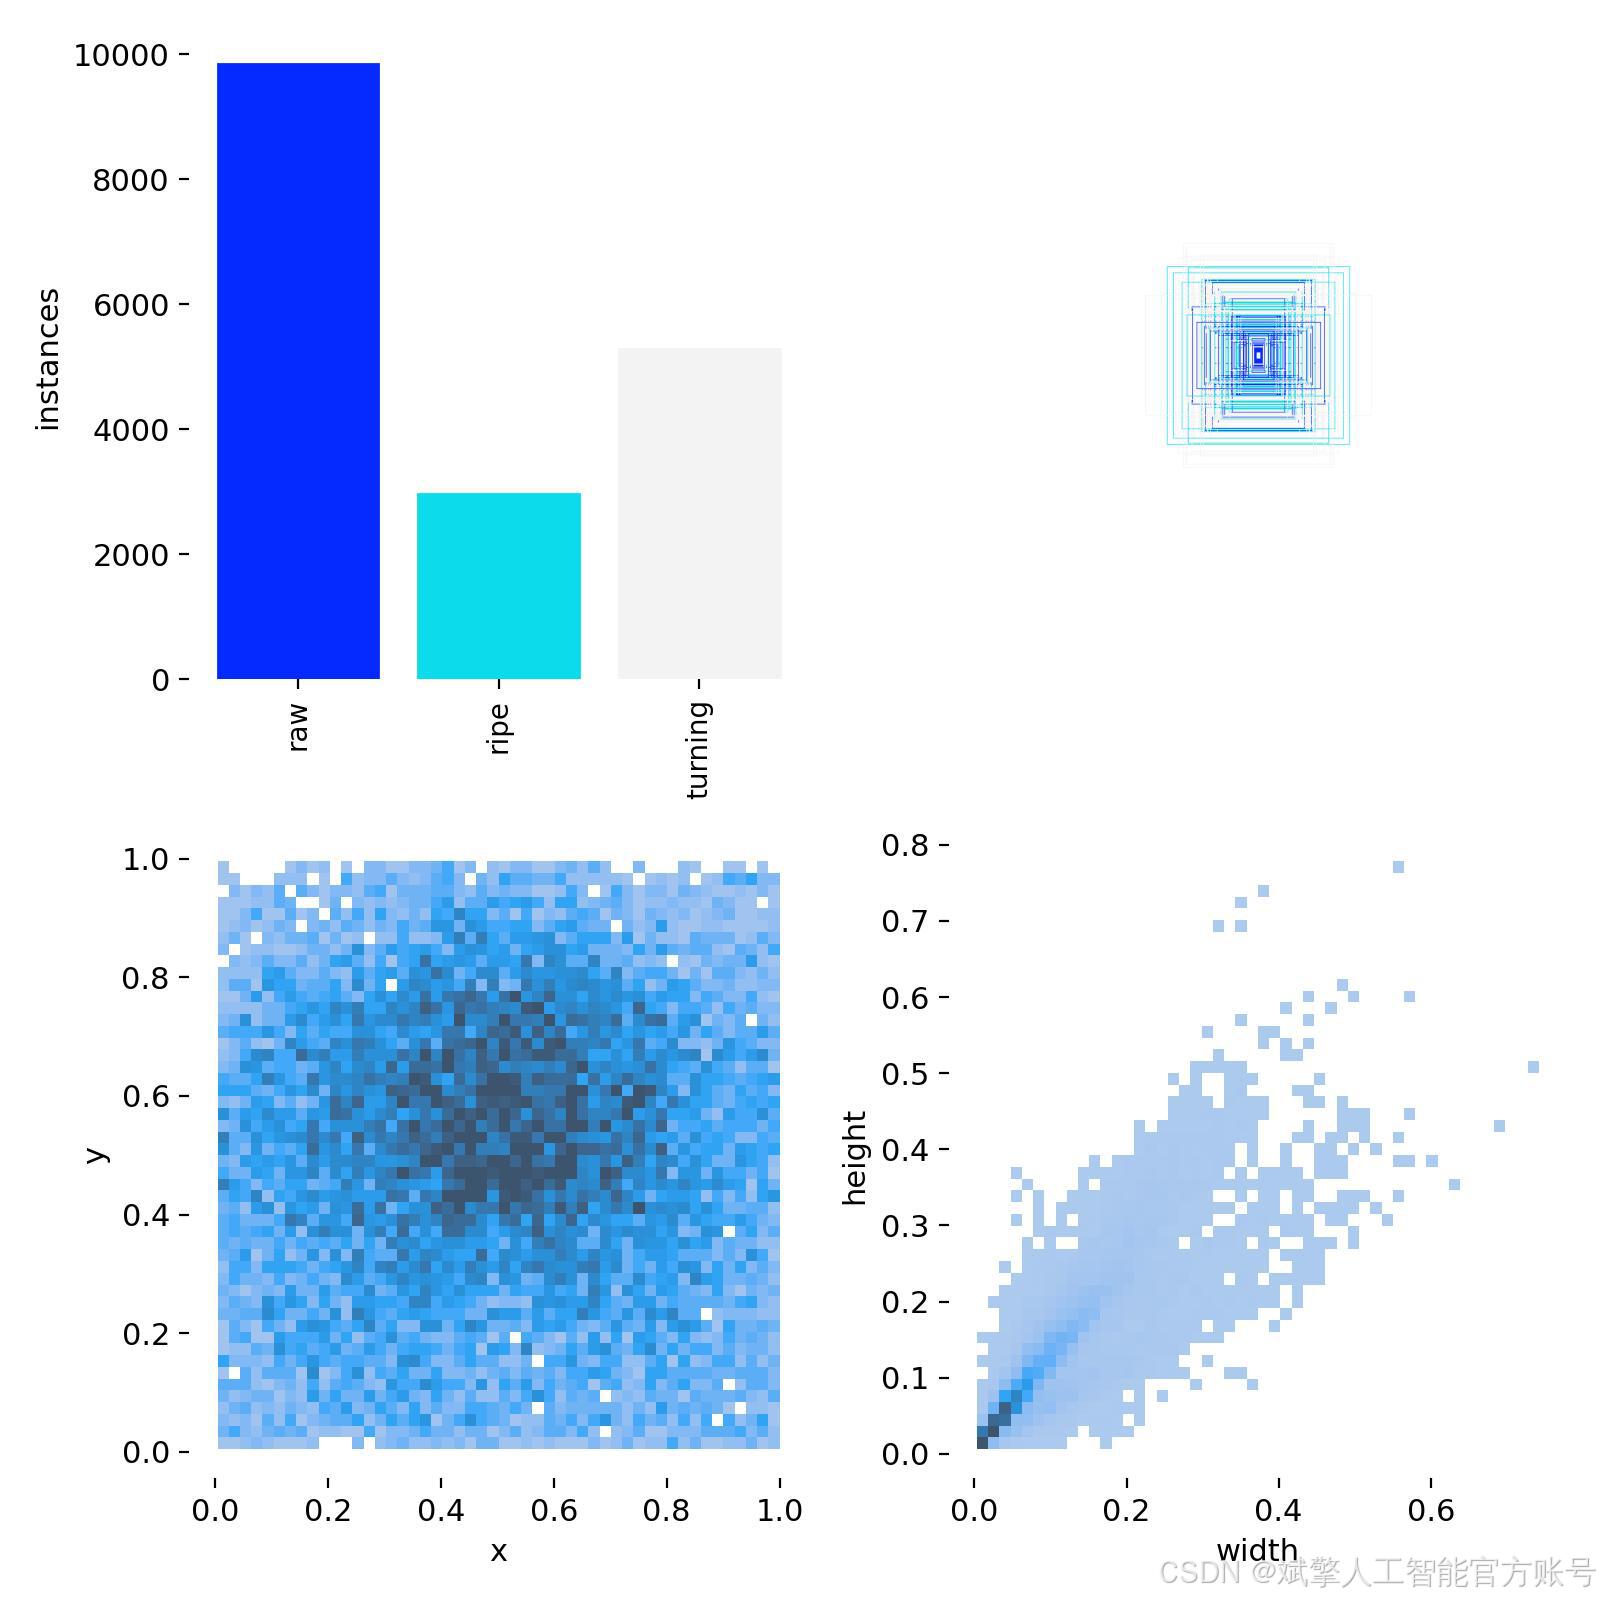
數據集共包含 3713 張圖像,其中:
-
訓練集:2939 張(占 79.15%)
-
驗證集:774 張(占 20.85%)
數據集配置文件
數據集采用標準化YOLO格式組織:
train: F:\草莓成熟度檢測數據集\train\images
val: F:\草莓成熟度檢測數據集\val\images
test:nc: 3
names: ["raw", "ripe", "turning"]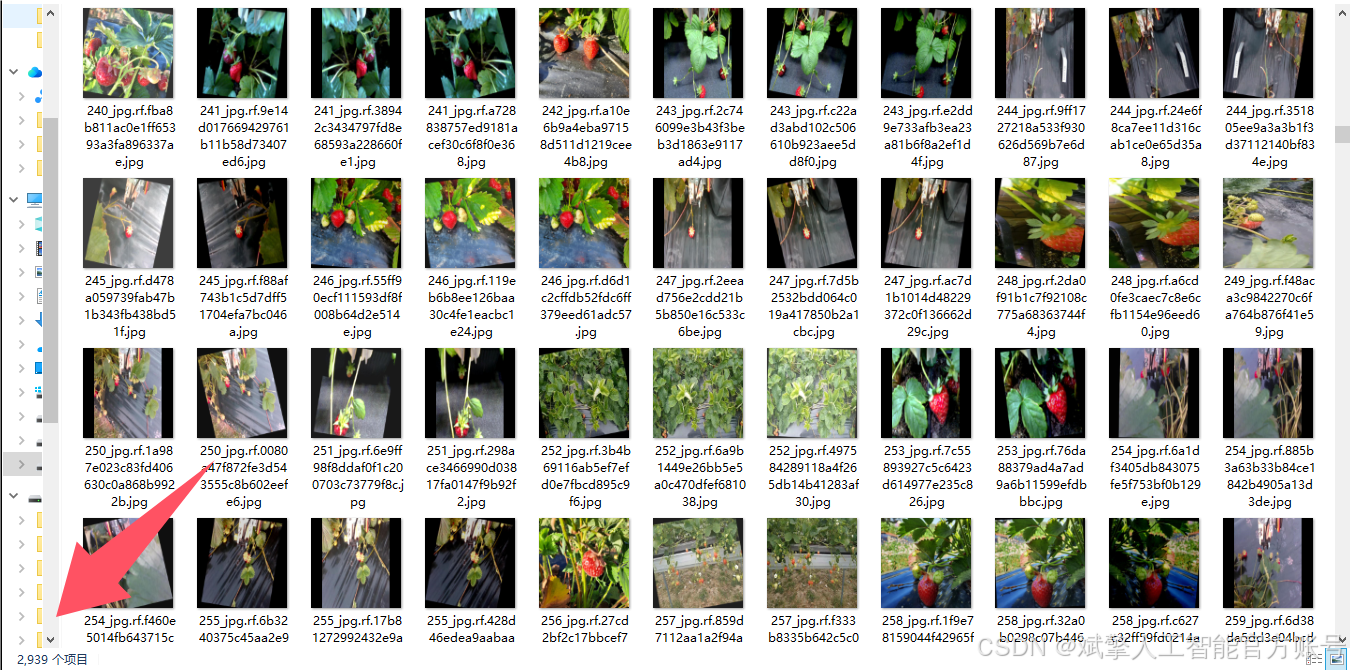
四、項目環境配置
創建虛擬環境
首先新建一個Anaconda環境,每個項目用不同的環境,這樣項目中所用的依賴包互不干擾。
終端輸入
conda create -n yolov12 python==3.9

激活虛擬環境
conda activate yolov12

安裝cpu版本pytorch
pip install torch torchvision torchaudio

安裝所需要庫
pip install -r requirements.txt
pycharm中配置anaconda


五、模型訓練
訓練代碼
from ultralytics import YOLOmodel_path = 'yolo12s.pt'
data_path = 'data.yaml'if __name__ == '__main__':model = YOLO(model_path)results = model.train(data=data_path,epochs=100,batch=8,device='0',workers=0,project='runs',name='exp',)
根據實際情況更換模型 # yolov12n.yaml (nano):輕量化模型,適合嵌入式設備,速度快但精度略低。 # yolov12s.yaml (small):小模型,適合實時任務。 # yolov12m.yaml (medium):中等大小模型,兼顧速度和精度。 # yolov12b.yaml (base):基本版模型,適合大部分應用場景。 # yolov12l.yaml (large):大型模型,適合對精度要求高的任務。
--batch 8:每批次8張圖像。--epochs 100:訓練100輪。--datasets/data.yaml:數據集配置文件。--weights yolov12s.pt:初始化模型權重,yolov12s.pt是預訓練的輕量級YOLO模型。
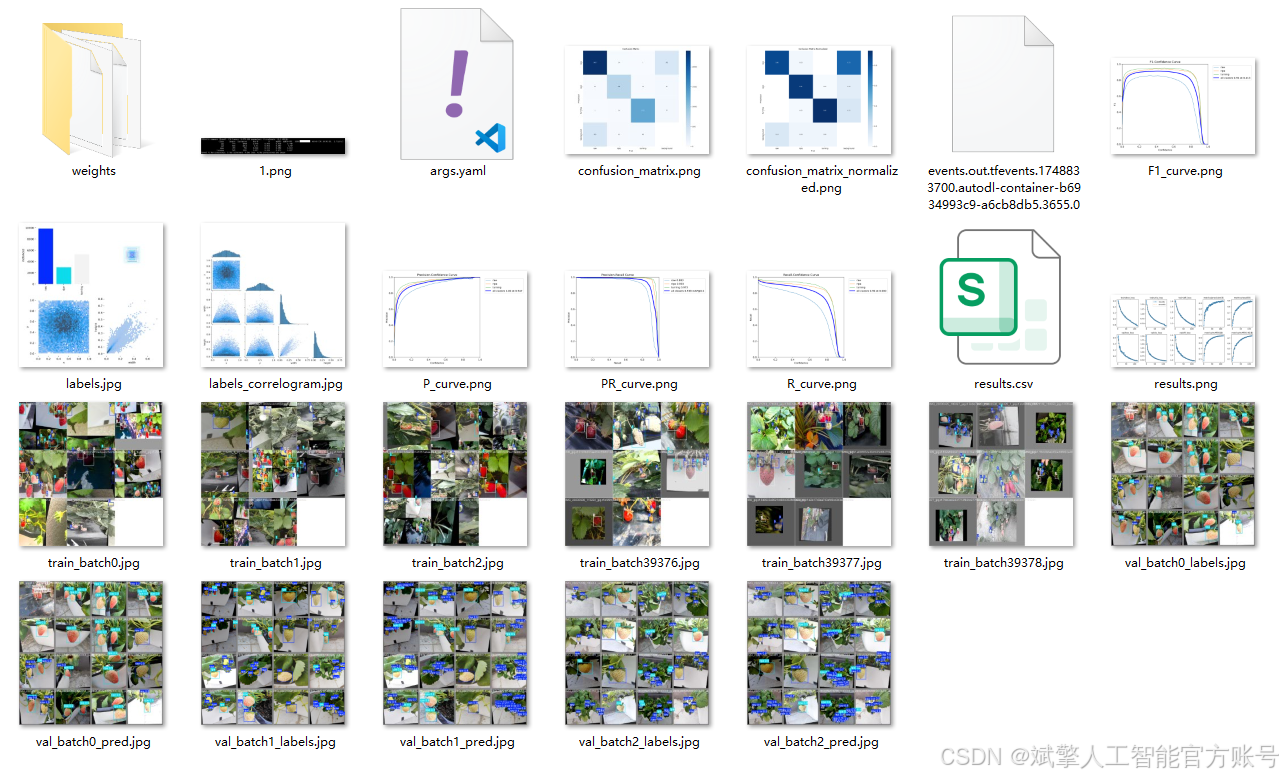
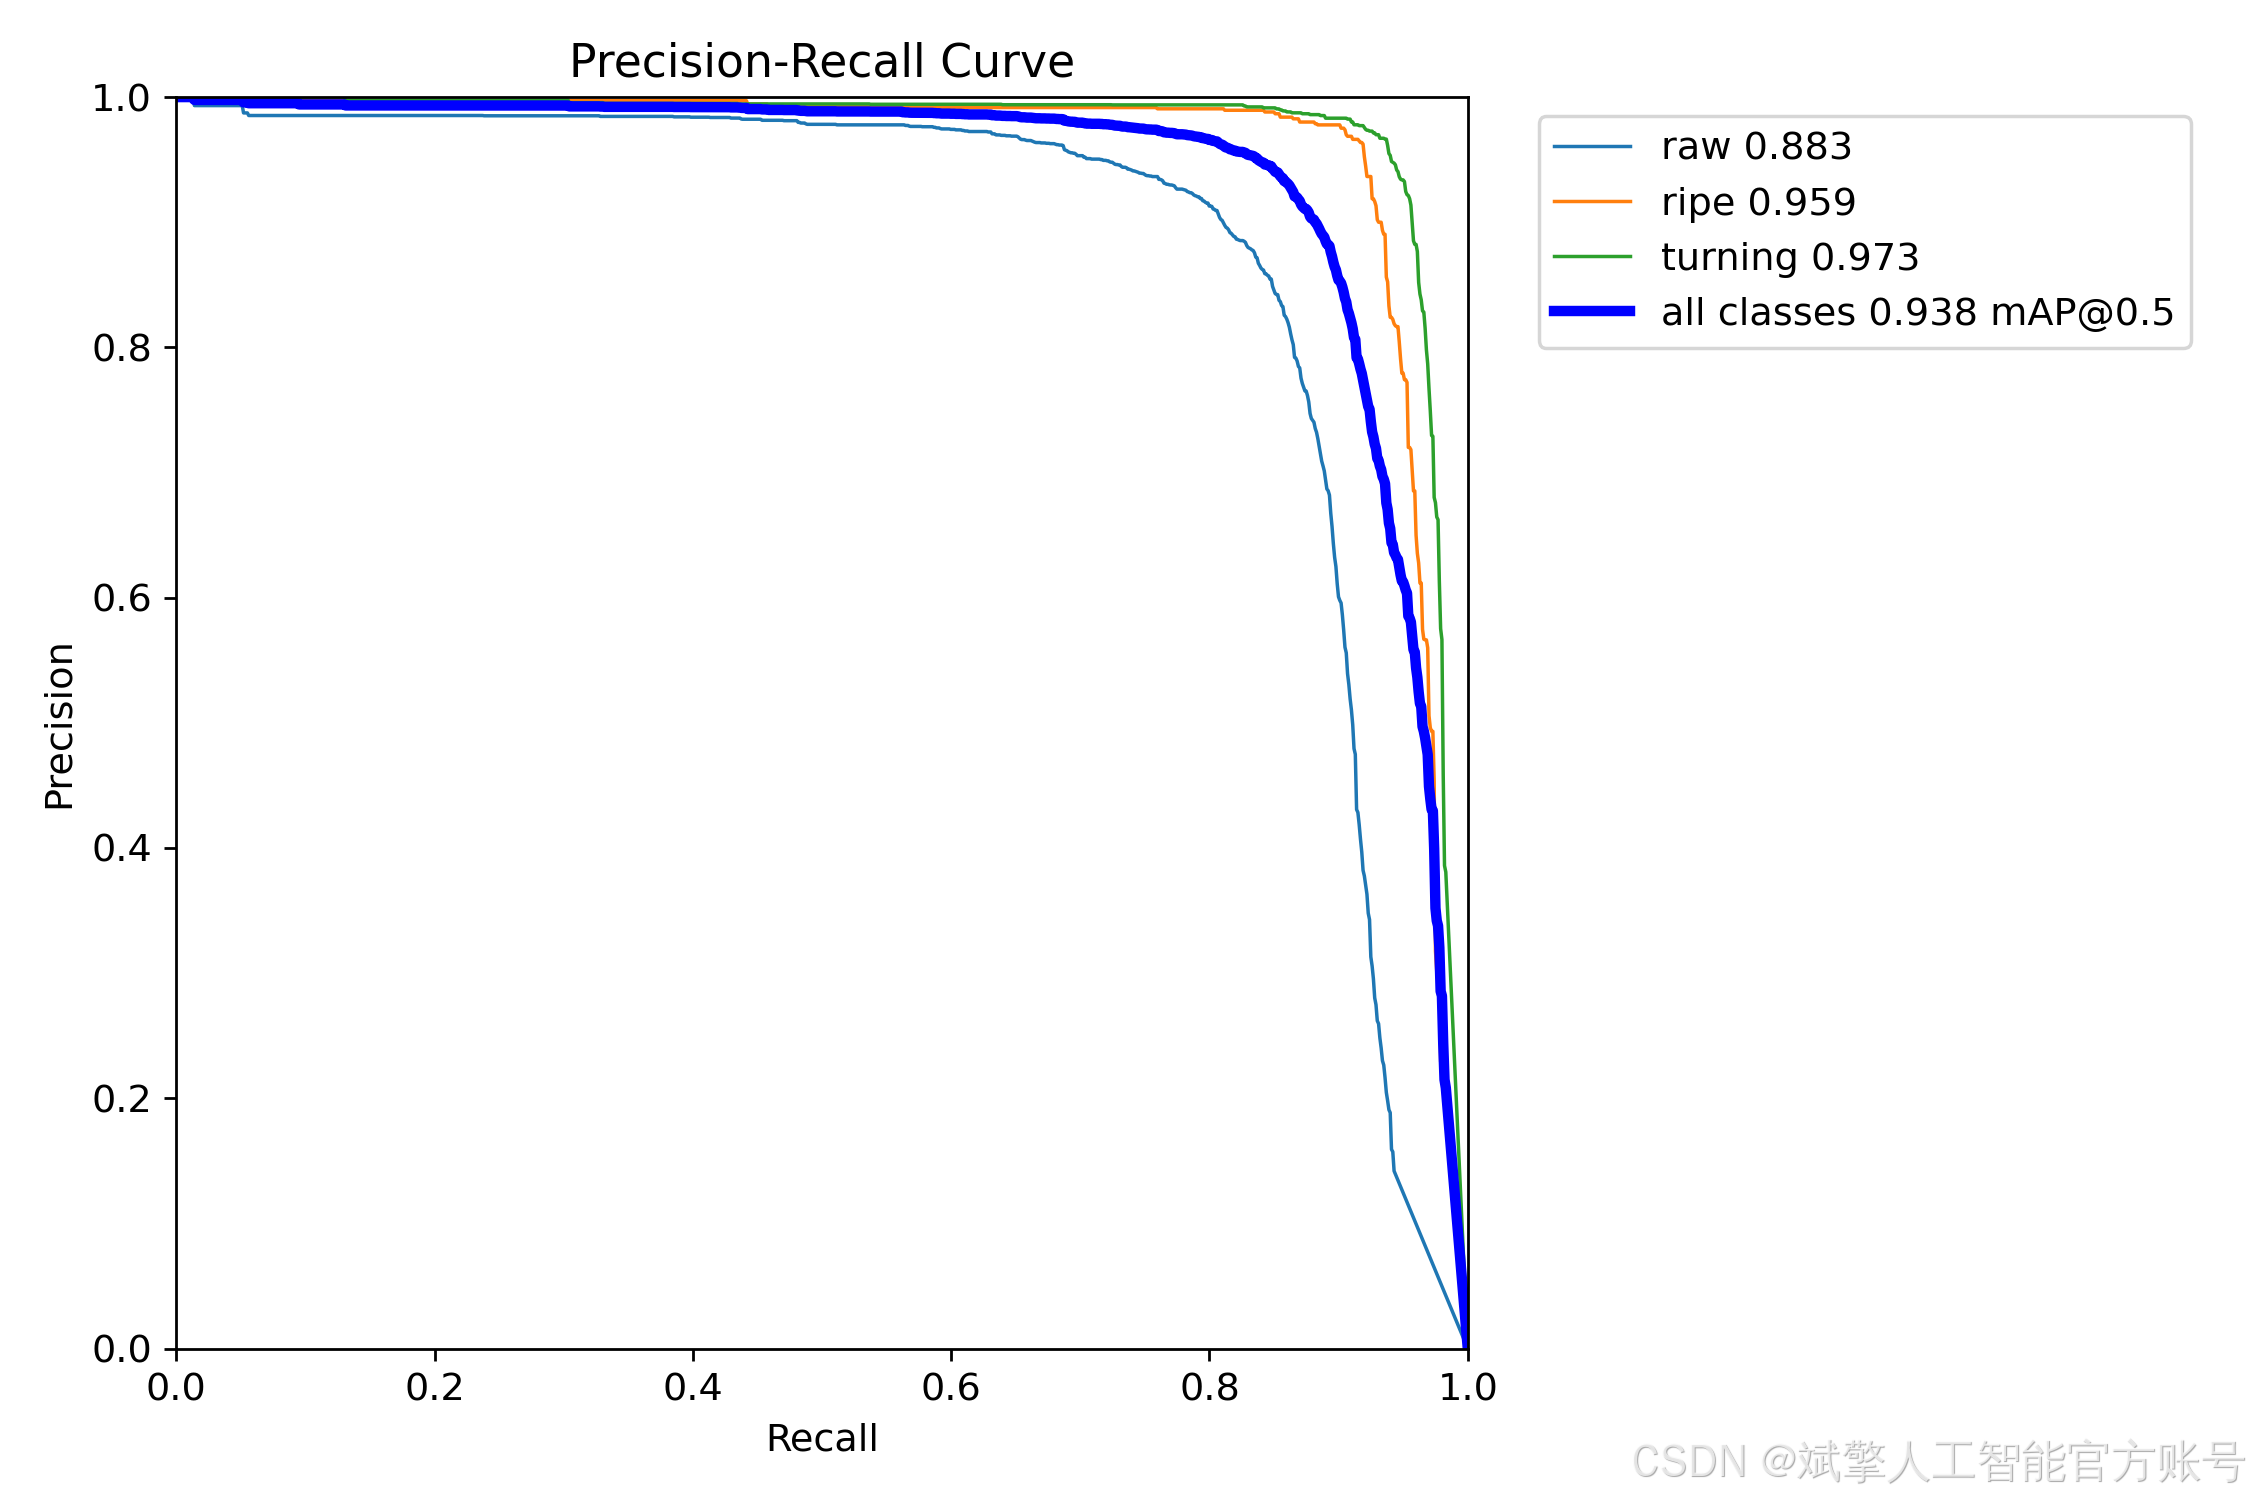
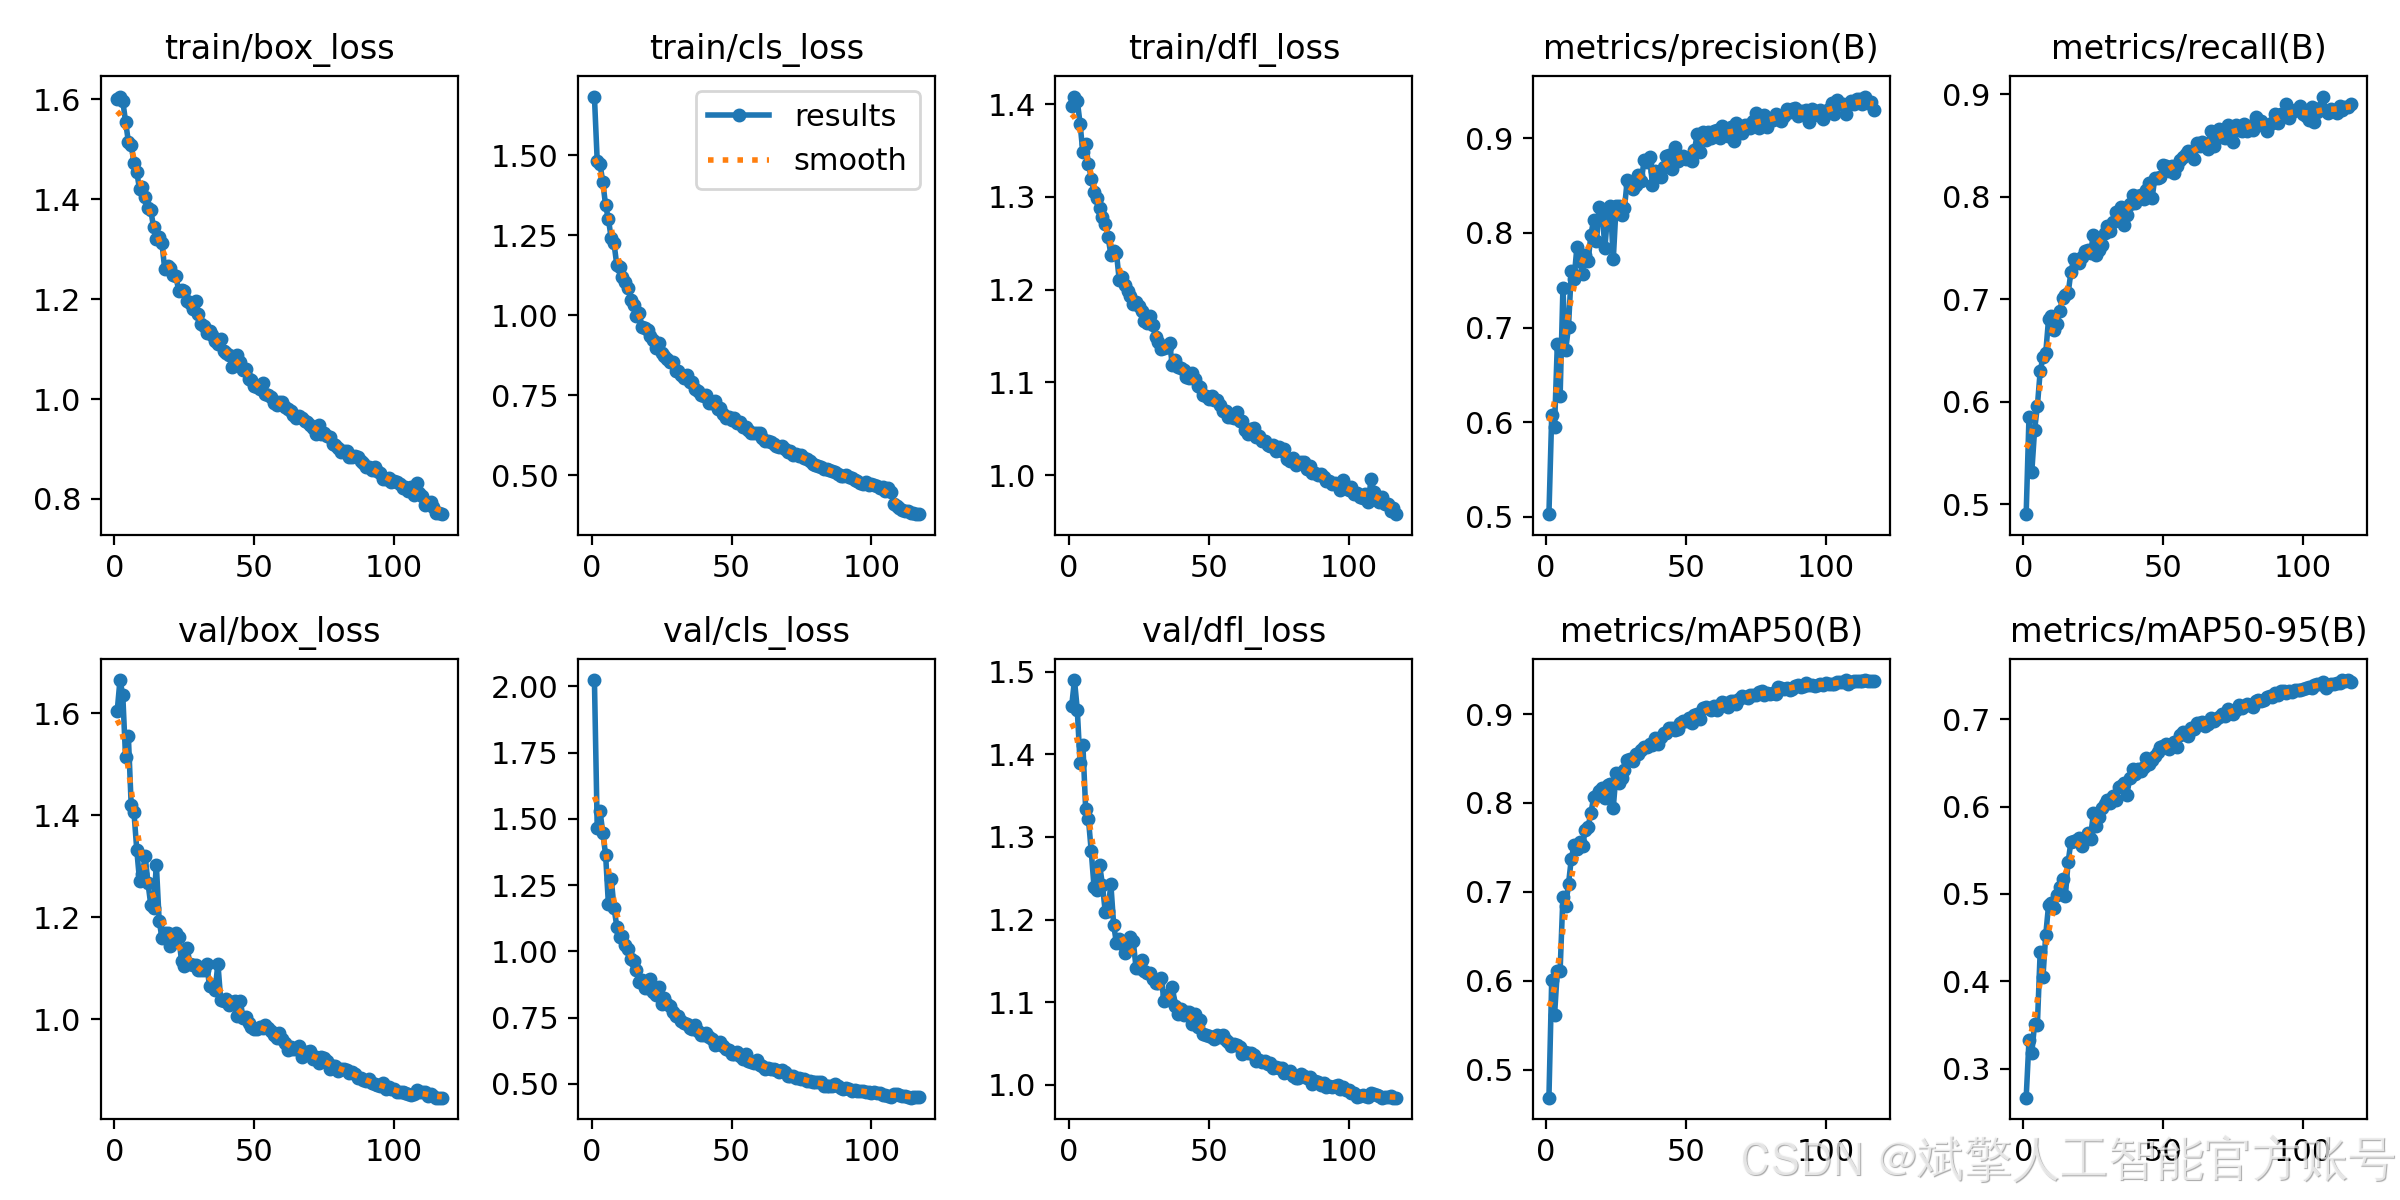
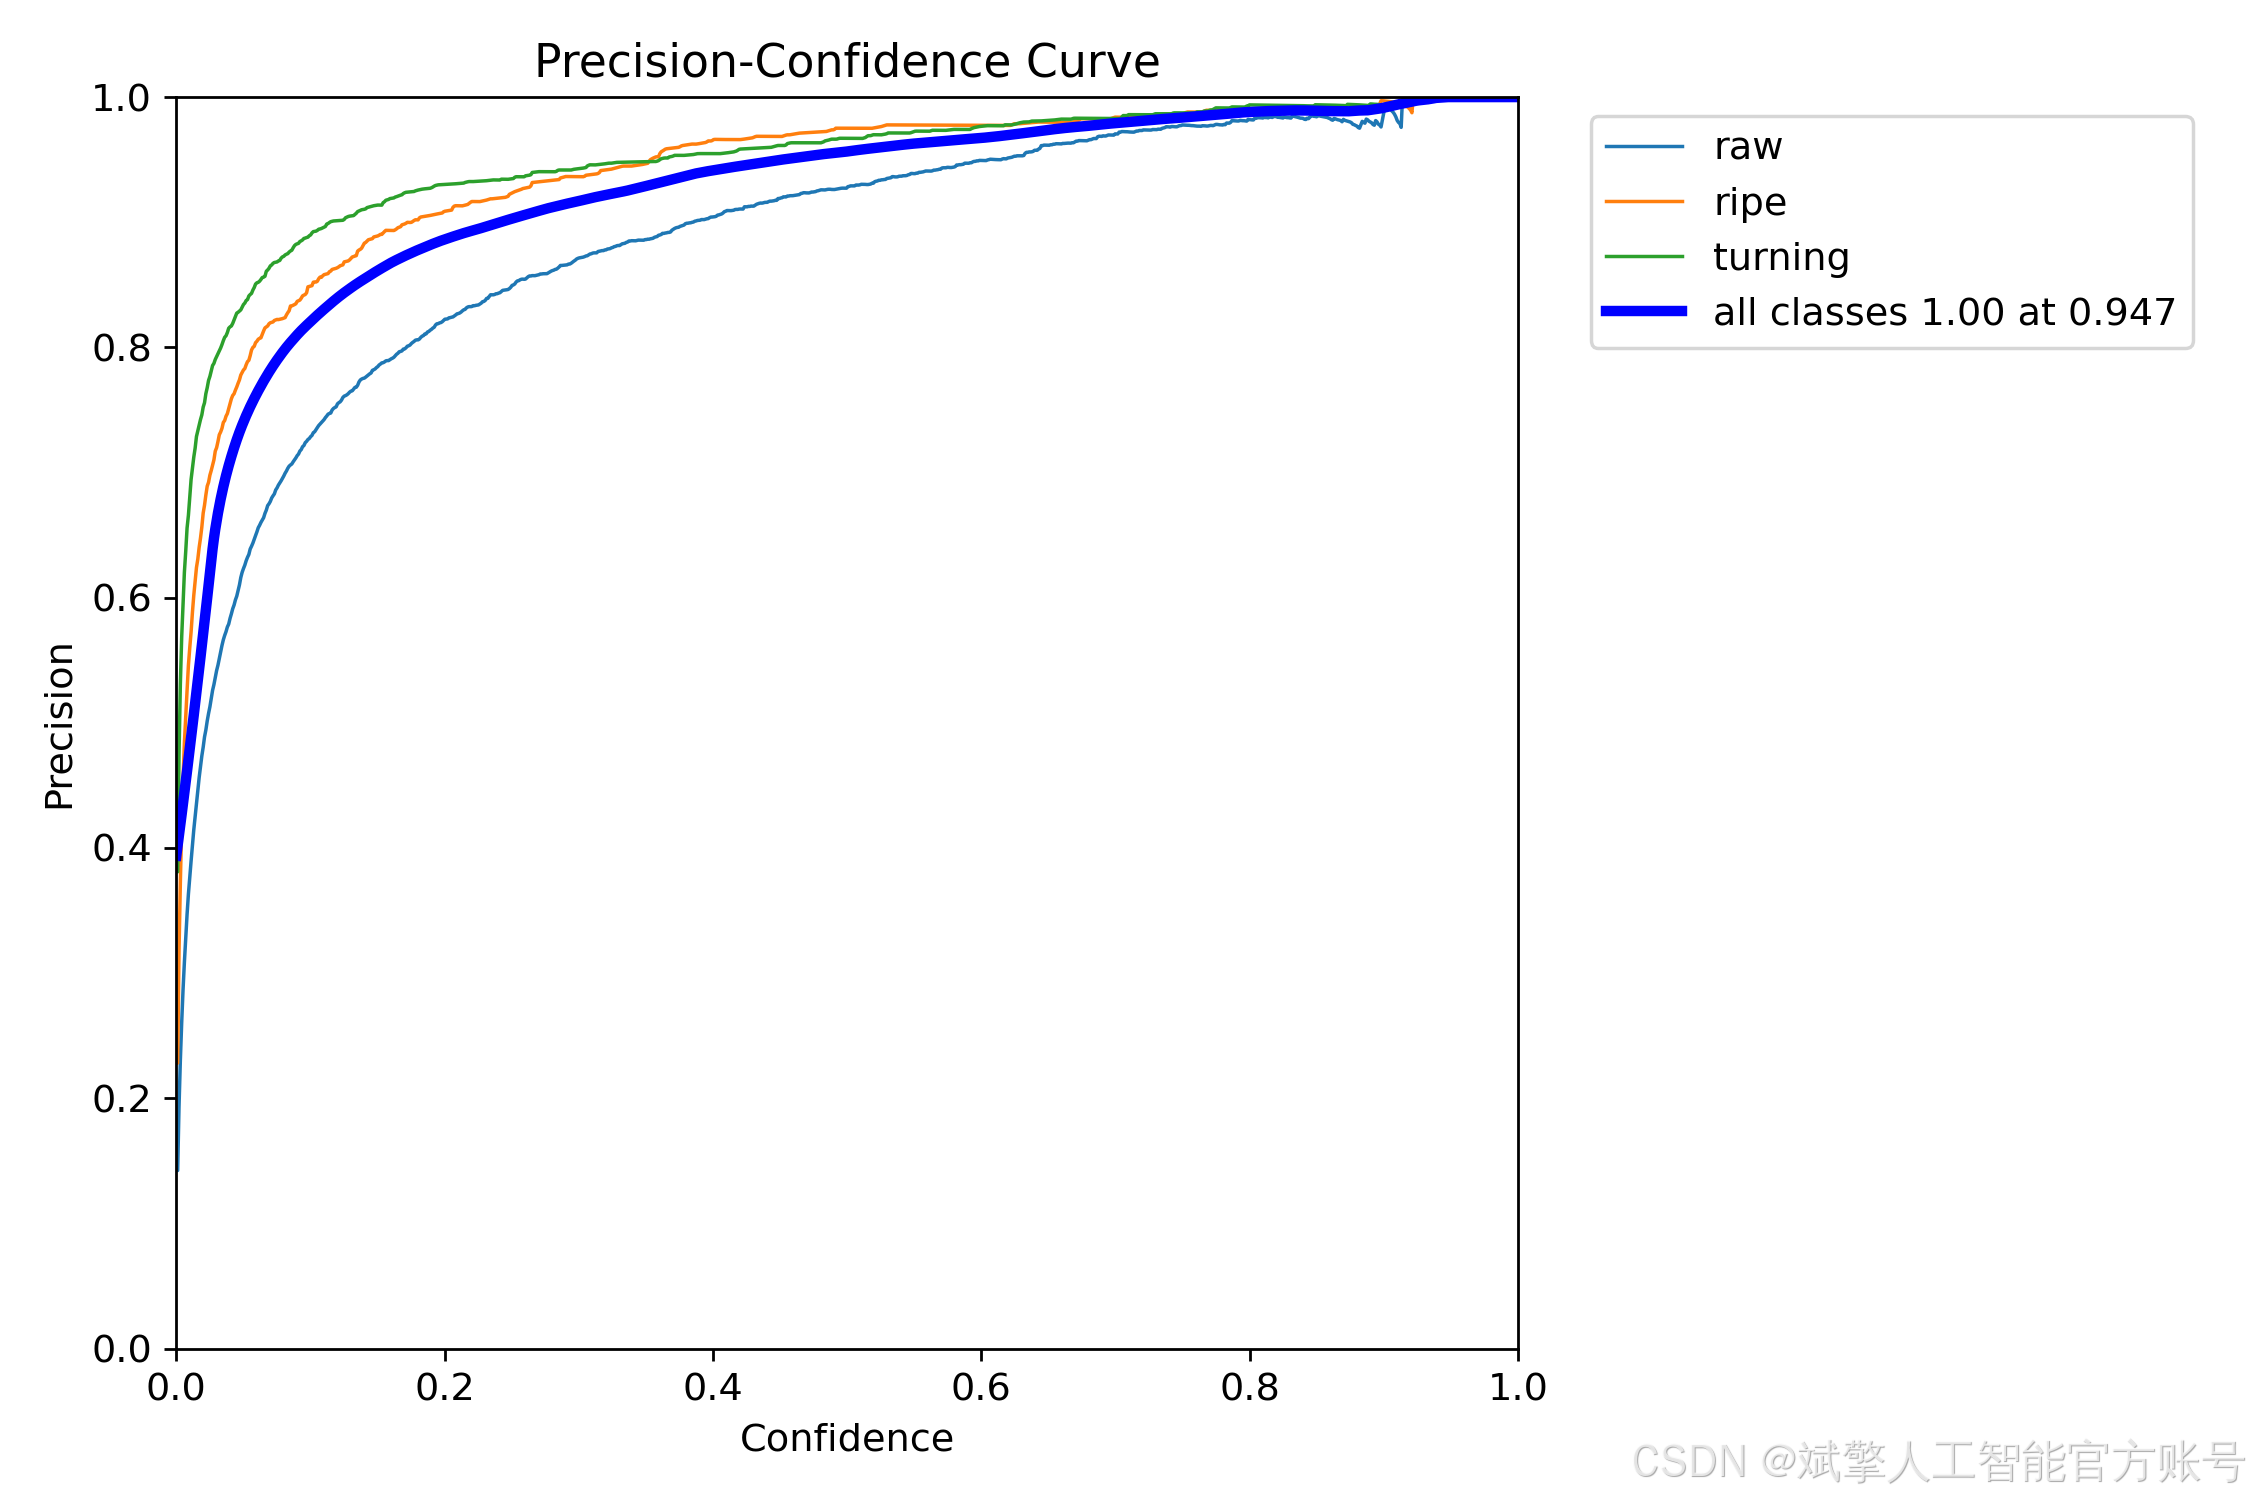
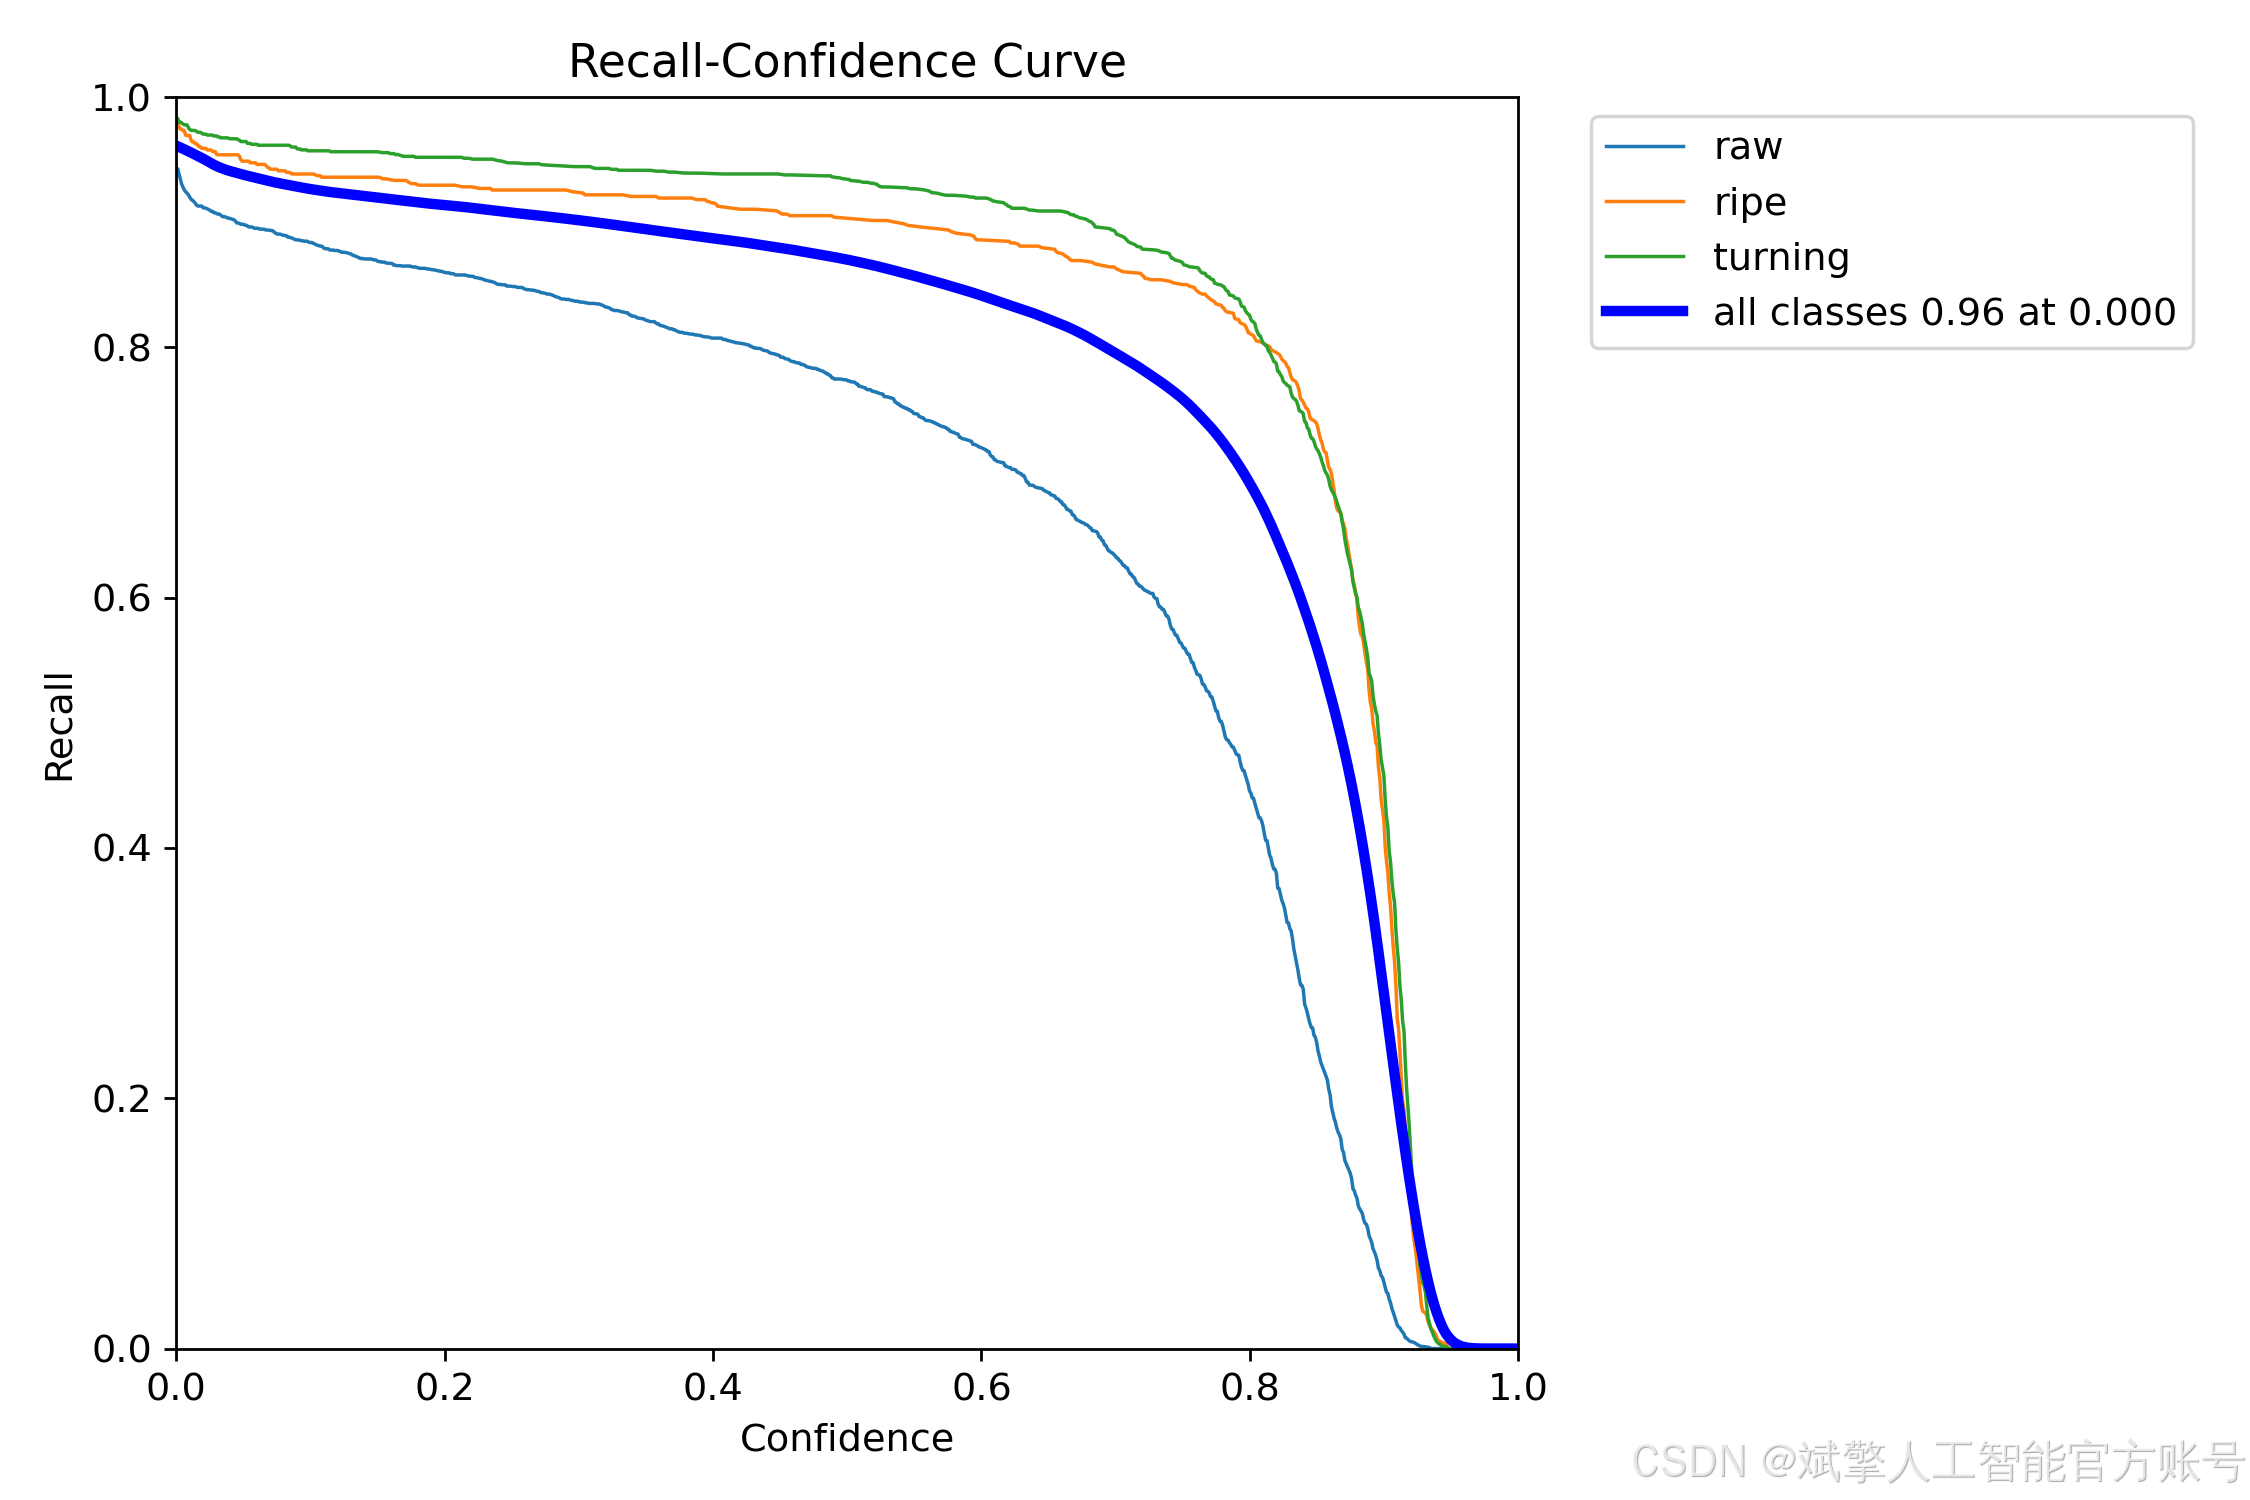
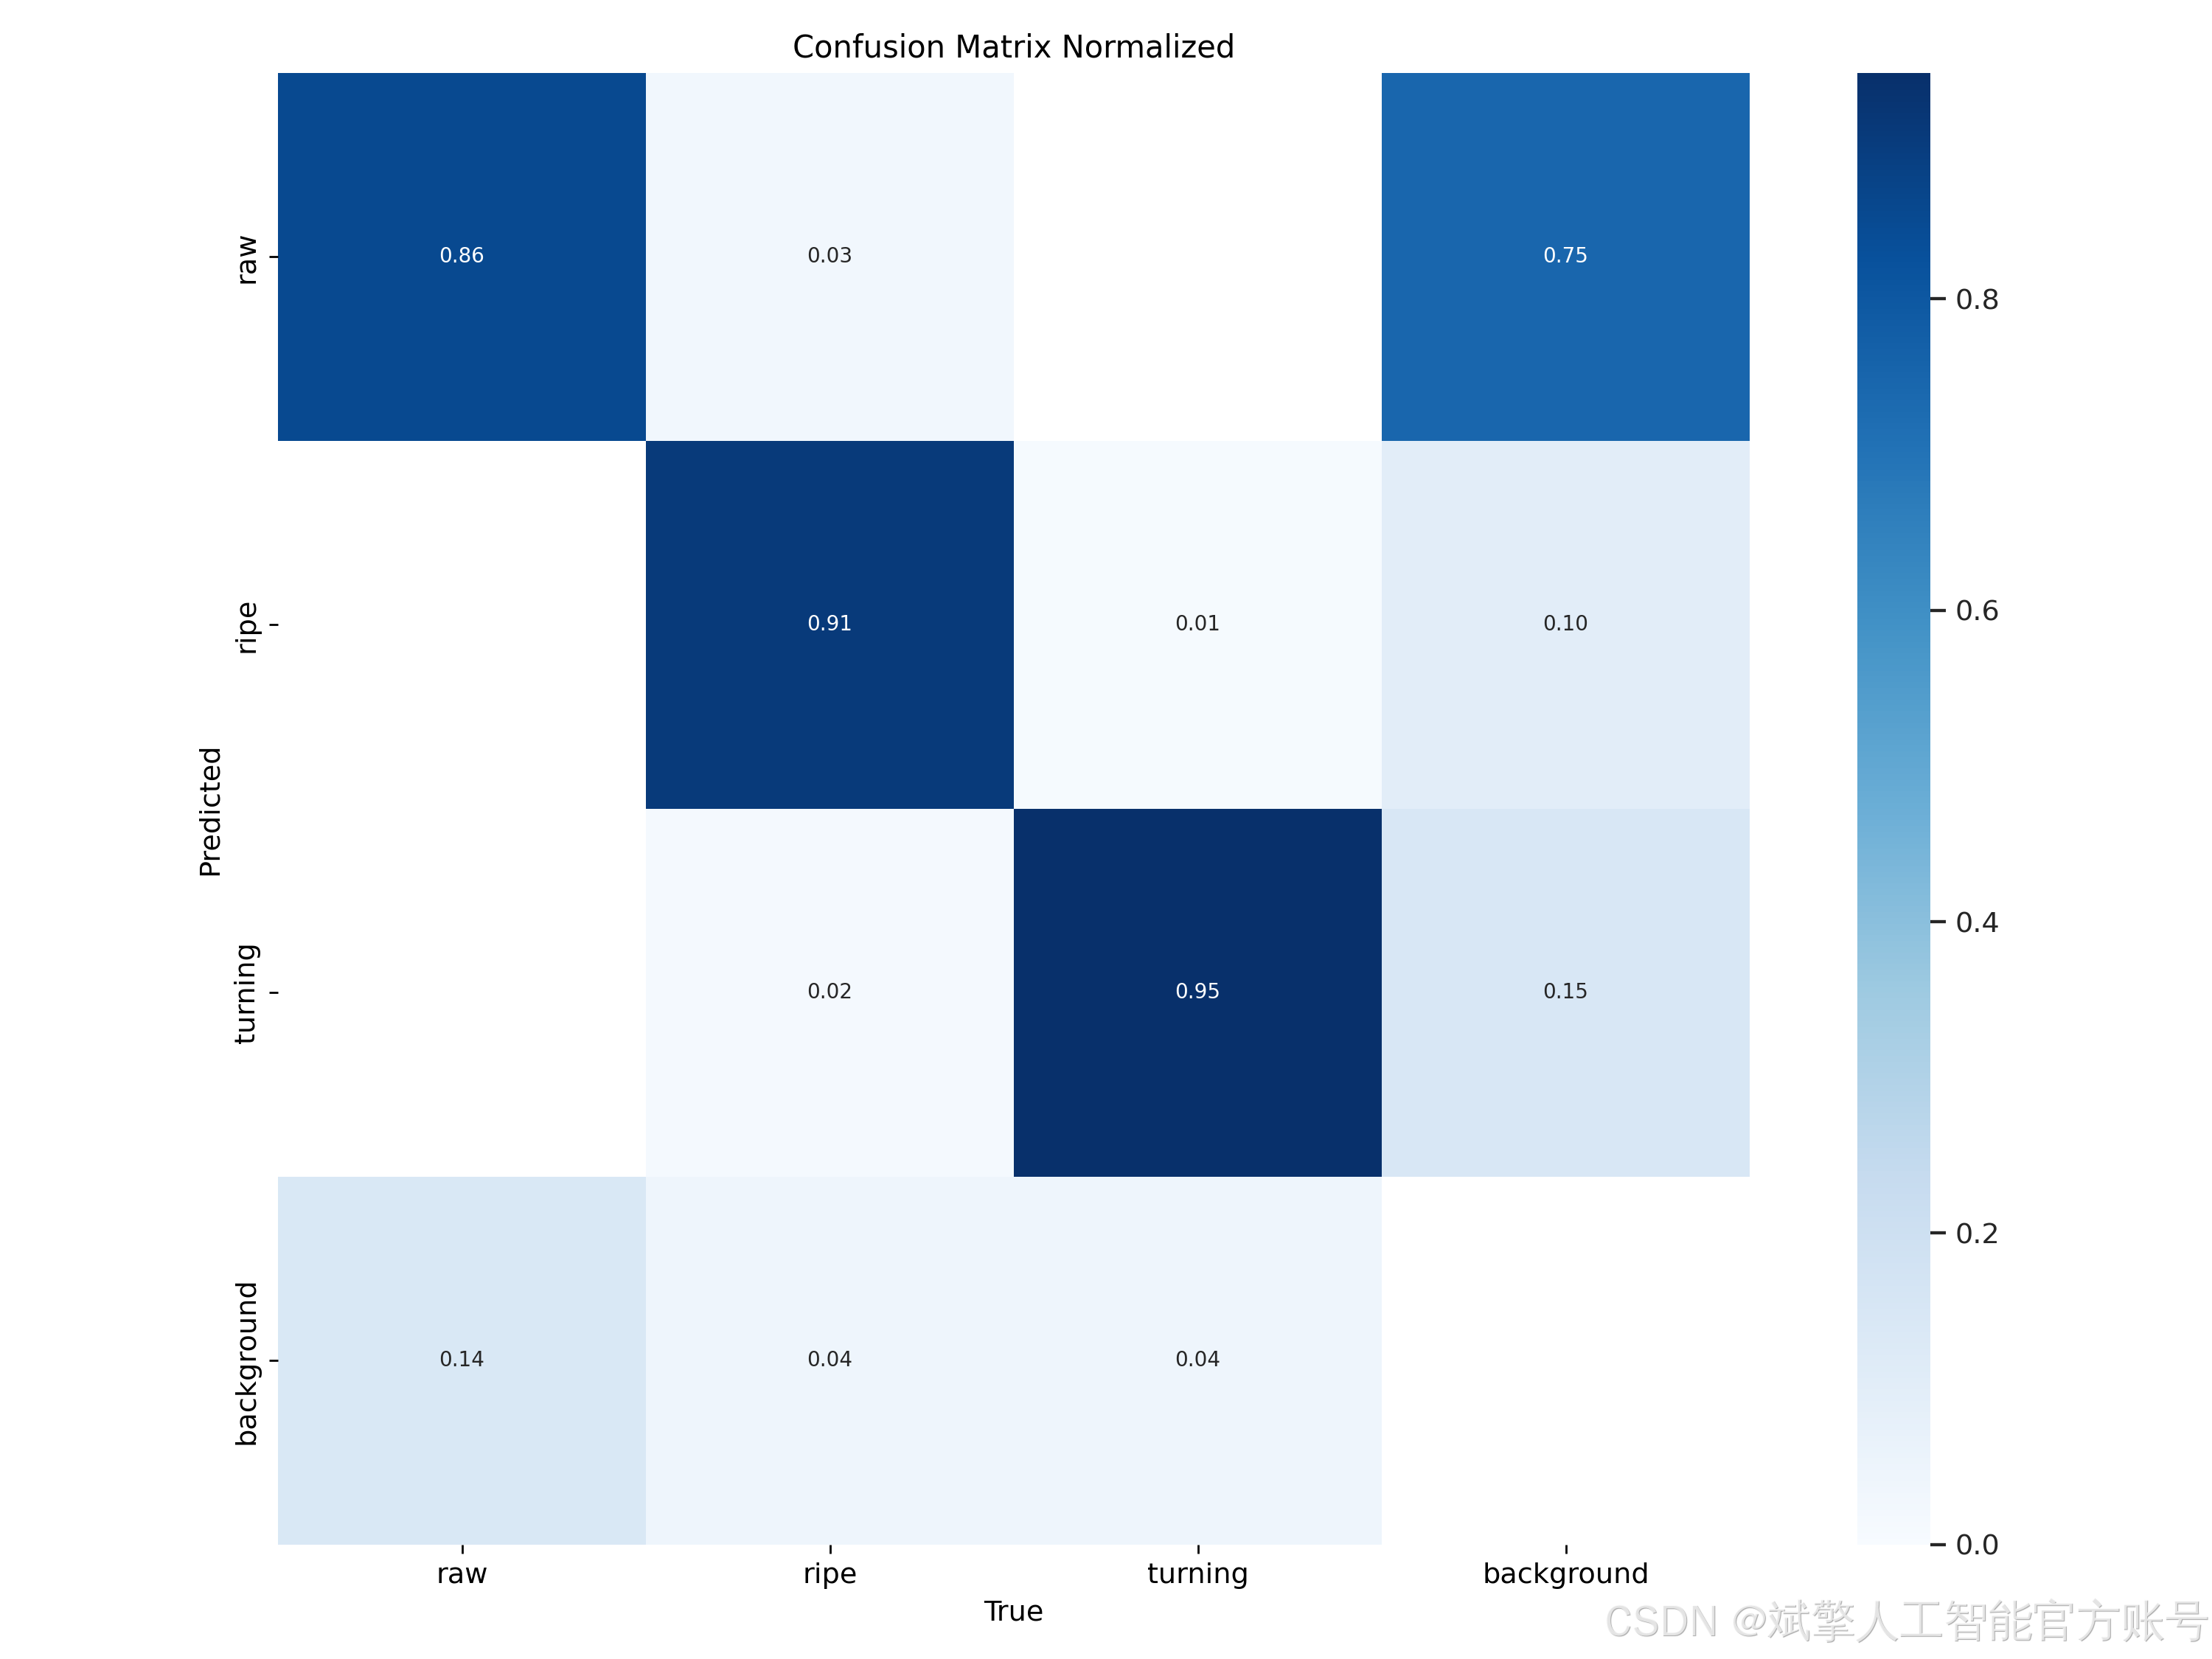
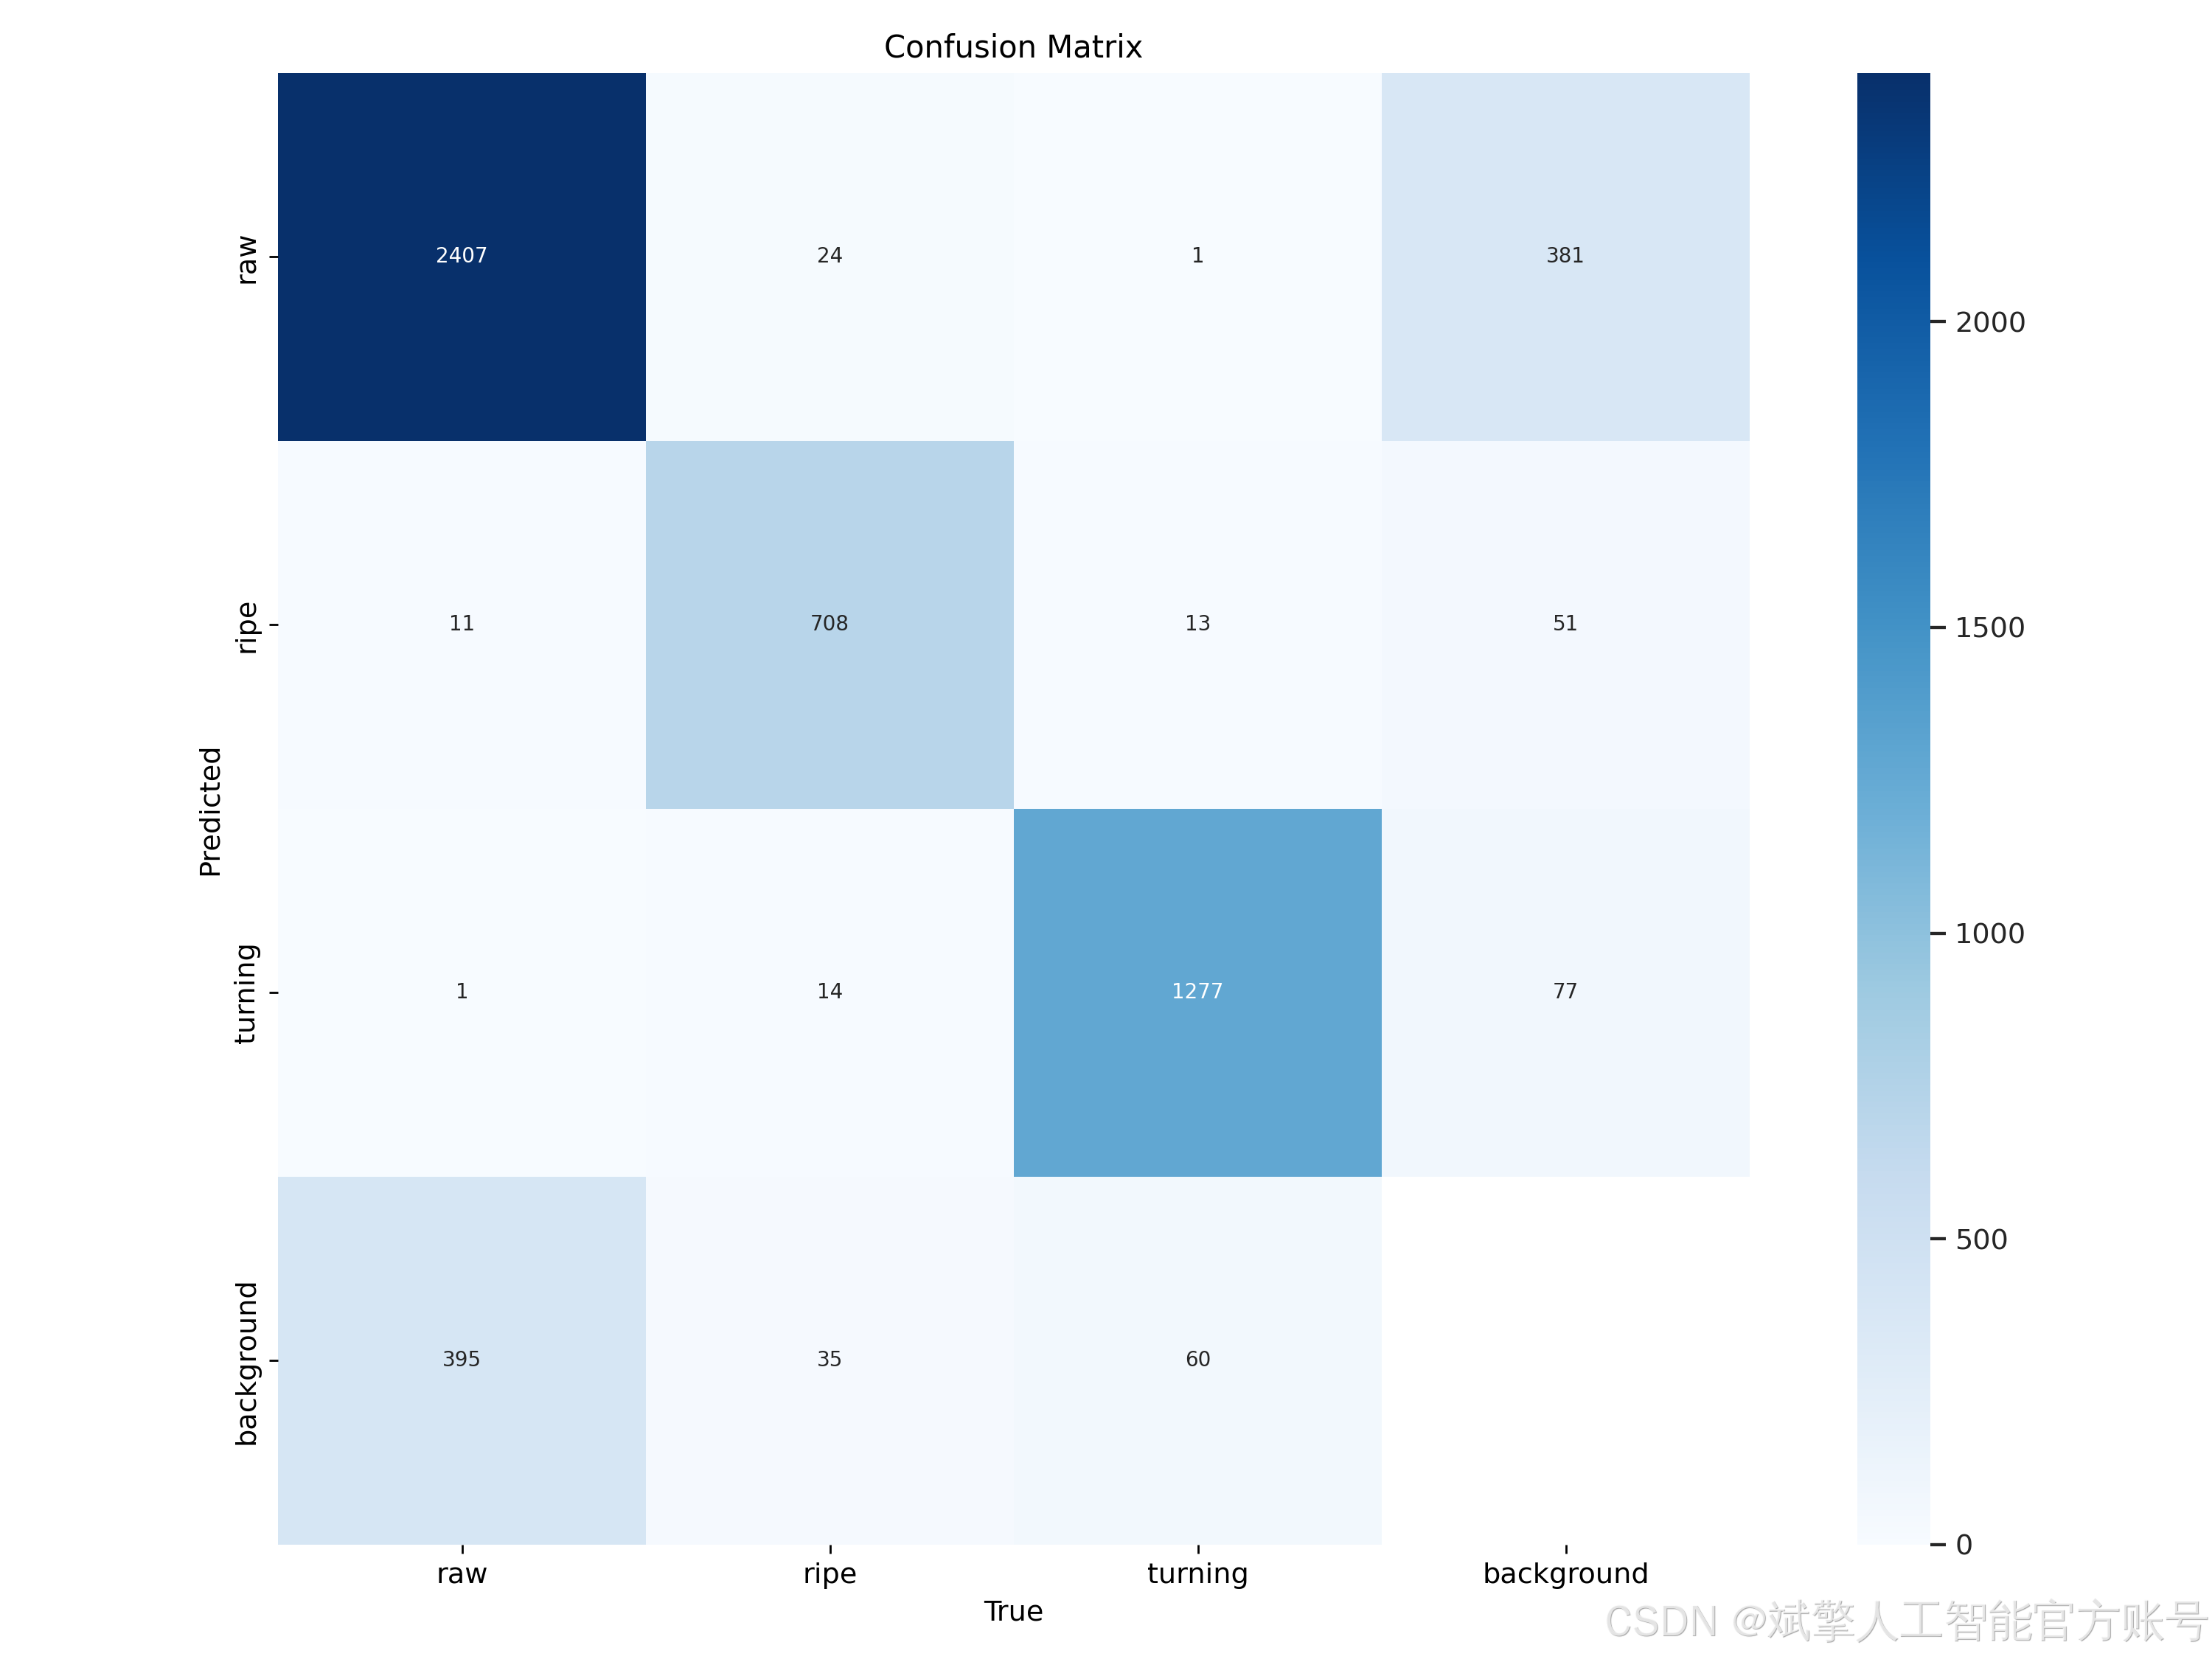
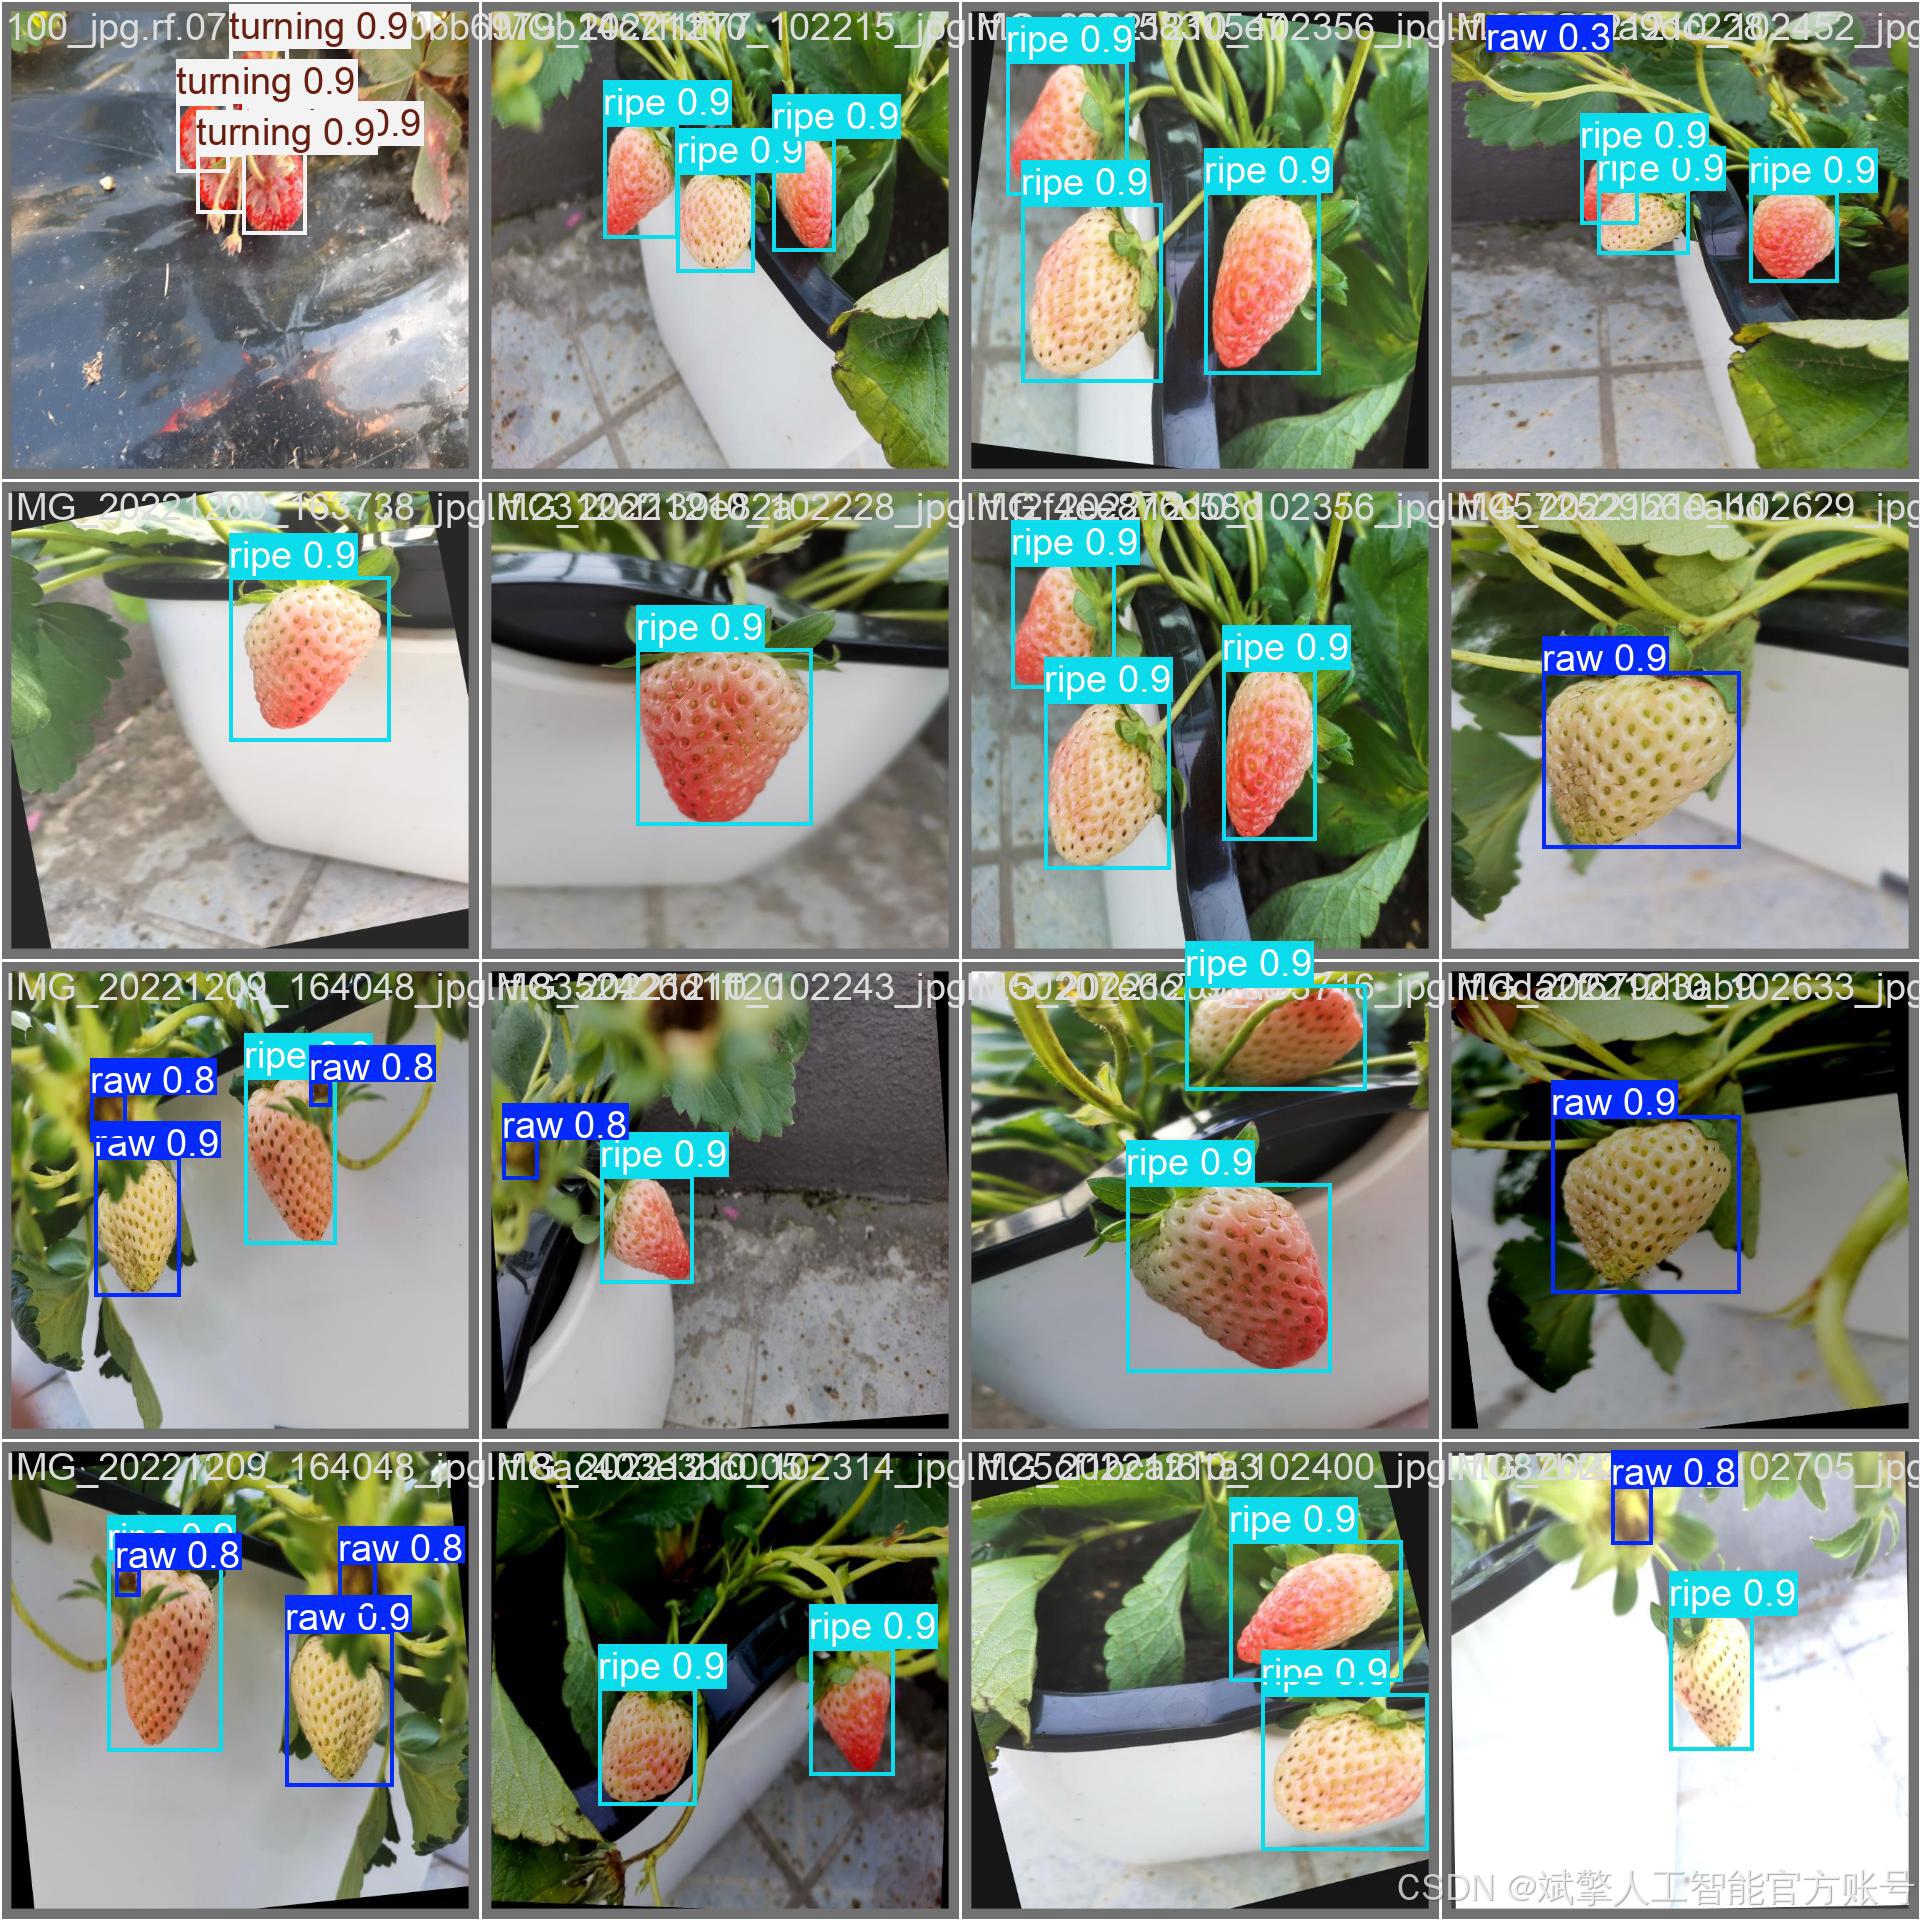
訓練結果


六、核心代碼

import sysimport cv2
import numpy as np
from PyQt5.QtWidgets import QApplication, QMessageBox, QFileDialog
from PyQt5.QtCore import QThread, pyqtSignal
from ultralytics import YOLO
from UiMain import UiMainWindow
import time
import os
from PyQt5.QtWidgets import QDialog
from LoginWindow import LoginWindowclass DetectionThread(QThread):frame_received = pyqtSignal(np.ndarray, np.ndarray, list)  # 原始幀, 檢測幀, 檢測結果finished_signal = pyqtSignal()  # 線程完成信號def __init__(self, model, source, conf, iou, parent=None):super().__init__(parent)self.model = modelself.source = sourceself.conf = confself.iou = iouself.running = Truedef run(self):try:if isinstance(self.source, int) or self.source.endswith(('.mp4', '.avi', '.mov')):  # 視頻或攝像頭cap = cv2.VideoCapture(self.source)while self.running and cap.isOpened():ret, frame = cap.read()if not ret:break# 保存原始幀original_frame = frame.copy()# 檢測results = self.model(frame, conf=self.conf, iou=self.iou)annotated_frame = results[0].plot()# 提取檢測結果detections = []for result in results:for box in result.boxes:class_id = int(box.cls)class_name = self.model.names[class_id]confidence = float(box.conf)x, y, w, h = box.xywh[0].tolist()detections.append((class_name, confidence, x, y))# 發送信號self.frame_received.emit(cv2.cvtColor(original_frame, cv2.COLOR_BGR2RGB),cv2.cvtColor(annotated_frame, cv2.COLOR_BGR2RGB),detections)# 控制幀率time.sleep(0.03)  # 約30fpscap.release()else:  # 圖片frame = cv2.imread(self.source)if frame is not None:original_frame = frame.copy()results = self.model(frame, conf=self.conf, iou=self.iou)annotated_frame = results[0].plot()# 提取檢測結果detections = []for result in results:for box in result.boxes:class_id = int(box.cls)class_name = self.model.names[class_id]confidence = float(box.conf)x, y, w, h = box.xywh[0].tolist()detections.append((class_name, confidence, x, y))self.frame_received.emit(cv2.cvtColor(original_frame, cv2.COLOR_BGR2RGB),cv2.cvtColor(annotated_frame, cv2.COLOR_BGR2RGB),detections)except Exception as e:print(f"Detection error: {e}")finally:self.finished_signal.emit()def stop(self):self.running = Falseclass MainWindow(UiMainWindow):def __init__(self):super().__init__()# 初始化模型self.model = Noneself.detection_thread = Noneself.current_image = Noneself.current_result = Noneself.video_writer = Noneself.is_camera_running = Falseself.is_video_running = Falseself.last_detection_result = None  # 新增:保存最后一次檢測結果# 連接按鈕信號self.image_btn.clicked.connect(self.detect_image)self.video_btn.clicked.connect(self.detect_video)self.camera_btn.clicked.connect(self.detect_camera)self.stop_btn.clicked.connect(self.stop_detection)self.save_btn.clicked.connect(self.save_result)# 初始化模型self.load_model()def load_model(self):try:model_name = self.model_combo.currentText()self.model = YOLO(f"{model_name}.pt")  # 自動下載或加載本地模型self.update_status(f"模型 {model_name} 加載成功")except Exception as e:QMessageBox.critical(self, "錯誤", f"模型加載失敗: {str(e)}")self.update_status("模型加載失敗")def detect_image(self):if self.detection_thread and self.detection_thread.isRunning():QMessageBox.warning(self, "警告", "請先停止當前檢測任務")returnfile_path, _ = QFileDialog.getOpenFileName(self, "選擇圖片", "", "圖片文件 (*.jpg *.jpeg *.png *.bmp)")if file_path:self.clear_results()self.current_image = cv2.imread(file_path)self.current_image = cv2.cvtColor(self.current_image, cv2.COLOR_BGR2RGB)self.display_image(self.original_image_label, self.current_image)# 創建檢測線程conf = self.confidence_spinbox.value()iou = self.iou_spinbox.value()self.detection_thread = DetectionThread(self.model, file_path, conf, iou)self.detection_thread.frame_received.connect(self.on_frame_received)self.detection_thread.finished_signal.connect(self.on_detection_finished)self.detection_thread.start()self.update_status(f"正在檢測圖片: {os.path.basename(file_path)}")def detect_video(self):if self.detection_thread and self.detection_thread.isRunning():QMessageBox.warning(self, "警告", "請先停止當前檢測任務")returnfile_path, _ = QFileDialog.getOpenFileName(self, "選擇視頻", "", "視頻文件 (*.mp4 *.avi *.mov)")if file_path:self.clear_results()self.is_video_running = True# 初始化視頻寫入器cap = cv2.VideoCapture(file_path)frame_width = int(cap.get(cv2.CAP_PROP_FRAME_WIDTH))frame_height = int(cap.get(cv2.CAP_PROP_FRAME_HEIGHT))fps = cap.get(cv2.CAP_PROP_FPS)cap.release()# 創建保存路徑save_dir = "results"os.makedirs(save_dir, exist_ok=True)timestamp = time.strftime("%Y%m%d_%H%M%S")save_path = os.path.join(save_dir, f"result_{timestamp}.mp4")fourcc = cv2.VideoWriter_fourcc(*'mp4v')self.video_writer = cv2.VideoWriter(save_path, fourcc, fps, (frame_width, frame_height))# 創建檢測線程conf = self.confidence_spinbox.value()iou = self.iou_spinbox.value()self.detection_thread = DetectionThread(self.model, file_path, conf, iou)self.detection_thread.frame_received.connect(self.on_frame_received)self.detection_thread.finished_signal.connect(self.on_detection_finished)self.detection_thread.start()self.update_status(f"正在檢測視頻: {os.path.basename(file_path)}")def detect_camera(self):if self.detection_thread and self.detection_thread.isRunning():QMessageBox.warning(self, "警告", "請先停止當前檢測任務")returnself.clear_results()self.is_camera_running = True# 創建檢測線程 (默認使用攝像頭0)conf = self.confidence_spinbox.value()iou = self.iou_spinbox.value()self.detection_thread = DetectionThread(self.model, 0, conf, iou)self.detection_thread.frame_received.connect(self.on_frame_received)self.detection_thread.finished_signal.connect(self.on_detection_finished)self.detection_thread.start()self.update_status("正在從攝像頭檢測...")
🔐登錄注冊驗證
對應文件:LoginWindow.py
# 賬戶驗證核心邏輯
def handle_login(self):username = self.username_input.text().strip()password = self.password_input.text().strip()if not username or not password:QMessageBox.warning(self, "警告", "用戶名和密碼不能為空!")returnif username in self.accounts and self.accounts[username] == password:self.accept()  # 驗證通過else:QMessageBox.warning(self, "錯誤", "用戶名或密碼錯誤!")# 密碼強度檢查(注冊時)
def handle_register(self):if len(password) < 6: # 密碼長度≥6位QMessageBox.warning(self, "警告", "密碼長度至少為6位!")🎯?多重檢測模式
對應文件:main.py
圖片檢測
def detect_image(self):file_path, _ = QFileDialog.getOpenFileName(self, "選擇圖片", "", "圖片文件 (*.jpg *.jpeg *.png *.bmp)")if file_path:self.detection_thread = DetectionThread(self.model, file_path, conf, iou)self.detection_thread.start() # 啟動檢測線程視頻檢測
def detect_video(self):file_path, _ = QFileDialog.getOpenFileName(self, "選擇視頻", "", "視頻文件 (*.mp4 *.avi *.mov)")if file_path:self.video_writer = cv2.VideoWriter() # 初始化視頻寫入器self.detection_thread = DetectionThread(self.model, file_path, conf, iou)實時攝像頭
def detect_camera(self):self.detection_thread = DetectionThread(self.model, 0, conf, iou) # 攝像頭設備號0self.detection_thread.start()🖼??沉浸式可視化
對應文件:UiMain.py
雙畫面顯示
def display_image(self, label, image):q_img = QImage(image.data, w, h, bytes_per_line, QImage.Format_RGB888)pixmap = QPixmap.fromImage(q_img)label.setPixmap(pixmap.scaled(label.size(), Qt.KeepAspectRatio)) # 自適應縮放結果表格
def add_detection_result(self, class_name, confidence, x, y):self.results_table.insertRow(row)items = [QTableWidgetItem(class_name), # 類別列QTableWidgetItem(f"{confidence:.2f}"), # 置信度QTableWidgetItem(f"{x:.1f}"), # X坐標QTableWidgetItem(f"{y:.1f}") # Y坐標]???參數配置系統
對應文件:UiMain.py
雙閾值聯動控制
# 置信度閾值同步
def update_confidence(self, value):confidence = value / 100.0self.confidence_spinbox.setValue(confidence)  # 滑塊→數值框self.confidence_label.setText(f"置信度閾值: {confidence:.2f}")# IoU閾值同步
def update_iou(self, value):iou = value / 100.0self.iou_spinbox.setValue(iou)??UI美學設計
對應文件:UiMain.py
科幻風格按鈕
def create_button(self, text, color):return f"""QPushButton {{border: 1px solid {color};color: {color};border-radius: 6px;}}QPushButton:hover {{background-color: {self.lighten_color(color, 10)};box-shadow: 0 0 10px {color}; # 懸停發光效果}}"""動態狀態欄
def update_status(self, message):self.status_bar.showMessage(f"狀態: {message} | 最后更新: {time.strftime('%H:%M:%S')}" # 實時時間戳)🔄?智能工作流
對應文件:main.py
線程管理
class DetectionThread(QThread):frame_received = pyqtSignal(np.ndarray, np.ndarray, list) # 信號量通信def run(self):while self.running: # 多線程檢測循環results = self.model(frame, conf=self.conf, iou=self.iou)self.frame_received.emit(original_frame, result_frame, detections)七、項目源碼(視頻簡介)

演示與介紹視頻:
基于深度學習YOLOv12的草莓成熟度檢測系統(YOLOv12+YOLO數據集+UI界面+登錄注冊界面+Python項目源碼+模型)_嗶哩嗶哩_bilibili
基于深度學習YOLOv12的草莓成熟度檢測系統(YOLOv12+YOLO數據集+UI界面+登錄注冊界面+Python項目源碼+模型)


和CT(協調轉彎)雙模型,二維環境下的軌跡定位。附代碼下載鏈接)