所有文章都是免費查看的,如果有無法查看的情況,煩請聯系我修改哈~
序言
????????為什么要做這個呢?因為所需要的條碼打印功能比較簡單,符合需要即可,但是呢網上查看了發現并沒有合適的開源項,其他成熟的軟件收費又超出預算。沒法子,自己整唄。
? ? ? ? 核心邏輯就是利用谷歌網頁端的打印功能去調用打印機,以實現打印功能。打印機的驅動還是要裝的,dpi我這邊默認是300(足夠一般使用了),打印精度問題是通過將網頁的條碼打印區域整個變成圖片進行打印的,網頁的靜默打印模式需要單獨設置。OK,方案可行,下面直接開始:
? ? ? ? 先展示下總體頁面:??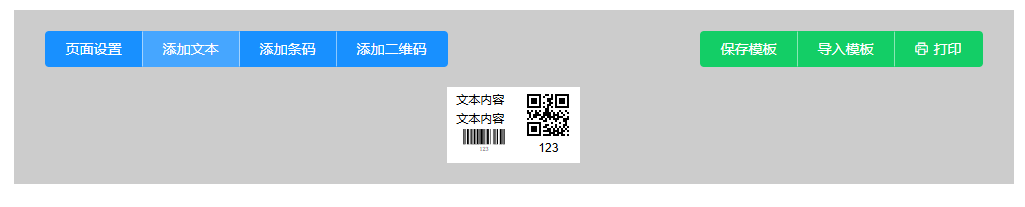
一、主要功能
- 組件僅需要文本、條碼、二維碼
- 組件可以調整大小和位置
- 組件值需要實時展示,方便查看結果
- 模板導入導出使用較為方便的json文件,腳本保存在數據庫也比較方便
- 需要一鍵打印(靜默打印)
- 可以進行多條碼打印
二、文本模塊
? ? ? ? 這個沒什么好說的,直接上代碼:
// TextLabel.vue<template><div class="text-component" :style="[dynamicStyle, selected ? selectedStyle : {}]" @mousedown="onDragStart"@dblclick="handleDoubleClick" ref="dragElement"><span class="text-class">{{ textData.content }}</span></div>
</template><script>
export default {props: {index: {type: Number,required: true,},textData: {type: Object,default: () => ({content: "",}),},styleData: {type: Object,default: () => ({position: "absolute",top: "50px",left: "50px",fontSize: "12px", // 新增默認字體大小width: "auto", // 修改為自適應寬度height: "auto", // 修改為自適應高度}),},selected: {type: Boolean,default: false,},},data() {return {};},methods: {handleDoubleClick() {this.$emit("dblclick"); // 觸發父組件的雙擊事件},onDragStart(event) {// 阻止默認事件,避免選擇文本等干擾event.preventDefault();// 記錄鼠標的初始位置const initialX = event.clientX - this.$refs.dragElement.offsetLeft;const initialY = event.clientY - this.$refs.dragElement.offsetTop;// 定義拖動過程中的移動事件const onDrag = (e) => {const newLeft = e.clientX - initialX;const newTop = e.clientY - initialY;// 更新元素的樣式this.$refs.dragElement.style.left = `${newLeft}px`;this.$refs.dragElement.style.top = `${newTop}px`;// 通過事件傳遞新的位置this.$emit("updateStyle",{ left: `${newLeft}px`, top: `${newTop}px` },this.index);};// 監聽鼠標移動事件const onMouseUp = () => {// 移除鼠標移動和鼠標松開的事件監聽window.removeEventListener("mousemove", onDrag);window.removeEventListener("mouseup", onMouseUp);};// 開始拖動,綁定鼠標移動事件和鼠標釋放事件window.addEventListener("mousemove", onDrag);window.addEventListener("mouseup", onMouseUp);},},computed: {dynamicStyle() {return {...this.styleData,// 自動計算最小寬度和高度minWidth: `${(this.textData.content.length * parseInt(this.styleData.fontSize)) / 2}px`,minHeight: `${parseInt(this.styleData.fontSize) * 1.5}px`,};},selectedStyle() {return {border: "2px solid #409EFF",boxShadow: "0 0 5px rgba(64, 158, 255, 0.5)",};},},
};
</script><style scoped>
.text-component {cursor: move; /* 增加一個拖動手勢 */display: inline-block; /* 改為行內塊級元素 */border: 1px solid transparent; /* 默認透明邊框 */background-color: transparent; /* 新增透明背景 */
}.text-component:not(.selected) {border-color: transparent !important; /* 未選中時隱藏邊框 */
}.text-class {font-size: v-bind('styleData.fontSize + "px"');
}
</style>
要點:
- 使用v-bind將傳入組件的值綁定到css中;
- 行內塊級元素以及其他css的應用是頁面展示的關鍵;
- 文字暫未實現換行展示的功能,可以自行增加。
三、條碼模塊
? ? ? ? 通過jsbarcode實時同步展示條碼,其他功能基本與文本組件類似,不多贅述:
// BarcodeLabel.vue<template><div class="barcode-container" :style="[dynamicStyle, selected ? selectedStyle : {}]" @mousedown="onDragStart"@dblclick="handleDoubleClick" ref="dragElement"><!-- 條形碼顯示部分 --><svg ref="barcode" class="barcode-svg"></svg><!-- <span v-if="showText" class="barcode-text">{{ textData.content }}</span> --></div>
</template><script>
import JsBarcode from 'jsbarcode';  // 引入jsbarcode庫export default {props: {index: {type: Number,required: true},textData: {type: Object,default: () => ({content: '',})},styleData: {type: Object,default: () => ({position: 'absolute',top: '50px',left: '50px',showText: true,fontSize: 12,fontSpac: 1})},selected: {type: Boolean,default: false}},data() {return {};},methods: {handleDoubleClick() {this.$emit('dblclick'); // 觸發父組件的雙擊事件},generateBarcode(text) {// 使用jsbarcode庫生成條形碼JsBarcode(this.$refs.barcode, text, {format: "CODE128",  // 設置條形碼的格式,可以根據需要更改width: 2,           // 條形碼寬度height: 50,         // 條形碼高度displayValue: true  // 同步顯示文字開關});},onDragStart(event) {// 阻止默認事件,避免選擇文本等干擾event.preventDefault();// 記錄鼠標的初始位置const initialX = event.clientX - this.$refs.dragElement.offsetLeft;const initialY = event.clientY - this.$refs.dragElement.offsetTop;// 定義拖動過程中的移動事件const onDrag = (e) => {const newLeft = e.clientX - initialX;const newTop = e.clientY - initialY;// 更新元素的樣式this.$refs.dragElement.style.left = `${newLeft}px`;this.$refs.dragElement.style.top = `${newTop}px`;// 通過事件傳遞新的位置this.$emit('updateStyle', { left: `${newLeft}px`, top: `${newTop}px` }, this.index);};// 監聽鼠標移動事件const onMouseUp = () => {// 移除鼠標移動和鼠標松開的事件監聽window.removeEventListener('mousemove', onDrag);window.removeEventListener('mouseup', onMouseUp);};// 開始拖動,綁定鼠標移動事件和鼠標釋放事件window.addEventListener('mousemove', onDrag);window.addEventListener('mouseup', onMouseUp);}},watch: {'textData.content'(newText) {this.generateBarcode(newText);  // 更新條形碼}},created() {this.$nextTick(() => {// 初始生成條形碼this.generateBarcode(this.textData.content);})},computed: {showText() {return this.styleData.showText ?? true;},dynamicStyle() {return {...this.styleData,border: '1px solid transparent', // 默認透明邊框background: 'transparent'};},selectedStyle() {return {border: '2px solid transparent',boxShadow: '0 0 5px rgba(64, 158, 255, 0.5)'};}}
};
</script><style scoped>
.barcode-container {padding: 10px;border: 1px solid transparent; /* 默認透明邊框 */background-color: transparent; /* 新增透明背景 */cursor: move; /* 增加一個拖動手勢 */display: flex;flex-direction: column;align-items: center;
}.barcode-svg {width: 200px; /* 設置條形碼的寬度 */height: 50px; /* 設置條形碼的高度 */
}.barcode-text {font-size: v-bind('styleData.fontSize + "px"');margin-top: v-bind('styleData.fontSpac + "px"');line-height: 1.2;text-align: center;white-space: nowrap; /* 防止文字換行 */
}
</style>
要點:
- 這個組件用的比較少,暫未發現啥。
四、二維碼模塊
? ? ? ? 同理,使用qrcode實現二維碼的實時展示:
// QRCodeLabel.vue<template><div class="qrcode-container" :style="[dynamicStyle, selected ? selectedStyle : {}]" @mousedown="onDragStart"@dblclick="handleDoubleClick" ref="dragElement"><div class="qrcode-wrapper"><img :src="barcodeSrc" :style="qrCodeSize" alt="QRCode" /></div><span v-if="showText" class="qrcode-text">{{ textData.content }}</span></div>
</template><script>
import QRCode from 'qrcode';export default {props: {index: {type: Number,required: true},textData: {type: Object,default: () => ({content: '',})},styleData: {type: Object,default: () => ({position: 'absolute',top: '50px',left: '50px',width: '20px',height: '20px',showText: true,fontSize: 12,fontSpac: 20})},selected: {type: Boolean,default: false}},data() {return {barcodeSrc: ''  // 存儲二維碼的路徑};},methods: {handleDoubleClick() {this.$emit('dblclick'); // 觸發父組件的雙擊事件},generateQRCode(text) {// 使用 qrcode 庫生成二維碼QRCode.toDataURL(text, { width: 200, margin: 2 }, (err, url) => {if (err) {// console.error('QRCode generation error:', err);return;}this.barcodeSrc = url;  // 更新二維碼圖片的路徑});},onDragStart(event) {// 阻止默認事件,避免選擇文本等干擾event.preventDefault();// 記錄鼠標的初始位置const initialX = event.clientX - this.$refs.dragElement.offsetLeft;const initialY = event.clientY - this.$refs.dragElement.offsetTop;// 定義拖動過程中的移動事件const onDrag = (e) => {const newLeft = e.clientX - initialX;const newTop = e.clientY - initialY;// 更新元素的樣式this.$refs.dragElement.style.left = `${newLeft}px`;this.$refs.dragElement.style.top = `${newTop}px`;// 通過事件傳遞新的位置this.$emit('updateStyle', { left: `${newLeft}px`, top: `${newTop}px` }, this.index);};// 監聽鼠標移動事件const onMouseUp = () => {// 移除鼠標移動和鼠標松開的事件監聽window.removeEventListener('mousemove', onDrag);window.removeEventListener('mouseup', onMouseUp);};// 開始拖動,綁定鼠標移動事件和鼠標釋放事件window.addEventListener('mousemove', onDrag);window.addEventListener('mouseup', onMouseUp);}},computed: {dynamicStyle() {return {...this.styleData,width: this.styleData.width,  // 顯式綁定寬度height: this.styleData.height, // 顯式綁定高度background: 'transparent'};},selectedStyle() {return {border: '2px solid #409EFF',boxShadow: '0 0 5px rgba(64, 158, 255, 0.5)'};},qrCodeSize() {return {width: this.styleData.width,height: this.styleData.height};},showText() {return this.styleData.showText;}},watch: {'textData.content'(newText) {// 如果父組件的文本發生變化,也更新子組件的本地文本this.generateQRCode(newText);  // 更新二維碼}},created() {// 初始生成二維碼this.generateQRCode(this.textData.content);}
};
</script><style scoped>
.qrcode-container {min-width: 80px;min-height: 80px;overflow: visible; /* 防止內容被裁剪 */cursor: move; /* 增加一個拖動手勢 */display: flex;flex-direction: column;align-items: center;padding: 5px;border: 1px solid transparent; /* 默認透明邊框 */background-color: transparent; /* 新增透明背景 */box-sizing: border-box; /* 添加盒模型 */
}.qrcode-wrapper {width: calc(100% - 10px); /* 增加水平邊距 */height: calc(100% - 55px); /* 增加文字區域空間 */display: flex;align-items: center;justify-content: center;margin-top: 20px; /* 添加外上邊距 */
}.qrcode-wrapper img {width: 100%; /* 使用容器完整寬度 */height: 100%; /* 使用容器完整高度 */object-fit: contain; /* 保持寬高比 */padding: 0; /* 移除內邊距 */
}.qrcode-text {font-size: v-bind('styleData.fontSize + "px"');margin-top: v-bind('styleData.fontSpac + "px"');line-height: 1.2;text-align: center;min-height: 20px; /* 最小高度保證文字可見 */white-space: nowrap; /* 防止文字換行 */
}.qrcode-container:not(.selected) {border-color: transparent !important;
}
</style>
要點:
- 因為二維碼下面自帶的展示功能在打印時自動靠左的布局,所以這邊直接隱藏,需要在二維碼下發展示二維碼內容時建議直接使用TextLabel;
- 當然這個也可以用來自動生成二維碼截圖發送(本來沒注意,后來發現同事這么使用了,意外之喜吧)。?
五、紙張與組件功能
? ? ? ? 紙張大小的調整:
// PrintConfigDrawer.vue<template><el-drawertitle="打印設置":visible="value"direction="rtl"size="30%"@close="$emit('input', false)"><el-form label-width="100px"><el-form-item label="紙張寬度(mm)"><el-input-number:value="config.paperWidth"@change="val => $emit('update:config', {...config, paperWidth: val})":min="20":max="1000"/></el-form-item><el-form-item label="紙張高度(mm)"><el-input-number:value="config.paperHeight"@change="val => $emit('update:config', {...config, paperHeight: val})":min="20":max="1000"/></el-form-item><!-- <el-form-item label="邊距(mm)"><el-input-number:value="config.margin"@change="val => $emit('update:config', {...config, margin: val})":min="0":max="20"/></el-form-item> --></el-form></el-drawer>
</template><script>
export default {props: {value: Boolean,config: {type: Object,default: () => ({paperWidth: 100,paperHeight: 150,margin: 0})}}
}
</script>
? ? ? ? ?組件的操作頁面:
// OperateDrawer.vue<template><el-drawer :visible="visible" :direction="direction" :size="size" title="編輯組件" @close="closeDrawer"><el-form :model="localComponent" label-width="80px" class="drawer-content"><!-- 長寬調整 --><el-form-item label="寬度"><el-input type="number" v-model.number="width" placeholder="寬度" /></el-form-item><el-form-item label="高度" v-if="componentType === 'barcode'"><el-input type="number" v-model.number="height" placeholder="高度" /></el-form-item><!-- 內容編輯 --><el-form-item label="內容"><el-input v-model="content" placeholder="修改內容" /></el-form-item><!-- 位置調整 --><el-form-item label="左邊距"><el-input type="number" v-model.number="left" placeholder="左邊距" /></el-form-item><el-form-item label="上邊距"><el-input type="number" v-model.number="top" placeholder="上邊距" /></el-form-item><el-form-item label="顯示文字" v-if="componentType === 'qrcode'"><el-switch v-model="showText"></el-switch></el-form-item><!-- 字體調整 --><el-form-item label="字體大小" v-if="['text', 'qrcode'].includes(componentType) && showText"><el-input-number v-model.number="fontSize" :min="8" :max="72" :step="2" /></el-form-item><el-form-item label="字間距" v-if="['text', 'qrcode'].includes(componentType) && showText"><el-input-number v-model.number="fontSpac" :step="1" /></el-form-item><!-- 操作按鈕 --><el-form-item><el-button type="danger" @click="deleteComponent">刪除組件</el-button></el-form-item></el-form></el-drawer>
</template><script>
export default {props: {visible: Boolean,           // 控制抽屜顯示/隱藏component: Object,          // 傳遞選中的組件數據componentType: String,      // 傳遞當前組件類型(text, barcode, qrcode)index: Number               // 當前組件的索引},data() {return {localComponent: {style: {}, // 確保 style 存在...this.component},direction: 'rtl', // 抽屜從右側彈出size: '20%' // 抽屜寬度};},computed: {width: {get() {return parseInt(this.localComponent.style?.width) || 0; // 去掉 'px' 單位},set(value) {if (!this.localComponent.style) {this.localComponent.style = {};}// 當類型為二維碼時同步高度if (this.componentType === 'qrcode') {this.localComponent.style.height = `${value}px`;}this.localComponent.style.width = `${value}px`; // 添加 'px' 單位this.saveChanges();}},height: {get() {return parseInt(this.localComponent.style?.height) || 0; // 去掉 'px' 單位},set(value) {if (!this.localComponent.style) {this.localComponent.style = {};}this.localComponent.style.height = `${value}px`; // 添加 'px' 單位this.saveChanges();}},left: {get() {return parseInt(this.localComponent.style?.left) || 0; // 去掉 'px' 單位},set(value) {if (!this.localComponent.style) {this.localComponent.style = {};}this.localComponent.style.left = `${value}px`; // 添加 'px' 單位this.saveChanges();}},top: {get() {return parseInt(this.localComponent.style?.top) || 0; // 去掉 'px' 單位},set(value) {if (!this.localComponent.style) {this.localComponent.style = {};}this.localComponent.style.top = `${value}px`; // 添加 'px' 單位this.saveChanges();}},content: {get() {return this.localComponent.text?.content || '';},set(value) {this.localComponent.text.content = value;this.saveChanges();}},showText: {get() { return this.localComponent.style?.showText ?? true; },set(value) {this.$set(this.localComponent.style, 'showText', value);this.saveChanges();}},fontSize: {get() {return parseInt(this.localComponent.style?.fontSize) || 12;},set(value) {this.$set(this.localComponent.style, 'fontSize', `${value}`);this.saveChanges();}},fontSpac: {get() {return parseInt(this.localComponent.style?.fontSpac) || 20;},set(value) {this.$set(this.localComponent.style, 'fontSpac', `${value}`);this.saveChanges();}},},methods: {closeDrawer() {// this.$emit('update:visible', false); // 通知父組件更新 visiblethis.$emit('close');},deleteComponent() {this.$emit('delete', this.componentType, this.index);  // 刪除當前組件},saveChanges() {this.$emit('update', this.localComponent, this.index);  // 通知父組件更新}},watch: {component(newVal) {this.localComponent = {style: {}, // 確保 style 存在...newVal};}}
};
</script><style scoped>
.drawer-content {padding-right: 20px;
}
</style>
要點:
- 父子組件傳值吧,過。?
六、導入與導出
? ? ? ? 導出功能組件:
// SaveTemplateDrawer.vue<template><el-drawer:visible="visible":direction="direction":size="size"title="保存模板"@close="closeDrawer"><div class="label-print-drawer"><el-input:value="templateData"@input="$emit('update:templateData', $event.target.value)"type="textarea"rows="15"readonlyplaceholder="模板內容將自動生成..."/><el-button type="success" @click="saveTemplate" class="drawer-btn">保存為文件</el-button></div></el-drawer>
</template><script>
export default {props: {visible: {type: Boolean,default: false,},templateData: {type: String,default: "",},},data() {return {direction: "rtl",size: "50%",};},methods: {saveTemplate() {const blob = new Blob([this.templateData], { type: "text/plain" });const url = URL.createObjectURL(blob);const link = document.createElement("a");link.href = url;link.download = "template.txt";link.click();},closeDrawer() {this.$emit("update:visible", false);},},
};
</script><style scoped>
.drawer-btn {float: right;margin-top: 10px;
}.label-print-drawer {padding: 20px;
}
</style>
????????導入功能組件:
// ImportTemplateDrawer.vue<template><el-drawer:visible="visible"@update:visible="$emit('update:modelValue', $event)"title="導入模板"size="50%"@close="closeDrawer"><div class="label-print-drawer"><el-inputv-model="inputContent"type="textarea"rows="15"placeholder="粘貼模板內容或選擇文件導入..."/><inputtype="file"ref="fileInput"@change="handleFile"hiddenaccept=".txt"/><el-button-group class="drawer-btn"><el-button type="primary" @click="$refs.fileInput.click()">選擇文件</el-button><el-button type="primary" @click="handleSubmit">導入內容</el-button></el-button-group></div></el-drawer>
</template><script>
export default {props: {visible: Boolean,},data() {return {inputContent: "",};},methods: {handleFile(e) {const file = e.target.files[0];if (!file) return;const reader = new FileReader();reader.onload = (e) => {this.inputContent = e.target.result;this.handleSubmit();};reader.readAsText(file);},handleSubmit() {try {const parsed = JSON.parse(this.inputContent);this.$emit("import", parsed);} catch (e) {this.$message.error("模板解析失敗: " + e.message);return;}this.inputContent = "";// 關閉抽屜this.closeDrawer();},closeDrawer() {this.$emit("update:visible", false);},},
};
</script><style scoped>
.label-print-drawer {padding: 20px;
}.drawer-btn {float: right;margin: 10px 0 0 0;
}
</style>
要點:
- 父子組件傳遞控制drawer的visible的這段代碼其實還有更好的寫法,可以參考官方文檔哈。?
七、主頁展示
? ? ? ? 核心父組件:
<template><div><back-button /><div class="label-editor"><el-row type="flex" justify="space-between"><el-col><el-button-group class="controls"><el-button type="primary" @click="openPrintConfig">打印配置</el-button><el-button type="primary" @click="addTextComponent">添加文本</el-button><el-button type="primary" @click="addBarcodeComponent">添加條碼</el-button><el-button type="primary" @click="addQRCodeComponent">添加二維碼</el-button></el-button-group></el-col><el-col><el-button-group class="controls" style="float: right"><el-button type="success" @click="saveTemplate">保存模板</el-button><el-buttontype="success"@click="() => (importDrawerVisible = true)">導入模板</el-button><el-buttontype="success"icon="el-icon-printer"@click="printPageV5">打印</el-button><!-- <el-buttontype="success"icon="el-icon-printer"@click="printPageMulti">批量打印測試</el-button> --></el-button-group></el-col></el-row><divclass="canvas"id="labelContainer":style="{width: printConfig.paperWidth + 'mm',height: printConfig.paperHeight + 'mm',margin: '0 auto',transform: 'scale(1)',boxSizing: 'border-box',position: 'relative',background: '#fff',border: '0', // 移除容器邊框}"><div id="inner-container"><TextComponentv-for="(item, index) in components.text":key="'text-' + index":index="index":styleData="item.style":textData="item.text":selected="isSelected('text', index)"@updateStyle="(newStyle) =>handleUpdateStyle(newStyle, 'text', index)"@dblclick="selectComponent('text', index)"/><BarcodeComponentv-for="(item, index) in components.barcode":key="'barcode-' + index":index="index":styleData="item.style":textData="item.text":selected="isSelected('barcode', index)"@updateStyle="(newStyle) =>handleUpdateStyle(newStyle, 'barcode', index)"@dblclick="selectComponent('barcode', index)"/><QRCodeComponentv-for="(item, index) in components.qrcode":key="'qrcode-' + index":index="index":styleData="item.style":textData="item.text":selected="isSelected('qrcode', index)"@updateStyle="(newStyle) =>handleUpdateStyle(newStyle, 'qrcode', index)"@dblclick="selectComponent('qrcode', index)"/></div></div><Drawer:visible="isDrawerVisible"@update:visible="isDrawerVisible = $event":component="selectedComponent":componentType="selectedComponentType":index="selectedComponentIndex"@close="closeDrawer"@delete="deleteComponent"/><PrintConfigDrawerv-model="printConfigVisible":config.sync="printConfig"@update:visible="(val) => (printConfigVisible = val)"/><SaveTemplateDrawer:visible="saveDrawerVisible":template-data="templateJson"@update:visible="(val) => (saveDrawerVisible = val)"/><ImportTemplateDrawer:visible="importDrawerVisible"@update:visible="(val) => (importDrawerVisible = val)"@import="handleTemplateImport"/></div></div>
</template><script>
import TextComponent from "@/components/labelPrint/TextLabel.vue";
import BarcodeComponent from "@/components/labelPrint/BarcodeLabel.vue";
import QRCodeComponent from "@/components/labelPrint/QRCodeLabel.vue";
import Drawer from "@/components/labelPrint/OperateDrawer.vue";
import PrintConfigDrawer from "@/components/labelPrint/PrintConfigDrawer.vue";
import BackButton from "@/components/BackButton.vue";
import SaveTemplateDrawer from "@/components/labelPrint/SaveTemplateDrawer.vue";
import ImportTemplateDrawer from "@/components/labelPrint/ImportTemplateDrawer.vue";
import html2canvas from "html2canvas";import temps from "@/assets/templates/multiTemp.json"; // 導入模板數據export default {components: {BackButton,TextComponent,BarcodeComponent,QRCodeComponent,Drawer,PrintConfigDrawer,SaveTemplateDrawer,ImportTemplateDrawer,},data() {return {components: {text: [],barcode: [],qrcode: [],},isDrawerVisible: false, // 控制抽屜的顯示和隱藏selectedComponent: null,selectedComponentType: null, // 用來標識選擇的是文本、條碼還是二維碼selectedComponentIndex: null, // 記錄選中組件的索引printConfigVisible: false, // 打印配置抽屜的顯示和隱藏// 打印配置參數printConfig: {paperWidth: 35, // 單位:mmpaperHeight: 20, // 單位:mmmargin: 0,},saveDrawerVisible: false,importDrawerVisible: false,templateJson: "",printQueue: [], // 新增打印隊列isPrinting: false, // 新增打印狀態標志temps: temps, // 多模板參數};},methods: {// 添加文本組件addTextComponent() {this.components.text.push({text: {content: "文本內容",},style: {position: "absolute",top: "0px",left: "0px",width: "120px",fontSize: "12px",},});},// 添加條碼組件addBarcodeComponent() {this.components.barcode.push({text: {content: "123",},style: {position: "absolute",top: "0px",left: "0px",width: "100px",height: "50px",showText: true,fontSize: 10,fontSpac: 1,},});},// 添加二維碼組件addQRCodeComponent() {this.components.qrcode.push({text: {content: "123",},style: {position: "absolute",top: "0px",left: "0px",width: "50px",height: "50px",showText: true,fontSize: 12,fontSpac: 20,},});},// 組件選中selectComponent(type, index) {this.selectedComponentType = type;this.selectedComponentIndex = index;this.selectedComponent = { ...this.components[type][index] }; // 創建一個副本,避免直接修改原始數據this.isDrawerVisible = true; // 打開抽屜},// 修改組件handleUpdateStyle(newStyle, type, index) {this.$set(this.components[type], index, {...this.components[type][index],style: {...this.components[type][index].style,...newStyle,},});},// 判斷組件是否被選中isSelected(type, index) {return (this.selectedComponentType === type &&Number(this.selectedComponentIndex) === Number(index));},// 打開打印配置openPrintConfig() {this.printConfigVisible = true;},// 保存模板saveTemplate() {const template = {config: this.printConfig,components: {text: this.components.text.map((item) => ({text: item.text,style: item.style,})),barcode: this.components.barcode.map((item) => ({text: item.text,style: item.style,})),qrcode: this.components.qrcode.map((item) => ({text: item.text,style: item.style,})),},};this.templateJson = JSON.stringify(template);// 打開保存抽屜this.saveDrawerVisible = true;},// 導入模板handleTemplateImport(template) {this.printConfig = template.config;this.components = template.components;this.$message.success("模板導入成功");},// 模板加入隊列addToPrintQueue(template) {this.printQueue.push(JSON.parse(JSON.stringify(template)));if (!this.isPrinting) this.processPrintQueue();},// 隊列處理async processPrintQueue() {if (this.printQueue.length === 0) {this.isPrinting = false;return;}this.isPrinting = true;const template = this.printQueue.shift();await this.printSingleLabel(template);this.processPrintQueue();},// 打印功能async printSingleLabel(template) {try {// 應用模板配置this.printConfig = template.config;this.components = template.components;await this.$nextTick(); // 等待DOM更新await this.printPageV5(); // 使用新的打印方法this.$message.success("打印成功");} catch (error) {this.$message.error("打印失敗:" + error.message);}},// 1. 創建一個谷歌瀏覽器的快捷方式// 2. 右鍵快捷方式,點擊【屬性】,點擊【起始位置】,在【目標】尾部位置 添加 “ --kiosk-printing” 注意空格!!! 重點來了 ! 設置好之后需要關閉當前全部打開的瀏覽器界面!!再次打開配置完成 提示:先預覽打印效果,調整好比例再設置,設置完之后可用同樣方法取消自動打印。// 3. 即可實現【靜默打印】async printPageV5() {try {const container = document.getElementById("labelContainer");if (!container) {this.$message.error("未找到打印容器");return;}// 使用300dpi進行換算(打印機常用分辨率)const mmToPx = (mm) => mm * 11.81; // 300dpi下1mm≈11.81pxconst targetWidth = mmToPx(this.printConfig.paperWidth);const targetHeight = mmToPx(this.printConfig.paperHeight);// 使用html2canvas轉換容器為圖片const canvas = await html2canvas(container, {useCORS: true,scale: 3, // 固定高倍縮放因子logging: false,width: container.offsetWidth,height: container.offsetHeight,windowWidth: targetWidth,windowHeight: targetHeight,});const imgData = canvas.toDataURL("image/png");// 創建一個隱藏的iframeconst iframe = document.createElement('iframe');iframe.style.position = 'fixed';iframe.style.right = '-1000px';iframe.style.bottom = '-1000px';iframe.style.width = '0';iframe.style.height = '0';iframe.style.border = '0';document.body.appendChild(iframe);iframe.onload = () => {const iframeDoc = iframe.contentDocument || iframe.contentWindow.document;iframeDoc.write(`<!DOCTYPE html><html><head><title>標簽打印</title><style>@media print {@page {size: ${this.printConfig.paperWidth}mm ${this.printConfig.paperHeight}mm;margin: 0;}body {margin: 0;width: ${this.printConfig.paperWidth}mm;height: ${this.printConfig.paperHeight}mm;overflow: hidden; /* 防止內容溢出產生分頁 */}img {position: absolute;top: 0;right: 0;bottom: 0;left: 0;width: 100% !important;height: 100% !important;object-fit: contain;image-rendering: -webkit-optimize-contrast; /* 更好的清晰度 */border: none !important;outline: none !important;box-shadow: none !important;}}</style></head><body><img src="${imgData}" onload="window.focus(); window.print();" /></body></html>`);iframeDoc.close();// 可選:在一定時間后移除iframesetTimeout(() => {document.body.removeChild(iframe);}, 1000); // 調整時間以確保打印已完成};// 設置iframe的src為空以觸發加載事件iframe.src = 'about:blank';} catch (error) {console.error("生成打印圖片失敗:", error);this.$message.error("生成打印圖片失敗:" + error.message);}},async printPageMulti() {if (!this.temps || !this.temps.length) {this.$message.warning('沒有要打印的模板');return;}// 清空當前打印隊列this.printQueue = [];// 將模板列表加入打印隊列this.temps.forEach(template => {this.addToPrintQueue({config: template.config,components: template.components});});// 觸發打印隊列處理if (!this.isPrinting) {this.processPrintQueue();}},// 關閉抽屜closeDrawer() {this.isDrawerVisible = false;// 新增清除選中狀態邏輯this.selectedComponent = null;this.selectedComponentType = null;this.selectedComponentIndex = null;},// 組件刪除deleteComponent(type, index) {this.components[type].splice(index, 1);// 關閉抽屜this.isDrawerVisible = false;// 重置選中的組件this.selectedComponent = null;this.selectedComponentType = null;this.selectedComponentIndex = null;},},
};
</script><style scoped>
.label-editor {position: relative;max-width: 1000px;height: auto; /* 改為自適應 */border: 1px solid #ccc;margin: 20px auto;padding: 20px; /* 添加內邊距 */background-color: #ccc;
}.controls {margin-bottom: 20px;
}.controls button {margin: 0 10px;padding: 10px 20px;font-size: 14px;
}.canvas {position: relative;border: 1px solid #ddd;background-color: #fff;overflow: hidden; /* 添加防止內容溢出 */box-sizing: border-box;
}
</style>
要點:
- 靜默打印的如何實現:?
1. 創建一個谷歌瀏覽器的快捷方式
2. 右鍵快捷方式,點擊【屬性】,點擊【起始位置】,在【目標】尾部位置 添加 “ --kiosk-printing” 注意空格!!! 重點來了 ! 設置好之后需要關閉當前全部打開的瀏覽器界面!!再次打開配置完成 提示:先預覽打印效果,調整好比例再設置,設置完之后可用同樣方法取消自動打印。
3. 即可實現【靜默打印】
- 缺少 BackButton 組件?這個是我用來返回上一層的(因為后面還會有一篇點擊圖片獲取百分比點位的文章,正在整理中。這邊這個組件刪掉即可,不影響功能)
- 缺少 temps 文件?這個是測試批量打印用的,
刪掉即可,我后面展示出來。。。
八、其他
? ? ? ? temps.json文件:
[{"config":{"paperWidth":35,"paperHeight":20,"margin":0},"components":{"text":[],"barcode":[],"qrcode":[{"text":{"content":"123"},"style":{"position":"absolute","top":"0px","left":"0px","width":"50px","height":"50px","showText":true,"fontSize":12,"fontSpac":20}}]}},{"config":{"paperWidth":35,"paperHeight":20,"margin":0},"components":{"text":[],"barcode":[],"qrcode":[{"text":{"content":"125"},"style":{"position":"absolute","top":"0px","left":"0px","width":"50px","height":"50px","showText":true,"fontSize":12,"fontSpac":20}}]}},{"config":{"paperWidth":35,"paperHeight":20,"margin":0},"components":{"text":[],"barcode":[],"qrcode":[{"text":{"content":"127"},"style":{"position":"absolute","top":"0px","left":"0px","width":"50px","height":"50px","showText":true,"fontSize":12,"fontSpac":20}}]}}]? ? ? ? 什么,嫌組件自己造輪子太不方便?可是這只是半成品,行吧,我打包發布npm了,直達鏈接
? ? ? ? 完結撒鹽!


html基礎和開發工具)


 ——在職考研 199 管綜 + 英語二 30 周「順水行舟」上岸指南)
)


![ndk { setAbiFilters([‘armeabi-v7a‘, “arm64-v8a“]) }](http://pic.xiahunao.cn/ndk { setAbiFilters([‘armeabi-v7a‘, “arm64-v8a“]) })


進程地址空間)

