SCRFD算法核心解析
1. 算法定義與背景
SCRFD(Sample and Computation Redistribution for Efficient Face Detection)由Jia Guo等人于2021年在arXiv提出,是一種高效、高精度的人臉檢測算法,其核心創新在于:
- 雙重重分配策略:
- 樣本重分配(SR)?:動態增強關鍵訓練階段的樣本數據。
- 計算重分配(CR)?:通過神經架構搜索(NAS)優化骨干網絡(Backbone)、頸部(Neck)和頭部(Head)的計算負載。
- 輕量化設計:支持從0.5GF到34GF的多規格模型,兼顧移動端與高性能設備。
2. 技術架構與創新
架構組成
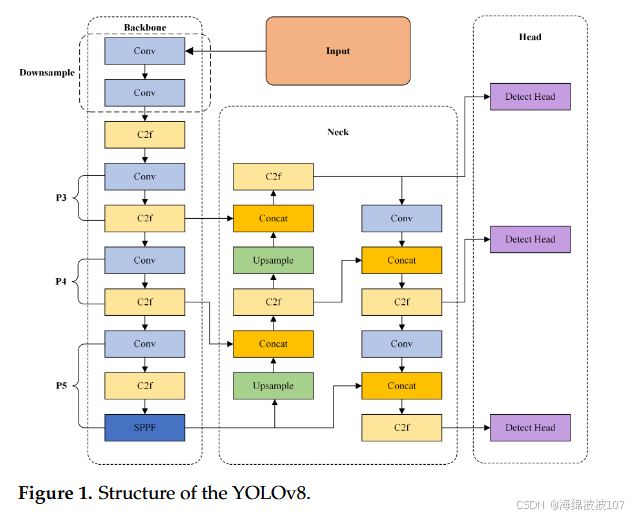
- 骨干網絡(Backbone):
- 基于ResNet變體(如CSPDarknet),通過殘差連接解決深層網絡訓練難題。

- 支持量化(FP16/INT8)降低計算量。
- 基于ResNet變體(如CSPDarknet),通過殘差連接解決深層網絡訓練難題。
- 頸部(Neck):
- 采用?特征金字塔網絡(FPN)?實現多尺度特征融合,增強小目標檢測。
- 引入PANet優化特征傳遞路徑。
- 頭部(Head):
- 基于FCOS(Focal Loss)實現無錨框檢測,簡化輸出層。
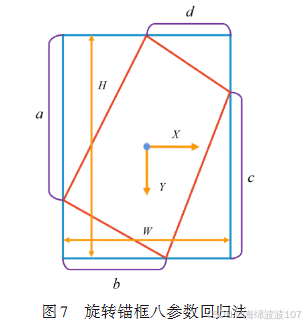
- 采用八參數回歸直接預測邊界框坐標。
核心創新機制
- 計算重分配搜索算法:
- 訓練階段:通過NAS動態分配Backbone/Neck/Head的計算比例,最大化資源利用率。
- 硬件加速:
- 存內計算:權重映射至硬件加速單元,減少數據傳輸。
- 異構加速:支持GPU/TPU/NPU多平臺部署。
- 量化優化:FP16/INT8量化降低推理延遲。
3. 性能基準
WIDER FACE數據集表現
| 模型 | Easy AP (%) | Medium AP (%) | Hard AP (%) | 推理延遲 (ms) |
|---|---|---|---|---|
| SCRFD-34GF | 96.06 | 94.92 | 85.29 | 11.7 (V100) |
| RetinaFace-R50 | 94.92 | 91.90 | 64.17 | 21.7 (V100) |
| 數據來源: |
- 效率優勢:
- SCRFD-34GF比RetinaFace-R50快?47%(11.7ms vs 21.7ms)。
- SCRFD-0.5GF比RetinaFace-MobileNet0.25快?45.57%。
跨設備優化
- 邊緣設備適配:
- 深度可分離卷積(如MobileNet)降低參數量。
- 模型壓縮:剪枝/蒸餾技術減少冗余計算。

- 部署實踐:
- NVIDIA Jetson系列:支持120 FPS實時推理。
- 內存優化:Memssqueezer架構提升緩存命中率。
4. 與RetinaFace的深度對比
技術差異
| 維度 | SCRFD | RetinaFace |
|---|---|---|
| 檢測機制 | 無錨框(FCOS) | 基于錨框 |
| 計算分配 | 動態重分配(CR策略) | 固定計算結構 |
| 硬件適配 | 支持FP16/INT8量化 | 依賴ResNet/MobileNet骨干 |
| 小目標檢測 | FPN+多尺度融合優化 | 傳統特征金字塔 |
實戰性能
- 精度:SCRFD在Hard AP上領先RetinaFace?21.12%(85.29% vs 64.17%)。
- 資源效率:SCRFD-34GF計算量僅為競品TinaFace的?20%。
- 局限性:批量處理時RetinaFace可能更快。
5. 實現與應用
開源生態
- 代碼倉庫:`https://github.com/deepinsight/insightface/tree/master/detection/scrfd。
- 訓練流程:
- 數據加載:WIDER FACE/MS1M數據集。
- NAS搜索:優化Backbone/Neck/Head計算比例。
- 量化訓練:FP16/INT8轉換提升推理速度。
- 部署示例:
# FastDeploy示例[[223]]
from fastdeploy.vision import SCRFD
model = SCRFD("scrfd_10g_fp32.onnx")
results = model.predict(image)
論文資源
- 核心文獻:
Sample and Computation Redistribution for Efficient Face Detection(arXiv:2105.04714, 2021)。 - 擴展研究:
后續改進融入Transformer架構及遙感檢測。
結論
SCRFD通過三重革新——動態計算分配、無錨框檢測及量化硬件適配——解決了人臉檢測在精度與效率間的矛盾。其在WIDER FACE上85.29%的Hard AP及11.7ms的V100推理延遲,顯著優于傳統方案(如RetinaFace)。未來方向包括:
- 與Transformer架構結合強化遮擋處理。
- 自適應計算分配支持動態場景。
- 跨平臺編譯優化進一步壓縮延遲。
代碼:
class ONNXRuntimeModel:"""一個通用的ONNX模型推理封裝類"""def __init__(self, onnx_path):# 使用ONNX Runtime的CUDA執行器providers = ['CUDAExecutionProvider', 'CPUExecutionProvider']self.session = ort.InferenceSession(onnx_path, providers=providers)self.input_name = self.session.get_inputs()[0].nameself.output_names = [output.name for output in self.session.get_outputs()]def __call__(self, input_tensor):# ONNX Runtime 需要 numpy array 作為輸入input_feed = {self.input_name: input_tensor.cpu().numpy()}outputs = self.session.run(self.output_names, input_feed)return outputsclass SCRFD():def __init__(self, onnxmodel, confThreshold=0.5, nmsThreshold=0.5):self.inpWidth = 640self.inpHeight = 640self.confThreshold = confThresholdself.nmsThreshold = nmsThresholdself.session = ort.InferenceSession(onnxmodel, providers=['CUDAExecutionProvider', 'CPUExecutionProvider'])self.keep_ratio = Trueself.fmc = 3self._feat_stride_fpn = [8, 16, 32]self._num_anchors = 2def resize_image(self, srcimg):padh, padw, newh, neww = 0, 0, self.inpHeight, self.inpWidthif self.keep_ratio and srcimg.shape[0] != srcimg.shape[1]:hw_scale = srcimg.shape[0] / srcimg.shape[1]if hw_scale > 1:newh, neww = self.inpHeight, int(self.inpWidth / hw_scale)img = cv2.resize(srcimg, (neww, newh), interpolation=cv2.INTER_AREA)padw = int((self.inpWidth - neww) * 0.5)img = cv2.copyMakeBorder(img, 0, 0, padw, self.inpWidth - neww - padw, cv2.BORDER_CONSTANT,value=0) # add borderelse:newh, neww = int(self.inpHeight * hw_scale) + 1, self.inpWidthimg = cv2.resize(srcimg, (neww, newh), interpolation=cv2.INTER_AREA)padh = int((self.inpHeight - newh) * 0.5)img = cv2.copyMakeBorder(img, padh, self.inpHeight - newh - padh, 0, 0, cv2.BORDER_CONSTANT, value=0)else:img = cv2.resize(srcimg, (self.inpWidth, self.inpHeight), interpolation=cv2.INTER_AREA)return img, newh, neww, padh, padwdef distance2bbox(self, points, distance, max_shape=None):x1 = points[:, 0] - distance[:, 0]y1 = points[:, 1] - distance[:, 1]x2 = points[:, 0] + distance[:, 2]y2 = points[:, 1] + distance[:, 3]if max_shape is not None:x1 = x1.clamp(min=0, max=max_shape[1])y1 = y1.clamp(min=0, max=max_shape[0])x2 = x2.clamp(min=0, max=max_shape[1])y2 = y2.clamp(min=0, max=max_shape[0])return np.stack([x1, y1, x2, y2], axis=-1)def distance2kps(self, points, distance, max_shape=None):preds = []for i in range(0, distance.shape[1], 2):px = points[:, i % 2] + distance[:, i]py = points[:, i % 2 + 1] + distance[:, i + 1]if max_shape is not None:px = px.clamp(min=0, max=max_shape[1])py = py.clamp(min=0, max=max_shape[0])preds.append(px)preds.append(py)return np.stack(preds, axis=-1)def detect(self, srcimg):img, newh, neww, padh, padw = self.resize_image(srcimg)blob = cv2.dnn.blobFromImage(img, 1.0 / 128, (self.inpWidth, self.inpHeight), (127.5, 127.5, 127.5), swapRB=True)blob = np.ascontiguousarray(blob)# onnxruntime輸入通常是NCHWort_inputs = {self.session.get_inputs()[0].name: blob}ort_outs = self.session.run(None, ort_inputs)outs = ort_outs # 結構與原OpenCV DNN輸出一致# 后續邏輯保持不變scores_list, bboxes_list, kpss_list = [], [], []for idx, stride in enumerate(self._feat_stride_fpn):scores = outs[idx][0]bbox_preds = outs[idx + self.fmc * 1][0] * stridekps_preds = outs[idx + self.fmc * 2][0] * strideheight = blob.shape[2] // stridewidth = blob.shape[3] // strideanchor_centers = np.stack(np.mgrid[:height, :width][::-1], axis=-1).astype(np.float32)anchor_centers = (anchor_centers * stride).reshape((-1, 2))if self._num_anchors > 1:anchor_centers = np.stack([anchor_centers] * self._num_anchors, axis=1).reshape((-1, 2))pos_inds = np.where(scores >= self.confThreshold)[0]bboxes = self.distance2bbox(anchor_centers, bbox_preds)pos_scores = scores[pos_inds]pos_bboxes = bboxes[pos_inds]scores_list.append(pos_scores)bboxes_list.append(pos_bboxes)kpss = self.distance2kps(anchor_centers, kps_preds)kpss = kpss.reshape((kpss.shape[0], -1, 2))pos_kpss = kpss[pos_inds]kpss_list.append(pos_kpss)scores = np.vstack(scores_list).ravel()bboxes = np.vstack(bboxes_list)kpss = np.vstack(kpss_list)bboxes[:, 2:4] = bboxes[:, 2:4] - bboxes[:, 0:2]ratioh, ratiow = srcimg.shape[0] / newh, srcimg.shape[1] / newwbboxes[:, 0] = (bboxes[:, 0] - padw) * ratiowbboxes[:, 1] = (bboxes[:, 1] - padh) * ratiohbboxes[:, 2] = bboxes[:, 2] * ratiowbboxes[:, 3] = bboxes[:, 3] * ratiohkpss[:, :, 0] = (kpss[:, :, 0] - padw) * ratiowkpss[:, :, 1] = (kpss[:, :, 1] - padh) * ratioh# NMS# 可用PyTorch或onnxruntime自帶的NMS,也可以保留cv2.dnn.NMSBoxesif len(bboxes) == 0:return []bboxes_xyxy = np.stack([bboxes[:,0], bboxes[:,1], bboxes[:,0]+bboxes[:,2], bboxes[:,1]+bboxes[:,3]], axis=1)keep = torch.ops.torchvision.nms(torch.tensor(bboxes_xyxy, dtype=torch.float32), torch.tensor(scores, dtype=torch.float32), self.nmsThreshold)detections = []for i in keep:i = i.item()x1, y1 = int(bboxes[i, 0]), int(bboxes[i, 1])x2, y2 = int(bboxes[i, 0] + bboxes[i, 2]), int(bboxes[i, 1] + bboxes[i, 3])box = [x1, y1, x2, y2]score = float(scores[i])kps = kpss[i]detections.append([box, score, kps])return detections這段代碼實現了一個功能完整的人臉檢測器。它使用了名為?SCRFD?的先進人臉檢測模型,并通過?ONNX Runtime?庫來運行這個模型,從而可以在不同的硬件(CPU或GPU)上高效執行。
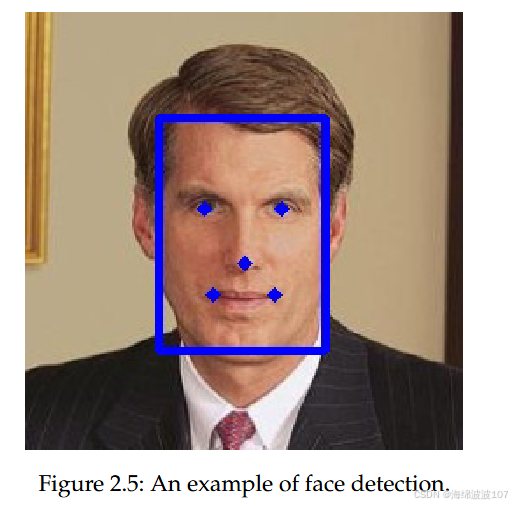
代碼的核心目標是:輸入一張圖片,輸出圖片中所有檢測到的人臉信息,包括位置(邊界框)、置信度分數和五官關鍵點。
1. 整體結構概覽
這個?SCRFD?類可以看作一個“黑盒子”。你只需要關心兩件事:
-
初始化 (__init__): 告訴它你的模型文件在哪里,以及你對檢測結果的要求(置信度、重疊框合并的閾值)。
-
檢測 (detect): 給它一張圖片,它會返回檢測結果。
所有復雜的中間步驟,比如圖像預處理、模型推理、結果后處理,都被封裝在了類的內部方法中。
2.?__init__?構造函數:初始化檢測器
class SCRFD():def __init__(self, onnxmodel, confThreshold=0.5, nmsThreshold=0.5):# 1. 設置模型輸入尺寸self.inpWidth = 640self.inpHeight = 640# 2. 設置閾值self.confThreshold = confThreshold # 置信度閾值self.nmsThreshold = nmsThreshold # NMS閾值# 3. 加載ONNX模型self.session = ort.InferenceSession(onnxmodel, providers=['CUDAExecutionProvider', 'CPUExecutionProvider'])# 4. 設置模型相關參數self.keep_ratio = Trueself.fmc = 3 # Feature Map Count, 每個輸出頭(score/bbox/kps)有3個特征圖self._feat_stride_fpn = [8, 16, 32] # FPN的步長self._num_anchors = 2 # 每個位置的錨點數量逐行解釋:
-
self.inpWidth,?self.inpHeight: 定義了模型需要的標準輸入圖像尺寸為 640x640 像素。任何輸入圖片都會被調整到這個尺寸。
-
self.confThreshold:?置信度閾值。模型會對每個可能的人臉位置給出一個分數(0到1之間),表示“這里是人臉”的可信度。只有分數高于這個閾值(默認0.5)的才會被認為是有效檢測。
-
self.nmsThreshold:?非極大值抑制 (NMS) 閾值。模型可能會對同一個臉輸出多個高度重疊的邊界框。NMS算法會移除多余的框,只保留最好的一個。這個閾值決定了兩個框重疊到什么程度才算“多余”。
-
self.session = ort.InferenceSession(...): 這是核心部分。它使用?onnxruntime?庫加載你提供的?.onnx?模型文件。providers?參數指定了推理后端,'CUDAExecutionProvider'?表示優先使用NVIDIA GPU(如果可用),否則回退到?'CPUExecutionProvider'?使用CPU。
-
self.keep_ratio: 一個布爾標志,決定在調整圖像大小時是否保持原始圖像的寬高比。True?表示保持,這可以防止人臉變形,提高檢測精度。
-
self.fmc,?_feat_stride_fpn,?_num_anchors: 這些是與SCRFD模型架構緊密相關的超參數。
-
_feat_stride_fpn = [8, 16, 32]: SCRFD使用了特征金字塔網絡(FPN),它在不同大小的特征圖上進行預測。步長(stride)為8的特征圖用來檢測小人臉,16的檢測中等大小人臉,32的檢測大人臉。
-
_num_anchors = 2: 在特征圖的每個位置,模型會預設2個不同尺寸的“錨點框”(anchor),并基于這些錨點框進行預測。
-
3.?resize_image?方法:圖像預處理
def resize_image(self, srcimg):# ... (代碼)這個函數負責將你輸入的任意尺寸的原始圖像 (srcimg) 轉換成模型需要的 640x640 格式。
-
如果?self.keep_ratio?為?True?(默認):
-
計算原始圖像的寬高比。
-
將圖像等比例縮放,使其最長邊等于640。
-
為了補足到 640x640,在較短的那一邊上下或左右填充黑邊 (cv2.copyMakeBorder)。
-
返回處理后的圖像 (img) 以及填充的尺寸信息 (padh,?padw),這些信息在后續恢復坐標時至關重要。
-
-
如果?self.keep_ratio?為?False:
-
它會粗暴地將圖像直接拉伸或壓縮到 640x640,這可能會導致人臉變形。
-
4.?distance2bbox?和?distance2kps?方法:解碼模型輸出
def distance2bbox(self, points, distance, max_shape=None):# ... (代碼)
def distance2kps(self, points, distance, max_shape=None):# ... (代碼)
SCRFD模型的一個特點是,它不直接預測邊界框的坐標 (x1, y1, x2, y2)。相反,它預測的是:
-
對于每個“錨點”,其中心到真實人臉邊界框四條邊的距離。
-
對于每個“錨點”,其中心到真實人臉每個關鍵點的位移。
這兩個函數就是用來做逆運算的,將模型輸出的“距離/位移”解碼成我們能理解的“坐標”。
-
distance2bbox: 輸入錨點中心坐標 (points) 和模型預測的4個距離值 (distance),計算出最終的邊界框坐標?[x1, y1, x2, y2]。
-
distance2kps: 輸入錨點中心坐標 (points) 和模型預測的關鍵點位移 (distance),計算出最終的5個關鍵點坐標?[x_eye1, y_eye1, x_eye2, y_eye2, ...]。
5.?detect?方法:核心檢測流程
這是整個類的“主心骨”,它串聯起了所有步驟。
def detect(self, srcimg):# 步驟1: 圖像預處理img, newh, neww, padh, padw = self.resize_image(srcimg)blob = cv2.dnn.blobFromImage(img, 1.0 / 128, (self.inpWidth, self.inpHeight), (127.5, 127.5, 127.5), swapRB=True)# 步驟2: 模型推理ort_inputs = {self.session.get_inputs()[0].name: blob}ort_outs = self.session.run(None, ort_inputs)# 步驟3: 結果后處理與解碼# ... (循環處理不同stride的輸出)for idx, stride in enumerate(self._feat_stride_fpn):# 從模型輸出中提取 score, bbox, kps# 創建錨點網格# 篩選出分數 > confThreshold 的結果# 使用 distance2bbox 和 distance2kps 解碼# ...# 步驟4: 整合與坐標還原# ... (合并所有stride的結果)# 將坐標從 640x640 的填充圖映射回原始圖像# 步驟5: 非極大值抑制 (NMS)# ...keep = torch.ops.torchvision.nms(...) # 使用PyTorch的NMS# 步驟6: 格式化輸出# ...# 將最終保留下來的結果整理成 [box, score, kps] 的格式并返回return detections詳細流程分解:
-
圖像預處理:
-
調用?resize_image?將圖片調整為帶黑邊填充的 640x640 圖像。
-
cv2.dnn.blobFromImage: 這是非常關鍵的一步。它將圖像轉換為一個“Blob”,也就是模型需要的4D張量格式 (N, C, H, W)。同時,它還做了兩件事:
-
歸一化:?1.0 / 128?和?(127.5, 127.5, 127.5)?將像素值從?[0, 255]?范圍轉換到?[-1, 1]?范圍。
-
通道轉換:?swapRB=True?將OpenCV默認的BGR順序轉換為模型需要的RGB順序。
-
-
-
模型推理:
-
將?blob?作為輸入,調用?self.session.run?執行模型推理,得到模型的原始輸出?ort_outs。ort_outs?是一個包含多個Numpy數組的列表,分別對應人臉分數、邊界框距離和關鍵點位移。
-
-
結果后處理與解碼:
-
這是一個循環,分別處理來自步長8、16、32的三個特征圖的預測結果。
-
對于每個特征圖:
-
它首先生成該特征圖上所有的錨點中心坐標?(anchor_centers)。
-
然后,它用?self.confThreshold?過濾掉所有置信度低的結果。
-
最后,對保留下來的高置信度結果,調用?distance2bbox?和?distance2kps?將其解碼為實際的邊界框和關鍵點坐標。
-
-
-
整合與坐標還原:
-
將三個特征圖解碼出的所有結果(框、分數、關鍵點)合并在一起。
-
坐標還原:這是至關重要的一步。因為之前的預測都是基于640x640的填充圖像,現在需要利用?resize_image?返回的?ratioh,?ratiow,?padh,?padw,通過數學計算,將坐標映射回原始輸入圖像的尺寸和位置。
-
-
非極大值抑制 (NMS):
-
此時,我們可能有很多重疊的框。torch.ops.torchvision.nms?函數會根據?self.nmsThreshold?剔除冗余的檢測框,只為每個真實人臉保留一個得分最高的框。
-
-
格式化輸出:
-
遍歷NMS后保留下來的結果索引?keep。
-
將每個檢測結果整理成一個包含?[邊界框, 分數, 關鍵點]?的列表。
-
返回這個包含所有檢測結果的列表。
-
總結
這個?SCRFD?類是一個高度封裝、流程清晰的人臉檢測器。其工作流可以總結為:
輸入原圖?->?預處理(縮放/填充/歸一化)?->?模型推理?->?解碼(將模型輸出轉為坐標)?->?坐標還原(映射回原圖)?->?NMS(去重)?->?輸出最終結果。
你只需要準備好一個?scrfd_..._.onnx?模型文件(已發布在我的資源),然后像下面這樣使用它:
import cv2
import numpy as np
import onnxruntime as ort
import torch # NMS需要torch# 假設你的 SCRFD 類代碼保存在 scrfd.py 文件中# 1. 初始化檢測器
model_path = "scrfd_2.5g_kps.onnx" # 你的模型路徑
face_detector = SCRFD(onnxmodel=model_path, confThreshold=0.5, nmsThreshold=0.5)# 2. 讀取圖片
image = cv2.imread("your_image.jpg")# 3. 執行檢測
detections = face_detector.detect(image)# 4. 可視化結果
if detections:print(f"檢測到 {len(detections)} 張人臉。")for box, score, kps in detections:x1, y1, x2, y2 = box# 畫框cv2.rectangle(image, (x1, y1), (x2, y2), (0, 255, 0), 2)# 畫關鍵點for i in range(kps.shape[0]):cv2.circle(image, (int(kps[i, 0]), int(kps[i, 1])), 2, (0, 0, 255), -1)# 顯示結果
cv2.imshow("Detected Faces", image)
cv2.waitKey(0)
cv2.destroyAllWindows()

)


線性表(上):SeqList 順序表)

)
)


——PROJECT#0)


![[Dify] -進階4-在 Dify 中實現 PDF 文檔問答功能全流程](http://pic.xiahunao.cn/[Dify] -進階4-在 Dify 中實現 PDF 文檔問答功能全流程)


