
1.list(容器,不是類)模擬實現基本結構
這個實現是和源碼的實現不同的,不要進行強制類型轉換了,很麻煩。我們把定義放在.h文件中,在.cpp中放測試代碼。
注:這個基本結構之后會改變,到時候再講原因。
//.h
#include<iostream>
#include<list>
#include<assert.h>
using namespace std;
namespace td
{template<class T>struct list_node{public:list_node<T>* _next;list_node<T>* _prev;T _data;};template<class T>class list{public:typedef list_node<T> Node;private:Node* _head;};
}
//.cpp
#include"test.h"
namespace td
{
void test()
{ }
}
int main()
{return 0;
}2.list的無參構造函數的實現
這個很簡單,我們直接先申請一個Node大小的空間,然后再改變指向即可:
//.h
list()
{_head = new Node;_head->_next = _head;_head->_prev = _head;
}
3.list_node的有參構造函數的實現
這個函數比較簡單,用初始化列表即可,但是,注意:我們這個構造有參是因為要把數據存儲起來,一般建議:給一個缺省值,這樣讓它更好的進行初始化。在C++中一般給T()即可:
//.h
list_node(const T& x = T()):_next(nullptr),_prev(nullptr),_data(x)
{ }
4.list::push_back的實現
這個尾插難度不是很高,只要注意改變指向即可:
//.h
void push_back(const T& val)
{Node* newnode = new Node(x);Node* tail = _head->_prev;newnode->_prev = tail;tail->_next = newnode;newnode->_next = _head;_head->_prev = newnode;
}
這個代碼確實有些難看懂,主要是我們對雙向鏈表了解不是很全面,首先tail是尾結點,我們尾插是在尾結點之后插入結點,然后再把另外一些的指向改成正確的,這樣就沒太大的問題了。
5.list_iterator類的基本結構
我們無法用typedef Node* iterator的方式來得到迭代器,因為我們無法遍歷,如果std::list<int> lt1;std::list<int>::iterator it1=lt1.begin();其中如果*it1那么本質上可以理解*it1為:it1.operator*();而在這里面解引用是用_node->_data的方式實現的。所以我們需要用迭代器,這個迭代器是被封裝的一個類,那么基本結構為:
template<class T>
struct list_iterator
{typedef list_node<T> Node;Node* _node;
};
5.1list_iterator類的基本函數實現
一般包括但不限于*、++、--、==、!=這些運算符,還有->,這里一并實現了:
list_iterator(Node* node):_node(node)
{ }
T& operator*()
{return _node->data;
}
//前置++
list_iterator<T>& operator++()
{_node = _node->next;return *this;
}
bool operator!=(const list_iterator<T>& it)
{return _node != it._node;
}
bool operator==(const list_iterator<T>& it)
{return _node == it._node;
}
5.2list_iterator::operator->()的實現
這里先講它的寫法:
T* operator->()
{return &_node->_data;
}
為什么能這樣寫?
假設:
struct A
{int _a1;int _a2;
};
如果在我們std::list<A> lt;auto it=lt.begin();如果it->_a1,
那么實際上它會轉化為it.operator->()->_a1也就是說,之前我們應當寫為:it->->_a1的,但是,為了可讀性,編譯器做了特殊處理,省略了一個->。所以能這樣寫。
6.如何實現list_const_iterator
我們無法在list_iterator里面加一個const迭代器版本,因為這樣并不能作為重載,因為返回值不同并不能作為重載,比如begin它在普通迭代器就要返回值為iterator,那么如果是const迭代器就要返回值為const_iterator,實際上就是:const T,所以我們只能自己寫一個額外的迭代器,那么我們可以這樣寫:
template<class T>
struct list_const_iterator
{typedef list_node<T> Node;Node* _node;list_const_iterator(Node* node):_node(node){}const T& operator*(){return _node->_data;}const T* operator->(){return &_node->_data;}list_const_iterator<T>& operator++(){_node = _node->_next;return *this;}bool operator!=(const list_const_iterator<T>& it){return _node != it._node;}bool operator==(const list_const_iterator<T>& it){return _node == it._node;}
};
我們發現大部分只是返回值不一樣而已,所以這種方式確實不是那么好,所以我們可以把它再寫為模板的形式。
7.list_iterator類的改進結構
為了適應多種迭代器,所以我們可以把它寫為模板形式,不過如果真再寫一個模板我們是沒有思路的,所以我們可以改成如下形式(先看一下,理解難度有些高):
template<class T,class Ref,class Ptr>
struct list_iterator
{typedef list_node<T> Node;typedef list_iterator<T, Ref, Ptr> Self;Node* _node;list_iterator(Node* node):_node(node){}Ref operator*(){return _node->_data;}Ptr operator->(){return &_node->_data;}//前置++Self& operator++(){_node = _node->_next;return *this;}//后置++Self operator++(int){Self tmp(*this);_node = _node->_next;return tmp;}//前置--Self& operator--(){_node = _node->_prev;return *this;}//后置--Self operator--(int){Self tmp(*this);_node = _node->_prev;return tmp;}bool operator!=(const Self& it){return _node != it._node;}bool operator==(const Self& it){return _node == it._node;}
};這個結構就是改進后的結構,添加的兩個模板參數其中Ref意思是:引用,Ptr的意思是:指針。所以之后傳遞的時候就要這樣傳遞。其次,我們把之前寫為list_iterator的部分都改為Self。這里的++、--有后置與前置之分,所以我們要注意它的寫法,這里就不做過多講解了。
8.list類的改進結構
通過這些改變,我們可以加上這些:
typedef list_iterator<T, T&, T*> iterator;
typedef list_iterator<T, const T&,const T*> const_iterator;
9.list::begin、list::end的實現
這兩個函數都有const迭代器版本和普通迭代器版本,我們要注意的是,如果是begin,那么就是_head->_next,因為頭結點是哨兵位,不存儲數據;如果是end那么就是哨兵位,因為end這個位置是不存儲數據的,可以認為這是尾結點的后面一個指針!!!所以我們可以寫出:
//list
iterator begin()
{return _head->_next;
}
iterator end()
{return _head;
}
const_iterator begin() const
{return _head->_next;
}
const_iterator end() const
{return _head;
}
10.list的增刪查改的實現
這些增刪查改相對于我們之前的數據結構中的雙向鏈表沒什么太大的區別,如果想要更加深入了解代碼生成的原因,可以看我之前的博客:
數據結構初階-雙向鏈表-CSDN博客文章瀏覽閱讀524次,點贊9次,收藏7次。為結構體,其中包含一個指針指向下一個結點的結構體指針next,一個指針指向上一個結點的指針prev,還有所存儲的數據data,由于存儲的數據類型未知,所以我們typedef int LTDataType;若結果為8 -> 6 -> 4 -> 2 -> 3 -> 1 -> 2 -> 3 -> 4 ->則代碼無誤,如果感興趣的話也可以寫一個在pos位置之前插入數據的函數。如果結果為8 -> 6 -> 4 -> 2 -> 3 -> 1 -> 2 -> 3 -> 4 ->//存儲下一個結點的地址。https://blog.csdn.net/2401_86446710/article/details/145201866?sharetype=blogdetail&sharerId=145201866&sharerefer=PC&sharesource=2401_86446710&sharefrom=mp_from_link那么這些東西比較簡單,我這里就只講解一些比較重要的代碼:
//list
//在pos位置之前插入
void insert(iterator pos, const T& x)
{Node* cur = pos._node;Node* prev = cur->_prev;Node* newnode = new Node(x);//這不是唯一的寫法//但是一定要改變四個指針的指向prev->_next = newnode;newnode->_prev = prev;newnode->_next = cur;cur->_prev = newnode;
}
//清除pos位置的數據,并返回清除后該位置的指針
iterator erase(iterator pos)
{//防止鏈表為空assert(pos != end());Node* cur = pos._node;Node* nextNode = cur->_next;Node* prevNode = cur->_prev;//只要改變兩個指針的指向即可prevNode->_next = nextNode;nextNode->_prev = prevNode;delete cur;//強制類型轉換return iterator(nextNode);
}
void push_back(const T& x)
{insert(end(), x);
}
void push_front(const T& x)
{insert(begin(), x);
}
void pop_front()
{erase(begin());
}
void pop_back()
{//end位置沒有數據,所以要清除end位置前面一個位置的數據erase(--end());
}
11.list::size的實現
這個函數的實現可能需要先加一個_size到成員變量里面,所以可以寫出:
//list
template<class T>
class list
{
public:typedef list_node<T> Node;typedef list_iterator<T, T&, T*> iterator;typedef list_iterator<T, const T&,const T*> const_iterator;list(){_head = new Node;_head->_next = _head;_head->_prev = _head;_size = 0;}//void push_back(const T& val)//{//	Node* newnode = new Node(x);//	Node* tail = _head->_prev;//	newnode->_prev = tail;//	tail->_next = newnode;//	newnode->_next = _head;//	_head->_prev = newnode;//}iterator begin(){return _head->_next;}iterator end(){return _head;}const_iterator begin() const{return _head->_next;}const_iterator end() const{return _head;}//在pos位置之前插入void insert(iterator pos, const T& x){Node* cur = pos._node;Node* prev = cur->_prev;Node* newnode = new Node(x);//這不是唯一的寫法//但是一定要改變四個指針的指向prev->_next = newnode;newnode->_prev = prev;newnode->_next = cur;cur->_prev = newnode;++_size;}//清除pos位置的數據,并返回清除后該位置的指針iterator erase(iterator pos){//防止鏈表為空assert(pos != end());Node* cur = pos._node;Node* nextNode = cur->_next;Node* prevNode = cur->_prev;//只要改變兩個指針的指向即可prevNode->_next = nextNode;nextNode->_prev = prevNode;delete cur;--_size;//強制類型轉換return iterator(nextNode);}void push_back(const T& x){insert(end(), x);}void push_front(const T& x){insert(begin(), x);}void pop_front(){erase(begin());}void pop_back(){//end位置沒有數據,所以要清除end位置前面一個位置的數據erase(--end());}size_t size() const{return _size;}
private:Node* _head;size_t size;
};
12.list::clear的實現
這個函數我們可以知道,直接先erase后返回值是有效的,所以我們不用怕it是野指針,所以我們可以這樣寫:
void clear()
{iterator it = begin();while (it != end()){it = erase(it);}
}
由于erase已經delete了pos位置的結點(原it位置),所以直接這樣寫就可以了。
13.list::~list的實現
這個函數只要先調用clear函數后再把哨兵位的空間釋放,_size置為0即可:
~list()
{clear();delete _head;_head = nullptr;_size = 0;
}
14.list::swap的實現
這個函數實現不是很難,所以直接寫了:
void swap(list<T>& lt)
{std::swap(_head, lt._head);std::swap(_size, lt._size);
}
15.list的拷貝構造函數的實現
我們和list底層相似的方式進行完善:
void empty_init()
{//哨兵位_head = new Node;_head->_next = _head;_head->_prev = _head;_size = 0;
}
list(const list<T>& lt)
{empty_init();for (auto e : lt){push_back(e);}
}
16.list::operator=的實現
這個函數也是比較簡單的實現,但是要注意:我們不能給形參加上引用,因為那樣是比較麻煩的寫法:
list<T>& operator=(list<T> lt)
{swap(lt);return *this;
}
17.list::list(initializer_list<T> lt)的實現
這個函數實現不是很難,我們直接先構造一個頭結點,再和拷貝構造一樣尾插即可:
list(initializer_list<T> lt)
{empty_init();for (auto& e : lt){push_back(e);}
}
18.測試
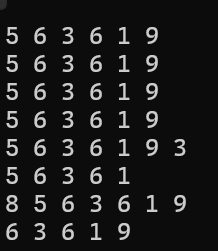
我們用以下代碼進行測試:
namespace td
{void test(){td::list<int> l1 = { 5,6,3,6,1,9 };td::list<int> l2 = l1;td::list<int> l3(l1);td::list<int> l4;l4 = l1;for (const auto& e : l1){cout << e << " ";}cout << endl;for (const auto& e : l2){cout << e << " ";}cout << endl;for (const auto& e : l3){cout << e << " ";}cout << endl;for (const auto& e : l4){cout << e << " ";}cout << endl;l1.push_back(3);l2.pop_back();l3.push_front(8);l4.pop_front();for (const auto& e : l1){cout << e << " ";}cout << endl;for (const auto& e : l2){cout << e << " ";}cout << endl;for (const auto& e : l3){cout << e << " ";}cout << endl;for (const auto& e : l4){cout << e << " ";}cout << endl;}
}
//struct A
//{
//	int _a1;
//	int _a2;
//};
int main()
{td::test();return 0;
}
那么最終運行結果為:
如果有人想測試一下insert和erase,可以用一個迭代器通過begin()和end()進行++、--的操作,進行插入刪除測試即可。
19.總結
list的模擬實現已經全部講解完,有些不常用的函數如:remove_if、splice這些感興趣的可以自己去實現一下。std::list已經全部講完了,下講將講解:stack和queue(棧和隊列)。喜歡的可以一鍵三連哦,下講再見!


)


-----深度優先搜索(DFS)實現)


