目錄
一、組合式API下的父組件傳子組件。(自定義屬性)
(1)基本思想。
(2)核心注意點。(defineProps)
(3)傳遞簡單類型數據。
(4)傳遞對象類型數據。(v-bind="對象類型數據")
(5)傳遞響應式類型數據。(:屬性="響應式數據")
(6)defineProps原理簡要分析。
二、組合式API下的子組件傳父組件。(自定義事件)
(1)基本思想。
(2)核心注意點。
<1>事件驅動通信。
<2>單向數據流原則。
<3>核心實現步驟。
(3)頁面渲染時子組件立即向父組件傳遞數據。
(4)基于子組件的事件函數向父組件傳遞數據。
三、Vue3組合式API中的父、子組件間通信小結。
一、組合式API下的父組件傳子組件。(自定義屬性)
(1)基本思想。
- 父組件中給子組件綁定屬性。(propsXXX)
- 子組件內部通過props選項(setup中使用defineProps:“編譯器宏”)接收。
(2)核心注意點。(defineProps)
- 單向數據流:數據從父組件流向子組件,子組件不直接修改父組件數據。
- 聲明式接收:子組件通過 defineProps 聲明要接收的屬性(props),明確數據類型和校驗規則。
- 響應式綁定:父組件通過 ref 或 reactive 創建響應式數據。用 ":" 動態綁定到子組件屬性,數據變化時子組件自動更新。
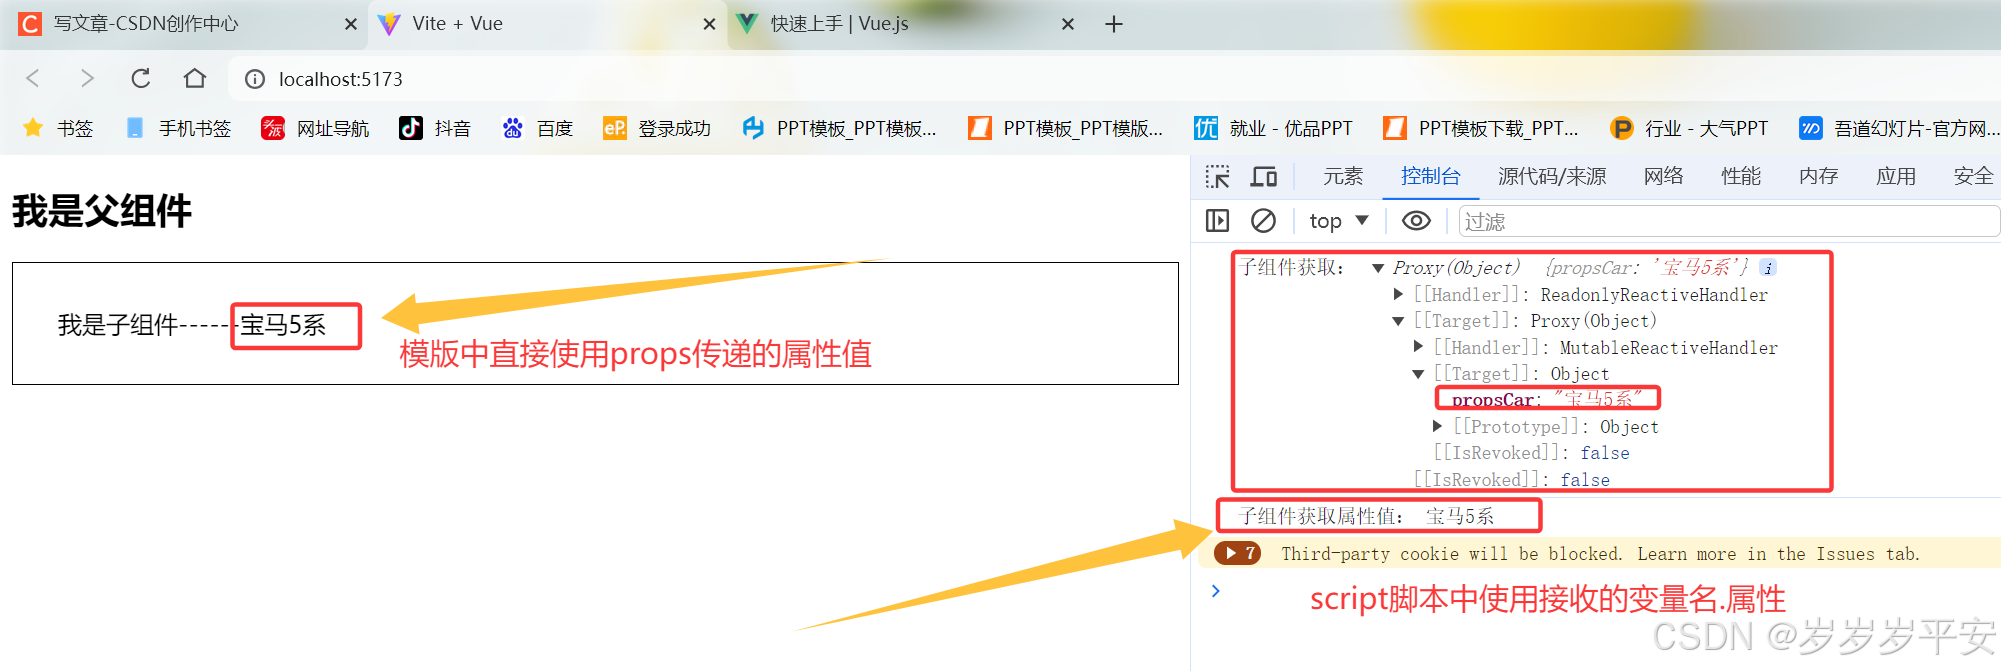
(3)傳遞簡單類型數據。
- 父組件代碼示例。
<script setup>
//局部子組件(導入就能使用)
import Son from "./components/Son.vue";</script><template><div><h2>我是父組件</h2><Son propsCar="寶馬5系" /></div>
</template><style scoped>
</style>
- 子組件代碼示例。
<script setup>
//因為寫在setup中,無法直接配置props選項
//借助于“編譯器宏"函數接收子組件傳遞的數據
const props = defineProps({propsCar : String
})
console.log('子組件獲取:',props)
//腳本中獲取屬性需要通過props.xxx獲取
console.log('子組件獲取屬性值:',props.propsCar)
</script><template>
<!-- 對于模版中,可以直接使用props傳遞的值 --><div class="son">我是子組件------{{propsCar}}</div>
</template><style scoped>
.son{border: 1px solid #000;padding: 30px;
}
</style>
- 頁面渲染效果。
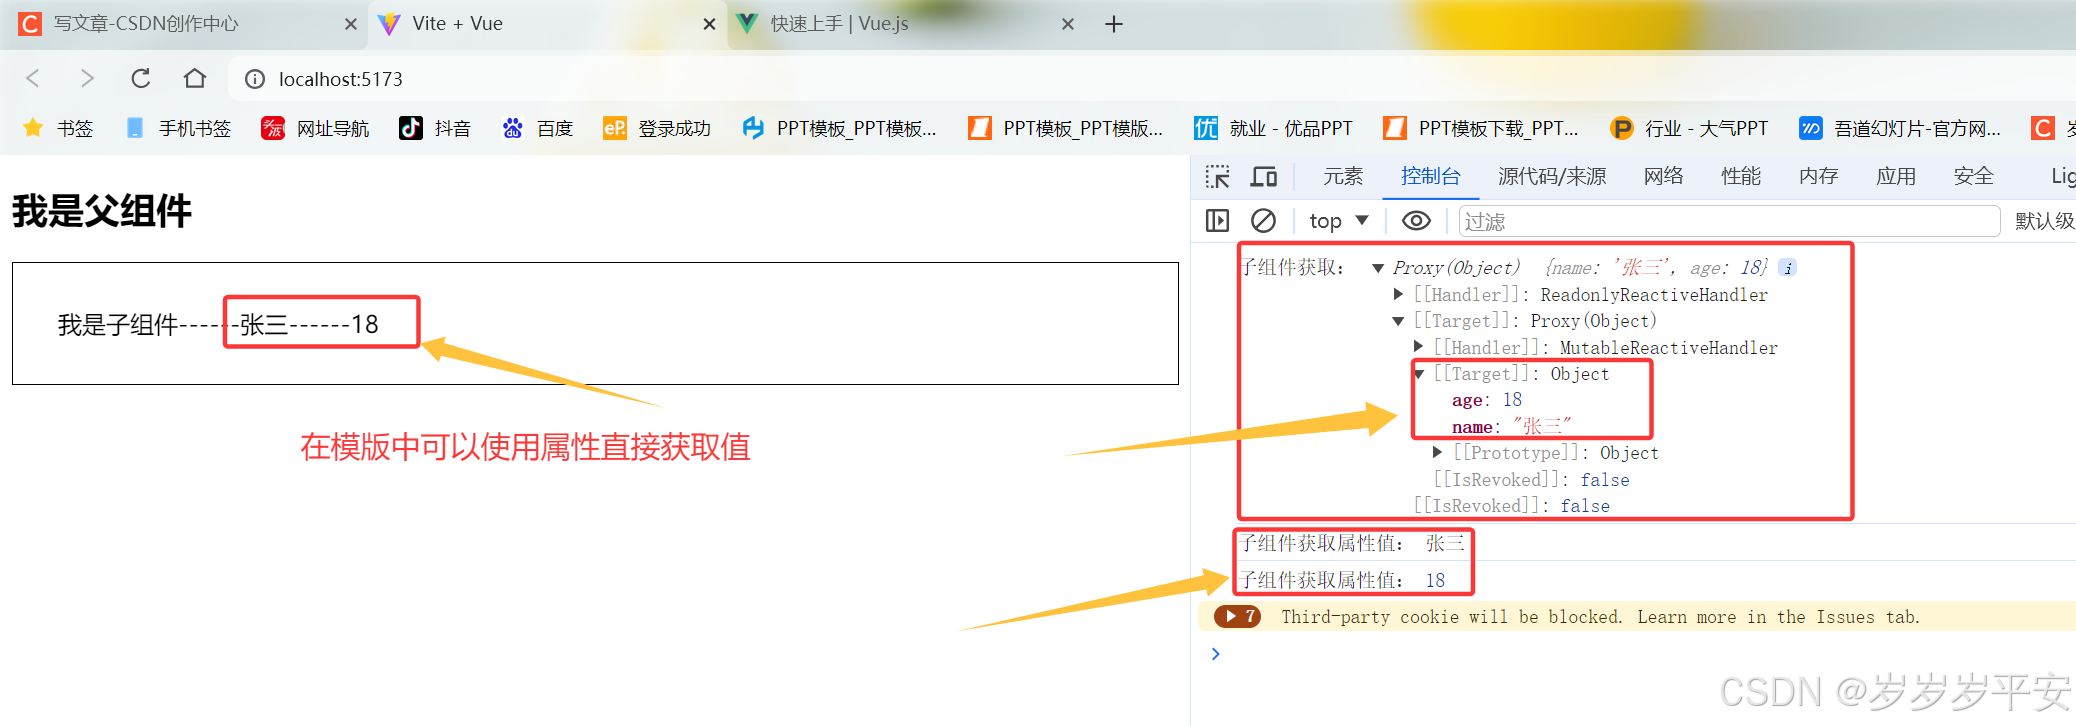
(4)傳遞對象類型數據。(v-bind="對象類型數據")
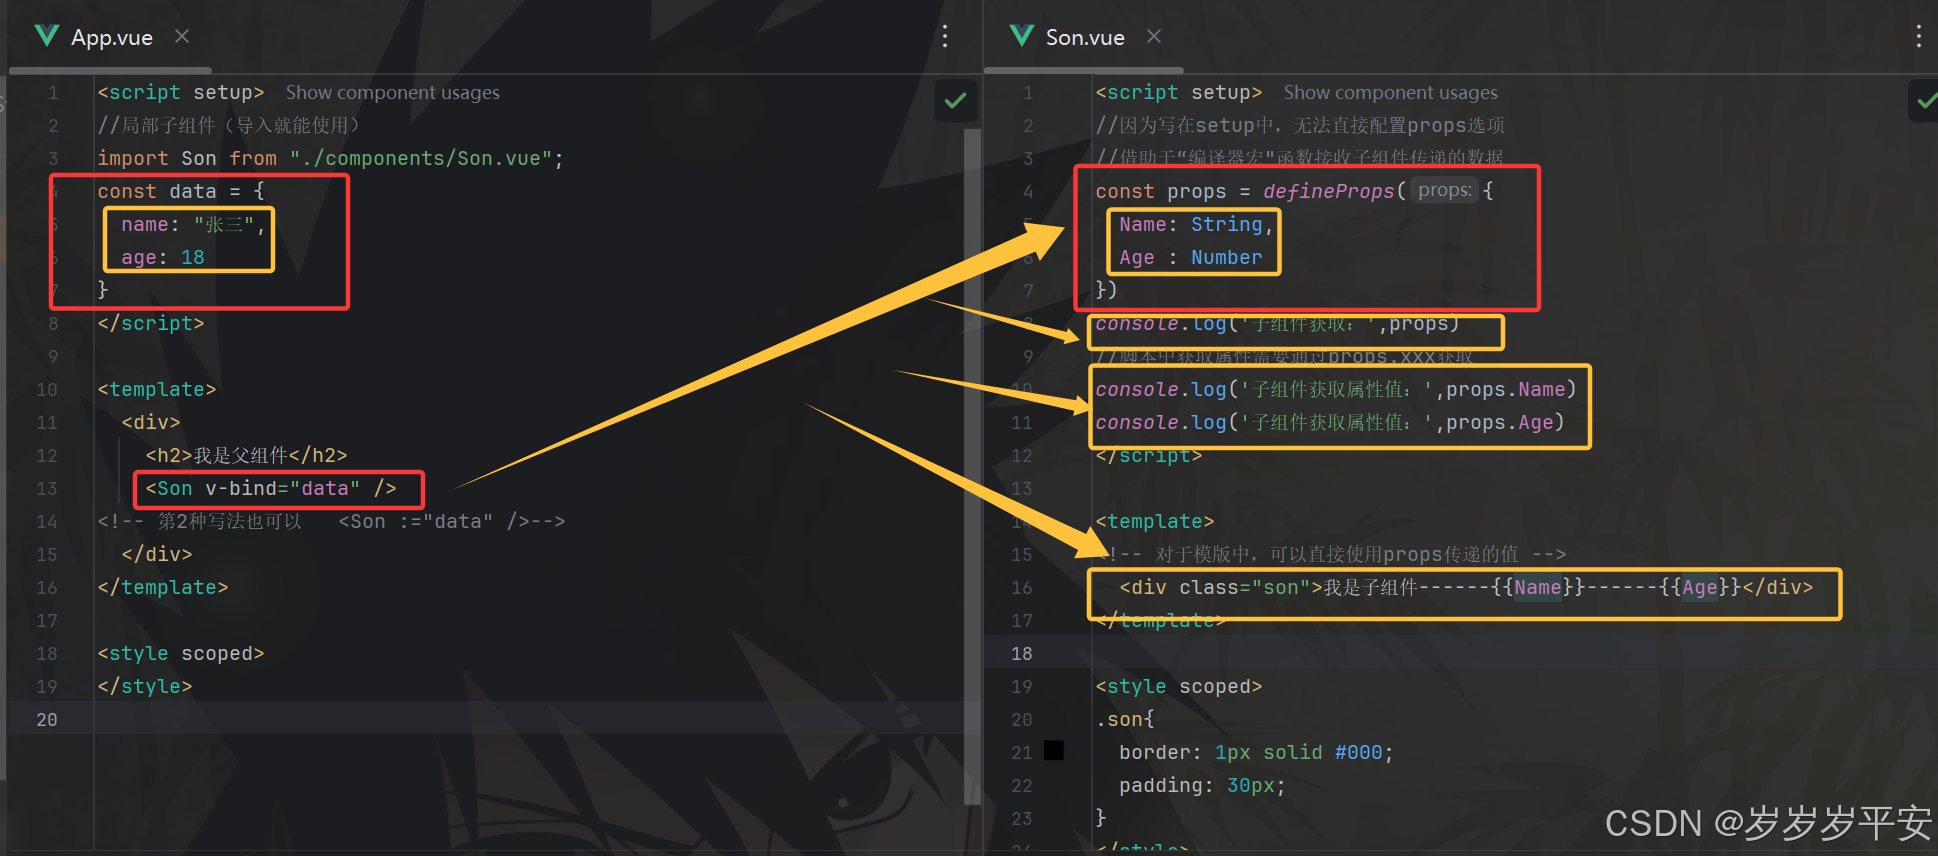
- 父組件代碼示例。
<script setup>
//局部子組件(導入就能使用)
import Son from "./components/Son.vue";
const data = {name: "張三",age: 18
}
</script><template><div><h2>我是父組件</h2><Son v-bind="data" />
<!-- 第2種寫法也可以   <Son :="data" />--></div>
</template><style scoped>
</style>
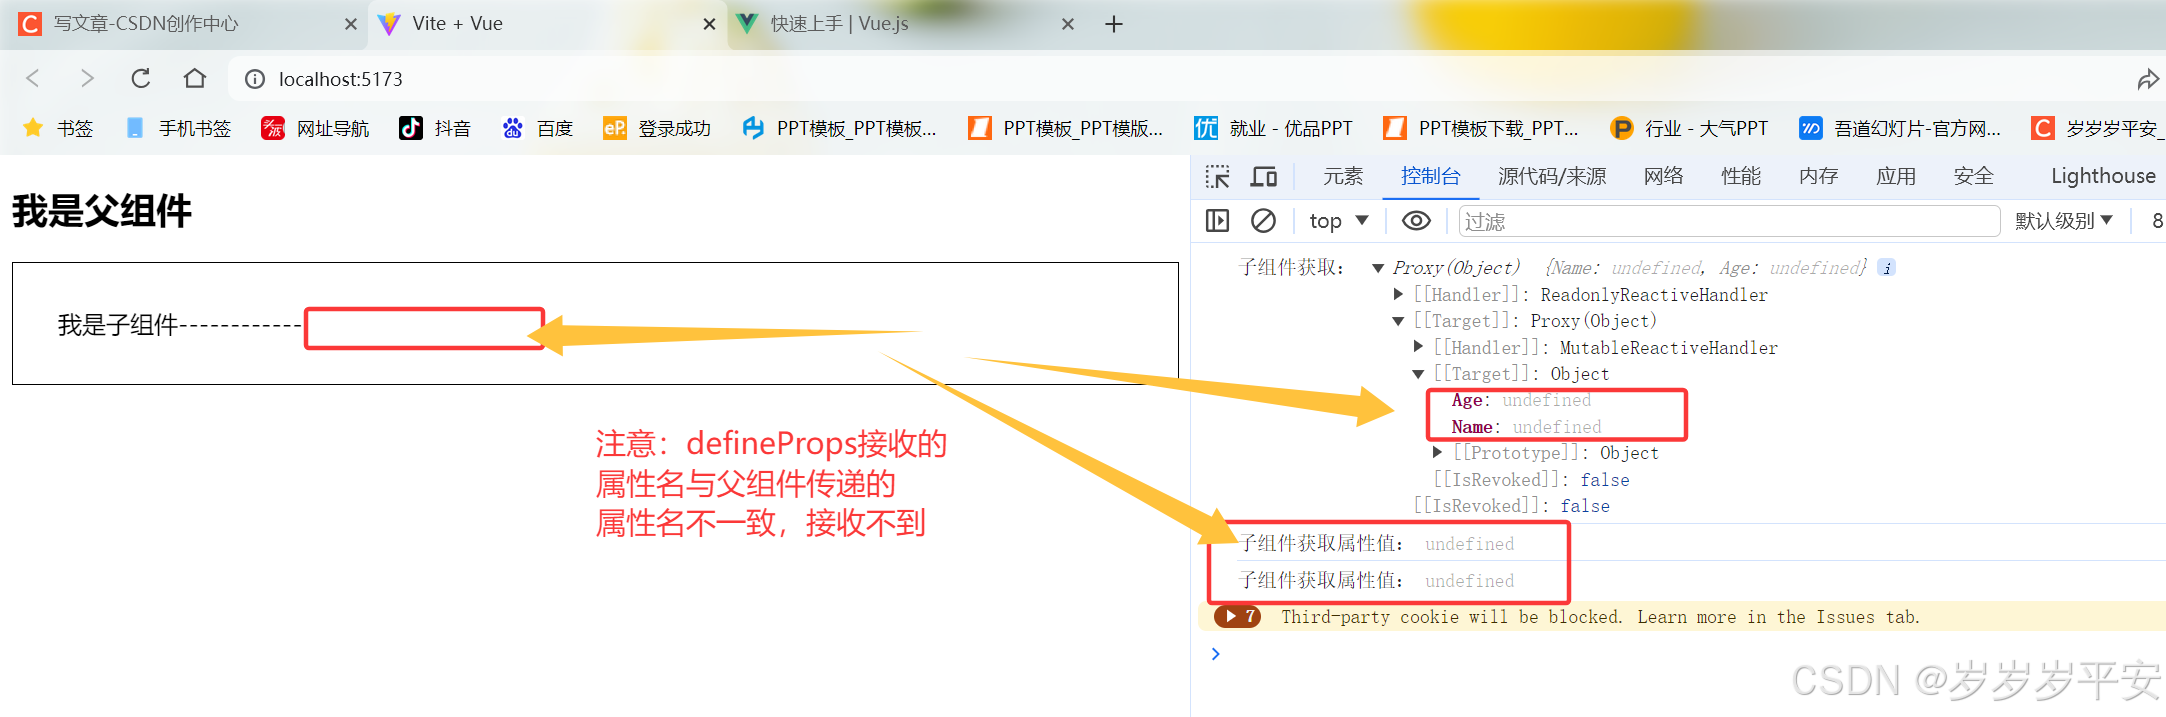
- 子組件代碼示例。
<script setup>
//因為寫在setup中,無法直接配置props選項
//借助于“編譯器宏"函數接收子組件傳遞的數據
const props = defineProps({name: String,age : Number
})
console.log('子組件獲取:',props)
//腳本中獲取屬性需要通過props.xxx獲取
console.log('子組件獲取屬性值:',props.name)
console.log('子組件獲取屬性值:',props.age)
</script><template>
<!-- 對于模版中,可以直接使用props傳遞的值 --><div class="son">我是子組件------{{name}}------{{age}}</div>
</template><style scoped>
.son{border: 1px solid #000;padding: 30px;
}
</style>
- 頁面渲染效果。
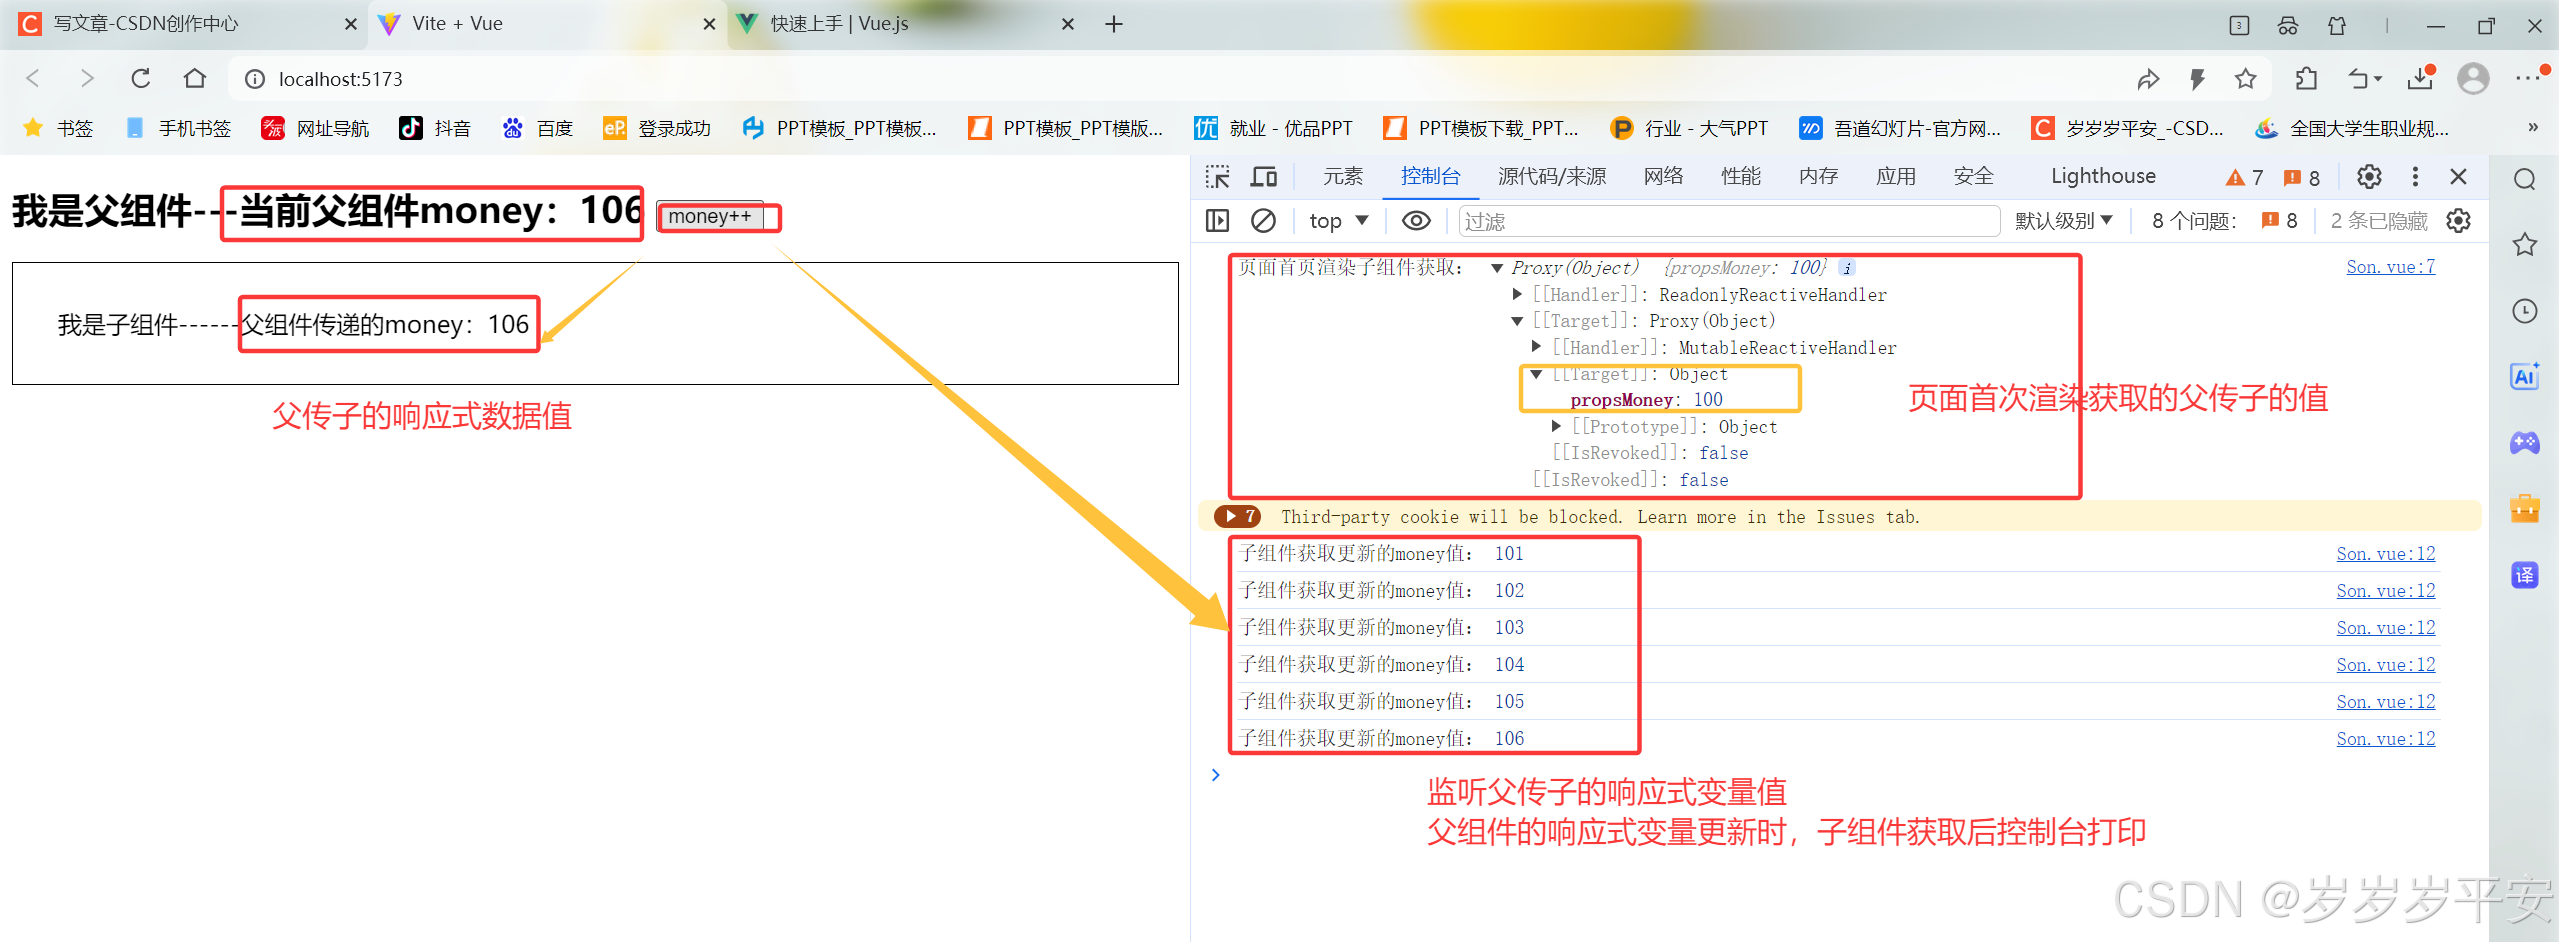
(5)傳遞響應式類型數據。(:屬性="響應式數據")
- 父組件代碼示例。
<script setup>
//局部子組件(導入就能使用)
import Son from "./components/Son.vue";
import {ref} from "vue";
const money = ref(100)
const addMoney = () =>{money.value++
}
</script><template><div><h2>我是父組件---當前父組件money:{{money}}<button @click="addMoney">money++</button></h2><Son :propsMoney="money" /></div>
</template><style scoped>
</style>
- 子組件代碼示例。
<script setup>
//因為寫在setup中,無法直接配置props選項
//借助于“編譯器宏"函數接收子組件傳遞的數據
import {watch} from "vue";const props = defineProps(['propsMoney'])
console.log('頁面首頁渲染子組件獲取:',props)
//腳本中獲取屬性需要通過props.xxx獲取
//監聽父組件傳遞的響應式數據是否變化
watch(() => props.propsMoney, (newValue) => {//每變化一次就打印一次console.log('子組件獲取更新的money值:',newValue)
})
</script><template>
<!-- 對于模版中,可以直接使用props傳遞的值 --><div class="son">我是子組件------父組件傳遞的money:{{propsMoney}}</div>
</template><style scoped>
.son{border: 1px solid #000;padding: 30px;
}
</style>
- 頁面渲染效果。
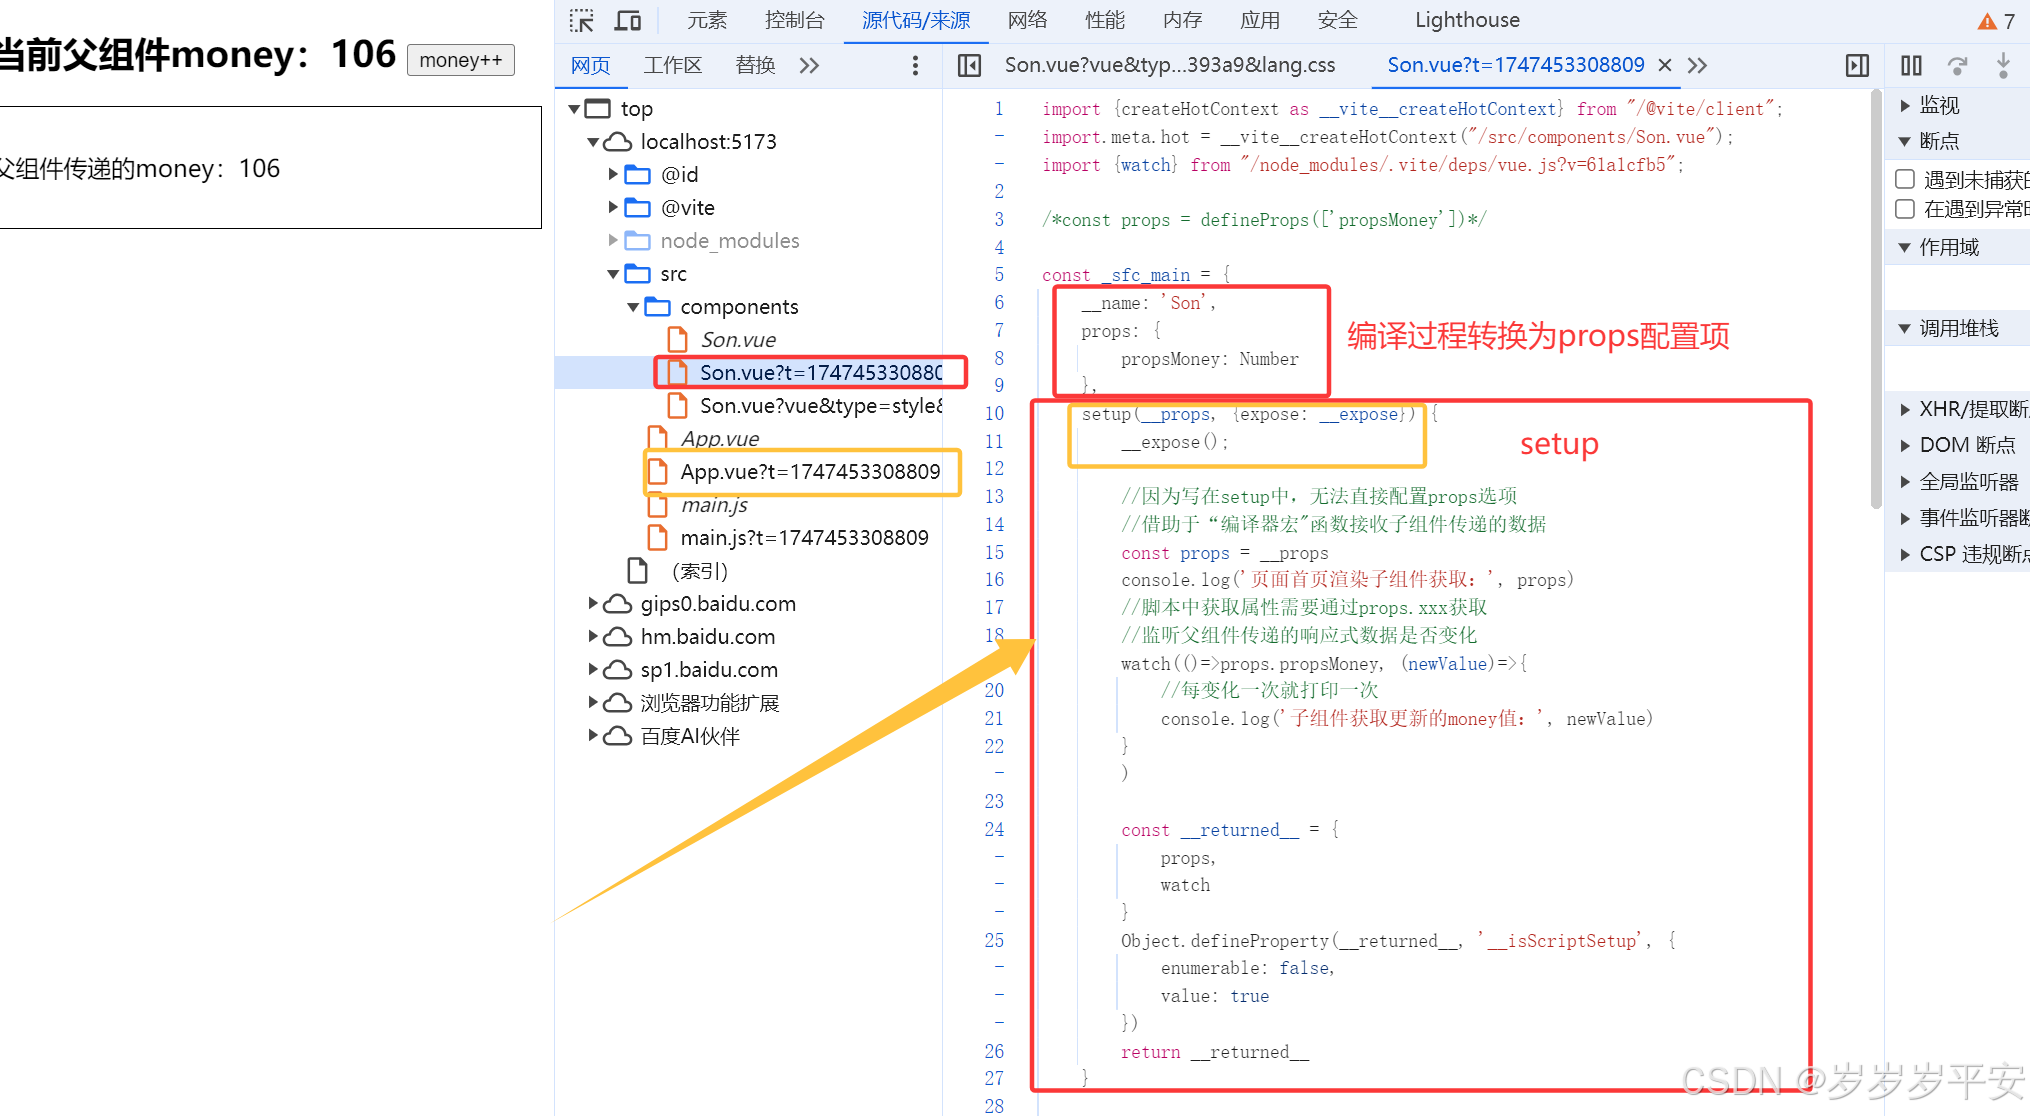
(6)defineProps原理簡要分析。
- 本質上是編譯階段的一個標識。實際當編譯器解析時,遇到后會進行編譯轉換。
二、組合式API下的子組件傳父組件。(自定義事件)
(1)基本思想。
- 父組件中給子組件通過@綁定事件。
- 子組件內部通過emit方法觸發事件。
(2)核心注意點。
<1>事件驅動通信。
- 子組件通過自定義事件向父組件發送數據。父組件監聽這些事件并處理數據。
- 子組件使用defineEmits聲明可觸發的事件。通過emit觸發事件并傳遞參數。
<2>單向數據流原則。
- 子組件不直接修改父組件數據,而是通過事件通知父組件自行更新。
<3>核心實現步驟。
- 子組件步驟。
- 聲明事件:const emit = defineEmits(['事件名',...,])。
- 觸發事件:emit ('需觸發的事件名',{需攜帶的參數...})。
- 父組件步驟。
- 監聽事件:子組件標簽<Xxx?@子組件觸發的事件名="父組件中處理事件的方法">。
- 處理事件:在對應的方法中更新自身狀態。
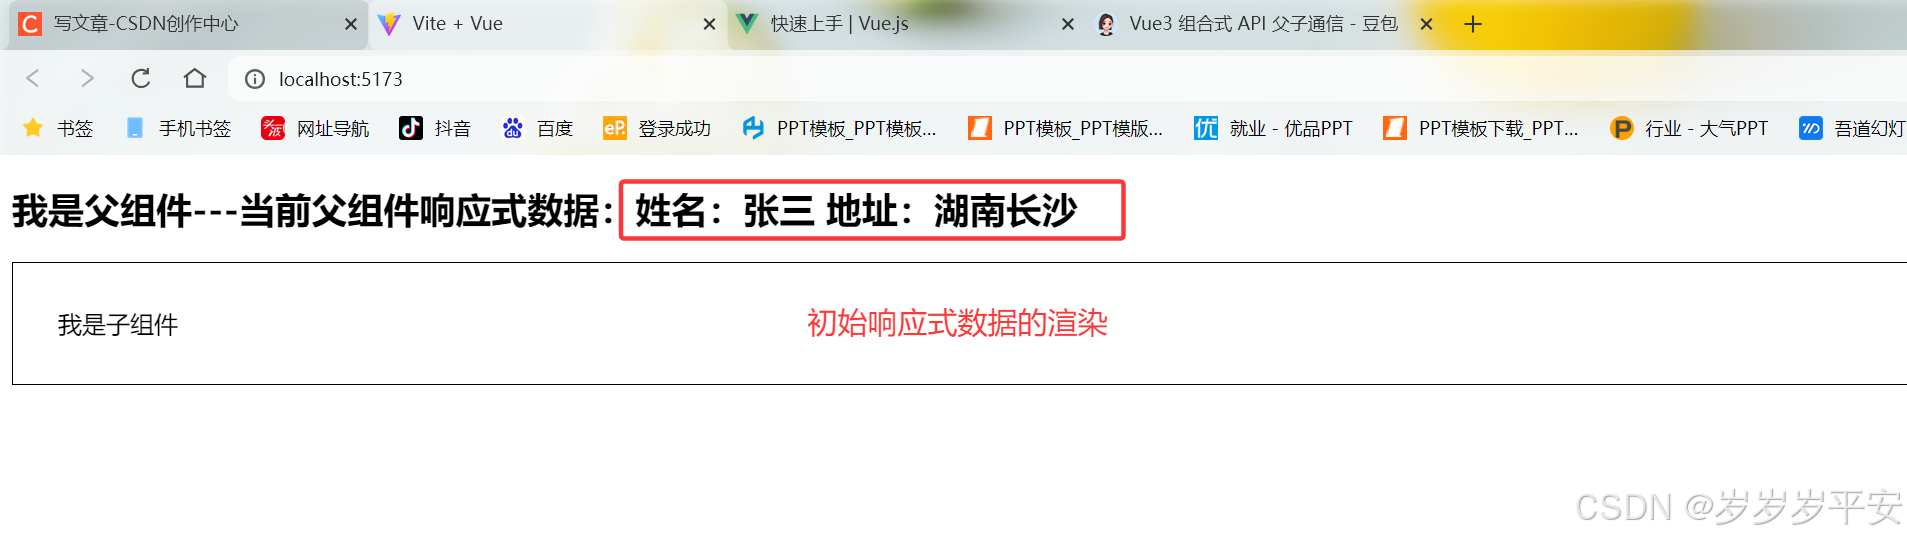
(3)頁面渲染時子組件立即向父組件傳遞數據。
- 父組件頁面初始渲染效果。
<script setup>
//局部子組件(導入就能使用)
import Son from "./components/Son.vue";
import {reactive} from "vue";
const data = reactive({name:'張三',addr:'湖南長沙'
})</script><template><div><h2>我是父組件---當前父組件響應式數據:姓名:{{data.name}} 地址:{{data.addr}}</h2><Son /></div>
</template><style scoped>
</style>
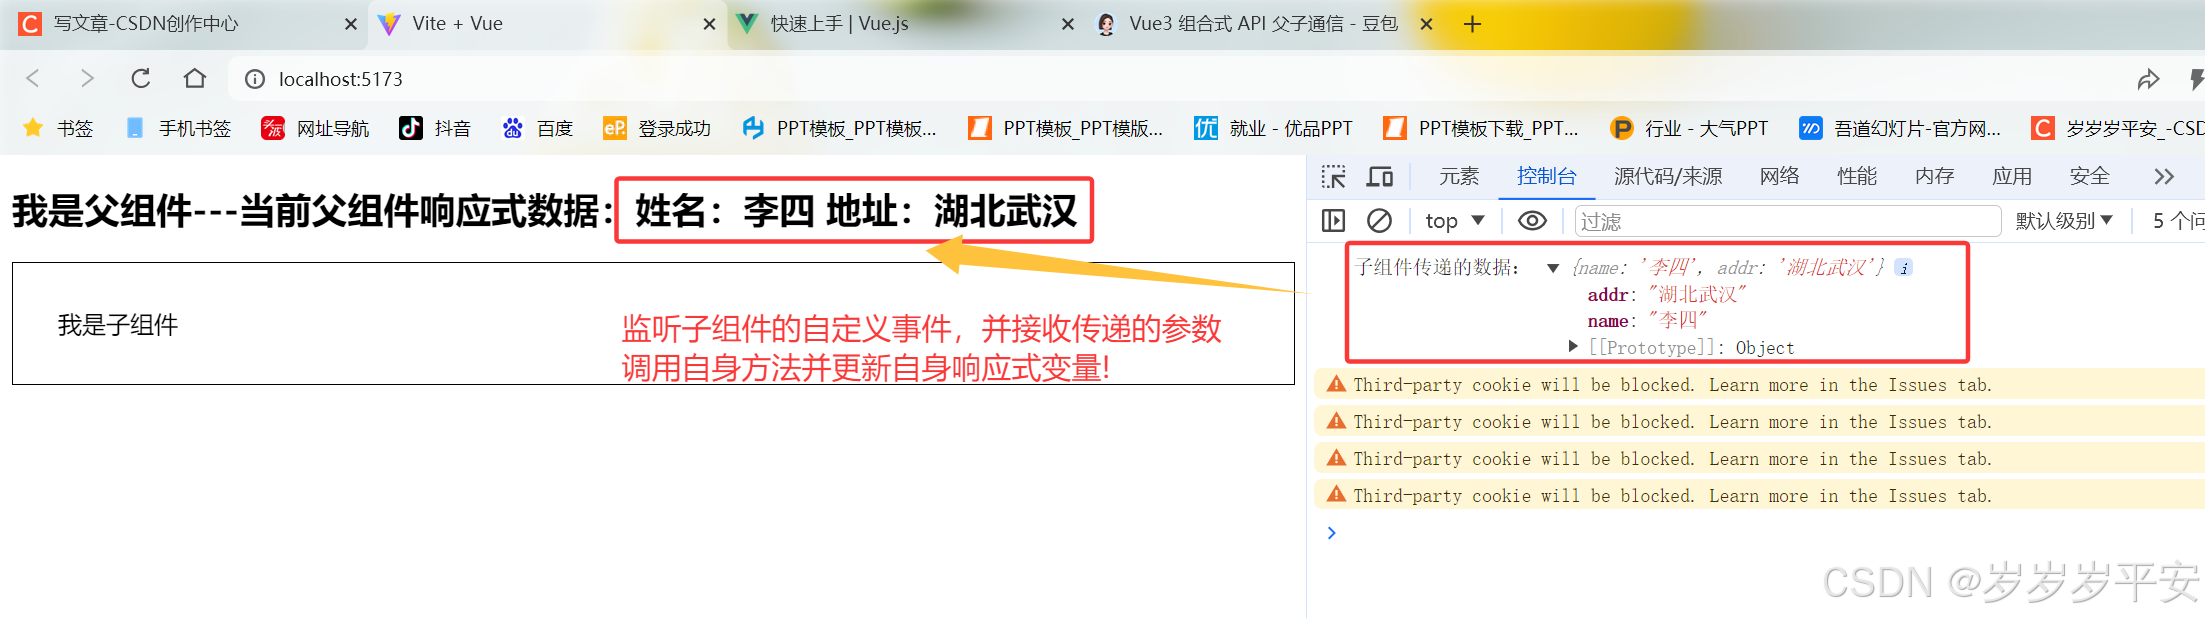
- 子組件自定義事件向父組件傳遞新值。
<script setup>//通過defineEmits編譯器宏聲明事件、emit方法
const emit = defineEmits(['changeValue'])
//頁面渲染時直接觸發自定義的事件并進行傳參
emit('changeValue',{name : '李四',addr : '湖北武漢'
})
</script><template><div class="son">我是子組件</div>
</template><style scoped>
.son{border: 1px solid #000;padding: 30px;
}
</style>
- 父組件監聽子組件(自定義事件)傳遞的數據。
<script setup>
//局部子組件(導入就能使用)
import Son from "./components/Son.vue";
import {reactive} from "vue";
const data = reactive({name:'張三',addr:'湖南長沙'
})const getValue = (res) => {console.log('子組件傳遞的數據:',res);data.name = res.name;data.addr = res.addr;
};</script><template><div><h2>我是父組件---當前父組件響應式數據:姓名:{{data.name}} 地址:{{data.addr}}</h2>
<!--  @后面跟的必須和子組件的事件名一致  -->
<!--  getValue:處理子組件傳遞的數據,更新自身狀態  --><Son @change-value="getValue" /></div>
</template><style scoped>
</style>
- 頁面最終渲染效果。
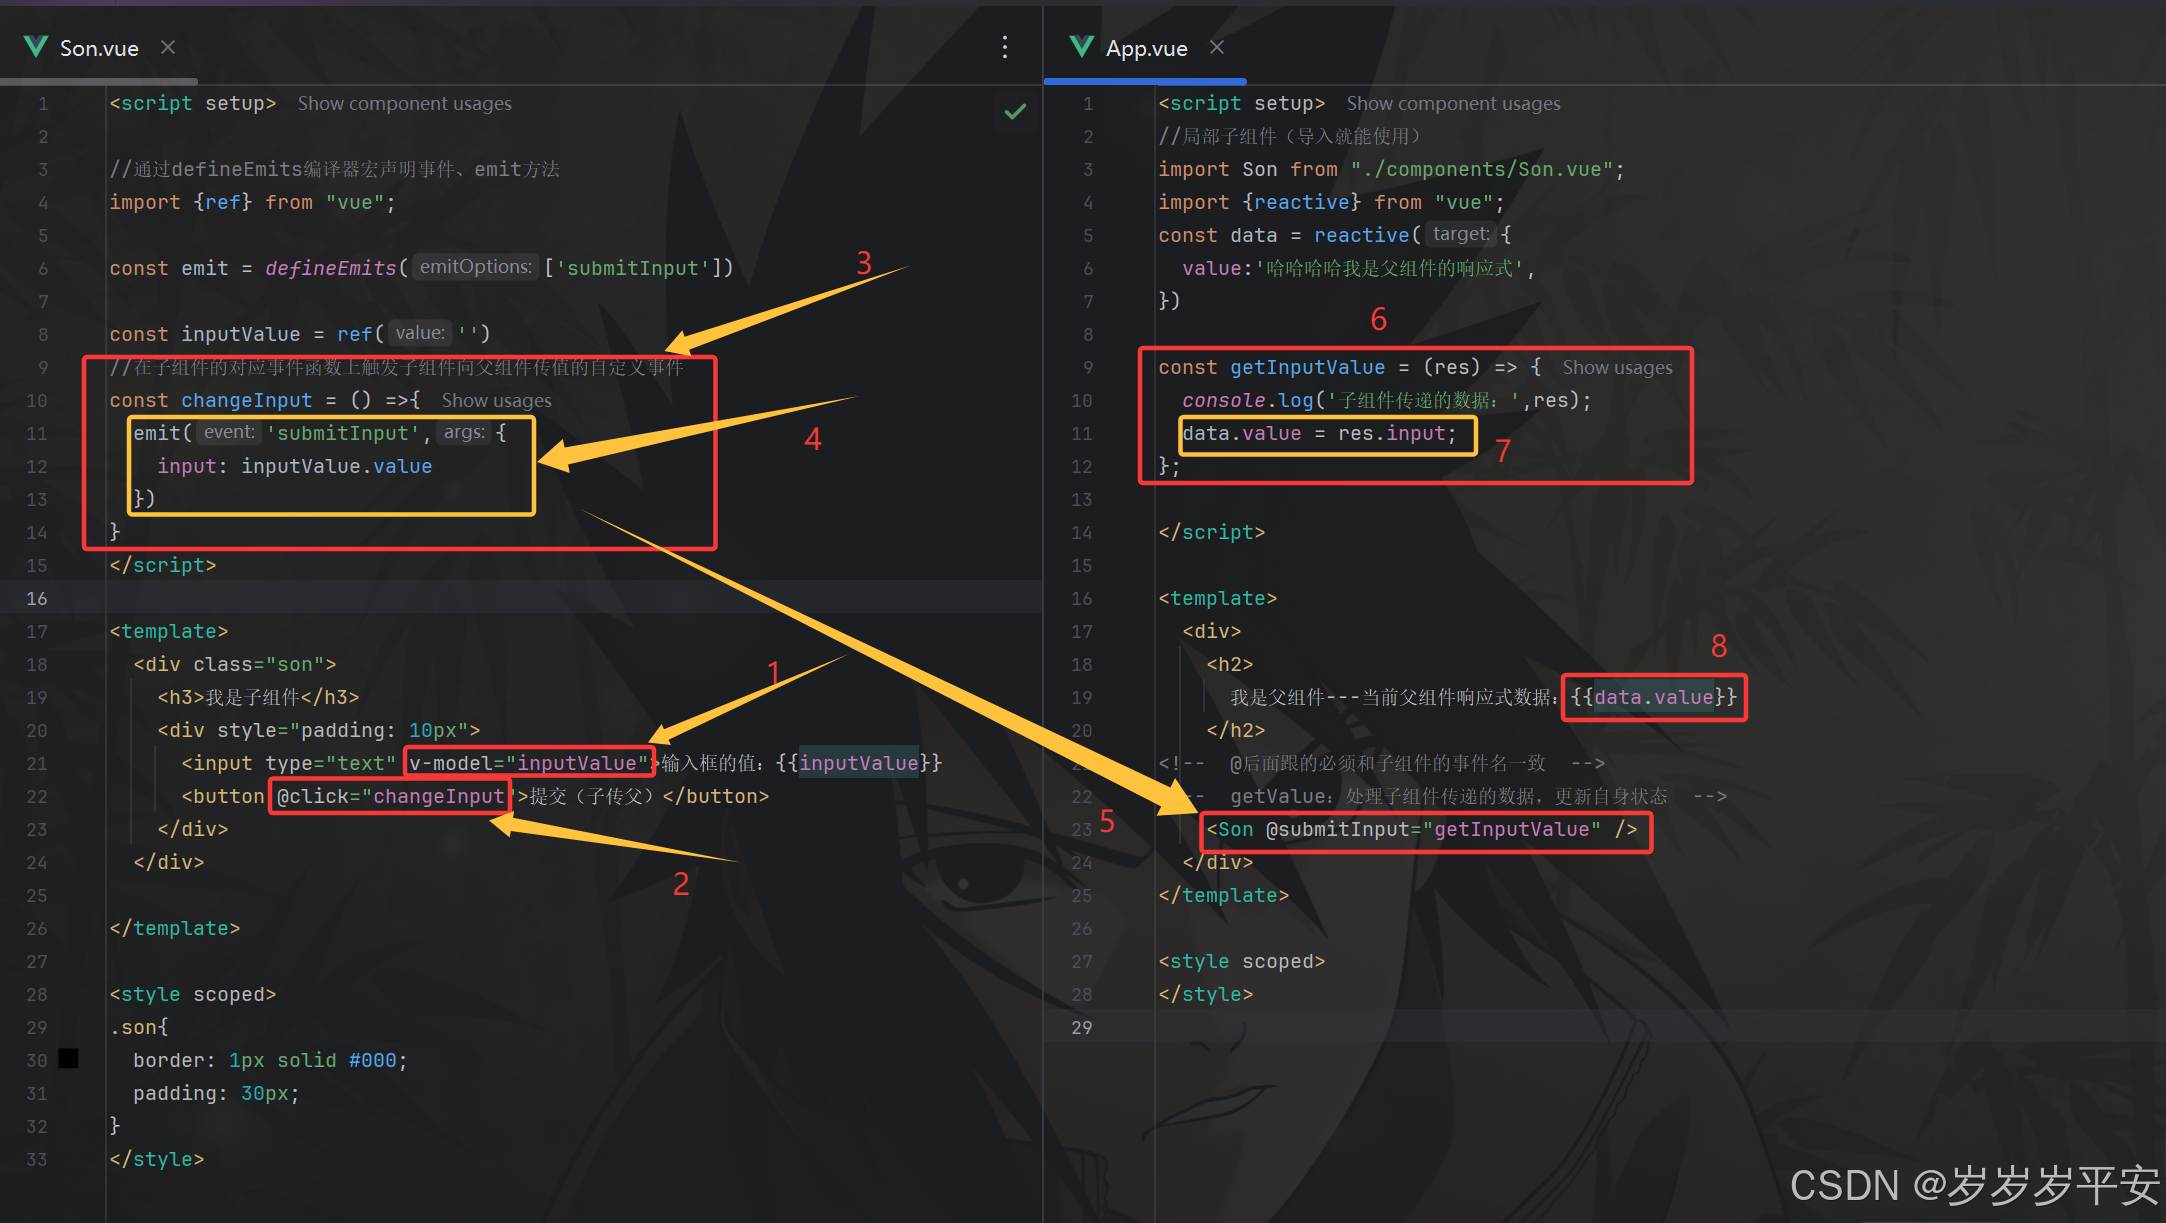
(4)基于子組件的事件函數向父組件傳遞數據。
- 基本實現:當子組件輸入框的內容并按鈕提交(事件函數觸發),通過自定義事件的觸發將對應的參數通過子組件傳遞到父組件。
- 子組件代碼示例。
<script setup>//通過defineEmits編譯器宏聲明事件、emit方法
import {ref} from "vue";const emit = defineEmits(['submitInput'])const inputValue = ref('')
//在子組件的對應事件函數上觸發子組件向父組件傳值的自定義事件
const changeInput = () =>{emit('submitInput',{input: inputValue.value})
}
</script><template><div class="son"><h3>我是子組件</h3><div style="padding: 10px"><input type="text" v-model="inputValue">輸入框的值:{{inputValue}}<button @click="changeInput">提交(子傳父)</button></div></div></template><style scoped>
.son{border: 1px solid #000;padding: 30px;
}
</style>
- 父組件代碼示例。
<script setup>
//局部子組件(導入就能使用)
import Son from "./components/Son.vue";
import {reactive} from "vue";
const data = reactive({value:'哈哈哈哈我是父組件的響應式',
})const getInputValue = (res) => {console.log('子組件傳遞的數據:',res);data.value = res.input;
};</script><template><div><h2>我是父組件---當前父組件響應式數據:{{data.value}}</h2>
<!--  @后面跟的必須和子組件的事件名一致  -->
<!--  getValue:處理子組件傳遞的數據,更新自身狀態  --><Son @submitInput="getInputValue" /></div>
</template><style scoped>
</style>
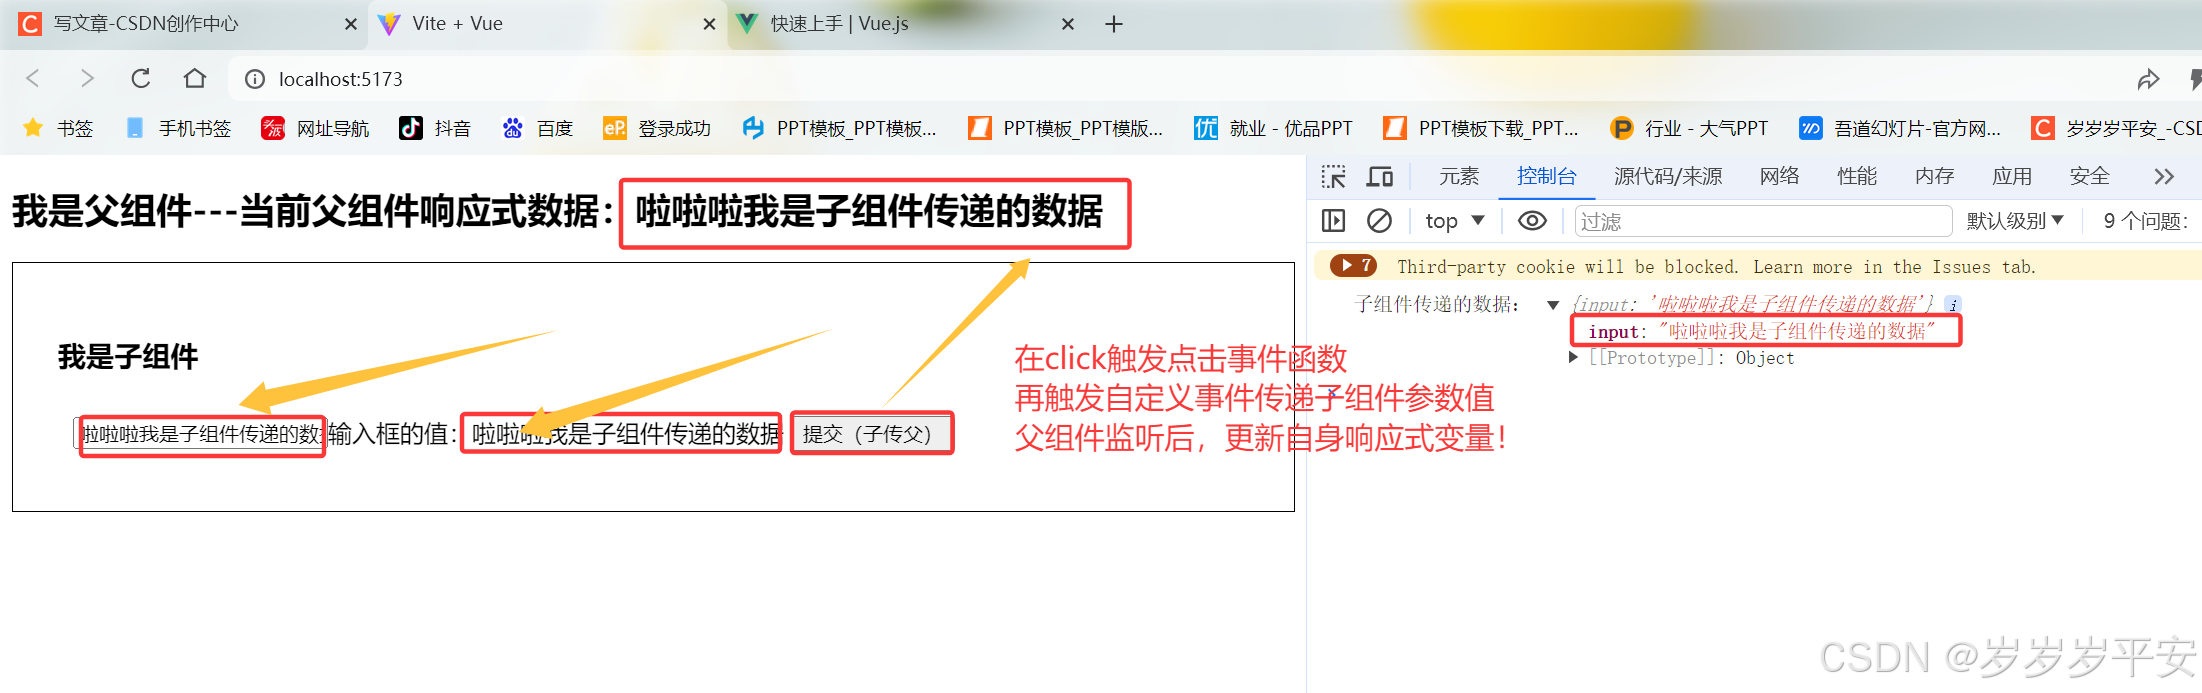
- 頁面渲染效果。

三、Vue3組合式API中的父、子組件間通信小結。
- 父傳子過程中通過 defineProps({屬性名:類型,...}) 方式接收props。
- setup語法糖中通過 const props=defineProps({屬性名:類型,...})、props.xxx 使用父組件傳遞的數據。而在模版中可以直接通過屬性名使用。
- 子傳父過程中通過 defineEmits(['事件名',...]) 方式得到emit方法。
- 觸發事件:emit('事件名',需傳遞的參數) 。父組件通過@事件名即可監聽。


)

:管道 - 過濾器架構)

![polarctf-web-[簡單rce]](http://pic.xiahunao.cn/polarctf-web-[簡單rce])

)
)
openjdk17 c++源碼垃圾回收安全點信號函數處理線程阻塞)


