1 概述
在同城多機房情景下,各個機房各自部署一套微服務集群,正常情況下微服務調用在本機房閉環。在如下某些災難情景,可以嘗試拉遠調用以最大程度維持業務連續性,這些情景例如:
- A機房多個服務器宕機。
- 應用由于BUG發生OOM導致暫時性應用不可用、或者被kubelet重啟,等應用重新正常運行需要5分鐘以上。
為了實現拉遠調用,進程的負載均衡邏輯需要感知機房位置,因此微服務注冊到服務注冊中心時需要夾帶額外的元數據。
2 spring cloud loadbalancer
Spring Cloud LoadBalancer是Spring Cloud提供的一個用于微服務架構中的客戶端負載均衡解決方案。它旨在取代Netflix Ribbon,提供了更現代化的API和更好的與Spring生態系統的集成。
2.1 主要特性
- 簡化配置:
Spring Cloud LoadBalancer提供了簡化的配置選項,并且可以通過應用程序屬性文件輕松配置。 - 自動配置支持:
它能夠自動與RestTemplate和Feign客戶端集成,無需手動設置負載均衡邏輯。 - 反應式編程支持:
支持基于 WebFlux 的非阻塞 I/O 操作,對于構建高性能、響應式的微服務非常重要。 - 靈活的負載均衡策略:
內置多種負載均衡算法(如輪詢、隨機選擇等),并且可以自定義實現以滿足特定需求。 - 服務發現集成:
與Spring Cloud DiscoveryClient接口兼容,可以與Eureka、Consul等服務發現工具無縫協作。
2.2 自定義負載均衡的套路
2.2.1 步驟1
編寫自定義負載均衡邏輯的類,內容如下:
package com.example.consumer.balancer;
import java.util.List;
import java.util.concurrent.ThreadLocalRandom;
import java.util.stream.Collectors;
import org.apache.commons.logging.Log;
import org.apache.commons.logging.LogFactory;
import reactor.core.publisher.Mono;
import org.springframework.beans.factory.ObjectProvider;
import org.springframework.cloud.client.ServiceInstance;
import org.springframework.cloud.client.loadbalancer.DefaultResponse;
import org.springframework.cloud.client.loadbalancer.EmptyResponse;
import org.springframework.cloud.client.loadbalancer.Request;
import org.springframework.cloud.client.loadbalancer.Response;
import  org.springframework.cloud.loadbalancer.core.NoopServiceInstanceListSupplier;
import  org.springframework.cloud.loadbalancer.core.ReactorServiceInstanceLoadBalancer;
import org.springframework.cloud.loadbalancer.core.SelectedInstanceCallback;
import org.springframework.cloud.loadbalancer.core.ServiceInstanceListSupplier;public class MyNewLoadBalancer implements ReactorServiceInstanceLoadBalancer {private static final Log log =  LogFactory.getLog(MyNewLoadBalancer.class);private final String serviceId;private ObjectProvider<ServiceInstanceListSupplier>  serviceInstanceListSupplierProvider;private final String localDataCenter;/**
*      * @param serviceInstanceListSupplierProvider a provider of
*             * {@link ServiceInstanceListSupplier} that will be used to get available instances
*                    * @param serviceId id of the service for which to choose an  instance
*                           */public MyNewLoadBalancer(ObjectProvider<ServiceInstanceListSupplier>  serviceInstanceListSupplierProvider,String serviceId, String localDataCenter) {this.serviceId = serviceId;this.serviceInstanceListSupplierProvider =  serviceInstanceListSupplierProvider;this.localDataCenter = localDataCenter;}@SuppressWarnings("rawtypes")@Override// 核心方法,負載均衡的邏輯就是從choose()開始public Mono<Response<ServiceInstance>> choose(Request request) {ServiceInstanceListSupplier supplier =  serviceInstanceListSupplierProvider.getIfAvailable(NoopServiceInstanceListSupplier::new);return supplier.get(request).next().map(serviceInstances ->  processInstanceResponse(supplier, serviceInstances));}private Response<ServiceInstance>  processInstanceResponse(ServiceInstanceListSupplier supplier,List<ServiceInstance> serviceInstances) {Response<ServiceInstance> serviceInstanceResponse =  getInstanceResponse(serviceInstances);if (supplier instanceof SelectedInstanceCallback &&  serviceInstanceResponse.hasServer()) {((SelectedInstanceCallback)  supplier).selectedServiceInstance(serviceInstanceResponse.getServer());}return serviceInstanceResponse;}private Response<ServiceInstance>  getInstanceResponse(List<ServiceInstance> instances) {if (instances.isEmpty()) {if (log.isWarnEnabled()) {log.warn("No servers available for service: " +  serviceId);}return new EmptyResponse();}// 同機房的服務實例List<ServiceInstance> sameDcInstances = instances.stream().filter(instance -> localDataCenter.equals(instance.getMetadata().get("DATA_CENTER"))).collect(Collectors.toList());// 其他機房的服務實例List<ServiceInstance> otherDcInstances = instances.stream().filter(instance -> !localDataCenter.equals(instance.getMetadata().get("DATA_CENTER"))).collect(Collectors.toList());// 兩個服務實例列表,選擇一個  List<ServiceInstance> selectedInstances = sameDcInstances.isEmpty() ?otherDcInstances : sameDcInstances;// 選好實例列表后,再使用隨機方式挑選出一個int index =  ThreadLocalRandom.current().nextInt(selectedInstances.size());ServiceInstance instance = selectedInstances.get(index);return new DefaultResponse(instance);}
}
2.2.2 步驟2
編寫工廠類,不需要添加@Configuration:
package com.example.consumer.balancer;
import org.springframework.cloud.client.ServiceInstance;
import org.springframework.cloud.loadbalancer.core.ReactorLoadBalancer;
import org.springframework.cloud.loadbalancer.core.ServiceInstanceListSupplier;
import org.springframework.cloud.loadbalancer.support.LoadBalancerClientFactory;
import org.springframework.context.annotation.Bean;
import org.springframework.core.env.Environment;public class MyLoadBalancerConfig {@Beanpublic ReactorLoadBalancer<ServiceInstance> randomLoadBalancer(Environment  environment, LoadBalancerClientFactory loadBalancerClientFactory){String name =  environment.getProperty(LoadBalancerClientFactory.PROPERTY_NAME);// 本地機房的信息,從環境變量中獲取即可String localDataCenter = environment.getProperty("spring.cloud.nacos.discovery.metadata.DATA_CENTER");return new MyNewLoadBalancer(loadBalancerClientFactory.getLazyProvider(name,  ServiceInstanceListSupplier.class), name, localDataCenter);}
}
2.2.3 步驟3
在main類中使用@LoadBalancerClient或@LoadBalancerClients來指定剛剛創建工廠類:
package com.example.consumer;
import org.springframework.boot.SpringApplication;
import org.springframework.boot.autoconfigure.SpringBootApplication;
import org.springframework.cloud.client.discovery.EnableDiscoveryClient;
import org.springframework.cloud.loadbalancer.annotation.LoadBalancerClients;
import org.springframework.cloud.openfeign.EnableFeignClients;
import org.springframework.cloud.loadbalancer.annotation.LoadBalancerClient;
import com.example.consumer.balancer.MyLoadBalancerConfig;@SpringBootApplication
@EnableDiscoveryClient
@EnableFeignClients
@LoadBalancerClient(name = "service-provider", configuration =  MyLoadBalancerConfig.class)
// @LoadBalancerClients(defaultConfiguration = MyLoadBalancerConfig.class)
public class ConsumerApplication {public static void main(String[] args) {SpringApplication.run(ConsumerApplication.class, args);}
}
2.2.4 完整代碼
https://gitee.com/handsomeboylj/spring-cloud-nacos-demo
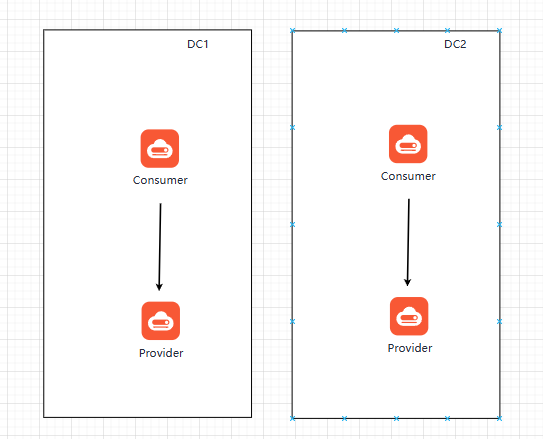
3 容災方案
兩邊機房都正常時:
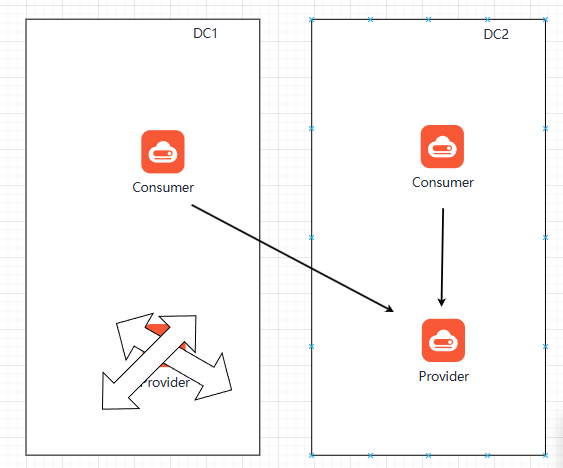
DC1機房的Provider應用臨時不可用時,拉遠調用另外機房的Provider應用:
4 測試
本次測試中,namespace dc1作為dc1機房,namespace dc2作為dc2機房,所有微服務實例都注冊到同一個nacos服務中,所有微服務實例在網絡層都是扁平的、可直接調用的(對應到現實里,就是是兩個機房通過VPN或專線打通,容器網絡使用underlay模式)。
git clone https://gitee.com/handsomeboylj/spring-cloud-nacos-demo.git
kubectl apply -f doc/k8s/dc-awareness/
部署成功后,如下:
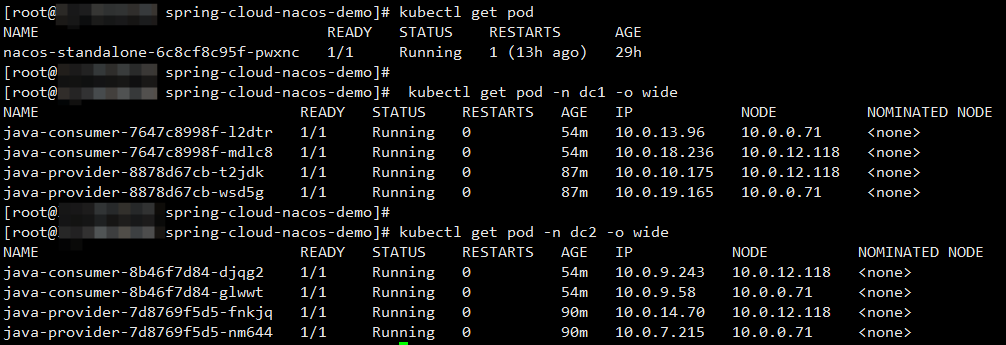
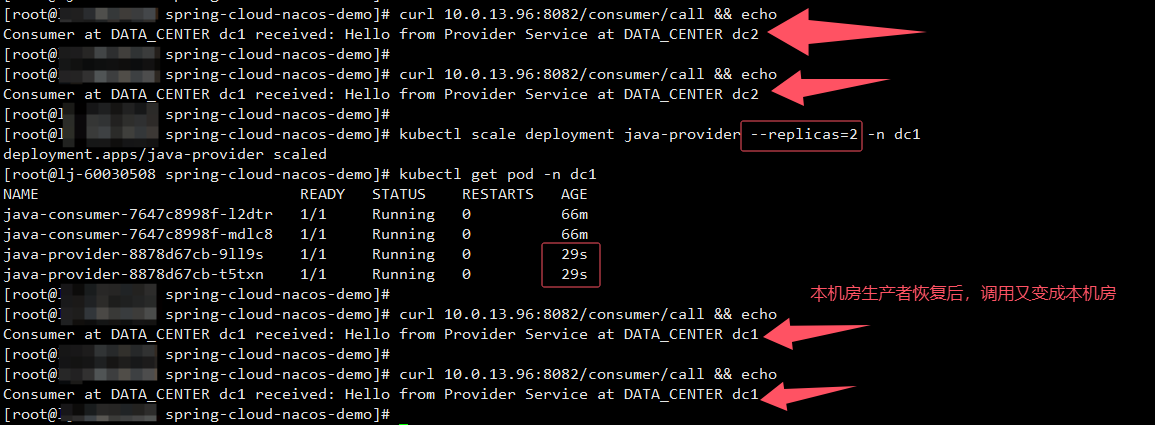
dc1機房的一個消費者的IP是10.0.13.96,其工作端口是8082,接口是/consumer/call,調用可以看見結果,消費者和生產者都會響應自己所在的機房:

將dc1機房的生產者關閉后,再訪問dc1機房的消費者的接口,可以看見響應是dc2,說明調用了機房2的生產者。
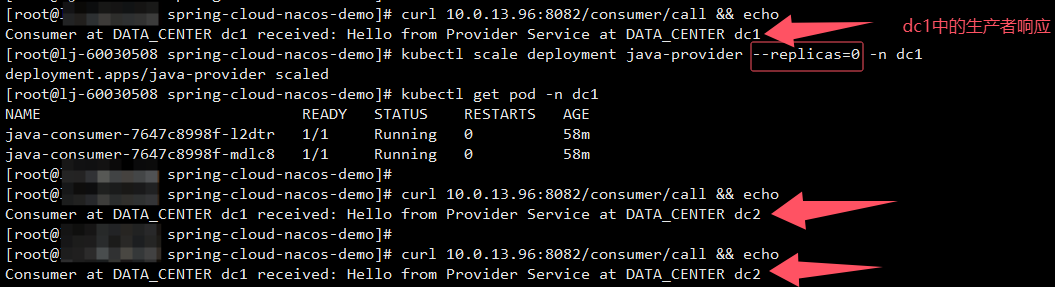
將dc1機房的生產者重新上線后,dc1的消費者從拉遠調用轉變成本機房調用。
5 小結
本文介紹拉遠調用可臨時維持業務系統的連續性,并且使用spring cloud loadbalancer來實現感知機房,優先本機房閉環調用,次之拉遠調用。


)


)


動態計算swiper高度封裝自定義hook)


)


![[思維模式-38]:看透事物的關系:什么是事物的關系?事物之間的關系的種類?什么是因果關系?如何通過數學的方式表達因果關系?](http://pic.xiahunao.cn/[思維模式-38]:看透事物的關系:什么是事物的關系?事物之間的關系的種類?什么是因果關系?如何通過數學的方式表達因果關系?)
)
