Android 13.0 MTK Camera2 設置默認拍照尺寸功能實現
文章目錄
- 需求:
- 參考資料
- 架構圖了解
- Camera相關專欄
- 零散知識了解
- 部分相機源碼參考,學習API使用,梳理流程,偏應用層
- Camera2 系統相關
- 修改文件-修改方案
- 修改文件:
- 修改內容:
- PictureSize.java onValueInitialized 方法
- PictureSizeHelper.java getCustomDefault 方法
- 源碼分析
- 設置拍照尺寸的核心類
- 源碼逐步分析
- 關聯的照片大小搜索
- PictureSizeSelector
- 進入界面選中的邏輯
- 點擊選中圖片大小邏輯
- PictureSizeSelectorPreference
- PictureSizeSettingView
- onItemClick
- onPreferenceClick
- PictureSize
- onValueInitialized
- 總結
需求:
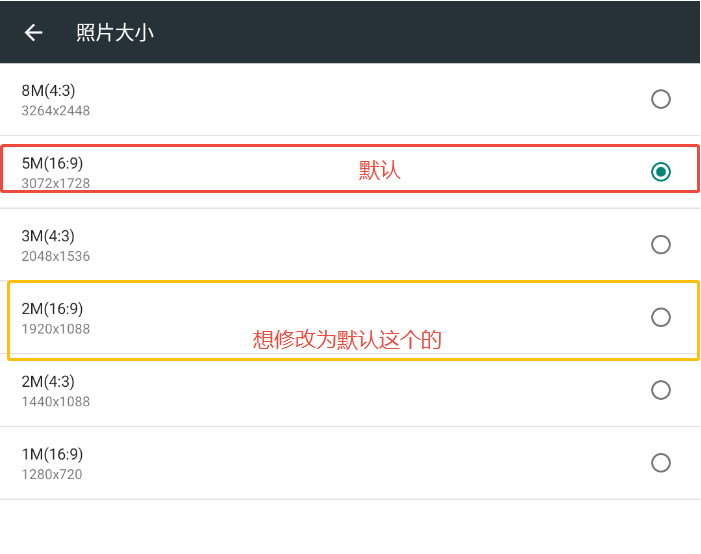
默認相機拍照尺寸
需求原因
1)客戶自身喜好
2)部分客戶自己的攝像頭不兼容,比如拍照尺寸太大會卡頓,拉絲等現象
參考資料
Android 13.0 MTK Camera2 設置默認拍照尺寸功能實現
Android 11.0 MTK Camera2 設置默認拍照尺寸功能實現
這兩篇文章介紹的蠻好的,可以看看,對于類似需求同理也可以按照改一改? 為什么有些會默認最高分辨率拍照,可能原因在于手機端產品為了最好的拍攝效果,尺寸會默認到最大。
對于Camera2 開發,遇到的困難點就是源碼代碼量太多,對于很多同事來說就是一臉懵逼,建議多積累一定的代碼量,掌握基本的知識。
架構圖了解
MTKCamera2相機架構
Camera2架構
Android Camera架構簡析
Camera相關專欄
Camera Framework 專欄
小馳私房菜系列
小馳私房菜MTK系列
小馳Camera 開發系列
Camera 相機開發
展訊平臺 Camera
官方文檔:谷歌官方 API 描述
零散知識了解
MTK 相機UI介紹
Camera2 相機認知
Camera2學習筆記
camera2關于拍照預覽方向旋轉90度和拍照圖片鏡像功能實現
Camera2 預覽集成、簡單拍照:熟悉預覽步驟流程比較有用
Camera鏡像上下左右顛倒問題的解決辦法
MTK相機成像質量差
Camera應用分析
部分相機源碼參考,學習API使用,梳理流程,偏應用層
極客相機 Camera2 API
Camera2 API詳解
極客相機源碼
Camera2 相機Demo
Camera2 專業相機Demo
拍照、預覽、錄像Demo
使用Camera2 拍照
Camera2 系統相關
Camera2 Service 啟動
修改文件-修改方案
修改文件:
\vendor\mediatek\proprietary\packages\apps\Camera2\feature\setting\picturesize\src\com\mediatek\camera\feature\setting\picturesize\PictureSize.java\vendor\mediatek\proprietary\packages\apps\Camera2\feature\setting\picturesize\src\com\mediatek\camera\feature\setting\picturesize\PictureSizeHelper.java修改內容:
PictureSize.java onValueInitialized 方法
在 onValueInitialized 方法中,默認valueInStore 中調用PictureSizeHelper 類中自定義的 getCustomDefault 方法
         if (valueInStore == null) {// Default picture size is the max full-ratio size.
-            List<String> entryValues = getEntryValues();
+                       LogHelper.d(TAG, "valueInStore == null  Default picture size is the max full-ratio size:");
+            /*List<String> entryValues = getEntryValues();for (String value : entryValues) {if (PictureSizeHelper.getStandardAspectRatio(value) == fullRatio) {valueInStore = value;
+                                       LogHelper.d(TAG, "valueInStore == null:valueInStore:"+valueInStore);break;}
-            }
+            }*/
+                        valueInStore =PictureSizeHelper.getCustomDefault(getEntryValues());
+                       }
PictureSizeHelper.java getCustomDefault 方法
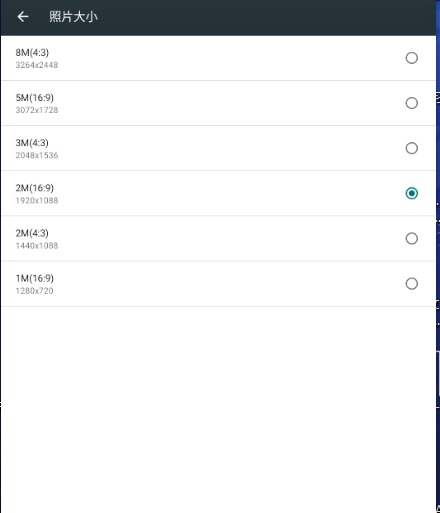
自定義 getCustomDefault 方法,設置默認分辨率。 這里直接寫死,或者 根據客需要求設置為最大、最小 等。
public static String getCustomDefault(List<String> supportedEntryValues){for (int i=0;i< supportedEntryValues.size();i++) { /*Size size = valueToSize(supportedEntryValues.get(i));temp = size.width * size.height; if (temp > maxSize) {maxSize = temp;maxIndex = i;}*/LogHelper.d(TAG, "getCustomDefault:" +supportedEntryValues.get(i));}return "1920x1088";}源碼分析
設置拍照尺寸的核心類
\vendor\mediatek\proprietary\packages\apps\Camera2\feature\setting\picturesize\src\com\mediatek\camera\feature\setting\picturesize\PictureSize.java
\vendor\mediatek\proprietary\packages\apps\Camera2\feature\setting\picturesize\src\com\mediatek\camera\feature\setting\picturesize\PictureSizeHelper.java
\vendor\mediatek\proprietary\packages\apps\Camera2\feature\setting\picturesize\src\com\mediatek\camera\feature\setting\picturesize\PictureSizeSettingView.java
源碼逐步分析
關聯的照片大小搜索
grep -rn 照片大小

找到如下路徑相關關鍵字:照片大小
feature/mode/vsdof/res/values-zh-rCN/strings.xml
<string name="sdof_picture_size_title">"照片大小"</string>feature/setting/picturesize/res/values-zh-rCN/strings.xml<string name="pref_camera_picturesize_title">"照片大小"</string>
PictureSizeSelector
上面已經找到了兩個關鍵字,這里先根據第一個關鍵字找一下源碼:
路徑:
/vendor/mediatek/proprietary/packages/apps/Camera2/feature/setting/picturesize/src/com/mediatek/camera/feature/setting/picturesize/PictureSizeSelector.java
R.string.pref_camera_picturesize_title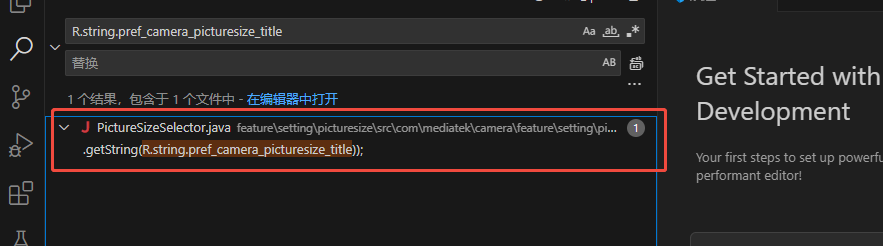
我們看類定義:
/*** Picture size selector.*/public class PictureSizeSelector extends PreferenceFragment {
就是圖片大小選擇器
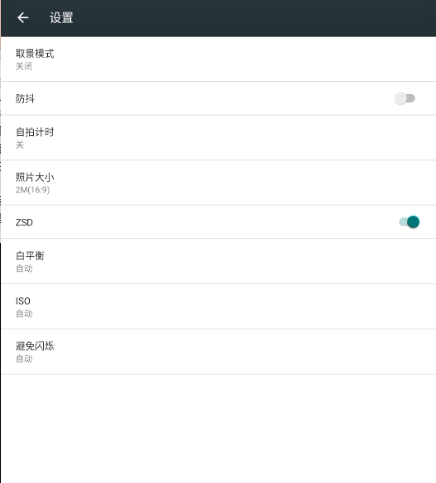
對應的是如下界面:
既然是這個界面,那就看一下點擊選中方法和進入這個界面的設置方法
進入界面選中的邏輯
這里關聯的有四個方法,對應的進入界面選中邏輯:
@Overridepublic void onCreate(Bundle savedInstanceState) {LogHelper.d(TAG, "[onCreate]");super.onCreate(savedInstanceState);prepareValuesOnShown();Toolbar toolbar = (Toolbar) getActivity().findViewById(R.id.toolbar);if (toolbar != null) {toolbar.setTitle(getActivity().getResources().getString(R.string.pref_camera_picturesize_title));}addPreferencesFromResource(R.xml.picturesize_selector_preference);PreferenceScreen screen = getPreferenceScreen();for (int i = 0 ; i < mEntryValues.size(); i++) {RadioPreference preference = new RadioPreference(getActivity());if (mEntryValues.get(i).equals(mSelectedValue)) {preference.setChecked(true);}LogHelper.d(TAG," onCreate ->mEntryValues.get(i):"+mEntryValues.get(i));preference.setTitle(mTitleList.get(i));preference.setSummary(mSummaryList.get(i));preference.setOnPreferenceClickListener(mOnPreferenceClickListener);screen.addPreference(preference);}}/*** Set the default selected value.** @param value The default selected value.*/public void setValue(String value) {LogHelper.d(TAG," setValue: value->"+value);mSelectedValue = value;}/*** Set the picture sizes supported.** @param entryValues The picture sizes supported.*/public void setEntryValues(List<String> entryValues) {mEntryValues.clear();mEntryValues.addAll(entryValues);}private void prepareValuesOnShown() {List<String> tempValues = new ArrayList<>(mEntryValues);mEntryValues.clear();mTitleList.clear();mSummaryList.clear();for (int i = 0; i < tempValues.size(); i++) {String value = tempValues.get(i);String title = PictureSizeHelper.getPixelsAndRatio(value);LogHelper.d(TAG," prepareValuesOnShown: value->"+value+" title:"+title);if (title != null) {mTitleList.add(title);mEntryValues.add(value);mSummaryList.add(value);}else{LogHelper.d(TAG, "[prepareValuesOnShown] value :"+value+" will not shown.");}}}
| 方法 | 作用 |
|---|---|
| setEntryValues | 設置支持的圖片大小 分辨率 |
| prepareValuesOnShown | 準備顯示的數據 在onCreate 方法里面調用的 |
| setValue | 設置默認選擇的值 |
| onCreate | 通過setEntryValue 設置的集合,遍歷創建PreferenceScreen ,對于傳遞進來的value 作為選中效果 |
點擊選中圖片大小邏輯
對于點擊邏輯更為簡單,回調 返回上一層,代碼如下:
private class MyOnPreferenceClickListener implements Preference.OnPreferenceClickListener {@Overridepublic boolean onPreferenceClick(Preference preference) {String summary = (String) preference.getSummary();int index = mSummaryList.indexOf(summary);String value = mEntryValues.get(index);mListener.onItemClick(value);LogHelper.d(TAG," MyOnPreferenceClickListener: onPreferenceClick value->"+value);mSelectedValue = value;getActivity().getFragmentManager().popBackStack();return true;}}
PictureSizeSelectorPreference
同 PictureSizeSelector 上面已經找到了兩個關鍵字,這里先根據第二個關鍵字找一下源碼:
路徑:
./vendor/mediatek/proprietary/packages/apps/Camera2/feature/mode/aicombo/src/com/mediatek/camera/feature/mode/aicombo/photo/view/PictureSizeSelectorPreference.java
./vendor/mediatek/proprietary/packages/apps/Camera2/feature/mode/vsdof/src/com/mediatek/camera/feature/mode/vsdof/photo/view/PictureSizeSelectorPreference.java看源碼發現和 PictureSizeSelector 代碼基本一致 ,但是仔細看一個方法的說明如下:/*** Set the video quality supported.* @param entryValues The video quality supported.*/public void setEntryValues(List<String> entryValues) {mEntryValues.clear();mEntryValues.addAll(entryValues);}這些事設置Vieo 的  并不是設置picture 的。 所以我們需求設置圖片質量的其實應該是上面找到的 PictureSizeSelector
PictureSizeSettingView
路徑:
/vendor/mediatek/proprietary/packages/apps/Camera2/feature/setting/picturesize/src/com/mediatek/camera/feature/setting/picturesize/PictureSizeSettingView.java
找到這個類的方法有兩種
- grep 查找關鍵字 “照片大小”
- 根據上面定位到的源碼 PictureSizeSelector
就是進入到 PictureSizeSelector 界面之前的頁面,如下:
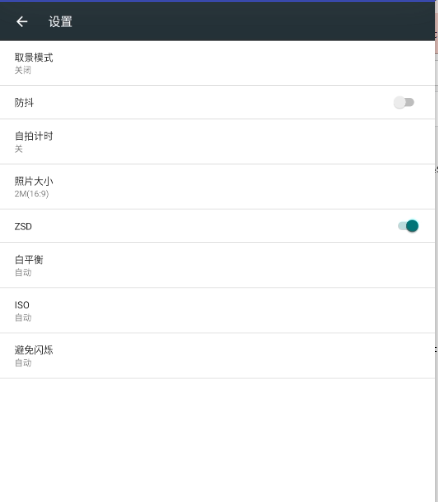
準確的來說, PictureSizeSettingView 對應的其實是這個界面中 圖片大小的這個item .
源碼代碼量不多,我們賦上來看看:
package com.mediatek.camera.feature.setting.picturesize;import android.app.Activity;
import android.app.FragmentTransaction;
import android.preference.PreferenceFragment;import com.mediatek.camera.R;
import com.mediatek.camera.common.debug.LogHelper;
import com.mediatek.camera.common.debug.LogUtil;
import com.mediatek.camera.common.preference.Preference;
import com.mediatek.camera.common.setting.ICameraSettingView;import java.util.ArrayList;
import java.util.List;/*** Picture size setting view.*/
public class PictureSizeSettingView implements ICameraSettingView,PictureSizeSelector.OnItemClickListener {private static final LogUtil.Tag TAG =new LogUtil.Tag(PictureSizeSettingView.class.getSimpleName());private Activity mActivity;private Preference mPref;private OnValueChangeListener mListener;private String mKey;private String mSelectedValue;private List<String> mEntryValues = new ArrayList<>();private String mSummary;private PictureSizeSelector mSizeSelector;private boolean mEnabled;/*** Listener to listen picture size value changed.*/public interface OnValueChangeListener {/*** Callback when picture size value changed.** @param value The changed picture size, such as "1920x1080".*/void onValueChanged(String value);}/*** Picture size setting view constructor.** @param key The key of picture size.*/public PictureSizeSettingView(String key) {mKey = key;}@Overridepublic void loadView(PreferenceFragment fragment) {LogHelper.d(TAG, "[loadView]");mActivity = fragment.getActivity();if (mSizeSelector == null) {mSizeSelector = new PictureSizeSelector();mSizeSelector.setOnItemClickListener(this);}fragment.addPreferencesFromResource(R.xml.picturesize_preference);mPref = (Preference) fragment.findPreference(mKey);mPref.setRootPreference(fragment.getPreferenceScreen());mPref.setId(R.id.picture_size_setting);mPref.setContentDescription(mActivity.getResources().getString(R.string.picture_size_content_description));mPref.setOnPreferenceClickListener(new Preference.OnPreferenceClickListener() {@Overridepublic boolean onPreferenceClick(android.preference.Preference preference) {mSizeSelector.setValue(mSelectedValue);mSizeSelector.setEntryValues(mEntryValues);FragmentTransaction transaction = mActivity.getFragmentManager().beginTransaction();transaction.addToBackStack(null);transaction.replace(R.id.setting_container,mSizeSelector, "picture_size_selector").commit();return true;}});mPref.setEnabled(mEnabled);if (mSelectedValue != null) {mSummary = PictureSizeHelper.getPixelsAndRatio(mSelectedValue);}}@Overridepublic void refreshView() {if (mPref != null) {LogHelper.d(TAG, "[refreshView]");mPref.setSummary(mSummary);mPref.setEnabled(mEnabled);}}@Overridepublic void unloadView() {LogHelper.d(TAG, "[unloadView]");}@Overridepublic void setEnabled(boolean enabled) {mEnabled = enabled;}@Overridepublic boolean isEnabled() {return mEnabled;}/*** Set listener to listen the changed picture size value.** @param listener The instance of {@link OnValueChangeListener}.*/public void setOnValueChangeListener(OnValueChangeListener listener) {mListener = listener;}/*** Set the default selected value.** @param value The default selected value.*/public void setValue(String value) {mSelectedValue = value;}/*** Set the picture sizes supported.** @param entryValues The picture sizes supported.*/public void setEntryValues(List<String> entryValues) {mEntryValues = entryValues;}@Overridepublic void onItemClick(String value) {mSelectedValue = value;mSummary = PictureSizeHelper.getPixelsAndRatio(value);if (mListener != null) {mListener.onValueChanged(value);}}
}
onItemClick
這里關注下這個 onItemClick 點擊方法,我們看類聲明如下:
PictureSizeSettingView implements ICameraSettingView,PictureSizeSelector.OnItemClickListener
所以 這個 onItemClick 方法其實是PictureSizeSelector 類的點擊方法的回調。
onPreferenceClick
先看源碼,如下:
mPref.setOnPreferenceClickListener(new Preference.OnPreferenceClickListener() {@Overridepublic boolean onPreferenceClick(android.preference.Preference preference) {mSizeSelector.setValue(mSelectedValue);mSizeSelector.setEntryValues(mEntryValues);FragmentTransaction transaction = mActivity.getFragmentManager().beginTransaction();transaction.addToBackStack(null);transaction.replace(R.id.setting_container,mSizeSelector, "picture_size_selector").commit();return true;}});
這個方法其實就做了三件事情:
- setValue 設置默認圖片大小
- setEntryValues 設置支持的所有圖片大小集合
- transaction.replace 操作,跳轉到PictureSizeSelector 界面
這里其實就和PictureSizeSelector 完全關聯起來了。
接下來就要關注 兩個事情:
- mListener.onValueChanged(value); 在哪里設置回調的
- setValue 這個類里面也有設置默認圖片大小,到底在哪里設置的
PictureSize
源碼路徑:
/vendor/mediatek/proprietary/packages/apps/Camera2/feature/setting/picturesize/src/com/mediatek/camera/feature/setting/picturesize/PictureSize.java
如何關聯到這個類?
上面已經分析到了 PictureSizeSettingView 的 onValueChanged,其實就是要找 PictureSizeSettingView 中 接口 OnValueChangeListener 是在哪里實現的,這樣來找到具體的實現和調用地方。
先看類說明:
這里我們看下部分代碼片段截圖:

上面截圖就可以基本確認了,它對應的界面才是 照片設置圖,如下:
onValueInitialized
源代碼如下:
/*** Invoked after setting's all values are initialized.** @param supportedPictureSize Picture sizes which is supported in current platform.*/public void onValueInitialized(List<String> supportedPictureSize) {LogHelper.d(TAG, "[onValueInitialized], supportedPictureSize:" + supportedPictureSize);double fullRatio = PictureSizeHelper.findFullScreenRatio(mActivity);List<Double> desiredAspectRatios = new ArrayList<>();desiredAspectRatios.add(fullRatio);desiredAspectRatios.add(PictureSizeHelper.RATIO_4_3);PictureSizeHelper.setDesiredAspectRatios(desiredAspectRatios);PictureSizeHelper.setFilterParameters(DEGRESSIVE_RATIO, MAX_COUNT);if (sFilterPictureSize) {supportedPictureSize = PictureSizeHelper.filterSizes(supportedPictureSize);LogHelper.d(TAG, "[onValueInitialized], after filter, supportedPictureSize = "+ supportedPictureSize);}if (FILTER_MODE.equals(mModeKey)|| VFB_MODE.equals(mModeKey)|| FB_MODE.equals(mModeKey)) {//for low romif ((VFB_MODE.equals(mModeKey)||FILTER_MODE.equals(mModeKey))&& isLowRam()) {List<String> supportedPictureSizeAfterCheck = new ArrayList<String>();for (String pictureSize : supportedPictureSize) {String[] size = pictureSize.split("x");int width = Integer.parseInt(size[0]);int height = Integer.parseInt(size[1]);if (width < PICTURE_SIZE_9M_WIDTH&& height < PICTURE_SIZE_9M_HEIGHT) {supportedPictureSizeAfterCheck.add(pictureSize);}}supportedPictureSize = supportedPictureSizeAfterCheck;LogHelper.d(TAG, "[onValueInitialized], low ram, after check, " +"supportedPictureSize:"+ supportedPictureSize);} else {List<String> supportedPictureSizeAfterCheck = new ArrayList<String>();for (String pictureSize : supportedPictureSize) {String[] size = pictureSize.split("x");int width = Integer.parseInt(size[0]);int height = Integer.parseInt(size[1]);if (width <= PictureSizeHelper.getMaxTexureSize()&& height <= PictureSizeHelper.getMaxTexureSize()) {supportedPictureSizeAfterCheck.add(pictureSize);}}supportedPictureSize = supportedPictureSizeAfterCheck;LogHelper.d(TAG, "[onValueInitialized], GPU Mode, after check, " +"supportedPictureSize:"+ supportedPictureSize);}}if (HDR_MODE.equals(mModeKey)) {List<String> supportedPictureSizeAfterCheck = new ArrayList<String>();for (String pictureSize : supportedPictureSize) {for (String yuvSize:mYUVsupportedSize){if(pictureSize.equals(yuvSize)){supportedPictureSizeAfterCheck.add(pictureSize);}}}supportedPictureSize=supportedPictureSizeAfterCheck;LogHelper.d(TAG, "[onValueInitialized], PostAlgo Mode, after check, supportedPictureSize:"+ supportedPictureSize);}if (AIBEAUTYPHOTO_MODE.equals(mModeKey)|| AIBOKEHPHOTO_MODE.equals(mModeKey)|| AICOLORPHOTO_MODE.equals(mModeKey)|| AILEGGYPHOTO_MODE.equals(mModeKey)|| AISLIMMINGPHOTO_MODE.equals(mModeKey)) {List<String> supportedPictureSizeAfterCheck = new ArrayList<String>();for (String pictureSize : supportedPictureSize) {String[] size = pictureSize.split("x");int width = Integer.parseInt(size[0]);int height = Integer.parseInt(size[1]);if (width <= PictureSizeHelper.getMaxTexureSize()&& height <= PictureSizeHelper.getMaxTexureSize()) {supportedPictureSizeAfterCheck.add(pictureSize);}}supportedPictureSize = supportedPictureSizeAfterCheck;LogHelper.d(TAG, "[onValueInitialized], mModeKey:" + mModeKey + ",after check, supportedPictureSize:"+ supportedPictureSize);}setSupportedPlatformValues(supportedPictureSize);setSupportedEntryValues(supportedPictureSize);setEntryValues(supportedPictureSize);refreshViewEntry();String valueInStore = mDataStore.getValue(getKey(), null, getStoreScope());if (valueInStore != null&& !supportedPictureSize.contains(valueInStore)) {LogHelper.d(TAG, "[onValueInitialized], value:" + valueInStore+ " isn't supported in current platform");valueInStore = null;mDataStore.setValue(getKey(), null, getStoreScope(), false);}if (valueInStore == null) {// Default picture size is the max full-ratio size.LogHelper.d(TAG, "valueInStore == null Default picture size is the max full-ratio size:");/*List<String> entryValues = getEntryValues();for (String value : entryValues) {if (PictureSizeHelper.getStandardAspectRatio(value) == fullRatio) {valueInStore = value;LogHelper.d(TAG, "valueInStore == null:valueInStore:"+valueInStore);break;}}*/valueInStore =PictureSizeHelper.getCustomDefault(getEntryValues());}// If there is no full screen ratio picture size, use the first value in// entry values as the default value.if (valueInStore == null) {valueInStore = getEntryValues().get(0);LogHelper.d(TAG, "valueInStore:valueInStore:"+valueInStore);}setValue(valueInStore);}
看方法注釋就一目了然了,根據當前平臺設置-初始化圖片大小
/*** Invoked after setting's all values are initialized.** @param supportedPictureSize Picture sizes which is supported in current platform.*/
對于 valueInStore 的具體設置內容和關聯邏輯,這里暫不分析。
總結
- 實現了MTK Android13 平臺下默認圖片大小的邏輯
- 分析了解決問題的思路,源碼分析流程
- 建議對Camera2 相關知識需要一定的了解最好
- 在查看源碼的過程中,難免找不到關鍵字,不知道修改哪里。 可以借助IDE- AS VS 操作,方便定位源碼位置。


:大模型NL2SQL繪制城市之間連線)


詳解與實踐)


