使用 Spring Boot 快速構建企業微信 JS-SDK 權限簽名后端服務
本篇文章將介紹如何使用 Spring Boot 快速構建一個用于支持企業微信 JS-SDK 權限校驗的后端接口,并提供一個簡單的 HTML 頁面進行功能測試。適用于需要在企業微信網頁端使用掃一掃、定位、錄音等接口的場景。
一、項目目標
我們希望實現一個包含以下功能的服務:
- 提供獲取企業微信
access_token的接口 - 提供獲取部門成員信息的接口(需要帶 token)
- 提供 JS-SDK 前端初始化所需簽名參數的接口(
wx.config()配置) - 提供一個前端頁面用于測試掃碼、定位、數據表格展示等功能
二、開發環境與依賴
- JDK 17
- IDEA
- Spring Boot 3.2.5
- Maven 3.x
三、項目結構
DemoAPI
├── pom.xml                       		  // 項目依賴配置
├── src
│   └── main
│       ├── java
│       │   └── org.example
│       │       ├── Main.java             // 項目啟動類
│       │       ├── WeComController.java  // 控制器:處理請求
│       │       └── WeComService.java     // 服務類:處理邏輯
│       └── resources
│           └── static
│               └── index.html            // 測試前端頁面
說明: 本項目未配置 application.yml,Spring Boot 默認即可運行。
四、完整功能實現
第一步:修改 pom.xml,添加 Spring Boot 配置
pom.xml 中我們引入了:
<dependencies><dependency><groupId>org.springframework.boot</groupId><artifactId>spring-boot-starter-web</artifactId></dependency><dependency><groupId>org.springframework.boot</groupId><artifactId>spring-boot-devtools</artifactId><scope>runtime</scope></dependency>
</dependencies>
可能遇到的問題:
- 依賴下載失敗,可通過加速器優化下載速度。
- 注意 Spring Boot 3.x 要使用 JDK 17+。
第二步:刷新依賴
你可以點擊 IntelliJ 右側 “Maven” 工具窗口的刷新按鈕(🔄),或者右鍵 pom.xml → Add as Maven Project,IDE 會自動下載 Spring Boot 依賴。
第三步:修改你的 Main.java,變成 Spring Boot 啟動類
package org.example;import org.springframework.boot.SpringApplication;
import org.springframework.boot.autoconfigure.SpringBootApplication;@SpringBootApplication
public class Main {public static void main(String[] args) {SpringApplication.run(Main.class, args);}
}
問題回顧: 如果你忘記添加 @SpringBootApplication,將導致 ApplicationContext 啟動失敗,同時控制臺可能提示找不到 Web 容器類(如 Tomcat)或無法創建 Controller Bean。解決辦法:確保注解已加。
第四步:創建一個服務類 WeComService.java
提供 access_token 緩存獲取、jsapi_ticket 緩存、JS-SDK 簽名生成邏輯:
String raw = String.format("jsapi_ticket=%s&noncestr=%s×tamp=%d&url=%s",jsapiTicket, nonceStr, timestamp, url);MessageDigest md = MessageDigest.getInstance("SHA-1");
md.update(raw.getBytes(StandardCharsets.UTF_8));
注意:
- 簽名計算必須嚴格按參數順序和格式
access_token和jsapi_ticket建議緩存,避免頻繁請求- 返回格式需包括
appId、timestamp、nonceStr、signature
JS-SDK 參數生成
- 參數組成:
jsapi_ticket、nonceStr、timestamp、url - 算法:
SHA-1(raw字符串)生成簽名 - 返回結構:包含
appId、timestamp、nonceStr、signature
第五步:控制器類 WeComController.java
提供如下接口:
| 接口地址 | 請求方法 | 功能描述 |
|---|---|---|
/wecom/token | GET | 獲取 access_token |
/wecom/department/users | GET | 獲取指定部門的成員列表 |
/wecom/js-sdk-config | GET | 獲取 JS-SDK 初始化配置信息 |
常見問題:
- 若自動注入失敗,請確認
@Service和@RestController注解是否添加 - 如果依賴注入失敗,控制臺會提示
UnsatisfiedDependencyException
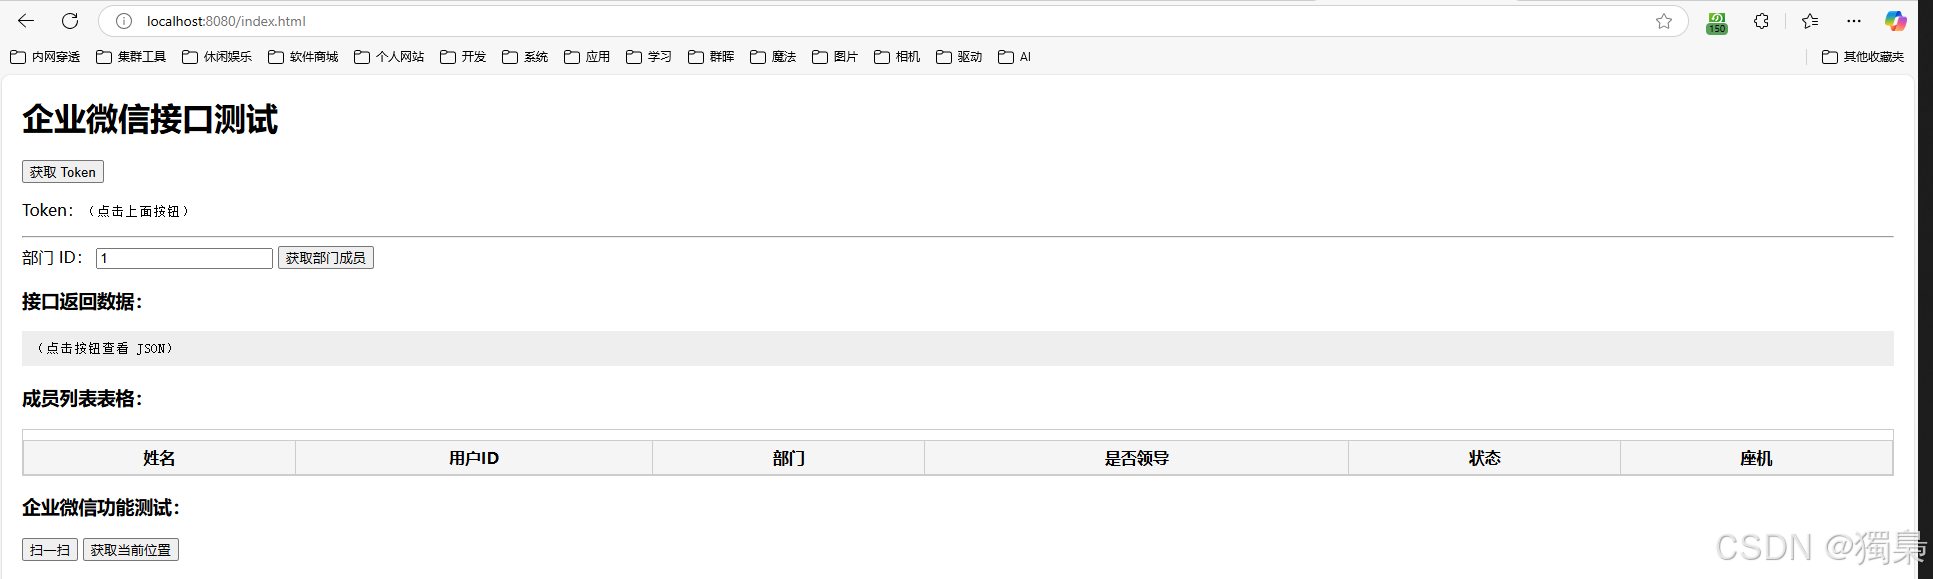
第六步:創建前端測試頁面 index.html
功能:
- 獲取 Token 并展示
- 獲取部門成員并展示表格(含滾動條)
- 初始化 JS SDK,支持掃碼、定位等測試按鈕
wx.config({appId: config.appId,timestamp: config.timestamp,nonceStr: config.nonceStr,signature: config.signature,jsApiList: ["scanQRCode", "getLocation"]
});wx.ready(function() {alert("? 企業微信 JS SDK 初始化成功");
});
失敗處理:
wx.error(function (err) {alert("? SDK 初始化失敗: " + JSON.stringify(err));
});
頁面結構清晰,所有邏輯通過 window.onload 初始化即可。
第七步:運行你的 Spring Boot 應用
在 IntelliJ 中右鍵 Main.java → Run ‘Main’,或點擊綠色的 ? 按鈕。
看到類似:
Tomcat started on port(s): 8080
Started Main in x.xxx seconds
說明服務已成功啟動。
第八步:界面展示
http://localhost:8080/index.html
運行 & 測試(可選)
啟動 Spring Boot 項目后,瀏覽器訪問可訪問下面的接口:
http://localhost:8080/wecom/token
http://localhost:8080/wecom/department/users?id=1
六、常見問題總結
| 問題 | 說明 | 解決辦法 |
|---|---|---|
| SDK 初始化失敗 | 簽名無效、時間戳不一致等 | 保證 URL 不帶 #,參數順序正確 |
| Bean 注入失敗 | 啟動報錯找不到 Controller Bean | 檢查是否缺少 @SpringBootApplication 或 @Service 注解 |
| 依賴無法拉取 | Maven 倉庫連接慢 | 配置阿里云鏡像源,提高穩定性 |
| HTML 無法訪問 | 資源路徑未設置正確 | 放到 resources/static/ 下由 Spring Boot 自動映射 |
? 錯誤核心提示:
APPLICATION FAILED TO STARTWeb application could not be started as there was no
org.springframework.boot.web.servlet.server.ServletWebServerFactory bean defined in the context.
原因解釋:Spring Boot 應用是一個 Web 項目,但 缺少內嵌 Servlet 容器(比如 Tomcat)依賴,也就是沒有 ServletWebServerFactory,Spring Boot 啟動 Web 服務失敗。
最常見的原因:
pom.xml中 缺失或拼錯了spring-boot-starter-web依賴- Maven 沒有下載成功依賴(網絡或倉庫問題)
- 沒有添加
@SpringBootApplication
七、后續可擴展方向
- 接入企業微信身份認證(OAuth2)
- 支持更多 JS API(如錄音、語音識別、打開地圖)
- 使用 Redis 緩存 token,提升性能與健壯性
- 前后端分離,使用 Vue、React 等框架
八、結語
通過本項目我們實現了從零搭建一個企業微信 JS-SDK 權限校驗服務,具備了完整的后端支持和前端測試頁面。如果想正常使用企業微信的掃描等功能需要在企業微信內部訪問,那么就需要設置 IP 白名單、域名、網頁授權及JS-SDK、企業微信授權登錄和應用主頁等。
九、推薦
Maven Central(Maven 中央倉庫 Web 版)
這是最常用、幾乎所有 Java 開發者都會用的網站 —— 一個圖形化的 Maven 中央倉庫檢索平臺:
👉 網站地址:
🌐 https://mvnrepository.com
使用 Spring Initializr 官網 創建項目(圖形化窗口版)
這個網站會自動幫你生成一個可運行的 Spring Boot 項目,并打包成一個 zip 文件。解壓 zip,然后用 IDEA 打開即可。
👉 地址:
🌐 https://start.spring.io
附錄:完整文件(可自行補全代碼)
pom.xml ?
<?xml version="1.0" encoding="UTF-8"?>
<project xmlns="http://maven.apache.org/POM/4.0.0"xmlns:xsi="http://www.w3.org/2001/XMLSchema-instance"xsi:schemaLocation="http://maven.apache.org/POM/4.0.0 http://maven.apache.org/xsd/maven-4.0.0.xsd"><modelVersion>4.0.0</modelVersion><groupId>org.example</groupId><artifactId>DemoAPI</artifactId><version>1.0-SNAPSHOT</version><packaging>jar</packaging><!-- Spring Boot 父項目 --><parent><groupId>org.springframework.boot</groupId><artifactId>spring-boot-starter-parent</artifactId><version>3.2.5</version><relativePath/></parent><properties><maven.compiler.source>17</maven.compiler.source><maven.compiler.target>17</maven.compiler.target><project.build.sourceEncoding>UTF-8</project.build.sourceEncoding></properties><dependencies><!-- Spring Boot Web 模塊(包含內嵌 Tomcat) --><dependency><groupId>org.springframework.boot</groupId><artifactId>spring-boot-starter-web</artifactId></dependency><!-- 開發工具(自動重啟,非必須) --><dependency><groupId>org.springframework.boot</groupId><artifactId>spring-boot-devtools</artifactId><scope>runtime</scope></dependency></dependencies><build><plugins><plugin><groupId>org.springframework.boot</groupId><artifactId>spring-boot-maven-plugin</artifactId></plugin></plugins></build>
</project>
index.html ?
<!DOCTYPE html>
<html lang="zh">
<head><meta charset="UTF-8"><title>企業微信接口測試</title><style>body {font-family: "微軟雅黑", sans-serif;margin: 20px;}table {border-collapse: collapse;width: 100%;margin-top: 10px;}th, td {border: 1px solid #ccc;padding: 6px 12px;text-align: center;}th {background-color: #f5f5f5;}pre {background-color: #eee;padding: 10px;}.scroll-box {max-height: 160px;overflow-y: auto;border: 1px solid #ccc;}</style><!-- 引入企業微信 JS SDK --><script src="https://res.wx.qq.com/open/js/jweixin-1.2.0.js"></script><script>// 初始化企業微信 JS SDKasync function initWeComJsSdk() {const url = window.location.href.split('#')[0];const res = await fetch('/wecom/js-sdk-config?url=' + encodeURIComponent(url));const config = await res.json();wx.config({beta: true,debug: false,appId: config.appId,timestamp: config.timestamp,nonceStr: config.nonceStr,signature: config.signature,jsApiList: ["scanQRCode", "getLocation"]});wx.ready(function () {console.log("企業微信 JS SDK 就緒");alert("? 企業微信 JS SDK 初始化成功!");document.getElementById('scanBtn').onclick = function () {wx.scanQRCode({needResult: 1,scanType: ["qrCode", "barCode"],success: function (res) {alert("掃碼結果:" + res.resultStr);}});};document.getElementById('locBtn').onclick = function () {wx.getLocation({type: 'wgs84',success: function (res) {alert("當前位置:經度 " + res.longitude + ",緯度 " + res.latitude);}});};});wx.error(function (err) {console.error("JS SDK 初始化失敗:", err);alert("? 企業微信 JS SDK 初始化失敗!\n" + JSON.stringify(err));});}async function getToken() {const res = await fetch('/wecom/token');const token = await res.text();document.getElementById('token').innerText = token;}async function getUsers() {const deptId = document.getElementById('dept').value || '1';const res = await fetch(`/wecom/department/users?id=${deptId}`);const json = await res.json();document.getElementById('result').innerText = JSON.stringify(json, null, 2);if (json.userlist) {renderTable(json.userlist);} else {document.getElementById('userTableBody').innerHTML = "<tr><td colspan='6'>無成員數據</td></tr>";}}function renderTable(users) {const tbody = document.getElementById("userTableBody");tbody.innerHTML = "";users.forEach(user => {const row = document.createElement("tr");row.innerHTML = `<td>${user.name}</td><td>${user.userid}</td><td>${(user.department || []).join(',')}</td><td>${user.isleader === 1 ? '是' : '否'}</td><td>${translateStatus(user.status)}</td><td>${user.telephone || ''}</td>`;tbody.appendChild(row);});}function translateStatus(status) {switch (status) {case 1: return "正常";case 2: return "已禁用";case 4: return "未激活";default: return "未知";}}window.onload = function () {initWeComJsSdk();};</script>
</head>
<body><h1>企業微信接口測試</h1><!-- 獲取 Token -->
<button onclick="getToken()">獲取 Token</button>
<p>Token:<code id="token">(點擊上面按鈕)</code></p><!-- 獲取部門成員 -->
<hr>
<label>部門 ID:</label>
<input type="text" id="dept" value="1">
<button onclick="getUsers()">獲取部門成員</button><!-- 顯示返回數據 -->
<h3>接口返回數據:</h3>
<pre id="result">(點擊按鈕查看 JSON)</pre><!-- 成員列表表格 -->
<h3>成員列表表格:</h3>
<div class="scroll-box"><table><thead><tr><th>姓名</th><th>用戶ID</th><th>部門</th><th>是否領導</th><th>狀態</th><th>座機</th></tr></thead><tbody id="userTableBody"></tbody></table>
</div><!-- 企業微信 JS API 按鈕 -->
<h3>企業微信功能測試:</h3>
<button id="scanBtn">掃一掃</button>
<button id="locBtn">獲取當前位置</button></body>
</html>
Main.java ?
package org.example;import org.springframework.boot.SpringApplication;
import org.springframework.boot.autoconfigure.SpringBootApplication;/*** ==================================================* This class ${NAME} is responsible for [功能描述].** @author Darker* @version 1.0* ==================================================*/@SpringBootApplication
public class Main {public static void main(String[] args) {SpringApplication.run(Main.class, args);}
}
WeComService.java ?
package org.example;import org.springframework.stereotype.Service;
import org.springframework.web.client.RestTemplate;
import org.springframework.web.util.UriComponentsBuilder;
import org.springframework.http.ResponseEntity;import java.nio.charset.StandardCharsets;
import java.security.MessageDigest;
import java.util.Formatter;
import java.util.HashMap;
import java.util.Map;
import java.util.UUID;import java.time.Instant;/*** ==================================================* This class WeComService is responsible for [功能描述].** @author Darker* @version 1.0* ==================================================*/@Service
public class WeComService {private static final String CORP_ID = "你的企業微信ID";private static final String SECRET = "你的自建應用的Secret";private static final String TOKEN_URL = "https://qyapi.weixin.qq.com/cgi-bin/gettoken";private String accessToken;private long expireTime = 0;// jsapi_ticket(緩存 2 小時)private String jsapiTicket;private long ticketExpire = 0;public String getAccessToken() {long now = Instant.now().getEpochSecond();if (accessToken != null && now < expireTime) {return accessToken;}// 請求新的 tokenRestTemplate restTemplate = new RestTemplate();UriComponentsBuilder builder = UriComponentsBuilder.fromHttpUrl(TOKEN_URL).queryParam("corpid", CORP_ID).queryParam("corpsecret", SECRET);ResponseEntity<WeComTokenResponse> response = restTemplate.getForEntity(builder.toUriString(), WeComTokenResponse.class);WeComTokenResponse body = response.getBody();if (body != null && body.getAccess_token() != null) {this.accessToken = body.getAccess_token();this.expireTime = now + body.getExpires_in() - 60; // 提前60秒過期return accessToken;}throw new RuntimeException("無法獲取 access_token");}public Map<String, Object> getJsSdkConfig(String url) {String jsapiTicket = getJsApiTicket(); // 用下面方法實現String nonceStr = UUID.randomUUID().toString().replace("-", "");long timestamp = System.currentTimeMillis() / 1000;String raw = String.format("jsapi_ticket=%s&noncestr=%s×tamp=%d&url=%s",jsapiTicket, nonceStr, timestamp, url);String signature;try {MessageDigest md = MessageDigest.getInstance("SHA-1");md.update(raw.getBytes(StandardCharsets.UTF_8));signature = bytesToHex(md.digest());} catch (Exception e) {throw new RuntimeException("簽名失敗", e);}Map<String, Object> result = new HashMap<>();result.put("appId", CORP_ID);result.put("timestamp", timestamp);result.put("nonceStr", nonceStr);result.put("signature", signature);return result;}private String bytesToHex(byte[] bytes) {Formatter formatter = new Formatter();for (byte b : bytes) {formatter.format("%02x", b);}String result = formatter.toString();formatter.close();return result;}public String getJsApiTicket() {long now = System.currentTimeMillis() / 1000;if (jsapiTicket != null && now < ticketExpire) {return jsapiTicket;}String token = getAccessToken();String url = "https://qyapi.weixin.qq.com/cgi-bin/get_jsapi_ticket?access_token=" + token;RestTemplate restTemplate = new RestTemplate();Map<String, Object> res = restTemplate.getForObject(url, Map.class);if (res != null && res.get("ticket") != null) {jsapiTicket = (String) res.get("ticket");ticketExpire = now + ((Integer) res.get("expires_in")) - 60;return jsapiTicket;}throw new RuntimeException("獲取 jsapi_ticket 失敗");}// 內部類用于接收 JSON 響應public static class WeComTokenResponse {private String access_token;private int expires_in;public String getAccess_token() {return access_token;}public void setAccess_token(String access_token) {this.access_token = access_token;}public int getExpires_in() {return expires_in;}public void setExpires_in(int expires_in) {this.expires_in = expires_in;}}
}
WeComController.java ?
package org.example;import org.springframework.beans.factory.annotation.Autowired;
import org.springframework.web.bind.annotation.*;
import org.springframework.web.client.RestTemplate;
import org.springframework.http.ResponseEntity;
import org.springframework.web.util.UriComponentsBuilder;/*** ==================================================* This class WeComController is responsible for [功能描述].** @author Darker* @version 1.0* ==================================================*/@RestController
@RequestMapping("/wecom")
public class WeComController {@Autowiredprivate WeComService weComService;// GET 接口:/wecom/token@GetMapping("/token")public String getToken() {return weComService.getAccessToken();}@GetMapping("/department/users")public Object getDepartmentUsers(@RequestParam("id") String departmentId) {String token = weComService.getAccessToken();String url = "https://qyapi.weixin.qq.com/cgi-bin/user/list";UriComponentsBuilder builder = UriComponentsBuilder.fromHttpUrl(url).queryParam("access_token", token).queryParam("department_id", departmentId);RestTemplate restTemplate = new RestTemplate();ResponseEntity<Object> response = restTemplate.getForEntity(builder.toUriString(), Object.class);return response.getBody();}// GET 接口:/wecom/js-sdk-config?url=xxx@GetMapping("/js-sdk-config")public Object getJsSdkConfig(@RequestParam("url") String url) {return weComService.getJsSdkConfig(url);}
}


的簡單程序)


