🌸個人主頁:https://blog.csdn.net/2301_80050796?spm=1000.2115.3001.5343
🏵?熱門專欄:
🧊 Java基本語法(97平均質量分)https://blog.csdn.net/2301_80050796/category_12615970.html?spm=1001.2014.3001.5482
🍕 Collection與數據結構 (93平均質量分)https://blog.csdn.net/2301_80050796/category_12621348.html?spm=1001.2014.3001.5482
🧀線程與網絡(96平均質量分) https://blog.csdn.net/2301_80050796/category_12643370.html?spm=1001.2014.3001.5482
🍭MySql數據庫(93平均質量分)https://blog.csdn.net/2301_80050796/category_12629890.html?spm=1001.2014.3001.5482
🍬算法(97平均質量分)https://blog.csdn.net/2301_80050796/category_12676091.html?spm=1001.2014.3001.5482
🍃 Spring(97平均質量分)https://blog.csdn.net/2301_80050796/category_12724152.html?spm=1001.2014.3001.5482
🎃Redis(97平均質量分)https://blog.csdn.net/2301_80050796/category_12777129.html?spm=1001.2014.3001.5482
🐰RabbitMQ(97平均質量分) https://blog.csdn.net/2301_80050796/category_12792900.html?spm=1001.2014.3001.5482
感謝點贊與關注~~~

目錄
- 10. 阿里云短信服務
- 11. 阿里云OSS對象存儲
- 12. docker代碼沙箱
- 13. xxl-job定時任務
- 13.1 歷史競賽與完賽的競賽
- 13.2 競賽結束之后發送站內信
- 14. OpenFeign
- 15. TransmittableThreadLocal
- 15.1 技術原理
- 15.2 項目應用
- 16. RabbitMQ異步通信
- 17. 數據庫表設計
- 18. Gateway網關
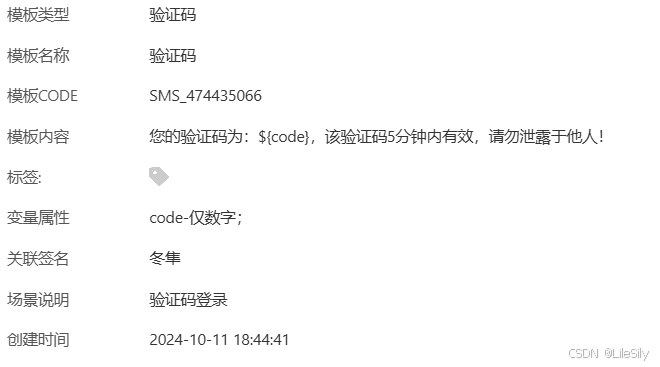
10. 阿里云短信服務
首先我們需要對阿里云的短信服務進行配置,我們需要配置調用發送短信API的必要數據,accessKeyId,accessKeySecret,這連個是每個用戶有且僅有一個,用來拿到阿里云賬號的用戶權限.之后配置的是endpoint,即要發送短信的地域集群(這封短信從那個城市集群發出).
@Configuration
public class AliSmsConfig {@Value("${sms.aliyun.accessKeyId:}")private String accessKeyId;@Value("${sms.aliyun.accessKeySecret:}")private String accessKeySecret;@Value("${sms.aliyun.endpoint:}")private String endpoint;@Bean("aliClient")public Client client() throws Exception {Config config = new Config().setAccessKeyId(accessKeyId).setAccessKeySecret(accessKeySecret).setEndpoint(endpoint);return new Client(config);}
}
我們調用短信服務主要用來發送驗證碼,在發送驗證碼的方法中,我們在SendSmsRequest中定義了要發送的手機號phone,使用的簽名,即在短信頭的中括號中顯示的簽名singName,之后就是我們需要使用的短信模版idtemplateCode,之后就是我們需要往短信中填充的內容,短信的模版中有一些內容是可變的,即${ }中的內容,這個Map中就修改的是這其中的內容.
@Component
@Slf4j
public class AliSmsService {@Autowiredprivate Client aliClient;//業務配置@Value("${sms.aliyun.templateCode:}")private String templateCode;@Value("${sms.aliyun.sing-name:}")private String singName;public boolean sendMobileCode(String phone, String code) {Map<String, String> params = new HashMap<>();params.put("code", code);return sendTempMessage(phone, singName, templateCode, params);}public boolean sendTempMessage(String phone, String singName, String templateCode,Map<String, String> params) {SendSmsRequest sendSmsRequest = new SendSmsRequest();sendSmsRequest.setPhoneNumbers(phone);sendSmsRequest.setSignName(singName);sendSmsRequest.setTemplateCode(templateCode);sendSmsRequest.setTemplateParam(JSON.toJSONString(params));try {SendSmsResponse sendSmsResponse = aliClient.sendSms(sendSmsRequest);SendSmsResponseBody responseBody = sendSmsResponse.getBody();if (!"OK".equalsIgnoreCase(responseBody.getCode())) {log.error("短信{} 發送失敗,失敗原因:{}.... ", JSON.toJSONString(sendSmsRequest), responseBody.getMessage());return false;}return true;}  catch (Exception e) {log.error("短信{} 發送失敗,失敗原因:{}.... ",  JSON.toJSONString(sendSmsRequest), e.getMessage());return false;}}
}
11. 阿里云OSS對象存儲
從OSS配置的屬性中,我們就可以看出OSS對象存儲服務需要的字段,和上面的短信服務一樣,我們仍然需要endpoint城市集群結點URL,用戶唯一的權限校驗id和密鑰accessKeyId和accessKeySecret,其次,我們的配置還需要比短信服務多出了bucketNameOSS對象存儲的存儲空間,即存儲對象的容器.其次就是pathPrefix,表示的是對象在bucket中的存儲路徑.最后是region,表示的是對象存儲的城市服務器集群.我們需要首先在DefaultCredentialProvider把accessKeyId和accessKeySecret兩個屬性配置好.之后配置進OSSClientBuilder即可,之后我們還需要配置endpoint和Region,即城市集群URL和城市集群地域信息.由于OSS對象存儲服務是以數據流的方式對數據進行上上傳的,所以我們在上傳完成之后需要對數據流進行關閉closeOSSClient().
@Slf4j
@Configuration
public class OSSConfig {@Autowiredprivate OSSProperties prop;public OSS ossClient;@Beanpublic OSS ossClient() throws ClientException {DefaultCredentialProvider credentialsProvider = CredentialsProviderFactory.newDefaultCredentialProvider(prop.getAccessKeyId(), prop.getAccessKeySecret());// 創建ClientBuilderConfigurationClientBuilderConfiguration clientBuilderConfiguration = new ClientBuilderConfiguration();clientBuilderConfiguration.setSignatureVersion(SignVersion.V4);// 使用內網endpoint進行上傳ossClient = OSSClientBuilder.create().endpoint(prop.getEndpoint()).credentialsProvider(credentialsProvider).clientConfiguration(clientBuilderConfiguration).region(prop.getRegion()).build();return ossClient;}@PreDestroypublic void closeOSSClient() {ossClient.shutdown();}
}
@Data
@Component
@ConfigurationProperties(prefix = "file.oss")
public class OSSProperties {private String endpoint;private String region;private String accessKeyId;private String accessKeySecret;private String bucketName;private String pathPrefix;
}
我們在配置好屬性之后,我們就可以對外提供一個用于向OSS上傳文件的Service方法了, 在一個c端的用戶想要對頭像進行修改的時候,為了保證某些惡意用戶浪費系統資源,我們對每個用戶單日上傳頭像的此處做了一定的限制,把每個用戶上傳頭像的次數保存在Redis中,在上傳頭像之前先去Redis中查詢當前用戶上傳頭像的次數,如果超過了一定的次數限制,那么直接限制,如果沒有超過,直接對Redis中的當前緩存的Value++.同時在每天的凌晨1點的時候對緩存進行刷新.進行檢查之后,就可以對文件進行上傳了,首先需要指定好文件路徑與文件名,也就是在OSS的bucket中,我們需要把文件上傳到哪個路徑之下,之后我們可以使用InputStream輸入流對文件進行上傳,最后記得在finally方法中關閉輸入流.
public OSSResult uploadFile(MultipartFile file) throws Exception {if (!test) {checkUploadCount();}InputStream inputStream = null;try {String fileName;if (file.getOriginalFilename() != null) {fileName = file.getOriginalFilename().toLowerCase();} else {fileName = "a.png";}String extName = fileName.substring(fileName.lastIndexOf(".") + 1);inputStream = file.getInputStream();return upload(extName, inputStream);} catch (Exception e) {log.error("OSS upload file error", e);throw new ServiceException(ResultCode.FAILED_FILE_UPLOAD);} finally {if (inputStream != null) {inputStream.close();}}
}
private void checkUploadCount() {Long userId = ThreadLocalUtil.get(Constants.USER_ID, Long.class);Long times = redisService.getCacheMapValue(CacheConstants.USER_UPLOAD_TIMES_KEY, String.valueOf(userId), Long.class);if (times != null && times >= maxTime) {throw new ServiceException(ResultCode.FAILED_FILE_UPLOAD_TIME_LIMIT);}redisService.incrementHashValue(CacheConstants.USER_UPLOAD_TIMES_KEY, String.valueOf(userId), 1);if (times == null || times == 0) {long seconds = ChronoUnit.SECONDS.between(LocalDateTime.now(),LocalDateTime.now().plusDays(1).withHour(0).withMinute(0).withSecond(0).withNano(0));redisService.expire(CacheConstants.USER_UPLOAD_TIMES_KEY, seconds, TimeUnit.SECONDS);}
}
12. docker代碼沙箱
在用戶的id和用戶的代碼被提交到java判題功能的時候,首先需要根據用戶提交的代碼進行用戶代碼文件的構建,即createUserCodeFile,就是把用戶提交的代碼和主方法拼接起來,之后使用FileUtil工具類在指定的目錄之下創建一個用戶代碼文件.之后就是初始化代碼沙箱,在初始化代碼沙箱的時候,我們使用的是容器池的技術,即池化技術,避免每一次提交代碼都在創建容器上產生不必要的開銷,直接從容器池中獲取到一個docker容器并啟動docker容器.創建并啟動完成之后,把我們之前創建好的用戶代碼提交到docker容器中進行編譯,如果編譯不通過直接返回編譯錯誤,并刪除之前創建的docker容器和用戶代碼文件避免資源的浪費,如果編譯通過,則把測試用例的輸入帶入到用戶提交的代碼中進行執行并得到返回結果.
@Override
public SandBoxExecuteResult exeJavaCode(Long userId, String userCode, List<String> inputList) {containerId = sandBoxPool.getContainer();//創建用戶代碼文件createUserCodeFile(userCode);//編譯代碼CompileResult compileResult = compileCodeByDocker();//編譯是否通過,如果不通過,直接把容器歸還給容器池,并刪除用戶代碼路徑if (!compileResult.isCompiled()) {sandBoxPool.returnContainer(containerId);deleteUserCodeFile();//返回一個失敗的結果return SandBoxExecuteResult.fail(CodeRunStatus.COMPILE_FAILED, compileResult.getExeMessage());}//如果編譯通過,則執行代碼return executeJavaCodeByDocker(inputList);
}
//創建并返回用戶代碼的文件
private void createUserCodeFile(Long userId, String userCode) {//創建存放用戶代碼的目錄String examCodeDir = System.getProperty("user.dir") + File.separator + JudgeConstants.EXAM_CODE_DIR;if (!FileUtil.exist(examCodeDir)) {FileUtil.mkdir(examCodeDir);}String time = LocalDateTimeUtil.format(LocalDateTime.now(), DateTimeFormatter.ofPattern("yyyyMMddHHmmss"));//拼接用戶代碼文件格式userCodeDir = examCodeDir + File.separator + userId + Constant.UNDERLINE_SEPARATOR + time;userCodeFileName = userCodeDir + File.separator + JudgeConstants.USER_CODE_JAVA_CLASS_NAME;FileUtil.writeString(userCode, userCodeFileName, Constant.UTF8);
}
在創建一個docker容器的時候,需要對當前的docker容器進行配置,首先就是創建DefaultDockerClientConfig配置類,采用其中的createDefaultConfigBuilder()docker默認配置即可,之后為配置類指定要創建在哪個端口上,即withDockerHost.創建好配置類之后,使用DockerClientBuilder為我們需要創建的docker容器指定配置.之后拉取鏡像.之后為當前容器指定其他的一些核心配置,比如限制最大內存,限制內存最大交換次數,限制cpu可以使用的核心,禁用網絡等.之后為我們要創建的容器指定一個名稱,之后就可以為容器傳入配置正式創建容器,拿到創建好的容器id就可以正式啟動容器了.
private void initDockerSanBox(){//創建一個docker客戶端配置,采用默認配置,并設置端口號DefaultDockerClientConfig clientConfig = DefaultDockerClientConfig.createDefaultConfigBuilder().withDockerHost(dockerHost).build();//構建docker容器dockerClient = DockerClientBuilder.getInstance(clientConfig) //傳入docker配置.withDockerCmdExecFactory(new NettyDockerCmdExecFactory()).build();//拉取鏡像pullJavaEnvImage();//獲取到容器的配置HostConfig hostConfig = getHostConfig();//創建容器并指定容器的名稱CreateContainerCmd containerCmd = dockerClient.createContainerCmd(JudgeConstants.JAVA_ENV_IMAGE).withName(JudgeConstants.JAVA_CONTAINER_NAME);//配置容器參數CreateContainerResponse createContainerResponse = containerCmd.withHostConfig(hostConfig)//使用之前獲取到的配置.withAttachStderr(true).withAttachStdout(true).withTty(true).exec();//記錄容器idcontainerId = createContainerResponse.getId();//啟動容器dockerClient.startContainerCmd(containerId).exec();
}
private HostConfig getHostConfig() {HostConfig hostConfig = new HostConfig();//設置掛載目錄,指定用戶代碼路徑,這是為了讓容器可以訪問用戶代碼,同時限制容器只能訪問這個特定目錄hostConfig.setBinds(new Bind(userCodeDir, new Volume(JudgeConstants.DOCKER_USER_CODE_DIR)));//限制docker容器使用資源//限制內存資源hostConfig.withMemory(memoryLimit);//限制最大內存hostConfig.withMemorySwap(memorySwapLimit);//限制內存最大交換次數hostConfig.withCpuCount(cpuLimit);//限制cpu可以使用的核心hostConfig.withNetworkMode("none"); //禁用網絡hostConfig.withReadonlyRootfs(true); //禁止在root目錄寫文件return hostConfig;
}
docker容器池的創建其實和線程池的原理差不多,都是一種池化技術,首先我們在構造方法中指定該docker容器池的配置,包括容器客戶端,代碼沙箱鏡像,掛載目錄,最大內存限制,最大內存交換次數限制,使用的最大的cpu核心數,容器池中的最大容器數量,容器前綴名,歸還與獲取容器的阻塞隊列,initDockerPool就是使用我們前面提到的創建容器的方法,為當前容器池中創建容器.getContainer方法是從docker容器池的阻塞隊列中獲取到docker容器,returnContainer是把docker容器歸還到阻塞隊列中.
/*** 實現容器池,避免因為創建容器而產生的開銷*/
@Slf4j
public class DockerSandBoxPool {private DockerClient dockerClient;//容器客戶端private String sandboxImage;//代碼沙箱鏡像private String volumeDir;//掛載目錄,與宿主機中的目錄進行關聯private Long memoryLimit;//最大內存限制private Long memorySwapLimit;//最大內存交換次數限制private Long cpuLimit;//使用的最大的cpu核心數private int poolSize;//容器池中的最大容器數量private String containerNamePrefix;//容器前綴名private BlockingQueue<String> containerQueue;//歸還與獲取容器的阻塞隊列private Map<String, String> containerNameMap;public DockerSandBoxPool(DockerClient dockerClient,String sandboxImage,String volumeDir, Long memoryLimit,Long memorySwapLimit, Long cpuLimit,int poolSize, String containerNamePrefix) {this.dockerClient = dockerClient;this.sandboxImage = sandboxImage;this.volumeDir = volumeDir;this.memoryLimit = memoryLimit;this.memorySwapLimit = memorySwapLimit;this.cpuLimit = cpuLimit;this.poolSize = poolSize;this.containerQueue = new ArrayBlockingQueue<>(poolSize);this.containerNamePrefix = containerNamePrefix;this.containerNameMap = new HashMap<>();}public void initDockerPool() {log.info("------  創建容器開始  -----");for(int i = 0; i < poolSize; i++) {createContainer(containerNamePrefix + "-" + i);}log.info("------  創建容器結束  -----");}public String getContainer() {try {return containerQueue.take();} catch (InterruptedException e) {throw new RuntimeException(e);}}public void returnContainer(String containerId) {containerQueue.add(containerId);}
13. xxl-job定時任務
13.1 歷史競賽與完賽的競賽
在每天的凌晨一點,都需要對競賽的列表進行刷新,我們需要先從數據庫中查詢到結束時間早于當前時間的競賽和晚于當前時間的競賽,由于c端用戶獲取到競賽列表的時候是首先從Redis中拿到的,所以我們需要對緩存中的競賽列表進行刷新,即refreshCache(unFinishList, CacheConstants.EXAM_UNFINISHED_LIST);和refreshCache(historyList, CacheConstants.EXAM_HISTORY_LIST);.
@XxlJob("examListOrganizeHandler")
public void examListOrganizeHandler() {log.info("*** examListOrganizeHandler ***");List<Exam> unFinishList = examMapper.selectList(new LambdaQueryWrapper<Exam>().select(Exam::getExamId, Exam::getTitle, Exam::getStartTime, Exam::getEndTime).gt(Exam::getEndTime, LocalDateTime.now()).eq(Exam::getStatus, Constants.TRUE).orderByDesc(Exam::getCreateTime));refreshCache(unFinishList, CacheConstants.EXAM_UNFINISHED_LIST);List<Exam> historyList = examMapper.selectList(new LambdaQueryWrapper<Exam>().select(Exam::getExamId, Exam::getTitle, Exam::getStartTime, Exam::getEndTime).le(Exam::getEndTime, LocalDateTime.now()).eq(Exam::getStatus, Constants.TRUE).orderByDesc(Exam::getCreateTime));refreshCache(historyList, CacheConstants.EXAM_HISTORY_LIST);log.info("*** examListOrganizeHandler 統計結束 ***");
}
13.2 競賽結束之后發送站內信
還是在每天的固定時間,從數據庫中查詢當天結束的競賽,針對參加這些競賽的用戶創建站內信,通知用戶競賽結束并公布排名.
@XxlJob("examResultHandler")
public void examResultHandler() {LocalDateTime now = LocalDateTime.now();LocalDateTime minusDateTime = now.minusDays(1);//從當前時間中減去一天List<Exam> examList = examMapper.selectList(new LambdaQueryWrapper<Exam>().select(Exam::getExamId, Exam::getTitle).eq(Exam::getStatus, Constants.TRUE).ge(Exam::getEndTime, minusDateTime)// 結束時間 >= minusDateTime(前一天).le(Exam::getEndTime, now));// 結束時間 <= now(當前時間)if (CollectionUtil.isEmpty(examList)) {return;}Set<Long> examIdSet = examList.stream().map(Exam::getExamId).collect(Collectors.toSet());List<UserScore> userScoreList = userSubmitMapper.selectUserScoreList(examIdSet);Map<Long, List<UserScore>> userScoreMap = userScoreList.stream().collect(Collectors.groupingBy(UserScore::getExamId));createMessage(examList, userScoreMap);
}
14. OpenFeign
用戶在c端調用Submit接口提交代碼的時候,由于判題服務和代碼提交服務是在兩個不同的服務當中,需要通過OpenFeign的方式來把friend服務構造好的JudgeSubmitDTO參數(其中包含用戶提交的代碼)提交到判題服務中,由代碼沙箱進行代碼運行之后,得到判題的結果.
@FeignClient(contextId = "RemoteJudgeService",value = Constant.JUDGE_SERVICE)
public interface RemoteJudgeService {@PostMapping("/judge/doJudgeJavaCode")R<UserQuestionResultVO> doJudgeJavaCode(@RequestBody JudgeSubmitDTO judgeSubmitDTO);
}
15. TransmittableThreadLocal
15.1 技術原理
見線程與網絡專欄"線程池,定時器,ThreadLocal".需要注意的一點是,之所以在當前項目中不直接使用ThreadLocal,是因為,ThreadLocal在一些場景下會出現問題,比如在線程池進行線程復用的時候會出現上下文污染,上一個線程中的信息回被下一個線程讀取到,在消息異步處理的時候可能會導致子線程無法拿到在父線程中設置的信息.
15.2 項目應用
由于我們在某些時候需要在程序中用到當前用戶的信息,所以我們需要在ThreadLocal中設置當前用戶的userId以及userKey,但是需要注意的是,我們不可以在網關的服務中對ThreadLocal的信息進行設置,因為網關屬于一個單獨的服務,與其他的服務屬于不同的進程,在網關設置的信息無法在其他的服務拿到,所以我們需要在攔截器中對其進行設置.攔截器與網關不同,只要那個服務調用了攔截器,當前攔截器就屬于這個服務.
@Override
public boolean preHandle(HttpServletRequest request, HttpServletResponse response, Object handler) throws Exception {String token = getToken(request);  //請求頭中獲取tokenif (StrUtil.isEmpty(token)) {return true;}Claims claims = tokenService.getClaims(token, secret);Long userId = tokenService.getUserId(claims);String userKey = tokenService.getUserKey(claims);ThreadLocalUtil.set(Constants.USER_ID, userId);ThreadLocalUtil.set(Constants.USER_KEY, userKey);tokenService.extendToken(claims);return true;
}
16. RabbitMQ異步通信
在提交用戶代碼的時候,我們除了使用OpenFeign,最優的方案還是使用RabbitMQ進行異步通信.
還是在提交功能和判題功能的交互中,可能同時會有很多用戶提交代碼,而且判題功能邏輯較為復雜,這時候我們就需要用到消息隊列來對消息進行削峰處理和異步處理,保證消息準確從提交功能到達判題功能.
在提交功能中,我們把構造好的JudgeSubmitDTO提交到消息隊列中.
@Override
public boolean rabbitSubmit(UserSubmitDTO submitDTO) {Integer programType = submitDTO.getProgramType();if (ProgramType.JAVA.getValue().equals(programType)) {//按照java邏輯處理JudgeSubmitDTO judgeSubmitDTO = assembleJudgeSubmitDTO(submitDTO);judgeProducer.produceMsg(judgeSubmitDTO);return true;}throw new ServiceException(ResultCode.FAILED_NOT_SUPPORT_PROGRAM);
}
在判題功能中,我們設置一個Listener對消息進行監聽,確保判題服務可以拿到JudgeSubmitDTO.
@Slf4j
@Component
public class JudgeConsumer {@Autowiredprivate IJudgeService judgeService;@RabbitListener(queues = RabbitMQConstants.OJ_WORK_QUEUE)public void consume(JudgeSubmitDTO judgeSubmitDTO) {log.info("收到消息為: {}", judgeSubmitDTO);judgeService.doJudgeJavaCode(judgeSubmitDTO);}
}
但是這里有一個問題,由于我們是通過消息隊列來把代碼提交給另一個服務的,所以我們無法從判題服務中把判題的結果再次返回到friend服務中,所以我們只能在數據庫中再維護一張表tb_user_submit用來保存判題的結果,在判題服務中,我們把判題的結果保存到表中,在friend服務中,從數據庫中獲取到判題的結果即可.
private void saveUserSubmit(JudgeSubmitDTO judgeSubmitDTO, UserQuestionResultVO userQuestionResultVO) {UserSubmit userSubmit = new UserSubmit();BeanUtil.copyProperties(userQuestionResultVO, userSubmit);userSubmit.setUserId(judgeSubmitDTO.getUserId());userSubmit.setQuestionId(judgeSubmitDTO.getQuestionId());userSubmit.setExamId(judgeSubmitDTO.getExamId());userSubmit.setProgramType(judgeSubmitDTO.getProgramType());userSubmit.setUserCode(judgeSubmitDTO.getUserCode());userSubmit.setCaseJudgeRes(JSON.toJSONString(userQuestionResultVO.getUserExeResultList()));userSubmit.setCreateBy(judgeSubmitDTO.getUserId());userSubmitMapper.delete(new LambdaQueryWrapper<UserSubmit>().eq(UserSubmit::getUserId, judgeSubmitDTO.getUserId()).eq(UserSubmit::getQuestionId, judgeSubmitDTO.getQuestionId()).isNull(judgeSubmitDTO.getExamId() == null, UserSubmit::getExamId).eq(judgeSubmitDTO.getExamId() != null, UserSubmit::getExamId, judgeSubmitDTO.getExamId()));userSubmitMapper.insert(userSubmit);
}
@Override
public UserQuestionResultVO exeResult(Long examId, Long questionId, String currentTime) {Long userId = ThreadLocalUtil.get(Constants.USER_ID, Long.class);UserSubmit userSubmit = userSubmitMapper.selectCurrentUserSubmit(userId, examId, questionId, currentTime);UserQuestionResultVO resultVO = new UserQuestionResultVO();if (userSubmit == null) {resultVO.setPass(QuestionResType.IN_JUDGE.getValue());} else {resultVO.setPass(userSubmit.getPass());resultVO.setExeMessage(userSubmit.getExeMessage());if (StrUtil.isNotEmpty(userSubmit.getCaseJudgeRes())) {resultVO.setUserExeResultList(JSON.parseArray(userSubmit.getCaseJudgeRes(), UserExeResult.class));}}return resultVO;
}
17. 數據庫表設計
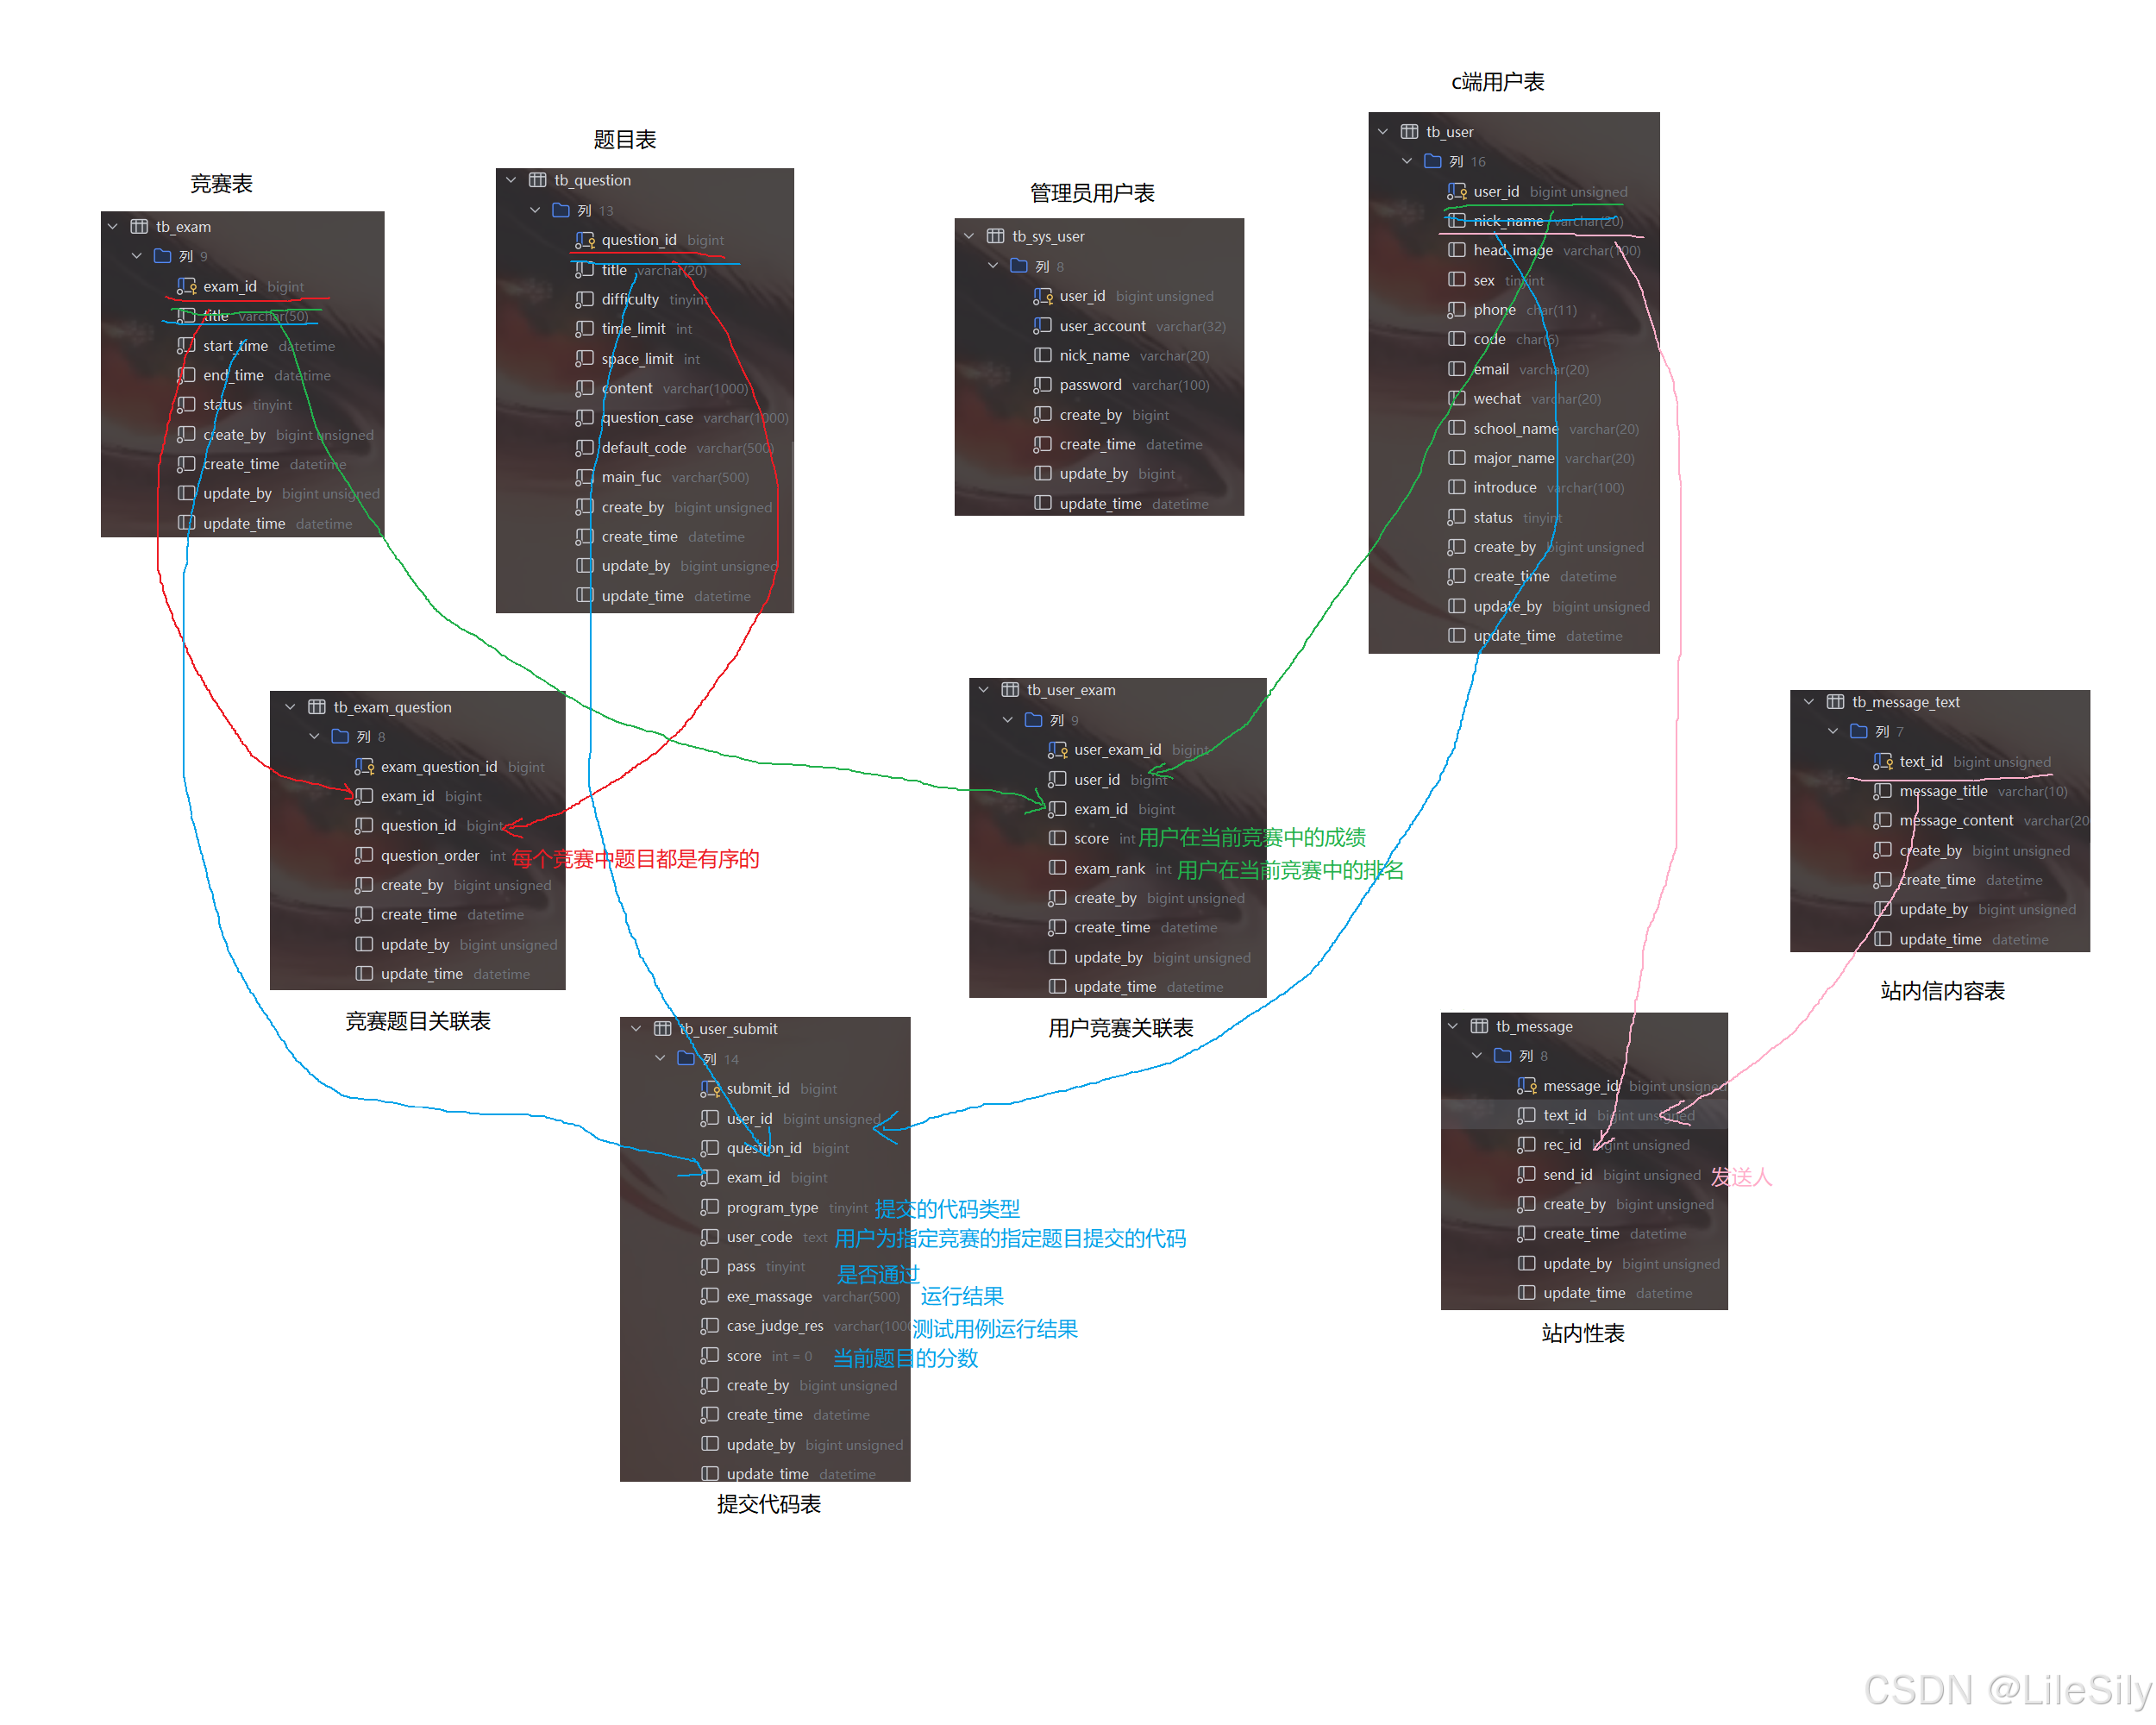
我們在涉及站內信的數據庫表設計的時候,我們設計的是分開兩張表的方式,之所以我們需要這樣設計,是因為我們向不同的用戶發送的消息可能是相同的,如果全部存在一張表中,會浪費很大的空間,所以我們選擇把消息內容和發送人接收人內容分開存儲.
18. Gateway網關
網關主要是對用戶的權限做一些校驗,我們采用了自定義過濾器的方式,其中自定義過濾器類中實現了GlobalFilter接口,證明是全局過濾器,會應用到所有路由請求上,實現Order用于指定過濾器的優先級.想要從網絡請求中獲取到相關的請求信息,首先我們需要從ServerWebExchange獲取到網絡請求.
ServerHttpRequest request = exchange.getRequest();
當然我們有一些接口是不需要經過網關權限驗證的,比如用戶登錄功能,用戶注冊功能,游客可瀏覽頁面,我們可以配置一個白名單,對白名單中的值不進行權限校驗.繼續執行下一個過濾器.由于網關中只有這一個自定義過濾器,所以相當于直接進入了后端服務中.
其中,白名單類IgnoreWhiteProperties中,我們使用@RefreshScope熱更新,當Nacos中的配置更新之后,不需要重新讀取配置,會立即進行配置更新,使用@ConfigurationProperties注解從配置文件中直接讀取配置相關信息,對類中的屬性進行注入.無需使用@Value注入.其中private List<String> whites = new ArrayList<>();中存放的就是從Nacos中讀取出來的白名單路由信息.
@Autowired
private IgnoreWhiteProperties ignoreWhite;
// 跳過不需要驗證的路徑(白名單中的路徑,比如登錄功能)
if (matches(url, ignoreWhite.getWhites())) {return chain.filter(exchange);
}@Configuration
@RefreshScope //配置熱更新,無需刷新,配置更新之后自動更新
@ConfigurationProperties(prefix = "security.ignore")//在配置文件中找到security.ignore,為響應屬性注入值
public class IgnoreWhiteProperties {/*** 放行白名單配置,網關不校驗此處的白名單,比如登錄接口*/private List<String> whites = new ArrayList<>();public List<String> getWhites() {return whites;}public void setWhites(List<String> whites) {this.whites = whites;}
}
我們在if條件中使用match函數對請求的路徑進行校驗,ignoreWhite.getWhites()是我們從Nacos中獲取到的白名單配置,如果url中符合白名單中的通配符表達式,那么就返回一個true,證明這個URL無需進行校驗.其中AntPathMatcher.match方法就是專門用來做通配符校驗的.
private boolean matches(String url, List<String> patternList) {if (StrUtil.isEmpty(url) || patternList.isEmpty()) {return false;}for (String pattern : patternList) {if (isMatch(pattern, url)) {return true;}}return false;
}
private boolean isMatch(String pattern, String url) {AntPathMatcher matcher = new AntPathMatcher();return matcher.match(pattern, url);
}
由于我們的用戶token是保存在header中的,所以我們需要從header中獲取到用戶的token信息.由于Header中是一些key-value形式的信息,其中HttpConstants.AUTHENTICATION是我們在header中保存用戶token的key,拿著這個key,就可以獲取到value,即用戶令牌.*由于OAuth 2.0和JWT規范,Authorization頭的Token通常以Bearer開頭,所以如果字符串中有Bearer前綴,我們需要把這個前綴去掉,獲取到純凈的token信息.
//從http請求頭中獲取token
String token = getToken(request);
if (StrUtil.isEmpty(token)) {return unauthorizedResponse(exchange, "令牌不能為空");
}
/*** 從請求頭中獲取請求token*/
private String getToken(ServerHttpRequest request) {String token =request.getHeaders().getFirst(HttpConstants.AUTHENTICATION);// 如果前端設置了令牌前綴,則裁剪掉前綴if (StrUtil.isNotEmpty(token) &&token.startsWith(HttpConstants.PREFIX)) {token = token.replaceFirst(HttpConstants.PREFIX, StrUtil.EMPTY);}return token;
}
之后我們就可以從獲取到的token信息中解析用戶詳細信息.其中我們需要傳入我們在Nacos中配置好的簽名密鑰.
在解析JWT的方法中.我們傳入用戶令牌和簽名密鑰,我們就可以拿到Body信息.即用戶信息.如果沒有解析出用戶的詳細信息,即if (claims == null),我們就判斷用戶傳入的令牌不正確或者已經過期.
判斷令牌不正確之后,我們就需要給前端返回一個錯誤信息,其中webFluxResponseWriter方法封裝一個JSON類型的響應數據,其中包括設置http請求的狀態碼,設置header,設置返回結果,并通過response.writeWith封裝進入Mono(異步的、零或一個結果的流式數據)異步返回.
Claims claims;
try {claims = JWTUtils.parseToken(token, secret); //獲取令牌中信息 解析payload中信息if (claims == null) {return unauthorizedResponse(exchange, "令牌已過期或驗證不正確!");}
} catch (Exception e) {return unauthorizedResponse(exchange, "令牌已過期或驗證不正確!");
}
public static Claims parseToken(String token, String secret) {return Jwts.parser().setSigningKey(secret).parseClaimsJws(token).getBody();
}
private Mono<Void> unauthorizedResponse(ServerWebExchange exchange, Stringmsg) {log.error("[鑒權異常處理]請求路徑:{}", exchange.getRequest().getPath());return webFluxResponseWriter(exchange.getResponse(), msg,ResultCode.FAILED_UNAUTHORIZED.getCode());
}
//拼裝webflux模型響應
private Mono<Void> webFluxResponseWriter(ServerHttpResponse response,String msg, int code) {response.setStatusCode(HttpStatus.OK);//設置http響應的狀態碼response.getHeaders().add(HttpHeaders.CONTENT_TYPE,MediaType.APPLICATION_JSON_VALUE);//設置headerR<?> result = R.fail(code, msg);DataBuffer dataBuffer =response.bufferFactory().wrap(JSON.toJSONString(result).getBytes());return response.writeWith(Mono.just(dataBuffer));//異步返回result
}
之后我們就可以從解析出的用戶信息Claims中獲取到UserKey,之后從redis查詢當前的userKey是否存在,如果不存在,則證明登錄狀態已經過期.和上面一樣,校驗不同過之后,我們就構造一個http響應數據(JSON響應數據),使用Mono進行異步返回.
String userKey = JWTUtils.getUserKey(claims); //獲取jwt中的key
boolean isLogin = redisService.hasKey(getTokenKey(userKey));//判斷Redis中是否還存在當前用戶的UserKey
if (!isLogin) {return unauthorizedResponse(exchange, "登錄狀態已過期");
}
之后需要校驗Claim數據的完整性,確保userId也存在,方便我們進行之后的操作.
String userId = JWTUtils.getUserId(claims); //判斷jwt中的信息是否完整
if (StrUtil.isEmpty(userId)) {return unauthorizedResponse(exchange, "令牌驗證失敗");
}
如果進行了上面的校驗之后,均沒有返回錯誤信息,則證明redis中的token信息是正確的,我們就根據UserKey把用戶信息從redis中拿出來(即拿出UserKey的value信息),之后我們需要對當前用戶的身份進行校驗,看看當前用戶是管理員還是普通用戶,如果身份對不上,還是和上面一樣,通過Mono異步方式返回錯誤信息.
具體的校驗方式,是首先拿到我們之前的從ServerWebExchange獲取到的URL信息,看看URL中包含/system還是/friend,如果是/system,則只有管理員才可以訪問,如果是/friend,只有普通用戶才可以訪問,我們可以從redis中獲取到的用戶信息中獲取到用戶的身份信息,以此來作比較.
LoginUser user = redisService.getCacheObject(getTokenKey(userKey),LoginUser.class);//把該用戶的身份信息從Redis中拿出來
if (url.contains(HttpConstants.SYSTEM_URL_PREFIX) &&!UserIdentity.ADMIN.getValue().equals(user.getIdentity())) {//如果獲取URL中的前綴發現是system前綴,但是當前用戶的身份不是管理員return unauthorizedResponse(exchange, "令牌驗證失敗");
}
if (url.contains(HttpConstants.FRIEND_URL_PREFIX) &&!UserIdentity.ORDINARY.getValue().equals(user.getIdentity())) {//從URL中獲取前綴發現是friend,但是當前用戶不是普通用戶return unauthorizedResponse(exchange, "令牌驗證失敗");
}
最后進行返回,把當前請求交給下一個過濾器.
return chain.filter(exchange);


】dataset 工具,Parquet和Arrow 數據文件格式,load dataset 方法)


)
)
