GUI簡介
我們前面實現的都是基于控制臺的程序,程序和用戶的交互通過控制臺來完成
本章,我們來學習GUI圖形用戶界面編程,我們可以通過python提供的豐富的組件,快速的視線使用圖形界面和用戶交互
GUI變成類似于“搭積木”,將一個個組件(widget)放到窗口中。windows中的畫圖軟件,就是一個典型的GUI程序:
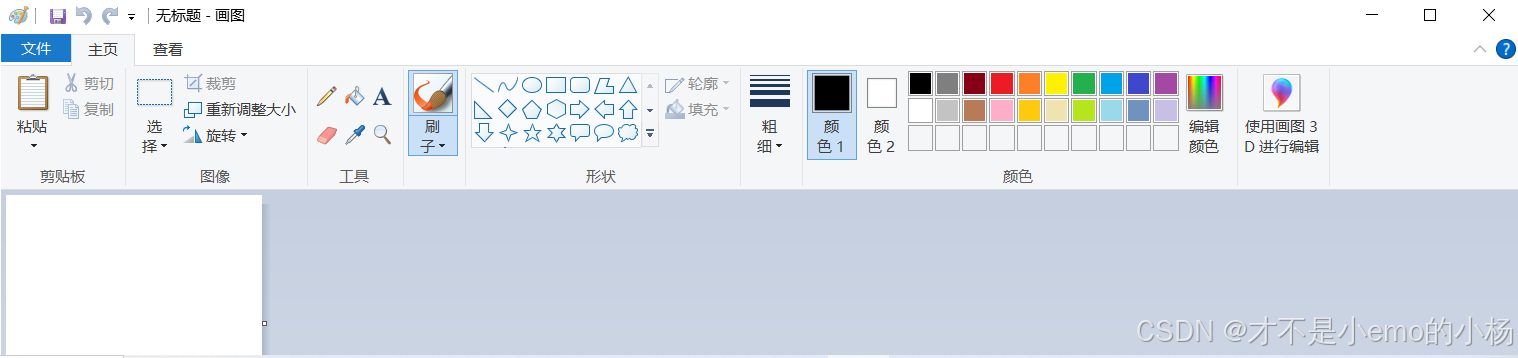
上面的各種按鈕、菜單、編輯區域等都是一個個組件,它們都防止到窗口中,并通過增加“對時間的處理”稱為一個完整的程序。
常用的GUI庫
- Tkinter
tkinter是Python的標準GUI庫,支持跨平臺的GUI程序開發,主要一tkinter為核心進行講解 - wxPython
wxPyhton是比較流行的GUI庫,適合大型應用程序開發,功能強于tkinter,整體設計框架類似于MFC - PyQT
Qt是一種開源的GUI庫,適合大型GUI程序開發,PyQT是Qt工具包標準的Python實現。我們也可以使用Qt Desginer界面設計器快速開發GUI應用程序
tkinter模塊
本章設計大量的API講解。學習API最好的來源就是官方提供的文檔:tkinter官方網站:
Graphical User Interfaces with Tk — Python 3.7.17 documentation或者:https://effbot.org/tkinternook/
基于tkinter模塊創建GUI程序包含如下4個核心步驟:
1.創建應用程序主窗口對象
????????(1)通過類Tk的無參數構造函數
from tkinter import *root=Tk()2.在主窗口中,添加各種可視化組件,比如:按鈕(Button)、文本框(Label)等
btn01=Button(root)
btn01["text"]="點我就送花"
3.通過幾何布局管理器,管理組件的大小和位置
btn01.pack()
4.事件處理
(1)通過綁定事件處理程序,響應用戶操作所觸發的時間(比如:單擊、雙擊等)
def songhua(e):messagebox.showinfo("Message", "送你一朵玫瑰花,請你愛上我")print("送你99多玫瑰花")btn01.bind("<Button-1>", songhua())
總代碼
from tkinter import *
from tkinter import messageboxroot = Tk()btn01 = Button(root)
btn01["text"] = "點我就送花"btn01.pack()def songhua(e):  # e就是事件對象messagebox.showinfo("Message", "送你一朵花")print("送你999多玫瑰花")btn01.bind("<Button-1>", songhua)root.mainloop()  # 調用組件的mainloop()方法,進入時間循環
主窗口大小和位置
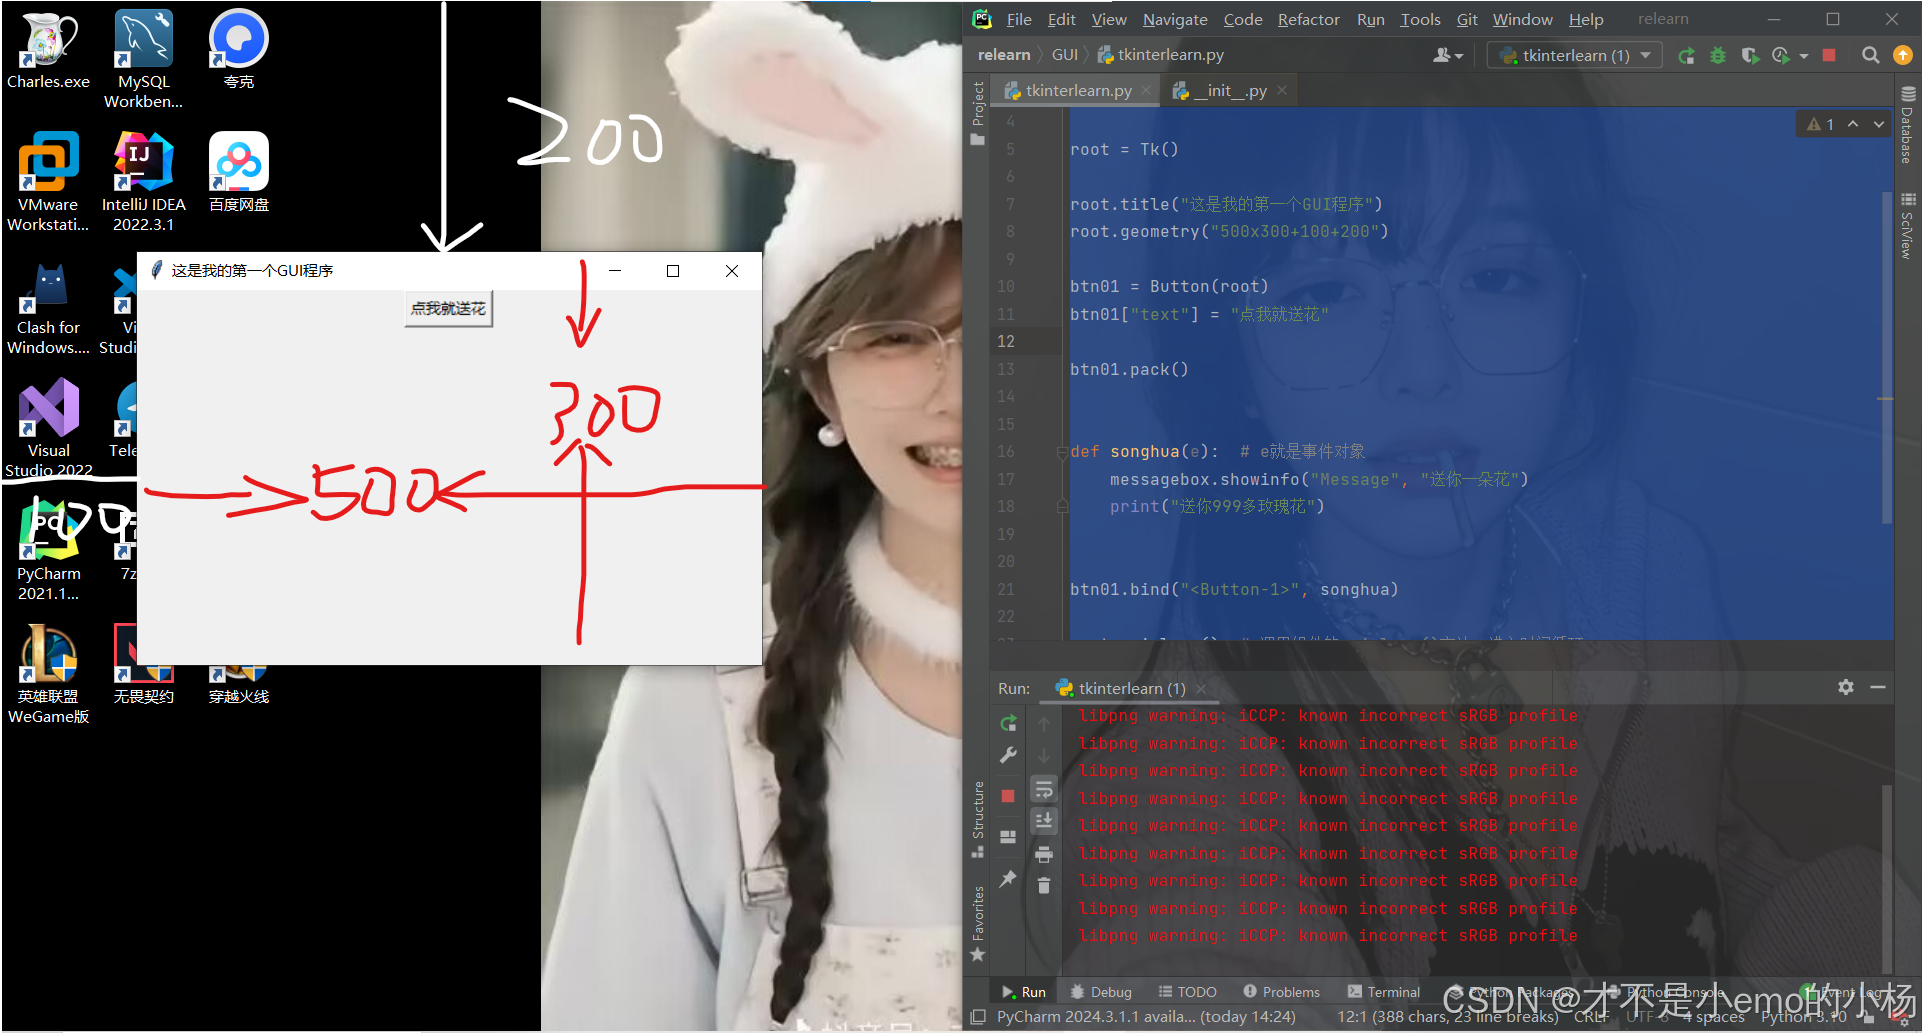
通過geometry('w x h+-x+-y')進行設置。w為寬度,h為高度。+x表示距屏幕左邊的距離;-x表示距屏幕右邊的距離;+y表示距屏幕上邊的距離;-y表示距屏幕下邊的距離。
【測試】測試tkinter主窗口位置和大小的設置
# -*- coding: utf-8 -*-
from tkinter import *
from tkinter import messageboxroot = Tk()root.title("這是我的第一個GUI程序")
root.geometry("500x300+100+200")btn01 = Button(root)
btn01["text"] = "點我就送花"btn01.pack()def songhua(e):  # e就是事件對象messagebox.showinfo("Message", "送你一朵花")print("送你999多玫瑰花")btn01.bind("<Button-1>", songhua)root.mainloop()  # 調用組件的mainloop()方法,進入時間循環
GUI編程整體描述
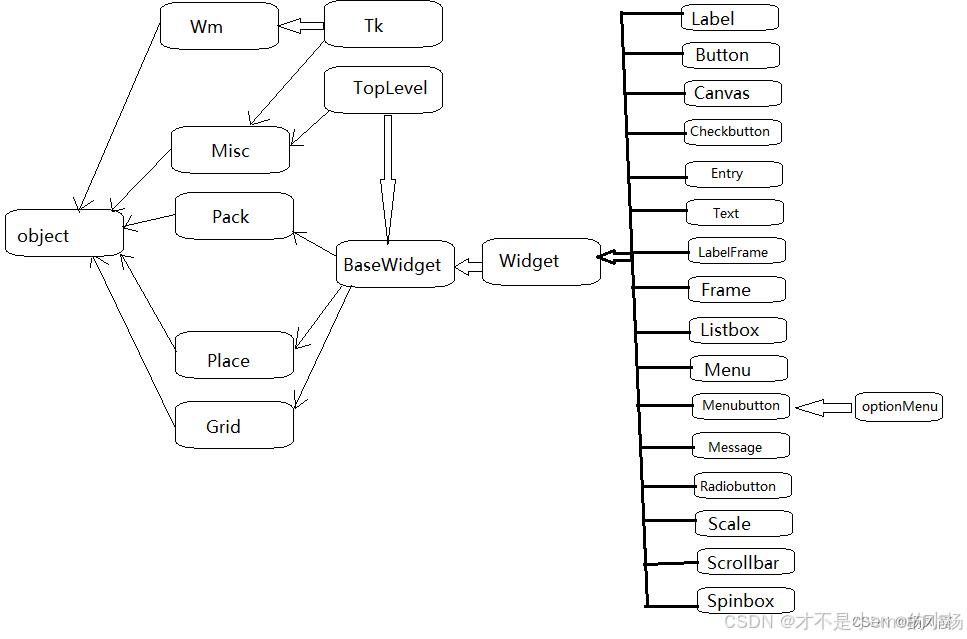
圖形用戶界面是由一個個組件組成,就像小孩“搭積木”一樣最終組成整個界面。有的組件還能再里面再放置其他組件,我們稱為“容器”。Tkinter的GUI組件關系圖如下:
GUI應用程序類的經典寫法
本節程序也是GUI應用程序編寫的惡一個主要結構,采用了面向對象的方式,更加合理的組織代碼。
通過類Application組織整個GUI程序,類Application繼承了Frame及通過繼承擁有了父類的特性。通過構造函數__init__()初始化窗口中的對象,通過createWidfets()方法創建窗口中的對象。
Frame框架式一個tkinter組件,表示一個矩形的區域。Frame一般作為容器使用,可以放置其他組件,從而實現復雜的布局。
# -*- coding: utf-8 -*-
"""測試一個經典的GUI程序寫法,使用面向對象的方式"""
from tkinter import *
from tkinter import messageboxclass Application(Frame):"""一個經典的GUI程序的類的寫法"""def __init__(self, master=None):super().__init__(master)  # super()代表的是父類的定義,而不是父類對象self.master = master  # 傳入root作為繼承self.pack()  # 是用來將一個組件(如按鈕、標簽、框架等)添加到其父容器中的一種布局管理方法。self.createWiget()  # 調用創建組件方法def createWiget(self):"""創建組件"""self.btn01 = Button(self.master)self.btn01["text"] = "點擊送花"self.btn01.pack()self.btn01["command"] = self.songhua# 創建一個退出按鈕self.btnQuit = Button(self.master, text="退出", command=root.destroy)self.btnQuit.pack()def songhua(self):messagebox.showinfo("送花", "送你99多玫瑰花")if __name__ == '__main__':"""Application 類實例化時,將 master 參數設為 root,這意味著 Application 的所有組件(在 Frame 中創建)都將在 root 主窗口中顯示。"""root = Tk()  # 創建一個Tk對象root.geometry("400x100+200+300")  # 設置Tk的窗口大小和范圍root.title("一個經典的GUI程序類的測試")  # 設置Tk的的名字app = Application(master=root)  # 實例化一個Application對象root.mainloop()  # 它的作用是啟動 Tkinter 事件循環,讓你的應用程序開始運行并等待用戶的操作
-
root:- 代表了 Tkinter 主窗口的實例,是?
Tk?類的對象。 - 這是 GUI 應用程序的頂層窗口,對整個應用進行管理。
- 代表了 Tkinter 主窗口的實例,是?
-
Frame:- 是一個容器控件,用于在應用程序窗口中組織其他控件(比如按鈕、標簽等)。
- 在這里,
Application?類是?Frame?的子類,它通過繼承?Frame?來創建一個新的組件。
1.?Button(self.master)
如果你的?master?是一個?Tk?實例(也就是主窗口),那么使用?Button(self.master)?是合適的。這種情況下,按鈕會被添加到主窗口中。
2.?Button(self)
如果你在一個自定義類中,且希望按鈕添加到該類的實例(比如?Frame?或者?Toplevel),則使用?Button(self)?是合適的。按鈕將被添加到這個特定的實例中。
簡單組件
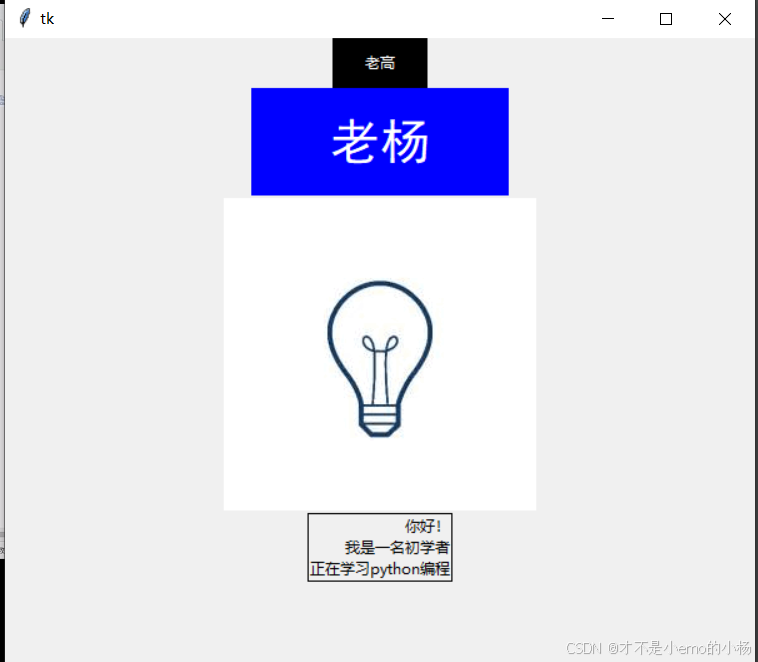
Label標簽
Label(標簽)主要用于顯示文本信息,也可以顯示圖像。
Label(標簽)有一些常見的屬性:
- width,height:
用于指定區域大小,如果顯示是文本,則以單個英文字符大小為單位(一個漢字占2個字符位置,高度和英文字符一樣);如果顯示是圖像,則以像素為單位。默認值是根據具體顯示的內容動態調用。 - font
指定字體和字體大小 - image
顯示在Label上的圖像,目前tkinter只支持gif格式 - fg和bg
fg(foreground):前景色、bg(background):背景色 - justify
針對多行文字的對齊,可設置justify屬性,可選值"left"、"center" or "right
# -*- coding: utf-8 -*-
"""測試一個經典的GUI程序寫法,使用面向對象的方式"""
from tkinter import *class Application(Frame):"""測試labels標簽"""def __init__(self, master=None):super().__init__(master)self.master = masterself.pack()self.createWidget()  # 創建的框架def createWidget(self):self.label01 = Label(self, text="老高", width=10, height=2, bg="black", fg="white")self.label01.pack()self.label02 = Label(self, text="老楊", width=10, height=2, bg="blue", fg="white", font=("黑體", 30))self.label02.pack()# 顯示圖像# global photo  # 把photo聲明成全局變量,如果是局部變量,不然本方法執行后,圖像對象銷毀self.photo = PhotoImage(file="img/3.gif")self.label03 = Label(self, image=self.photo)self.label03.pack()self.label04 = Label(self, text="你好!\n我是一名初學者\n正在學習python編程",borderwidth=1, relief="solid", justify="right")self.label04.pack()if __name__ == '__main__':root = Tk()root.geometry("600x500+200+200")app = Application(master=root)root.mainloop()
Option選項詳解
通過學習Label組件,我們發現可以通過Options設置組件的屬性,從而控制組件的各種狀態,比如:寬度、高度、顏色、位置等等。
我們可以通過三種方式設置Options選項,這在各種GUI組件中用法都一直。
- 創建對象時,使用命名參數(也叫關鍵字參數)
fred=Button(self,fg="red,bg="blue") -
創建對象后,使用字典索引方式
fred["fg"]="red"
fred["bg"]="blue" -
創建對象后,使用config()方法
fred.config(fg="red",bg="blue")
Button
Button(按鈕)用來執行用戶的單擊操作。Button可以包含文本,也可以包含圖像。按鈕被單擊后會自動調用對應事件綁定的方法。
from tkinter import *
from tkinter import messageboxclass Application(Frame):def __init__(self, master=None):super().__init__(master)self.master = masterself.pack()self.createWidget()def createWidget(self):"""框架方法"""self.butn1 = Button(self.master, text="begin",width=6, height=3, anchor=E, command=self.songhua)  # anchor的作用就是決定你的text文本唯一按鈕的那個位置self.butn1.pack()# 插入圖片self.photo = PhotoImage(file="img/1.gif")self.butn2 = Button(self.master, image=self.photo, command=self.login)self.butn2.pack()self.butn2.config(state=DISABLED)  # 加入state會讓你不能點擊,就讓你取消點擊狀態def songhua(self):"""點擊開始送花"""messagebox.showinfo("恭喜你", "得到兩朵玫瑰花")def login(self):messagebox.showinfo("系統", "登錄成功!歡迎開始學習!")if __name__ == '__main__':root = Tk()root.title("button練習")root.geometry("400x300+200+100")app = Application(root)root.mainloop()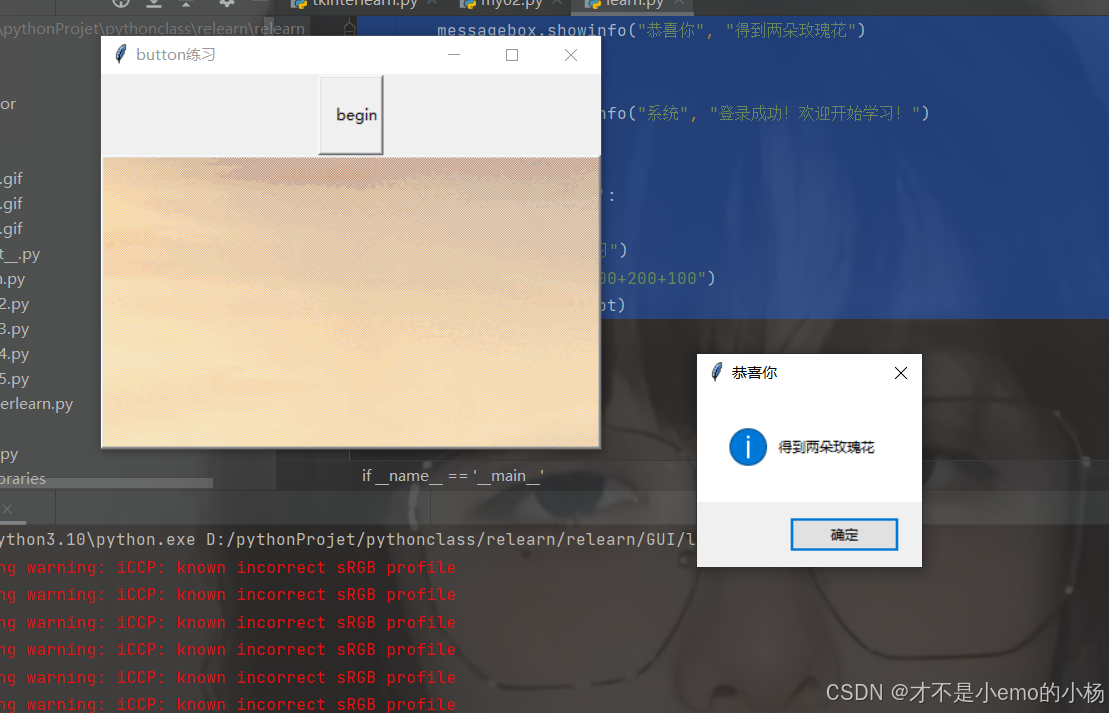
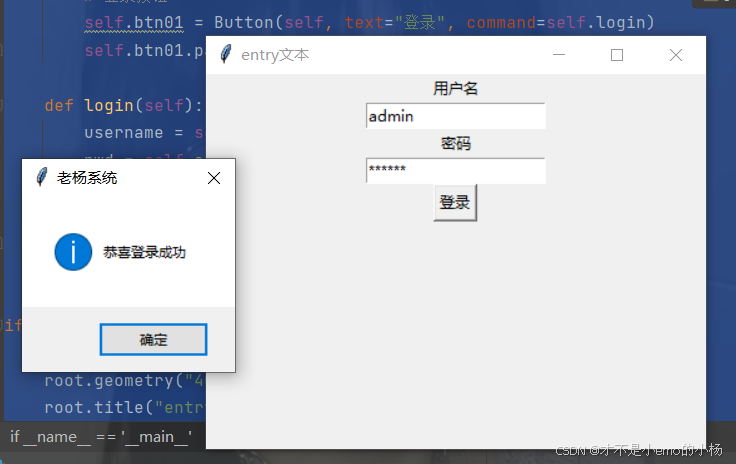
Entry單行文本框
Entry用來接收一行字符串的控件。如果用戶輸入的文字長度長于Entry控件的寬度時,文字會自動向后滾動。如果想輸入多行文本,需要使用Text控件。
# -*- coding: utf-8 -*-from tkinter import *
from tkinter import messageboxclass Application(Frame):def __init__(self, master):super().__init__(master)self.master = masterself.pack()self.createWidgt()def createWidgt(self):"""創建登錄界面的組件"""self.label01 = Label(self, text="用戶名")self.label01.pack()# StringVar變量綁定到指定的組件。# StringVar變量的值發生變化,組件內容也變化。# 組件內容發生變化,StringVar變量的值也發生變化。v1 = StringVar()self.entry01 = Entry(self, textvariable=v1)self.entry01.pack()v1.set("admin")print(v1.get())print(self.entry01.get())# 創建密碼框self.label02 = Label(self, text="密碼")self.label02.pack()v2 = StringVar()self.entry02 = Entry(self, textvariable=v2, show="******")self.entry02.pack()# 登錄按鈕self.btn01 = Button(self, text="登錄", command=self.login)self.btn01.pack()def login(self):username = self.entry01.get()pwd = self.entry02.get()print("用戶名:" + username)print("密 碼 :" + pwd)messagebox.showinfo("老楊系統", "恭喜登錄成功")if __name__ == '__main__':root = Tk()root.geometry("400x300+200+100")root.title("entry文本")app = Application(root)root.mainloop()
Text多行文本框
Text(多行文本框)的主要用于顯示多行文本,還可以顯示網頁鏈接,圖片,HTML頁面,甚至CSS樣式表,添加組件等。因此,也常被當做簡單的文本處理器、文本編輯器或者網頁瀏覽器來使用。比如IDLE就是Text組件構成的。
# -*- coding: utf-8 -*-
import webbrowser
from tkinter import *
from tkinter import messageboxclass Application(Frame):def __init__(self, master):super().__init__(master)self.master = masterself.pack()self.createWidget()def createWidget(self):"""創建框架"""self.w1 = Text(self.master, width=40, height=12, bg="gray")  # 注意這里的self.master可以是root,但是不能是self# 寬度20個字母(10個漢字),高度一個行高self.w1.pack()self.w1.insert(1.0, "0123456789\nabcdefg")  # 這里的1.0的意思是第一行第0列self.w1.insert(2.3, "鋤禾日當午,汗滴禾下土。誰知盤中餐,粒粒皆辛苦\n ")Button(self, text="重復插入文本", command=self.insertText).pack(side="left")Button(self, text="返回文本", command=self.returnText).pack(side="left")Button(self, text="添加圖片", command=self.addImage).pack(side="left")Button(self, text="添加組件", command=self.addWidget).pack(side="left")Button(self, text="通過tag精準控制文本", command=self.testTag).pack(side="left")def insertText(self):# INSERT索引表示在光標出插入self.w1.insert(INSERT, "老楊")# END索引號表示在最后插入self.w1.insert(END, "你好,我是你大哥")def returnText(self):# indexes(索引)是用來紙箱Text組件中文本的位置,# Text的組件索引也是對應實際字符之間的位置# 核心:行號以1開始,列好以0開始print(self.w1.get(1.2, 1.6))self.w1.insert(1.8, "老楊")print("所有文本內容為:\n" + self.w1.get(1.0, END))def addImage(self):"""在光標位置插入圖片"""global photophoto = PhotoImage(file="img/3.gif")self.w1.image_create(END, image=photo)  # 在文章的末尾插入self.w1.image_create(INSERT, image=photo)  # 在鼠標的光標出插入圖片def addWidget(self):"""增加新的控件方法"""b1 = Button(self.w1, text="愛你老楊", command=self.songhua)# 在text創建組件的命令self.w1.window_create(INSERT, window=b1)def testTag(self):self.w1.delete(1.0, END)self.w1.insert(INSERT, "good good study ,day day up!\n老楊,老楊\n我愛你\n就像老鼠愛大米\n百度")self.w1.tag_add("good", 1.0, 1.9)  # 第一個參數為標記名稱,第二個參數和第三個參數是索引的位置self.w1.tag_config("good", background="yellow", foreground="red")  # 第一個參數是需要添加配置的標記,第二和第三個參數的含義是添加前景色和背景色self.w1.tag_add("baidu", 5.0, 5.2)self.w1.tag_config("baidu", underline=True)self.w1.tag_bind("baidu", "<Button-1>", self.webshow)def webshow(self, event):webbrowser.open("http://www.baidu.com")def songhua(self):"""送花"""messagebox.showinfo("老楊系統", "送你9999朵玫瑰花")if __name__ == '__main__':root = Tk()root.geometry("400x300+200+100")root.title("老楊系統")app = Application(root)root.mainloop()
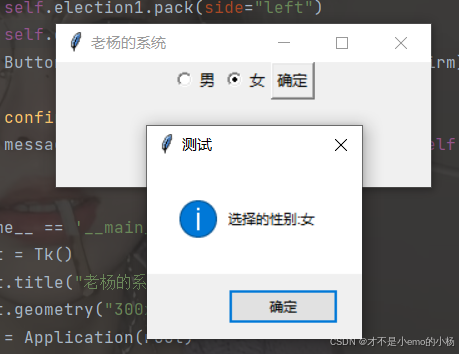
Radiobutton單選按鈕
Radiobutton控件用于選擇同一組單選按鈕中的一個
Radiobutton可以顯示文本,也可以顯示圖像
# -*- coding: utf-8 -*-
from tkinter import *
from tkinter import messageboxclass Application(Frame):def __init__(self, master=None):super().__init__(master)self.master = masterself.pack()self.createWidget()def createWidget(self):"""創建組件"""self.v = StringVar()self.v.set("女")self.election1 = Radiobutton(self.master, text="男", value="男", variable=self.v)self.election2 = Radiobutton(self.master, text="女", value="女", variable=self.v)self.election1.pack(side="left")self.election2.pack(side="left")Button(self.master, text="確定", command=self.confirm).pack(side="left")def confirm(self):messagebox.showinfo("測試", "選擇的性別:" + self.v.get())if __name__ == '__main__':root = Tk()root.title("老楊的系統")root.geometry("400x300+200+100")app = Application(root)root.mainloop()
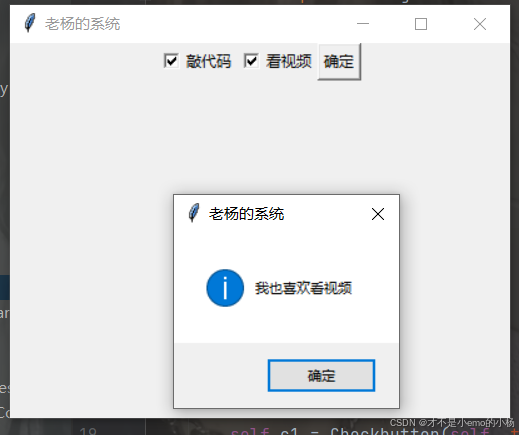
Checkbutton復選按鈕
Checkbutton控件用于選擇多個按鈕的情況。Checkbutton可以顯示文本,也可以顯示圖像
# -*- coding: utf-8 -*-
from tkinter import *
from tkinter import messageboxclass Application(Frame):def __init__(self, master=None):super().__init__(master)self.master = masterself.pack()self.createWidget()def createWidget(self):"""創建組件"""self.codeHobby = IntVar()self.videoHobby = IntVar()print(self.codeHobby.get())  # 默認值是0self.c1 = Checkbutton(self, text="敲代碼", variable=self.codeHobby, onvalue=1, offvalue=0)self.c2 = Checkbutton(self, text="看視頻", variable=self.videoHobby, onvalue=1, offvalue=0)self.c1.pack(side="left")self.c2.pack(side="left")Button(self, text="確定", command=self.confirm).pack(side="left")def confirm(self):if self.videoHobby.get() == 1:messagebox.showinfo("老楊的系統", "我也喜歡看視頻")if self.codeHobby.get() == 1:messagebox.showinfo("老楊的系統", "我也喜歡敲代碼")if __name__ == '__main__':root = Tk()root.title("老楊的系統")root.geometry("400x300+200+100")app = Application(root)root.mainloop()
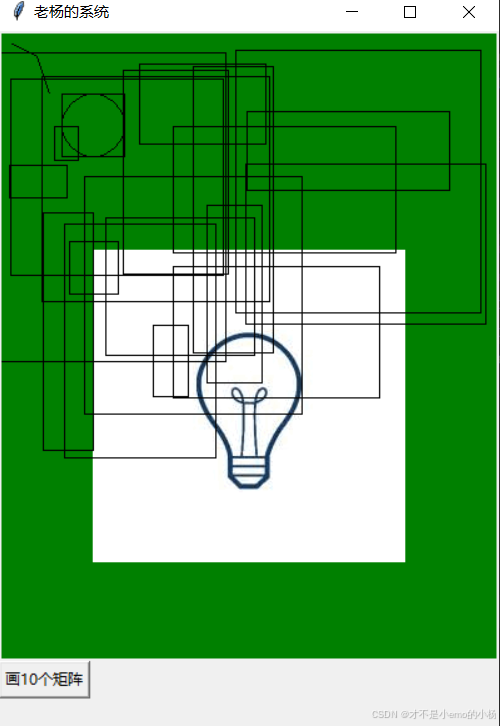
canvas畫布
canvas(畫布)是一個矩形區域,可以放置圖形、圖像、組件等。本節我們簡單介紹canvas的使用。
# -*- coding: utf-8 -*-
from tkinter import *
from tkinter import messagebox
import randomclass Application(Frame):def __init__(self, master=None):super().__init__(master)self.pack()self.createWidget()def createWidget(self):"""創建組件"""self.canvas = Canvas(self, width=400, height=500, bg="green")self.canvas.pack()# 畫一條直線line = self.canvas.create_line(10, 10, 30, 20, 40, 50)# 畫一個矩形rect = self.canvas.create_rectangle(50, 50, 100, 100)# 畫一個橢圓,坐標兩雙。為橢圓的邊界矩形左上角和底部右下角oval = self.canvas.create_oval(50, 50, 100, 100)  # 畫圓是在它所在的外切矩形的左邊點global photophoto = PhotoImage(file="img/3.gif")self.canvas.create_image(200, 300, image=photo)Button(self, text="畫10個矩陣", command=self.draw50Recg).pack(side="left")def draw50Recg(self):for i in range(0, 10):x1 = random.randrange(int(self.canvas["width"]) / 2)  # 生成一個從0到這個數中的其中一個數y1 = random.randrange(int(self.canvas["height"]) / 2)x2 = x1 + random.randrange(int(self.canvas["width"]) / 2)y2 = y1 + random.randrange(int(self.canvas["height"]) / 2)self.canvas.create_rectangle(x1, y1, x2, y2)if __name__ == '__main__':root = Tk()root.title("老楊的系統")root.geometry("400x600+200+100")app = Application(root)root.mainloop()
布局管理器
一個GUI應用程序必然有大量的組件,這些組件如何排布?z這時候,就需要使用tkinter提供的布局管理器幫租我們組織、管理在父組件中子組件的布局方式,,tkinter提供了三種管理器:pack、grid、place。
grid布局管理器
grid表格布局,采用表格結構組織組件。子組件的位置由行和列的單元格來確定,并且可以跨行和跨列,從而實現復雜的布局。
grid()方法提供的選項
| 選項 | 說明 | 取值范圍 |
|---|---|---|
| column | 單元格的列號 | 從0開始的正整數 |
| columnspan | 跨列,跨越的列數 | 正整數 |
| row | 單元格的行號 | 從0開始的正整數 |
| rowspan | kuahang,跨越的行數 | 正整數 |
| ipadx,ipady | 設置子組件之間的間隔,x方向或者y方向,默認單位為像素 | 非負浮點數,默認為0.0 |
| padx,pady | 與之并列的組件之間的間隔,x方向或者y方向,默認單位是像素 | 非負浮點數,默認0.0 |
| sticky | 組件緊貼所在單元格的某一角,對應于東南西北中以及4個角 | “n”,“s”,“w”,“e”,“nw”,“sw”,“se”,“ne”,“center(默認)” |
# -*- coding: utf-8 -*-
from tkinter import *
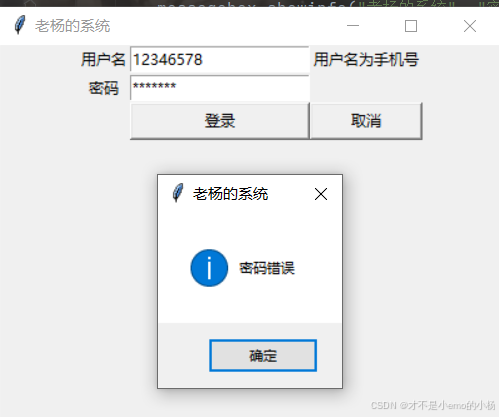
from tkinter import messageboxclass Application(Frame):def __init__(self, master=None):super().__init__(master)self.master = masterself.pack()self.createWidget()def createWidget(self):"""創建組件"""# 用戶名self.label01 = Label(self, text="用戶名")self.label01.grid(row=0, column=0)v1 = StringVar()self.entry01 = Entry(self, textvariable=v1)self.entry01.grid(row=0, column=1)v1.set("12346578")print(self.entry01.get())self.label02 = Label(self, text="用戶名為手機號")self.label02.grid(row=0, column=2)# 密碼self.label03 = Label(self, text="密碼")self.label03.grid(row=1, column=0)v2 = StringVar()self.entry02 = Entry(self, textvariable=v2, show="*")self.entry02.grid(row=1, column=1)# 登錄Button(self, text="登錄", command=lambda: self.login(self.entry01.get(), self.entry02.get())).grid(row=2,column=1,sticky="EW")Button(self, text="取消", command=self.quxiao).grid(row=2, column=2, sticky="EW")def login(self, admin, key):"""用于登錄:param admin:用戶名:param key: 密碼:return:"""if admin == "17729686779" and key == "123456":messagebox.showinfo("老楊的系統", "密碼正確")else:messagebox.showinfo("老楊的系統", "密碼錯誤")def quxiao(self):"""取消登錄"""self.entry01.delete(0, END)self.entry01.insert(0, "123456")self.entry02.delete(0, END)if __name__ == '__main__':root = Tk()root.title("老楊的系統")root.geometry("400x300+200+100")app = Application(root)root.mainloop()
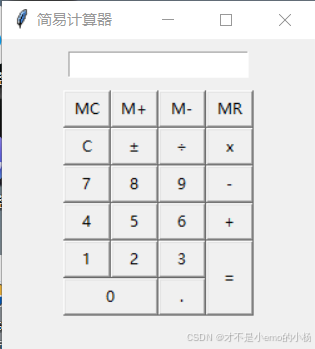
【示例】通過grid布局-實現計算器軟件界面
根據實際建議計算器的按鍵分布,設計一個相仿的計算器界面,
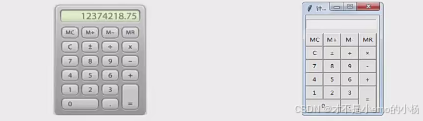
如上界面,實際可以設計成一個7行4列的表格布局,然后將相應的按鈕放置進去即可
# -*- coding: utf-8 -*-
from tkinter import *
from tkinter import messageboxclass Application(Frame):  # 制作一個簡易的計算器def __init__(self, master=None):super().__init__(master)self.pack()self.master = masterself.createWidget()def createWidget(self):"""通過grid布局實現計算器的界面"""# 按鈕binText = (("MC", "M+", "M-", "MR"),("C", "±", "÷", "x"),(7, 8, 9, "-"),(4, 5, 6, "+"),(1, 2, 3, "="),(0, "."))# 輸入框self.v1 = StringVar()self.entry01 = Entry(self, textvariable=self.v1)self.entry01.grid(row=0, column=0, columnspan=4, pady=10)  # pady=10 意味著在 entry01 的頂部和底部各添加 10 像素的空間。for rindex, rText in enumerate(binText):for cindex, cvalue in enumerate(rText):if cvalue == "=":Button(self, text=cvalue, width=2, command=self.mainCaculate()).grid(row=rindex + 1, column=cindex,rowspan=2, sticky=NSEW)elif cvalue == 0:Button(self, text=cvalue, width=2).grid(row=rindex + 1, column=cindex, columnspan=2, sticky=NSEW)elif cvalue == ".":Button(self, text=cvalue, width=2).grid(row=rindex + 1, column=cindex + 1, sticky=NSEW)else:Button(self, text=cvalue, width=4).grid(row=rindex + 1, column=cindex, sticky=NSEW)# sticky=NSEW,意味著按鈕會填充整個單元格def mainCaculate(self):passif __name__ == '__main__':root = Tk()root.title("簡易計算器")root.geometry("250x250+200+100")app = Application(root)root.mainloop()
pack布局管理器
pack按照組件的創建順序將子組件添加到父組件中,按照垂直或者水平的方向自然排布。如果不指定任何選項,默認在父組件中自頂向下垂直添加組件。
pack是代碼量最少,最簡單的一種,可以用于快速生成界面
pack()方法提供的功能
| 名稱 | 描述 | 取值范圍 |
|---|---|---|
| expand | 當值為“yes”時,side選項無效,組件顯示在父配件中心位置;若fill選項為“both”,則填充父組件的剩余空間 | “yes”,自然數,“no”,0(默認值“no”或0) |
| fill | 填充x(y)方向上的控件,當屬性side=“top”或“bottom”時,填充x方向;當屬性side=“left”或“right”時,填充“y”方向;當expand選項為“yes”時,填充父組件的剩余空間。 | “x”,“y”,“both”,“none”(默認值為none) |
| ipadx,ipady | 設置子組件之間的間隔,x方向或者y方向,默認單位為像素 | 非負浮點數,默認0.0 |
| padx,pady | 與之并列的組件之間的間隔,x方向或者y方向,默認單位是像素 | 非負浮點數,默認0.0 |
| side | 定義停靠在父組件的哪一邊上 | “top”,“bottom”,“left”,“right”(默認為“top”) |
| before | 將本組件于所選組建對象之前pack,類似于先創建本組件再創建選定組件 | 已經pack后的組件對象 |
| after | 將本組件于所組建對象之后pack,類似于先創建選定組件再本組件 | 已經pack后的組件對象 |
| in_ | 將本組件作為所選組建對象的子組件,類似于指定本組件的master為選定組件 | 已經pack后的組件對象 |
| anchor | 對齊方式,左對齊“w”,右對齊“e”,頂對齊“n”,底對齊“s” | “n”,“s”,“w”,“e”,“nw”,“sw”,“se”,“ne”,“center”(默認) |
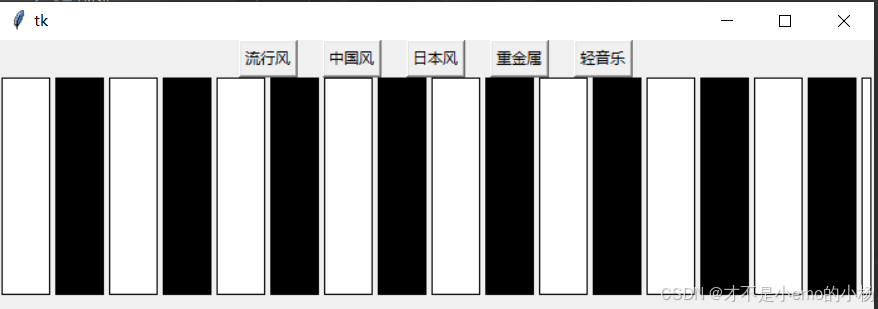
【示例】pack布局用法,制作鋼琴按鍵布局
# -*- coding: utf-8 -*-
from tkinter import *root = Tk()
root.geometry("700x220")# Frame是一個矩形區域,就是用來放置其他子組件
f1 = Frame(root)
f1.pack()
f2 = Frame(root)
f2.pack()btnText = ("流行風", "中國風", "日本風", "重金屬", "輕音樂")for txt in btnText:Button(f1, text=txt).pack(side="left", padx="10")for i in range(1, 20):Label(f2, width=5, height=10, borderwidth=1, relief="solid", bg="black" if i % 2 == 0 else "white").pack(side="left", padx=2)root.mainloop()
place布局管理器
place布局管理器可以通過坐標精準控制組件的位置,使用于一些布局更加靈活的場景
place()方法的選項
| 選項 | 說明 | 取值范圍 |
|---|---|---|
| x,y | 組件左上角的絕對坐標(相對于窗口) | 非負整數 x和y選項用于設置偏移(像素)如果同時設置relx(rely)和x(y),那么place將優先計算relx和rely,然后再實現x和y指定的偏移 |
| relx rely | 組件左上角的坐標(相對于父容器) | relx是相對于父組件的位置,0是最左邊,0.5是正中間,1是最右邊 rely是相對于父組件的位置,0是最上邊,0.5是正中間,1.是最下邊 |
| width height | 組件的寬度和高度 | 非負整數 |
| relwidth relheight | 組件的寬度和高度(相對于父容器) | 與relx、rely取值類似,但是相對于父組件的尺寸 |
| anchor | 對齊方式,左對齊“w”,右對齊“e”,頂對齊“n”,底對齊“s” | “n”,“s”,“w”,“e”,“nw”,“sw”,“se”,“ne”,“center”(默認) |
# -*- coding: utf-8 -*-
from tkinter import *
from tkinter import messageboxroot = Tk()
root.geometry("500x300")
root.title("布局管理place")
root["bg"] = "white"
f1 = Frame(root, width=200, height=200, bg="green")
f1.place(x=30, y=20)
Button(root, text="老楊").place(relx=0.5, x=100, y=20, relwidth=0.2, relheight=0.5)
# 如果relx和x同時存在的話,就是先定位relx的位置,然后再定位x的位置,就是定位了relx的位置后,向兩邊移x
Button(f1, text="老楊愛睡覺").place(relx=0.6, rely=0.7)
Button(f1, text="老楊大哥").place(relx=0.5, rely=0.2)root.mainloop()
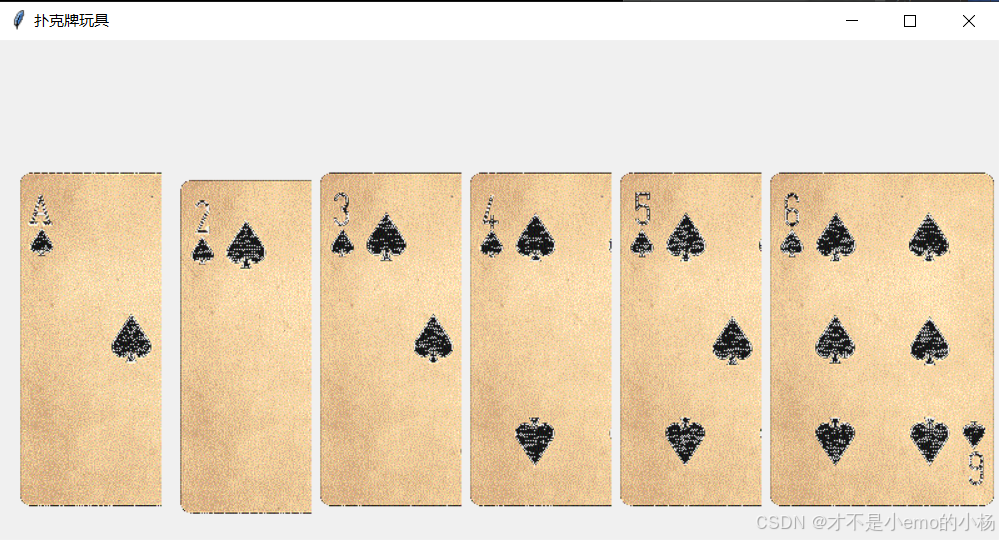
【示例】place布局管理-撲克牌游戲demo
!!!撲克圖片需要自己在網上去找,然后做成gif圖片的形式
# -*- coding: utf-8 -*-
from tkinter import *
from tkinter import messageboxclass Application(Frame):"""通過place布局管理器實現撲克牌位置控制"""def __init__(self, master=None):super().__init__(master)self.master = masterself.pack()self.yabs = 100self.createWidget()def createWidget(self):"""創建控制組件"""# self.photo = PhotoImage(file="img/puke/1.gif")# self.puke1 = Label(self.master, image=self.photo)# self.puke1.place(x=10, y=50)self.photos = [PhotoImage(file="img/puke/" + str(i + 1) + ".gif") for i in range(6)]self.pukes = [Label(self.master, image=self.photos[i]) for i in range(6)]for i in range(6):self.pukes[i].place(x=10 + i * 120, y=self.yabs)# 為所有的Label增加事件處理for i in range(6):self.pukes[i].bind_class("Label", "<Button-1>", self.chupai)def chupai(self, event):print(event.widget.winfo_geometry())print(event.widget.winfo_y())if event.widget.winfo_y() == self.yabs:event.widget.place(y=self.yabs - 50)else:event.widget.place(y=self.yabs)if __name__ == '__main__':root = Tk()root.geometry("800x400+300+200")root.title("撲克牌玩具")app = Application(root)root.mainloop()
lambda表達式詳解
lambda表達式定義的是一個匿名函數,只適合簡單輸入參數,簡單計算返回結果,不適合功能復雜情況
lambda定義的匿名函數也有輸入、也有輸出,只是沒有名字。語法格式如下:
lambda 參數值列表:表達式
參數值列表即為輸入。
表達式計算的結構即為輸出。
寫一個簡單的案例:
add3args = lambda x, y, z: x + y + z
print(add3args(10, 20, 30))
上面的lambda表達式相當于如下函數定義:
def add3args(x, y, z):return x + y + z
print(add3args(10, 20, 30))
lambda表達式的參數值列表可以為如下內容:
| lambda格式 | 說明 |
|---|---|
| lambda x,y:x*y | 函數輸入是x和y,輸出是它們的積x*y |
| lambda:None | 函數沒有輸入參數,輸出是None |
| lambda:aaa(3,4) | 函數沒有輸入參數,輸出是aaa(3,4)的結果 |
| lambda *args:sum(args) | 輸入是任意個數的參數,輸出是它們的和 |
| lambda **kwargs:1 | 輸入是任意鍵值對參數,輸出是1 |
使用lambda表達式實現傳參
【示例】使用lambda幫助command屬性綁定時傳參
from tkinter import *root = Tk()
root.geometry("270x50")def mouseTest1():print("command方式,簡單情況:不涉及獲取event對象,可以使用")def mouseTest2(a, b):print("a={0},b={1}".format(a, b))Button(root, text="測試command1", command=mouseTest1).pack(side="left")Button(root, text="測試command2", command=lambda: mouseTest2("laoyang", "xixi")).pack(side="left")root.mainloop()
多種事件綁定方式匯總
組件對象的綁定
- 通過command屬性綁定(適合簡單不需要獲取event對象)
Button(root,text=“登錄”,command=login) - 通過bind()方法綁定(適合需要獲取event對象)
c1=Canvas();c1.bind("<Button-1>",drawLine)
組件類的綁定
調用對象的bind_class函數,將該組件類所有的組件綁定事件:
w.bind_class("Widget","event",eventhanler)
# -*- coding: utf-8 -*-
from tkinter import *root = Tk()
root.geometry("270x30")def mouseTest1(event):print("bind()方式綁定,可以獲取event對象")print(event.widget)def mouseTest2(a, b):print("a={},b={}".format(a, b))print("command方式綁定,不能直接獲取event對象")def mouseTest3(event):print("右鍵單擊事件,綁定所有按鈕啦!!")print(event.widget)b1 = Button(root, text="測試bind()綁定")
b1.pack(side="left")
# bind方式綁定事件
b1.bind("<Button-1>", mouseTest1)# command屬性直接綁定事件
b2 = Button(root, text="測試command2", command=lambda: mouseTest2("laoyang", "xixi"))
b2.pack(side="left")# 給所有Button按鈕都綁定右鍵單擊事件<Button-2>
b1.bind_class("Button", "<Button-3>", mouseTest3)  # Button-3是單擊右鍵的意思root.mainloop()
其他組件
OptionMenu選擇項
OptionMenu(選擇項)用來做多選一,選中的項在頂部顯示。
【示例】OptioMenu(選擇項)的基本用法
from tkinter import *
from tkinter import messageboxclass Application(Frame):def __init__(self, master=None):super().__init__(master)self.pack()self.createWidget()def createWidget(self):"""創建組件"""Label(self, text="最愛的人是誰:").grid(row=0, column=0)v = StringVar(self)v.set("彭于晏")om = OptionMenu(self, v, "彭于晏", "劉亦菲", "yyx")om["width"] = 10om.grid(row=0, column=1)Btn1 = Button(self, text="確定", command=lambda: self.test1(v))Btn1.grid(row=1, column=1)def test1(self, v):print("最愛的人:", v.get())if __name__ == '__main__':root = Tk()root.geometry("300x100")root.title("最愛的明星")app = Application(root)root.mainloop()
Scale滑塊
Scale(移動滑塊)用于在指定的數值區間,通過滑塊的移動來選擇值
【示例】使用Scale(移動滑塊)控制字體大小變化
# -*- coding: utf-8 -*-
from tkinter import *
from tkinter import messageboxclass Application(Frame):def __init__(self, master=None):super().__init__(master)self.master = masterself.pack()self.createWidget()self.adef createWidget(self):"""創建框架"""s1 = Scale(self, from_=10, to=50, length=200, tickinterval=5, orient=HORIZONTAL,command=self.test1)  # 默認是豎直的,HORIZONTAL是水平的,這里調用test的時候,會默認將value的值傳入函數中s1.pack()self.a = Label(self, text="yyx", width=10, height=1, bg="white", fg="red")self.a.pack()def test1(self, value):print("滑塊的值:", value)newFont = ("宋體", value)self.a.config(font=newFont)if __name__ == '__main__':root = Tk()root.geometry("400x300")root.title("yyx的系統")app = Application(root)root.mainloop()
顏色選擇框
顏色選擇框可以幫組我們設置背景色、前景色、畫筆顏色、字體顏色等等
【示例】顏色選擇框的用法
# -*- coding: utf-8 -*-
from tkinter import *
from tkinter import messagebox
from tkinter import colorchooserclass Application(Frame):def __init__(self, master=None):super().__init__(master)self.pack()self.master = masterself.createWidget()def createWidget(self):"""創建組件"""Button(self, text="選擇背景色", command=self.test1).pack()def test1(self):s1 = colorchooser.askcolor(color="white", title="選擇背景色")print(s1)self.master.config(bg=s1[1])if __name__ == '__main__':root = Tk()root.geometry("400x300")root.title("yyx的系統")app = Application(root)root.mainloop()
文件對話框
文件對話框幫助我們實現可視化的操作目錄、操作文件。最后,將文件、目錄的信息傳入到程序中。文件對話框包含如下一些常用函數:
| 函數名 | 對話框 | 說明 |
| askopenfilename(**options) | 文件對話框 | 返回打開的文件名 |
| askopenfilenames(**options) | 返回打開的多個文件名列表 | |
| askopenfile(**options) | 返回打開文件對象 | |
| askopenfiles(**options) | 返回打開的文件對象的列表 | |
| askdirectory(**options) | 目錄對話框 | 返回目錄名 |
| asksavefile(**options) | 保存對話框 | 返回保存的文件對象 |
| asksaveasfilename(**options) | 返回保存的文件名 |
命名參數options的常見值如下:
| 參數名 | 說明 |
| defaultextension | 默認后綴:.xxx 用戶沒有輸入則自動添加 |
| filetypes=[(label1,pattern1),(label2,pattern2)] | 文件顯示過濾器 |
| initialldir | 初始目錄 |
| initialfile | 初始文件 |
| parent | 父窗口,默認根窗口 |
| title | 窗口標題 |
【示例】文件對話框基本用法
# -*- coding: utf-8 -*-from tkinter import *
from tkinter import messagebox
from tkinter import filedialogclass Application(Frame):def __init__(self, master=None):super().__init__(master)self.pack()self.master = masterself.createWidget()def createWidget(self):"""用于創建組件"""Button(self, text="選擇編輯的視頻文件", command=self.test1).pack()self.show = Label(self, width=40, height=3, bg="green")self.show.pack()def test1(self):f = filedialog.askopenfilename(title="上傳文件", initialdir="d:", filetypes=[("視頻文件", "mp4")])self.show["text"] = fif __name__ == '__main__':root = Tk()root.geometry("400x300")root.title("yyx的程序")app = Application(root)root.mainloop()
簡單輸入對話框
simpledialog(簡單對話框)包含如下常用函數:
| 函數名 | 說明 |
| askfloat(title,prompt,**kw) | 輸入并返回浮點數 |
| askinteger(title,prompt,**kw) | 輸入并返回整數 |
| askstring(title,prompt,**kw) | 輸入并返回字符串 |
參數中,title表示窗口標題;prompt是提示信息;命令參數kw為各種選項:initialvalue(初始值)、minvalue(最小值)、maxvalue(最大值)
【示例】簡單對話框基本用法
# -*- coding: utf-8 -*-
from tkinter.simpledialog import *class Application(Frame):def __init__(self, master=None):super().__init__(master)self.pack()self.master = masterself.createWidget()def createWidget(self):"""用于創建組件"""Button(self, text="老楊你多大了?請輸入", command=self.test1).pack()self.show = Label(self, width=40, height=3, bg="green")self.show.pack()def test1(self):a = askinteger(title="輸入年齡", prompt="請輸入年齡", initialvalue=18, minvalue=1, maxvalue=150)self.show["text"] = aif __name__ == '__main__':root = Tk()root.geometry("400x300")root.title("yyx的系統")app = Application(root)root.mainloop()
通用消息框
messagebox(通用消息框)用于和用戶簡單的交互,用戶點擊確定、取消。如下列出了messagebox的常見函數:
| 函數名 | 說明 |
| askokcancel(title,message,**options) | OK/Cancel對話框 |
| askquestion(title,message,**options) | Yes/No問題對話框 |
| askretrycancel(title,message,**options) | Retry/Cancel問題對話框 |
| showerror(title,message,**options) | 錯誤消息對話框 |
| showinfo(title,message,**options) | 消息框 |
| showwarning(title,message,**options) | 警告消息框 |
# -*- coding: utf-8 -*-
from tkinter import *
from tkinter.messagebox import *class Application(Frame):def __init__(self, master=None):super().__init__(master)self.pack()self.master = masterself.createWidget()def createWidget(self):"""創建組件"""# a1 = showinfo(title="yyx系統", message="yyx大牛")# a2 = askokcancel(title="yyx系統", message="你是不是gay")# a3 = askquestion(title="yyx系統", message="你是不是傻逼")# a4 = showerror(title="yyx系統", message="報錯了")# a5 = showwarning(title="yyx系統", message="無法進行這樣的操作")if __name__ == '__main__':root = Tk()root.geometry("400x300")root.title("yyx的系統")app = Application(root)root.mainloop()
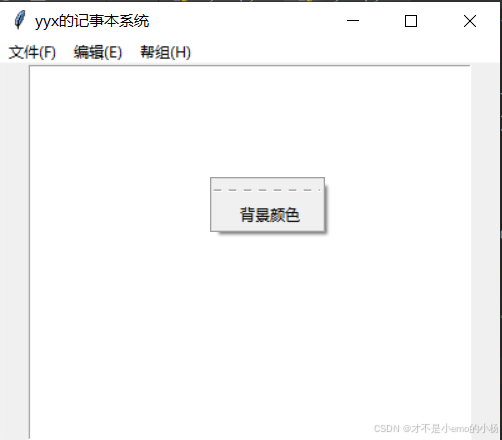
菜單
GUI程序通常都有菜單,方便用戶的交互。我們一般將菜單分為兩種:
主菜單
主菜單通常位于GUI程序上方
上下文菜單
快捷菜單(上下文菜單)是通過鼠標右鍵單擊組件而彈出的菜單,一般是和這個組件相關的操作,比如:剪切、復制、粘貼、屬性等。
# -*- coding: utf-8 -*-
from tkinter import *
from tkinter import messageboxclass Application(Frame):def __init__(self, master=None):super().__init__(master)self.pack()self.master = masterself.textpad = Noneself.createWidget()def createWidget(self):"""創建組件"""# 創建主菜單欄menubar = Menu(self)# 創建子菜單menuFile = Menu(menubar)menuEdit = Menu(menubar)menuHelp = Menu(menubar)# 將子菜單加入到主菜單欄menubar.add_cascade(label="文件(F)", menu=menuFile)menubar.add_cascade(label="編輯(E)", menu=menuEdit)menubar.add_cascade(label="幫組(H)", menu=menuHelp)# 添加菜單項menuFile.add_command(label="新建", accelerator="ctrl+n", command=self.test)menuFile.add_command(label="打開", accelerator="ctrl+o", command=self.test)menuFile.add_command(label="保存", accelerator="ctrl+s", command=self.test)menuFile.add_separator()  # 添加分割線menuFile.add_command(label="退出", accelerator="ctrl+q", command=self.test)# 將主菜單欄加到根窗口self.master["menu"] = menubar# 文本編輯區self.textpad = Text(self, width=50, height=30)self.textpad.pack()# 創建上下菜單self.contentMenu = Menu(self.master)self.contentMenu.add_command(label="背景顏色", command=self.test)# 為右鍵綁定事件self.master.bind("<Button-3>", self.createContextMenu)def test(self):"""用于測試"""passdef createContextMenu(self, event):"""菜單在鼠標右鍵單擊的坐標處顯示"""self.contentMenu.post(event.x_root, event.y_root)if __name__ == '__main__':root = Tk()root.geometry("400x300")root.title("yyx的記事本系統")app = Application(root)root.mainloop()
記事本項目
【示例】創建一個記事本項目
# -*- coding: utf-8 -*-
from tkinter import *
from tkinter import messagebox
from tkinter.filedialog import *
from tkinter.colorchooser import *class Application(Frame):def __init__(self, master=None):super().__init__(master)self.pack()self.master = master# 對象參數self.textpad = None  # 初始化文本編輯區對象self.filename = Noneself.createWidget()def createWidget(self):"""用于創建模塊"""# 創建主菜單欄menubar = Menu(root)  # 創建一個主菜單對象# 創建子菜單menuFile = Menu(menubar)  # 將menuFile對象放在Menu中menuEdit = Menu(menubar)menuHelp = Menu(menubar)# 將子菜單加入到主菜單欄中menubar.add_cascade(label="文件(F)", menu=menuFile)  # 文件放到menuFile中menubar.add_cascade(label="編輯(E)", menu=menuEdit)menubar.add_cascade(label="幫助(H)", menu=menuHelp)# 添加菜單項menuFile.add_command(label="新建", accelerator="ctrl+n", command=self.newFile)menuFile.add_command(label="打開", accelerator="ctrl+o", command=self.openFile)menuFile.add_command(label="保存", accelerator="ctrl+s", command=self.saveFile)menuFile.add_separator()  # 添加分割線menuFile.add_command(label="退出", accelerator="ctrl+q", command=self.test)# 將主菜單欄加到根窗口self.master["menu"] = menubar# 文本編輯區self.textpad = Text(root)self.textpad.pack()# 創建上下菜單self.contentMenu = Menu(root)self.contentMenu.add_command(label="背景顏色", command=self.openAskColor)# 為右鍵綁定事件self.master.bind("<Button-3>", self.createContextMenu)# 綁定窗口變化事件root.bind('<Configure>', self.on_resize)def test(self):"""用于測試專用"""passdef createContextMenu(self, event):"""菜單在鼠標右鍵單擊的坐標處顯示"""self.contentMenu.post(event.x_root, event.y_root)def openFile(self):if self.textpad.get("1.0", "end") != "\n":if messagebox.askquestion("yyx的記事本", "請問是否要保存當前文本數據") == "yes":self.saveFile()else:self.textpad.delete("1.0", "end")try:with askopenfile(title="打開文本文件") as f:self.textpad.insert(INSERT, f.read())self.filename = f.name# print(self.filename)except:messagebox.showinfo("yyx的記事本", "未打開文件,請重試")def saveFile(self):if self.filename == None:# 說明未選擇要存取的的文件messagebox.showinfo("yyx的記事本", "請選擇你要存儲的文件")try:with askopenfile(title="打開你要存儲的文本文件") as f:self.filename = f.nameexcept:messagebox.showinfo("yyx的記事本", "未保存成功,請重試")else:# 如果當前文件板中存在數據,但是想存入新的文件if messagebox.askquestion("yyx的記事本", "請問要把當前的文本數據存入其他文件中嗎") == "yes":try:with askopenfile(title="打開你要存儲的文本文件") as f:self.filename = f.nameself.filename = Noneexcept:messagebox.showinfo("yyx的記事本", "未保存成功,請重試")else:with open(self.filename, "w") as f:c = self.textpad.get(1.0, END)f.write(c)self.filename = None  # 再進行寫入過后要將filename令為None值def newFile(self):"""創建一個新的文件"""self.filename = asksaveasfilename(title="另存為", initialfile="未命名.txt", filetype=[("文本文檔", "*.txt")],defaultextension=".txt")self.saveFile()def openAskColor(self):"""打開背景顏色框"""s1 = askcolor(color="red", title="選擇背景色")self.textpad.config(bg=s1[1])def on_resize(self, event):"""textpad的窗口跟隨root的窗口變化"""self.textpad.config(width=event.width, height=event.height)if __name__ == '__main__':root = Tk()root.geometry("400x300")root.title("yyx的記事本")app = Application(root)root.mainloop()
python項目打包成exe可執行文件
在pycharm的Terminal終端輸入如下命令:
pyinstaller -F xxxx.py
【注】相關參數如下:
? ? ? ? --icon=圖標路徑(pyinstaller -F --icon=my.ico XXXX.py)
? ? ? ? -F 打包成一個exe文件
? ? ? ? -W 使用窗口,無控制臺
? ? ? ? -c 使用控制臺,無窗口
? ? ? ? -D 創建一個目錄,里面包含exe以及其他一些依賴性文件

在打包的過程中遇到一些問題:
1.如果提示AttributeError: 'str' object has no attribute 'decode'. Did you mean: 'encode'?
可以嘗試將pyinstaller更新一下
pip install --upgrade pyinstaller2.如果提示Please remove this package (located in D:\python3.10\lib\site-packages ) using "D:\python3.10\python.exe" -m pip uninstall pathlib then try again.
就將這個pathlib庫刪除即可
畫圖軟件開發
開發一款簡單的畫圖軟件,包含如下功能:
- 畫筆
- 矩形/橢圓繪制
- 清屏
- 橡皮擦
- 直線/帶箭頭的執行
- 修改畫筆顏色、背景顏色
# -*- coding: utf-8 -*-
import tkinter
from tkinter import *
from tkinter import messageboxclass Application(Frame):def __init__(self, master=None, win_width=900, win_height=450):super().__init__(master)self.pack()self.master = masterself.x = 0self.y = 0self.bgcolor = "#000000"self.fgcolor = "#ff0000"self.lastDraw = 0  # 表示最后繪制的圖形self.startDrawFlag = False# 創建元素參數區域self.canvasPad = Noneself.win_width = win_widthself.win_height = win_heightself.createWidget()def createWidget(self):"""創建控件"""# 創建繪圖區self.canvasPad = Canvas(self.master, width=self.win_width, height=self.win_height * 0.9, bg=self.bgcolor)self.canvasPad.pack(fill=tkinter.BOTH, expand=True)# 創建功能按鈕btn_start = Button(self.master, text="開始", name="start")btn_start.pack(side="left", padx="10")btn_pen = Button(self.master, text="畫筆", name="pen")btn_pen.pack(side="left", padx="10")btn_rect = Button(self.master, text="矩形", name="rect")btn_rect.pack(side="left", padx="10")btn_clear = Button(self.master, text="清屏", name="clear")btn_clear.pack(side="left", padx="10")btn_eraser = Button(self.master, text="橡皮擦", name="eraser")btn_eraser.pack(side="left", padx="10")btn_line = Button(self.master, text="直線", name="line")btn_line.pack(side="left", padx="10")btn_lineArrow = Button(self.master, text="箭頭直線", name="lineArrow")btn_lineArrow.pack(side="left", padx="10")btn_color = Button(self.master, text="顏色", name="color")btn_color.pack(side="left", padx="10")# 時間處理self.canvasPad.bind_class("Button", "<1>", self.eventManger)self.canvasPad.bind("<ButtonRelease-1>", self.stopDraw)"""綁定快捷鍵區域"""# 綁定窗口變化self.master.bind("<Configure>", self.resize_canvas)def test(self):"""用于測試專用"""passdef eventManger(self, event):"""整個事件管理"""name = event.widget.winfo_name()print(name)if name == "line":self.canvasPad.bind("<B1-Motion>", self.myline)elif name == "lineArrow":self.canvasPad.bind("<B1-Motion>", self.mylineArrow)elif name == "rect":self.canvasPad.bind("<B1-Motion>", self.myRect)elif name == "pen":self.canvasPad.bind("<B1-Motion>", self.myPen)elif name == "eraser":self.canvasPad.bind("<B1-Motion>", self.myEraser)def startDraw(self, event):self.canvasPad.delete(self.lastDraw)if not self.startDrawFlag:self.startDrawFlag = Trueself.x = event.xself.y = event.ydef stopDraw(self, evnet):self.startDrawFlag = Falseself.lastDraw = 0def myline(self, event):"""創建直線"""self.startDraw(event)self.lastDraw = self.canvasPad.create_line(self.x, self.y, event.x, event.y, fill=self.fgcolor)def mylineArrow(self, event):"""繪制箭頭直線"""self.startDraw(event)self.lastDraw = self.canvasPad.create_line(self.x, self.y, event.x, event.y, arrow=LAST, fill=self.fgcolor)def myRect(self, event):self.startDraw(event)self.lastDraw = self.canvasPad.create_rectangle(self.x, self.y, event.x, event.y, outline=self.fgcolor)def myPen(self, event):self.startDraw(event)self.canvasPad.create_line(self.x, self.y, event.x, event.y, fill=self.fgcolor)self.x = event.xself.y = event.ydef myEraser(self, event):self.startDraw(event)self.canvasPad.create_rectangle(event.x - 6, event.y - 6, event.x + 6, event.y + 6,fill=self.bgcolor)self.x = event.xself.y = event.ydef resize_canvas(self, event):"""canvas的窗口跟隨root的窗口變化"""self.canvasPad.config(width=event.width, height=event.height * 0.9)if __name__ == '__main__':win_width = 900win_height = 450root = Tk()root.geometry("600x500")root.title("yyx的畫圖軟件")app = Application(root, win_width=win_width, win_height=win_height)root.mainloop()
)


趣學設計模式 之 原型模式!)


--kaggle學堂:<機器學習簡介>基礎數據探索)
)


實現用戶登陸功能)


