kubernetes集群架構和組件
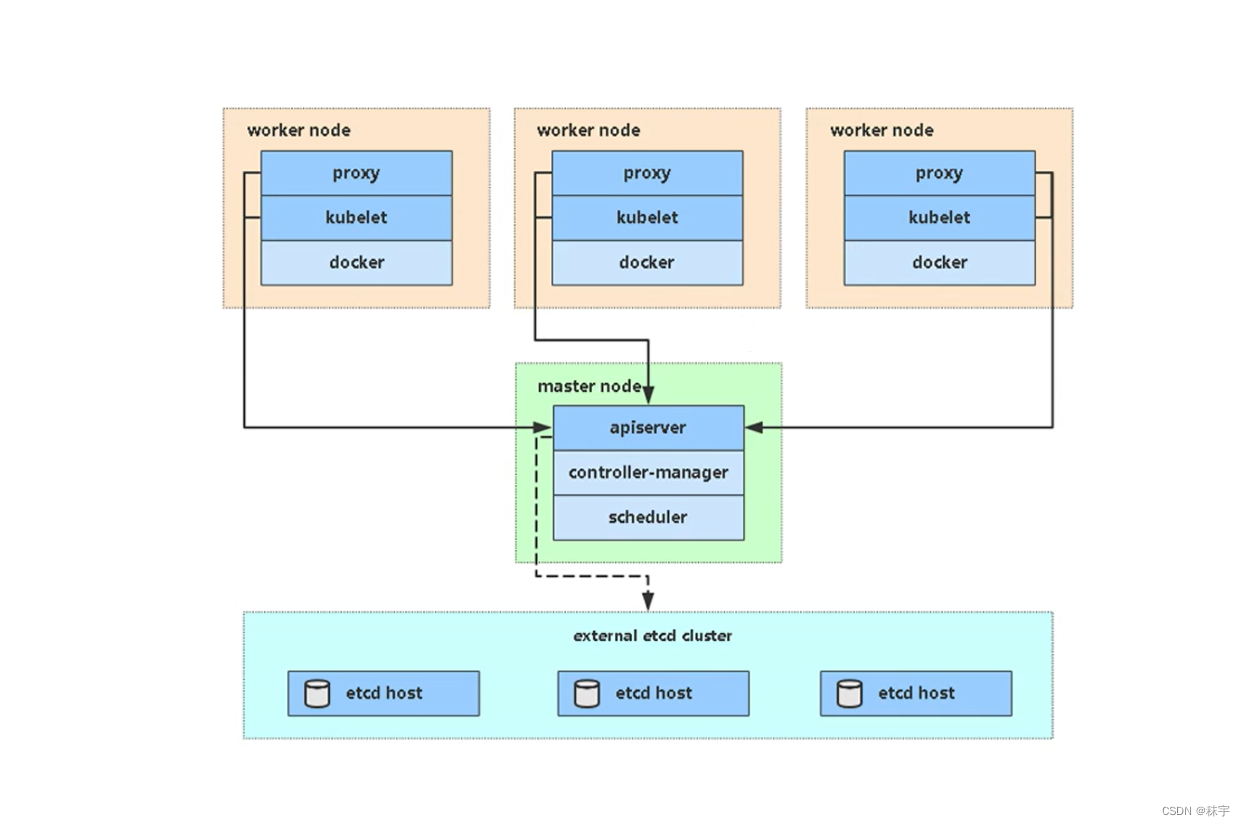
master節點組件
-
kube-apiserver:Kubernetes API,集群的統一入口,各組件的協調者,以RESTful API提供接口服務,所有對象資源的增刪改查和監聽操作都交給APIserver處理后再交給Etcd存儲。
-
kube-controller-manager:處理集群中的常規后臺事務,一個資源對應一個控制器,Controller Manager就是負責管理這些控制器的。
-
kube-scheduler:根據算法為新創建的Pode選擇一個Node節點。
Node節點組件
-
kubelet:kubelet是Master在Node節點上的Agent,管理本機運行容器的生命周期,比如:創建容器,pod掛載數據卷,下載secret,獲取容器和節點狀態等工作。kubelet將每個Pod轉換為一組容器。
-
kube-proxy:在Node節點上實現Pod網絡代理,維護網絡規則和四層負載均衡工作。
-
容器進行時:容器引擎,運行容器,例如Docker,containerd,podman等。
kubeadm搭建一個簡單的集群
硬件配置
學習環境:
-
master-2C/2G/20G
-
node-2C/2G/20G
測試環境:
-
master-4C/8G/50G
-
node-8C/16G/100G
生產環境:
-
master-8C/16G/500G
-
node-16C/32G/1T
環境準備
- 操作系統:CentOS7.9-x86_64
- Docker版本:26.1.4(CE)
- kubernetes:1.28
服務器規劃
| 主機名 | ip |
|---|---|
| k8s-master | 192.168.3.10 |
| k8s-node1 | 192.168.3.11 |
| k8s-node2 | 192.168.3.12 |
操作系統初始化配置
#關閉防火墻
systemctl stop firewalld && systemctl disable firewalld#關閉selinux
setenforce 0
sed -i 's/SELINUX=enforcing/SELINUX=disabled/' /etc/selinux/config#關閉swap分區
sed -ri 's@(.*swap.*)@#\1@g' /etc/fstab#修改主機名
hostnamectl set-hostname <hostname>#修改hosts文件(非必選配置)
cat >> /etc/hosts << EOF
192.168.3.10  k8s-master
192.168.3.11  k8s-node1
192.168.3.12  k8s-node2
EOF#開啟內核 ipv4 轉發需要執?如下命令加載  overlay、br_netfilter  模塊
cat > /etc/modules-load.d/k8s.conf <<EOF
overlay
br_netfilter
EOF
modprobe overlay
modprobe br_netfilter#配置內核參數,將橋接的IPv4流量傳遞到iptables鏈
cat > /etc/sysctl.d/k8s.conf << EOF
net.bridge.bridge-nf-call-ip6tables = 1
net.bridge.bridge-nf-call-iptables = 1
EOF
sysctl -p /etc/sysctl.d/k8s.conf#時間同步,統一配置阿里云時鐘服務器
server ntp.aliyun.com iburst
安裝docker
配置docker鏡像源
# step 1: 安裝必要的一些系統工具
sudo yum install -y yum-utils device-mapper-persistent-data lvm2
# Step 2: 添加軟件源信息
sudo yum-config-manager --add-repo https://mirrors.aliyun.com/docker-ce/linux/centos/docker-ce.repo
# Step 3
sudo sed -i 's+download.docker.com+mirrors.aliyun.com/docker-ce+' /etc/yum.repos.d/docker-ce.repo
# Step 4: 更新并安裝Docker-CE
sudo yum makecache fast
sudo yum -y install docker-ce
配置鏡像加速器
sudo mkdir -p /etc/docker
sudo tee /etc/docker/daemon.json <<-'EOF'
{"registry-mirrors": ["https://5fid4glg.mirror.aliyuncs.com","https://docker.m.daocloud.io"],"exec-opts": ["native.cgroupdriver=systemd"]
}
EOF
注意:這里的鏡像源中,大部分鏡像都是兩年前的,眾所周知docker hub已經不對國內開放了,但是學習用也足夠了。
“exec-opts”: [“native.cgroupdriver=systemd”] 這個配置是官方推薦的一個配置,也可以不做修改。
“insecure-registries”: 證書驗證
配置完成之后,加載配置文件,重啟docker,設置開機自啟動
systemctl daemon-reload
systemctl enable docker --now
安裝cri-docker
wget https://github.com/Mirantis/cri-dockerd/releases/download/v0.3.14/cri-dockerd-0.3.14-3.el7.x86_64.rpm
如果由于網絡原因,無法下載,可以科學上網先下載再上傳到機器。
指定依賴鏡像地址:
在cri-docker.service配置文件中添加:–pod-infra-container-image=registry.aliyuncs.com/google_containers/pause:3.9
# vi /usr/lib/systemd/system/cri-docker.service
...
[Service]
Type=notify
ExecStart=/usr/bin/cri-dockerd --container-runtime-endpoint fd:// --pod-infra-container-image=registry.aliyuncs.com/google_containers/pause:3.9
ExecReload=/bin/kill -s HUP $MAINPID
TimeoutSec=0
RestartSec=2
Restart=always
...systemctl daemon-reload
systemctl enable cri-docker --now
安裝kubernetes組件
配置yum源
cat <<EOF | tee /etc/yum.repos.d/kubernetes.repo
[kubernetes]
name=Kubernetes
baseurl=https://mirrors.aliyun.com/kubernetes-new/core/stable/v1.28/rpm/
enabled=1
gpgcheck=1
gpgkey=https://mirrors.aliyun.com/kubernetes-new/core/stable/v1.28/rpm/repodata/repomd.xml.key
EOF
安裝指定版本的kubeadm、kubelet、kubectl組件
kubeadm :初始化集群?具
kubelet :在集群中的每個節點上?來啟動 Pod 和容器等
kubectl :?來與集群通信的命令??具(管理節點安裝即可)
yum install kubelet-1.28.0 kubeadm-1.28.0 kubectl-1.28.0 -y
配置kubelet服務開機自啟動
systemctl enable kubelet --now
配置Master節點
在master節點執行
kubeadm init \
--apiserver-advertise-address="192.168.3.10" \
--image-repository registry.aliyuncs.com/google_containers \
--kubernetes-version v1.28.0 \
--service-cidr=10.96.0.0/16 \
--pod-network-cidr=10.244.0.0/16 \
--cri-socket=unix:///var/run/cri-dockerd.sock
- –apiserver-advertise-address 集群通告地址,即監聽地址
- –image-repository registry.aliyuncs.com/google_containers 默認是k8s.gcr.io國內無法訪問,這里指定阿里云鏡像倉庫地址
- –kubernetes-version v1.28.0 指定k8s版本,和機器安裝的版本保持一致
- –service-cidr=10.96.0.0/16 集群內部虛擬網絡,Pod統一訪問入口
- –pod-network-cidr=10.244.0.0/16 Pod網絡,和CNI網絡組件yanl中保持一致
- –cri-socket=unix:///var/run/cri-dockerd.sock 指定接口
- –ignore-preflight-errors=all 忽略警告
這里執行可能會很慢,因為需要從鏡像站拉取鏡像,如果感覺慢,也可以先拉取鏡像再初始化。
kubeadm config images pull \--image-repository registry.aliyuncs.com/google_containers \--kubernetes-version v1.28.0 \--cri-socket=unix:///var/run/cri-dockerd.sock
全過程如下:
[root@k8s-master ~]# kubeadm init \
> --apiserver-advertise-address="192.168.3.10" \
> --image-repository registry.aliyuncs.com/google_containers \
> --kubernetes-version v1.28.0 \
> --service-cidr=10.96.0.0/16 \
> --pod-network-cidr=10.244.0.0/16 \
> --cri-socket=unix:///var/run/cri-dockerd.sock
[init] Using Kubernetes version: v1.28.0
[preflight] Running pre-flight checks
[preflight] Pulling images required for setting up a Kubernetes cluster
[preflight] This might take a minute or two, depending on the speed of your internet connection
[preflight] You can also perform this action in beforehand using 'kubeadm config images pull'
[certs] Using certificateDir folder "/etc/kubernetes/pki"
[certs] Generating "ca" certificate and key
[certs] Generating "apiserver" certificate and key
[certs] apiserver serving cert is signed for DNS names [k8s-master kubernetes kubernetes.default kubernetes.default.svc kubernetes.default.svc.cluster.local] and IPs [10.96.0.1 192.168.3.10]
[certs] Generating "apiserver-kubelet-client" certificate and key
[certs] Generating "front-proxy-ca" certificate and key
[certs] Generating "front-proxy-client" certificate and key
[certs] Generating "etcd/ca" certificate and key
[certs] Generating "etcd/server" certificate and key
[certs] etcd/server serving cert is signed for DNS names [k8s-master localhost] and IPs [192.168.3.10 127.0.0.1 ::1]
[certs] Generating "etcd/peer" certificate and key
[certs] etcd/peer serving cert is signed for DNS names [k8s-master localhost] and IPs [192.168.3.10 127.0.0.1 ::1]
[certs] Generating "etcd/healthcheck-client" certificate and key
[certs] Generating "apiserver-etcd-client" certificate and key
[certs] Generating "sa" key and public key
[kubeconfig] Using kubeconfig folder "/etc/kubernetes"
[kubeconfig] Writing "admin.conf" kubeconfig file
[kubeconfig] Writing "kubelet.conf" kubeconfig file
[kubeconfig] Writing "controller-manager.conf" kubeconfig file
[kubeconfig] Writing "scheduler.conf" kubeconfig file
[etcd] Creating static Pod manifest for local etcd in "/etc/kubernetes/manifests"
[control-plane] Using manifest folder "/etc/kubernetes/manifests"
[control-plane] Creating static Pod manifest for "kube-apiserver"
[control-plane] Creating static Pod manifest for "kube-controller-manager"
[control-plane] Creating static Pod manifest for "kube-scheduler"
[kubelet-start] Writing kubelet environment file with flags to file "/var/lib/kubelet/kubeadm-flags.env"
[kubelet-start] Writing kubelet configuration to file "/var/lib/kubelet/config.yaml"
[kubelet-start] Starting the kubelet
[wait-control-plane] Waiting for the kubelet to boot up the control plane as static Pods from directory "/etc/kubernetes/manifests". This can take up to 4m0s
[apiclient] All control plane components are healthy after 10.504564 seconds
[upload-config] Storing the configuration used in ConfigMap "kubeadm-config" in the "kube-system" Namespace
[kubelet] Creating a ConfigMap "kubelet-config" in namespace kube-system with the configuration for the kubelets in the cluster
[upload-certs] Skipping phase. Please see --upload-certs
[mark-control-plane] Marking the node k8s-master as control-plane by adding the labels: [node-role.kubernetes.io/control-plane node.kubernetes.io/exclude-from-external-load-balancers]
[mark-control-plane] Marking the node k8s-master as control-plane by adding the taints [node-role.kubernetes.io/control-plane:NoSchedule]
[bootstrap-token] Using token: twzwgv.xqhb98gfu1edpm62
[bootstrap-token] Configuring bootstrap tokens, cluster-info ConfigMap, RBAC Roles
[bootstrap-token] Configured RBAC rules to allow Node Bootstrap tokens to get nodes
[bootstrap-token] Configured RBAC rules to allow Node Bootstrap tokens to post CSRs in order for nodes to get long term certificate credentials
[bootstrap-token] Configured RBAC rules to allow the csrapprover controller automatically approve CSRs from a Node Bootstrap Token
[bootstrap-token] Configured RBAC rules to allow certificate rotation for all node client certificates in the cluster
[bootstrap-token] Creating the "cluster-info" ConfigMap in the "kube-public" namespace
[kubelet-finalize] Updating "/etc/kubernetes/kubelet.conf" to point to a rotatable kubelet client certificate and key
[addons] Applied essential addon: CoreDNS
[addons] Applied essential addon: kube-proxyYour Kubernetes control-plane has initialized successfully!To start using your cluster, you need to run the following as a regular user:mkdir -p $HOME/.kubesudo cp -i /etc/kubernetes/admin.conf $HOME/.kube/configsudo chown $(id -u):$(id -g) $HOME/.kube/configAlternatively, if you are the root user, you can run:export KUBECONFIG=/etc/kubernetes/admin.confYou should now deploy a pod network to the cluster.
Run "kubectl apply -f [podnetwork].yaml" with one of the options listed at:https://kubernetes.io/docs/concepts/cluster-administration/addons/Then you can join any number of worker nodes by running the following on each as root:kubeadm join 192.168.3.10:6443 --token twzwgv.xqhb98gfu1edpm62 \--discovery-token-ca-cert-hash sha256:43eff3fcb345a6138ae9254d60b219cd04dd5e18cc2910d0eb52db209bb93b26
[root@k8s-master ~]#
拷? kubeconfig 配置?件
mkdir -p $HOME/.kubesudo cp -i /etc/kubernetes/admin.conf $HOME/.kube/configsudo chown $(id -u):$(id -g) $HOME/.kube/config
將Node節點加入集群
在node節點執行
kubeadm join 192.168.3.10:6443 --token twzwgv.xqhb98gfu1edpm62 \--discovery-token-ca-cert-hash sha256:43eff3fcb345a6138ae9254d60b219cd04dd5e18cc2910d0eb52db209bb93b26 \--cri-socket=unix:///var/run/cri-dockerd.sock
為了安全性,kubeadm生成的token,默認有效期為24小時,過期之后就無法使用了,需要重新生成加入節點命令:
kubeadm token create --print-join-command
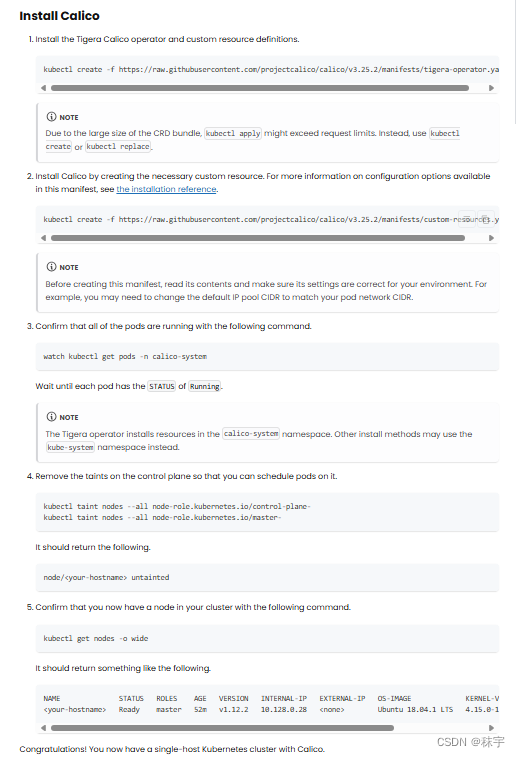
部署容器網絡
提前下載好calico的鏡像文件,導入所有節點
ls *.tar | xargs -i docker load -i {}
在master節點使用yaml文件創建pod
kubectl create -f tigera-operator.yaml
kubectl create -f custom-resources.yaml
注意:按官方給的做法,是直接使用yaml文件然后在線下載,必須保證鏡像源的訪問速度才行。不然需要很久很久
到這里,集群就算是搭建完成了
[root@localhost ~]# kubectl get pods -n calico-system
NAME                                       READY   STATUS    RESTARTS   AGE
calico-kube-controllers-85955d4f5b-rlrrg   1/1     Running   0          21s
calico-node-gvv4h                          1/1     Running   0          21s
calico-node-mhkxp                          0/1     Running   0          21s
calico-node-z9czg                          1/1     Running   0          21s
calico-typha-6dfcdf98b5-984zj              1/1     Running   0          22s
calico-typha-6dfcdf98b5-pvg5j              1/1     Running   0          18s
csi-node-driver-b5h5x                      2/2     Running   0          21s
csi-node-driver-htgqx                      2/2     Running   0          21s
csi-node-driver-js88m                      2/2     Running   0          21s
[root@localhost ~]# kubectl get nodes
NAME         STATUS   ROLES           AGE    VERSION
k8s-master   Ready    control-plane   4h4m   v1.28.0
k8s-node1    Ready    <none>          4h2m   v1.28.0
k8s-node2    Ready    <none>          4h2m   v1.28.0
Master節點命令自動補全
yum install bash-completion -y
echo 'source <(kubectl completion bash)' >>~/.bashrc

與usememo())


用法詳解)


