一、張量Tensor概念
矢量、標量和其他張量的計算函數,有內積、外積、線性映射以及笛卡兒積等
張量坐標在 n?維空間內,有?nr?個分量
每個分量都是坐標的函數,變換時每個坐標分量都按規則作線性變換
張量是一種特殊的數據結構,類似于數組和矩陣
張量是MindSpore網絡運算中的基本數據結構
二、環境準備
1. 安裝minspore模塊
!pip uninstall mindspore -y
!pip install -i https://pypi.mirrors.ustc.edu.cn/simple mindspore==2.3.0rc1
2.導入minspore、Tensor等相關模塊
import numpy as np
import mindspore
from mindspore import ops
from mindspore import Tensor, CSRTensor, COOTensor
三、創建張量
支持Tensor、float、int、bool、tuple、list、numpy.ndarray等
1.根據數據自動生成
data = [1, 0, 1, 0]
x_data = Tensor(data)
print(x_data, x_data.shape, x_data.dtype)
輸出:
[1 0 1 0] (4,) Int642.從NumPy數組生成
np_array = np.array(data)
x_np = Tensor(np_array)
print(x_np, x_np.shape, x_np.dtype)輸出:[
[1 0 1 0] (4,) Int643.init初始化器構造張量
支持參數:
init? ? ?:initializer的子類,? 例如init=One(),主要用于并行模式
shape:list、tuple、int,? ?例如shape=(2, 2)
dtype?:mindspore.dtype,例如dtype=mindspore.float32
from mindspore.common.initializer import One, Normal# Initialize a tensor with ones
tensor1 = mindspore.Tensor(shape=(2, 2), dtype=mindspore.float32, init=One())
# Initialize a tensor from normal distribution
tensor2 = mindspore.Tensor(shape=(2, 2), dtype=mindspore.float32, init=Normal())print("tensor1:\n", tensor1)
print("tensor2:\n", tensor2)
輸出:
tensor1:[[1. 1.][1. 1.]]
tensor2:[[-0.00247062 0.00723172][-0.00915686 -0.00984331]]4.繼承張量生成新張量
from mindspore import opsx_ones = ops.ones_like(x_data)
print(f"Ones Tensor: \n {x_ones} \n")x_zeros = ops.zeros_like(x_data)
print(f"Zeros Tensor: \n {x_zeros} \n")
輸出:
Ones Tensor: [1 1 1 1] Zeros Tensor: [0 0 0 0] 四、張量屬性
shape ??:形狀(tuple)
dtype ??:MindSpore數據類型
itemsize:單個元素占用字節數(整數)
nbytes ?:整個張量占用總字節數(整數)
ndim ???:維數,張量的秩=len(tensor.shape)(整數)
size ???:張量所有元素的個數(整數)
strides :張量每一維步長,每一維字節數(tuple)
x = Tensor(np.array([[1, 2], [3, 4]]), mindspore.int32)print("x_shape:", x.shape)
print("x_dtype:", x.dtype)
print("x_itemsize:", x.itemsize)
print("x_nbytes:", x.nbytes)
print("x_ndim:", x.ndim)
print("x_size:", x.size)
print("x_strides:", x.strides)
輸出:
x_shape: (2, 2)
x_dtype: Int32
x_itemsize: 4
x_nbytes: 16
x_ndim: 2
x_size: 4
x_strides: (8, 4)五、張量索引
從0開始編制
負索引表示倒序編制
切片用冒號:和 ...
tensor = Tensor(np.array([[0, 1], [2, 3]]).astype(np.float32))print("First row: {}".format(tensor[0]))
print("value of bottom right corner: {}".format(tensor[1, 1]))
print("Last column: {}".format(tensor[:, -1]))
print("First column: {}".format(tensor[..., 0]))
輸出:
First row: [0. 1.]
value of bottom right corner: 3.0
Last column: [1. 3.]
First column: [0. 2.]六、張量運算
包括算術、線性代數、矩陣處理(轉置、標引、切片)、采樣等。
1.算術運算:
x = Tensor(np.array([1, 2, 3]), mindspore.float32)
y = Tensor(np.array([4, 5, 6]), mindspore.float32)output_add = x + y
output_sub = x - y
output_mul = x * y
output_div = y / x
output_mod = y % x
output_floordiv = y // xprint("add:", output_add)
print("sub:", output_sub)
print("mul:", output_mul)
print("div:", output_div)
print("mod:", output_mod)
print("floordiv:", output_floordiv)
輸出:
add: [5. 7. 9.]
sub: [-3. -3. -3.]
mul: [ 4. 10. 18.]
div: [4.  2.5 2. ]
mod: [0. 1. 0.]
floordiv: [4. 2. 2.]
2. 連接concat,在指定維度連接張量
示例:
data1 = Tensor(np.array([[0, 1], [2, 3]]).astype(np.float32))
data2 = Tensor(np.array([[4, 5], [6, 7]]).astype(np.float32))
output = ops.concat((data1, data2), axis=0)print(output)
print("shape:\n", output.shape)
輸出:
[[0. 1.][2. 3.][4. 5.][6. 7.]]
shape:(4, 2)
3. stack,堆疊張量,形成新的維度
data1 = Tensor(np.array([[0, 1], [2, 3]]).astype(np.float32))
data2 = Tensor(np.array([[4, 5], [6, 7]]).astype(np.float32))
output = ops.stack([data1, data2])print(output)
print("shape:\n", output.shape)
輸出:
[[[0. 1.][2. 3.]][[4. 5.][6. 7.]]]
shape:(2, 2, 2)七、張量與NumPy轉換
1. Tensor轉換為NumPy
?Tensor.asnumpy()
t = Tensor([1., 1., 1., 1., 1.])
print(f"t: {t}", type(t))
n = t.asnumpy()
print(f"n: {n}", type(n))
輸出:
t: [1. 1. 1. 1. 1.] <class 'mindspore.common.tensor.Tensor'>
n: [1. 1. 1. 1. 1.] <class 'numpy.ndarray'>
2.NumPy轉換為Tensor
Tensor.from_numpy()
n = np.ones(5)
t = Tensor.from_numpy(n)
np.add(n, 1, out=n)
print(f"n: {n}", type(n))
print(f"t: {t}", type(t))
輸出:
n: [2. 2. 2. 2. 2.] <class 'numpy.ndarray'>
t: [2. 2. 2. 2. 2.] <class 'mindspore.common.tensor.Tensor'>
八、稀疏張量
絕大部分元素的值為零或者某個確定值。
常用CSR和COO兩種稀疏數據格式
稀疏張量的表達形式
<indices:Tensor, values:Tensor, shape:Tensor>
indices 非零下標元素
values 非零元素的值
shape 被壓縮的稀疏張量的形狀
三種稀疏張量結構:CSRTensor、COOTensor和RowTensor。
1.CSRTensor
Compressed Sparse Row壓縮稀疏行
values?:非零元素的值,一維張量
indptr?:行維度,非零元素在values中的起始位置和終止位置,一維整數張量
indices:列維度,非零元素在列中的位置,其長度與values相等,一維整數張量
???????索引數據類型支持int16、int32、int64
shape??:壓縮稀疏張量的形狀,數據類型為Tuple,目前僅支持二維CSRTensor
參考mindspore.CSRTensor。
示例:
indptr = Tensor([0, 1, 2])
indices = Tensor([0, 1])
values = Tensor([1, 2], dtype=mindspore.float32)
shape = (2, 4)# Make a CSRTensor
csr_tensor = CSRTensor(indptr, indices, values, shape)print(csr_tensor.astype(mindspore.float64).dtype)
輸出:
Float64生成的CSRTensor:

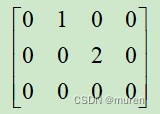
2.COOTensor
Coordinate Format坐標格式
values?:非零元素的值,一維張量,形狀:[N]
indices:每行代表非零元素下標,二維整數張量,形狀:[N, ndims]
索引數據類型支持int16、int32、int64。
shape??:壓縮稀疏張量的形狀,目前僅支持二維COOTensor
參考mindspore.COOTensor。
示例:
indices = Tensor([[0, 1], [1, 2]], dtype=mindspore.int32)
values = Tensor([1, 2], dtype=mindspore.float32)
shape = (3, 4)# Make a COOTensor
coo_tensor = COOTensor(indices, values, shape)print(coo_tensor.values)
print(coo_tensor.indices)
print(coo_tensor.shape)
print(coo_tensor.astype(mindspore.float64).dtype)  # COOTensor to float64
輸出:
[1. 2.]
[[0 1][1 2]]
(3, 4)
Float64生成的COOTensor:


(圖形化界面手把手教學))
)


?詳細解讀文本分類、情感分析和機器翻譯的核心技術)


)


)


