概述
- 在上一篇文章中,我們已經詳細了解了開發 Webpack Loader 需要用到的基本技能,包括:Loader 基本形態、如何構建測試環境、如何使用 Loader Context 接口等。接下來我們繼續拓展學習一些 Loader 輔助工具,包括:
- 了解
loader-utils,并使用loader-utils拼接文件名; - 了解
schema-tiles,以及其背后的ajv庫與 JSON-Schema 協議,學習使用schema-utils實現參數校驗
- 了解
- 文章最后還會深入剖析
vue-loader組件源碼,通過實戰方式幫助大家更深入理解:如何開發一個成熟 Loader
使用 schema-utils
Webpack,以及 Webpack 生態下的諸多 Loader、Plugin 基本上都會提供若干“配置項”,供用戶調整組件的運行邏輯,這些組件內部通常都會使用 schema-utils 工具庫校驗用戶傳入的配置是否滿足要求。
因此,若我們開發的 Loader 需要對外暴露配置項,建議也盡量使用這一工具,基本用法:
-
安裝依賴:
yarn add -D schema-utils -
編寫配置對象的 Schema 描述,例如:
// options.json {"type": "object","properties": {"name": {"type": "boolean"}},"required": ["name"],"additionalProperties": false } -
在 Loader 中調用
schema-utils校驗配置對象:import { validate } from "schema-utils"; import schema from "./options.json";// 調用 schema-utils 完成校驗 export default function loader(source) {const options = this.getOptions();validate(schema, options);return source; }// Webpack5 之后還可以借助 Loader Context 的 `getOptions` 接口完成校驗 export default function loader(source) {const options = this.getOptions(schema);return source; }
之后,若用戶傳入不符合 Schema 描述的參數對象,會報類似下面這種錯誤提示:
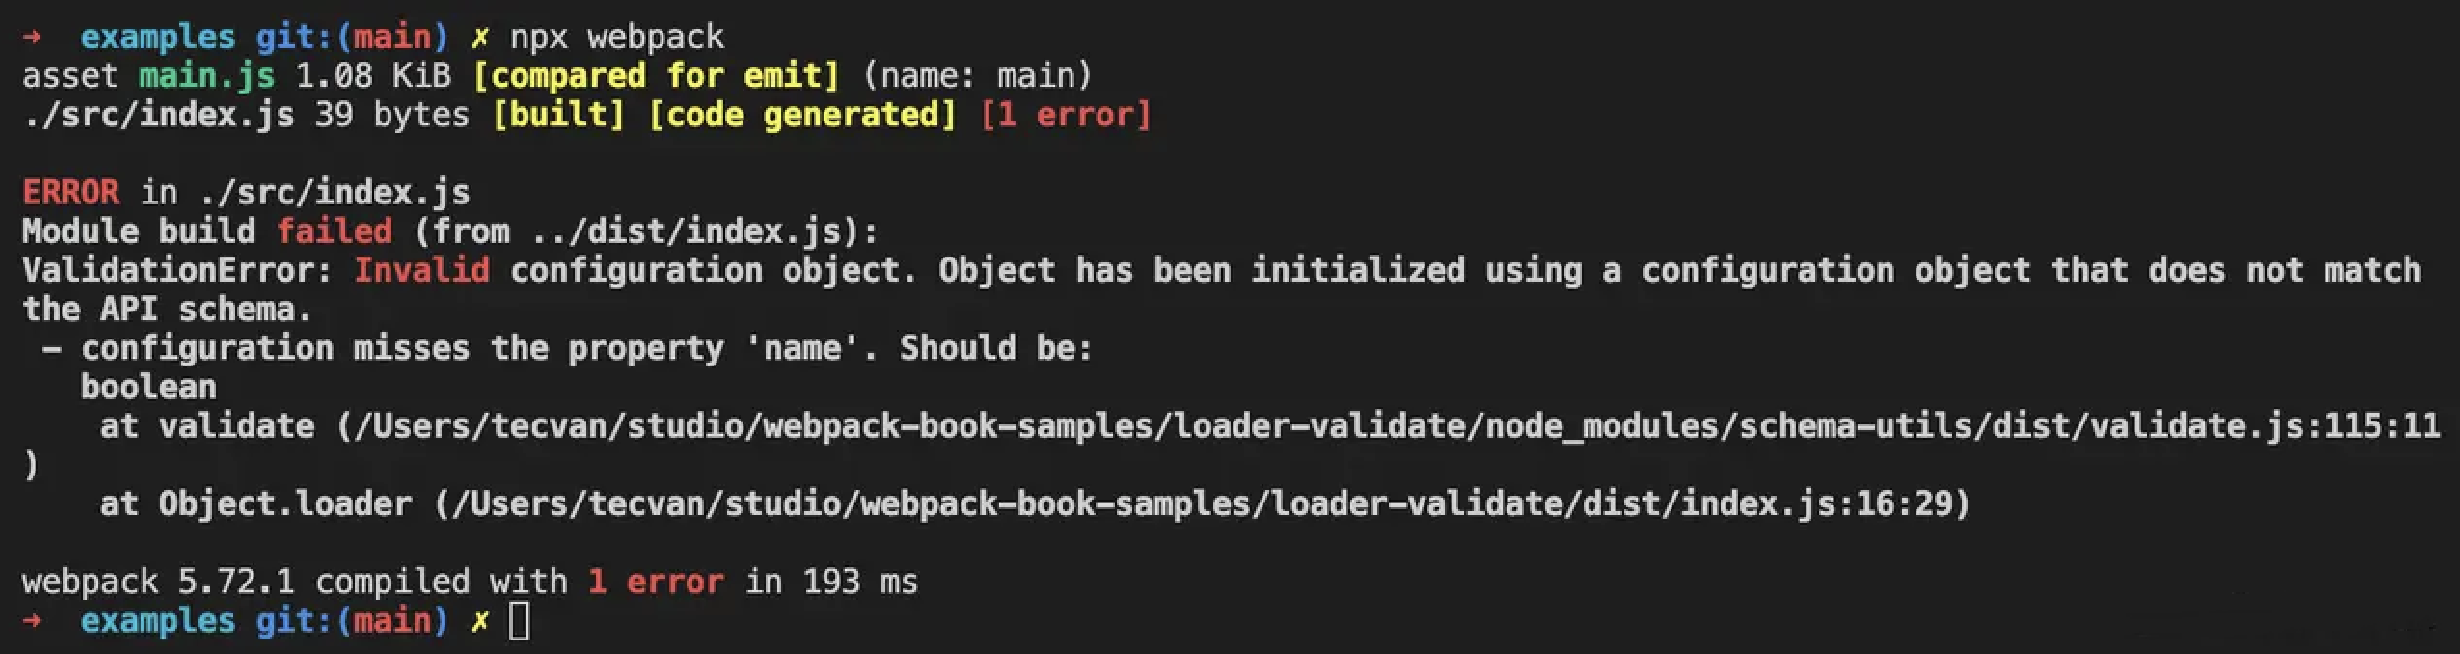
schema-utils 的校驗能力很強,能夠完美支撐起 Webpack 生態下非常復雜的參數校驗需求,但官方文檔非常語焉不詳,翻閱源碼后發現,它底層主要依賴于 ajv ,這是一個應用廣泛、功能強大且性能優異的校驗工具:
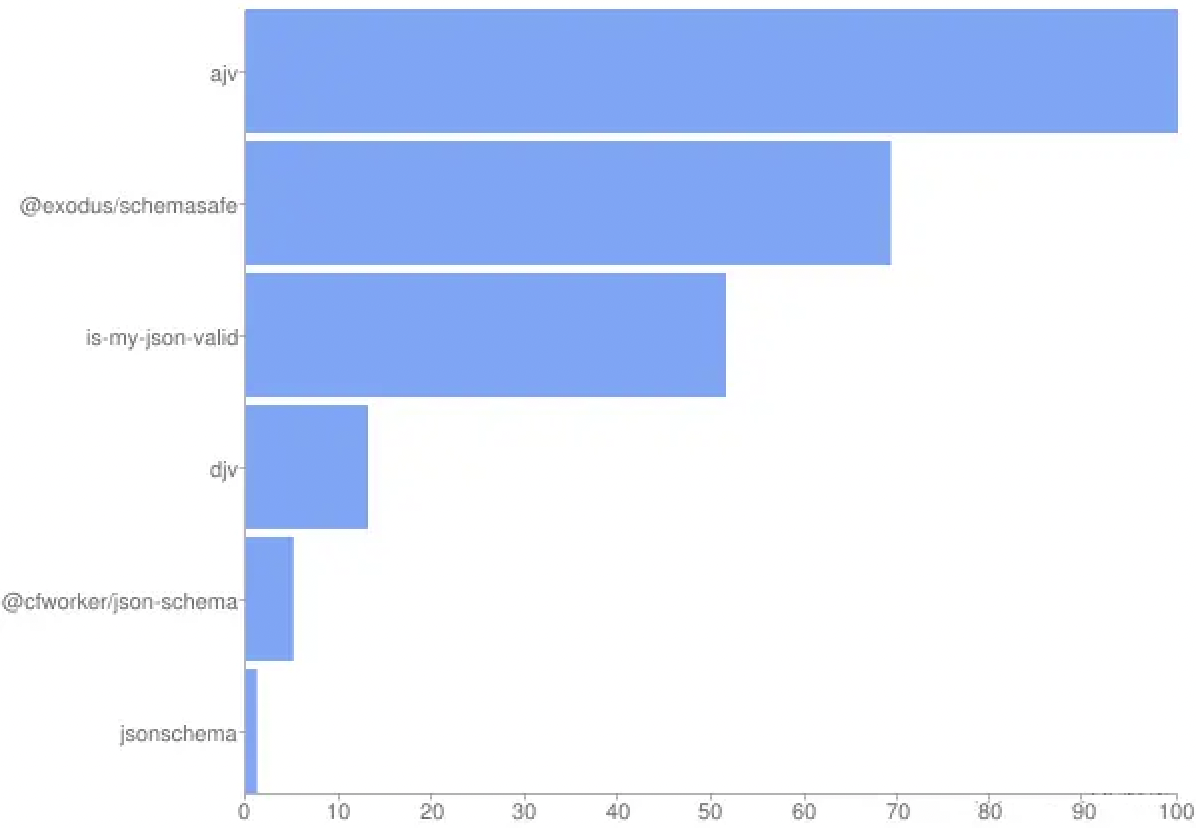
- 提示:
ajv在對象校驗、JSON 序列化/反序列化方面的性能表現非常突出,許多知名開源框架 如:ESLint、fast-json-stringify、middy、swagger、tailwind 等底層都依賴于ajv,值得我們學習、復用到業務項目中。
ajv 功能非常完備,基本上已經覆蓋了“使用 JSON 描述對象約束”的所有場景,我們不可能在一篇文章里介紹所有細節,所以我下面只摘要介紹一些比較重要的能力與實例,更多信息建議參考 官網。
-
ajv數據描述格式基礎知識: -
schema-utils內部使用ajv的 JSON-Schema 模式實現參數校驗,而 JSON-Schema 是一種以 JSON 格式描述數據結構的 公共規范,使用時至少需要提供type參數,如:{"type": "number" }
ajv 默認支持七種基本數據類型。
-
number :數值型,支持整數、浮點數,支持如下校驗規則:
maximum、minimum:屬性值必須大于等于minimum,且小于等于maximum;exclusiveMaximum、exclusiveMinimum:屬性值必須大于exclusiveMinimum,且小于exclusiveMinimum;multipleOf:屬性值必須為multipleOf的整數倍,例如對于multipleOf = 5,則10/20/5均符合預期,但8/9/1等不符合預期。
-
interger:整數型,與number類似,也支持上面介紹的maximum等校驗規則; -
string :字符串型,支持如下校驗規則:
maxLength、minLength:限定字符串的最大長度、最小長度;pattern:以正則表達式方式限定字符串內容;format:聲明字符串內容格式,schema-utils底層調用了[ajv-formats](https://github.com/ajv-validator/ajv-formats)插件,開箱支持date/ipv4/regex/uuid等格式。
-
boolean:bool 值; -
array :數組型,支持如下校驗屬性:
maxItems、minItems:限定數組的最多、最少的元素數量;uniqueItems:限定數組元素是否必須唯一,不可重復;items:聲明數組項的 Schema 描述,數組項內可復用 JSON-Schema 的任意規則,從而形成嵌套定義結構;
-
null:空值,常用于復合type類型,如type = ['object', 'null']支持傳入對象結構或null值; -
object :對象結構,這是一個比較負責的結構,支持如下校驗屬性:
-
maxProperties/minProperties:限定對象支持的最多、最少屬性數量; -
required:聲明哪些屬性不可為空,例如required = ['name', 'age']時,傳入的值必須至少提供name/age屬性; -
properties:定義特定屬性的 Schema 描述,與array的items屬性類似,支持嵌套規則,例如:{type: "object",properties: {foo: {type: "string"},bar: {type: "number",minimum: 2}} }
-
-
patternProperties:同樣用于定義對象屬性的 Schema,但屬性名支持正則表達式形式,例如:{type: "object",patternProperties: {"^fo.*$": {type: "string"},"^ba.*$": {type: "number"}} } -
additionalProperties:限定對象是否可以提供除properties、patternProperties之外的屬性;
除此之外,Schema 節點還支持一些通用的規則字段,包括:
-
enum:枚舉數組,屬性值必須完全等于(Deep equal)這些值之一,例如:// JSON-Schema {"type": "string","enum": ["fanwenjie","tecvan"] }// 有效值: "fanwenjie"/"tecvan" // 無效值,如: "foo bar" 等 -
const:靜態數值,屬性值必須完全等于const定義,單獨看const似乎作用不大,但配合 $data 指令的 JSON-Pointer 能力,可以實現關聯相等的效果,例如:// JSON-Schema {type: "object",properties: {foo: {type: "string"},bar: {const: {$data: "1/foo"}}} }// bar 必須等于 foo,如: {"foo": "fanwenjie","bar": "fanwenjie" } // 否則無效: {"foo": "fanwenjie","bar": "tecvan" } -
這些基礎數據類型與校驗規則奠定了
ajv的基礎校驗能力,我們使用schema-utils時大部分時間都需要與之打交道,建議同學們多加學習掌握。 -
使用
ajv復合條件指令
除上述介紹的基本類型與基礎校驗規則外,ajv 還提供了若干復合校驗指令:
-
not:數值必須不符合該條件,例如:
{type: "number", not: {minimum: 3}}時,傳入數值必須小于 3; -
anyof:數值必須滿足
anyof條件之一,這是一個非常實用的指令,例如在css-loader中:// css-loader/src/options.json {"additionalProperties": false,"properties": {"url": {"description": "Enables/Disables 'url'/'image-set' functions handling (https://github.com/webpack-contrib/css-loader#url).","anyOf": [{"type": "boolean"},{"instanceof": "Function"}]},// more properties},"type": "object" }
這意味著 css-loader 的 url 配置項只接受 Bool 或函數值。
-
oneof:數值必須滿足且只能滿足
oneof條件之一,例如:{type: "number",oneOf: [{maximum: 3}, {type: "integer"}] } // 下述數值符合要求: 1.1、2.1、4、5 等// 下述數值不符合要求: 3.5、2、1 等
數值要么是小于等于3的浮點數,要么是大于3的整數,不在此區間的數值如“3.5/2” 等均不符合要求。
-
allof:數值必須滿足
allof指定的所有條件,例如:{type: "number",allOf: [{maximum: 3}, {type: "integer"}] } // 下述數值符合要求: 1、2、3 等// 下述數值不符合要求: 1.1、4、5 等
這要求傳入的數值必須小于 3,且必須為整型。
-
if/then/else:這是一個稍顯復雜的三元組復合條件,大致邏輯為:若傳入的數值滿足if條件,則必須同時滿足then條件;若不滿足if則必須同時滿足else,其中else可選。例如:{type: "object",if: {properties: {foo: {minimum: 10}}},then: {required: ["bar"]},else: {required: ["baz"]} }
這意味著,若傳入的 foo 屬性值大于等于 10 時,則必須同時提供 then 所要求的 bar 屬性;否則必須同時提供 else 所要求的 baz 屬性。
總結一下,Webpack 官方選擇 ajv 作用配置參數的校驗工具,并將其二次封裝為 schema-utils 庫,供 Webpack 生態下的諸多 Loader、Plugin 使用。
而上面介紹的基礎類型、類型校驗、復合校驗規則等內容是 ajv 非常基礎且重要的知識點,三者協作組成 ajv 校驗 schema 的框架結構,除此之外還有許多增強 Schema 表述能力的增強指令,包括:$data、$ref、definitions 等,篇幅關系這里不一一列舉。同學們也可以參考 Webpack 官方編寫的 Schema 文件,學習各種校驗規則的寫法。
使用 loader-utils
在 Webpack5 之前,loader-utils 是一個非常重要的 Loader 開發輔助工具,為開發者提供了諸如 getOptions/getCurrentRequest/parseQuery 等核心接口,這些接口被諸多 Loader 廣泛使用,到 Webpack5 之后干脆將這部分能力遷移到 Loader Context,致使 loader-utils 被大幅裁減簡化。
被裁減后的 loader-utils 僅保留了四個接口:
urlToRequest:用于將模塊路徑轉換為文件路徑的工具函數;isUrlRequest:用于判定字符串是否為模塊請求路徑;getHashDigest:用于計算內容 Hash 值;interpolateName:用于拼接文件名的模板工具;
翻閱大量 Loader 源碼后發現,前三個接口使用率極低,實用性不大,因此本文直接跳過,僅側重介紹 interpolateName 接口。
使用 interpolateName 拼接文件名
Webpack 支持以類似 [path]/[name]-[hash].js 方式設定 output.filename 即輸出文件的命名,這一層規則通常不需要關注,但在編寫類似 webpack-contrib/file-loader 這種自行輸出產物文件的 Loader 時,需要由開發者自行處理產物路徑邏輯。
此時可以使用 loader-utils 提供的 interpolateName 方法在 Loader 中以類似 Webpack 的 output.filename 規則拼接資源路徑及名稱,例如:
// file-loader/src/index.js
import { interpolateName } from 'loader-utils';export default function loader(content) {const context = options.context || this.rootContext;const name = options.name || '[contenthash].[ext]';// 拼接最終輸出的名稱const url = interpolateName(this, name, {context,content,regExp: options.regExp,});let outputPath = url;// ...let publicPath = `__webpack_public_path__ + ${JSON.stringify(outputPath)}`;// ...if (typeof options.emitFile === 'undefined' || options.emitFile) {// ...// 提交、寫出文件this.emitFile(outputPath, content, null, assetInfo);}// ...const esModule =typeof options.esModule !== 'undefined' ? options.esModule : true;// 返回模塊化內容return `${esModule ? 'export default' : 'module.exports ='} ${publicPath};`;
}export const raw = true;
代碼的核心邏輯:
- 根據 Loader 配置,調用
interpolateName方法拼接目標文件的完整路徑; - 調用上下文
this.emitFile接口,寫出文件; - 返回
module.exports = ${publicPath},其它模塊可以引用到該文件路徑。
- 提示:除
file-loader外,css-loader、eslint-loader都有用到該接口,感興趣的同學請自行前往查閱源碼。
interpolateName 功能稍弱于 Webpack 的 Template String 規則,僅支持如下占位符:
[ext]:原始資源文件的擴展名,如.js;[name]:原始文件名;[path]:原始文件相對context參數的路徑;[hash]:原始文件的內容 Hash 值,與output.file類似同樣支持[hash:length]指定 Hash 字符串的長度;[contenthash]:作用、用法都與上述[hash]一模一樣。
綜合示例:Vue-loader
接下來,我們再結合 vue-loader 源碼進一步學習 Loader 開發的進階技巧。vue-loader 是一個綜合性很強的示例,它借助 Webpack 與組件的一系列特性巧妙地解決了:如何區分 Vue SFC 不同代碼塊,并復用其它 Loader 處理不同區塊的內容?
先從結構說起,vue-loader 內部實際上包含了三個組件:
lib/index.js定義的 Normal Loader,負責將 Vue SFC 不同區塊轉化為 JavaScriptimport語句,具體邏輯下面細講;lib/loaders/pitcher.js定義的 Pitch Loader,負責遍歷的rules數組,拼接出完整的行內引用路徑;lib/plugin.js定義的插件,負責初始化編譯環境,如復制原始rules配置等;
三者協作共同完成對 SFC 的處理,使用時需要用戶同時注冊 Normal Loader 和 Plugin,如:
const VueLoaderPlugin = require("vue-loader/lib/plugin");module.exports = {module: {rules: [{test: /.vue$/,use: [{ loader: "vue-loader" }],}],},plugins: [new VueLoaderPlugin()],
};
vue-loader 運行過程大致上可以劃分為兩個階段:
- 預處理階段:動態修改 Webpack 配置,注入
vue-loader專用的一系列module.rules; - 內容處理階段:Normal Loader 配合 Pitch Loader 完成文件內容轉譯。
預處理階段
vue-loader 插件會在 apply 函數中動態修改 Webpack 配置,核心代碼如下:
class VueLoaderPlugin {apply (compiler) {// ...const rules = compiler.options.module.rules// ...const clonedRules = rules.filter(r => r !== rawVueRules).map((rawRule) => cloneRule(rawRule, refs))// ...// global pitcher (responsible for injecting template compiler loader & CSS// post loader)const pitcher = {loader: require.resolve('./loaders/pitcher'),resourceQuery: query => {if (!query) { return false }const parsed = qs.parse(query.slice(1))return parsed.vue != null}// ...}// replace original rulescompiler.options.module.rules = [pitcher,...clonedRules,...rules]}
}function cloneRule (rawRule, refs) {// ...
}module.exports = VueLoaderPlugin
拆開來看,插件主要完成兩個任務:
- 初始化并注冊 Pitch Loader:代碼第16行,定義pitcher對象,指定loader路徑為
require.resolve('./loaders/pitcher'),并將pitcher注入到rules數組首位。
這種動態注入的好處是用戶不用關注 —— 不去看源碼根本不知道還有一個pitcher loader,而且能保證pitcher能在其他rule之前執行,確保運行順序。
- 復制
rules配置:代碼第8行遍歷compiler.options.module.rules數組,也就是用戶提供的 Webpack 配置中的module.rules項,對每個rule執行cloneRule方法復制規則對象。
之后,將 Webpack 配置修改為 [pitcher, ...clonedRules, ...rules] 。感受一下實際效果,例如:
module.exports = {module: {rules: [{test: /.vue$/i,use: [{ loader: "vue-loader" }],},{test: /\.css$/i,use: [MiniCssExtractPlugin.loader, "css-loader"],},{test: /\.js$/i,exclude: /node_modules/,use: {loader: "babel-loader",options: {presets: [["@babel/preset-env", { targets: "defaults" }]],},},},],},plugins: [new VueLoaderPlugin(),new MiniCssExtractPlugin({ filename: "[name].css" }),],
};
這里定義了三個 rule,分別對應 vue、js、css 文件。經過 plugin 轉換之后的結果大概為:
module.exports = {module: {rules: [{loader: "/node_modules/vue-loader/lib/loaders/pitcher.js",resourceQuery: () => {},options: {},},{resource: () => {},resourceQuery: () => {},use: [{loader: "/node_modules/mini-css-extract-plugin/dist/loader.js",},{ loader: "css-loader" },],},{resource: () => {},resourceQuery: () => {},exclude: /node_modules/,use: [{loader: "babel-loader",options: {presets: [["@babel/preset-env", { targets: "defaults" }]],},ident: "clonedRuleSet-2[0].rules[0].use",},],},{test: /\.vue$/i,use: [{ loader: "vue-loader", options: {}, ident: "vue-loader-options" },],},{test: /\.css$/i,use: [{loader: "/node_modules/mini-css-extract-plugin/dist/loader.js",},{ loader: "css-loader" },],},{test: /\.vue$/i,exclude: /node_modules/,use: [{loader: "babel-loader",options: {presets: [["@babel/preset-env", { targets: "defaults" }]],},ident: "clonedRuleSet-2[0].rules[0].use",},],},],},
};
轉換之后生成6個rule,按定義的順序分別為:
- 針對
xx.vue&vue格式路徑生效的規則,只用了vue-loader的 Pitch 作為 Loader; - 被復制的 CSS 處理規則,
use數組與開發者定義的規則相同; - 被復制的 JS 處理規則,
use數組也跟開發者定義的規則相同; - 開發者定義的
vue-loader規則,內容及配置都不變; - 開發者定義的css規則,用到
css-loader、mini-css-extract-plugin loader; - 開發者定義的js規則,用到
babel-loader。
可以看到,第2、3項是從開發者提供的配置中復制過來的,內容相似,只是 cloneRule 在復制過程會給這些規則重新定義 resourceQuery 函數:
function cloneRule (rawRule, refs) {const rules = ruleSetCompiler.compileRules(`clonedRuleSet-${++uid}`, [{rules: [rawRule]}], refs)const conditions = rules[0].rules.map(rule => rule.conditions)// shallow flat.reduce((prev, next) => prev.concat(next), [])// ...const res = Object.assign({}, rawRule, {resource: resources => {currentResource = resourcesreturn true},resourceQuery: query => {if (!query) { return false }const parsed = qs.parse(query.slice(1))if (parsed.vue == null) {return false}if (!conditions) {return false}// 用import路徑的lang參數測試是否適用于當前ruleconst fakeResourcePath = `${currentResource}.${parsed.lang}`for (const condition of conditions) {// add support for resourceQueryconst request = condition.property === 'resourceQuery' ? query : fakeResourcePathif (condition && !condition.fn(request)) {return false}}return true}})// ...return res}
cloneRule 內部定義的 resourceQuery 函數對應 module.rules.resourceQuery 配置項,與我們經常用的 test 差不多,都用于判斷資源路徑是否適用這個rule。這里 resourceQuery 核心邏輯就是取出路徑中的lang參數,偽造一個以 lang 結尾的路徑,傳入rule的condition中測試路徑名對該rule是否生效,例如下面這種會命中 /\.js$/i 規則:
import script from "./index.vue?vue&type=script&lang=js&"
vue-loader 正是基于這一規則,為不同內容塊 (css/js/template) 匹配、復用用戶所提供的 rule 設置。
內容處理階段
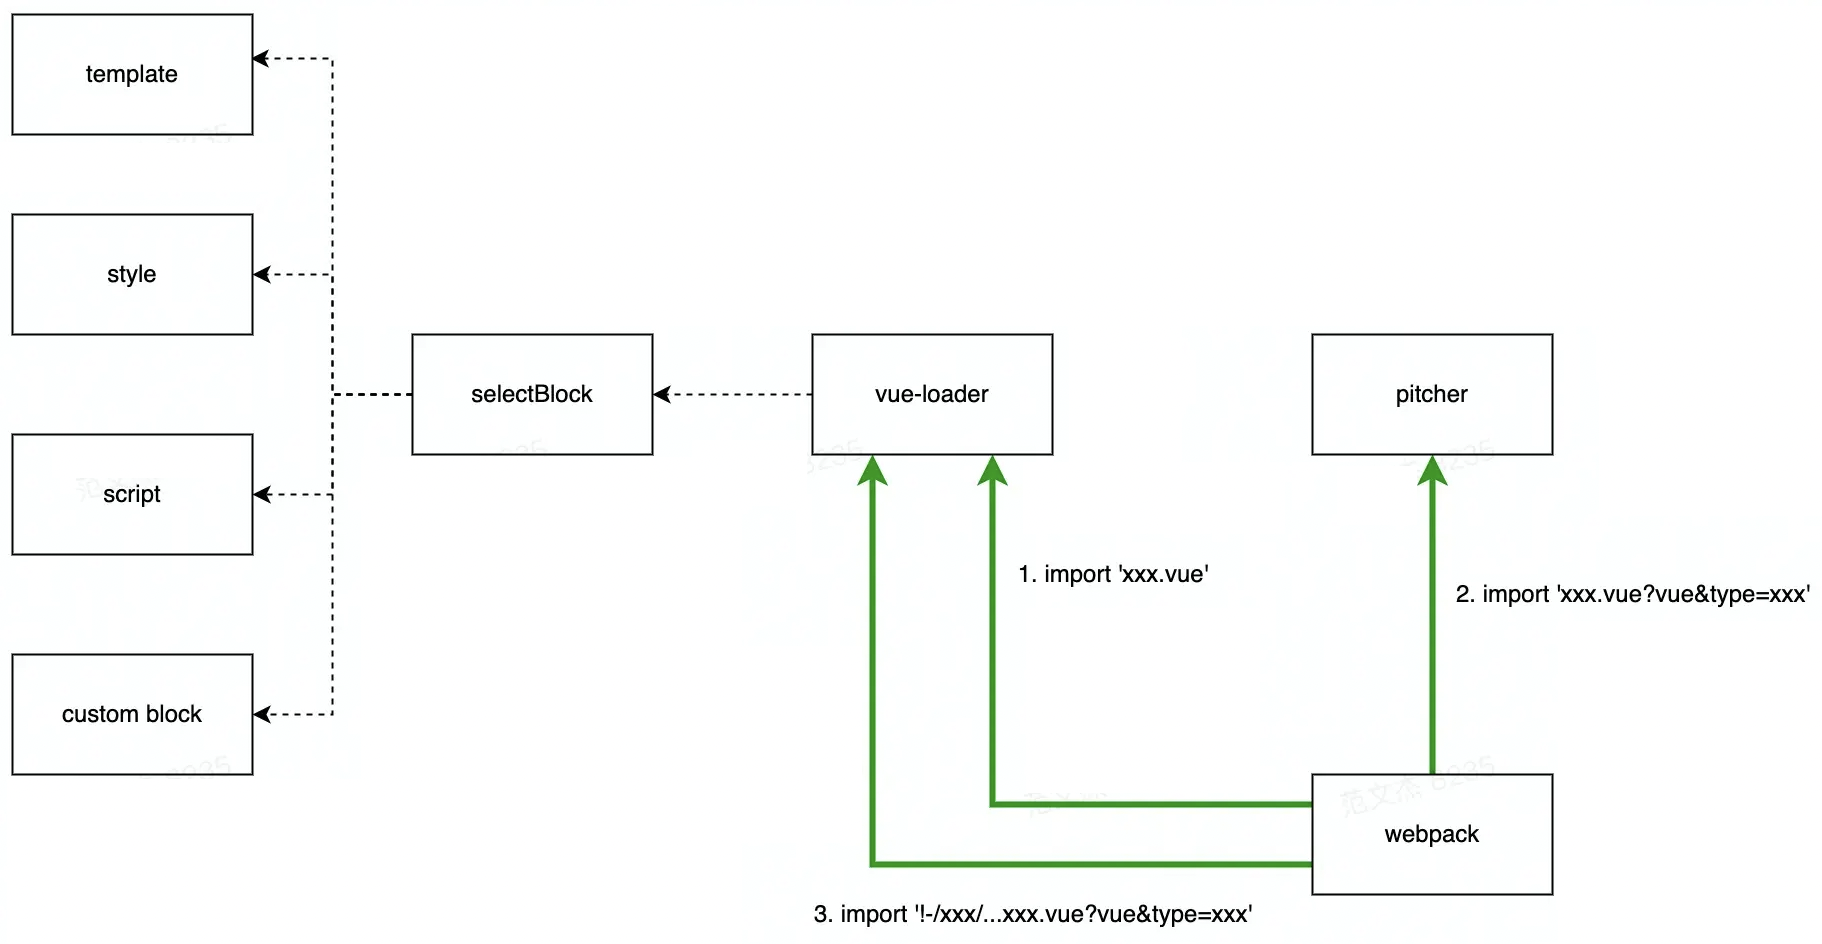
插件處理完配置,webpack 運行起來之后,Vue SFC 文件會被多次傳入不同的 Loader,經歷多次中間形態變換之后才產出最終的 js 結果,大致上可以分為如下步驟:
- 路徑命中
/\.vue$/i規則,調用vue-loader生成中間結果 A; - 結果 A 命中
xx.vue?vue規則,調用vue-loaderPitch Loader 生成中間結果 B; - 結果 B 命中具體 Loader,直接調用 Loader 做處理。
過程大致為:
舉個轉換過程的例子:
// 原始代碼
import xx from './index.vue';
// 第一步,命中 vue-loader,轉換為:
import { render, staticRenderFns } from "./index.vue?vue&type=template&id=2964abc9&scoped=true&"
import script from "./index.vue?vue&type=script&lang=js&"
export * from "./index.vue?vue&type=script&lang=js&"
import style0 from "./index.vue?vue&type=style&index=0&id=2964abc9&scoped=true&lang=css&"// 第二步,命中 pitcher,轉換為:
export * from "-!../../node_modules/vue-loader/lib/loaders/templateLoader.js??vue-loader-options!../../node_modules/vue-loader/lib/index.js??vue-loader-options!./index.vue?vue&type=template&id=2964abc9&scoped=true&"
import mod from "-!../../node_modules/babel-loader/lib/index.js??clonedRuleSet-2[0].rules[0].use!../../node_modules/vue-loader/lib/index.js??vue-loader-options!./index.vue?vue&type=script&lang=js&";
export default mod; export * from "-!../../node_modules/babel-loader/lib/index.js??clonedRuleSet-2[0].rules[0].use!../../node_modules/vue-loader/lib/index.js??vue-loader-options!./index.vue?vue&type=script&lang=js&"
export * from "-!../../node_modules/mini-css-extract-plugin/dist/loader.js!../../node_modules/css-loader/dist/cjs.js!../../node_modules/vue-loader/lib/loaders/stylePostLoader.js!../../node_modules/vue-loader/lib/index.js??vue-loader-options!./index.vue?vue&type=style&index=0&id=2964abc9&scoped=true&lang=css&"// 第三步,根據行內路徑規則按序調用loader
第一次執行 vue-loader
在運行階段,根據配置規則, Webpack 首先將原始的 SFC 內容傳入 vue-loader,例如對于下面的代碼:
// main.js
import xx from 'index.vue';// index.vue 代碼
<template><div class="root">hello world</div>
</template><script>
export default {data() {},mounted() {console.log("hello world");},
};
</script><style scoped>
.root {font-size: 12px;
}
</style>
此時第一次執行 vue-loader ,執行如下邏輯:
- 調用
@vue/component-compiler-utils包的parse函數,將SFC 文本解析為AST對象; - 遍歷 AST 對象屬性,轉換為特殊的引用路徑;
- 返回轉換結果。
對于上述 index.vue 內容,轉換結果為:
import { render, staticRenderFns } from "./index.vue?vue&type=template&id=2964abc9&scoped=true&"
import script from "./index.vue?vue&type=script&lang=js&"
export * from "./index.vue?vue&type=script&lang=js&"
import style0 from "./index.vue?vue&type=style&index=0&id=2964abc9&scoped=true&lang=css&"/* normalize component */
import normalizer from "!../../node_modules/vue-loader/lib/runtime/componentNormalizer.js"
var component = normalizer(script,render,staticRenderFns,false,null,"2964abc9",null)...
export default component.exports
注意,這里并沒有真的處理 block 里面的內容,而是簡單地針對不同類型的內容塊生成 import 語句:
- Script:
"./index.vue?vue&type=script&lang=js&" - Template:
"./index.vue?vue&type=template&id=2964abc9&scoped=true&" - Style:
"./index.vue?vue&type=style&index=0&id=2964abc9&scoped=true&lang=css&"
這些路徑都對應原始的 .vue 路徑基礎上增加了 vue 標志符及 type、lang 等參數。
執行 Pitch Loader
如前所述,vue-loader 插件會在預處理階段插入帶 resourceQuery 函數的 Pitch Loader:
const pitcher = {loader: require.resolve('./loaders/pitcher'),resourceQuery: query => {if (!query) { return false }const parsed = qs.parse(query.slice(1))return parsed.vue != null}
}
其中, resourceQuery 函數命中 xx.vue?vue 格式的路徑,也就是說上面 vue-loader 轉換后的 import 路徑會被 Pitch Loader 命中,做進一步處理。Pitch Loader 的邏輯比較簡單,做的事情也只是轉換 import 路徑:
const qs = require('querystring')
...const dedupeESLintLoader = loaders => {...}const shouldIgnoreCustomBlock = loaders => {...}// 正常的loader階段,直接返回結果
module.exports = code => codemodule.exports.pitch = function (remainingRequest) {const options = loaderUtils.getOptions(this)const { cacheDirectory, cacheIdentifier } = options// 關注點1: 通過解析 resourceQuery 獲取loader參數const query = qs.parse(this.resourceQuery.slice(1))let loaders = this.loaders// if this is a language block request, eslint-loader may get matched// multiple timesif (query.type) {// if this is an inline block, since the whole file itself is being linted,// remove eslint-loader to avoid duplicate linting.if (/\.vue$/.test(this.resourcePath)) {loaders = loaders.filter(l => !isESLintLoader(l))} else {// This is a src import. Just make sure there's not more than 1 instance// of eslint present.loaders = dedupeESLintLoader(loaders)}}// remove selfloaders = loaders.filter(isPitcher)// do not inject if user uses null-loader to void the type (#1239)if (loaders.some(isNullLoader)) {return}const genRequest = loaders => {... }// Inject style-post-loader before css-loader for scoped CSS and trimmingif (query.type === `style`) {const cssLoaderIndex = loaders.findIndex(isCSSLoader)if (cssLoaderIndex > -1) {...return query.module? `export { default } from  ${request}; export * from ${request}`: `export * from ${request}`}}// for templates: inject the template compiler & optional cacheif (query.type === `template`) {...// console.log(request)// the template compiler uses esm exportsreturn `export * from ${request}`}// if a custom block has no other matching loader other than vue-loader itself// or cache-loader, we should ignore itif (query.type === `custom` && shouldIgnoreCustomBlock(loaders)) {return ``}const request = genRequest(loaders)return `import mod from ${request}; export default mod; export * from ${request}`
}
核心功能是遍歷用戶定義的rule數組,拼接出完整的行內引用路徑,例如:
// 開發代碼:
import xx from 'index.vue'
// 第一步,通過vue-loader轉換成帶參數的路徑
import script from "./index.vue?vue&type=script&lang=js&"
// 第二步,在 pitcher 中解讀loader數組的配置,并將路徑轉換成完整的行內路徑格式
import mod from "-!../../node_modules/babel-loader/lib/index.js??clonedRuleSet-2[0].rules[0].use!../../node_modules/vue-loader/lib/index.js??vue-loader-options!./index.vue?vue&type=script&lang=js&";
第二次執行vue-loader
通過上面 vue-loader -> Pitch Loader 處理后,會得到一個新的行內路徑,例如:
import mod from "-!../../node_modules/babel-loader/lib/index.js??clonedRuleSet-2[0].rules[0].use!../../node_modules/vue-loader/lib/index.js??vue-loader-options!./index.vue?vue&type=script&lang=js&";
以這個 import 語句為例,之后 Webpack 會按照下述邏輯運行:
- 調用
vue-loader處理index.js文件; - 調用
babel-loader處理上一步返回的內容。
這就給了 vue-loader 第二次執行的機會,再回過頭來看看 vue-loader 的代碼:
module.exports = function (source) {// ...const {target,request,minimize,sourceMap,rootContext,resourcePath,resourceQuery = "",} = loaderContext;// ...const descriptor = parse({source,compiler: options.compiler || loadTemplateCompiler(loaderContext),filename,sourceRoot,needMap: sourceMap,});// if the query has a type field, this is a language block request// e.g. foo.vue?type=template&id=xxxxx// and we will return earlyif (incomingQuery.type) {return selectBlock(descriptor,loaderContext,incomingQuery,!!options.appendExtension);}//...return code;
};module.exports.VueLoaderPlugin = plugin;
第二次運行時由于路徑已經帶上了 type 參數,會命中上面第26行的判斷語句,進入 selectBlock 函數,這個函數的邏輯很簡單:
module.exports = function selectBlock (descriptor,loaderContext,query,appendExtension
) {// templateif (query.type === `template`) {if (appendExtension) {loaderContext.resourcePath += '.' + (descriptor.template.lang || 'html')}loaderContext.callback(null,descriptor.template.content,descriptor.template.map)return}// scriptif (query.type === `script`) {if (appendExtension) {loaderContext.resourcePath += '.' + (descriptor.script.lang || 'js')}loaderContext.callback(null,descriptor.script.content,descriptor.script.map)return}// stylesif (query.type === `style` && query.index != null) {const style = descriptor.styles[query.index]if (appendExtension) {loaderContext.resourcePath += '.' + (style.lang || 'css')}loaderContext.callback(null,style.content,style.map)return}// customif (query.type === 'custom' && query.index != null) {const block = descriptor.customBlocks[query.index]loaderContext.callback(null,block.content,block.map)return}
}
至此,就可以完成從 Vue SFC 文件中抽取特定 Block 內容,并復用用戶定義的其它 Loader 加載這些 Block
綜上,我們可以將 vue-loader 的核心邏輯總結為:
- 首先給原始文件路徑增加不同的參數,后續配合
resourceQuery參數就可以分開處理這些內容,這樣的實現相比于一次性處理,邏輯更清晰簡潔,更容易理解; - 經過 Normal Loader、Pitch Loader 兩個階段后,SFC 內容會被轉化為
import xxx from '!-babel-loader!vue-loader?xxx'格式的引用路徑,以此復用用戶配置。
總結
-
使用
schema-utils與loader-utils工具實現更多 Loader 進階特性,并進一步剖析vue-loader源碼,講解如何構建一個成熟的 Webpack Loader 組件。 -
我們可以總結一些常用的開發方法論,包括:
- Loader 主要負責將資源內容轉譯為 Webpack 能夠理解、處理的標準 JavaScript 形式,所以通常需要做 Loader 內通過
return/this.callback方式返回翻譯結果; - Loader Context 提供了許多實用接口,我們可以借助這些接口讀取上下文信息,或改變 Webpack 運行狀態(相當于產生 Side Effect,例如通過
emitFile接口); - 假若我們開發的 Loader 需要對外提供配置選項,建議使用
schema-utils校驗配置參數是否合法; - 假若 Loader 需要生成額外的資源文件,建議使用
loader-utils拼接產物路徑; - 執行時,Webpack 會按照
use定義的順序從前到后執行 Pitch Loader,從后到前執行 Normal Loader,我們可以將一些預處理邏輯放在 Pitch 中(如vue-loader) 等等
- Loader 主要負責將資源內容轉譯為 Webpack 能夠理解、處理的標準 JavaScript 形式,所以通常需要做 Loader 內通過
-
最后,參考一些知名 Loader 的源碼,如:css-loader/babel-loader/file-loader


?詳細解讀文本分類、情感分析和機器翻譯的核心技術)


)


)


