創建editor項目
將上一教程中的hello-world復制過來,改名hello-editor
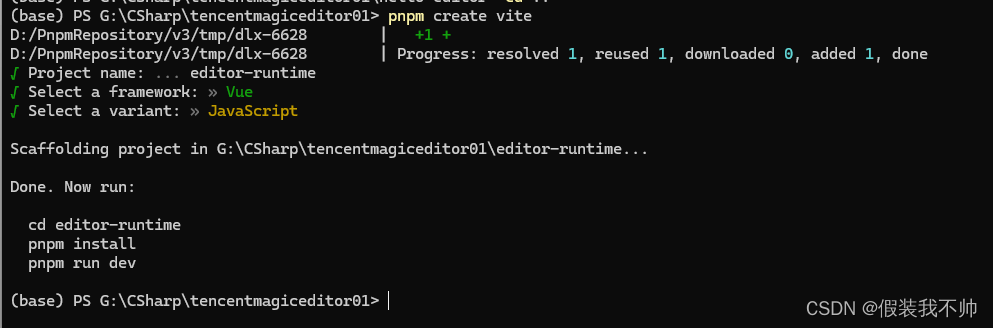
創建runtime項目
和hello-editor同級
pnpm create vite

刪除src/components/HelloWorld.vue
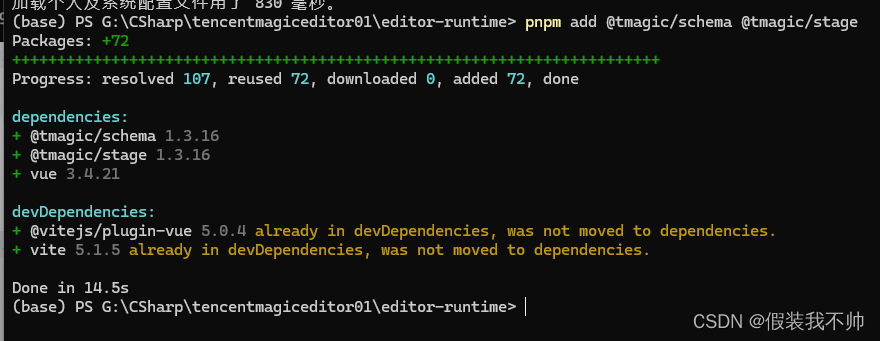
按鈕需要用的ts types依賴
pnpm add @tmagic/schema @tmagic/stage
實現runtime
將hello-editor中的render函數實現移植到runtime項目中
<script setup lang="ts">
import {createApp,ref, computed} from 'vue';
import type StageCore from '@tmagic/stage';const value = ref({type: 'app',// 必須加上ID,這個id可能是數據庫生成的key,也可以是生成的uuidid: 1,items: [],
});const render = async ({renderer}:StageCore) => {const root = window.document.createElement('div');const page = value.value.items[0];if (!page.value) return root;const {width = 375, height = 1700} = page.value.style || {};root.id = `${page.value.id}`;root.style.cssText = `width: ${width}px;height: ${height}px;`;createApp({template: '<div v-for="node in config.items" :key="node.id" :id="node.id">hello world</div>',props: ['config'],},{config: page.value,},).mount(root);renderer.on('onload', () => {const style = window.document.createElement('style');// 隱藏滾動條,重置默認樣式style.innerHTML = `body {overflow: auto;}html,body {height: 100%; margin: 0;padding: 0;}html::-webkit-scrollbar {width: 0 !important;display: none;}`;renderer.iframe?.contentDocument?.head.appendChild(style);renderer.contentWindow?.magic?.onPageElUpdate(root);renderer.contentWindow?.magic?.onRuntimeReady({});});return root;
};
</script><template><div></div>
</template><style scoped>
</style>
新建ui-page.vue文件
<template><div v-if="config" :id="config.id" :style="style"><div v-for="node in config.items" :key="node.id" :id="node.id">hello world</div></div>
</template><script lang="ts" setup>
import { computed } from 'vue';const props = defineProps<{config: any;
}>();const style = computed(() => {const { width = 375, height = 1700 } = props.config.style || {};return {width: `${width}px`,height: `${height}px`,};
});
</script>
將以下代碼覆蓋到src/App.vue中
<template><uiPage :config="page"></uiPage>
</template><script lang="ts" setup>
import { ref } from 'vue';import uiPage from './ui-page.vue';const page = ref<any>();
</script>
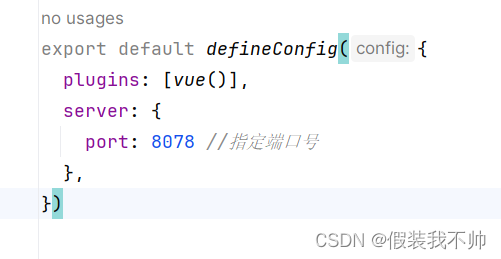
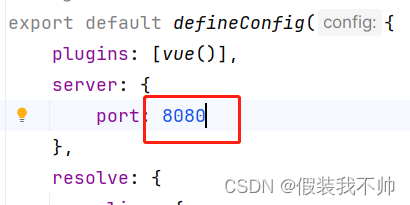
修改vite.config.js
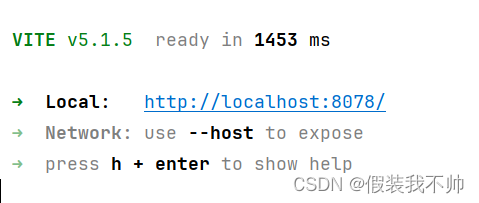
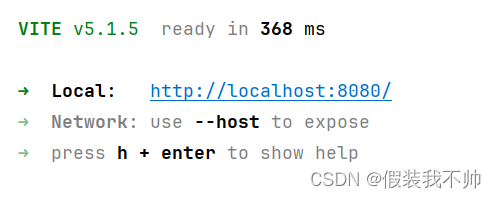
啟動項目
修改hello-editor
刪除render props,添加runtimeUrl,修改樣式app.vue
<template><m-editorv-model="value":runtime-url="runtimeUrl":component-group-list="componentGroupList"></m-editor>
</template><script lang="ts" setup>
import {ref, createApp, computed} from 'vue';
import {editorService} from '@tmagic/editor';const page = computed(() => editorService.get('page'));const value = ref({type: 'app',// 必須加上ID,這個id可能是數據庫生成的key,也可以是生成的uuidid: 1,items: [],
});const componentGroupList = ref([{title: '組件列表',items: [{icon: 'https://vfiles.gtimg.cn/vupload/20220614/9cc3091655207317835.png',text: 'HelloWorld',type: 'hello-world',},],},
]);const runtimeUrl = 'http://localhost:8078/';
</script><style>
#app {overflow: auto;
}html,body,#app {height: 100%; margin: 0;padding: 0;
}#app::-webkit-scrollbar {width: 0 !important;display: none;
}
</style>
啟動hello-editor
跨域問題
修改editor-runtime下的vite.config.js
server: {port: 8078, //指定端口號headers:{'Access-Control-Allow-Origin': '*',}},
runtime與editor通信
到這里項目就可以正常訪問了,但是會發現添加組件沒有反應。
這是因為在runtime中無法直接獲取到editor中的dsl,所以需要通過editor注入到window的magic api來交互
如出現在runtime中出現magic為undefined, 可以嘗試在App.vue中通過監聽message,來準備獲取magic注入時機,然后調用magic.onRuntimeReady,示例代碼如下
window.addEventListener('message', ({ data }) => {if (!data.tmagicRuntimeReady) {return;}window.magic?.onRuntimeReady({// ...});
});
注意:這里可能會出現editor拋出message的時候,runtime還沒有執行到監聽message的情況 編輯器只在iframe onload事件中拋出message 如果出現runtime中接收不到message的情況,可以嘗試在onMounted的時候調用magic.onRuntimeReady
修改main.js為main.ts
import { createApp } from 'vue'
import type { Magic } from '@tmagic/stage';
import './style.css';
import App from './App.vue';declare global {interface Window {magic?: Magic;}
}
createApp(App).mount('#app')
新增tsconfig.json
{"compilerOptions": {"target": "esnext","module": "esnext","strict": true,"jsx": "preserve","moduleResolution": "node","skipLibCheck": true,"esModuleInterop": true,"allowSyntheticDefaultImports": true,"forceConsistentCasingInFileNames": true,"useDefineForClassFields": true,"sourceMap": true,"baseUrl": ".","types": ["webpack-env"],"paths": {"@/*": ["src/*"]},"lib": ["esnext","dom","dom.iterable","scripthost"]},"include": ["src/**/*.ts","src/**/*.tsx","src/**/*.vue","tests/**/*.ts","tests/**/*.tsx"],"exclude": ["node_modules"]
}
src下新增shims-vue.d.ts
/* eslint-disable */
declare module '*.vue' {import type { DefineComponent } from 'vue'const component: DefineComponent<{}, {}, any>export default component
}
修改runtime下的app.vue
<template><uiPage :config="page"></uiPage>
</template><script lang="ts" setup>
import type { RemoveData, UpdateData } from '@tmagic/stage';
import type { Id, MApp, MNode } from '@tmagic/schema';
import { ref,reactive } from 'vue';
import uiPage from './ui-page.vue';
const root = ref<MApp>();const page = ref<any>();window.magic?.onRuntimeReady({/** 當編輯器的dsl對象變化時會調用 */updateRootConfig(config: MApp) {root.value = config;},/** 當編輯器的切換頁面時會調用 */updatePageId(id: Id) {page.value = root.value?.items?.find((item) => item.id === id);},/** 新增組件時調用 */add({ config }: UpdateData) {const parent = config.type === 'page' ? root.value : page.value;parent.items?.push(config);},/** 更新組件時調用 */update({ config }: UpdateData) {const index = page.value.items?.findIndex((child: MNode) => child.id === config.id);page.value.items.splice(index, 1, reactive(config));},/** 刪除組件時調用 */remove({ id }: RemoveData) {const index = page.value.items?.findIndex((child: MNode) => child.id === id);page.value.items.splice(index, 1);},
});
</script>
同步頁面dom給編輯器
由于組件渲染在runtime中,對于編輯器來說是個黑盒,并不知道哪個dom節點才是頁面(對于dsl的解析渲染可能是千奇百怪的),所以需要將頁面的dom節點同步給編輯器
修改runtime下的app.vue
const pageComp = ref<InstanceType<typeof uiPage>>();watch(page, async () => {// page配置變化后,需要等dom更新await nextTick();window?.magic?.onPageElUpdate(pageComp.value?.$el);
});
以上就是一個簡單runtime實現,以及與編輯的交互,這是一個不完善的實現(會發現組件再畫布中無法自由拖動,是因為沒有完整的解析style),但是其中已經幾乎覆蓋所有需要關心的內容
當前教程中實現了一個簡單的page,tmagic提供了一個比較完善的實現,將在下一節介紹
)


)


-基于比較的高效排序算法-歸并排序)
)


等級考試試卷(五級)2024年3月)
