目錄
1 前言
2 項目環境
2.1 硬件準備
2.2 軟件準備
2.3 方案圖示
3 例程修改
4 功能驗證
5. 總結
1 前言
HTTP(超文本傳輸協議,HyperText Transfer Protocol)是一種用于分布式、協作式、超媒體信息系統的應用層協議, 基于 TCP/IP 通信協議來傳遞數據,是萬維網(WWW)的數據通信的基礎。設計 HTTP 最初的目的是為了提供一種發布和接收 HTML 頁面的方法,通過 HTTP 或者 HTTPS 協議請求的資源由統一資源標識符(Uniform Resource Identifiers,URI)來標識。 以上是HTTP協議的簡介,如想深入了解該協議,請參考mozilla網站上的介紹: HTTP 概述 - HTTP | MDN
MQTT是一種輕量級通信協議,基于TCP/IP,采用發布-訂閱模式,廣泛應用于物聯網領域。
MQTT的工作原理圍繞著三個核心部分:發布者(Publishers)、代理(Broker,也稱服務器)和訂閱者(Subscribers)。發布者負責發送消息到特定的主題(Topic),代理則接收這些消息并將其轉發給所有訂閱了該主題的訂閱者。這種模式允許設備間異步通信,且設備不需要直接了解彼此的存在,從而降低了系統的復雜性。
W55MH32 是 WIZnet 新推出的高性能以太網單片機。它采用高性能 Arm? Cortex-M3 內核,主頻最高達 216MHz,內置 1024KB FLASH、96KB SRAM 。尤為突出的是,其搭載 WIZnet TCP/IP offload 引擎(TOE),集成全硬件 TCP/IP 協議棧、MAC 及 PHY ,還配備 32KB 獨立以太網收發緩存,供 8 個硬件 socket 使用,是真正的All-in-One解決方案。
2 項目環境
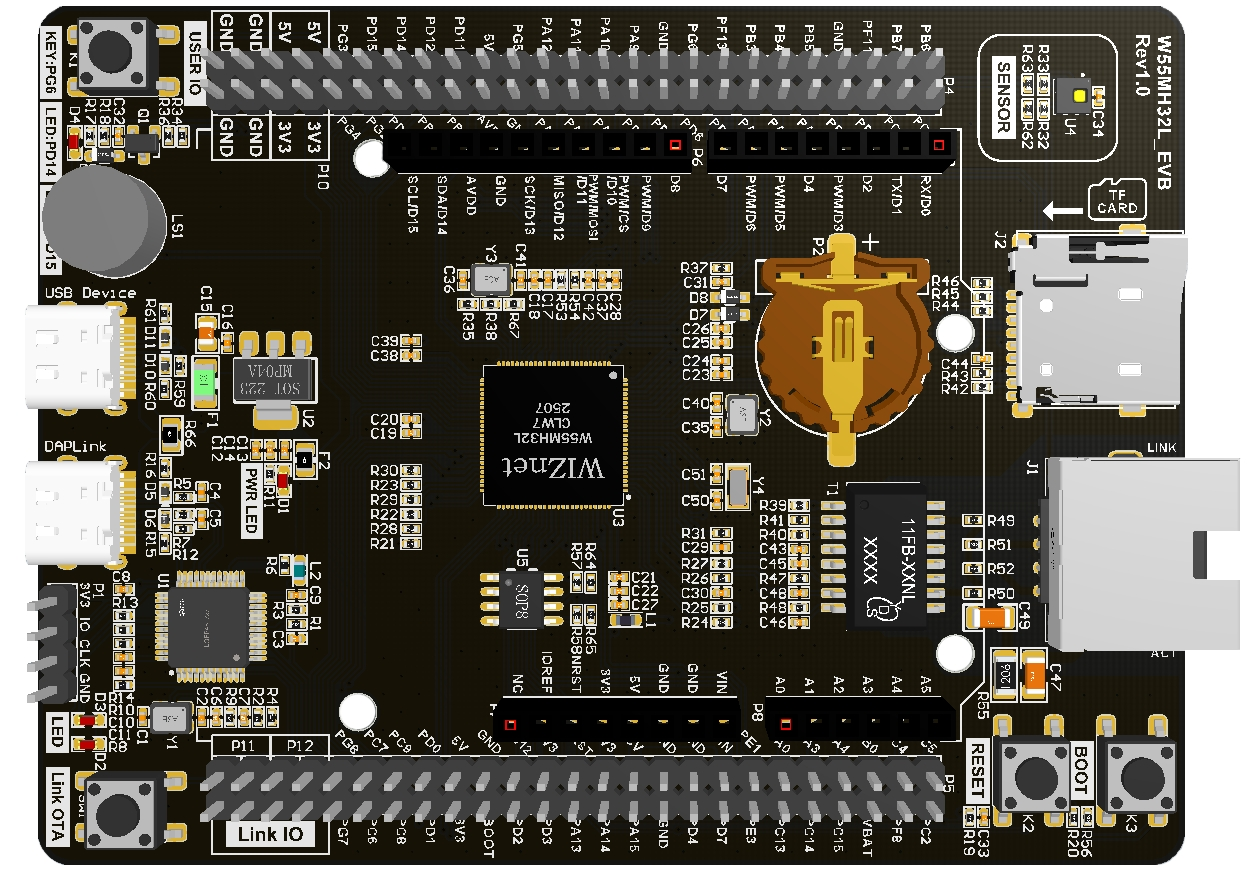
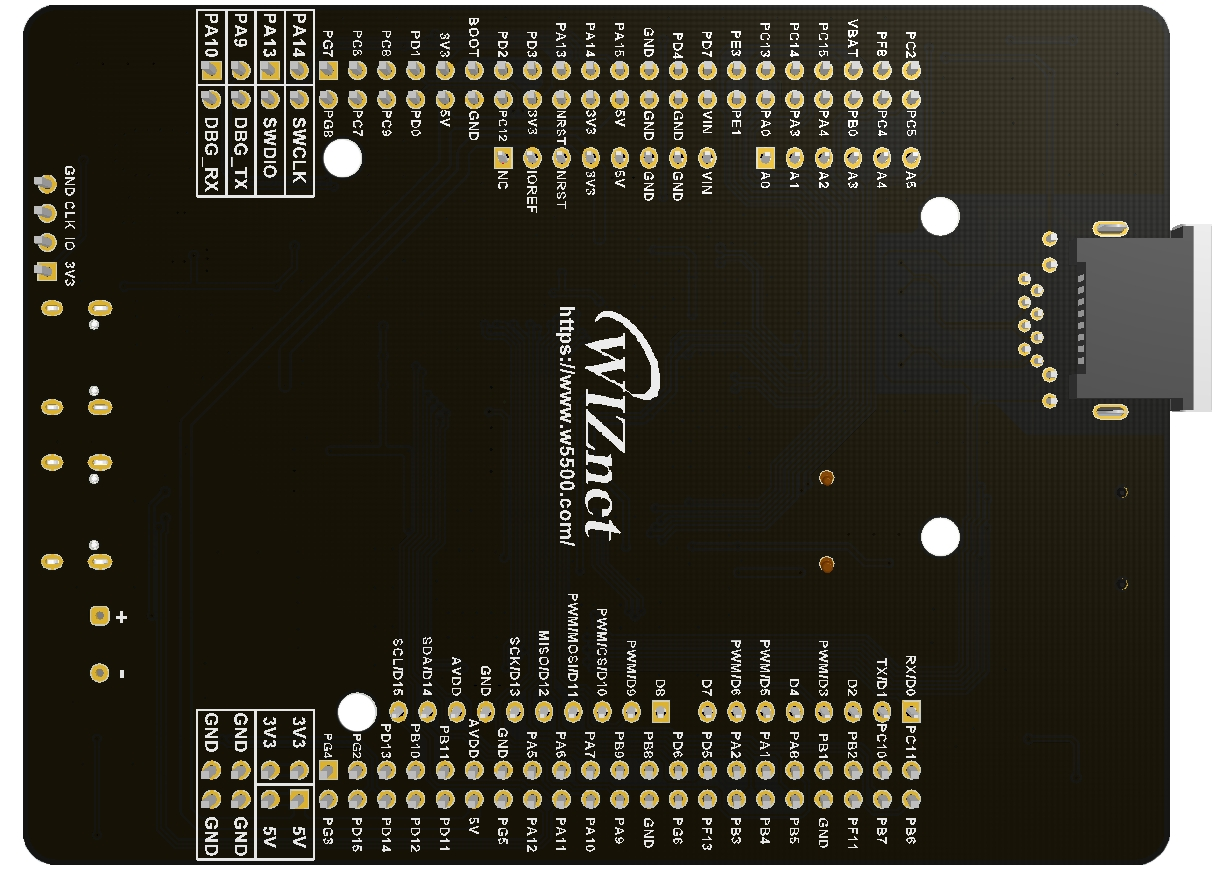
2.1 硬件準備
- W55MH32L-EVB
- 一根網線
- USB Type-C
2.2 軟件準備
- 例程鏈接:w5500.com/w55mh32.html
- 開發環境:keil uvision 5
- 飛思創串口助手
- 瀏覽器
- 阿里云
2.3 方案圖示

3 例程修改
1.我們把HTTP_Server的例程和MQTT&Aliyun的例程下載下來,我們對先對HTTP_Server的例程進行修改,我們創建一個web_server.c和web_server.h,并在web_server.c添加頭文件以及全局變量和初始化
#include "user_main.h"
#include "web_server.h"
#include <stdio.h>
#include <string.h>
// 全局變量
uint8_t txBuff[2048] = {0};  // 發送緩沖區
uint8_t rxBuff[2048] = {0};  // 接收緩沖區
uint8_t socketCount = 8;      // 支持的Socket數量
uint8_t socketList[] = {0,1}; // Socket列表// LED狀態管理
uint8_t led_status = 0;       // 0:關燈 1:開燈
uint8_t status_content[2] = "0"; // 狀態頁內容2.創建HTML用戶界面,主要包含開/關控制按鈕(JavaScript事件),實時調試信息面板,狀態輪詢機制(每2秒更新),時間戳日志功能
uint8_t *contentName = "index.html";
uint8_t content[] =
"<!doctype html>\n"
"<html lang=\"en\">\n"
"<head>\n"
"    <meta charset=\"GBK\">\n"
"    <meta name=\"viewport\" content=\"width=device-width, initial-scale=1.0\">\n"
"    <title>LED Control</title>\n"
"    <style>\n"
"        #light {\n"
"            width: 100px; height: 100px; border-radius: 50%;\n"
"            margin: 20px auto; border: 2px solid #333;\n"
"            transition: background-color 0.5s;\n"
"        }\n"
"        .light-on { background-color: yellow; box-shadow: 0 0 20px yellow; }\n"
"        .light-off { background-color: #ccc; }\n"
"        .btn { padding: 10px 20px; margin: 5px; }\n"
"        #debug { margin-top: 20px; padding: 10px; border: 1px solid #ccc; font-family: monospace; max-height: 200px; overflow-y: auto; }\n"
"    </style>\n"
"</head>\n"
"<body>\n"
"    <h1>LED Control Panel</h1>\n"
"    <button class=\"btn\" onclick=\"controlLED(1)\">開燈</button>\n"
"    <button class=\"btn\" onclick=\"controlLED(0)\">關燈</button>\n"
"    <div id=\"debug\">Debug information will appear here...</div>\n"
"    <script>\n"
"        const light = document.getElementById('light');\n"
"        const debugDiv = document.getElementById('debug');\n"
"        \n"
"        // 調試函數 - 在頁面上顯示調試信息\n"
"        function log(message) {\n"
"            console.log(message);\n"
"            debugDiv.innerHTML += '<p>' + new Date().toLocaleTimeString() + ': ' + message + '</p>';\n"
"            debugDiv.scrollTop = debugDiv.scrollHeight; // 自動滾動到底部\n"
"        }\n"
"        \n"
"        // 初始加載時獲取狀態\n"
"        fetchStatus();\n"
"        \n"
"        function controlLED(state) {\n"
"            log('Sending control: ' + state);\n"
"            fetch(`/control?action=${state ? '1' : '0'}&t=${Date.now()}`)\n"
"                .then(response => {\n"
"                    log(`Control response: ${response.status}`);\n"
"                    if (response.ok) {\n"
"                        log('Control command successful');\n"
"                        fetchStatus();\n"
"                    } else {\n"
"                        log('Control command failed');\n"
"                    }\n"
"                })\n"
"                .catch(error => {\n"
"                    log('Control error: ' + error);\n"
"                });\n"
"        }\n"
"        \n"
"        function fetchStatus() {\n"
"            const url = '/status?t=' + Date.now();\n"
"            log('Fetching status: ' + url);\n"
"            \n"
"            fetch(url)\n"
"                .then(response => {\n"
"                    log(`Status response: ${response.status}`);\n"
"                    if (!response.ok) {\n"
"                        throw new Error('Bad status: ' + response.status);\n"
"                    }\n"
"                    return response.text();\n"
"                })\n"
"                .then(status => {\n"
"                    log('Received status: ' + status);\n"
"                    updateLight(status.trim()); // 確保去除空白字符\n"
"                })\n"
"                .catch(error => {\n"
"                    log('Status error: ' + error);\n"
"                });\n"
"        }\n"
"        \n"
"        function updateLight(status) {\n"
"            if (status === '1') {\n"
"                light.className = 'light-on';\n"
"                log('Light ON - UI updated');\n"
"            } else if (status === '0') {\n"
"                light.className = 'light-off';\n"
"                log('Light OFF - UI updated');\n"
"            } else {\n"
"                log('Invalid status: ' + status);\n"
"            }\n"
"        }\n"
"        \n"
"        // 每2秒輪詢一次狀態\n"
"        setInterval(fetchStatus, 2000);\n"
"        \n"
"        // 初始日志\n"
"        log('Control panel initialized');\n"
"        log('Waiting for status updates...');\n"
"    </script>\n"
"</body>\n"
"</html>";
3.添加URL解析與控制邏輯
static uint8_t parse_url_action(uint8_t *url) {// 從URL中提取action參數uint8_t *pAction = (uint8_t *)strstr((char *)url, "action=");return *(pAction + 7); // 返回action值
}
// 根據action執行LED操作
static void do_led_action(uint8_t action)
{if (action == '1')  // 開燈{printf("[LED] Turning ON\n");
       led_status = 1;
       status_content[0] = '1';}else if (action == '0')  // 關燈{printf("[LED] Turning OFF\n");
        led_status = 0;
        status_content[0] = '0';}else{printf("[LED] Unknown action: %c\n", action);}// 打印當前狀態printf("[STATUS] Current LED status: %d\n", led_status);
}
4.添加初始化WEB服務器函數
// 初始化Web服務器
void WebServer_Init(void)
{// 初始化http服務器httpServer_init(txBuff, rxBuff, socketCount, socketList);// 注冊html頁面reg_httpServer_webContent(contentName, content);// 注冊狀態頁面 - 關鍵修復:確保狀態頁正確注冊reg_httpServer_webContent("status", status_content);// 注冊控制端點reg_httpServer_webContent("control", (uint8_t *)"OK");printf("[WEB] Server initialized\n");printf("[STATUS] Initial LED status: %d\n", led_status);
}
5. 添加web服務器
// 啟動Web服務器
void WebServer_Start(void)
{for (uint8_t i = 0; i < sizeof(socketList); i++){httpServer_run(i);}
}6. 添加處理核心函數
void handler_user_function(uint8_t *url)
{printf("[HTTP] Request received: %s\n", url);// 檢查是否為控制請求if (strstr((char *)url, "control") != NULL) {// 1. 從URL里提取出action的值uint8_t action = parse_url_action(url);// 2. 根據action的值,執行相應的LED操作do_led_action(action);// 調試輸出printf("[CONTROL] Processed action: %c\n", action);}// 檢查是否為狀態請求else if (strstr((char *)url, "status") != NULL){// 確保返回最新的狀態值printf("[STATUS] Request received. Returning: %s\n", status_content);// 更新狀態頁內容 - 確保返回最新值reg_httpServer_webContent("status", status_content);}
}
// 狀態獲取函數
uint8_t* get_led_status(void)
{return status_content;
}// 狀態更新通知
void update_led_status(void)
{// 當LED狀態改變時調用此函數reg_httpServer_webContent("status", status_content);printf("[STATUS] Updated status page to: %s\n", status_content);
}
?7.添加web_server.函數
#ifndef __WEB_SERVER_H
#define __WEB_SERVER_H
#include "httpServer.h"
#include <string.h>
// 初始化Web服務器
void WebServer_Init(void);
// 啟動Web服務器
void WebServer_Start(void);
extern uint8_t led_status; // 0:關燈 1:開燈
extern uint8_t status_content[2]; // 狀態頁內容
#endif
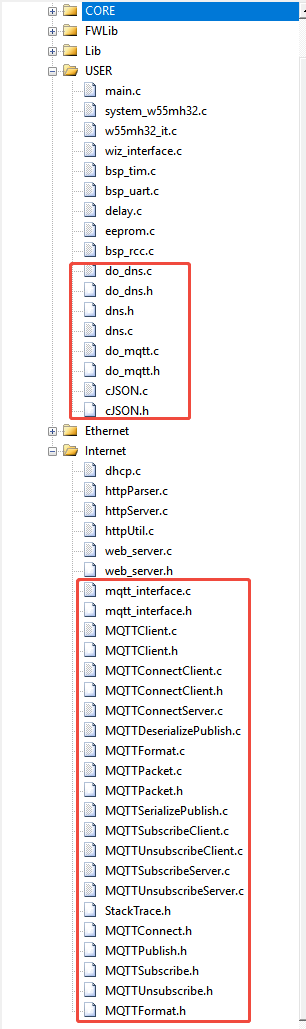
8. 接下來我們把MQTT&Aliyun中的函數添加到HTTP_Server中去,如圖所示,把所需要的文件添加進來。
9. 在do_mqtt.c函數中把clientid、passwd以及username修改為自己的參數,把post主題和set主題中的產品名稱以及,設備名稱修改為自己的。
mqttconn mqtt_params = {
    .mqttHostUrl = "iot-06z00h54zbdynx7.mqtt.iothub.aliyuncs.com",
    .server_ip = {
        0,
    },                                                                   /*Define the Connection Server IP*/
    .port = 1883,                                                   /*Define the connection service port number*/
    .clientid = "k18mmode=2,signmethod=hmacsha256,timestamp=1751966302834|", /*Define the client ID*/
    .username = "zhao&k18maZe3w1u",                                         /*Define the user name*/
    .passwd = "1f0069321cb554e432ad893177919fc65579c227a65a9a420b303b7bf8301778", /*Define user passwords*/
    .pubtopic = "/sys/k18maZe3w1u/zhao/thing/event/property/post",           /*Define the publication message*/
    .subtopic = "/sys/k18maZe3w1u/zhao/thing/service/property/set",          /*Define subscription messages*/
    .pubQoS = QOS0,                                 /*Defines the class of service for publishing messages*/
};
10. 修改函數使數據定時上傳到云平臺,在PUB_MESSAGE和RECV中進行更改。
#define PUBLISH_COUNTER_MAX 500  // 10秒間隔(假設主循環周期為10ms)
static uint32_t publish_counter = 0;
    case PUB_MESSAGE:
    {
        pubmessage.qos = QOS0;
        char buffer[128]; // 確保緩沖區足夠大
        snprintf(buffer, sizeof(buffer),
     "{\"id\":\"123\",\"version\":\"1.0\",\"params\":{\"LEDSwitch\":%d},\"method\":\"thing.event.property.post\"}",
                led_status);
        pubmessage.payload = buffer;
        pubmessage.payloadlen = strlen(pubmessage.payload);        ret = MQTTPublish(&c, (char *)&(mqtt_params.pubtopic), &pubmessage); /* Publish message */
        if (ret != SUCCESSS) {
            run_status = ERR;
        } else {
            printf("publish:%s,%s\r\n\r\n", mqtt_params.pubtopic, (char *)pubmessage.payload);
            publish_counter = 0;  // 重置計數器
            run_status = RECV;  // 轉到接收/心跳狀態
        }
        break;
    }
    case RECV:  // 合并心跳和接收處理
    {
        // 保持MQTT連接活躍
        if (MQTTYield(&c, 30) != SUCCESSS) {
            run_status = ERR;
            break;
        }
        // 處理接收到的消息
        if (mqtt_recv_flag) {
            mqtt_recv_flag = 0;
            json_decode(mqtt_recv_msg);
        }
        // 計數器方案:檢查是否到達發布間隔
        publish_counter++;
        if(publish_counter >= PUBLISH_COUNTER_MAX) {
            run_status = PUB_MESSAGE;  // 重新進入發布狀態
        }
        break;
    }
11. 接收函數,打印出LED的狀態的時候,要改變led_status的數值,在第17行和第22行進行添加,此目的是為了讓云平臺數據和網頁數據進行統一。
void json_decode(char *msg)
{
    cJSON *jsondata = NULL;
    cJSON *params = NULL;
    cJSON *LED = NULL;
    jsondata = cJSON_Parse(msg);
    if (jsondata == NULL)
    {
        printf("json parse fail.\r\n");
        return;
    }
    params = cJSON_GetObjectItem(jsondata, "params");
    LED = cJSON_GetObjectItem(params, "LEDSwitch");
    if (LED->valueint == 1)
    {printf("LED ON\r\n");led_status=1; status_content[0] = '1';
    }
    else
    {
        printf("LED OFF\r\n");led_status=0; status_content[0] = '0';
    }
    cJSON_Delete(jsondata);}
12. 在主函數為MQTT定義分配一路socket,然后添加一段PG6外部中斷的代碼,PG6作為本地控制繼電器的開關。
#define SOCKET_ID4             4
void EXTI_Configuration(void)
{
    EXTI_InitTypeDef EXTI_InitStructure;
    GPIO_InitTypeDef GPIO_InitStructure;
    NVIC_InitTypeDef NVIC_InitStructure;// 1. 使能GPIOG時鐘RCC_APB2PeriphClockCmd(RCC_APB2Periph_GPIOG, ENABLE);// 2. 配置PG6為浮空輸入
    GPIO_InitStructure.GPIO_Pin = GPIO_Pin_6;
    GPIO_InitStructure.GPIO_Mode = GPIO_Mode_IN_FLOATING;
    GPIO_InitStructure.GPIO_Speed = GPIO_Speed_50MHz;GPIO_Init(GPIOG, &GPIO_InitStructure);// 3. 使能AFIO時鐘RCC_APB2PeriphClockCmd(RCC_APB2Periph_AFIO, ENABLE);// 4. 映射PG6到EXTI6GPIO_EXTILineConfig(GPIO_PortSourceGPIOG, GPIO_PinSource6);// 5. 配置EXTI6中斷線
    EXTI_InitStructure.EXTI_Line = EXTI_Line6;
    EXTI_InitStructure.EXTI_Mode = EXTI_Mode_Interrupt;
    EXTI_InitStructure.EXTI_Trigger = EXTI_Trigger_Falling;  // 上升沿觸發
    EXTI_InitStructure.EXTI_LineCmd = ENABLE;EXTI_Init(&EXTI_InitStructure);// 6. 配置NVIC
    NVIC_InitStructure.NVIC_IRQChannel = EXTI9_5_IRQn;  // EXTI5~9共享中斷通道
    NVIC_InitStructure.NVIC_IRQChannelPreemptionPriority = 0;
    NVIC_InitStructure.NVIC_IRQChannelSubPriority = 0;
    NVIC_InitStructure.NVIC_IRQChannelCmd = ENABLE;NVIC_Init(&NVIC_InitStructure);
}
// EXTI9_5中斷服務函數
void EXTI9_5_IRQHandler(void)
{// 檢查EXTI6中斷標志if (EXTI_GetITStatus(EXTI_Line6) != RESET){// 清除中斷標志EXTI_ClearITPendingBit(EXTI_Line6);// 執行中斷處理
        led_status = !led_status;
        status_content[0] = (status_content[0] == '0') ? '1' : '0'; if(led_status==0){printf("LED_OFF");}else{ printf("LED_ON");}}    }
}
13. 把do_mqtt()函數添加到循環中去,然后在main.c中添加#include "do_mqtt.h"頭文件.
4 功能驗證
1.硬件連接完畢,燒錄程序上電打印如下信息:在瀏覽器輸入192.168.2.22來進入html頁面
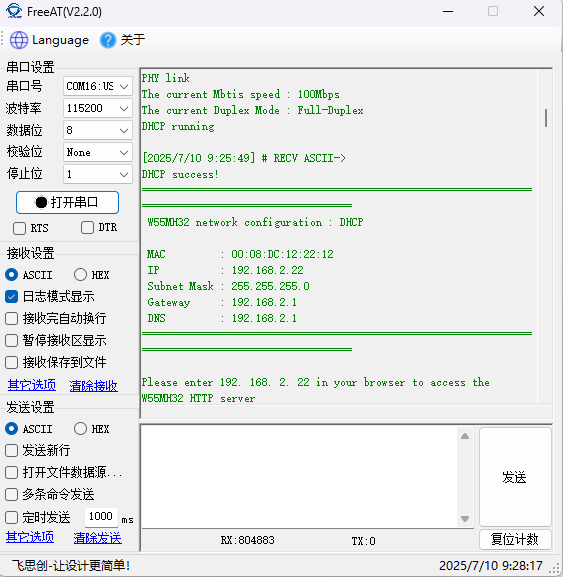
?2.我們同時打開串口助手,阿里云物聯網平臺以及HTML網頁控制來進行觀察,我們先使用網頁控制查看現象,先進行打開
3.關閉LED

4. 我們再來使用阿里云進行控制,首先設置開啟LED。
5. 關閉LED

6. 本地按鍵控制,查看阿里云物聯網平臺狀態以及html網頁變化。我們先測試打開
7. 我們再進行本地按鍵關閉測試

由上述可知,功能完好,可由阿里云,html網頁和按鍵控制繼電器開關,三種模式的開與管互通,這三種模式下都可以查看繼電器的狀態
5. 總結
本項目通過 W55MH32成功實現了 Web 網頁以及云平臺對繼電器的遠程控制,驗證了基于以太網的嵌入式 Web 服務器方案和云平臺控制的可行性。感謝大家的耐心閱讀!如果您在閱讀過程中有任何疑問,或者希望進一步了解這款產品及其應用,歡迎隨時通過私信或評論區留言。我們會盡快回復您的消息,為您提供更詳細的解答和幫助!
)
 除了傅里葉變換和離散余弦變換)


)


)