在點云目標檢測中,經常會有一系列的誤識別,為了減小誤識別的概率,可以通過區域過濾來刪除不需要的點云,如下圖所示
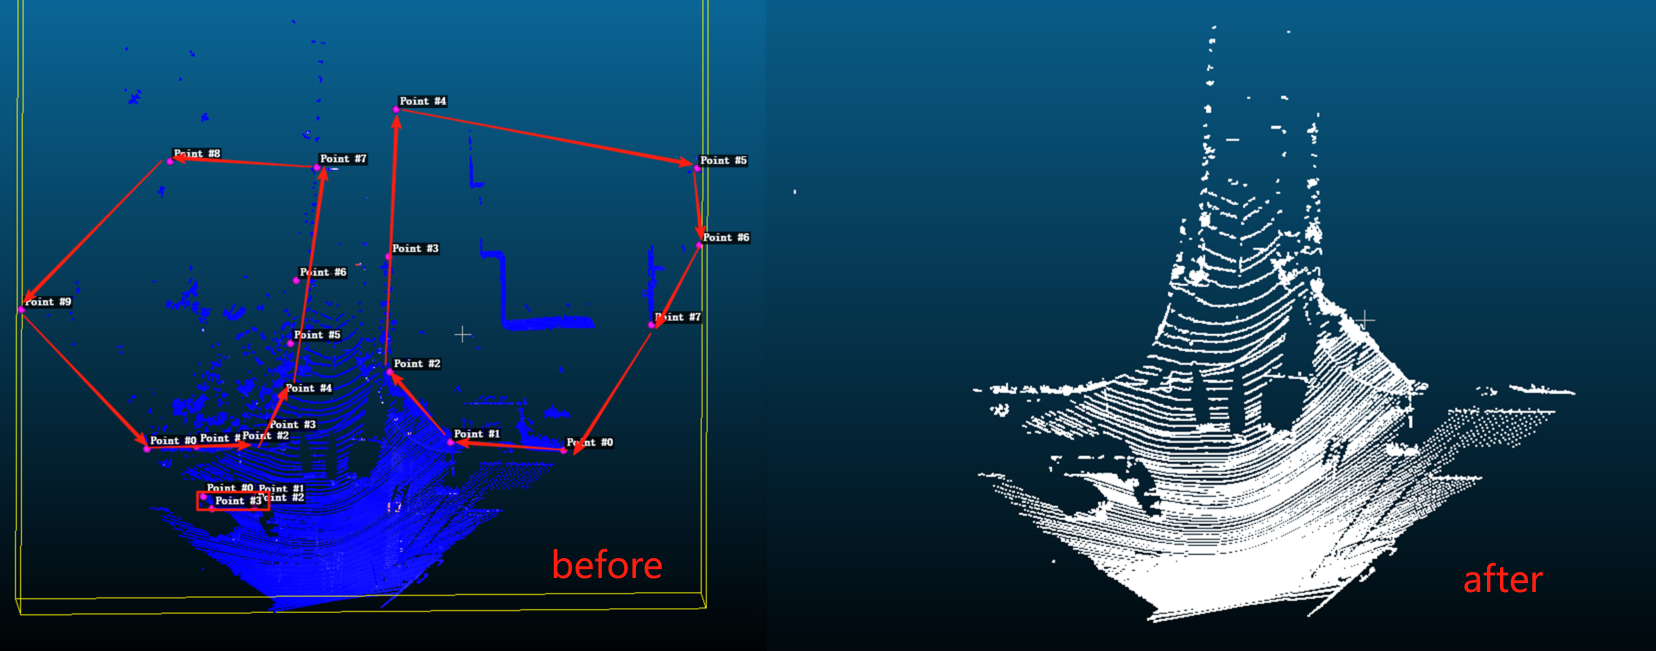
本例中點云的場景為路口交通場景,已經把雷達坐標系的xoy面轉換至點云中的地平面,具體原理和操作參考:https://blog.csdn.net/m0_64293675/article/details/145208953?spm=1001.2014.3001.5502
這樣可以將區域的劃分從3維變成2維,只需要給出多邊形區域的X和Y坐標,z軸無限延伸即可。
區域過濾的第一種方法是使用PCL庫的CropHull濾波器,也就是常說的凸包算法,第二種方法是射線法,即從點出發畫一條射線(例如水平向右),統計該射線與多邊形邊的交點個數。如果交點個數為奇數,點在多邊形內;偶數,則在多邊形外。
C++實現點云的多邊形區域過濾的2種方法
- 1、使用PCL庫的CropHull濾波器
- 2、射線法的CUDA實現
1、使用PCL庫的CropHull濾波器
需要安裝pcl庫,apt安裝即可,建議安裝版本大于等于1.8,ubuntu20.04用ap安裝的pcl默認版本是1.10.0,符合要求。如果想從源碼安裝,自行baidu。
sudo apt install libpcl-dev
- cut_roi.cpp
#include <iostream>
#include <vector>
#include <chrono>
#include <pcl/point_types.h>
#include <pcl/point_cloud.h>
#include <pcl/io/pcd_io.h>
#include <pcl/filters/crop_hull.h>
#include <pcl/surface/convex_hull.h>using namespace std;// 不需要intensity的可以用typedef pcl::PointXYZ PointT;
typedef pcl::PointXYZI PointT;// 刪除一個多邊形區域內的點
// cloud 輸入點云
// polygon 多邊形區域的頂點坐標
pcl::PointCloud<PointT>::Ptr removePointsInPolygon(pcl::PointCloud<PointT>::Ptr cloud,const vector<pair<float, float>> &polygon)
{// 創建多邊形點云pcl::PointCloud<PointT>::Ptr hullPoints(new pcl::PointCloud<PointT>);for (const auto &vertex : polygon){// 根據PointT 的內容對應賦值PointT p;p.x = vertex.first;p.y = vertex.second;p.z = 0.0f;p.intensity = 0.0f;hullPoints->push_back(p);}// 添加第一個點使多邊形閉合hullPoints->push_back(hullPoints->points[0]);// 創建凸包對象pcl::ConvexHull<PointT> hull;hull.setInputCloud(hullPoints);hull.setDimension(2); // 2D多邊形// 存儲凸包結果的容器pcl::PointCloud<PointT>::Ptr hullCloud(new pcl::PointCloud<PointT>);vector<pcl::Vertices> hullPolygons;hull.reconstruct(*hullCloud, hullPolygons);// 創建裁剪對象pcl::CropHull<PointT> cropFilter;cropFilter.setHullCloud(hullCloud);cropFilter.setHullIndices(hullPolygons);cropFilter.setDim(2); // 2D操作// 執行裁剪(保留多邊形外的點)pcl::PointCloud<PointT>::Ptr filteredCloud(new pcl::PointCloud<PointT>);cropFilter.setInputCloud(cloud);cropFilter.setCropOutside(false); // 保留多邊形外部的點,刪除內部的點cropFilter.filter(*filteredCloud);return filteredCloud;
}// 刪除多個多邊形區域內的點
pcl::PointCloud<PointT>::Ptr removePointsInPolygons(pcl::PointCloud<PointT>::Ptr cloud,const vector<vector<pair<float, float>>> &polygons)
{for (const auto &polygon : polygons){cloud = removePointsInPolygon(cloud, polygon);}return cloud;
}int main()
{using clock = chrono::high_resolution_clock;using ms = chrono::milliseconds;using ns = chrono::nanoseconds;pcl::PointCloud<PointT>::Ptr cloud(new pcl::PointCloud<PointT>);//while (1){pcl::io::loadPCDFile("../test.pcd", *cloud);//示例多區域的頂點(x,y) 順時針逆時針都可可以vector<vector<pair<float, float>>> polygons = {{{79.5060272217, 79.175064086},{79.2747802734, 58.571964263},{81.6638717651, 41.394405365},{86.0577163696, 30.583795547},{101.274185181, 24.103635788},{122.022064209, 20.140935897},{149.628707886, 18.349731445},{195.621643066, 9.6359605789},{198.321121216, 69.765792846},{138.335754395, 130.86445617}},{{77.3776473999, -91.604118347},{80.9268569946, -45.400650024},{109.261535645, -20.841529846},{158.885635376, -19.598711013},{219.02204895, -22.8725452423},{188.727401733, -147.86555481},{159.747970581, -147.89741516},{126.374259949, -128.46434021}},{{59.590133667, 55.9770889282},{59.0997047424, 34.932685852},{54.9787826538, 34.951171875},{54.4650382996, 52.371749877}}};auto start1 = clock::now();// 刪除多邊形區域內的點pcl::PointCloud<PointT>::Ptr filteredCloud = removePointsInPolygons(cloud, polygons);auto end1 = clock::now();ns duration1 = chrono::duration_cast<ns>(end1 - start1);cout << "CPU上 使用pcl庫的CropHull濾波器刪除多個多邊形區域內的點 耗時: " << duration1.count() / 1000000.0 << " 毫秒" << endl;// 保存結果// pcl::io::savePCDFile("../filtered.pcd", *filteredCloud);cout << "num_input: " << cloud->size() << endl;cout << "num_output: " << filteredCloud->size() << endl;}return 0;
}
- CMakeLists.txt
cmake_minimum_required(VERSION 3.0)
project(lidar_process)add_definitions(-std=c++11)set(CMAKE_CXX_STANDARD 11)set(CMAKE_BUILD_TYPE Release)
# set(CMAKE_BUILD_TYPE Debug)
cmake_policy(SET CMP0074 NEW)find_package(PCL)
include_directories(${PCL_INCLUDE_DIRS})
link_directories(${PCL_LIBRARY_DIRS})
add_definitions(${PCL_DEFINITIONS})include_directories("include/")add_executable(lidar_process src/cut_roi.cpp)target_link_libraries(lidar_process ${PCL_LIBRARIES})
- 編譯運行
mkdir buildcd buildcmake ..make./lidar_process
2、射線法的CUDA實現
需要安裝合適版本的CUDA,可以參考:https://blog.csdn.net/m0_64293675/article/details/141166292?spm=1001.2014.3001.5502
- cut_roi_kernel.cuh
#ifndef CUT_LIDAR_ROI_CUH
#define CUT_LIDAR_ROI_CUH#include <iostream>
#include <vector>
#include <cuda_runtime.h>
#include <thrust/device_vector.h>
#include <thrust/host_vector.h>// 點云數據結構
struct Point_cuda
{float x;float y;float z;
};// 多邊形信息結構體
struct PolygonInfo {int start_idx;      // 在頂點數組中的起始索引int num_vertices;   // 多邊形的頂點數int is_negative;    // 0=將該區域刪除, 1=將該區域保留
};// CUDA核函數:判斷點是否在單個多邊形內,若返回true 表示點在多邊形內
__device__ bool isPointInSinglePolygon(float px, float py, const float2* polygon, int num_vertices);// CUDA核函數:標記點是否在任何一個多邊形內
__global__ void markPointsInPolygonsKernel(const float3* points, const float2* all_vertices, const PolygonInfo* polygons_info,int num_points, int num_polygons, int* flags);// CUDA核函數:壓縮點云(保留flags[idx]標記為0的點,不保留flags[idx]標記為1的點)
__global__ void compactPointsKernel(const float3* points, const int* flags, int num_points, float3* output, int* output_index);// CUDA實現點云多區域裁剪
std::vector<Point_cuda>  removePointsInPolygonsCUDA(std::vector<Point_cuda>  cloud, const std::vector<std::vector<std::pair<float,float>>>& polygons,const std::vector<int>& polygon_types);
#endif
- cut_roi_kernel.cu
#include "cut_roi_kernel.cuh"// CUDA錯誤檢查宏
#define CHECK_CUDA_ERROR(call) \
do { \cudaError_t err = call; \if (err != cudaSuccess) { \std::cerr << "CUDA error at " << __FILE__ << ":" << __LINE__ \<< " - " << cudaGetErrorString(err) << std::endl; \exit(EXIT_FAILURE); \} \
} while(0)// CUDA核函數:判斷點是否在單個多邊形內,若返回true 表示點在多邊形內
__device__ bool isPointInSinglePolygon(float px, float py, const float2* polygon, int num_vertices)
{int crossings = 0;for (int i = 0; i < num_vertices; i++) {int next = (i + 1) % num_vertices;float2 v1 = polygon[i];float2 v2 = polygon[next];// 檢查射線是否穿過邊if (((v1.y <= py) && (v2.y > py)) || ((v1.y > py) && (v2.y <= py))) {float x = v1.x + (py - v1.y) * (v2.x - v1.x) / (v2.y - v1.y);if (x > px) {crossings++;}}}// 奇數交點表示在多邊形內return (crossings % 2 == 1);
}// CUDA核函數:標記點是否在任何一個多邊形內
__global__ void markPointsInPolygonsKernel(const float3* points, const float2* all_vertices, const PolygonInfo* polygons_info,int num_points, int num_polygons, int* flags)
{int idx = blockIdx.x * blockDim.x + threadIdx.x;if (idx >= num_points) return;float px = points[idx].x;float py = points[idx].y;// 初始化標記為0(點不在任何多邊形內)int inside_any = 0;// 遍歷所有多邊形for (int p = 0; p < num_polygons; p++) {PolygonInfo poly_info = polygons_info[p];const float2* poly_vertices = &all_vertices[poly_info.start_idx];// 檢查點是否在當前多邊形內bool inside_current = isPointInSinglePolygon(px, py, poly_vertices, poly_info.num_vertices);// 根據多邊形類型更新標記if (inside_current) {// 點在多邊形內,如果is_negative == 0,表示要將該區域內的點刪除,需要將inside_any標志記為1//如果is_negative == 1,表示要將該區域內的點保留,inside_any標志不變(仍為0)if (poly_info.is_negative == 0) {inside_any = 1;break; // 點在一個區域,無需檢查其他多邊形}        }}flags[idx] = inside_any;
}// CUDA核函數:壓縮點云(保留flags[idx]標記為0的點,不保留flags[idx]標記為1的點)
__global__ void compactPointsKernel(const float3* points, const int* flags, int num_points, float3* output, int* output_index)
{int idx = blockIdx.x * blockDim.x + threadIdx.x;if (idx >= num_points) return;// 獲取輸出索引if (flags[idx] == 0) {int pos = atomicAdd(output_index, 1);output[pos] = points[idx];}
}// CUDA實現點云多區域裁剪
std::vector<Point_cuda>  removePointsInPolygonsCUDA(std::vector<Point_cuda>  cloud, const std::vector<std::vector<std::pair<float,float>>>& polygons,const std::vector<int>& polygon_types)
{// 1. 準備數據int num_points = cloud.size();int num_polygons = polygons.size();// 2. 準備主機端數據結構thrust::host_vector<float3> h_points(num_points);thrust::host_vector<float2> h_all_vertices;thrust::host_vector<PolygonInfo> h_polygons_info(num_polygons);// 轉換點云數據for (int i = 0; i < num_points; i++) {h_points[i] = make_float3(cloud[i].x, cloud[i].y, cloud[i].z);}std::cout<<"num_input:"<<num_points<<std::endl;// 構建多邊形頂點數組和索引信息int vertex_offset = 0;for (int p = 0; p < num_polygons; p++) {const auto& poly = polygons[p];int num_vertices = poly.size();h_polygons_info[p].start_idx = vertex_offset;h_polygons_info[p].num_vertices = num_vertices;h_polygons_info[p].is_negative = polygon_types[p];for (const auto& vertex : poly) {h_all_vertices.push_back(make_float2(vertex.first, vertex.second));}vertex_offset += num_vertices;}// 3. 分配設備內存thrust::device_vector<float3> d_points = h_points;thrust::device_vector<float2> d_all_vertices = h_all_vertices;thrust::device_vector<PolygonInfo> d_polygons_info = h_polygons_info;thrust::device_vector<int> d_flags(num_points, 0);// 4. 創建輸出索引thrust::device_vector<int> d_output_index(1, 0);// 5. 配置核函數參數dim3 blockSize(256);dim3 gridSize((num_points + blockSize.x - 1) / blockSize.x);// 6. 執行標記核函數markPointsInPolygonsKernel<<<gridSize, blockSize>>>(thrust::raw_pointer_cast(d_points.data()),thrust::raw_pointer_cast(d_all_vertices.data()),thrust::raw_pointer_cast(d_polygons_info.data()),num_points,num_polygons,thrust::raw_pointer_cast(d_flags.data()));CHECK_CUDA_ERROR(cudaDeviceSynchronize());// 7. 統計需要保留的點數thrust::host_vector<int> h_flags = d_flags;int num_inside = thrust::count(h_flags.begin(), h_flags.end(), 1);int num_outside = num_points - num_inside;// 8. 分配輸出內存thrust::device_vector<float3> d_output(num_outside);// 重置輸出索引thrust::fill(d_output_index.begin(), d_output_index.end(), 0);// 9. 執行壓縮核函數compactPointsKernel<<<gridSize, blockSize>>>(thrust::raw_pointer_cast(d_points.data()),thrust::raw_pointer_cast(d_flags.data()),num_points,thrust::raw_pointer_cast(d_output.data()),thrust::raw_pointer_cast(d_output_index.data()));CHECK_CUDA_ERROR(cudaDeviceSynchronize());// 10. 復制結果回主機thrust::host_vector<float3> h_output = d_output;std::cout<<"num_output:"<<num_outside<<std::endl;// 11. 賦值std::vector<Point_cuda> filteredCloud;for (int i = 0; i < num_outside; i++) {Point_cuda tmp;tmp.x = h_output[i].x;tmp.y = h_output[i].y;tmp.z = h_output[i].z;filteredCloud.emplace_back(tmp);}return filteredCloud;
}- main.cpp
#include <iostream>
#include <chrono>
#include <vector>
#include <cmath>
#include <algorithm>
#include <fstream>
#include <sstream>
#include "cut_roi_kernel.cuh"
#include <cuda_runtime.h>using namespace std;
// 讀取離線點云.bin文件, 這里避免用pcl庫,以免還需安裝pcl,當然也可以使用pcl的io讀取.pcd格式的點云文件。
vector<Point_cuda> read_bin_files(string filename)
{vector<Point_cuda> pc_data_;std::ifstream file(filename, std::ios::binary);if (!file){std::cerr << "無法打開文件: " << filename << std::endl;return pc_data_;}// 讀取文件直到文件末尾while (file.peek() != EOF){Point_cuda point;// 依次讀取 x, y, z 坐標file.read(reinterpret_cast<char *>(&point.x), sizeof(float));file.read(reinterpret_cast<char *>(&point.y), sizeof(float));file.read(reinterpret_cast<char *>(&point.z), sizeof(float));pc_data_.push_back(point);}file.close();return pc_data_;
}// 保存刪掉區域后的點云文件為txt,cloud compare軟件也可以可視化.txt格式的點云文件
void write_all_pc_to_file(string filename, vector<Point_cuda> all_Point)
{// 打開文件以寫入數據std::ofstream outFile(filename);// 檢查文件是否成功打開if (outFile.is_open()){// 遍歷 vector 并將每個元素寫入文件for (auto num : all_Point){outFile << num.x << "," << num.y << "," << num.z << std::endl;}// 關閉文件outFile.close();std::cout << "數據已成功保存到" << filename << "文件。" << std::endl;}else{std::cerr << "無法打開文件。" << std::endl;}
}int main()
{using clock = chrono::high_resolution_clock;using ms = chrono::milliseconds;using ns = chrono::nanoseconds;// while (1){vector<Point_cuda> test_data = read_bin_files("../test.bin");//示例多區域的頂點(x,y) 順時針逆時針都可可以vector<vector<pair<float, float>>> polygons = {{{79.5060272217, 79.175064086},{79.2747802734, 58.571964263},{81.6638717651, 41.394405365},{86.0577163696, 30.583795547},{101.274185181, 24.103635788},{122.022064209, 20.140935897},{149.628707886, 18.349731445},{195.621643066, 9.6359605789},{198.321121216, 69.765792846},{138.335754395, 130.86445617}},{{77.3776473999, -91.604118347},{80.9268569946, -45.400650024},{109.261535645, -20.841529846},{158.885635376, -19.598711013},{219.02204895, -22.8725452423},{188.727401733, -147.86555481},{159.747970581, -147.89741516},{126.374259949, -128.46434021}},{{59.590133667, 55.9770889282},{59.0997047424, 34.932685852},{54.9787826538, 34.951171875},{54.4650382996, 52.371749877}}};std::vector<int> polygon_types; // 0=將該區域刪除, 1=將該區域保留for(int i = 0; i < polygons.size(); i++){polygon_types.push_back(0);}auto start1 = clock::now();vector<Point_cuda> filteredCloud = removePointsInPolygonsCUDA(test_data, polygons, polygon_types);auto end1 = clock::now();ns duration1 = chrono::duration_cast<ns>(end1 - start1);cout << "CUDA 射線法刪除多個多邊形區域內的點 耗時: " << duration1.count() / 1000000.0 << " 毫秒" << endl;write_all_pc_to_file("../filtered.txt", filteredCloud);}return 0;
}
- CMakeLists.txt
cmake_minimum_required(VERSION 3.0)
project(lidar_process)add_definitions(-std=c++11)set(CMAKE_CXX_STANDARD 11)set(CMAKE_BUILD_TYPE Release)
# set(CMAKE_BUILD_TYPE Debug)
cmake_policy(SET CMP0074 NEW)# find_package(PCL)
# include_directories(${PCL_INCLUDE_DIRS})
# link_directories(${PCL_LIBRARY_DIRS})
# add_definitions(${PCL_DEFINITIONS})find_package(CUDA)
include_directories(${CUDA_INCLUDE_DIRS})# 根據自己的cuda路徑和版本修改
include_directories("/usr/local/cuda-11.8/targets/x86_64-linux/include""/usr/local/cuda/include""/usr/local/include")
link_directories("/usr/local/cuda/lib64""/usr/local/cuda/targets/x86_64-linux/lib""/usr/local/lib")include_directories("include/")cuda_add_executable(lidar_processsrc/cut_roi_kernel.cusrc/main.cpp
)- 編譯運行
mkdir buildcd buildcmake ..make./lidar_process
)


)
![[TG開發]簡單的回聲機器人](http://pic.xiahunao.cn/[TG開發]簡單的回聲機器人)

)


)

)
