項目背景
在計算機視覺任務中,我們經常需要對大量圖片進行目標檢測和標注。YOLO 系列模型憑借其高效性成為目標檢測的首選工具之一,但批量處理圖片時往往需要編寫繁瑣的腳本。本文將介紹一個基于 Flask 和 YOLOv11 的 API 服務,支持單張圖片和文件夾批量處理,可自定義置信度、交并比等參數,并能返回詳細的標注統計結果。
功能特點
- 支持單張圖片和文件夾批量處理,自動識別輸入類型
- 可自定義置信度閾值 (conf) 和交并比閾值 (iou)
- 自動選擇運行設備 (GPU 優先,無則 CPU)
- 生成標注后的圖片和檢測結果 TXT 文件
- 返回詳細的標注統計信息 (每個文件的目標類別及數量)
- 提供完整的任務狀態查詢和結果下載功能
技術棧
fastapi:用于構建高性能的 Web API。uvicorn:一個快速的 ASGI 服務器,用于運行 FastAPI 應用。pydantic:用于數據驗證和設置類型提示。ultralytics:包含 YOLO 模型,用于目標檢測。opencv-python:用于圖像處理和計算機視覺任務。numpy:用于數值計算。pillow:Python Imaging Library,用于圖像處理。torch:PyTorch 深度學習框架,YOLO 模型依賴于此。base64:用于 Base64 編碼和解碼,雖然是 Python 標準庫,但為了完整性列出。
代碼實現
完整代碼
import os
import shutil
import time
import json
import logging
import cv2
import numpy as np
import base64
from typing import Dict, Any, Optional, List
from fastapi import FastAPI, HTTPException, WebSocket, WebSocketDisconnect, Query
from fastapi.responses import JSONResponse, FileResponse
from fastapi.middleware.cors import CORSMiddleware
from pydantic import BaseModel
from ultralytics import YOLO
from PIL import Image, ImageDraw, ImageFont
import torch
import threading# 配置日志系統,設置日志級別為INFO,記錄關鍵操作和異常信息
logging.basicConfig(level=logging.INFO)
logger = logging.getLogger(__name__)# 初始化FastAPI應用,設置API標題和版本
app = FastAPI(title="YOLO目標檢測API", version="1.0")# 配置CORS(跨域資源共享),允許所有來源的請求訪問API
app.add_middleware(CORSMiddleware,allow_origins=["*"],allow_credentials=True,allow_methods=["*"],allow_headers=["*"],
)# 任務狀態跟蹤字典,用于存儲每個檢測任務的執行狀態和結果
tasks: Dict[str, Dict[str, Any]] = {}# 定義繪制檢測框的顏色列表,為不同類別分配不同顏色
COLORS = [(0, 255, 0), (0, 0, 255), (255, 0, 0), (255, 255, 0), (0, 255, 255),(255, 0, 255), (128, 0, 0), (0, 128, 0), (0, 0, 128)
]# 嘗試加載Arial字體用于繪制標簽,若加載失敗則使用默認字體
try:font = ImageFont.truetype("arial.ttf", 18)
except:font = ImageFont.load_default()# 定義檢測請求的數據模型,使用pydantic進行參數校驗
class DetectRequest(BaseModel):input_path: str  # 輸入文件或文件夾路徑output_dir: str = "demo"  # 輸出目錄,默認為demomodel_path: str = "yolo11n.pt"  # 模型路徑,默認為YOLO Nano版本device: Optional[str] = None  # 設備選擇,可選參數(如'0'表示GPU,'cpu'表示CPU)conf: float = 0.25  # 置信度閾值,過濾低置信度的檢測結果iou: float = 0.7  # IOU(交并比)閾值,用于非極大值抑制target_classes: Optional[str] = None  # 目標類別,逗號分隔的字符串(如"person,car")def draw_annotations(image: np.ndarray, boxes, class_names) -> np.ndarray:"""在圖像上繪制檢測框和類別標簽Args:image: 輸入的圖像數組(BGR格式)boxes: 過濾后的檢測框列表(YOLO模型的Box對象)class_names: 類別名稱字典({類別ID: 類別名稱})Returns:繪制標注后的圖像數組(BGR格式)"""# 將OpenCV的BGR格式轉換為PIL的RGB格式,用于繪制文本frame_pil = Image.fromarray(cv2.cvtColor(image, cv2.COLOR_BGR2RGB))draw = ImageDraw.Draw(frame_pil)if len(boxes) == 0:# 若無檢測結果,直接返回原圖return image# 遍歷每個檢測框for box in boxes:# 解析框坐標、類別ID和置信度x1, y1, x2, y2 = map(int, box.xyxy[0].tolist())  # 檢測框的左上角和右下角坐標class_id = int(box.cls)  # 類別IDconf = float(box.conf)   # 置信度# 為不同類別分配不同顏色(循環使用預定義顏色列表)color = COLORS[class_id % len(COLORS)]# 繪制邊界框draw.rectangle([(x1, y1), (x2, y2)], outline=color, width=3)# 構建標簽文本(類別名 + 置信度)label = f"{class_names[class_id]}: {conf:.2f}"# 獲取文本邊界框,用于確定標簽背景位置try:text_bbox = draw.textbbox((x1, y1), label, font=font)except AttributeError:# 兼容舊版本PIL,使用textsize方法替代textbboxtext_width, text_height = draw.textsize(label, font=font)text_bbox = (x1, y1, x1 + text_width, y1 + text_height)# 計算標簽的垂直位置,避免超出圖像邊界text_height = text_bbox[3] - text_bbox[1]label_y1 = y1 - text_height - 5 if (y1 - text_height - 5) > 0 else y1 + 5# 繪制標簽背景(與邊界框顏色相同的矩形)draw.rectangle([(x1, label_y1), (x1 + (text_bbox[2] - text_bbox[0]), label_y1 + text_height)],fill=color)# 繪制標簽文本(白色字體)draw.text((x1, label_y1), label, font=font, fill=(255, 255, 255))# 將PIL圖像轉換回OpenCV的BGR格式return cv2.cvtColor(np.array(frame_pil), cv2.COLOR_RGB2BGR)def batch_detect_and_annotate(task_id: str,input_path: str,output_dir: str = "demo",model_path: str = "yolo11n.pt",device: Optional[str] = None,conf: float = 0.25,iou: float = 0.7,target_classes: Optional[str] = None
):"""批量處理圖像或文件夾中的所有圖像,執行目標檢測并生成標注圖像和結果文件Args:task_id: 唯一任務標識符input_path: 輸入文件或文件夾路徑output_dir: 輸出目錄model_path: YOLO模型路徑device: 推理設備(如'0'表示GPU,'cpu'表示CPU)conf: 置信度閾值iou: IOU閾值target_classes: 目標類別(逗號分隔的字符串)"""# 初始化任務狀態為"running"tasks[task_id] = {"status": "running", "progress": 0, "message": "開始處理..."}try:start_time = time.time()  # 記錄開始時間os.makedirs(output_dir, exist_ok=True)  # 創建輸出目錄(如果不存在)# 自動選擇設備:若未指定則優先使用GPU,否則使用CPUselected_device = device if device else ('0' if torch.cuda.is_available() else 'cpu')# 加載YOLO模型try:model = YOLO(model_path)except Exception as e:# 模型加載失敗,更新任務狀態為"failed"tasks[task_id] = {"status": "failed", "message": f"模型加載失敗:{str(e)}"}return# 解析目標類別參數(如果有)target_set = Noneif target_classes:# 將逗號分隔的字符串轉換為集合,便于快速查找target_set = set([cls.strip() for cls in target_classes.split(',')])# 驗證目標類別是否存在于模型類別中model_classes = set(model.names.values())invalid_classes = [cls for cls in target_set if cls not in model_classes]if invalid_classes:# 若存在無效類別,更新任務狀態為"failed"tasks[task_id] = {"status": "failed", "message": f"無效的目標類別: {', '.join(invalid_classes)}"}return# 處理輸入路徑(文件或文件夾)input_dir = None  # 預初始化輸入目錄變量is_single_file = Falseif os.path.isfile(input_path):# 輸入是單個文件image_files = [os.path.basename(input_path)]  # 獲取文件名input_dir = os.path.dirname(input_path)       # 獲取文件所在目錄is_single_file = Trueelif os.path.isdir(input_path):# 輸入是文件夾image_extensions = (".jpg", ".jpeg", ".png", ".bmp", ".gif", ".tiff")# 篩選文件夾中的所有圖像文件image_files = [f for f in os.listdir(input_path)if f.lower().endswith(image_extensions) and os.path.isfile(os.path.join(input_path, f))]input_dir = input_path  # 輸入目錄即為指定文件夾is_single_file = Falseelse:# 輸入路徑不存在,更新任務狀態為"failed"tasks[task_id] = {"status": "failed", "message": f"輸入路徑不存在: {input_path}"}returnif not image_files:# 未找到圖像文件,更新任務狀態為"failed"tasks[task_id] = {"status": "failed", "message": f"未找到圖片文件: {input_path}"}returntotal_files = len(image_files)  # 總文件數success_count = 0               # 成功處理的文件數fail_count = 0                  # 處理失敗的文件數file_annotations = {}           # 存儲每個文件的檢測結果# 遍歷所有圖像文件for i, img_file in enumerate(image_files, 1):img_path = os.path.join(input_dir, img_file)  # 構建完整文件路徑img_name = os.path.splitext(img_file)[0]      # 獲取不帶擴展名的文件名# 更新任務進度progress = int((i / total_files) * 100)tasks[task_id]["progress"] = progresstasks[task_id]["message"] = f"正在處理:{img_file}"try:# 執行目標檢測results = model(img_path, device=selected_device, conf=conf, iou=iou)all_boxes = results[0].boxes  # 獲取所有檢測框# 過濾檢測框(如果指定了目標類別)filtered_boxes = []if target_set:# 僅保留目標類別中的檢測框for box in all_boxes:cls_name = model.names[int(box.cls)]if cls_name in target_set:filtered_boxes.append(box)else:# 未指定目標類別時,保留所有檢測框filtered_boxes = list(all_boxes)# 讀取原始圖像image = cv2.imread(img_path)if image is None:raise Exception(f"無法讀取圖像: {img_path}")# 生成標注圖像annotated_img = draw_annotations(image, filtered_boxes, model.names)# 定義輸出文件路徑output_img_name = f"{img_name}_annotated.jpg"output_txt_name = f"{img_name}_detections.txt"output_img_path = os.path.join(output_dir, output_img_name)txt_path = os.path.join(output_dir, output_txt_name)# 保存標注圖像cv2.imwrite(output_img_path, annotated_img)# 保存檢測結果到文本文件with open(txt_path, "w", encoding="utf-8") as f:for box in filtered_boxes:cls_name = model.names[int(box.cls)]confidence = round(float(box.conf), 4)x1, y1, x2, y2 = map(round, box.xyxy[0].tolist())f.write(f"{cls_name} {confidence} {x1} {y1} {x2} {y2}\n")# 統計每個類別的檢測數量annotations = {}for box in filtered_boxes:cls_name = model.names[int(box.cls)]annotations[cls_name] = annotations.get(cls_name, 0) + 1# 記錄當前文件的檢測結果file_annotations[img_name] = {"annotated_image": output_img_path,"detection_txt": txt_path,"class_counts": annotations}success_count += 1  # 成功計數加1except Exception as e:# 單個文件處理失敗,記錄錯誤并繼續處理下一個fail_count += 1logger.error(f"處理{img_file}失敗: {str(e)}")# 計算總處理時間total_time = round(time.time() - start_time, 2)# 更新任務狀態為"completed",并保存詳細結果tasks[task_id] = {"status": "completed", "progress": 100,"total_time": total_time,"success_count": success_count,"fail_count": fail_count,"total_files": total_files,"output_dir": os.path.abspath(output_dir),"input_path": input_path,"is_single_file": is_single_file,"parameters": {"confidence_threshold": conf,"iou_threshold": iou,"device": selected_device,"target_classes": list(target_set) if target_set else None},"annotations": file_annotations,"message": "處理完成"}except Exception as e:# 發生未知錯誤,更新任務狀態為"failed"tasks[task_id] = {"status": "failed", "message": f"未知錯誤:{str(e)}"}@app.post("/detect")
async def detect(request: DetectRequest):"""接收參數并啟動目標檢測任務(同步模式)Args:request: 檢測請求參數Returns:任務執行結果"""logger.info(f"收到檢測請求: {request.input_path}")# 驗證參數范圍if not (0 <= request.conf <= 1):raise HTTPException(status_code=400, detail="conf參數必須在0-1之間")if not (0 <= request.iou <= 1):raise HTTPException(status_code=400, detail="iou參數必須在0-1之間")# 生成唯一任務ID(使用時間戳確保唯一性)task_id = str(int(time.time() * 1000))logger.info(f"創建任務: {task_id}")try:# 執行檢測任務(同步調用,會阻塞直到完成)batch_detect_and_annotate(task_id, request.input_path, request.output_dir, request.model_path, request.device, request.conf, request.iou, request.target_classes)# 獲取任務結果task_result = tasks.get(task_id)if not task_result:raise HTTPException(status_code=500, detail="任務執行失敗,未獲取到結果")if task_result["status"] == "failed":# 任務執行失敗,返回錯誤信息return JSONResponse(status_code=400,content={"task_id": task_id,"status": "failed","message": task_result["message"]})logger.info(f"任務完成: {task_id}, 處理時間: {task_result['total_time']}秒")return task_result  # 返回完整的任務結果except Exception as e:# 處理請求過程中發生異常logger.exception(f"請求處理失敗: {str(e)}")raise HTTPException(status_code=500, detail=f"請求處理失敗: {str(e)}")@app.get("/status/{task_id}")
async def get_status(task_id: str):"""獲取指定任務的執行狀態Args:task_id: 任務IDReturns:任務狀態信息"""status = tasks.get(task_id, {"status": "not_found", "message": "任務ID不存在"})return status@app.get("/results/{task_id}")
async def get_results(task_id: str):"""獲取指定任務的結果(僅當任務完成時可用)Args:task_id: 任務IDReturns:任務結果信息"""task = tasks.get(task_id)if not task:raise HTTPException(status_code=404, detail="任務ID不存在")if task["status"] != "completed":# 任務未完成,返回當前狀態和錯誤信息return {"status": task["status"],"progress": task["progress"],"message": task["message"],"error": "任務未完成,無法獲取結果"}# 返回完整的任務結果return {"task_id": task_id,"status": "completed","total_time": task["total_time"],"success_count": task["success_count"],"fail_count": task["fail_count"],"total_files": task["total_files"],"input_path": task["input_path"],"is_single_file": task["is_single_file"],"output_dir": task["output_dir"],"parameters": task["parameters"],"annotations": task["annotations"],"message": "處理完成"}@app.get("/download/{task_id}/{filename:path}")
async def download_file(task_id: str, filename: str):"""下載任務結果文件Args:task_id: 任務IDfilename: 要下載的文件名Returns:文件響應"""task = tasks.get(task_id)if not task or task["status"] != "completed":raise HTTPException(status_code=400, detail="任務未完成或不存在")output_dir = task["output_dir"]file_path = os.path.join(output_dir, filename)if not os.path.isfile(file_path):raise HTTPException(status_code=404, detail="文件不存在")# 返回文件內容供客戶端下載return FileResponse(path=file_path,filename=os.path.basename(filename),media_type="application/octet-stream")@app.websocket("/ws/video_detection")
async def detect_video_websocket(websocket: WebSocket):"""通過WebSocket處理實時視頻幀檢測(適用于實時視頻流)Args:websocket: WebSocket連接對象"""await websocket.accept()  # 接受WebSocket連接logging.info("WebSocket 連接已建立。")try:while True:# 接收客戶端發送的數據data_str = await websocket.receive_text()data = json.loads(data_str)# 解析請求參數model_name = data['model_name']base64_str = data['image_base64']conf = data.get('conf', 60) / 100.0  # 默認置信度閾值為0.6iou = data.get('iou', 65) / 100.0   # 默認IOU閾值為0.65# 加載YOLO模型model = YOLO(model_name)# 解碼Base64格式的圖像try:header, encoded_data = base64_str.split(",", 1)if not encoded_data:logging.warning("接收到空的Base64數據,已跳過。")continueimage_bytes = base64.b64decode(encoded_data)if not image_bytes:logging.warning("Base64解碼后數據為空,已跳過。")continueexcept (ValueError, TypeError, IndexError) as e:logging.warning(f"Base64解析失敗: {e},已跳過。")continue# 將字節數據轉換為OpenCV圖像image_cv2 = cv2.imdecode(np.frombuffer(image_bytes, np.uint8), cv2.IMREAD_COLOR)if image_cv2 is None:logging.warning("圖像解碼失敗,已跳過。")continue# 執行目標檢測并過濾結果(如果指定了目標類別)target_classes = data.get('target_classes')target_set = set(target_classes.split(',')) if target_classes else Noneresults = model(image_cv2, conf=conf, iou=iou, verbose=False)all_boxes = results[0].boxesfiltered_boxes = []if target_set:# 過濾出目標類別for box in all_boxes:cls_name = model.names[int(box.cls)]if cls_name in target_set:filtered_boxes.append(box)else:# 保留所有類別filtered_boxes = list(all_boxes)# 繪制標注(調用之前定義的函數)annotated_image = draw_annotations(image_cv2, filtered_boxes, model.names)# 將標注后的圖像編碼為Base64格式_, buffer = cv2.imencode('.jpg', annotated_image)result_base64 = base64.b64encode(buffer).decode("utf-8")# 將結果發送回客戶端await websocket.send_json({"image_base64": f"data:image/jpeg;base64,{result_base64}"})except WebSocketDisconnect:# 客戶端斷開連接logging.info("WebSocket 客戶端斷開連接。")except Exception as e:# 處理WebSocket異常error_message = f"WebSocket 處理錯誤: {type(e).__name__}"logging.error(f"{error_message} - {e}")await websocket.close(code=1011, reason=error_message)if __name__ == '__main__':import uvicorn# 打印API啟動信息和可用端點print("啟動YOLO目標檢測API服務...")print("支持的API端點:")print("  POST /detect - 啟動檢測任務")print("  GET /status/<task_id> - 獲取任務狀態")print("  GET /results/<task_id> - 獲取結果")print("  GET /download/<task_id>/<filename> - 下載結果文件")print("  WS /ws/video_detection - 實時視頻幀檢測")# 啟動FastAPI應用uvicorn.run(app, host="0.0.0.0", port=5000)
核心參數說明
| 參數名 | 類型 | 說明 | 默認值 |
| input_path | String | 輸入路徑(支持單張圖片或文件夾) | 無(必填) |
| output_dir | String | 結果輸出文件夾路徑 | "demo" |
| model_path | String | YOLO 模型路徑 | "yolo11n.pt" |
| device | String | 運行設備("cpu" 或 "0") | 自動選擇 |
| conf | Float | 置信度閾值(0-1) | 0.25 |
| iou | Float | 交并比閾值(0-1) | 0.7 |
| target_classes | String | 目標類別(逗號分隔的字符串) | 無 |
?
部署與使用
1. 安裝依賴
pip install fastapi uvicorn pydantic ultralytics opencv-python numpy pillow torch base642. 啟動服務
ython yolo_api.py服務啟動后會監聽本地 5000 端口,輸出如下:
啟動YOLO目標檢測API服務...
支持的API端點:
POST /detect - 啟動檢測任務并返回結果
GET /status/<task_id> - 獲取任務狀態
GET /results/<task_id> - 獲取結果(與/detect相同)
GET /download/<task_id>/<filename> - 下載結果文件
* Running on http://0.0.0.0:5000/ (Press CTRL+C to quit)
3. 使用 Postman 調用 API
處理圖片
- 請求 URL: http://localhost:5000/detect
- 請求方法: POST
- 請求體:
{
? ? "input_path": "C:/Users/HUAWEI/Desktop/yoloapi/tupian/", ?// 待檢測圖片文件夾
? ? "output_dir": "C:/Users/HUAWEI/Desktop/yoloapi/output", ?// 結果輸出文件夾
? ? "model_path": "yolo11n.pt", ?// 模型路徑(默認會自動下載)
? ? "device": null, ?// 自動選擇設備(也可指定"cpu"或"0")
? ? "conf": 0.1, ? ?// 置信度閾值(越高越嚴格,默認0.25)
? ? "iou": 0.6, ? ? // 交并比閾值(越高越嚴格,默認0.7)
? ? "target_classes" : "car"
}
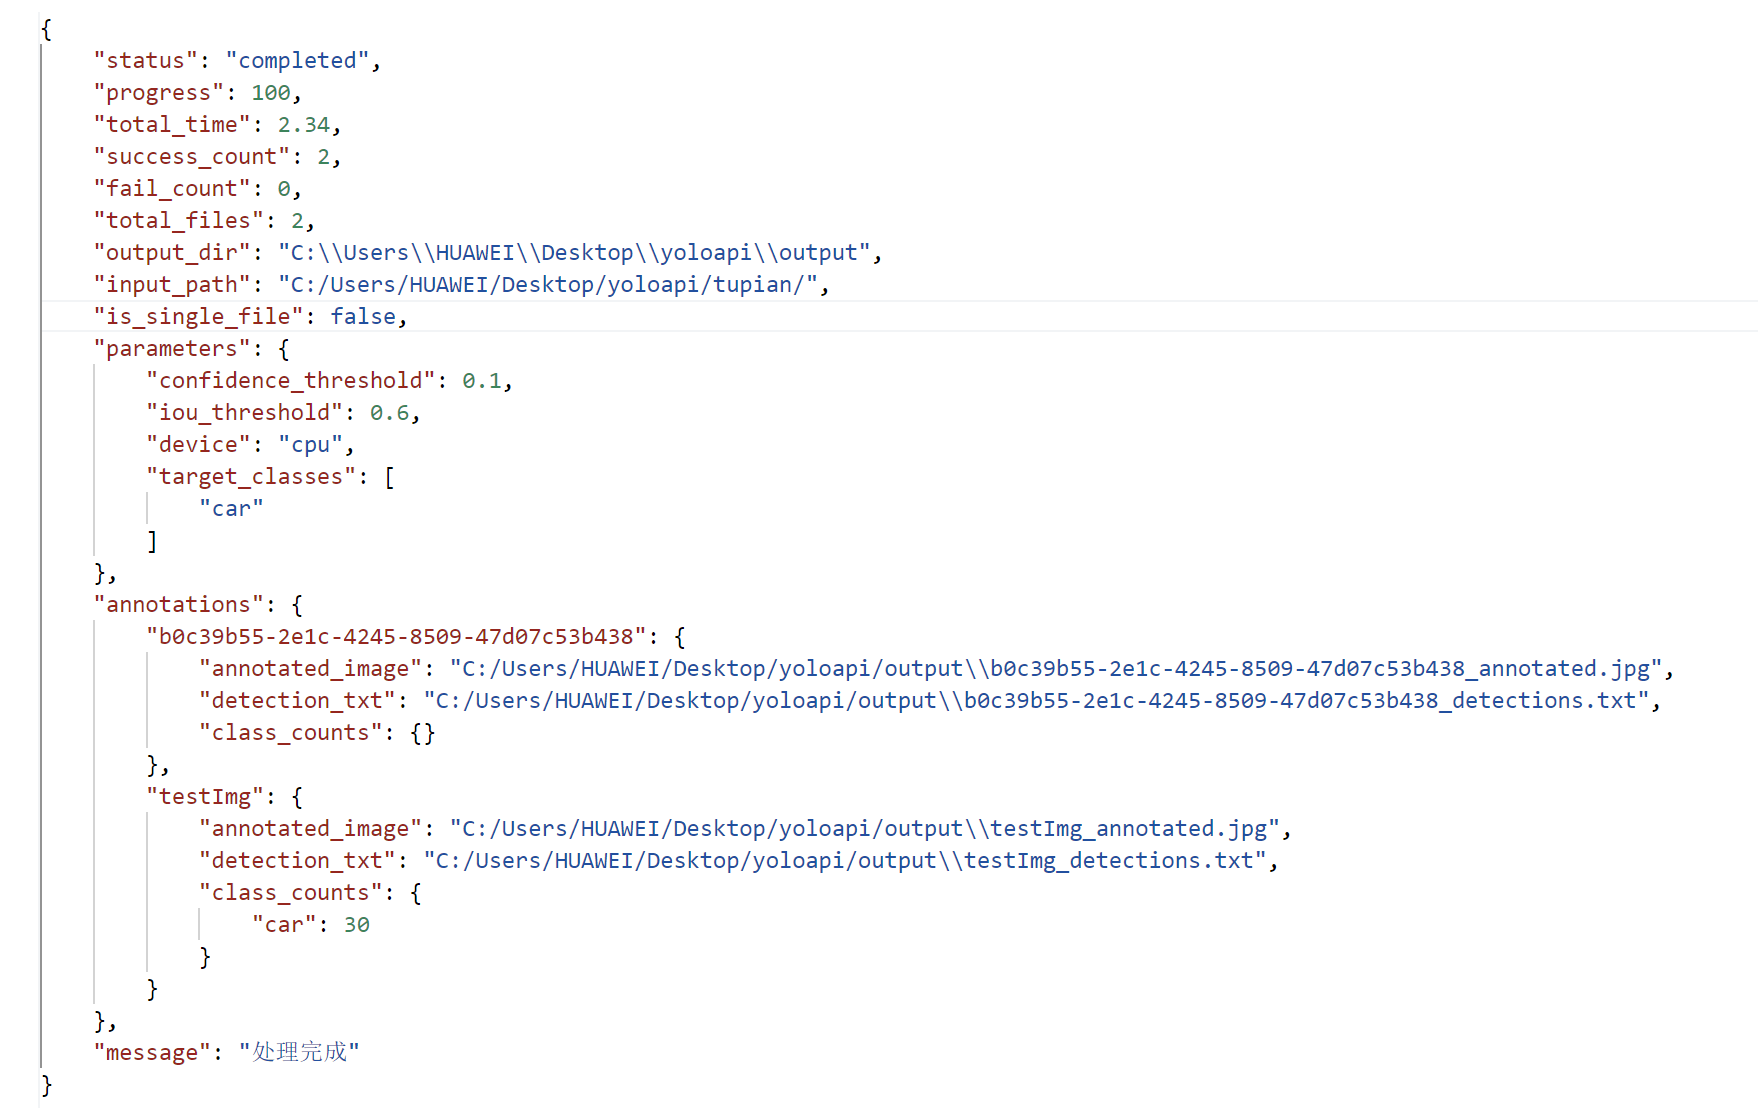
4. 返回結果示例


)

)


)
)