Netty
netty官網: Netty
什么是Netty?
- Netty 是 一個異步事件驅動的網絡應用程序框架,用于快速開發可維護的高性能協議服務器和客戶端。
- Netty 是一個 NIO 客戶端服務器框架,可以快速輕松地開發網絡應用程序(例如協議服務器和客戶端)。它極大地簡化了 TCP 和 UDP 套接字服務器等網絡編程。
Java IO
什么是Java IO?
官方文檔:https://docs.oracle.com/javase/tutorial/essential/io/
I/O(Input/Output) 是計算機與外部設備(磁盤、網絡、鍵盤等)進行數據交換的過程
分類
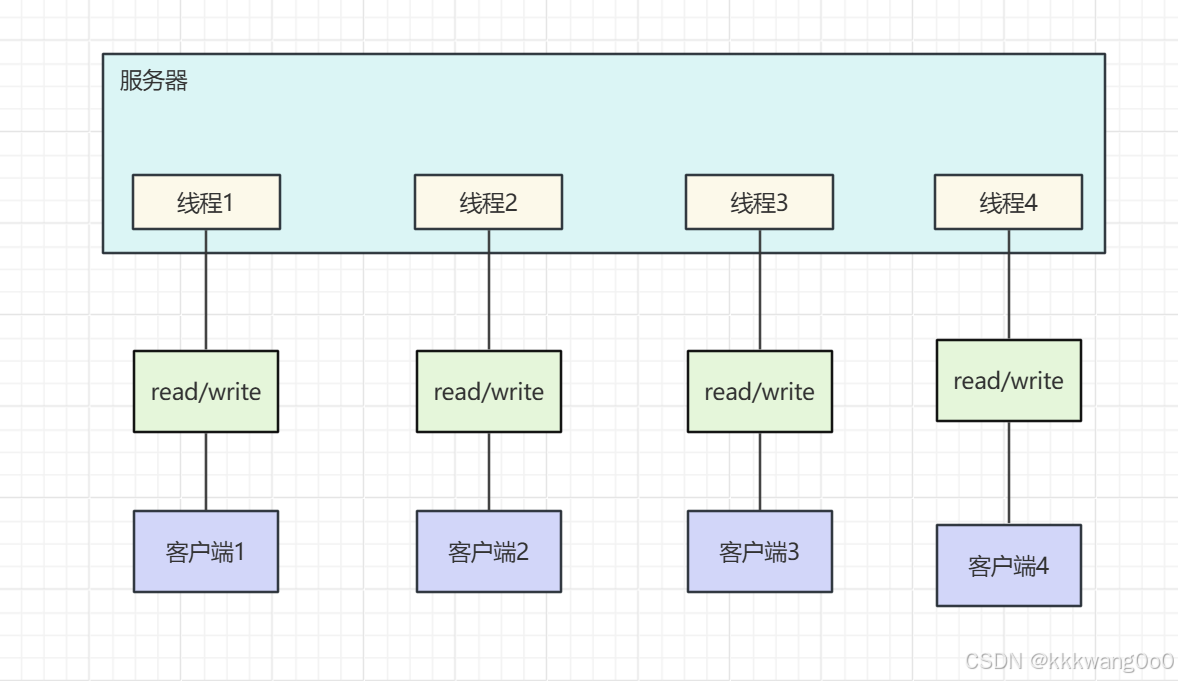
1.BIO (阻塞IO)
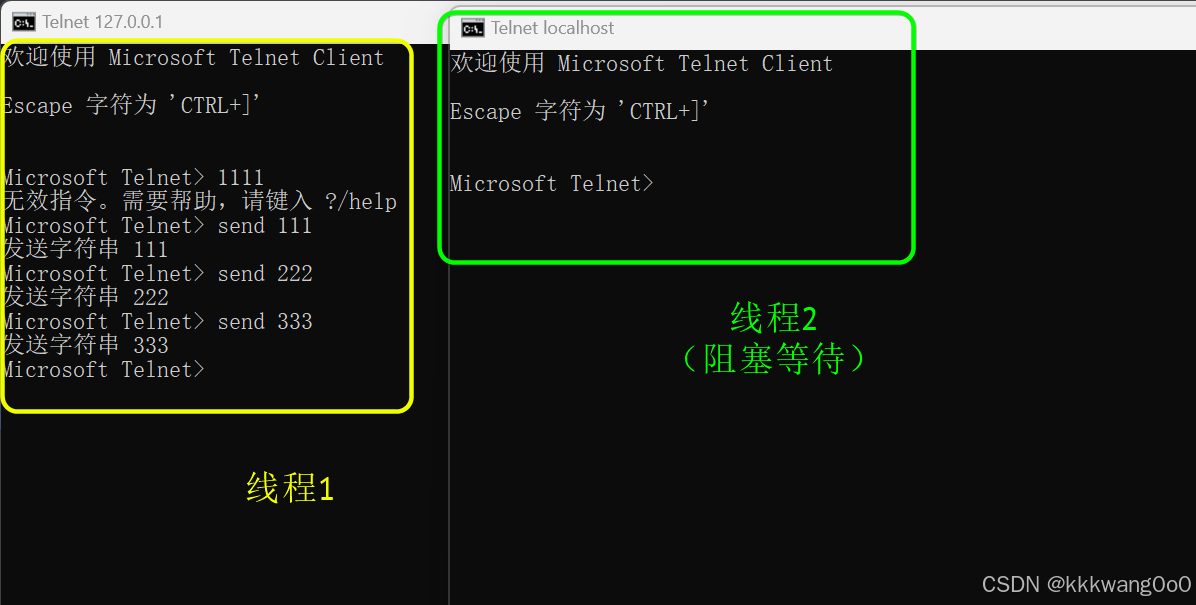
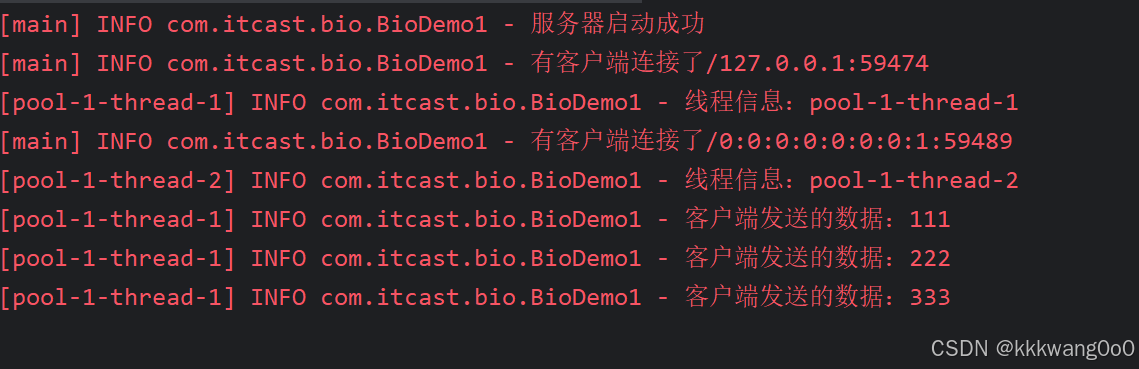
每當有一個客戶端與服務器進行連接,服務器就會創建一個線程去處理當前連接,當通道沒有數據的時候,線程會阻塞等待
@Slf4j
public class BioDemo1 {public static void main(String[] args) throws IOException {ExecutorService executorService = Executors.newCachedThreadPool();// 1.創建服務器監聽端口SocketServerSocket socketServer = new ServerSocket(3333);log.info("服務器啟動成功");// 2.等待客戶端連接while (true) {Socket socket = socketServer.accept();log.info("有客戶端連接了" + socket.getRemoteSocketAddress());// 3.創建線程處理客戶端連接executorService.execute(() -> {try {handle(socket);} catch (IOException e) {e.printStackTrace();}});}}/*** 處理客戶端連接* @param socket*/private static void handle(Socket socket) throws IOException {if (socket.isClosed()) return;// 1.打印線程信息log.info("線程信息:{}", Thread.currentThread().getName());InputStream inputStream = null;try {// 2.讀取通道數據inputStream = socket.getInputStream();// 2.1 獲取輸入流// 2.2 讀取數據byte[] bytes = new byte[1024]; // 創建一個緩存數組while (true) {int read = inputStream.read(bytes);if (read == -1) break;log.info("客戶端發送的數據:{}", new String(bytes, 0, read));}} catch (IOException e) {e.printStackTrace();}finally {log.info("客戶端斷開連接" + socket.getRemoteSocketAddress());if (inputStream != null) inputStream.close();socket.close();}}
}
文件傳輸
public class FileDemoServer {public static void main(String[] args) throws IOException {File file = new File("file/test01.txt");RandomAccessFile randomAccessFile = new RandomAccessFile(file, "rw");byte[] bytes = new byte[(int) file.length()];randomAccessFile.read(bytes); // 讀取文件// 創建服務端 等待客戶端連接發送文件ServerSocket server = new ServerSocket(3333);Socket client = server.accept();OutputStream outputStream = client.getOutputStream();outputStream.write(bytes);outputStream.close();}
}
public class FileDemoClient {public static void main(String[] args) throws IOException {Socket socket = new Socket();socket.connect(new InetSocketAddress(3333));InputStream inputStream = socket.getInputStream();byte[] bytes = new byte[1024];inputStream.read(bytes);System.out.println(new String(bytes));}
}
2.NIO (非阻塞IO)
官方文檔:https://docs.oracle.com/javase/8/docs/api/java/nio/package-summary.html
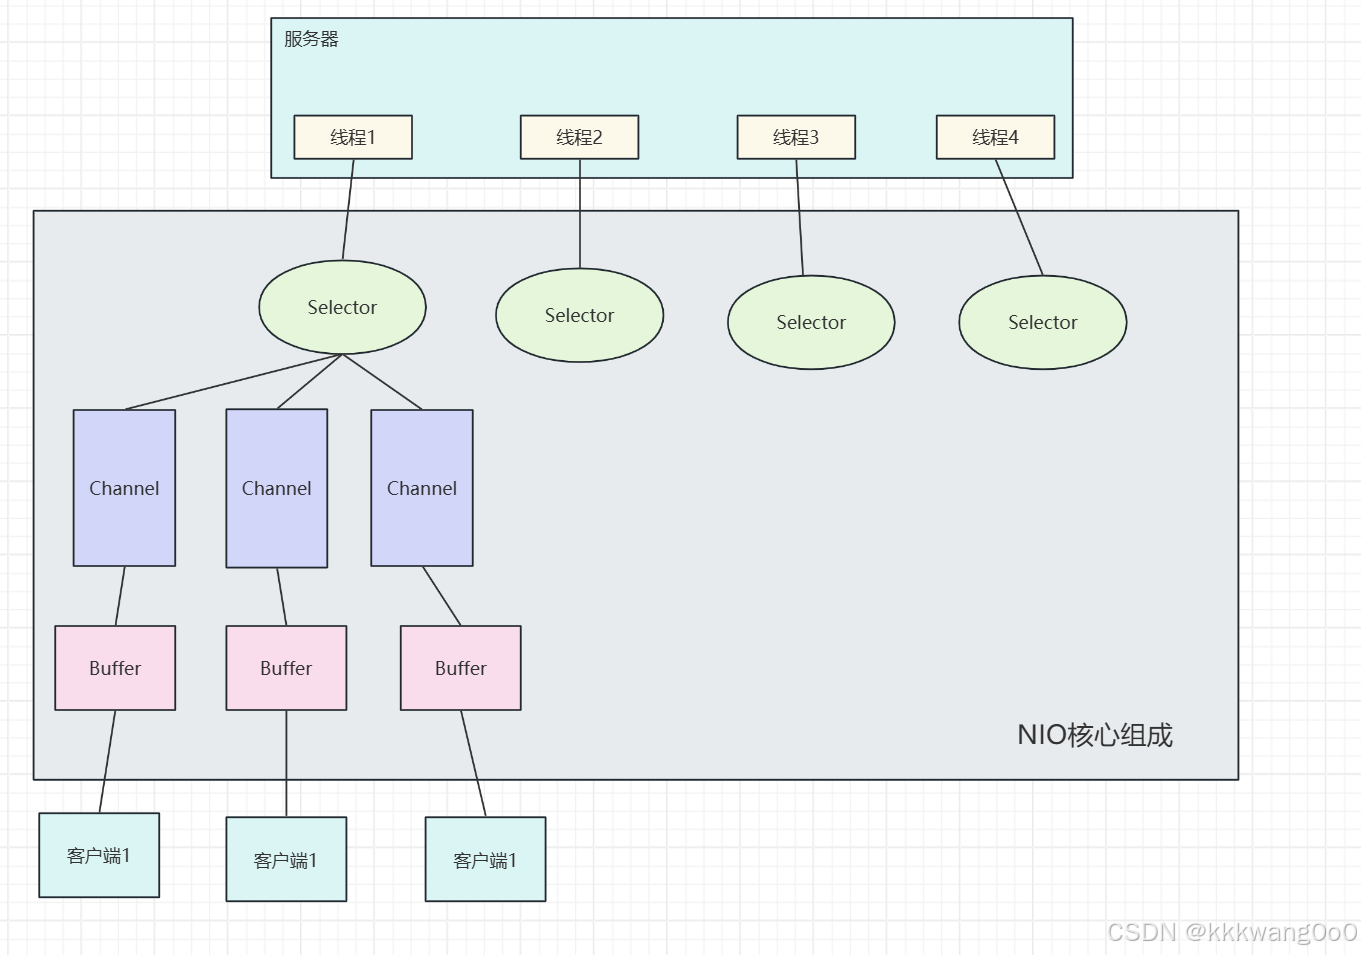
- NIO是面向緩沖區或者面向塊編程的
- 核心組成是Selector、Channel、Buffer
1.Channel(通道)
- 作用:雙向數據傳輸管道(支持讀和寫),替代傳統 BIO 的流(Stream)。
- 類型:
SocketChannel:TCP 客戶端通道。ServerSocketChannel:TCP 服務端監聽通道。FileChannel:文件讀寫通道。
2. Buffer(緩沖區)
-
作用:數據暫存容器,減少直接操作底層數據源的次數。
-
類型:
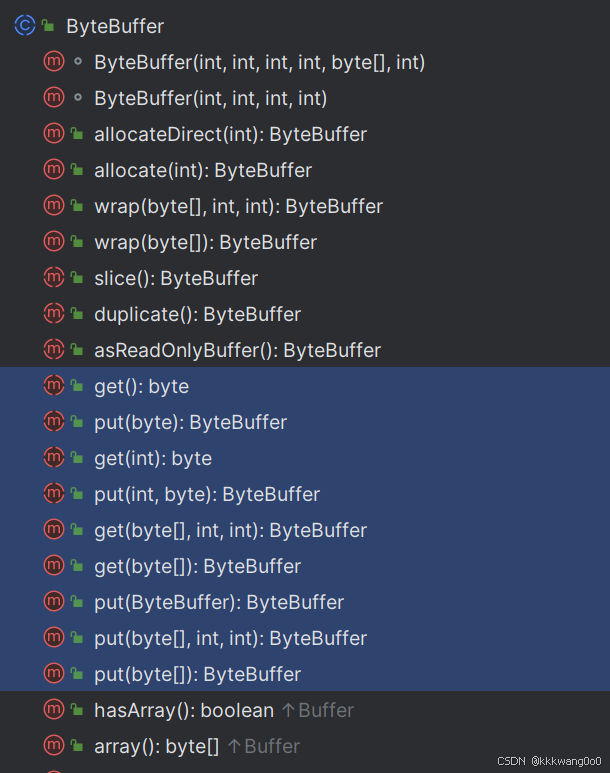
ByteBuffer(最常用)、CharBuffer、IntBuffer等。 -
關鍵方法:
put():寫入數據。get():讀取數據。flip():切換讀寫模式。clear():清空緩沖區(可復用)。
Buffer類中很重要的幾個字段:
/*** 標記位置,默認為-1,表示尚未設置標記*/
private int mark = -1;/*** 當前位置,用于指示當前操作的位置*/
private int position = 0;/*** 限制位置,表示可以操作的最大位置*/
private int limit;/*** 容量,表示最大容量*/
private int capacity;
3. Selector(選擇器)
- 作用:單線程監聽多個通道的 I/O 事件(如連接、讀、寫),實現多路復用。
- 核心事件:
OP_ACCEPT:服務端接收新連接。OP_CONNECT:客戶端完成連接。OP_READ:數據可讀。OP_WRITE:數據可寫。
3. I/O 多路復用
- 特點:通過 Selector/Epoll 監控多個 I/O 事件,當某個通道就緒時通知線程處理。
- 優點:單線程高效管理多個連接,減少線程切換開銷。
- 核心組件:
Selector(Java NIO)epoll(Linux)kqueue(BSD)
- 應用場景:高并發服務器(如 Netty、Nginx)。
4.AIO
異步 I/O(Asynchronous I/O,AIO)
- 特點:線程發起 I/O 操作后立即返回,內核負責將數據從內核緩沖區拷貝到用戶緩沖區,完成后通知線程。
- 優點:完全非阻塞,無輪詢或等待。
- 缺點:實現復雜,依賴操作系統支持(如 Linux AIO 不完善)。
- 應用場景:文件操作或高吞吐場景(如 Java
AsynchronousFileChannel)。
NIO

1.Buffer(緩沖區)
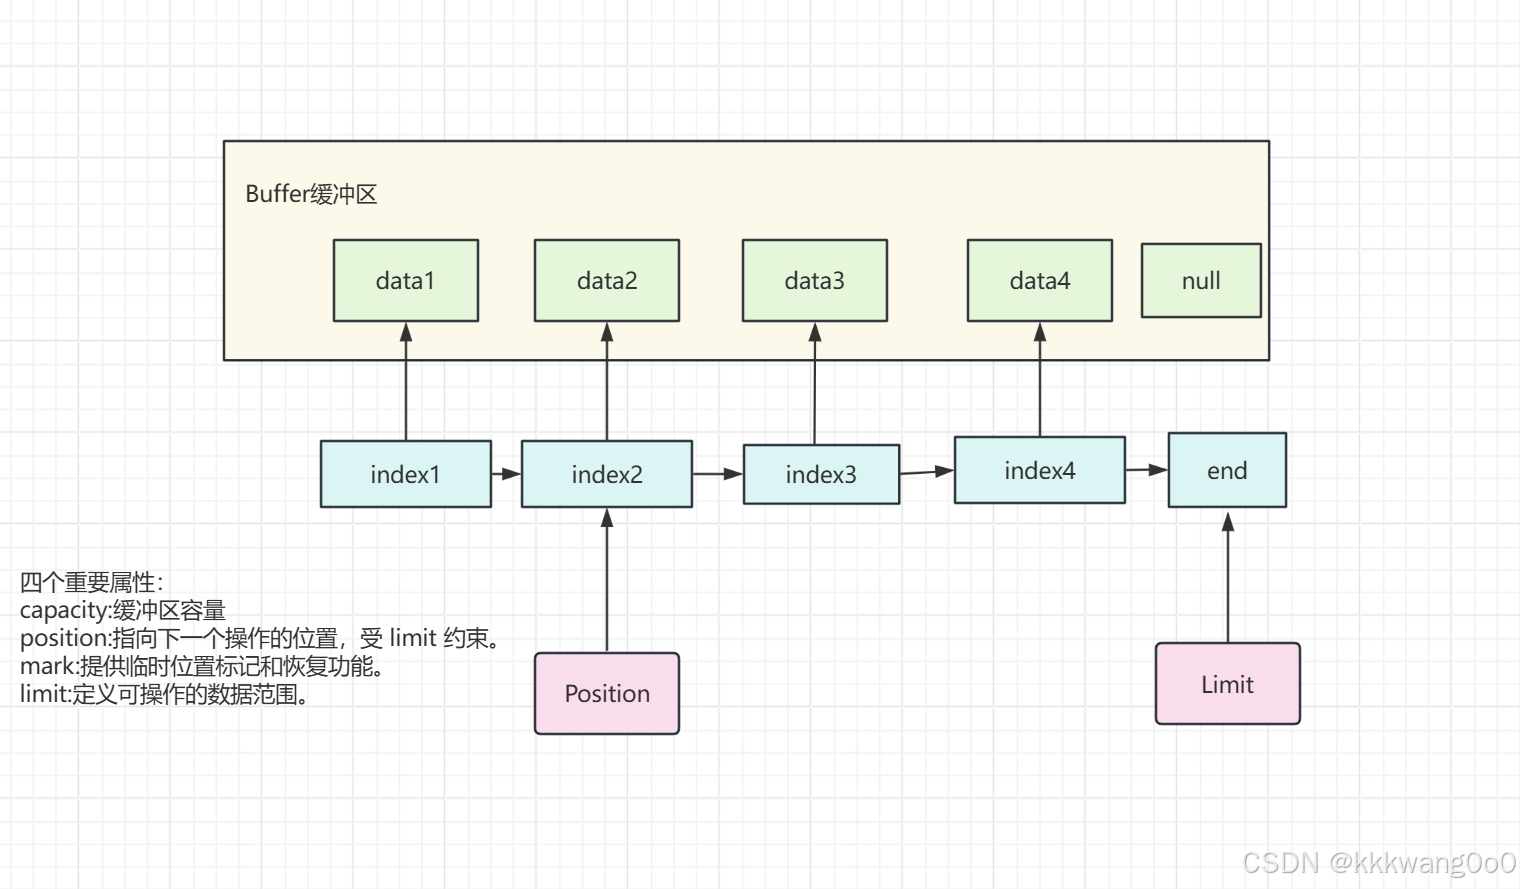
核心屬性:
| 屬性 | 描述 | 初始值 | 約束條件 |
|---|---|---|---|
capacity | 緩沖區的總容量(元素個數),創建時確定后不可修改。 | 由 allocate() 或 wrap() 確定 | capacity ≥ 0 |
position | 下一個要讀/寫的索引位置。初始為 0,每讀/寫一個元素遞增 1。 | 0 | 0 ≤ position ≤ limit |
limit | 第一個不能讀/寫的索引(即讀寫操作的終點)。初始等于 capacity,可動態調整。 | capacity | 0 ≤ limit ≤ capacity |
mark | 標記一個臨時位置,后續可通過 reset() 將 position 恢復到此值。默認未標記(-1)。 |
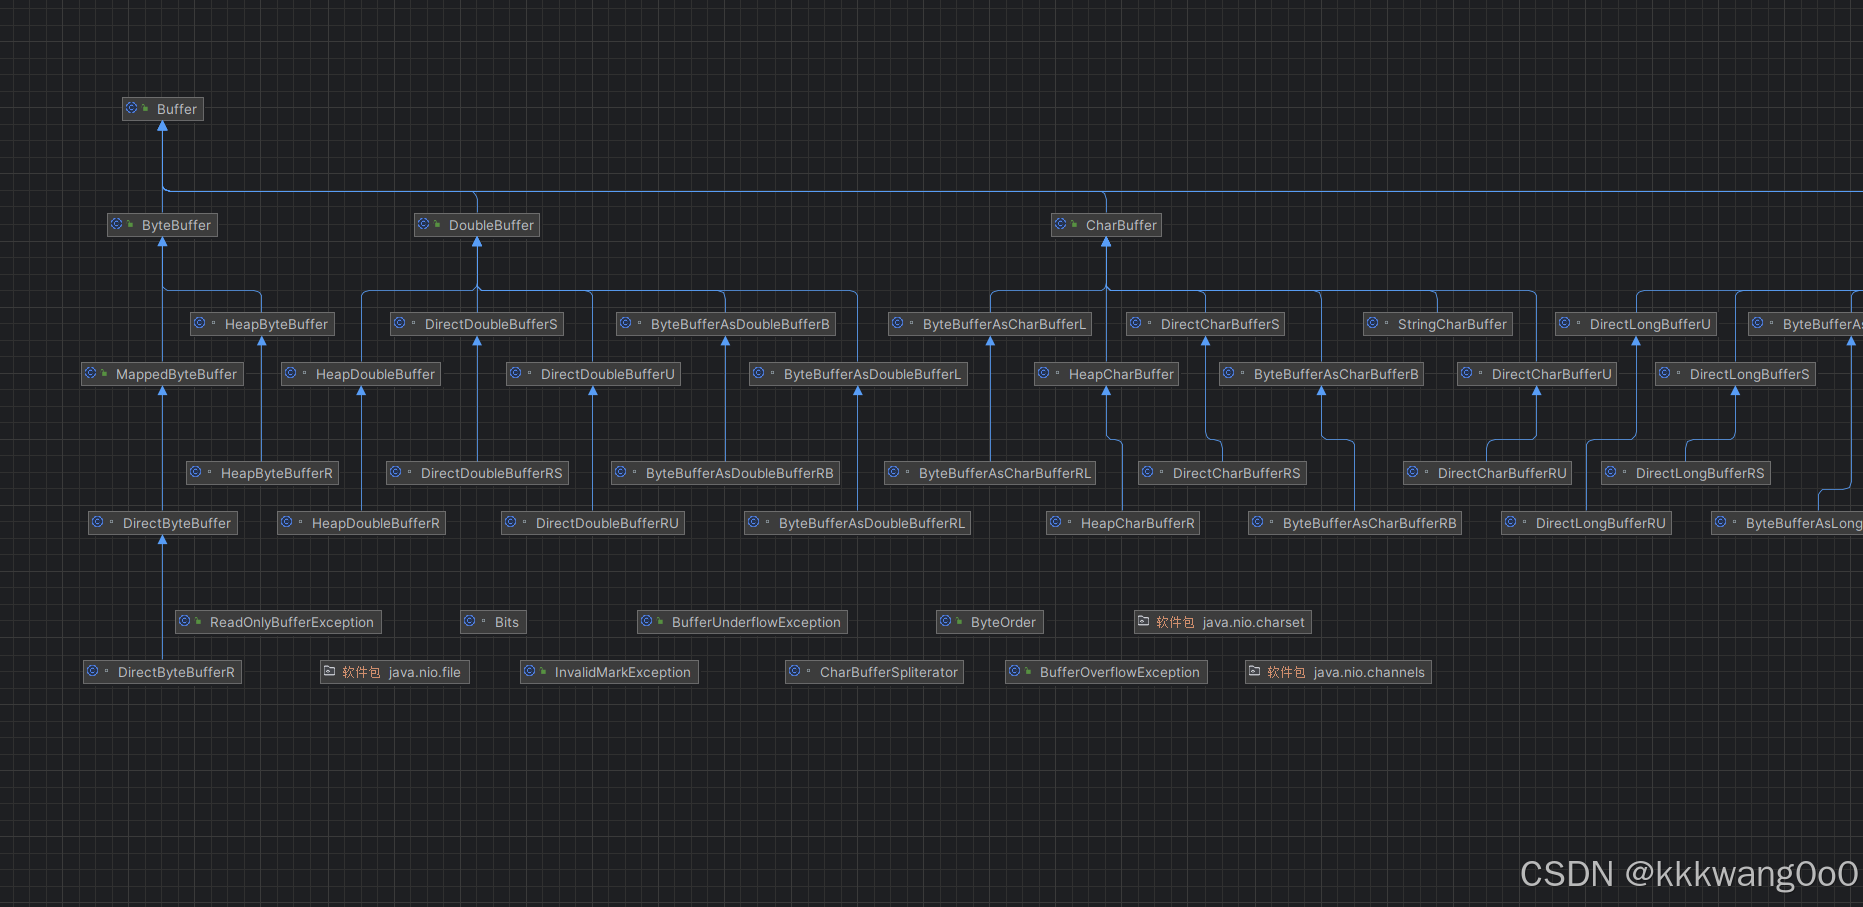
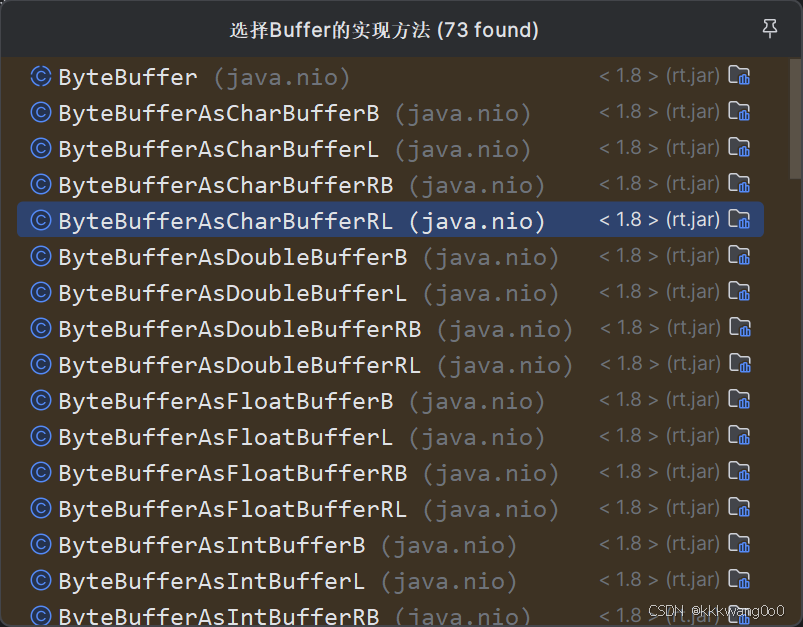
Buffer類是一個抽象類,有很多子類繼承其方法完成特定數據的緩沖操作
Buffer類中包括的方法:

(1)核心方法:
這些方法用于管理緩沖區的核心屬性:容量(Capacity)、位置(Position)、限制(Limit)。
| 方法 | 說明 |
|---|---|
int capacity() | 返回緩沖區的總容量,創建后不可修改。 |
int position() | 返回當前讀寫位置(索引)。 |
Buffer position(int p) | 設置當前讀寫位置,需滿足 0 ≤ p ≤ limit。 |
int limit() | 返回緩沖區的讀寫限制(position 不能超過此值)。 |
Buffer limit(int l) | 設置讀寫限制,需滿足 0 ≤ l ≤ capacity。 |
(2)狀態切換
用于在讀模式和寫模式之間切換緩沖區的狀態。
| 方法 | 說明 |
|---|---|
Buffer clear() | 重置緩沖區為寫模式:position=0, limit=capacity,數據未清除,但可被覆蓋。 |
Buffer flip() | 切換為讀模式:limit=position, position=0,通常在寫入數據后調用。 |
Buffer rewind() | 重置 position=0,保持 limit 不變,用于重新讀取數據。 |
Buffer compact() | (子類實現,如 ByteBuffer)壓縮緩沖區,將未讀數據移到頭部,準備繼續寫入。 |
(3)讀寫方法
用于向緩沖區寫入數據(put)或從緩沖區讀取數據(get),具體方法由子類實現。
1. 基本讀寫方法
| 方法 | 說明 |
|---|---|
ByteBuffer put(byte b) | 寫入一個字節,position 遞增。 |
ByteBuffer put(byte[] src) | 寫入字節數組。 |
byte get() | 讀取一個字節,position 遞增。 |
ByteBuffer get(byte[] dst) | 讀取字節到數組。 |
2.批量讀寫
| 方法 | 說明 |
|---|---|
Buffer put(Buffer src) | 將另一個緩沖區的數據復制到當前緩沖區。 |
Buffer get(byte[] dst, int offset, int length) | 從緩沖區讀取數據到數組的指定位置。 |
(4)標記與重置
用于標記和恢復 position 的位置。
| 方法 | 說明 |
|---|---|
Buffer mark() | 標記當前 position,后續可通過 reset() 恢復到此位置。 |
Buffer reset() | 將 position 重置到之前標記的位置。 |
(5)工具方法
| 方法 | 說明 |
|---|---|
int remaining() | 返回剩余可操作的元素數量:limit - position。 |
boolean hasRemaining() | 檢查是否還有剩余元素可操作(position < limit)。 |
boolean isReadOnly() | 判斷緩沖區是否為只讀。 |
boolean isDirect() | (如 ByteBuffer)判斷是否是直接內存(堆外內存)緩沖區。 |
(6)視圖與復制
用于創建緩沖區的視圖或副本,共享底層數據但獨立維護屬性。
| 方法 | 說明 |
|---|---|
Buffer duplicate() | 創建緩沖區的副本,共享數據但獨立維護 position、limit 等屬性。 |
Buffer slice() | 創建當前緩沖區的一個子視圖,范圍從 position 到 limit。 |
2.Channel
在 Java NIO 中,Channel(通道) 是用于在數據源(如文件、網絡套接字)和緩沖區(Buffer)之間高效傳輸數據的抽象。它與傳統 I/O 的流(InputStream/OutputStream)類似,但具有更強大的功能,如支持非阻塞模式、雙向讀寫(部分實現)以及內存映射文件操作。
Channel在Java中是一個接口
public interface Channel extends Closeable {public boolean isOpen();public void close() throws IOException;}
區別(Channel和Stream):
1.Channel可以同時進行讀寫,流只能讀或寫
2.通道可以實現異步讀寫
3。通道可以寫數據到緩沖區,也可以從緩沖區讀數據
實現子類:
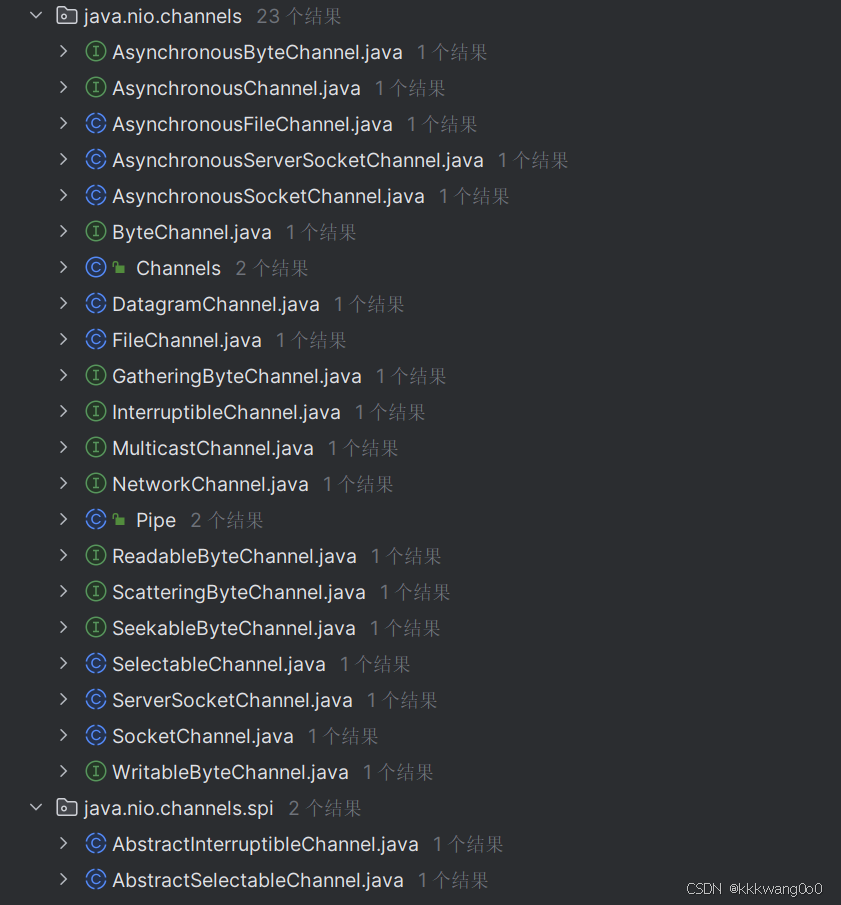
| Channel 子類 | 應用場景 | 關鍵特性 |
|---|---|---|
FileChannel | 文件讀寫 | 內存映射、零拷貝傳輸 |
SocketChannel | TCP 客戶端通信 | 非阻塞模式、Selector 多路復用 |
ServerSocketChannel | TCP 服務端監聽 | 接受客戶端連接 |
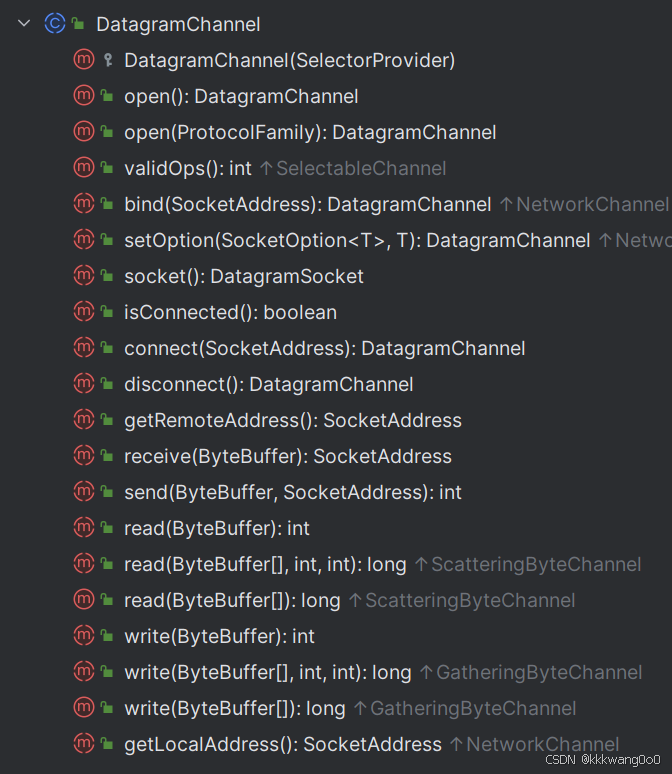
DatagramChannel | UDP 數據報通信 | 無連接、支持廣播 |
Pipe.Source/SinkChannel | 線程間通信 | 單向數據傳輸 |
AsynchronousFileChannel | 異步文件操作 | 回調或 Future 模式 |
AsynchronousSocketChannel | 異步 TCP 通信 | 非阻塞、高并發支持 |
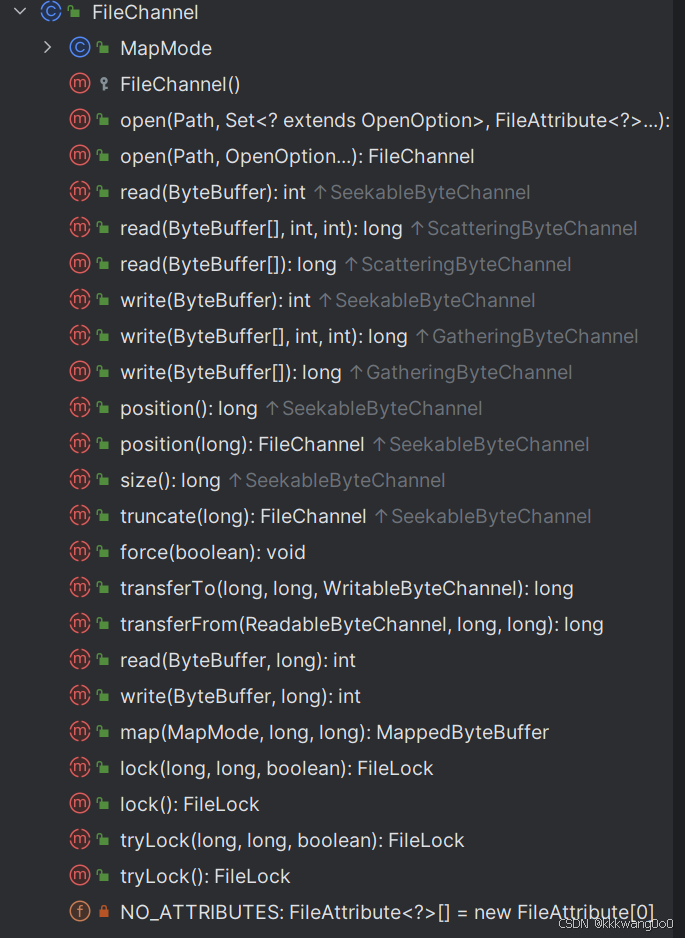
FileChannel類
用于文件的讀寫、內存映射及零拷貝傳輸。
| 方法 | 說明 |
|---|---|
| 讀寫操作 | |
int read(ByteBuffer dst) | 從通道讀取數據到 ByteBuffer,返回實際讀取的字節數(可能為 0)。 |
int write(ByteBuffer src) | 將 ByteBuffer 中的數據寫入通道,返回實際寫入的字節數。 |
| 定位與截斷 | |
long position() | 返回當前文件指針的位置。 |
FileChannel position(long newPosition) | 設置文件指針的位置(用于隨機讀寫)。 |
FileChannel truncate(long size) | 截斷文件到指定大小(丟棄超出部分)。 |
| 內存映射與零拷貝 | |
MappedByteBuffer map(MapMode mode, long position, long size) | 將文件映射到內存,返回 MappedByteBuffer。模式包括:READ_ONLY、READ_WRITE、PRIVATE。 |
long transferTo(long position, long count, WritableByteChannel target) | 將文件數據從 position 開始的 count 字節直接傳輸到目標通道(零拷貝優化)。 |
long transferFrom(ReadableByteChannel src, long position, long count) | 從源通道讀取數據,直接寫入文件的指定位置(零拷貝優化)。 |
| 文件鎖 | |
FileLock lock() | 獲取文件的獨占鎖(阻塞直到獲取成功)。 |
FileLock tryLock() | 嘗試非阻塞獲取鎖,失敗返回 null。 |
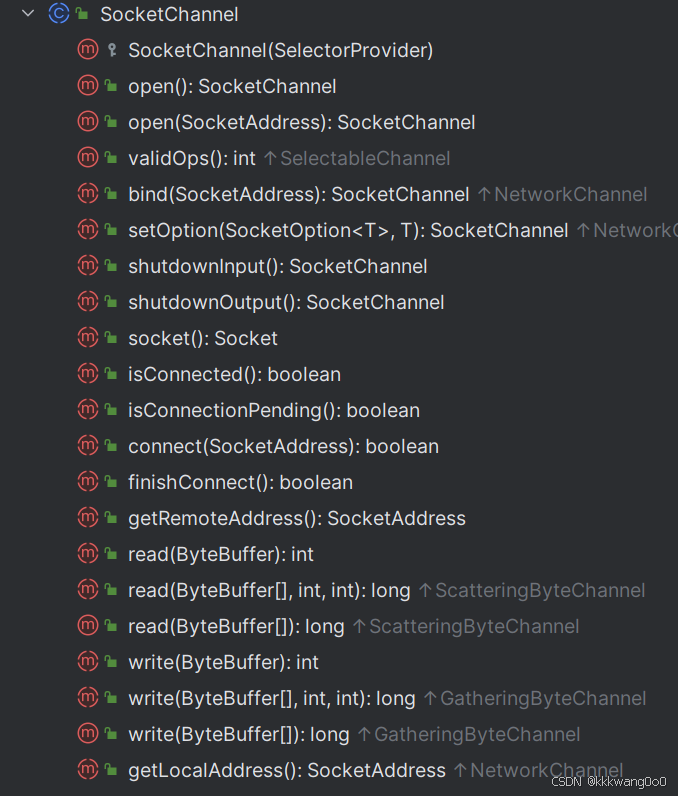
SocketChannel類
(TCP 客戶端)
| 方法 | 說明 |
|---|---|
boolean connect(SocketAddress remote) | 連接到服務端地址。在非阻塞模式下可能返回 false,需后續調用 finishConnect() 完成連接。 |
boolean finishConnect() | 完成非阻塞模式下的連接過程(需循環檢查)。 |
boolean isConnected() | 檢查是否已成功連接到服務端。 |
| 非阻塞模式 | |
SocketChannel configureBlocking(boolean block) | 設置阻塞模式(true 為阻塞,默認值)。 |
| 注冊到 Selector | |
SelectionKey register(Selector sel, int ops) | 將通道注冊到 Selector,監聽指定事件(如 SelectionKey.OP |
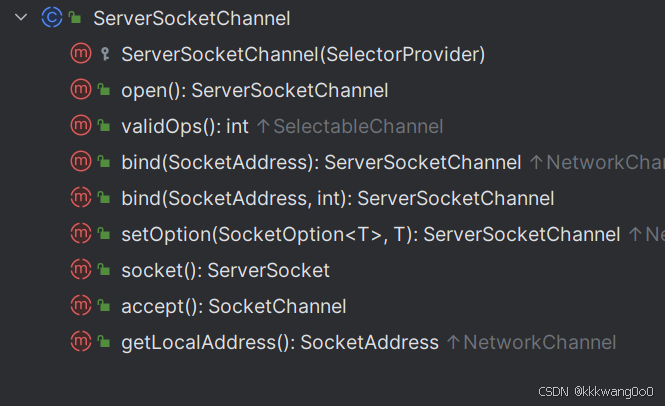
ServerSocketChannel類
(TCP 服務端)
| 方法 | 說明 |
|---|---|
ServerSocketChannel bind(SocketAddress local) | 綁定到指定端口(如 new InetSocketAddress(8080))。 |
SocketChannel accept() | 接受客戶端連接請求,返回對應的 SocketChannel(阻塞模式下會等待連接)。 |
| 非阻塞模式 | |
configureBlocking(boolean block) | 設置非阻塞模式后,accept() 可能立即返回 null。 |
DatagramChannel類
(UDP 通信)
| 方法 | 說明 |
|---|---|
DatagramChannel bind(SocketAddress local) | 綁定本地端口接收數據(如 new InetSocketAddress(9090))。 |
int send(ByteBuffer src, SocketAddress target) | 發送數據包到目標地址。 |
SocketAddress receive(ByteBuffer dst) | 接收數據包到 ByteBuffer,返回發送方的地址。 |
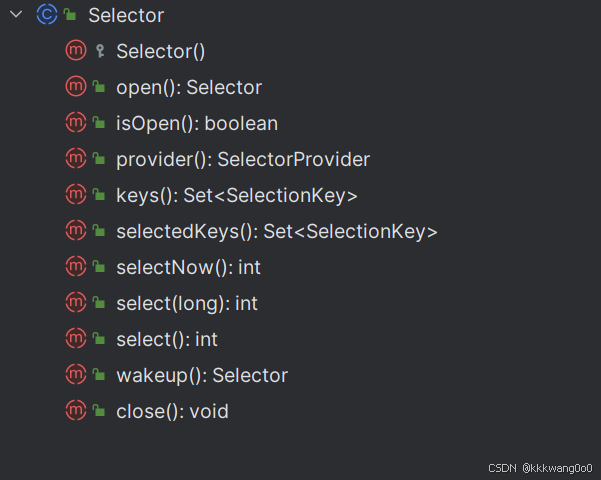
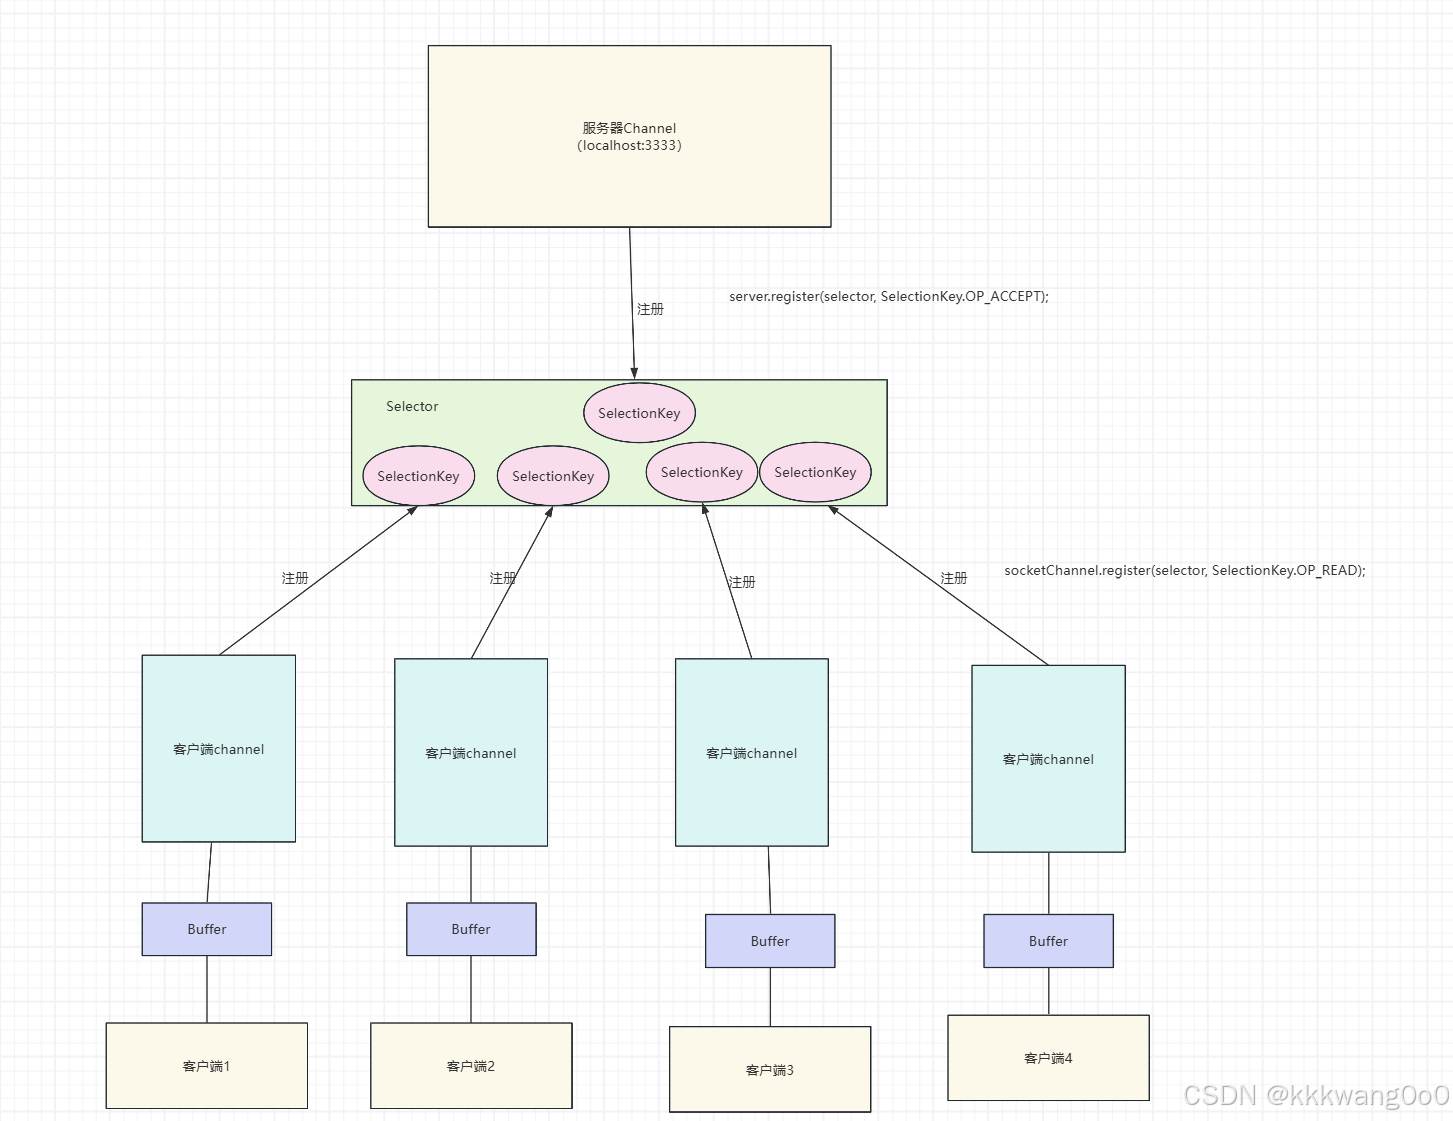
3.Selector
用一個線程處理多個客戶端連接,就會用到Selector,可以檢測注冊的多個通道中是否有事件發生,只有通道有讀寫事件發生時才會進行讀寫操作,不必為每個連接都創建線程,減少系統開銷
Selector是一個抽象類
核心特點:
- 多路復用:單線程可管理多個
Channel,減少線程資源消耗。 - 非阻塞模式:需將
Channel設置為非阻塞模式(configureBlocking(false))才能注冊到Selector。 - 事件驅動:通過監聽
SelectionKey標識的事件(如OP_READ、OP_WRITE)觸發操作。
常用方法
| 方法 | 說明 |
|---|---|
static Selector open() | 創建一個新的 Selector 實例。 |
int select() | 阻塞等待至少一個已注冊的 Channel 就緒事件,返回就緒事件的數量。 |
int select(long timeout) | 阻塞最多 timeout 毫秒,超時返回 0。 |
int selectNow() | 非阻塞檢查就緒事件,立即返回當前就緒數量。 |
Set<SelectionKey> selectedKeys() | 返回已就緒的事件集合(需手動清理已處理的 SelectionKey)。 |
Set<SelectionKey> keys() | 返回所有注冊到該 Selector 的 SelectionKey 集合(不可直接修改)。 |
Selector wakeup() | 喚醒因 select() 阻塞的線程。 |
void close() | 關閉 Selector 并釋放資源。 |
聊天案例
服務端
package com.itcast.nio.chat;import java.io.IOException;
import java.net.InetSocketAddress;
import java.nio.ByteBuffer;
import java.nio.channels.*;
import java.util.HashSet;
import java.util.Iterator;
import java.util.Set;public class Server {// 存儲當前群聊的所有在線用戶private static final Set<SocketChannel> clients = new HashSet<SocketChannel>();public static void main(String[] args) throws IOException {// 1.創建服務器通道并綁定端口ServerSocketChannel server = ServerSocketChannel.open();// 2.綁定端口并設置為非阻塞server.bind(new InetSocketAddress(3333));server.configureBlocking(false);System.out.println("服務器啟動成功" + server.getLocalAddress());// 3.創建選擇器Selector selector = Selector.open();// 4.注冊服務器通道到選擇器中server.register(selector, SelectionKey.OP_ACCEPT);while (true) {// 5.等待客戶端連接selector.select();// 6.獲取選擇器中所有注冊的通道Set<SelectionKey> selectionKeys = selector.selectedKeys();// 7.遍歷選擇器中的所有通道Iterator<SelectionKey> iterator = selectionKeys.iterator();// 8.處理每個通道while (iterator.hasNext()) {SelectionKey key = iterator.next();iterator.remove(); // 必須移除已處理的 keyif (key.isAcceptable()) {// 9.處理新連接handleAccept(key, selector);}else if (key.isReadable()) {// 10.處理數據讀取handleRead(key);}}}}/*** 處理新連接* @param key* @param selector*/public static void handleAccept(SelectionKey key, Selector selector){try {ServerSocketChannel serverChannel = (ServerSocketChannel) key.channel(); // 獲取服務器通道SocketChannel socketChannel = serverChannel.accept(); // 獲取客戶端通道clients.add(socketChannel);socketChannel.configureBlocking(false); // 設置為非阻塞socketChannel.register(selector, SelectionKey.OP_READ); // 注冊到選擇器中System.out.println("客戶端連接: " + socketChannel.getRemoteAddress());} catch (IOException e) {e.printStackTrace();}}/*** 處理讀寫* @param key* @throws IOException*/public static void handleRead(SelectionKey key){SocketChannel clientChannel = (SocketChannel) key.channel();ByteBuffer buffer = ByteBuffer.allocate(1024);int bytesRead = 0;try {bytesRead = clientChannel.read(buffer);} catch (IOException e) {e.printStackTrace();closeClient(clientChannel);return;}if (bytesRead == -1) {closeClient(clientChannel);return;}if (bytesRead > 0) {buffer.flip();byte[] data = new byte[buffer.remaining()];buffer.get(data);String message = new String(data).trim();try {System.out.println("客戶端收到消息 [" + clientChannel.getRemoteAddress() + "]: " + message);} catch (IOException e) {e.printStackTrace();}// 廣播給其他客戶端broadcastMessage(message, clientChannel);}}private static void broadcastMessage(String message, SocketChannel clientChannel) {if (clients.isEmpty()) return;ByteBuffer byteBuffer = ByteBuffer.wrap((message + '\n').getBytes());ByteBuffer buffer = ByteBuffer.wrap((message + "\n").getBytes());for (SocketChannel client : clients) {if (client != clientChannel && client.isOpen()) {try {client.write(buffer);buffer.rewind(); // 重置buffer供下次寫入} catch (IOException e) {closeClient(client);}}}}private static void closeClient(SocketChannel clientChannel) {clients.remove(clientChannel);try {System.out.println("客戶端斷開連接: " + clientChannel.getRemoteAddress());clientChannel.close();} catch (IOException e) {e.printStackTrace();}}
}
客戶端
package com.itcast.nio.chat;import java.io.IOException;
import java.net.InetSocketAddress;
import java.net.SocketAddress;
import java.nio.ByteBuffer;
import java.nio.channels.SocketChannel;
import java.util.Scanner;public class Client {public static void main(String[] args) throws IOException, InterruptedException {SocketChannel client = SocketChannel.open();client.configureBlocking(false);client.connect(new InetSocketAddress(3333));System.out.println("連接服務器...");// 等待連接完成while (!client.finishConnect()) {// 可以做一些其他處理或者等待Thread.sleep(100);System.out.println("等待連接...");}// 開啟線程讀取服務端推送的消息// 啟動讀取線程new Thread(() -> {ByteBuffer buffer = ByteBuffer.allocate(1024);while (true) {try {// 從緩沖區讀取數據int bytesRead = client.read(buffer);if (bytesRead > 0) {buffer.flip();System.out.println("[群消息] " + new String(buffer.array(), 0, bytesRead));buffer.clear();}} catch (IOException e) {break;}}}).start();// 循環發送消息// 控制臺輸入Scanner scanner = new Scanner(System.in);while (true) {String msg = scanner.nextLine();// 發送給服務器端client.write(ByteBuffer.wrap(msg.getBytes()));if ("exit".equals(msg)) {break;}}}
}
零拷貝
什么是零拷貝?
? 零拷貝(Zero-copy)技術指在計算機執行操作時,CPU 不需要先將數據從?個內存區域復制到另?個內存區域,從?可以減少上下?切換以及 CPU 的拷貝時間。它的作用是在數據從網絡設備到?戶程序空間傳遞的過程中,減少數據拷貝次數,減少系統調用,實現 CPU 的零參與,徹底消除 CPU 在這方面的負載。
實現零拷貝用到的最主要技術是 DMA 數據傳輸技術和內存區域映射技術。
零拷貝機制可以減少數據在內核緩沖區和?戶進程緩沖區之間反復的 I/O 拷貝操作。零拷貝機制可以減少用戶進程地址空間和內核地址空間之間因為上下?切換?帶來的 CPU 開銷。在 Java 程序中,常?的零拷貝有 mmap(內存映射)和 sendFile。
源自:https://www.cnblogs.com/liconglong/p/15211413.html
傳統 I/O 的數據拷貝流程
4 次上下文切換 + 4 次數據拷貝(其中 2 次由 CPU 參與),效率較低。
在傳統 I/O 操作中(例如從文件讀取數據并發送到網絡),數據需要經歷多次拷貝和上下文切換:
- 磁盤 → 內核緩沖區:數據從磁盤讀取到內核空間的緩沖區(通過 DMA 技術)。
- 內核緩沖區 → 用戶緩沖區:數據從內核空間拷貝到用戶空間的應用程序緩沖區(需要 CPU 參與)。
- 用戶緩沖區 → Socket 緩沖區:應用程序將數據從用戶緩沖區拷貝到內核空間的 Socket 緩沖區(再次 CPU 參與)。
- Socket 緩沖區 → 網卡:數據從 Socket 緩沖區發送到網絡設備(通過 DMA)。
public class FileDemoServer {public static void main(String[] args) throws IOException {File file = new File("file/test01.txt");RandomAccessFile randomAccessFile = new RandomAccessFile(file, "rw");byte[] bytes = new byte[(int) file.length()];randomAccessFile.read(bytes); // 讀取文件// 創建服務端 等待客戶端連接發送文件ServerSocket server = new ServerSocket(3333);Socket client = server.accept();OutputStream outputStream = client.getOutputStream();outputStream.write(bytes);outputStream.close();}
}
public class FileDemoClient {public static void main(String[] args) throws IOException {Socket socket = new Socket();socket.connect(new InetSocketAddress(3333));InputStream inputStream = socket.getInputStream();byte[] bytes = new byte[1024];inputStream.read(bytes);System.out.println(new String(bytes));}
}
零拷貝的兩種常見實現
sendfile系統調用:- 數據直接從文件描述符傳輸到 Socket 描述符,無需用戶態參與。
- 適用于文件到網絡的傳輸(如 HTTP 文件下載)。
- 內存映射文件(
mmap):- 將文件映射到用戶態虛擬內存,用戶程序直接操作內存,減少拷貝次數。
- 適用于需要頻繁修改文件的場景(如數據庫)
mmap 和 sendFile 的區別
1.mmap 適合小數據量讀寫,sendFile 適合大文件傳輸。
2.mmap 需要 4 次上下文切換,3 次數據拷貝;sendFile 需要 3 次上下文切換,最少 2 次數據拷貝。
3.sendFile 可以利用 DMA 方式,減少 CPU 拷貝,mmap 則不能(必須從內核拷貝到 Socket 緩沖區)。
傳統 I/O vs NIO 零拷貝的對比
| 步驟 | 傳統 I/O | NIO + 零拷貝 |
|---|---|---|
| 數據拷貝次數 | 4 次(2 次用戶態?內核態) | 2 次(僅內核態內拷貝) |
| CPU 參與次數 | 2 次(用戶態?內核態拷貝) | 0 次(DMA 完成) |
| 上下文切換次數 | 4 次(讀/寫各 2 次) | 2 次(系統調用發起和完成) |
| 典型實現 | FileInputStream.read() + Socket.send() | FileChannel.transferTo() |
DMA和內存映射
| 技術 | 核心作用 | 應用場景 |
|---|---|---|
| DMA | 外設與內存直接傳輸數據,減少 CPU 參與 | 磁盤 I/O、網絡通信、GPU 渲染 |
| 內存區域映射 | 將外設或文件映射到內存,實現零拷貝訪問 | 文件高效讀寫、硬件控制、進程間通信 |
零拷貝性能分析
(服務端向客戶端發送大文件)
不使用零拷貝:
OldServer.class
public class OldServer {public static void main(String[] args) throws IOException {ServerSocketChannel server = ServerSocketChannel.open();server.bind(new InetSocketAddress(3333));server.configureBlocking(false);Selector selector = Selector.open();server.register(selector, SelectionKey.OP_ACCEPT);selector.select(); // 阻塞等待客戶端連接Set<SelectionKey> selectionKeys = selector.selectedKeys();long t1 = System.currentTimeMillis();for (SelectionKey selectionKey : selectionKeys) {if (selectionKey.isAcceptable()) {handle(selectionKey, selector);}}long t2 = System.currentTimeMillis();System.out.println("耗時:" + (t2 - t1));}/*** 發送文件* @param key* @param selector*/public static void handle(SelectionKey key, Selector selector) throws IOException {File file = new File("file/protoc-3.6.1-win32.zip");ServerSocketChannel server = (ServerSocketChannel) key.channel();SocketChannel client = server.accept();// 注冊client.configureBlocking(false);client.register(selector, SelectionKey.OP_READ);// 獲取文件輸入流FileInputStream fileInputStream = new FileInputStream(file);while (true) {if (fileInputStream.available() == 0) {break;}byte[] bytes = new byte[4096];fileInputStream.read(bytes);int sum = client.write(ByteBuffer.wrap(bytes));System.out.println("發送了:" + sum + "字節");}fileInputStream.close();client.close();}
}
OldClient.class:
public class OldClient {public static void main(String[] args) throws IOException, InterruptedException {SocketChannel client = SocketChannel.open();client.configureBlocking(false);client.connect(new InetSocketAddress(3333));System.out.println("連接服務器...");while (!client.finishConnect()) {// 可以做一些其他處理或者等待Thread.sleep(100);System.out.println("等待連接完成...");}System.out.println("連接完成...");// 從服務器讀取數據long t1 = System.currentTimeMillis();while  (true) {byte[] bytes = new byte[4096];ByteBuffer buffer = ByteBuffer.wrap(bytes);int read = client.read(buffer);if (read == -1) break;}long t2 = System.currentTimeMillis();System.out.println("耗時:" + (t2 - t1));}
}
使用零拷貝:
NewServer.class:
public class NewServer {public static void main(String[] args) throws IOException {ServerSocketChannel server = ServerSocketChannel.open();server.configureBlocking(false);server.bind(new InetSocketAddress(3333));Selector selector = Selector.open();server.register(selector, SelectionKey.OP_ACCEPT);selector.select();Set<SelectionKey> selectionKeys = selector.selectedKeys();long t1 = System.currentTimeMillis();for (SelectionKey selectionKey : selectionKeys) {if (selectionKey.isAcceptable()) {handle(selectionKey, selector);}}long t2 = System.currentTimeMillis();System.out.println("耗時:" + (t2 - t1));}public static void handle(SelectionKey key, Selector selector) throws IOException {ServerSocketChannel server = (ServerSocketChannel) key.channel();// 1.獲得客戶端SocketChannel client = server.accept();client.configureBlocking(false);// 2.注冊client.register(selector, SelectionKey.OP_READ);// 3.獲得文件輸出流String filename = "file/protoc-3.6.1-win32.zip";FileChannel channel = new FileInputStream(filename).getChannel();// 4.使用transferTo實現零拷貝傳輸long sum = channel.transferTo(0, channel.size(), client);System.out.println("發送了" + sum + "字節");}
}
NewClient.class:
public class NewClient {public static void main(String[] args){SocketChannel client = null;try {client = SocketChannel.open();client.configureBlocking(false);client.connect(new InetSocketAddress(3333));System.out.println("連接服務器...");if (!client.finishConnect()) {// 等待連接完成Thread.sleep(100);System.out.println("正在連接中。。。");}ByteBuffer buffer = ByteBuffer.allocate(4096);while (true) {int read = 0;try {read = client.read(buffer);} catch (IOException e) {client.close();}if (read == -1) {System.out.println("服務端已關閉連接");break;}if (read > 0) {System.out.println("收到服務端的消息:" + new String(buffer.array(), 0, read));buffer.clear(); // 清空 buffer 以便下次讀取} else {Thread.sleep(100); // 等待數據到達}}client.close();} catch (IOException e) {e.printStackTrace();} catch (InterruptedException e) {e.printStackTrace();}System.out.println("連接已關閉");}
}
性能比較:
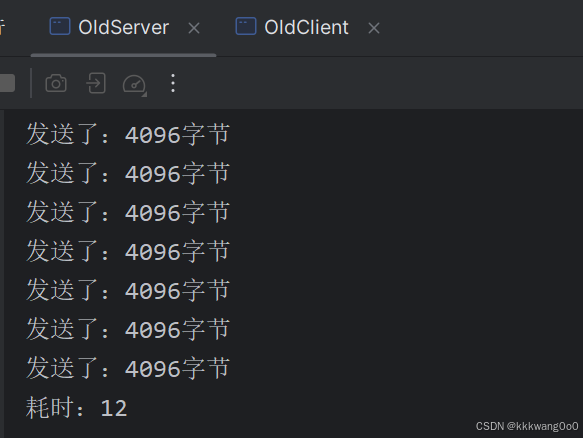
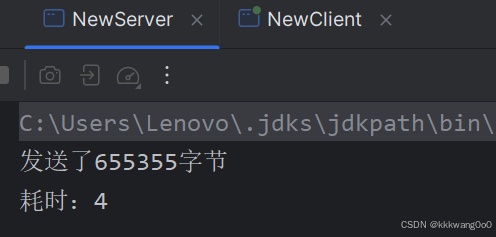
很顯然零拷貝性能要高很多
Reactor模式
什么是Reactor模式?
Reactor 模式是一種事件驅動模型,核心思想是 通過一個或多個線程監聽 I/O 事件(如連接、讀寫),并將事件分發給對應的處理器。常見的 Reactor 變體包括:
- 單 Reactor 單線程:所有操作(連接、I/O)由一個線程完成,簡單但性能受限。
- 單 Reactor 多線程:主線程處理連接,I/O 操作交給線程池,但主線程可能成為瓶頸。
- 主從 Reactor 多線程:主 Reactor 處理連接,子 Reactor 處理 I/O,Netty 默認采用此模式。
理解:
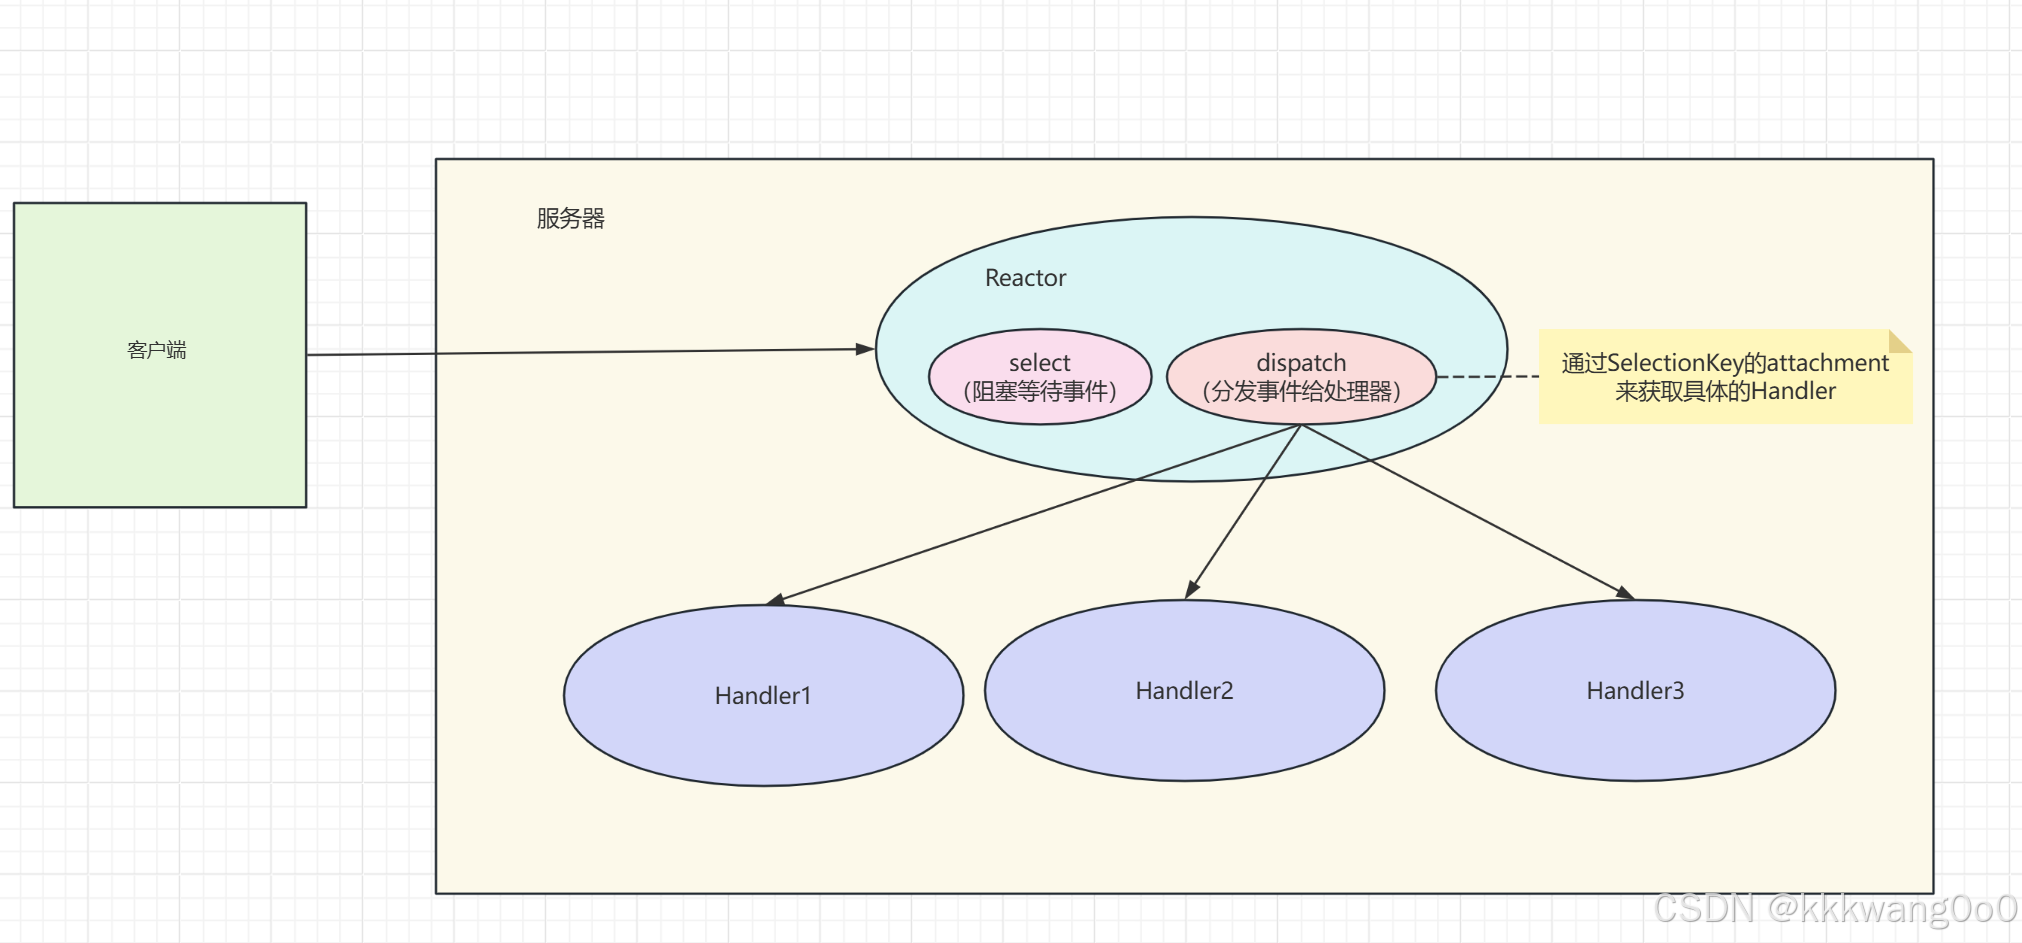
reactor可以認為是一種設計模式,用于處理客戶端的事件,主要是通過select和dispatch操作來監聽事件發生和處理事件
主要邏輯:
1.服務器注冊到selector中,為其連接事件分配一個Handler(其實是一個Runnable對象, 名稱可以定義為Acceptor)
2.Reactor監聽事件發生,當事件發生時,會通過dispatch將時間分發給具體的處理器
3.dispatch通過SelectionKey(可以認為是selector實例對象中的事件id)的attachment來獲取具體的Handler
4.執行具體的Handler邏輯
單Reactor單線程
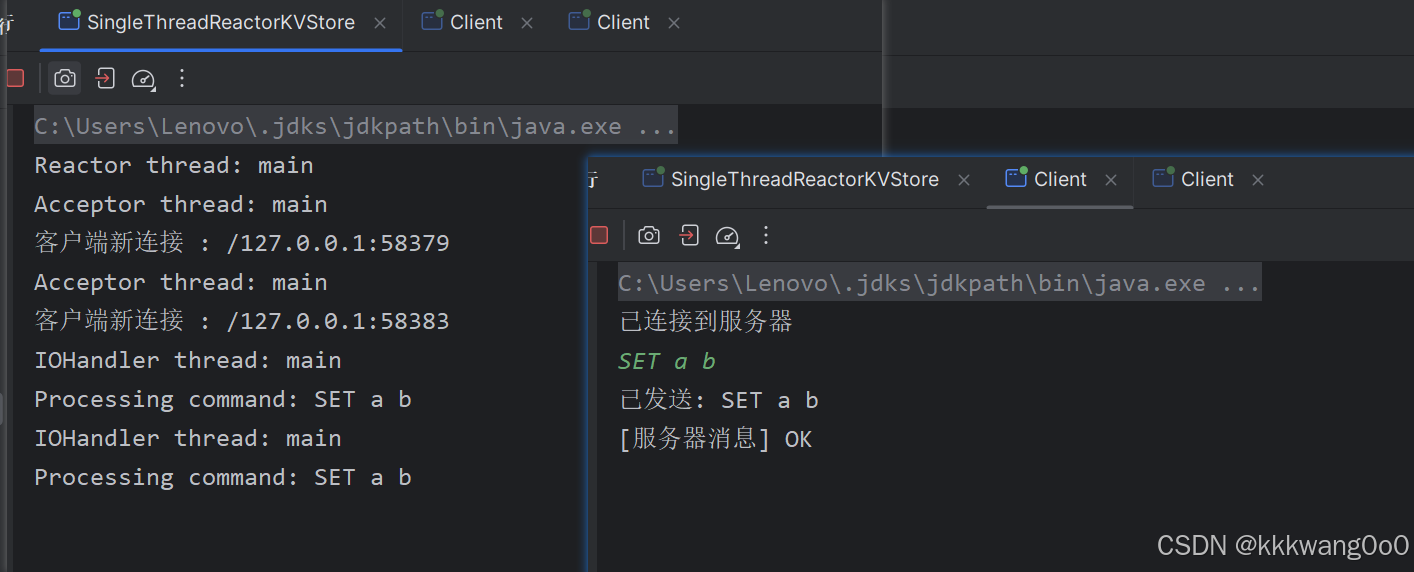
鍵值存儲服務器:
SingleThreadReactorKVStore.class:
import java.io.IOException;
import java.net.InetSocketAddress;
import java.nio.ByteBuffer;
import java.nio.channels.SelectionKey;
import java.nio.channels.Selector;
import java.nio.channels.ServerSocketChannel;
import java.nio.channels.SocketChannel;
import java.util.HashMap;
import java.util.Iterator;
import java.util.Map;
import java.util.Set;/*** 單線程 Reactor 模式的鍵值存儲服務器*/
public class SingleThreadReactorKVStore {private final Selector selector;private final ServerSocketChannel serverChannel;private final Map<String, String> store = new HashMap<>(); // 內存鍵值存儲/*** 構造函數,初始化服務器通道和選擇器,并監聽指定端口** @param port 服務器監聽的端口號* @throws IOException 如果初始化通道或選擇器時發生I/O錯誤*/public SingleThreadReactorKVStore(int port) throws IOException {selector = Selector.open();serverChannel = ServerSocketChannel.open();serverChannel.socket().bind(new InetSocketAddress(port));serverChannel.configureBlocking(false);// 注冊 Accept 事件到 ReactorserverChannel.register(selector, SelectionKey.OP_ACCEPT, new Acceptor());}/*** 啟動服務器,進入事件循環*/public void start() {System.out.println("Reactor thread: " + Thread.currentThread().getName());try {while (!Thread.interrupted()) {selector.select(); // 阻塞等待事件Set<SelectionKey> keys = selector.selectedKeys();Iterator<SelectionKey> it = keys.iterator();while (it.hasNext()) {SelectionKey key = it.next();dispatch(key); // 根據事件類型分發事件到具體的處理器it.remove();}}} catch (IOException e) {e.printStackTrace();} finally {try {serverChannel.close();selector.close();} catch (IOException e) {e.printStackTrace();}}}/*** 分發事件到對應的處理器** @param key 事件的 SelectionKey 對象*/private void dispatch(SelectionKey key) {// 獲取與鍵關聯的附件,這里附件是一個Runnable對象Runnable handler = (Runnable) key.attachment();// 檢查獲取到的handler是否為nullif (handler != null) {handler.run(); // 執行 Handler(Acceptor 或 IOHandler)}}/*** 處理 連接事件 的 Handler*/private class Acceptor implements Runnable {@Overridepublic void run() {System.out.println("Acceptor thread: " + Thread.currentThread().getName());try {SocketChannel clientChannel = serverChannel.accept();System.out.println("客戶端新連接 : " + clientChannel.getRemoteAddress());if (clientChannel != null) {new IOHandler(clientChannel); // 處理新連接的 I/O}} catch (IOException e) {e.printStackTrace();}}}/*** 處理 I/O 的 Handler*/private class IOHandler implements Runnable {private final SocketChannel channel;private final ByteBuffer buffer = ByteBuffer.allocate(1024);/*** 構造函數,初始化 SocketChannel 并注冊讀事件到選擇器** @param channel 接收到的客戶端通道* @throws IOException 如果配置通道時發生I/O錯誤*/public IOHandler(SocketChannel channel) throws IOException {this.channel = channel;channel.configureBlocking(false);// 注冊讀事件到 Reactorchannel.register(selector, SelectionKey.OP_READ, this);}@Overridepublic void run() {System.out.println("IOHandler thread: " + Thread.currentThread().getName());try {// 檢查通道是否已經關閉,如果關閉則直接返回if (!channel.isOpen()) return;// 清空緩沖區以準備讀取新的數據buffer.clear();// 讀取數據到緩沖區int bytesRead = channel.read(buffer);// 如果沒有更多數據可讀,關閉通道并返回if (bytesRead == -1) {channel.close();return;}// 解析請求并執行業務邏輯(單線程處理)buffer.flip();String request = new String(buffer.array(), 0, buffer.limit()).trim();String response = processCommand(request);// 返回響應ByteBuffer respBuffer = ByteBuffer.wrap((response + "\n").getBytes());channel.write(respBuffer);} catch (IOException e) {// 如果發生IO異常,嘗試關閉通道try {channel.close();} catch (IOException ex) {// 如果關閉通道時發生異常,打印異常信息ex.printStackTrace();}}}/*** 業務邏輯處理(單線程執行)** @param request 客戶端請求的字符串* @return 處理結果的字符串*/private String processCommand(String request) {System.out.println("Processing command: " + request);String[] parts = request.split(" ");if (parts.length < 2) return "ERROR: Invalid command";String cmd = parts[0].toUpperCase();String key = parts[1];switch (cmd) {case "SET":if (parts.length < 3) return "ERROR: Missing value";store.put(key, parts[2]);return "OK";case "GET":return store.getOrDefault(key, "(nil)");default:return "ERROR: Unknown command";}}}public static void main(String[] args) throws IOException {SingleThreadReactorKVStore server = new SingleThreadReactorKVStore(3333);server.start(); // 單一線程運行所有邏輯}
}
Client.class:
import java.io.IOException;
import java.net.InetSocketAddress;
import java.nio.ByteBuffer;
import java.nio.channels.SocketChannel;
import java.util.Scanner;
import java.util.concurrent.atomic.AtomicBoolean;public class Client {private static final AtomicBoolean isConnected = new AtomicBoolean(true);public static void main(String[] args) throws IOException {SocketChannel socketChannel = SocketChannel.open();socketChannel.configureBlocking(false); // 非阻塞模式socketChannel.connect(new InetSocketAddress("localhost", 3333));// 等待連接完成while (!socketChannel.finishConnect()) {System.out.println("等待連接完成...");}System.out.println("已連接到服務器");// 監聽服務器消息(包括連接關閉)Thread readThread = new Thread(() -> {ByteBuffer buffer = ByteBuffer.allocate(1024);try {while (isConnected.get()) {int bytesRead = socketChannel.read(buffer);if (bytesRead == -1) {// 服務器關閉連接System.out.println("[服務器已關閉連接]");isConnected.set(false);break;} else if (bytesRead > 0) {buffer.flip();System.out.println("[服務器消息] " +new String(buffer.array(), 0, bytesRead));buffer.clear();}}} catch (IOException e) {if (isConnected.get()) {System.err.println("連接異常: " + e.getMessage());isConnected.set(false);}} finally {closeChannel(socketChannel);}});readThread.start();// 發送消息循環try (Scanner scanner = new Scanner(System.in)) {while (isConnected.get()) {String line = scanner.nextLine();if ("exit".equals(line)) break;if (!isConnected.get()) {System.out.println("連接已斷開,無法發送消息");break;}ByteBuffer buffer = ByteBuffer.wrap(line.getBytes());try {socketChannel.write(buffer);System.out.println("已發送: " + line);} catch (IOException e) {System.err.println("發送失敗: " + e.getMessage());isConnected.set(false);break;}}}// 關閉連接closeChannel(socketChannel);}private static void closeChannel(SocketChannel channel) {try {if (channel != null && channel.isOpen()) {channel.close();System.out.println("連接已關閉");}} catch (IOException e) {e.printStackTrace();}}
}
運行結果:
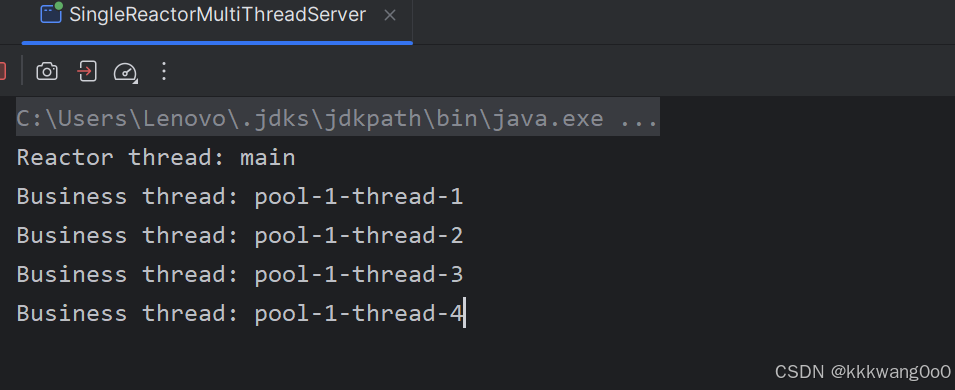
單 Reactor 多線程
簡單HTTP 服務器:
import java.io.IOException;
import java.net.InetSocketAddress;
import java.nio.ByteBuffer;
import java.nio.channels.*;
import java.util.Iterator;
import java.util.Set;
import java.util.concurrent.ExecutorService;
import java.util.concurrent.Executors;/*** 單 Reactor 多線程的 HTTP 服務器*/
public class SingleReactorMultiThreadServer {private final Selector selector;private final ServerSocketChannel serverChannel;private final ExecutorService businessPool = Executors.newFixedThreadPool(4); // 業務線程池public SingleReactorMultiThreadServer(int port) throws IOException {selector = Selector.open();serverChannel = ServerSocketChannel.open();serverChannel.socket().bind(new InetSocketAddress(port));serverChannel.configureBlocking(false);serverChannel.register(selector, SelectionKey.OP_ACCEPT, new Acceptor());}public void start() {System.out.println("Reactor thread: " + Thread.currentThread().getName());try {while (!Thread.interrupted()) {selector.select();Set<SelectionKey> keys = selector.selectedKeys();Iterator<SelectionKey> it = keys.iterator();while (it.hasNext()) {SelectionKey key = it.next();dispatch(key);it.remove();}}} catch (IOException e) {e.printStackTrace();}}private void dispatch(SelectionKey key) {Runnable handler = (Runnable) key.attachment();if (handler != null) {handler.run();}}/***  處理新連接*/private class Acceptor implements Runnable {@Overridepublic void run() {try {SocketChannel client = serverChannel.accept();new IOHandler(client); // 注冊讀事件} catch (IOException e) {e.printStackTrace();}}}/*** 處理 I/O 和業務邏輯*/private class IOHandler implements Runnable {private final SocketChannel channel;private final ByteBuffer buffer = ByteBuffer.allocate(1024);public IOHandler(SocketChannel channel) throws IOException {this.channel = channel;channel.configureBlocking(false);channel.register(selector, SelectionKey.OP_READ, this);}@Overridepublic void run() {try {if (!channel.isOpen()) return;// Reactor 線程處理讀事件(非阻塞)buffer.clear();int bytesRead = channel.read(buffer);if (bytesRead == -1) {channel.close();return;}// 解析請求(示例:HTTP GET)buffer.flip();String request = new String(buffer.array(), 0, buffer.limit());if (request.startsWith("GET")) {// 提交耗時任務到線程池businessPool.submit(() -> {try {processRequest(request);} catch (ClosedChannelException e) {e.printStackTrace();}});}} catch (IOException e) {try {channel.close();} catch (IOException ex) {ex.printStackTrace();}}}private void processRequest(String request) throws ClosedChannelException {System.out.println("Business thread: " + Thread.currentThread().getName());try {Thread.sleep(100);} catch (InterruptedException e) {e.printStackTrace();}String response = "HTTP/1.1 200 OK\r\nContent-Length: 12\r\n\r\nHello World!";// 傳遞 channel 到 WriteHandlerchannel.register(selector, SelectionKey.OP_WRITE, new WriteHandler(channel, response));}}/*** 處理 寫操作 的  Handler*/private class WriteHandler implements Runnable {private final SocketChannel channel;  // 新增成員變量private final String response;public WriteHandler(SocketChannel channel, String response) {this.channel = channel;this.response = response;}@Overridepublic void run() {try {ByteBuffer buffer = ByteBuffer.wrap(response.getBytes());channel.write(buffer);channel.close();} catch (IOException e) {e.printStackTrace();}}}public static void main(String[] args) throws IOException {SingleReactorMultiThreadServer server = new SingleReactorMultiThreadServer(3333);server.start();}

主從 Reactor 多線程案例
簡易Http服務器:
import java.io.IOException;
import java.net.InetSocketAddress;
import java.nio.ByteBuffer;
import java.nio.channels.*;
import java.util.Iterator;
import java.util.Queue;
import java.util.Set;
import java.util.concurrent.ConcurrentLinkedQueue;
import java.util.concurrent.ExecutorService;
import java.util.concurrent.Executors;
import java.util.concurrent.atomic.AtomicInteger;/*** 主從Reactor模式下的簡易Http服務器*/
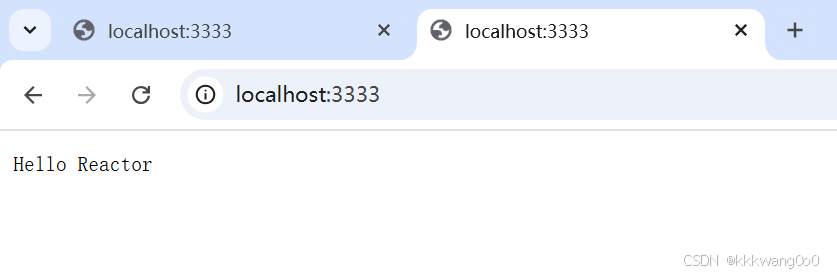
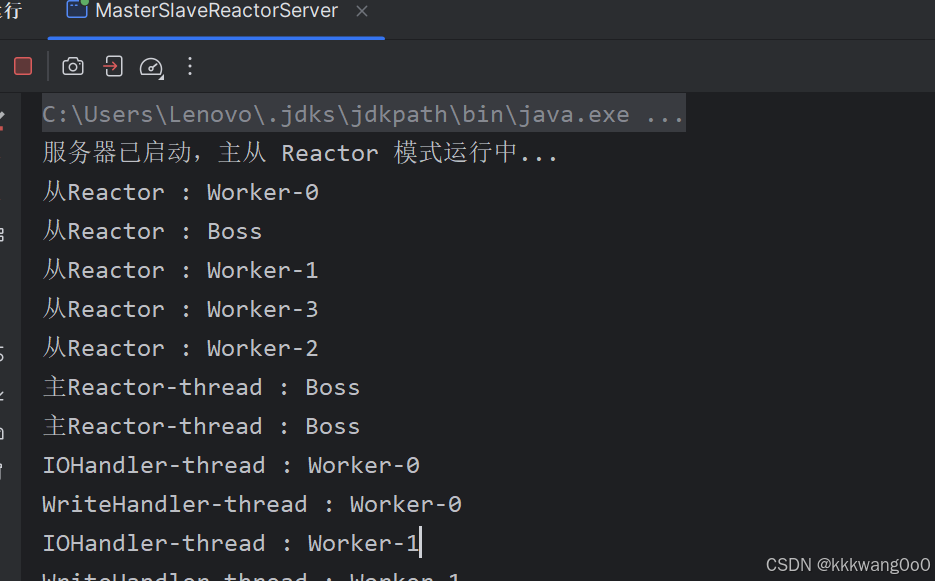
public class MasterSlaveReactorServer {// 主 Reactor 線程組(單線程)private final Reactor bossReactor;// 從 Reactor 線程組(多線程)private final Reactor[] workerReactors;// 輪詢計數器,用于分配連接給 Workerprivate final AtomicInteger workerIndex = new AtomicInteger(0);// 業務線程池(處理耗時任務)private final ExecutorService businessPool = Executors.newFixedThreadPool(4);public MasterSlaveReactorServer(int port, int workerCount) throws IOException {// 初始化主 ReactorbossReactor = new Reactor("Boss");// 初始化從 Reactor 組workerReactors = new Reactor[workerCount];for (int i = 0; i < workerCount; i++) {workerReactors[i] = new Reactor("Worker-" + i);}// 主 Reactor 綁定 ServerSocketChannelServerSocketChannel serverChannel = ServerSocketChannel.open();serverChannel.bind(new InetSocketAddress(port));serverChannel.configureBlocking(false);bossReactor.register(serverChannel, SelectionKey.OP_ACCEPT, new Acceptor(serverChannel));}// 啟動主從 Reactorpublic void start() {bossReactor.start();for (Reactor worker : workerReactors) {worker.start();}}// 主 Reactor 的 Acceptor,處理新連接private class Acceptor implements Runnable {private final ServerSocketChannel serverChannel;public Acceptor(ServerSocketChannel serverChannel) {this.serverChannel = serverChannel;}@Overridepublic void run() {System.out.println("主Reactor-thread : " + Thread.currentThread().getName());try {SocketChannel clientChannel = serverChannel.accept();if (clientChannel != null) {// 輪詢選擇一個 Worker Reactorint index = workerIndex.getAndIncrement() % workerReactors.length;Reactor worker = workerReactors[index];// 將新連接注冊到 Worker Reactorworker.registerChannel(clientChannel);}} catch (IOException e) {e.printStackTrace();}}}// Reactor 線程(主和從共用)private class Reactor extends Thread {private final Selector selector;private final Queue<Runnable> taskQueue = new ConcurrentLinkedQueue<>();public Reactor(String name) throws IOException {super(name);selector = Selector.open();}// 注冊 Channel 到當前 Reactorpublic void registerChannel(SocketChannel channel) {// 異步提交注冊任務,避免線程阻塞addTask(() -> {try {channel.configureBlocking(false);SelectionKey key = channel.register(selector, SelectionKey.OP_READ);key.attach(new IOHandler(channel, key));} catch (IOException e) {e.printStackTrace();}});selector.wakeup(); // 喚醒 select() 阻塞}// 添加異步任務(線程安全)public void addTask(Runnable task) {taskQueue.offer(task);}@Overridepublic void run() {System.out.println("從Reactor : " + Thread.currentThread().getName());try {while (!Thread.interrupted()) {selector.select(1000); // 超時 1 秒,避免無法喚醒processSelectedKeys();processPendingTasks();}} catch (IOException e) {e.printStackTrace();}}// 處理已就緒的 SelectionKeyprivate void processSelectedKeys() throws IOException {Set<SelectionKey> keys = selector.selectedKeys();Iterator<SelectionKey> it = keys.iterator();while (it.hasNext()) {SelectionKey key = it.next();it.remove();if (key.isValid()) {Runnable handler = (Runnable) key.attachment();if (handler != null) {handler.run();}}}}// 處理異步任務隊列private void processPendingTasks() {Runnable task;while ((task = taskQueue.poll()) != null) {task.run();}}public void register(ServerSocketChannel serverChannel, int opAccept, Acceptor acceptor) {try {serverChannel.configureBlocking(false);serverChannel.register(selector, opAccept, acceptor);} catch (IOException e) {e.printStackTrace();}}}// I/O 處理器(從 Reactor 線程執行)private class IOHandler implements Runnable {private final SocketChannel channel;private final SelectionKey key;private final ByteBuffer buffer = ByteBuffer.allocate(1024);public IOHandler(SocketChannel channel, SelectionKey key) {this.channel = channel;this.key = key;}@Overridepublic void run() {System.out.println("IOHandler-thread : " + Thread.currentThread().getName());try {if (!channel.isOpen()) return;// 處理讀事件if (key.isReadable()) {buffer.clear();int bytesRead = channel.read(buffer);if (bytesRead == -1) {channel.close();return;}// 提交業務邏輯到線程池buffer.flip();String request = new String(buffer.array(), 0, buffer.limit());businessPool.submit(() -> processRequest(request));}// 處理寫事件(示例省略,實際需注冊 OP_WRITE)} catch (IOException e) {try {channel.close();} catch (IOException ex) {ex.printStackTrace();}}}// 業務處理(在線程池執行)private void processRequest(String request) {// 模擬耗時操作try {Thread.sleep(100);} catch (InterruptedException e) {e.printStackTrace();}String response = "HTTP/1.1 200 OK\r\nContent-Length: 13\r\n\r\nHello Reactor!";// 寫回響應(需切換回 Reactor 線程)key.interestOps(SelectionKey.OP_WRITE);key.attach(new WriteHandler(channel, response));key.selector().wakeup(); // 喚醒 Selector}}// 寫處理器(由 Reactor 線程執行)private class WriteHandler implements Runnable {private final String response;private final SocketChannel channel;// 修改構造函數,傳入 channelpublic WriteHandler(SocketChannel channel, String response) {this.channel = channel;this.response = response;}@Overridepublic void run() {System.out.println("WriteHandler-thread : " + Thread.currentThread().getName());try {ByteBuffer buffer = ByteBuffer.wrap(response.getBytes());channel.write(buffer);channel.close(); // 短連接示例,關閉連接} catch (IOException e) {e.printStackTrace();}}}public static void main(String[] args) throws IOException {// 啟動服務器:1 個主 Reactor,4 個從 ReactorMasterSlaveReactorServer server = new MasterSlaveReactorServer(3333, 4);server.start();System.out.println("服務器已啟動,主從 Reactor 模式運行中...");}
}
Netty
介紹
- Netty 是一個 NIO 客戶端服務器框架,可以快速輕松地開發網絡應用程序(例如協議服務器和客戶端)。它極大地簡化了 TCP 和 UDP 套接字服務器等網絡編程。
- 它基于 Java NIO(Non-blocking I/O)技術,簡化了網絡編程的復雜性,廣泛應用于實時通信、游戲服務器、分布式系統等領域(如 Dubbo、RocketMQ 等框架的底層通信)。
官方文檔:https://netty.io/4.2/api/index.html
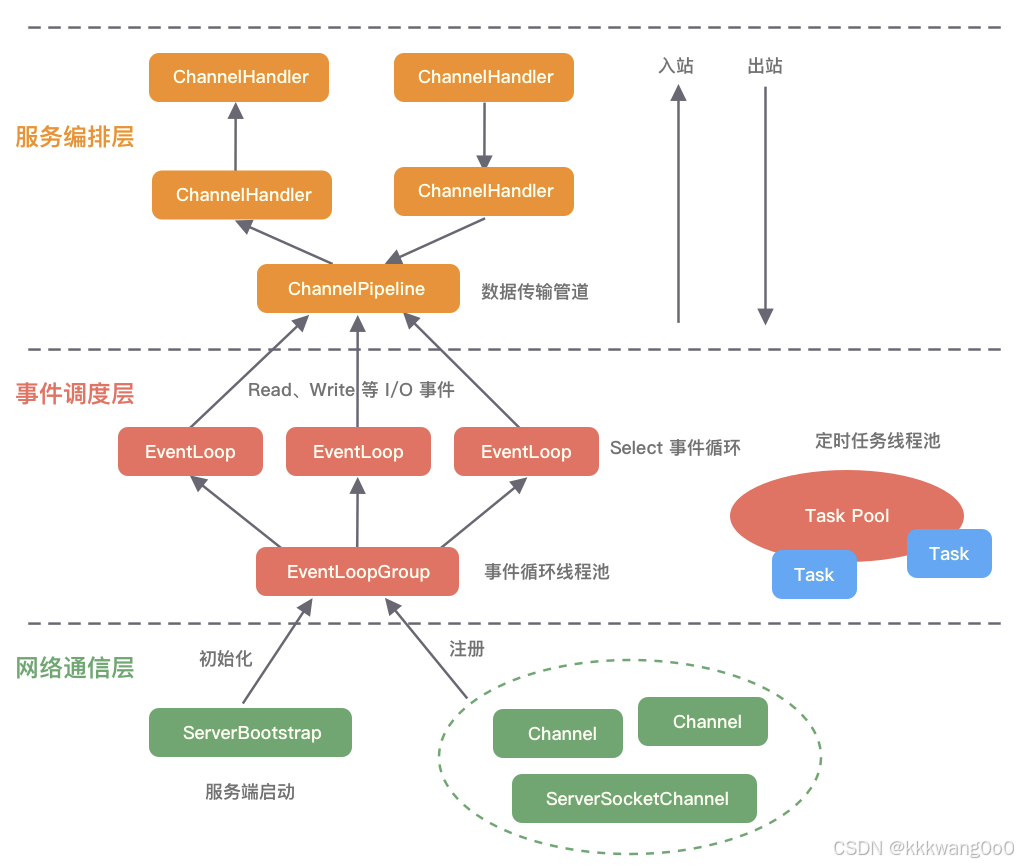
圖源:https://img2020.cnblogs.com/blog/1708060/202111/1708060-20211110224700852-1182764791.png
Netty啟動流程:
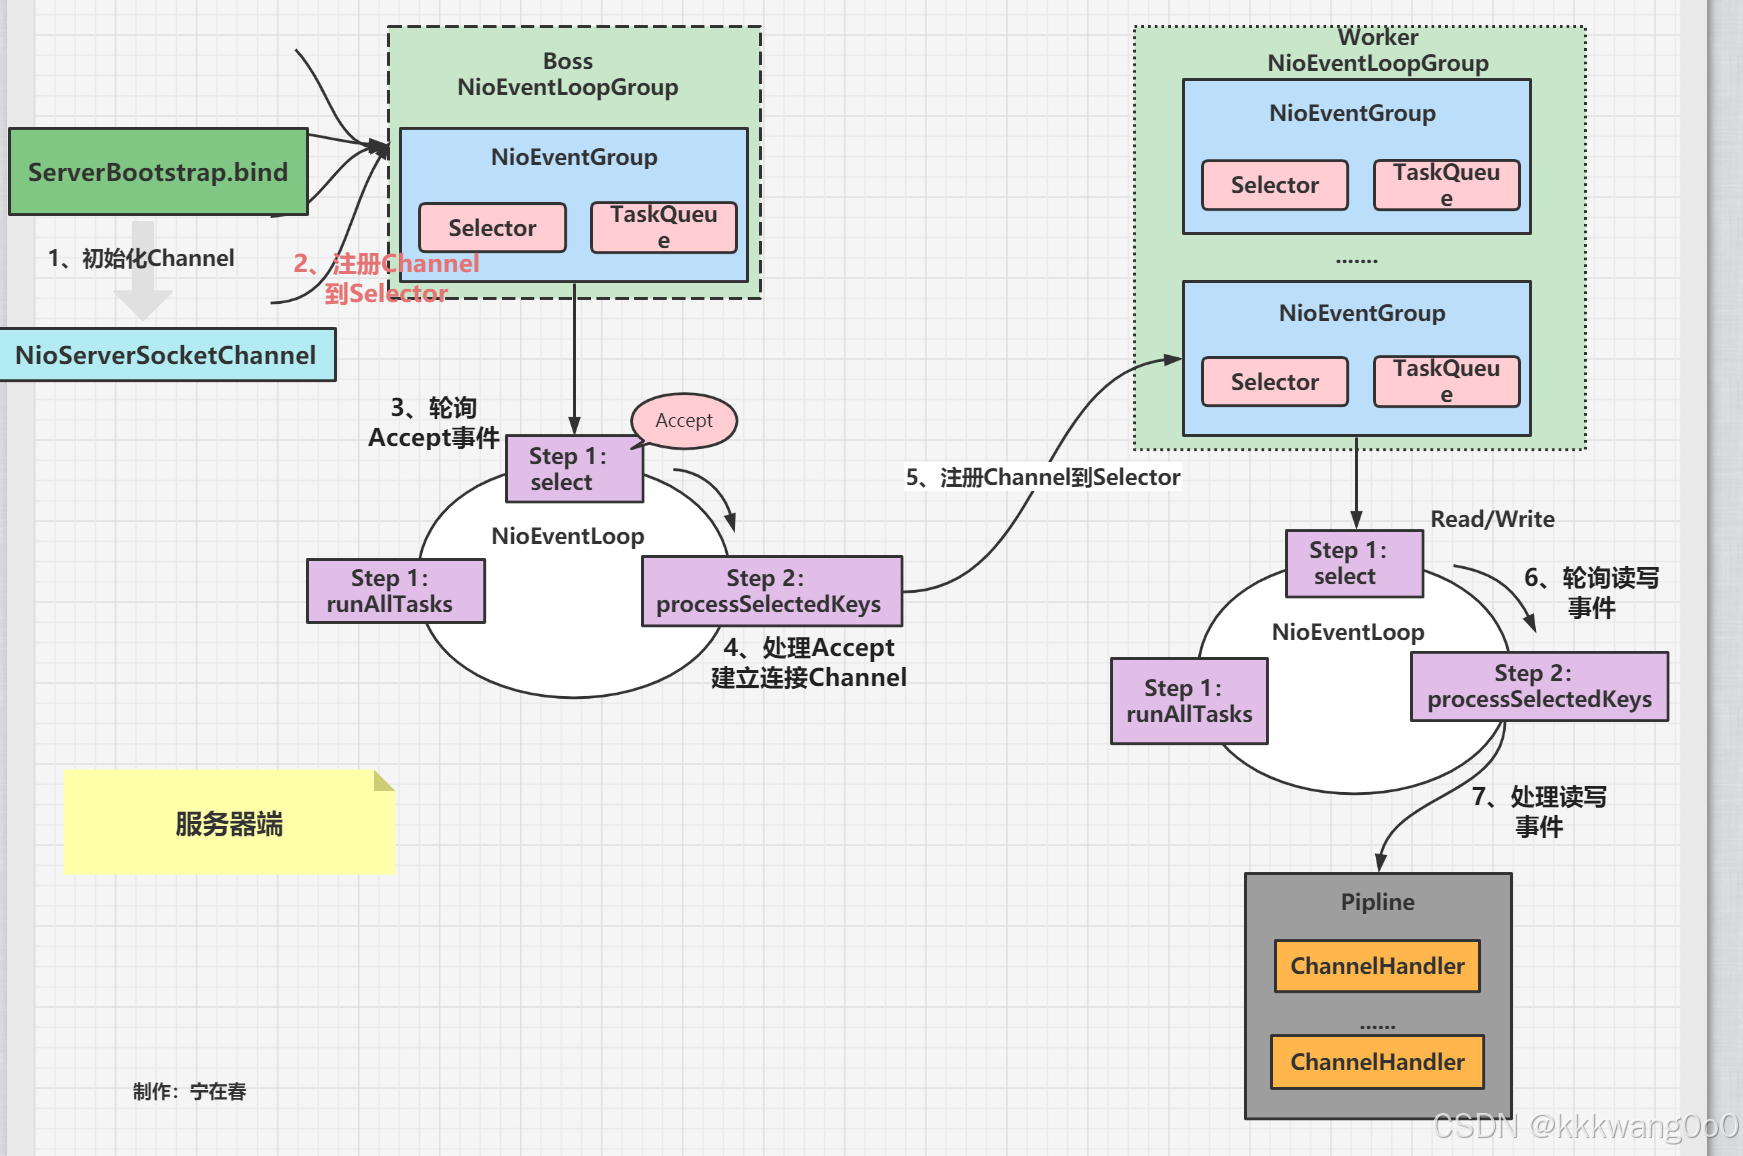
圖源:https://cloud.tencent.cn/developer/article/2146079
線程模式
Netty 基于 Reactor 模式設計,主要有三種線程模型:
- 單線程模型:所有 IO 操作由一個線程處理
- 多線程模型:Acceptor 和 IO 處理器分離為不同線程組
- 主從多線程模型:Acceptor 也使用線程池處理
核心組件
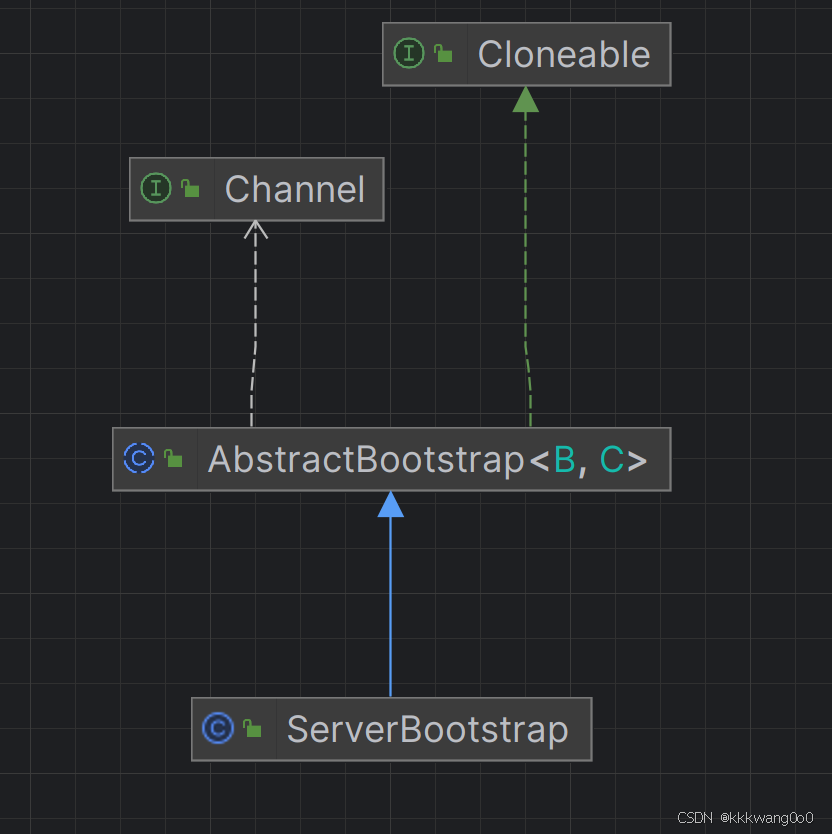
ServerBootstrap(服務器啟動類)
核心作用
- 用于配置和啟動 Netty 服務器。
- 管理兩個
EventLoopGroup:BossGroup(接受連接)和 WorkerGroup(處理 IO)。
關鍵方法
group(EventLoopGroup bossGroup, EventLoopGroup workerGroup):設置主從線程組。channel(Class<? extends ServerChannel> channelClass):設置服務器通道類型(如NioServerSocketChannel)。childHandler(ChannelHandler childHandler):設置子通道處理器(客戶端連接的 Pipeline)。option(ChannelOption option, T value):設置服務器通道選項(如SO_BACKLOG)。childOption(ChannelOption option, T value):設置子通道選項(如SO_KEEPALIVE)。bind(int port):綁定端口并啟動服務器。
Bootstrap(客戶端啟動類)
核心作用
- 用于配置和啟動 Netty 客戶端。
- 只需要一個
EventLoopGroup處理所有連接和 IO 操作。
關鍵方法
group(EventLoopGroup group):設置線程組。channel(Class<? extends Channel> channelClass):設置客戶端通道類型(如NioSocketChannel)。handler(ChannelHandler handler):設置通道處理器(客戶端 Pipeline)。option(ChannelOption option, T value):設置通道選項(如SO_KEEPALIVE)。connect(String host, int port):連接到遠程服務器。
EventLoopGroup 與 EventLoop
- EventLoopGroup:線程池,管理多個
EventLoop。 - EventLoop:單線程執行器,負責處理 IO 事件(連接、讀寫)和任務隊列。
分類
- NioEventLoopGroup:基于 Java NIO,跨平臺。
- EpollEventLoopGroup:基于 Linux epoll,性能更高。
Channel
NioSocketChannel:客戶端 TCP 連接。NioServerSocketChannel:服務器 TCP 監聽。NioDatagramChannel:UDP 連接。
ChannelPipeline
- 入站(Inbound):數據從網絡到應用(如
channelRead())。 - 出站(Outbound):數據從應用到網絡(如
write())。
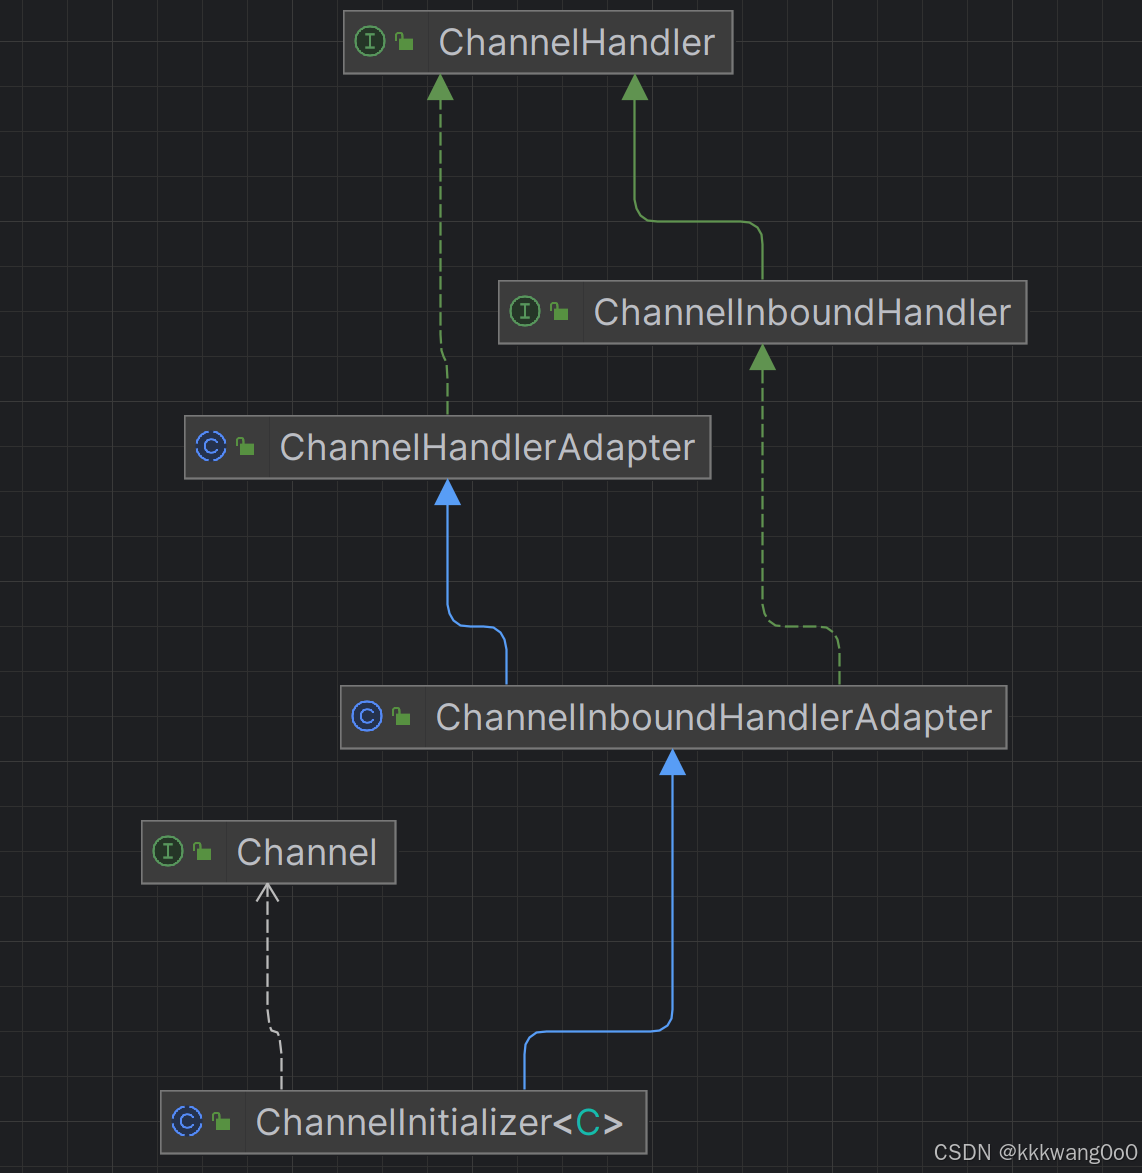
ChannelHandler
- ChannelInboundHandler:處理入站數據。
- ChannelOutboundHandler:處理出站數據。
關鍵接口/抽象類:
- ChannelInboundHandlerAdapter:入站處理器基類。
- ChannelOutboundHandlerAdapter:出站處理器基類。
- SimpleChannelInboundHandler:自動釋放資源的入站處理器。
案例分析(群聊系統):
服務器:
ChatServer.class
服務器啟動類
package com.itcast.netty.chat;import io.netty.bootstrap.ServerBootstrap;
import io.netty.channel.ChannelFuture;
import io.netty.channel.ChannelInitializer;
import io.netty.channel.ChannelOption;
import io.netty.channel.EventLoopGroup;
import io.netty.channel.nio.NioEventLoopGroup;
import io.netty.channel.socket.SocketChannel;
import io.netty.channel.socket.nio.NioServerSocketChannel;
import io.netty.handler.codec.string.StringDecoder;
import io.netty.handler.codec.string.StringEncoder;
import io.netty.handler.logging.LogLevel;
import io.netty.handler.logging.LoggingHandler;public class ChatServer {private final int port;public ChatServer(int port) {this.port = port;}public void run() throws InterruptedException {// 1.創建主從線程組// 1.1 處理客戶端連接NioEventLoopGroup bossGroup = new NioEventLoopGroup();// 1.2 處理事件NioEventLoopGroup workGroups = new NioEventLoopGroup(5);try {// 2.創建服務器// 創建并配置Netty服務器ServerBootstrap server = new ServerBootstrap();// 設置服務器的BossGroup和WorkGroupserver.group(bossGroup, workGroups);// 指定服務器的通道類型server.channel(NioServerSocketChannel.class);// 1. 主通道處理器(用于ServerSocketChannel,處理連接建立事件)server.handler(new ChannelInitializer<NioServerSocketChannel>() {@Overrideprotected void initChannel(NioServerSocketChannel ch) {// 配置主通道的處理器鏈(如日志記錄、連接限制等)ch.pipeline().addLast(new LoggingHandler(LogLevel.INFO));}});// 2. 子通道處理器(用于SocketChannel,處理讀寫事件)server.childHandler(new ChannelInitializer<SocketChannel>() {@Overrideprotected void initChannel(SocketChannel socketChannel) throws Exception {// 配置SocketChannel的管道socketChannel.pipeline().addLast(new StringDecoder(), // 字符串解碼器new StringEncoder(), // 字符串編碼器new ChatServerHandler(), // 自定義處理器new ChatConnectionServerHandler() // 監聽客戶端狀態);}});// 設置服務器的配置項server.option(ChannelOption.SO_BACKLOG, 128).childOption(ChannelOption.SO_KEEPALIVE, true);// 3.綁定端口并啟動服務ChannelFuture serverChannel = server.bind(port).sync();// 4.等待服務器關閉serverChannel.channel().closeFuture().sync();} finally {workGroups.shutdownGracefully();bossGroup.shutdownGracefully();}}public static void main(String[] args) {ChatServer chatServer = new ChatServer(3333);try {chatServer.run();} catch (InterruptedException e) {e.printStackTrace();}}
}
ChatServerHandler.class
處理客戶端發來的信息
package com.itcast.netty.chat;import io.netty.channel.Channel;
import io.netty.channel.ChannelHandlerContext;
import io.netty.channel.SimpleChannelInboundHandler;import java.net.SocketAddress;
import java.util.HashSet;public class ChatServerHandler extends SimpleChannelInboundHandler<String> {@Overridepublic void exceptionCaught(ChannelHandlerContext ctx, Throwable cause) throws Exception {cause.printStackTrace();ctx.close();}/*** 服務器接收的數據* @param channelHandlerContext* @param msg* @throws Exception*/@Overrideprotected void channelRead0(ChannelHandlerContext channelHandlerContext, String msg){SocketAddress socketAddress = channelHandlerContext.channel().remoteAddress();for (Channel channel : ChatConnectionServerHandler.onlineUsers) {if (!channel.remoteAddress().equals(socketAddress)) {channel.writeAndFlush(socketAddress + "說: " + msg);}}}
}
ChatConnectionServerHandler.class
處理客戶端連接和斷開連接
package com.itcast.netty.chat;import io.netty.channel.Channel;
import io.netty.channel.ChannelHandlerContext;
import io.netty.channel.ChannelInboundHandlerAdapter;import java.util.HashSet;public class ChatConnectionServerHandler extends ChannelInboundHandlerAdapter {public static HashSet<Channel> onlineUsers = new HashSet<Channel>();/*** 監聽信道的活躍狀態* @param ctx* @throws Exception*/@Overridepublic void channelActive(ChannelHandlerContext ctx) throws Exception {System.out.println("客戶端:" + ctx.channel().remoteAddress() + "上線了");onlineUsers.add(ctx.channel());}/***  監聽信道斷開連接* @param ctx* @throws Exception*/@Overridepublic void channelInactive(ChannelHandlerContext ctx) throws Exception {System.out.println("客戶端:" + ctx.channel().remoteAddress() + "斷開連接");onlineUsers.remove(ctx.channel());}@Overridepublic void exceptionCaught(ChannelHandlerContext ctx, Throwable cause) throws Exception {cause.printStackTrace();ctx.close();}
}
客戶端:
ChatClient.class
客戶端啟動類
package com.itcast.netty.chat;import io.netty.bootstrap.Bootstrap;
import io.netty.channel.ChannelFuture;
import io.netty.channel.ChannelInitializer;
import io.netty.channel.nio.NioEventLoopGroup;
import io.netty.channel.socket.SocketChannel;
import io.netty.channel.socket.nio.NioSocketChannel;
import io.netty.handler.codec.string.StringDecoder;
import io.netty.handler.codec.string.StringEncoder;
import java.util.Scanner;public class ChatClient {private final String host;private final int port;public ChatClient(String host, int port) {this.port = port;this.host = host;}public void run() throws InterruptedException {NioEventLoopGroup groups = new NioEventLoopGroup();try {Bootstrap client = new Bootstrap();client.group(groups);client.channel(NioSocketChannel.class);client.handler(new ChannelInitializer<SocketChannel>() {@Overrideprotected void initChannel(SocketChannel socketChannel) throws Exception {socketChannel.pipeline().addLast(new StringDecoder(),new StringEncoder(),new ChatClientHandler());}});// 啟動客戶端ChannelFuture clientChannel = client.connect(host, port).sync();//  讀取控制臺輸入 發送給服務器Scanner scanner = new Scanner(System.in);while (true) {String msg = scanner.nextLine();if ("exit".equals(msg)) {break;}clientChannel.channel().writeAndFlush(msg);}// 等待關閉clientChannel.channel().closeFuture().sync();} finally {groups.shutdownGracefully();}}public static void main(String[] args) {ChatClient client = new ChatClient("localhost", 3333);try {client.run();} catch (InterruptedException e) {e.printStackTrace();}}
}
ChatClientHandler.class
處理服務器發來的消息
package com.itcast.netty.chat;import io.netty.channel.ChannelHandlerContext;
import io.netty.channel.SimpleChannelInboundHandler;public class ChatClientHandler extends SimpleChannelInboundHandler<String> {@Overrideprotected void channelRead0(ChannelHandlerContext channelHandlerContext, String msg) throws Exception {System.out.println(msg);}@Overridepublic void exceptionCaught(ChannelHandlerContext ctx, Throwable cause) throws Exception {cause.printStackTrace();ctx.close();}
}
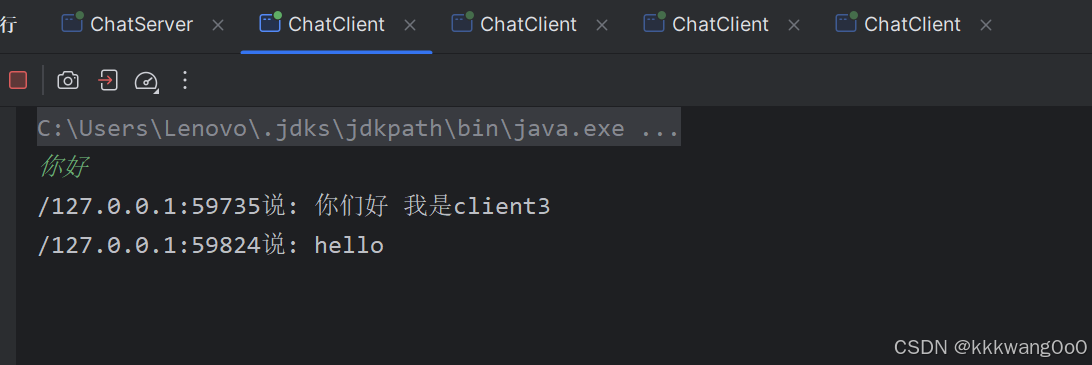
運行結果:
Netty源碼剖析
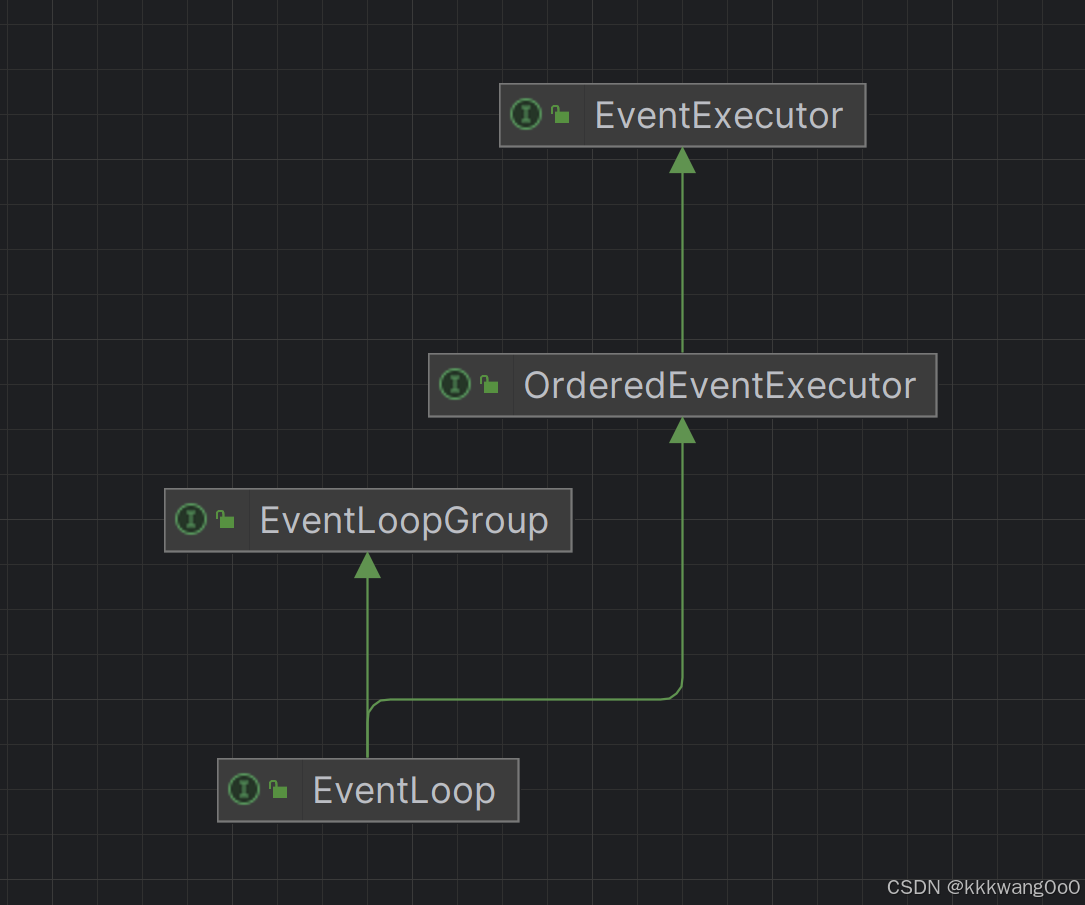
EventLoopGroup 和EventLoop
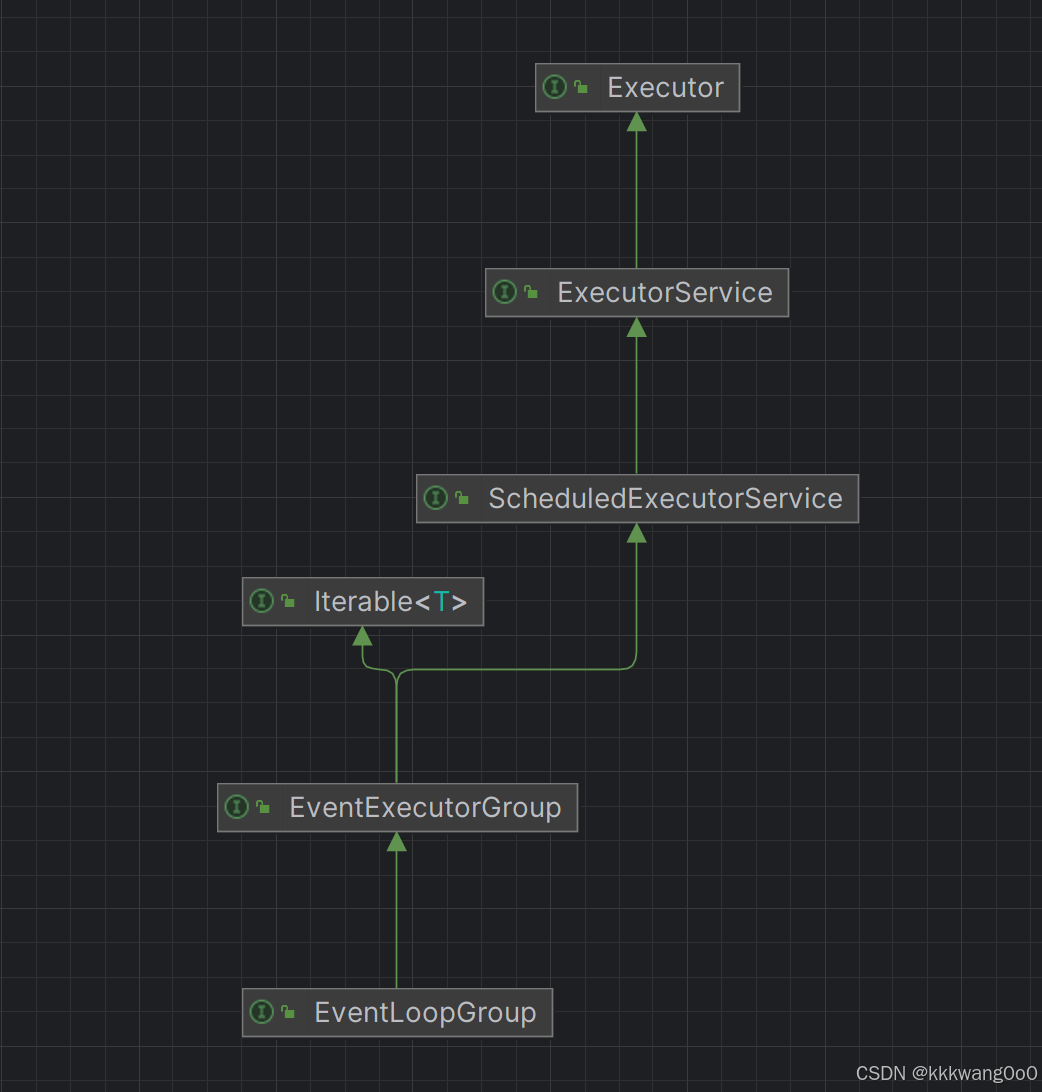
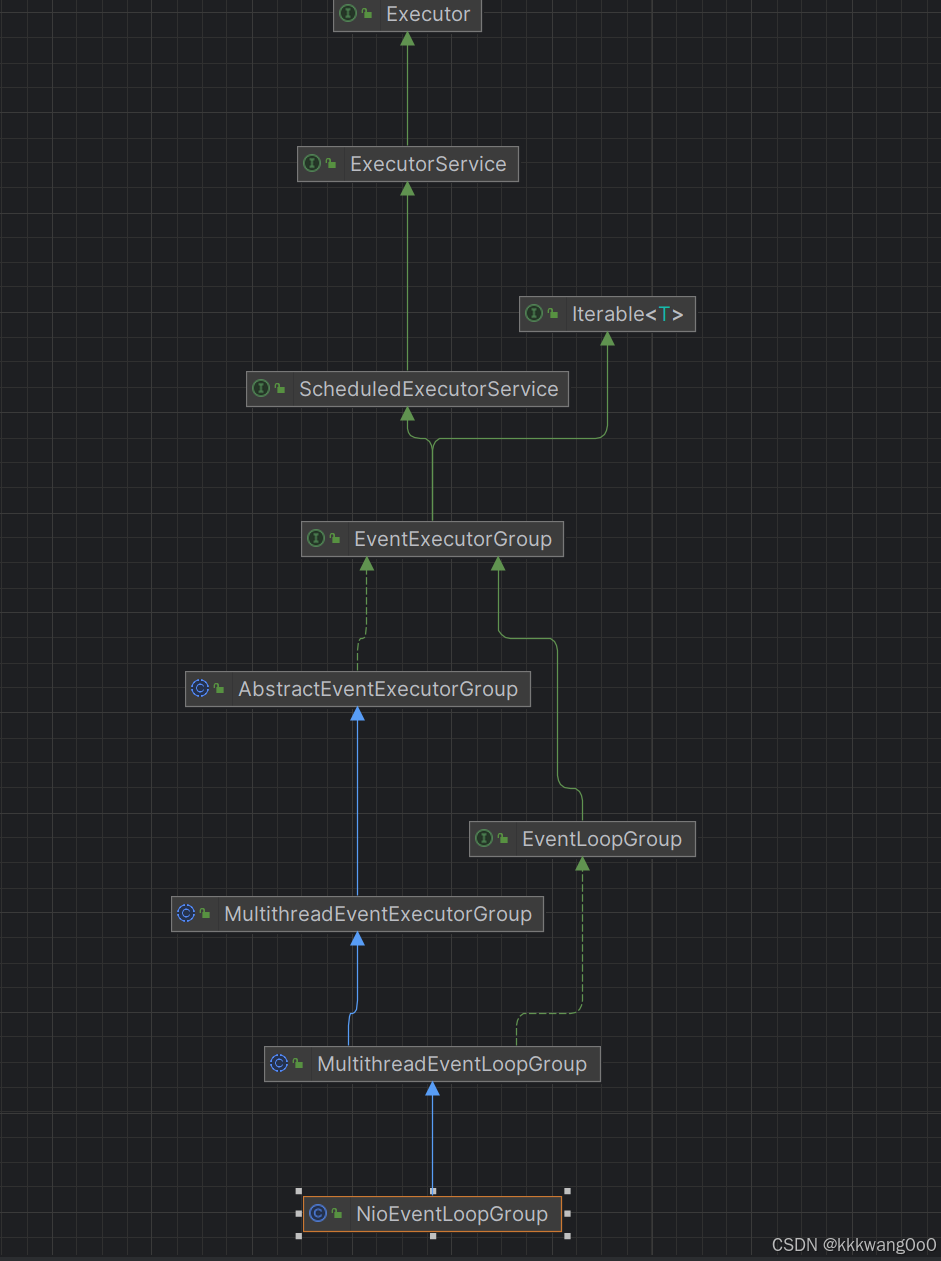
從EventLoopGroup接口的繼承關系圖可以從看出來這個接口繼承了ExecutorService接口,說明是一個線程池
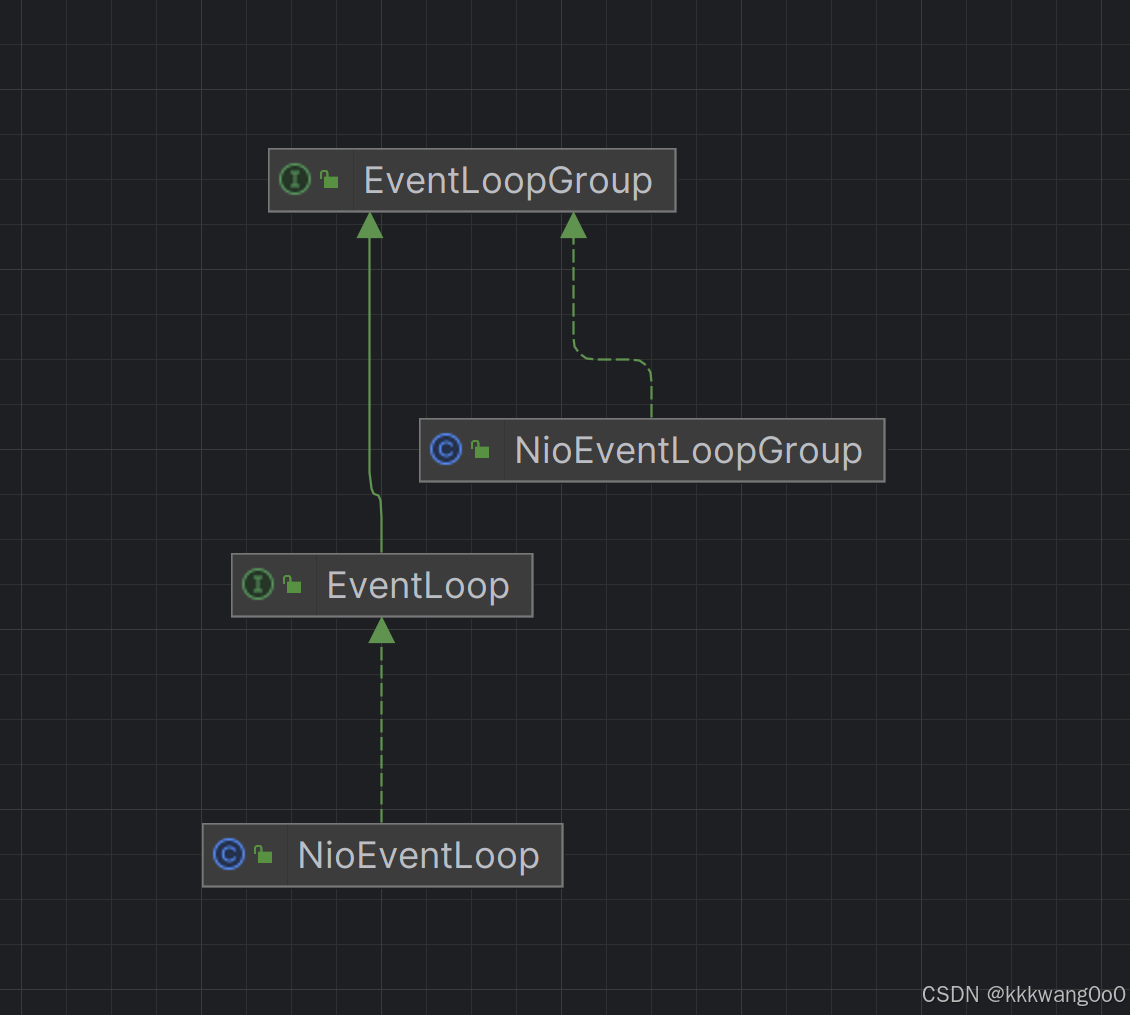
NioEventLoop
-
處理 I/O 多路復用,監聽 Channel 上的事件
-
NioEventLoop是 Netty 基于 Java NIO 機制構建的事件循環實現 -
NioEvent通過組合方式管理線程和任務。
-
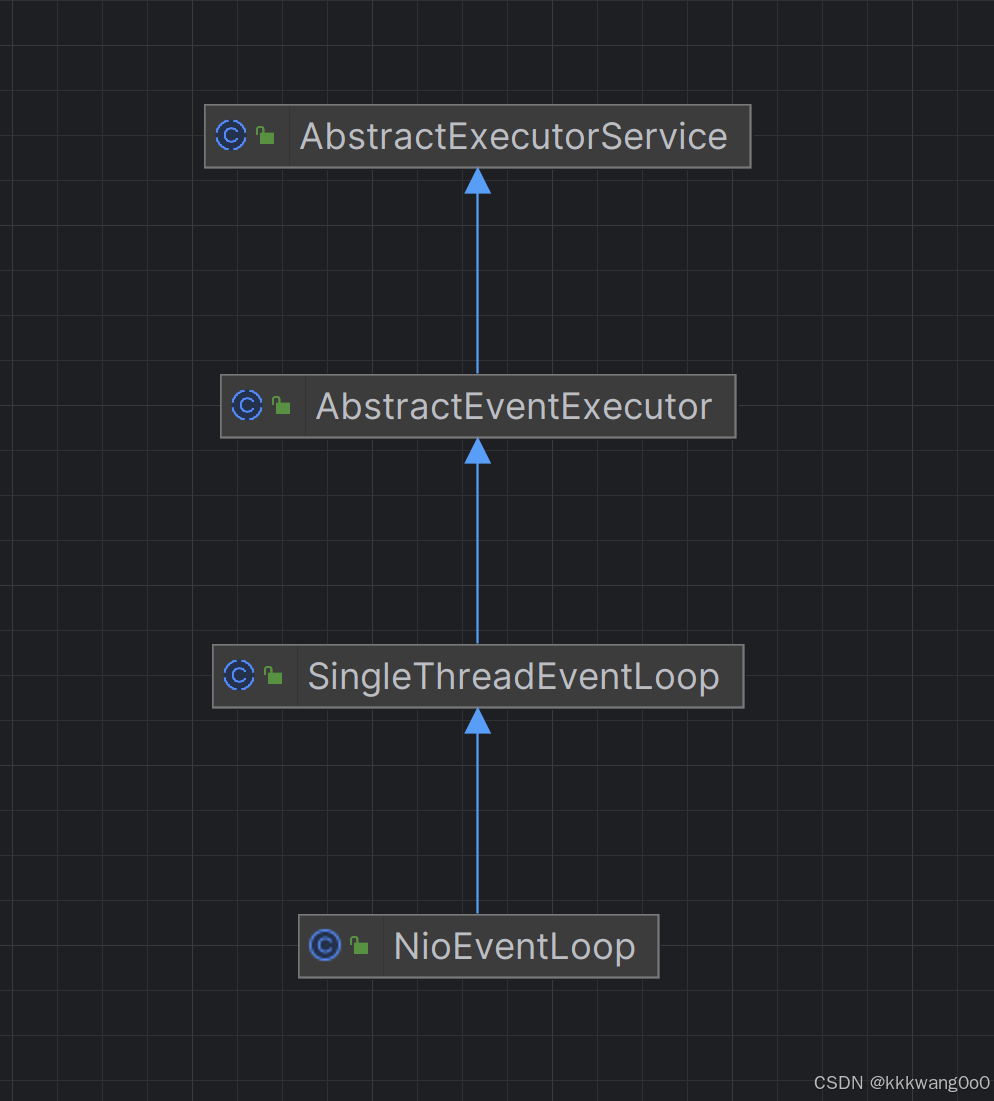
NioEventLoop→SingleThreadEventLoop→SingleThreadEventExecutor→AbstractScheduledEventExecutor。 -
Netty 采用 單線程模型 處理 Channel:
- 每個
EventLoop綁定一個 專屬線程(Thread)。 - 該線程負責處理該
EventLoop管理的 所有 Channel 的 IO 操作(如讀、寫、連接)。 - 所有 Channel 操作必須在其關聯的
EventLoop線程中執行,否則會導致線程安全問題。
- 每個
重要字段
| 屬性分類 | 關鍵屬性 | 作用與優化點 |
|---|---|---|
| Selector 優化 | selectedKeys | 使用數組替代 HashSet,提升選擇鍵處理性能 |
| 任務調度 | taskQueue、scheduledTaskQueue | 分離普通任務和定時任務,支持異步執行 |
| 線程控制 | threadId、wakenUp | 確保任務在正確線程執行,優化 Selector.wakeup() 調用 |
| 時間管理 | ioRatio、lastExecutionTime | 平衡 I/O 操作和任務執行時間,避免任務饑餓 |
| 狀態管理 | state、needsToSelectAgain | 控制事件循環狀態,處理取消的 SelectionKey |
1.Selector相關字段
// Java NIO Selector
private Selector selector;
private final SelectorProvider provider;// 優化后的 Selector(通過反射替換為數組實現)
private SelectedSelectionKeySet selectedKeys;// 原生 Selector(未優化版本)
private final Selector unwrappedSelector;
2.任務隊列相關字段
taskQueue:存儲通過execute()提交的普通任務。scheduledTaskQueue:存儲通過schedule()提交的定時任務。
// 普通任務隊列(無界隊列)
private final Queue<Runnable> taskQueue;// 定時任務隊列(基于優先級堆)
private final PriorityQueue<ScheduledFutureTask<?>> scheduledTaskQueue;
實現:
taskQueue默認使用MpscUnboundedArrayQueue(多生產者單消費者隊列)。scheduledTaskQueue使用二叉堆實現,按執行時間排序。
3.父級EventLoopGroup
表示當前EventLoop屬于哪個EventLoopGroup
// 父級 EventLoopGroup
private final NioEventLoopGroup parent;
4.線程相關
- 確保任務在正確的線程中執行(通過
inEventLoop()檢查)。 - 控制
Selector的喚醒機制(避免不必要的wakeup()調用)
// 線程 ID(用于檢查是否在 EventLoop 線程中執行)
private volatile int threadId;// 線程喚醒標志
private final AtomicBoolean wakenUp = new AtomicBoolean();// 線程狀態(-1: 未啟動, 1: 已啟動, 2: 關閉中)
private volatile int state = ST_NOT_STARTED;// 最大待處理任務數(默認 Integer.MAX_VALUE)
private final int maxPendingTasks;// 拒絕策略(當任務隊列滿時的處理方式)
private final RejectedExecutionHandler rejectedExecutionHandler;
5.事件相關
selectStrategy:決定何時調用select()、selectNow()或跳過選擇。needsToSelectAgain:標記是否需要重新執行select()。
// 選擇策略(控制 select() 行為)
private final SelectStrategy selectStrategy;// 待處理的取消鍵數量
private int cancelledKeys;// 是否需要重新選擇
private boolean needsToSelectAgain;
6. 時間與執行控制屬性
ioRatio:控制 I/O 操作與任務執行的時間分配。lastExecutionTime:用于計算任務執行超時和延遲調度。
// I/O 操作與任務執行的時間比例(默認 50%)
private final int ioRatio;// 最后一次執行任務的時間戳
private long lastExecutionTime;// 任務執行超時控制
private static final long SCHEDULE_PURGE_INTERVAL = TimeUnit.SECONDS.toNanos(1);
線程管理
每個 NioEventLoop 綁定一個獨立線程:
- 處理注冊到
Selector上的IO 事件(連接、讀寫等)。 - 執行用戶提交的普通任務(通過
execute(task))和定時任務(通過schedule(task, delay, unit))。 - 調度后續的任務執行(如定時任務)。
NioEventLoop內部沒有線程池,它是一個單線程的事件循環,所有操作都在同一個線程中完成。
NioEventLoop會將耗時任務通過NioEventLoopGroup提交到外部的線程池中
重要方法
run方法:
NioEventLoop通過內部線程執行 run() 方法,通過 execute(Runnable) 提交任務
-
無限循環處理 I/O 事件和任務隊列。
-
通過
processSelectedKeys()處理網絡 I/O。 -
通過
runAllTasks()執行提交的Runnable任務。 -
calculateStrategy是 Netty 中用于決定 EventLoop 選擇策略的核心方法,它平衡了 I/O 事件處理與任務執行的優先級。該方法由SelectStrategy接口定義,默認實現為DefaultSelectStrategy
/*** NIO事件循環的主處理方法,負責輪詢IO事件和執行任務* 這個方法實現了一個無限循環,不斷地選擇就緒的通道并處理IO事件,同時兼顧任務執行*/
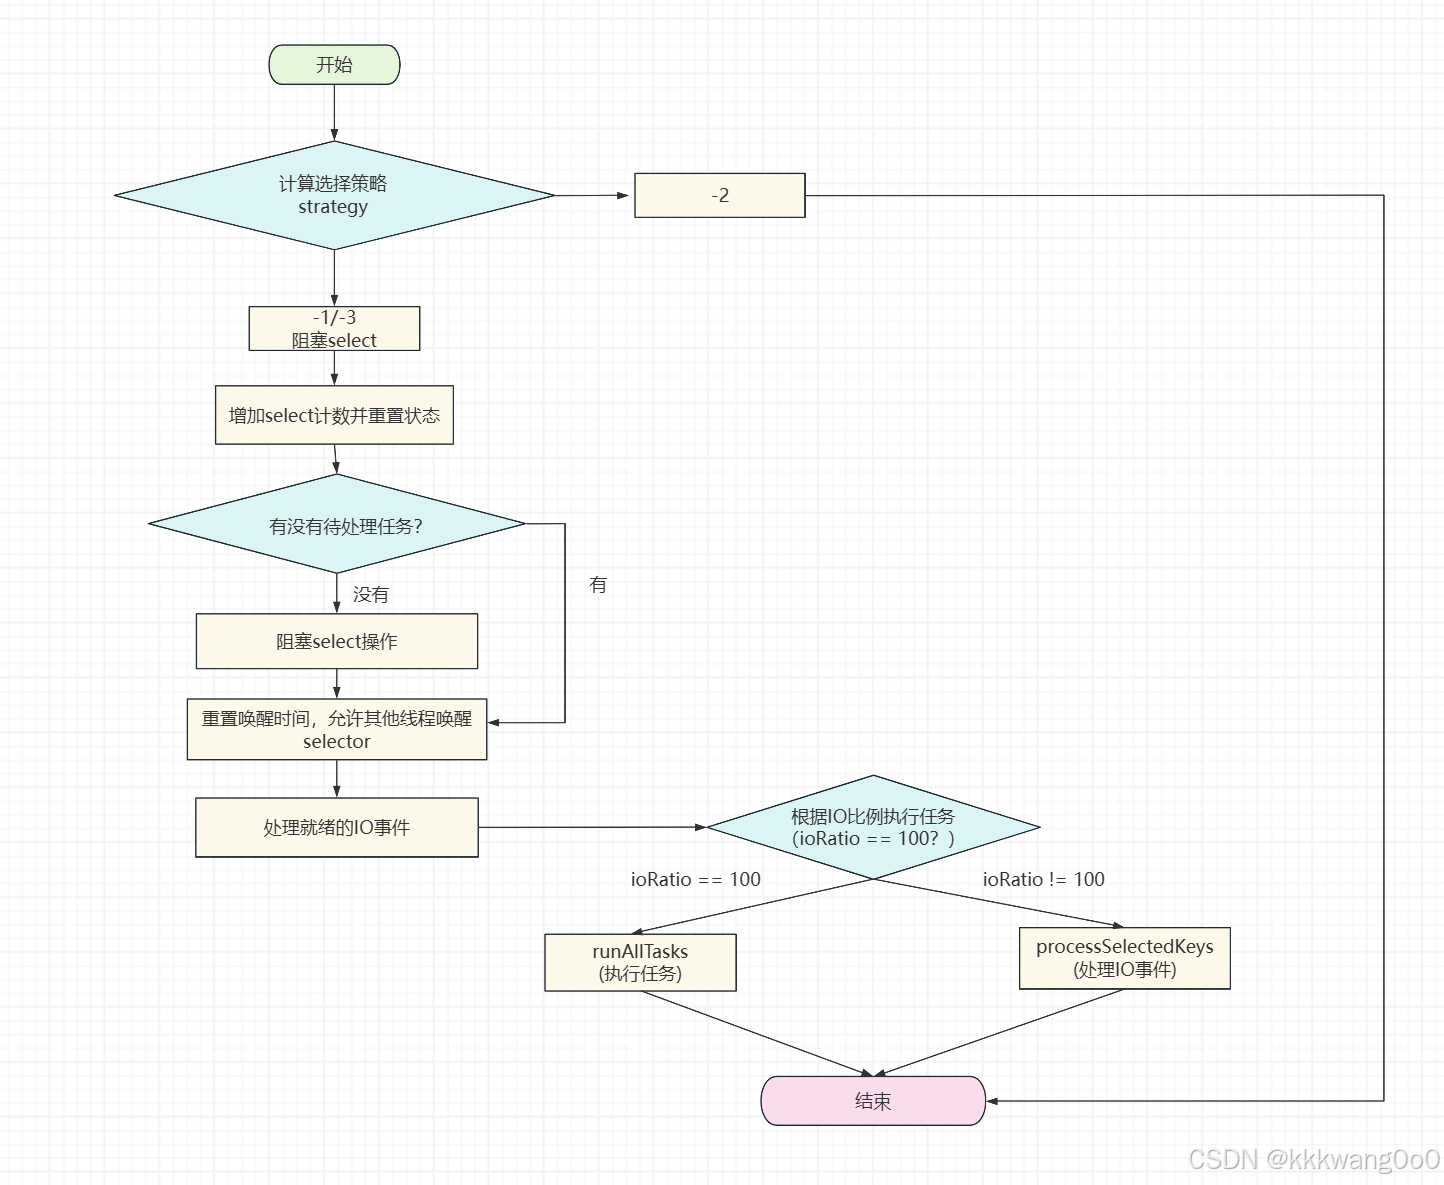
protected void run() {// 記錄select操作的連續喚醒次數,用于檢測異常喚醒情況int selectCnt = 0;// 主事件循環,持續運行直到線程關閉while(true) {try {// 計算選擇策略:-3/-1表示需要阻塞select,-2表示退出循環,其他正數表示就緒通道數int strategy = selectStrategy.calculateStrategy(selectNowSupplier, hasTasks());switch (strategy) {// 處理需要阻塞等待IO事件的情況case -3:case -1:// 獲取下一個定時任務的截止時間long curDeadlineNanos = nextScheduledTaskDeadlineNanos();if (curDeadlineNanos == -1L) {curDeadlineNanos = Long.MAX_VALUE;}nextWakeupNanos.set(curDeadlineNanos);try {// 如果沒有待處理任務,進行阻塞select操作if (!hasTasks()) {strategy = select(curDeadlineNanos);}} finally {// 重置喚醒時間,允許其他線程喚醒selectornextWakeupNanos.lazySet(-1L);}break;// 退出事件循環的策略case -2:break outerLoop;}// 增加select計數并重置狀態++selectCnt;cancelledKeys = 0;needsToSelectAgain = false;// 根據IO比例配置處理IO事件和任務執行的時間分配int ioRatio = this.ioRatio;boolean ranTasks;// 處理就緒的IO事件if (strategy > 0) {processSelectedKeys();}// 根據IO比例執行任務if (ioRatio == 100) {ranTasks = runAllTasks();} else {long ioStartTime = System.nanoTime();try {// 處理IO事件if (strategy > 0) {processSelectedKeys();}} finally {// 計算IO操作耗時,并按比例執行任務long ioTime = System.nanoTime() - ioStartTime;ranTasks = runAllTasks(ioTime * (long)(100 - ioRatio) / (long)ioRatio);}}// 如果沒有執行任務且select操作沒有返回就緒通道,檢查是否需要重置select計數if (!ranTasks && strategy <= 0) {if (unexpectedSelectorWakeup(selectCnt)) {selectCnt = 0;}}// 記錄select操作連續過早返回的情況,可能是JDK選擇器實現的問題if (selectCnt > 3 && logger.isDebugEnabled()) {logger.debug("Selector.select() returned prematurely {} times in a row for Selector {}.", selectCnt - 1, selector);}// 重置計數selectCnt = 0;} catch (IOException e) {// 發生IO異常時重建選擇器rebuildSelector0();selectCnt = 0;handleLoopException(e);} catch (CancelledKeyException e) {// 處理已取消鍵的異常if (logger.isDebugEnabled()) {logger.debug("CancelledKeyException raised by a Selector {} - JDK bug?", selector, e);}} catch (Error e) {// 致命錯誤直接拋出throw e;} catch (Throwable e) {// 處理其他異常handleLoopException(e);} finally {// 檢查是否正在關閉,如果是則關閉所有通道并確認關閉if (isShuttingDown()) {closeAll();if (confirmShutdown()) {return;}}}}
}
select(curDeadlineNanos):
deadlineNanos:下一個定時任務的截止時間Long.MAX_VALUE表示無定時任務,可永久阻塞deadlineNanos + 995000L:增加995000 納秒(約 1 毫秒)以避免浮點數精度誤差。deadlineToDelayNanos():計算當前時間到deadlineNanos的剩余時間(納秒)
private int select(long deadlineNanos) throws IOException {// 情況1:無截止時間(永久阻塞)if (deadlineNanos == Long.MAX_VALUE) {return this.selector.select(); // 永久阻塞,直到有 I/O 事件就緒} else {// 情況2:有截止時間,計算超時時間long timeoutMillis = deadlineToDelayNanos(deadlineNanos + 995000L) / 1000000L;// 根據超時時間決定執行方式return timeoutMillis <= 0L ? this.selector.selectNow()    // 無超時(立即返回): this.selector.select(timeoutMillis); // 帶超時的阻塞}
}
processSelectedKeys:
private void processSelectedKeys() {if (this.selectedKeys != null) {// 使用優化的數組實現(默認策略)this.processSelectedKeysOptimized();} else {// 回退到 JDK 原生的 HashSet 實現this.processSelectedKeysPlain(this.selector.selectedKeys());}
}
private void processSelectedKeysOptimized() {// 遍歷優化后的數組(替代原生 HashSet<SelectionKey>)for (int i = 0; i < this.selectedKeys.size; ++i) {SelectionKey k = this.selectedKeys.keys[i];this.selectedKeys.keys[i] = null; // 清空引用,幫助 GCObject a = k.attachment();if (a instanceof AbstractNioChannel) {// 處理 Channel 相關事件processSelectedKey(k, (AbstractNioChannel) a);} else {// 處理特殊任務(如 NioTask)NioTask<SelectableChannel> task = (NioTask) a;processSelectedKey(k, task);}// 檢查是否需要重新選擇(如發生 key 取消)if (this.needsToSelectAgain) {this.selectedKeys.reset(i + 1); // 重置數組游標this.selectAgain(); // 重新執行 select()i = -1; // 重新從數組頭部開始遍歷}}
}
private void processSelectedKeysPlain(Set<SelectionKey> selectedKeys) {if (!selectedKeys.isEmpty()) {Iterator<SelectionKey> i = selectedKeys.iterator();while (true) {SelectionKey k = i.next();Object a = k.attachment();i.remove(); // 處理后立即從集合中移除,避免重復處理if (a instanceof AbstractNioChannel) {// 處理 Channel 相關事件processSelectedKey(k, (AbstractNioChannel) a);} else {// 處理特殊任務(如 NioTask)NioTask<SelectableChannel> task = (NioTask) a;processSelectedKey(k, task);}// 檢查是否需要重新選擇if (!i.hasNext()) {break; // 遍歷完成,退出循環}if (this.needsToSelectAgain) {selectAgain(); // 重新執行 select()selectedKeys = this.selector.selectedKeys(); // 獲取新的就緒 keysif (selectedKeys.isEmpty()) {break; // 沒有新的就緒事件,退出循環}i = selectedKeys.iterator(); // 重置迭代器}}}
}
runAllTasks(long timeoutNanos):
Netty 使用優先級隊列(PriorityQueue)**管理定時任務,隊列中的任務按執行時間排序。當調用 runAllTasks() 時,會先將**已到期的任務從定時隊列提取到普通任務隊列
protected boolean runAllTasks(long timeoutNanos) {// 步驟1:將定時任務隊列中已到期的任務轉移到普通任務隊列this.fetchFromScheduledTaskQueue();// 步驟2:獲取第一個任務Runnable task = this.pollTask();if (task == null) {this.afterRunningAllTasks(); // 無任務時執行收尾工作return false;}// 步驟3:計算任務執行的截止時間long deadline = timeoutNanos > 0L ? this.getCurrentTimeNanos() + timeoutNanos : 0L;long runTasks = 0L; // 記錄已執行的任務數// 步驟4:循環執行任務,直到超時或隊列為空long lastExecutionTime;while(true) {safeExecute(task); // 安全執行任務++runTasks;// 每執行64個任務檢查一次超時(批量執行優化)if ((runTasks & 63L) == 0L) {lastExecutionTime = this.getCurrentTimeNanos();if (lastExecutionTime >= deadline) {break; // 超時,退出循環}}// 獲取下一個任務task = this.pollTask();if (task == null) {lastExecutionTime = this.getCurrentTimeNanos();break; // 隊列為空,退出循環}}// 步驟5:執行收尾工作并記錄執行時間this.afterRunningAllTasks();this.lastExecutionTime = lastExecutionTime;return true;
}
NioEventLoopGroup
參考鏈接:https://www.cnblogs.com/ZhuChangwu/p/11192219.html
NioEventLoopGroup 是 Netty 框架中處理網絡 IO 操作的核心組件,它管理一組 NioEventLoop 實例,負責注冊 Channel、處理 IO 事件和執行任務
重要字段
1. 線程池相關字段
private final EventExecutor[] children;         // 管理的 EventLoop 數組
private final Set<EventExecutor> readonlyChildren; // 只讀視圖
private final EventExecutorChooserFactory.EventExecutorChooser chooser; // 線程選擇器
- children:存儲所有 NioEventLoop 實例,負責實際的 IO 操作和任務執行。
- chooser:負責從 children 中選擇一個 EventLoop,實現負載均衡。
2. 線程配置字段
private final int nThreads;                     // 線程數
private final Executor executor;                // 任務執行器
private final EventExecutorGroup parent;        // 父級 EventLoopGroup
- nThreads:指定線程池大小,默認是 CPU 核心數的兩倍(
Runtime.getRuntime().availableProcessors() * 2)。 - executor:實際執行任務的線程池,默認使用
ThreadPerTaskExecutor。
3. Selector 配置字段
private final SelectorProvider provider;        // JDK Selector 提供者
private final SelectStrategyFactory selectStrategyFactory; // 選擇策略工廠
- provider:創建 JDK NIO Selector 的工廠,默認使用系統默認實現。
- selectStrategyFactory:創建選擇策略,控制 EventLoop 的 select 行為。
4. 拒絕策略和任務隊列字段
private final RejectedExecutionHandler rejectedExecutionHandler; // 任務拒絕策略
private final EventLoopTaskQueueFactory taskQueueFactory;         // 任務隊列工廠
- rejectedExecutionHandler:當任務隊列已滿時的拒絕策略,默認使用
AbortPolicy。
重要方法
1. 構造方法
public NioEventLoopGroup()
public NioEventLoopGroup(int nThreads)
public NioEventLoopGroup(int nThreads, Executor executor)
public NioEventLoopGroup(int nThreads, Executor executor, SelectorProvider provider)
- 初始化 EventLoopGroup,指定線程數、執行器和 Selector 提供者等參數。
2. 線程選擇方法
public EventExecutor next()
- 從 children 數組中選擇一個 EventLoop,通過
chooser實現負載均衡。
3. Channel 注冊方法
public ChannelFuture register(Channel channel)
- 將 Channel 注冊到一個 EventLoop 的 Selector 上,返回異步注冊結果。
4. 優雅關閉方法
public Future<?> shutdownGracefully()
public Future<?> shutdownGracefully(long quietPeriod, long timeout, TimeUnit unit)
- 優雅關閉線程池,允許在指定時間內完成未執行的任務。
5. 任務提交方法
public <T> Future<T> submit(Callable<T> task)
public Future<?> execute(Runnable task)
- 向 EventLoop 提交任務,由線程池異步執行。
6. 資源清理方法
protected void cleanup()
- 清理資源,關閉所有 EventLoop 和 Selector。
工作流程
- 初始化階段:
- 創建并啟動指定數量的 NioEventLoop 線程。
- 初始化線程選擇器
chooser,用于負載均衡。
- Channel 注冊階段:
- 調用
register(Channel)方法將 Channel 注冊到一個 EventLoop。 - EventLoop 將 Channel 注冊到其管理的 Selector 上。
- 調用
- IO 事件處理階段:
- EventLoop 不斷循環調用
Selector.select()方法檢測就緒事件。 - 處理就緒的 IO 事件(讀 / 寫),并執行相應的 ChannelHandler。
- EventLoop 不斷循環調用
- 任務執行階段:
- 通過
execute()或submit()方法提交的任務在 EventLoop 線程中執行。 - 定時任務由 ScheduledExecutorService 管理和執行。
- 通過
- 關閉階段:
- 調用
shutdownGracefully()方法優雅關閉線程池。 - 釋放所有資源,包括 Selector 和線程。
- 調用
初始化邏輯
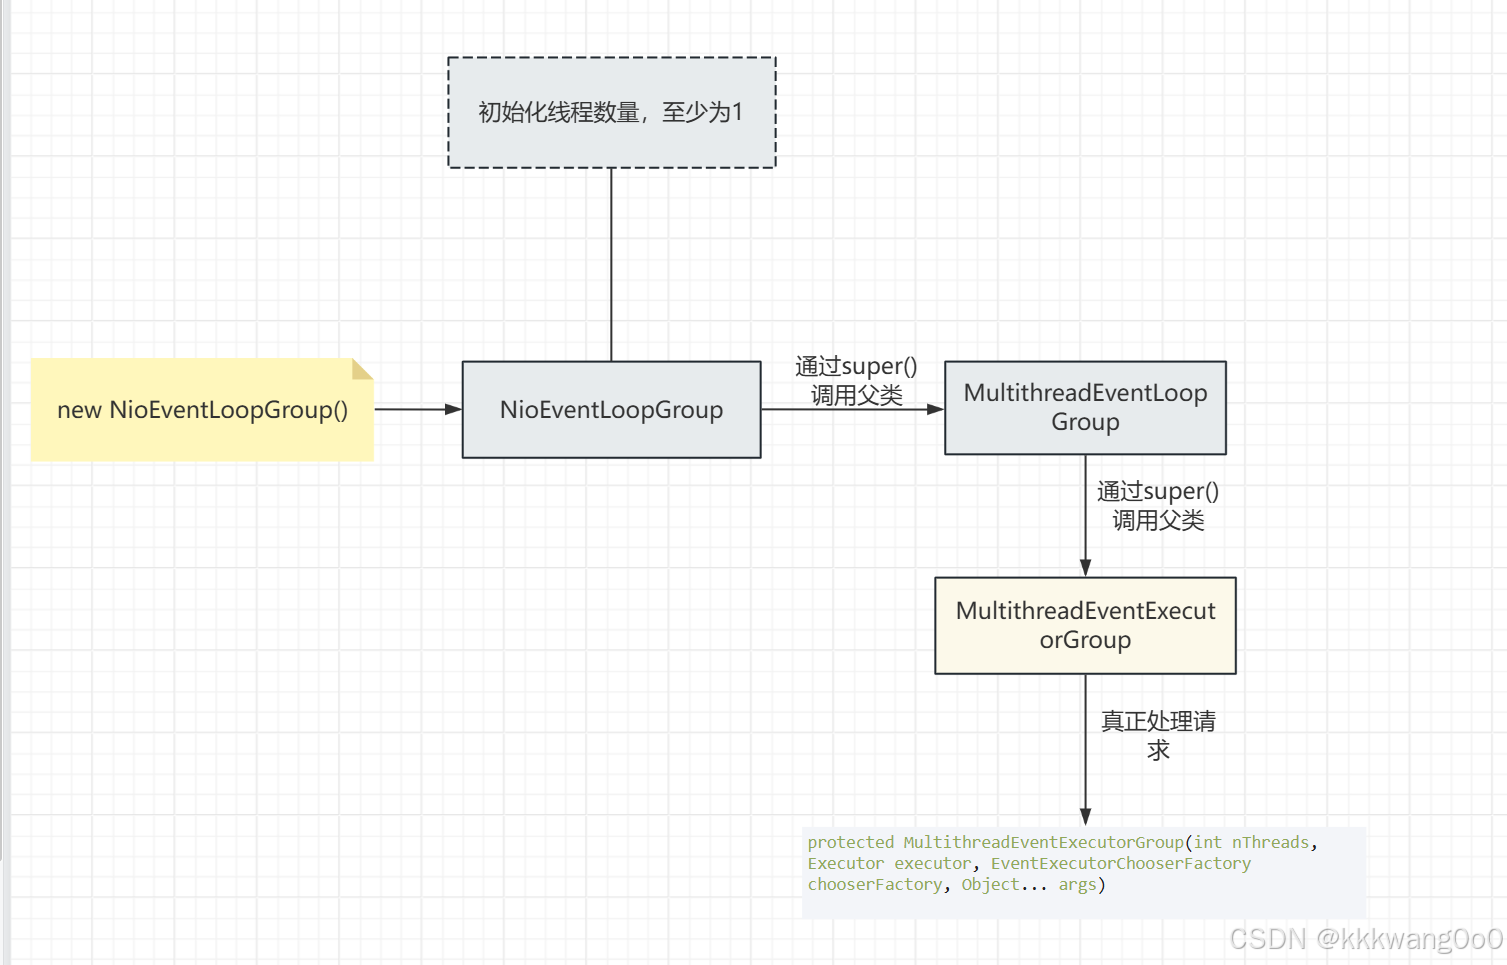
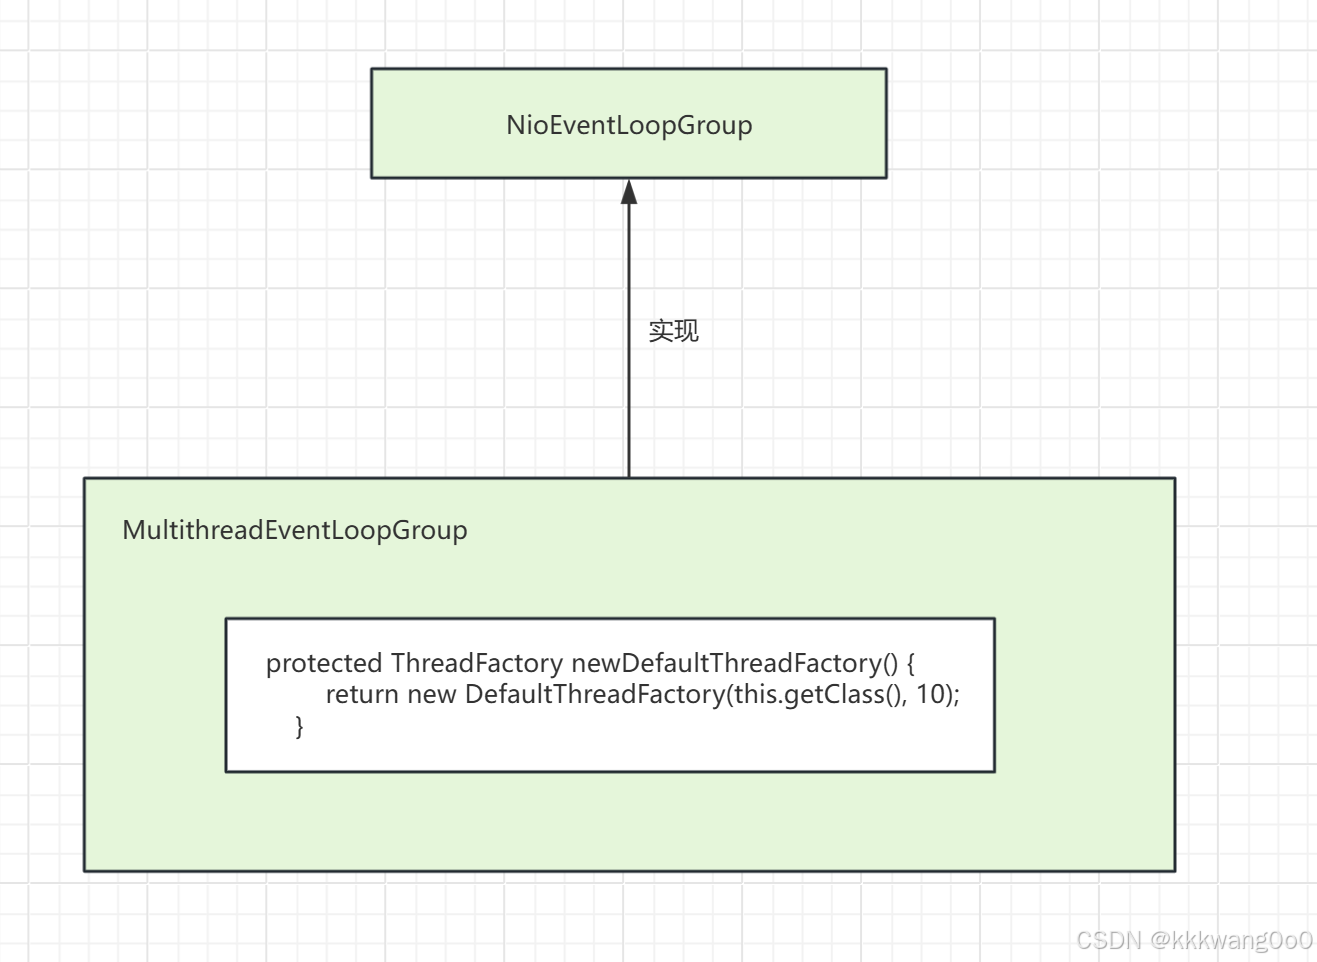
/*** 初始化多線程事件執行器組* * @param nThreads         線程數量,必須為正數* @param executor         用于執行任務的基礎線程池,若為null則創建默認實現* @param chooserFactory   執行器選擇工廠,用于從多個執行器中選擇一個處理任務* @param args             創建子執行器時傳遞的可選參數*/
protected MultithreadEventExecutorGroup(int nThreads, Executor executor, EventExecutorChooserFactory chooserFactory, Object... args) {// 原子計數器,記錄已終止的子執行器數量this.terminatedChildren = new AtomicInteger();// 異步終止承諾,用于通知整個執行器組已完全終止this.terminationFuture = new DefaultPromise(GlobalEventExecutor.INSTANCE);// 校驗線程數量為正數ObjectUtil.checkPositive(nThreads, "nThreads");// 若未提供基礎線程池,則創建默認實現(為每個任務創建新線程)if (executor == null) {executor = new ThreadPerTaskExecutor(this.newDefaultThreadFactory());}// 創建指定數量的子執行器數組this.children = new EventExecutor[nThreads];// 循環創建并初始化所有子執行器for(int i = 0; i < nThreads; ++i) {boolean success = false;boolean inTryBlock = false;try {inTryBlock = true;// 創建子執行器實例(由子類實現具體邏輯)this.children[i] = this.newChild((Executor)executor, args);success = true;inTryBlock = false;} catch (Exception e) {// 若創建失敗,拋出異常并終止已創建的子執行器throw new IllegalStateException("failed to create a child event loop", e);} finally {// 若在try塊中且創建失敗,優雅關閉已創建的子執行器if (inTryBlock && !success) {// 發起優雅關閉請求for(int j = 0; j < i; ++j) {this.children[j].shutdownGracefully();}// 等待所有已創建的子執行器完全終止for(int j = 0; j < i; ++j) {EventExecutor e = this.children[j];try {// 等待終止(超時時間設為極大值,等效于無限等待)while(!e.isTerminated()) {e.awaitTermination(2147483647L, TimeUnit.SECONDS);}} catch (InterruptedException ie) {// 恢復中斷狀態并退出循環Thread.currentThread().interrupt();break;}}}}// 若創建失敗(finally塊外的雙重檢查),再次確保資源釋放if (!success) {// 與finally塊中的邏輯相同,確保資源釋放for(int j = 0; j < i; ++j) {this.children[j].shutdownGracefully();}for(int j = 0; j < i; ++j) {EventExecutor e = this.children[j];try {while(!e.isTerminated()) {e.awaitTermination(2147483647L, TimeUnit.SECONDS);}} catch (InterruptedException ie) {Thread.currentThread().interrupt();break;}}}}// 創建執行器選擇器,用于從多個子執行器中選擇一個處理任務this.chooser = chooserFactory.newChooser(this.children);// 創建終止監聽器,當所有子執行器終止時觸發FutureListener<Object> terminationListener = new FutureListener<Object>() {public void operationComplete(Future<Object> future) throws Exception {// 原子增加已終止子執行器計數,當所有子執行器終止時,標記整個組終止完成if (MultithreadEventExecutorGroup.this.terminatedChildren.incrementAndGet() == MultithreadEventExecutorGroup.this.children.length) {MultithreadEventExecutorGroup.this.terminationFuture.setSuccess((Object)null);}}};// 為每個子執行器注冊終止監聽器EventExecutor[] executors = this.children;for(int i = 0; i < executors.length; ++i) {EventExecutor e = executors[i];e.terminationFuture().addListener(terminationListener);}// 創建子執行器的只讀集合視圖,防止外部修改Set<EventExecutor> childrenSet = new LinkedHashSet(this.children.length);Collections.addAll(childrenSet, this.children);this.readonlyChildren = Collections.unmodifiableSet(childrenSet);
}
這個方法主要是:
1.初始化EventLoop數組
根據傳遞進來的線程數,創建EventLoop,將EventLoop存儲在一個EventExecutor[]數組(即children)中
this.children[i] = this.newChild((Executor)executor, args);
這個newChild方法調用的是MultithreadEventExecutorGroup里面的newChild方法返回的是一個EventExecutor,EventLoop接口繼承了EventExecutor,所以這個EventExecutor其實是一個EventLoop對象
3.初始化選擇器chooser:
這個chooser是一個EventExecutorChooserFactory.EventExecutorChooser對象,這個對象提供了一個next方法,返回的是EventExecutor對象,所以這個選擇器用于從EventLoopGroup中選取一個EventLoop
this.chooser = chooserFactory.newChooser(this.children);
核心邏輯
當NioEventLoopGroup接收客戶端的連接時,會先分配一個NioEventLoop給當前的客戶端,當前這個線程池會將客戶端channel傳遞給NioEventLoop,這個NioEventLoop會將調用SingleThreadEventLoop的register方法將當前的客戶端注冊到當前的NIOEventLoop中
SingleThreadEventLoop.register:
參數檢查:確保
promise不為空。獲取 Unsafe 對象:
promise.channel().unsafe()獲取 Channel 的內部 Unsafe 實現。
- Unsafe:是 Netty 內部使用的接口,提供了底層操作的能力,如注冊、綁定、讀寫等。
調用 Unsafe.register ()
- 將當前
NioEventLoopGroup中的一個 EventLoop(通過next()方法選擇)傳遞給 Unsafe。- Unsafe 實現會負責實際的注冊操作。
返回 Promise:返回原始的 promise 對象,用于異步獲取注冊結果。
// ChannelPromise promise:一個異步操作的承諾對象,用于跟蹤注冊操作的完成狀態和結果
public ChannelFuture register(ChannelPromise promise) {// 檢查 promise 不為空ObjectUtil.checkNotNull(promise, "promise");// 獲取 Channel 的 Unsafe 對象并調用其 register 方法promise.channel().unsafe().register(this, promise);return promise;
}
然后這個方法最終會調用AbstractChannel.AbstractUnsafe.register(處理具體的注冊邏輯)
/*** 將 Channel 注冊到指定的 EventLoop 上* 此方法是 Channel 注冊流程的核心入口,負責初始化 Channel 與 EventLoop 的關聯* 并確保注冊操作在線程安全的環境中執行* * @param eventLoop 目標 EventLoop,Channel 將注冊到該 EventLoop 管理的 Selector 上* @param promise 用于異步通知注冊結果的 Promise 對象*/
public final void register(EventLoop eventLoop, final ChannelPromise promise) {// 檢查參數有效性ObjectUtil.checkNotNull(eventLoop, "eventLoop");// 確保 Channel 尚未注冊if (AbstractChannel.this.isRegistered()) {promise.setFailure(new IllegalStateException("registered to an event loop already"));return;}// 驗證 EventLoop 類型兼容性(例如 NioEventLoop 只能處理 NIO 類型的 Channel)if (!AbstractChannel.this.isCompatible(eventLoop)) {promise.setFailure(new IllegalStateException("incompatible event loop type: " + eventLoop.getClass().getName()));return;}// 將 Channel 與指定的 EventLoop 關聯// 這一步確保后續所有操作都在同一個 EventLoop 線程中執行AbstractChannel.this.eventLoop = eventLoop;// 檢查當前線程是否是目標 EventLoop 的線程// Netty 要求所有 Channel 操作必須在其關聯的 EventLoop 線程中執行if (eventLoop.inEventLoop()) {// 如果當前線程是 EventLoop 線程,直接執行注冊邏輯register0(promise);} else {// 如果不是 EventLoop 線程,則將注冊任務封裝為 Runnable 提交到 EventLoop// 確保注冊操作在 EventLoop 線程中執行,保證線程安全try {eventLoop.execute(new Runnable() {@Overridepublic void run() {register0(promise);}});} catch (Throwable t) {// 處理任務提交失敗的情況(例如 EventLoop 已關閉)logger.warn("Force-closing a channel whose registration task was not accepted by an event loop: {}", AbstractChannel.this, t);// 強制關閉 ChannelcloseForcibly();AbstractChannel.this.closeFuture.setClosed();// 標記 Promise 為失敗狀態safeSetFailure(promise, t);}}
}/*** 執行實際的注冊操作(由 register() 方法調用)* 此方法會完成 JDK NIO Channel 到 Selector 的注冊* 并觸發 ChannelPipeline 中的注冊完成事件*/
private void register0(ChannelPromise promise) {try {// 標記首次注冊狀態boolean firstRegistration = neverRegistered;// 執行 JDK NIO 底層注冊操作// 將 Channel 注冊到 EventLoop 的 Selector 上,初始不監聽任何事件(ops=0)doRegister();// 更新注冊狀態neverRegistered = false;registered = true;// 觸發 ChannelPipeline 中所有添加的 ChannelHandler 的初始化邏輯// 確保所有 handlerAdded() 方法被調用pipeline.invokeHandlerAddedIfNeeded();// 安全地標記 Promise 為成功狀態safeSetSuccess(promise);// 觸發 ChannelRegistered 事件,通知所有 Handler 通道已注冊pipeline.fireChannelRegistered();// 如果 Channel 已處于活躍狀態(例如客戶端 Channel 已連接)// 則觸發 ChannelActive 事件if (isActive()) {if (firstRegistration) {// 首次注冊且已激活,觸發 ChannelActive 事件pipeline.fireChannelActive();} else if (config().isAutoRead()) {// 非首次注冊但配置了自動讀取,開始讀取數據beginRead();}}} catch (Throwable t) {// 處理注冊過程中發生的異常// 包括 JDK NIO 注冊失敗、Handler 初始化異常等// 強制關閉 ChannelcloseForcibly();// 標記關閉狀態closeFuture.setClosed();// 安全地標記 Promise 為失敗狀態safeSetFailure(promise, t);}
}
假設:
EventLoop綁定的線程是Thread-1。- 主線程(
main)調用channel.register()。
執行流程:
- 主線程進入
register()方法。 - 檢查當前線程(
main)是否是EventLoop線程(Thread-1),發現不是。 - 將
register0()封裝成任務,提交到EventLoop的任務隊列。 Thread-1從隊列中取出任務并執行register0()。
注冊完成后會觸發pipeline.fireChannelActive();會調用AbstractChannelHandlerContext.invokeChannelActive
/*** 靜態工具方法:確保在正確的事件循環中調用 ChannelActive 事件* 根據執行器所在線程決定是直接調用還是提交異步任務執行* * 執行策略:* - 如果當前線程是處理器的事件循環線程,則直接同步調用* - 否則將調用封裝為任務提交到事件循環線程執行* * @param next 要調用的下一個 ChannelHandlerContext* @see EventExecutor#inEventLoop()*/
static void invokeChannelActive(final AbstractChannelHandlerContext next) {// 獲取處理器關聯的事件執行器EventExecutor executor = next.executor();// 判斷當前線程是否為事件循環線程if (executor.inEventLoop()) {// 直接在當前線程調用,避免線程切換開銷next.invokeChannelActive();} else {// 提交到事件循環線程異步執行executor.execute(new Runnable() {public void run() {next.invokeChannelActive();}});}
}/*** 觸發當前處理器的 ChannelActive 事件處理邏輯* 根據處理器類型調用對應實現,并處理可能的異常* * 執行流程:* 1. 判斷當前處理器是否應該處理該事件* 2. 根據處理器類型選擇具體的調用方式:*    - 頭部處理器:直接調用 HeadContext 的實現*    - 雙向處理器:調用 ChannelDuplexHandler 的實現*    - 默認情況:調用 ChannelInboundHandler 的實現* 3. 捕獲并處理所有異常,確保事件流不中斷* 4. 若當前處理器不處理,則將事件傳播到下一個處理器* * @see ChannelHandler#channelActive(ChannelHandlerContext)*/
private void invokeChannelActive() {// 判斷是否應由當前處理器處理事件if (this.invokeHandler()) {try {// 獲取當前處理器實例ChannelHandler handler = this.handler();// 獲取pipeline頭部處理器引用DefaultChannelPipeline.HeadContext headContext = this.pipeline.head;// 根據處理器類型選擇調用方式if (handler == headContext) {// 頭部處理器特殊處理(如網絡IO操作)headContext.channelActive(this);} else if (handler instanceof ChannelDuplexHandler) {// 雙向處理器支持完整的入站/出站操作((ChannelDuplexHandler)handler).channelActive(this);} else {// 默認作為入站處理器處理((ChannelInboundHandler)handler).channelActive(this);}} catch (Throwable var3) {// 異常處理機制確保事件處理流程不中斷this.invokeExceptionCaught(var3);}} else {// 將事件傳播到下一個處理器this.fireChannelActive();}
}
頭部處理器:
是Netty 底層 I/O 操作的入口和出口,負責處理與物理通道(如 TCP 連接)直接相關的操作,并銜接上層業務處理器、、
AbstractChannel
AbstractChannel 是 Netty 框架中的一個抽象類,它在 Netty 的網絡通信中扮演著非常重要的角色,是所有具體通道實現類的基類
AbstractChannel 類是 Netty 框架中實現網絡通信的基礎,它提供了通道的基本抽象和功能,為上層應用提供了一個統一的、高效的網絡編程接口。通過繼承 AbstractChannel,Netty 實現了多種不同類型的通道(如 NioServerSocketChannel、NioSocketChannel 等
屬性字段
| 字段名稱 | 類型 | 核心作用 | 設計要點 / 場景 |
|---|---|---|---|
parent | Channel | 父通道引用(如服務器通道對應的客戶端通道) | 用于層級管理,父通道關閉時可級聯關閉子通道 |
id | ChannelId | 通道全局唯一標識符 | 基于 UUID 生成,用于日志、監控標識特定連接 |
unsafe | Channel.Unsafe | 底層傳輸操作接口(如 Java NIO 的 Selector 操作) | 解耦 Netty 抽象層與具體 IO 模型(NIO/Epoll),提供 read()、write() 等底層方法 |
pipeline | DefaultChannelPipeline | 處理器鏈(ChannelHandler 鏈表) | 處理入站 / 出站事件,支持動態添加 / 刪除處理器,實現業務邏輯與 IO 的解耦 |
closeFuture | CloseFuture | 通道關閉事件的異步通知機制 | 基于 Future-Listener 模式,支持非阻塞式關閉回調(如資源釋放) |
eventLoop | EventLoop | 關聯的事件循環線程(NioEventLoop 等) | 通道的所有 IO 操作必須在此線程執行,確保線程安全 |
registered | boolean | 標識通道是否已注冊到 Selector | true 表示可開始監聽 IO 事件(如 OP_READ),由 register() 方法更新 |
localAddress | SocketAddress | 本地綁定地址(如服務器端口) | 綁定端口后設置(如 0.0.0.0:8080) |
remoteAddress | SocketAddress | 遠程連接地址(如客戶端 IP + 端口) | 客戶端連接建立后設置(如 192.168.1.1:50000) |
unsafeVoidPromise | VoidChannelPromise | 空操作的 ChannelPromise(占位符) | 用于不需要返回結果的操作(如內部清理),避免創建臨時對象 |
closeInitiated | boolean | 標識是否已發起關閉流程 | 防止重復關閉,確保關閉邏輯冪等性 |
initialCloseCause | Throwable | 關閉原因(異常信息) |
方法
| 方法名稱 | 參數 | 返回值 | 核心功能 | 設計要點 / 典型場景 |
|---|---|---|---|---|
register(EventLoop, Promise) | EventLoop, ChannelPromise | void | 將通道注冊到指定 EventLoop 的 Selector 上 | 線程安全設計:若當前線程不是 EventLoop 線程,通過 execute() 提交任務確保單線程執行 |
bind(SocketAddress, Promise) | SocketAddress, ChannelPromise | ChannelFuture | 綁定本地地址(如服務器端口) | 異步操作:返回 ChannelFuture 監聽綁定結果,內部調用 doBind() 實現具體邏輯 |
connect(SocketAddress, Promise) | SocketAddress, ChannelPromise | ChannelFuture | 連接遠程地址(客戶端模式) | 異步操作:支持超時設置,內部調用 doConnect() 實現具體連接邏輯 |
disconnect(Promise) | ChannelPromise | ChannelFuture | 斷開連接(客戶端模式) | 通常用于主動關閉連接,釋放資源,內部調用 doDisconnect() |
close(Promise) | ChannelPromise | ChannelFuture | 關閉通道(優雅關閉) | 觸發 pipeline 的 channelInactive() 事件,確保所有處理器有機會執行清理邏輯 |
write(Object, Promise) | Object(消息), ChannelPromise | ChannelFuture | 將消息寫入通道(異步操作) | 消息從 pipeline 的尾部開始流動,最終調用 unsafe.write() 執行底層寫操作 |
flush() | void | Channel | 強制刷新緩沖區,將數據發送到網絡 | 通常與 write() 配合使用(如 writeAndFlush()),觸發 pipeline 的 flush() 事件 |
read() | void | Channel | 觸發通道讀取數據(從網絡接收數據) | 調用 pipeline 的 read() 事件,最終調用 unsafe.beginRead() 注冊 OP_READ 事件 |
pipeline() | void | ChannelPipeline | 獲取通道的 ChannelPipeline(處理器鏈) | 線程安全:每個通道有獨立的 pipeline,支持動態添加 / 刪除處理器 |
config() | void | ChannelConfig | 獲取通道配置(如 TCP_NODELAY、SO_KEEPALIVE 等) | 配置參數通過 ChannelOption 設置,影響底層 Socket 行為 |
localAddress() | void | SocketAddress | 獲取本地綁定地址 | 綁定后返回 localAddress 字段值,否則返回 null |
remoteAddress() | void | SocketAddress | 獲取遠程連接地址 | 連接建立后返回 remoteAddress 字段值,否則返回 null |
isActive() | void | boolean | 判斷通道是否處于活躍狀態(已連接或已綁定) | 通常用于檢查通道是否可進行讀寫操作 |
Netty服務器啟動源碼剖析
// 創建并配置Netty服務器
ServerBootstrap server = new ServerBootstrap();
// 設置服務器的BossGroup和WorkGroup
server.group(bossGroup, workGroups);
// 指定服務器的通道類型
server.channel(NioServerSocketChannel.class);
// 2.配置服務器的處理器
// 2.1. 主通道處理器(用于ServerSocketChannel,處理連接建立事件)
server.handler(new ChannelInitializer<NioServerSocketChannel>() {@Overrideprotected void initChannel(NioServerSocketChannel ch) {// 配置主通道的處理器鏈(如日志記錄、連接限制等)ch.pipeline().addLast(new LoggingHandler(LogLevel.INFO));}
});
// 2.2. 子通道處理器(用于SocketChannel,處理讀寫事件)
ChannelInitializer<SocketChannel> childHandlers = new ChannelInitializer<SocketChannel>() {@Overrideprotected void initChannel(SocketChannel socketChannel) throws Exception {// 配置SocketChannel的管道socketChannel.pipeline().addLast(new StringDecoder(), // 字符串解碼器new StringEncoder(), // 字符串編碼器new ChatServerHandler(), // 自定義處理器new ChatConnectionServerHandler() // 監聽客戶端狀態);}
};
server.childHandler(childHandlers);
// 設置服務器的配置項
server.option(ChannelOption.SO_BACKLOG, 128).childOption(ChannelOption.SO_KEEPALIVE, true);// 3.綁定端口并啟動服務
ChannelFuture serverChannel = server.bind(port).sync();// 4.等待服務器關閉
serverChannel.channel().closeFuture().sync();
- 創建并初始化
ServerSocketChannel:ServerBootstrap根據配置創建一個ServerSocketChannel,用于監聽客戶端連接。- 配置
ServerSocketChannel的一些參數,如SO_BACKLOG(連接隊列長度)等。
- 將
ServerSocketChannel注冊到EventLoop:ServerSocketChannel會被注冊到EventLoop的Selector上,以便監聽連接事件。- 注冊過程是異步的,通過
ChannelFuture來通知注冊結果。
- 綁定端口:
- 調用
ServerSocketChannel的bind方法,將其綁定到指定的端口。 - 底層會調用操作系統的
bind系統調用,將套接字綁定到指定的 IP 地址和端口。
- 調用
- 啟動監聽:
- 綁定成功后,
ServerSocketChannel開始監聽客戶端連接。 - 此時,
ServerSocketChannel處于OP_ACCEPT狀態,等待客戶端連接。
- 綁定成功后,
- 阻塞等待綁定完成:
sync()方法會阻塞當前線程,直到綁定操作完成。- 如果綁定成功,
ChannelFuture的isSuccess()方法返回true;如果綁定失敗,ChannelFuture的isSuccess()方法返回false,并且可以通過cause()方法獲取失敗原因。
- 觸發
ChannelActive事件:- 如果
Channel在綁定后變為活躍狀態(之前不活躍),會異步觸發ChannelActive事件。 ChannelActive事件會被傳播到ChannelPipeline中的所有ChannelHandler,以便它們可以執行相應的初始化或處理邏輯。
- 如果
1.初始化EventLoopGroup
server.group(bossGroup, workerGroups);
調用ServerBootStrap的group方法指定bossGroup和workerGroup
workerGroup會傳遞給ServerBootStrap類,指定childGroup為workerGroupbossGroup會傳遞給AbstractBootstrap這個類,指定這個類的group屬性為傳遞的bossGroup
(ServerBootStrap類繼承了AbstractBootstrap類)
一般情況下:
bossGroup可以認為是主Reactor線程池,主要負責處理客戶端的連接請求(accept事件),建立與客戶端的連接
workerGroup可以認為是從Reactor線程池。主要負責處理已建立連接的 Channel 的讀寫事件(read/write事件),包括數據的接收、處理和發送
2.初始化channel
主要是設置AbstractBootstrap里面的channelFactory屬性設置為對應通道類型的工廠類
server.channel(NioServerSocketChannel.class);
調用的是父類AbstractBootstrap的channel方法
public B channel(Class<? extends C> channelClass) {return this.channelFactory((io.netty.channel.ChannelFactory)(new ReflectiveChannelFactory((Class)ObjectUtil.checkNotNull(channelClass, "channelClass"))));
}
public B channelFactory(io.netty.channel.ChannelFactory<? extends C> channelFactory) {return this.channelFactory((ChannelFactory)channelFactory);
}
public B channelFactory(ChannelFactory<? extends C> channelFactory) {ObjectUtil.checkNotNull(channelFactory, "channelFactory");if (this.channelFactory != null) {throw new IllegalStateException("channelFactory set already");} else {this.channelFactory = channelFactory;return this.self();}
}
ReflectiveChannelFactory 是 Netty 中用于通過反射創建 Channel 實例的工廠類
ReflectiveChannelFactory通過channelClass(當前通道的類型)通過反射拿到對應類(當前通道)的無參構造器
ReflectiveChannelFactory實現了ChannelFactory接口,所以它是ChannelFactory的子類
public ReflectiveChannelFactory(Class<? extends T> clazz) {ObjectUtil.checkNotNull(clazz, "clazz");try {this.constructor = clazz.getConstructor();} catch (NoSuchMethodException var3) {throw new IllegalArgumentException("Class " + StringUtil.simpleClassName(clazz) + " does not have a public non-arg constructor", var3);}
}
通過channelFactory方法將當前類的channelFactory屬性初始化為ReflectiveChannelFactory對象
public B channelFactory(ChannelFactory<? extends C> channelFactory) {ObjectUtil.checkNotNull(channelFactory, "channelFactory");if (this.channelFactory != null) {throw new IllegalStateException("channelFactory set already");} else {this.channelFactory = channelFactory;return this.self();}
}
ChannelFactory接口提供了一個newChannel方法,這個方法對應的實現類是ReflectiveChannelFactory,這個方法返回通過反射拿到的構造器創建對應通道類型的實例(即NioServerSocketChannel實例)
public T newChannel() {try {return (Channel)this.constructor.newInstance();} catch (Throwable var2) {throw new ChannelException("Unable to create Channel from class " + this.constructor.getDeclaringClass(), var2);}
}
3.初始化處理器
在 Netty 中,ChannelInitializer 是一個核心組件,用于動態初始化 Channel 的處理器鏈(ChannelPipeline)
會在 Channel 注冊到EventLoop后、真正開始處理數據前,動態添加處理器
當 Channel 注冊到EventLoop時,ChannelInitializer的initChannel()方法會被觸發,會調用AbstractChannel類的pipeline方法給當前Channel的ChannelPipeline對象(即pipeline)添加處理器鏈
@Override
protected void initChannel(SocketChannel socketChannel) throws Exception {// 配置SocketChannel的管道socketChannel.pipeline().addLast(new StringDecoder(), // 字符串解碼器new StringEncoder(), // 字符串編碼器new ChatServerHandler(), // 自定義處理器new ChatConnectionServerHandler() // 監聽客戶端狀態);
}
public final ChannelPipeline addLast(EventExecutorGroup executor, ChannelHandler... handlers) {ObjectUtil.checkNotNull(handlers, "handlers");ChannelHandler[] var3 = handlers;int var4 = handlers.length;for(int var5 = 0; var5 < var4; ++var5) {ChannelHandler h = var3[var5];if (h == null) {break;}this.addLast(executor, (String)null, h);}return this;
}
初始化主通道處理器(handler())
// 1. 主通道處理器(用于ServerSocketChannel,處理連接建立事件)
server.handler(new ChannelInitializer<NioServerSocketChannel>() {@Overrideprotected void initChannel(NioServerSocketChannel ch) {// 配置主通道的處理器鏈(如日志記錄、連接限制等)ch.pipeline().addLast(new LoggingHandler(LogLevel.INFO));}
});
調用入口是AbstractBootstrap類的handler方法,將AbstractBootstrap類的handler屬性設置為傳入的處理器,主要用于處理bossGroup
public B handler(ChannelHandler handler) {this.handler = (ChannelHandler)ObjectUtil.checkNotNull(handler, "handler");return this.self();
}
初始化子通道處理器(childHandler())
客戶端連接服務器時,為客戶端通道添加處理器鏈
// 2. 子通道處理器(用于SocketChannel,處理讀寫事件)
ChannelInitializer<SocketChannel> childHandlers = new ChannelInitializer<SocketChannel>() {@Overrideprotected void initChannel(SocketChannel socketChannel) throws Exception {// 配置SocketChannel的管道socketChannel.pipeline().addLast(new StringDecoder(), // 字符串解碼器new StringEncoder(), // 字符串編碼器new ChatServerHandler(), // 自定義處理器new ChatConnectionServerHandler() // 監聽客戶端狀態);}
};
server.childHandler(childHandlers);
調用的入口是ServerBootStrap的childHandler方法,主要是將ServerBootStrap的子處理器childHandler設置為傳入的處理器
這個子處理器其實就是用于處理workerGroup
public ServerBootstrap childHandler(ChannelHandler childHandler) {this.childHandler = (ChannelHandler)ObjectUtil.checkNotNull(childHandler, "childHandler");return this;
}
4.綁定端口并啟動服務
// 綁定端口并啟動服務
ChannelFuture serverChannel = server.bind(port).sync();
調用關系圖:
// 核心調用鏈路(簡化版)
1. ServerBootstrap.bind(port)                // 用戶調用入口
2.  -> AbstractBootstrap.doBind(localAddress) // 啟動器內部邏輯
3.     -> Channel.bind(localAddress)          // 通道綁定操作
4.       -> ChannelPipeline.bind()            // 觸發 Pipeline 事件
5.         -> HeadContext.bind()              // Pipeline 頭部處理器
6.           -> NioMessageUnsafe.bind()       // 底層 unsafe 操作
7.             -> ServerSocketChannel.bind()  // 調用 Java NIO 原生方法
8.               -> OS socket.bind()          // 操作系統系統調用
9.               -> OS socket.listen()        // 操作系統系統調用
10. serverChannel.sync()                     // 阻塞等待綁定完成
入口函數:調用AbstractBootstrap的bind方法
public ChannelFuture bind(int inetPort) {return this.bind(new InetSocketAddress(inetPort));
}
public ChannelFuture bind(SocketAddress localAddress) {this.validate();return this.doBind((SocketAddress)ObjectUtil.checkNotNull(localAddress, "localAddress"));
}
private ChannelFuture doBind(final SocketAddress localAddress) {// 步驟1:初始化Channel并注冊到EventLoopfinal ChannelFuture regFuture = this.initAndRegister();final Channel channel = regFuture.channel();// 步驟2:根據注冊結果處理綁定if (regFuture.cause() != null) {return regFuture; // 注冊失敗,直接返回失敗結果} else if (regFuture.isDone()) {// 注冊已完成,立即執行綁定ChannelPromise promise = channel.newPromise();doBind0(regFuture, channel, localAddress, promise);return promise;} else {// 注冊未完成(異步),添加監聽器,注冊完成后再執行綁定final PendingRegistrationPromise promise = new PendingRegistrationPromise(channel);regFuture.addListener(new ChannelFutureListener() {public void operationComplete(ChannelFuture future) throws Exception {Throwable cause = future.cause();if (cause != null) {promise.setFailure(cause); // 注冊失敗,傳播異常} else {promise.registered();AbstractBootstrap.doBind0(regFuture, channel, localAddress, promise); // 注冊成功,執行綁定}}});return promise;}
}
4.1.初始化并注冊Channel
調用AbstractBootstrap的initAndRegister方法
1.通過channelFactory工廠類,創建通道實例channel
2.通過this.init(channel)初始化當前通道,負責初始化服務器 Channel 的各項參數和處理器鏈。
3.將 Channel 注冊到 EventLoopGroup 中的某個 EventLoop
/*** 初始化 Channel 并將其注冊到 EventLoopGroup,為后續的網絡通信做準備。* 這是服務器啟動流程中的核心步驟,完成后 Channel 開始監聽網絡事件。* * @return 表示注冊操作的異步結果。成功時可通過 Channel 綁定端口,失敗時包含具體異常。*/
final ChannelFuture initAndRegister() {Channel channel = null;try {// 1. 通過反射創建 Channel 實例(如 NioServerSocketChannel)//    - 此步驟會初始化底層 Java NIO Channel(如 ServerSocketChannel)//    - 設置為非阻塞模式并創建對應的 Pipelinechannel = this.channelFactory.newChannel();// 2. 初始化 Channel 配置://    - 設置 TCP 參數(如 SO_BACKLOG、SO_REUSEADDR)//    - 添加用戶通過 handler() 設置的處理器(如 LoggingHandler)//    - 對于 ServerBootstrap,會添加 ServerBootstrapAcceptor 用于處理新連接this.init(channel);} catch (Throwable t) {// 初始化失敗時,強制關閉 Channel 并返回失敗的 ChannelPromise// 確保資源正確釋放,避免內存泄漏if (channel != null) {channel.unsafe().closeForcibly();return new DefaultChannelPromise(channel, GlobalEventExecutor.INSTANCE).setFailure(t);}// 若 Channel 創建失敗,返回特殊的 FailedChannel 實例return new DefaultChannelPromise(new FailedChannel(), GlobalEventExecutor.INSTANCE).setFailure(t);}// 3. 將 Channel 注冊到 EventLoopGroup 中的某個 EventLoop://    - 對于 ServerBootstrap,config().group() 返回 bossGroup(處理連接接受的線程池)//    - 注冊后,EventLoop 開始監聽 OP_ACCEPT 事件(對于服務器 Channel)//    - 注冊是異步操作,通過 ChannelFuture 通知結果ChannelFuture regFuture = this.config().group().register(channel);// 4. 注冊失敗處理://    - 若注冊過程中立即發現異常(如 Selector 打開失敗)//    - 根據 Channel 狀態選擇優雅關閉或強制關閉if (regFuture.cause() != null) {if (channel.isRegistered()) {channel.close(); // 已注冊但失敗,執行優雅關閉} else {channel.unsafe().closeForcibly(); // 未注冊成功,強制關閉}}return regFuture;
}
1.通過channelFactory屬性創建對應通道類型的實例(channelFactory這個工廠類是在初始化的時候創建的)
channel = this.channelFactory.newChannel();
2.通過調用ServerBootstrap類的init方法初始化當前通道
this.init(channel);
2.1.配置服務器 Channel:設置選項(如 SO_BACKLOG)和屬性。
2.2.構建 Pipeline:添加主處理器(如 LoggingHandler)和 ServerBootstrapAcceptor。
2.3.處理新連接:
ServerBootstrapAcceptor負責創建子 Channel(SocketChannel)。- 為子 Channel 配置處理器鏈(如
HttpServerCodec)。 - 將子 Channel 注冊到
childGroup的EventLoop。
void init(Channel channel) {// 1. 設置 Channel 選項(如 TCP 參數)setChannelOptions(channel, this.newOptionsArray(), logger);// 2. 設置 Channel 屬性(自定義鍵值對)setAttributes(channel, this.newAttributesArray());// 3. 獲取 Channel 的 Pipeline(處理器鏈)ChannelPipeline p = channel.pipeline();// 4. 保存 childGroup 和 childHandler 的引用(用于處理客戶端連接)final EventLoopGroup currentChildGroup = this.childGroup;final ChannelHandler currentChildHandler = this.childHandler;// 5. 添加一個特殊的 ChannelInitializer 到 Pipelinep.addLast(new ChannelInitializer<Channel>() {@Overridepublic void initChannel(final Channel ch) {// 5.1 添加用戶配置的主處理器(如 LoggingHandler)ChannelHandler handler = ServerBootstrap.this.config.handler();if (handler != null) {pipeline.addLast(handler);}// 5.2 添加 ServerBootstrapAcceptor 到 Pipeline(關鍵組件)ch.eventLoop().execute(() -> {pipeline.addLast(new ServerBootstrapAcceptor(ch, currentChildGroup, currentChildHandler, currentChildOptions, currentChildAttrs, extensions));});}});// 6. 調用擴展點(如果有)if (!extensions.isEmpty() && channel instanceof ServerChannel) {// 執行擴展邏輯...}
}
ServerBootstrapAcceptor 是一個特殊的 ChannelInboundHandler,它作為連接管理器存在于 NioServerSocketChannel 的 Pipeline 中,主要負責:
- 接收新連接:當主 Reactor(
bossGroup)檢測到客戶端連接請求時,創建對應的NioSocketChannel。 - 分配 EventLoop:從從 Reactor(
childGroup)中選擇一個EventLoop分配給新連接。 - 初始化子 Channel:為新連接的
NioSocketChannel配置處理器鏈(Pipeline)和選項。 - 注冊到 Selector:將新連接注冊到分配的
EventLoop的Selector上,開始監聽讀寫事件。
// 5.2 添加 ServerBootstrapAcceptor 到 Pipeline(關鍵組件)
ch.eventLoop().execute(() -> {pipeline.addLast(new ServerBootstrapAcceptor(ch, currentChildGroup, currentChildHandler, currentChildOptions, currentChildAttrs, extensions));
});
當有新客戶端連接時,ServerBootstrapAcceptor 的 channelRead() 方法會被觸發
核心功能:
/*** 處理新連接的核心方法。當主 Reactor(bossGroup)接收到客戶端連接時,此方法會被觸發,* 負責將新連接配置并注冊到從 Reactor(workerGroup)。* * @param ctx 上下文對象,用于與 Pipeline 交互* @param msg 新連接的 Channel 對象(如 NioSocketChannel)*/
public void channelRead(ChannelHandlerContext ctx, Object msg) {// 1. 獲取新連接的 Channel 對象(代表客戶端連接)final Channel child = (Channel) msg;// 2. 配置子 Channel 的 Pipeline://    - 添加用戶通過 childHandler() 設置的處理器鏈(如 HttpServerCodec、業務處理器)//    - 每個新連接都會創建獨立的 Pipeline 實例,確保線程安全child.pipeline().addLast(new ChannelHandler[]{this.childHandler});// 3. 設置子 Channel 的 TCP 選項://    - 常見選項:TCP_NODELAY(禁用 Nagle 算法)、SO_KEEPALIVE(啟用保活機制)//    - 這些選項會影響底層 Socket 的行為AbstractBootstrap.setChannelOptions(child, this.childOptions, ServerBootstrap.logger);// 4. 設置子 Channel 的自定義屬性://    - 存儲與連接相關的元數據(如認證信息、會話ID)//    - 示例:channel.attr(AttributeKey.valueOf("sessionId")).set("12345");AbstractBootstrap.setAttributes(child, this.childAttrs);// 5. 執行擴展邏輯(如果有)://    - 允許用戶在 Channel 初始化后執行自定義邏輯//    - 例如:添加額外的處理器、修改 Channel 配置if (!this.extensions.isEmpty()) {Iterator var4 = this.extensions.iterator();while(var4.hasNext()) {ChannelInitializerExtension extension = (ChannelInitializerExtension)var4.next();try {extension.postInitializeServerChildChannel(child);} catch (Exception var8) {ServerBootstrap.logger.warn("Exception thrown from postInitializeServerChildChannel", var8);}}}// 6. 將子 Channel 注冊到 workerGroup 的某個 EventLoop://    - 從 workerGroup 中選擇一個 EventLoop(線程)//    - 注冊后,該 EventLoop 將負責處理此連接的所有 IO 操作(讀寫、編解碼等)//    - 注冊是異步操作,通過 ChannelFuture 監聽結果try {this.childGroup.register(child).addListener(new ChannelFutureListener() {public void operationComplete(ChannelFuture future) throws Exception {if (!future.isSuccess()) {// 注冊失敗時,強制關閉連接并記錄異常ServerBootstrap.ServerBootstrapAcceptor.forceClose(child, future.cause());}}});} catch (Throwable var7) {// 注冊過程中發生異常,立即關閉連接forceClose(child, var7);}
}
3. 將 Channel 注冊到 EventLoopGroup 中的某個 EventLoop:
ChannelFuture regFuture = this.config().group().register(channel);
是 Netty 服務器啟動流程中的核心操作,負責將 Channel 注冊到 EventLoop 的 Selector,從而建立事件循環機制。這個操作標志著 Channel 開始真正參與網絡 IO 處理。
ChannelFuture封裝異步操作結果:
- 立即返回:調用
register(channel)后,方法會立即返回一個ChannelFuture,此時注冊操作可能尚未完成。 - 異步完成:Netty 會在后臺完成實際的注冊操作,完成后通過
ChannelFuture通知結果。
config().group()
config():返回AbstractBootstrapConfig,包含啟動配置信息。group():返回EventLoopGroup(線程池):- 對于
ServerBootstrap:
config().group()返回bossGroup,負責接受客戶端連接。
示例:ServerBootstrap.group(bossGroup, workerGroup)。 - 對于
Bootstrap(客戶端):
config().group()返回唯一的EventLoopGroup,負責處理所有連接的 IO。
- 對于
這個register方法最終會調用AbstractChannel類的register方法(AbstractChannel類是所有具體通道實現類的基類,定義了通道的一些通用屬性和方法),返回一個ChannelFuture對象,
SingleThreadEventLoop.class:
public ChannelFuture register(Channel channel) {return this.register((ChannelPromise)(new DefaultChannelPromise(channel, this)));
}public ChannelFuture register(ChannelPromise promise) {ObjectUtil.checkNotNull(promise, "promise");promise.channel().unsafe().register(this, promise);return promise;
}
AbstractChannel.class
/*** 將 Channel 注冊到指定的 EventLoop,建立事件循環機制。* 此方法是線程安全的,確保注冊操作在 EventLoop 線程中執行。* * @param eventLoop 目標 EventLoop,負責處理 Channel 的所有 IO 操作* @param promise 用于異步通知注冊結果的 Promise 對象*/
public final void register(EventLoop eventLoop, final ChannelPromise promise) {// 校驗參數:確保 EventLoop 不為空ObjectUtil.checkNotNull(eventLoop, "eventLoop");// 狀態檢查:防止重復注冊if (AbstractChannel.this.isRegistered()) {promise.setFailure(new IllegalStateException("Channel 已注冊到 EventLoop"));return;}// 兼容性檢查:確保 EventLoop 類型與 Channel 兼容(如 NioEventLoop 與 NioChannel)if (!AbstractChannel.this.isCompatible(eventLoop)) {promise.setFailure(new IllegalStateException("不兼容的 EventLoop 類型: " + eventLoop.getClass().getName()));return;}// 綁定 EventLoop:將 Channel 與指定的 EventLoop 永久關聯AbstractChannel.this.eventLoop = eventLoop;// 確保注冊操作在 EventLoop 線程中執行(關鍵!)if (eventLoop.inEventLoop()) {// 當前線程已是 EventLoop 線程,直接執行注冊register0(promise);} else {// 當前線程不是 EventLoop 線程,提交任務到 EventLoop 的任務隊列try {eventLoop.execute(() -> register0(promise));} catch (Throwable t) {// 任務提交失敗處理logger.warn("注冊任務被 EventLoop 拒絕,強制關閉 Channel: {}", AbstractChannel.this, t);closeForcibly();AbstractChannel.this.closeFuture.setClosed();safeSetFailure(promise, t);}}
}/*** 實際執行 Channel 注冊到 Selector 的核心方法。* 必須在 EventLoop 線程中調用,確保線程安全。* * @param promise 用于異步通知注冊結果的 Promise 對象*/
private void register0(ChannelPromise promise) {try {// 1. 標記 Promise 為不可取消,并檢查 Channel 是否處于打開狀態if (!promise.setUncancellable() || !ensureOpen(promise)) {return;}// 2. 記錄是否為首次注冊boolean firstRegistration = neverRegistered;// 3. 執行底層注冊操作(如調用 Java NIO 的 SelectableChannel.register())AbstractChannel.this.doRegister();// 4. 更新注冊狀態neverRegistered = false;registered = true;// 5. 觸發 HandlerAdded 回調(如果有)//    確保所有添加到 Pipeline 的 Handler 有機會執行初始化邏輯pipeline.invokeHandlerAddedIfNeeded();// 6. 標記注冊成功safeSetSuccess(promise);// 7. 觸發 ChannelRegistered 事件,通知 Pipeline 中的所有 Handlerpipeline.fireChannelRegistered();// 8. 如果 Channel 已處于活躍狀態(如客戶端已連接),觸發相應事件if (isActive()) {if (firstRegistration) {// 首次注冊且已活躍,觸發 ChannelActive 事件pipeline.fireChannelActive();} else if (config().isAutoRead()) {// 非首次注冊但配置了自動讀取,開始讀取數據beginRead();}}} catch (Throwable t) {// 注冊過程中發生異常,強制關閉 ChannelcloseForcibly();closeFuture.setClosed();safeSetFailure(promise, t);}
}
4.2 根據注冊結果處理綁定
ChannelPromise promise = channel.newPromise();
doBind0(regFuture, channel, localAddress, promise);
return promise;
調用AbstractBootstrap類的doBind0()
/*** 執行 Channel 綁定操作的核心邏輯。* 確保在 Channel 注冊到 EventLoop 成功后,再異步執行綁定操作。* * @param regFuture 注冊操作的 Future 對象,用于判斷注冊是否成功* @param channel 待綁定的 Channel* @param localAddress 要綁定的本地地址* @param promise 綁定操作的 Promise,用于異步通知結果*/
private static void doBind0(final ChannelFuture regFuture,final Channel channel,final SocketAddress localAddress,final ChannelPromise promise) {// 在 Channel 關聯的 EventLoop 線程中執行綁定操作channel.eventLoop().execute(() -> {if (regFuture.isSuccess()) {// 注冊成功,執行綁定操作,并添加失敗自動關閉監聽器channel.bind(localAddress, promise).addListener(ChannelFutureListener.CLOSE_ON_FAILURE);} else {// 注冊失敗,將注冊失敗原因傳遞給綁定 Promisepromise.setFailure(regFuture.cause());}});
}
channel.bind會去調用AbstractChannel的pipeline對象,并執行對應的bind方法
public ChannelFuture bind(SocketAddress localAddress, ChannelPromise promise) {return this.pipeline.bind(localAddress, promise);
}
執行DefaultChannelPipeline類的bind方法
public final ChannelFuture bind(SocketAddress localAddress, ChannelPromise promise) {return this.tail.bind(localAddress, promise);
}
public final ChannelFuture bind(SocketAddress localAddress, ChannelPromise promise) {return this.tail.bind(localAddress, promise);
}tail是AbstractChannelHandlerContext對象,會調用AbstractChannelHandlerContext類的bind方法
/*** 異步綁定 Channel 到指定的本地地址。* 通過 ChannelPipeline 觸發出站事件,最終由底層傳輸層執行實際綁定操作。* * @param localAddress 要綁定的本地地址(如 InetSocketAddress)* @param promise 用于異步通知綁定結果的 Promise* @return 返回傳入的 promise 對象,支持鏈式調用*/
public ChannelFuture bind(final SocketAddress localAddress, final ChannelPromise promise) {// 校驗參數:確保地址不為空ObjectUtil.checkNotNull(localAddress, "localAddress");// 驗證 Promise 有效性(如未取消、與當前 Channel 關聯)if (this.isNotValidPromise(promise, false)) {return promise; // 無效 Promise,直接返回}// 查找 Pipeline 中下一個支持 bind 操作的出站處理器上下文final AbstractChannelHandlerContext next = this.findContextOutbound(512); // 512 = BIND 操作掩碼EventExecutor executor = next.executor();// 確保在 EventLoop 線程中執行綁定操作(關鍵!)if (executor.inEventLoop()) {// 當前線程已是 EventLoop 線程,直接調用next.invokeBind(localAddress, promise);} else {// 當前線程不是 EventLoop 線程,提交任務到 EventLoop 線程池safeExecute(executor, () -> next.invokeBind(localAddress, promise), promise, null, false);}return promise; // 返回 Promise 供調用者監聽結果
}/*** 在當前 HandlerContext 中觸發 bind 事件,調用對應處理器的 bind 方法。* 此方法會根據處理器類型進行不同的調用邏輯。* * @param localAddress 要綁定的本地地址* @param promise 用于異步通知綁定結果的 Promise*/
private void invokeBind(SocketAddress localAddress, ChannelPromise promise) {// 檢查處理器是否啟用(isRemoved() 為 false)if (this.invokeHandler()) {try {ChannelHandler handler = this.handler();DefaultChannelPipeline.HeadContext headContext = this.pipeline.head;// 根據處理器類型選擇調用方式if (handler == headContext) {// 頭部處理器:直接調用 HeadContext 的 bind 方法(最終觸發底層網絡綁定)headContext.bind(this, localAddress, promise);} else if (handler instanceof ChannelDuplexHandler) {// 雙向處理器:調用其 bind 方法((ChannelDuplexHandler)handler).bind(this, localAddress, promise);} else if (handler instanceof ChannelOutboundHandlerAdapter) {// 出站處理器適配器:調用其 bind 方法(默認實現會傳遞給下一個處理器)((ChannelOutboundHandlerAdapter)handler).bind(this, localAddress, promise);} else {// 其他類型的出站處理器:強制轉換并調用 bind 方法((ChannelOutboundHandler)handler).bind(this, localAddress, promise);}} catch (Throwable t) {// 處理異常:通知出站處理器鏈發生異常notifyOutboundHandlerException(t, promise);}} else {// 處理器已移除,將事件傳遞給下一個處理器this.bind(localAddress, promise);}
}
根據handler的類型調用不同的bind方法
以headContext為例:
headContext這個bind方法會調用AbstractChannel的bind方法
/*** 執行 Channel 到指定本地地址的底層綁定操作。* 此方法由 Channel 的 unsafe 接口實現,必須在 EventLoop 線程中調用。* * @param localAddress 要綁定的本地地址(如 InetSocketAddress)* @param promise 用于異步通知綁定結果的 Promise*/
public final void bind(SocketAddress localAddress, ChannelPromise promise) {// 斷言當前線程是 Channel 關聯的 EventLoop 線程(確保線程安全)this.assertEventLoop();// 標記 Promise 為不可取消,并檢查 Channel 是否處于打開狀態if (promise.setUncancellable() && this.ensureOpen(promise)) {// 處理廣播地址警告(非 root 用戶綁定非通配地址可能無法接收廣播包)if (Boolean.TRUE.equals(AbstractChannel.this.config().getOption(ChannelOption.SO_BROADCAST)) && localAddress instanceof InetSocketAddress && !((InetSocketAddress)localAddress).getAddress().isAnyLocalAddress() && !PlatformDependent.isWindows() && !PlatformDependent.maybeSuperUser()) {logger.warn("非 root 用戶綁定非通配地址({})可能無法接收廣播包,但仍按請求繼續綁定", localAddress);}// 記錄綁定前的 Channel 活躍狀態boolean wasActive = AbstractChannel.this.isActive();try {// 執行實際的底層綁定操作(由子類實現,如 Java NIO 的 ServerSocketChannel.bind())AbstractChannel.this.doBind(localAddress);} catch (Throwable t) {// 綁定失敗處理:標記 Promise 為失敗,并在 Channel 已關閉時執行清理this.safeSetFailure(promise, t);this.closeIfClosed();return;}// 若綁定后 Channel 變為活躍狀態(之前不活躍),觸發 ChannelActive 事件if (!wasActive && AbstractChannel.this.isActive()) {// 異步觸發事件,避免在關鍵路徑中執行用戶代碼this.invokeLater(() -> AbstractChannel.this.pipeline.fireChannelActive());}// 標記 Promise 為成功this.safeSetSuccess(promise);}
}protected abstract void doBind(SocketAddress var1) throws Exception;
調用ServerSocketChannel的doBind方法
@SuppressJava6Requirement(reason = "Usage guarded by java version check"
)
protected void doBind(SocketAddress localAddress) throws Exception {if (PlatformDependent.javaVersion() >= 7) {this.javaChannel().bind(localAddress, this.config.getBacklog());} else {this.javaChannel().socket().bind(localAddress, this.config.getBacklog());}}public abstract ServerSocketChannel bind(SocketAddress local, int backlog)throws IOException;
上面的bind方法會調用ServerSocketChannelImpl的具體實現方法bind
/*** 將 ServerSocketChannel 綁定到指定的本地地址,并設置最大連接隊列長度。* 此方法是 Java NIO 底層網絡操作的核心實現,用于創建 TCP 服務器。* * @param local 要綁定的本地地址(如 InetSocketAddress),若為 null 則綁定到通配地址(0.0.0.0)* @param backlog 最大連接隊列長度(等待 accept 的連接數),若小于 1 則使用默認值 50* @return 綁定后的 ServerSocketChannel 自身,支持鏈式調用* @throws IOException 若發生 I/O 錯誤(如端口已被占用)* @throws ClosedChannelException 若 Channel 已關閉* @throws AlreadyBoundException 若 Channel 已綁定*/
public ServerSocketChannel bind(SocketAddress local, int backlog) throws IOException {// 使用內部鎖確保操作的線程安全性(同一時間只能有一個線程執行綁定)synchronized(this.lock) {// 校驗 Channel 狀態:必須處于打開且未綁定狀態if (!this.isOpen()) {throw new ClosedChannelException();} else if (this.isBound()) {throw new AlreadyBoundException();}// 處理地址參數:若為 null 則綁定到通配地址(0.0.0.0)并隨機分配端口InetSocketAddress addr = local == null ? new InetSocketAddress(0) : Net.checkAddress(local);// 安全檢查:驗證當前線程是否有監聽指定端口的權限// (例如:非 root 用戶嘗試監聽 1-1023 之間的特權端口會被拒絕)SecurityManager sm = System.getSecurityManager();if (sm != null) {sm.checkListen(addr.getPort());}// 平臺相關的 TCP 綁定前準備(如設置 TCP 參數、權限檢查等)NetHooks.beforeTcpBind(this.fd, addr.getAddress(), addr.getPort());try {// 1. 執行底層 bind 操作(通過 JNI 調用操作系統的 socket.bind())//    將套接字與指定 IP 地址和端口號關聯Net.bind(this.fd, addr.getAddress(), addr.getPort());// 2. 執行底層 listen 操作(通過 JNI 調用操作系統的 socket.listen())//    將套接字轉換為監聽狀態,開始接受客戶端連接//    backlog 參數指定等待 accept 的最大連接數(TCP 半連接隊列長度)Net.listen(this.fd, backlog < 1 ? 50 : backlog);} catch (IOException e) {// 綁定失敗時嘗試關閉文件描述符,避免資源泄漏try {this.fd.close();} catch (IOException suppressed) {e.addSuppressed(suppressed);}throw e;}// 更新本地地址信息(綁定成功后才能獲取實際綁定的地址和端口)// 例如:若綁定到 0.0.0.0:0,這里會獲取系統分配的實際端口號synchronized(this.stateLock) {this.localAddress = Net.localAddress(this.fd);}return this;}
}
如有錯誤,歡迎指正!
部分圖源來自網絡,侵刪!
——4.9多協議標簽交換MPLS)


5.14)


)


