安裝cmake
打開cmake官網 https://cmake.org/download/,下載安裝包:
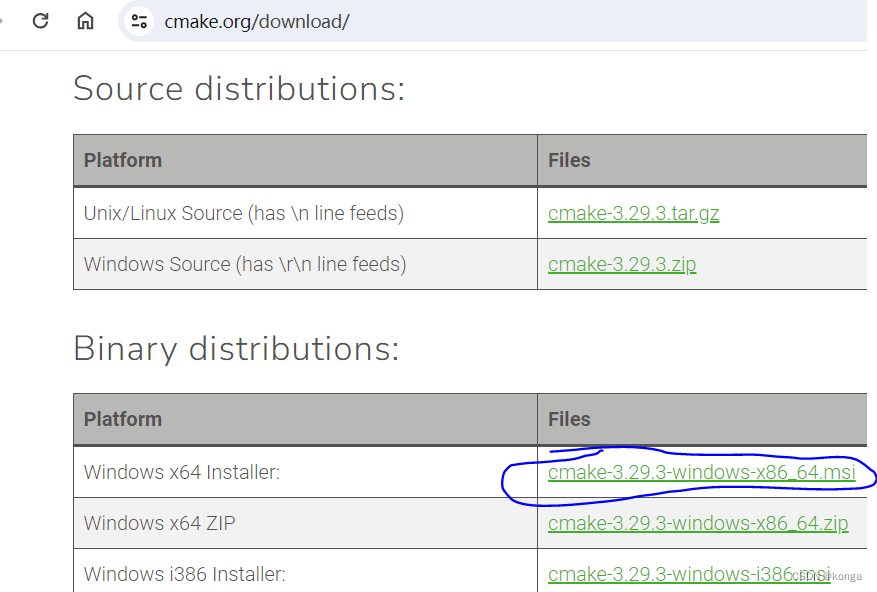
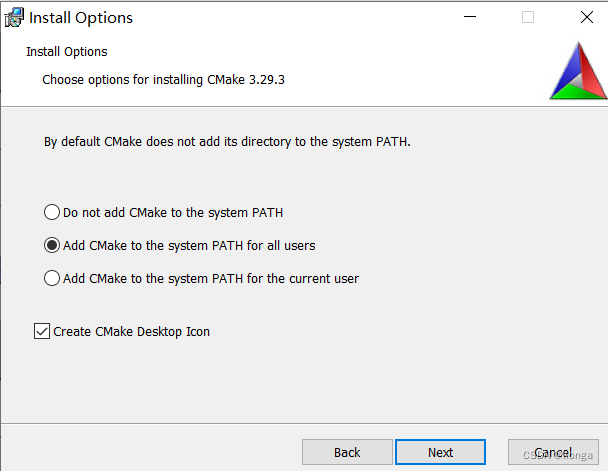
安裝時選擇將cmake加到系統環境變量里。安裝完成后在新的CMD命令窗口執行cmake --version可看到輸出:
D:\>cmake --version
cmake version 3.29.3
CMake suite maintained and supported by Kitware (kitware.com/cmake).
安裝Mingw64 GCC
Mingw目標是為支持Windows平臺上的GCC編譯,它主要提供頭文件和支持庫,Mingw自身不包括GCC和binutils,所以官網提供了集成這些組件的各種安裝包。列表里有Linux平臺的安裝包,那些是用來在Linux平臺生成Widows程序的。
https://www.mingw-w64.org/
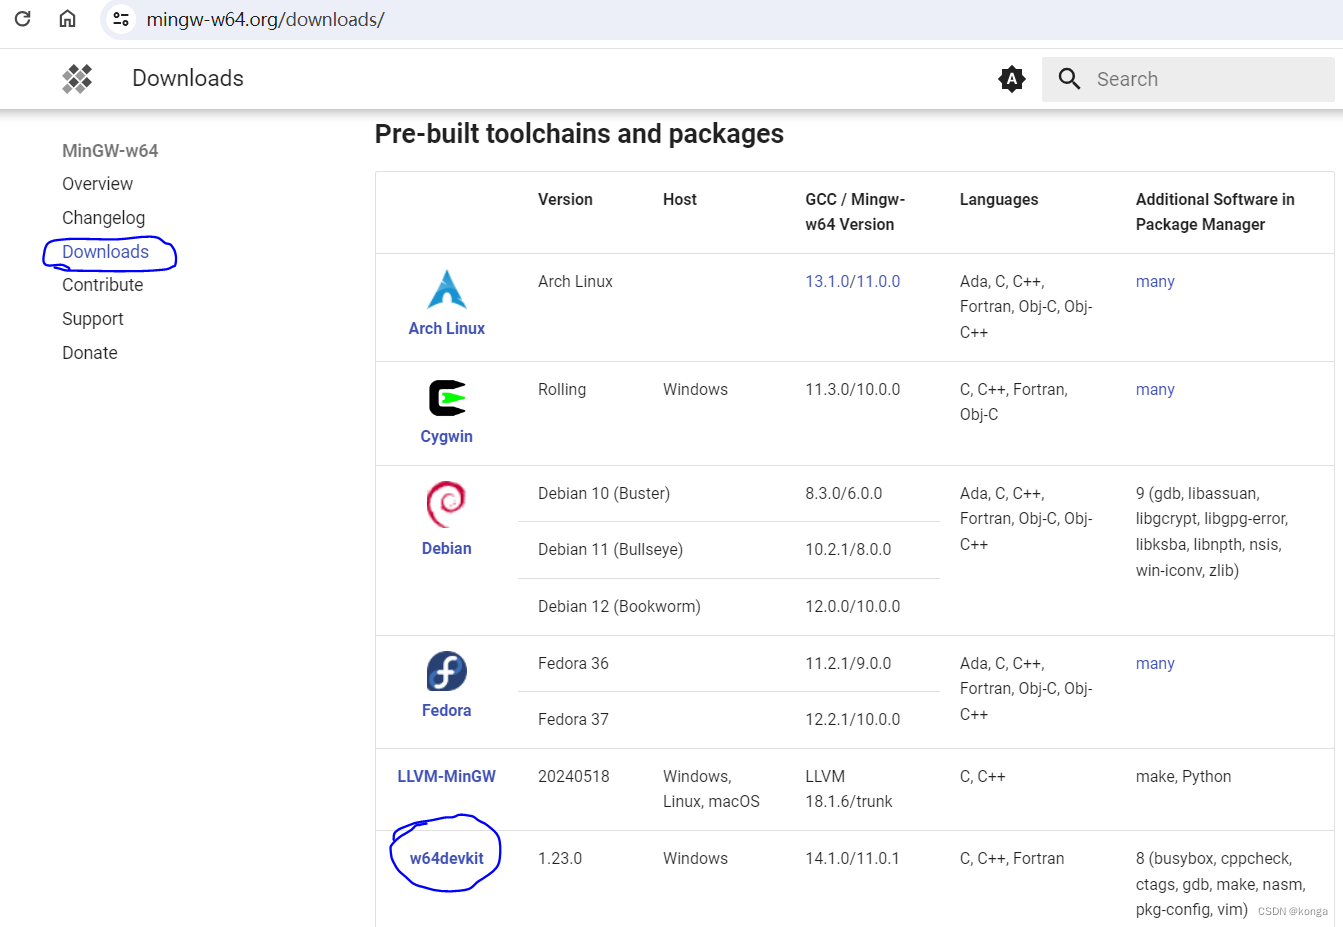
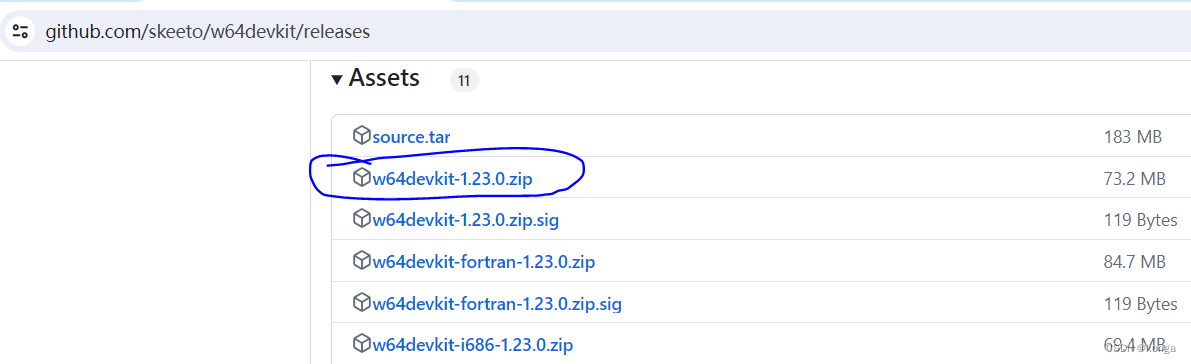
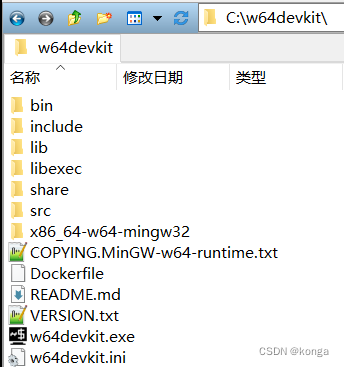
這里我選擇了w64devkit,點擊后安裝鏈接指向了github:https://github.com/skeeto/w64devkit/releases ,下載w64devkit-1.23.0.zip。
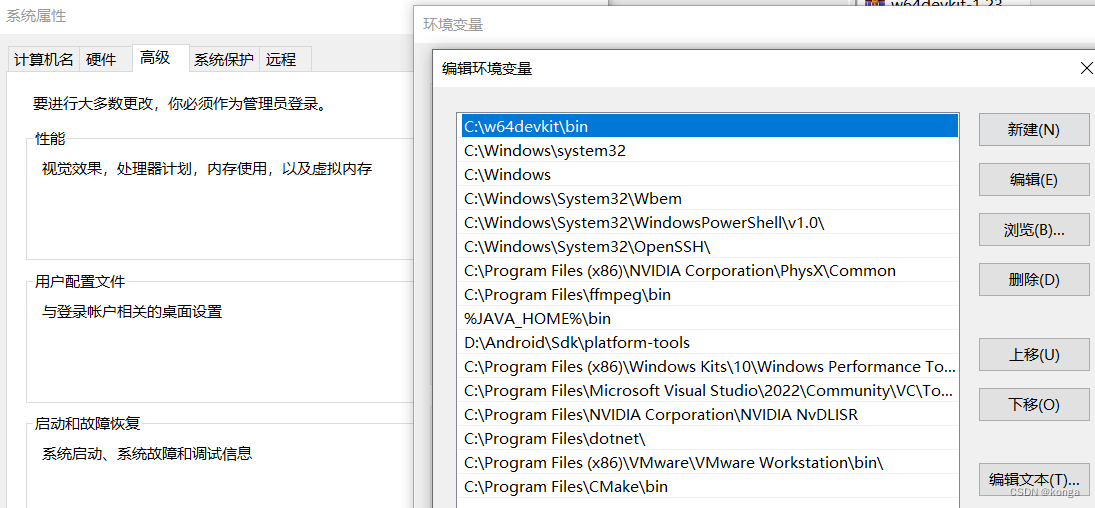
解壓后放在C盤,將目錄 C:\w64devkit\bin\ 加入系統PATH環境變量。
然后新打開的CMD命令窗口輸入gcc –v 可以看到輸出:
D:\>gcc -v
Using built-in specs.
COLLECT_GCC=gcc
COLLECT_LTO_WRAPPER=C:/w64devkit/bin/../libexec/gcc/x86_64-w64-mingw32/14.1.0/lto-wrapper.exe
Target: x86_64-w64-mingw32
Configured with: /gcc-14.1.0/configure --prefix=/w64devkit --with-sysroot=/w64devkit/x86_64-w64-mingw32 --with-native-system-header-dir=/include --target=x86_64-w64-mingw32 --host=x86_64-w64-mingw32 --enable-static --disable-shared --with-pic --with-gmp-include=/deps/include --with-gmp-lib=/deps/lib --with-mpc-include=/deps/include --with-mpc-lib=/deps/lib --with-mpfr-include=/deps/include --with-mpfr-lib=/deps/lib --enable-languages=c,c++ --enable-libgomp --enable-threads=posix --enable-version-specific-runtime-libs --disable-dependency-tracking --disable-lto --disable-multilib --disable-nls --disable-win32-registry --enable-mingw-wildcard CFLAGS_FOR_TARGET=-Os CXXFLAGS_FOR_TARGET=-Os LDFLAGS_FOR_TARGET=-s CFLAGS=-Os CXXFLAGS=-Os LDFLAGS=-s
Thread model: posix
Supported LTO compression algorithms: zlib
gcc version 14.1.0 (GCC)
下載libusb
Libuvc依賴libusb,libusb是一個低級的通用訪問USB設備的用戶空間庫。我們直接下載官網已經編譯好的二進制庫。
https://libusb.info/
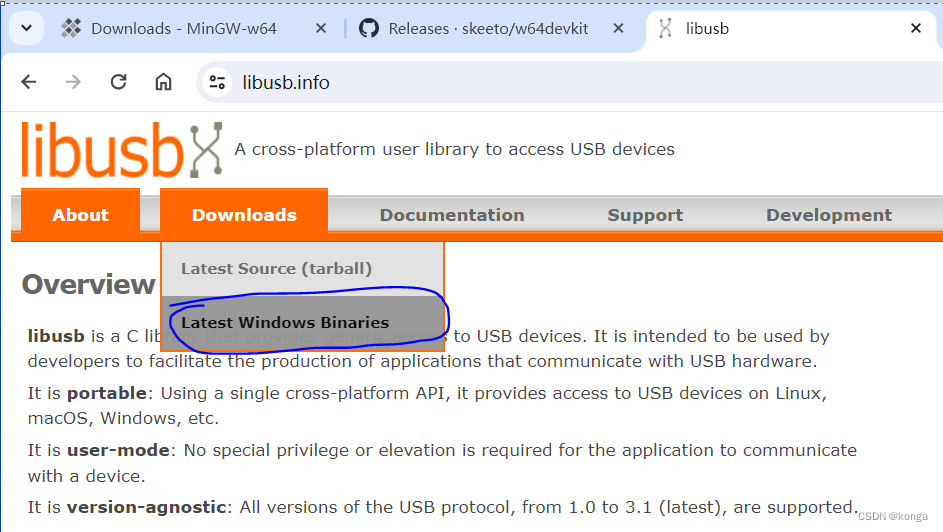
點擊圖中Latest Windows Binaries下載 https://github.com/libusb/libusb/releases/download/v1.0.27/libusb-1.0.27.7z 解壓后將 include\libusb.h, MinGW64下面的 .a 及 .dll 庫提取到一個目錄,如D:\libusb:

下載編譯libuvc
https://github.com/libuvc/libuvc
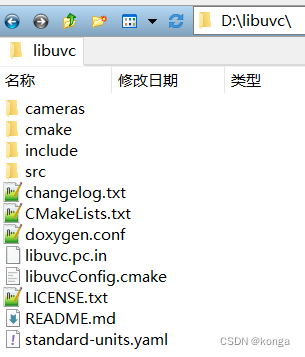
從官網以git clone下載源碼,源碼所放位置為D:\libuvc
由于cmake最小版本過低會產生如下告警:
CMake Deprecation Warning at CMakeLists.txt:1 (cmake_minimum_required):Compatibility with CMake < 3.5 will be removed from a future version ofCMake.Update the VERSION argument <min> value or use a ...<max> suffix to tellCMake that the project does not need compatibility with older versions.所以我們把libuvc/CmakeList.txt開頭的cmake最低版本改為3.10

如果直接執行cmake .. 會提示找不到libusb,打開D:\libuvc\CmakeLists.txt,刪除find_package(LibUSB)一行,替換為下面內容(目錄分隔符這里用的是 /, 如果用 \ 分隔,轉義的原因還要改為 \\):
# Locate the libusb-1.0 package manually if not found
#find_path(LIBUSB_INCLUDE_DIR NAMES libusb.h PATH_SUFFIXES libusb-1.0)
#find_library(LIBUSB_LIBRARY NAMES usb-1.0 libusb-1.0)
set(LIBUSB_INCLUDE_DIR D:/libusb)
set(LIBUSB_LIBRARY?? D:/libusb/libusb-1.0.dll? D:/libusb/libusb-1.0.dll.a)
#set(LIBUSB_LIBRARY? D:/libusb/libusb-1.0.a)?? # for static linkif(LIBUSB_INCLUDE_DIR AND LIBUSB_LIBRARY)set(LIBUSB_FOUND TRUE)
else()set(LIBUSB_FOUND FALSE)message(WARNING "LibUSB not found. Please install it.")
endif()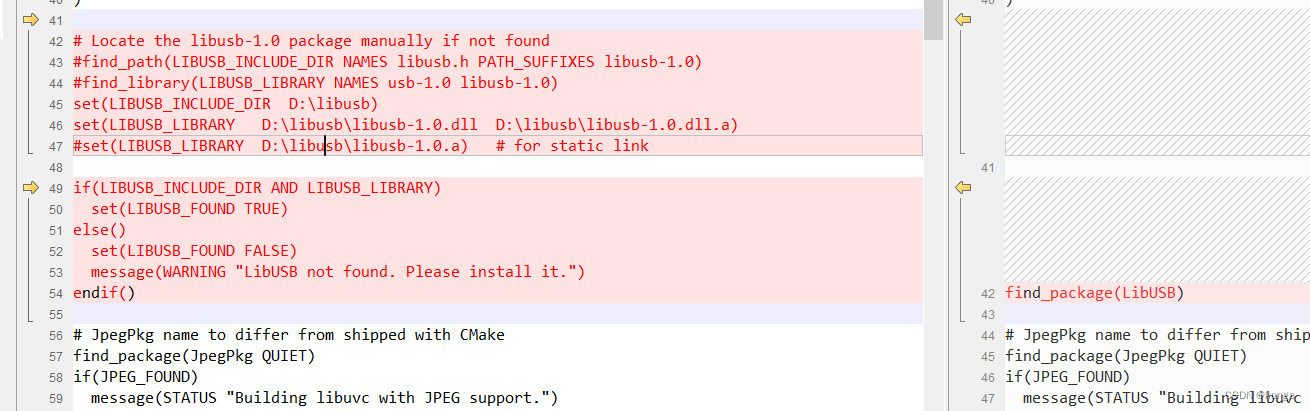
靜態鏈接用lbusb-1.0.a就注釋掉46行,打開47行, 這樣會更方便一點,不會產生找不到dll的問題。
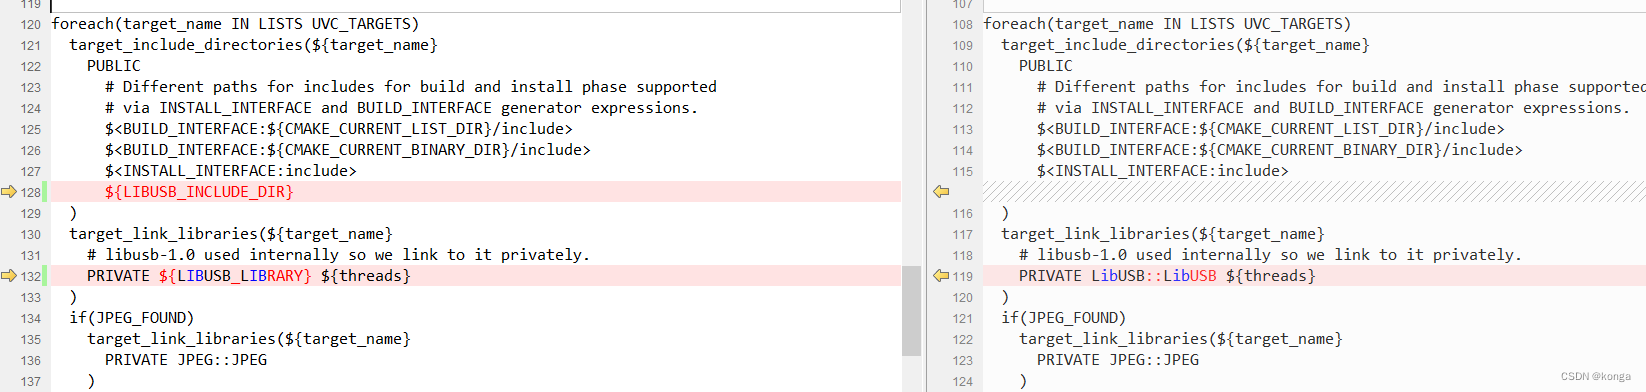
然后在130行左右添加libusb.h頭文件目錄和鏈接庫,
打開CMD窗口,執行下面命令:
cd D:\libuvc
mkdir build install
cd build
rm –fr *;? #如果cmake有錯,重新執行時建議把目錄清空。
cmake -G "MinGW Makefiles" -DCMAKE_INSTALL_PREFIX=D:\libuvc\install -DBUILD_SHARED_LIBS=ON ?..
第一次執行cmake報錯, 系統會報病毒攔截,再執行一次上面的cmake ?命令即可。 不確定是誤報還是真有病毒。
CMake Error at C:/Program Files/CMake/share/cmake-3.29/Modules/CMakeDetermineCompilerId.cmake:922 (file):file STRINGS file "D:/libuvc/build/CMakeFiles/3.29.3/CompilerIdC/a.exe"cannot be read.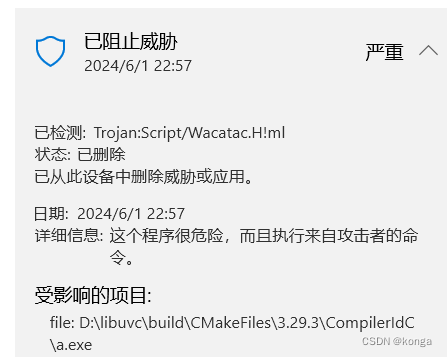
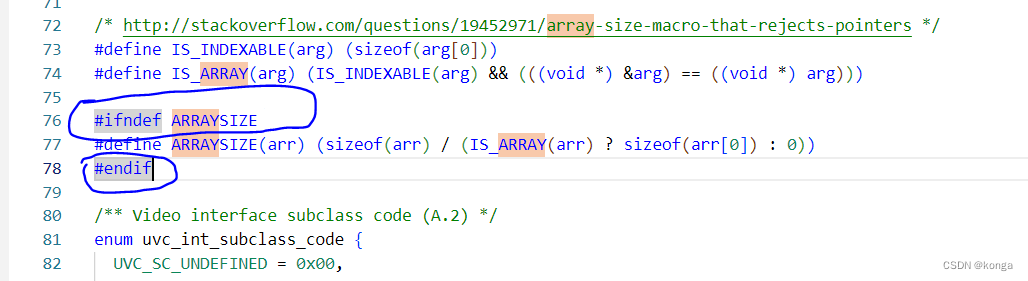
執行cmake成功后生成Makefie,接下來執行make命令進行編譯。編譯過程中會提示ARRAYSIZE重復定義的警告:
D:/libuvc/include/libuvc/libuvc_internal.h:75:9: warning: "ARRAYSIZE" redefined75 | #define ARRAYSIZE(arr) (sizeof(arr) / (IS_ARRAY(arr) ? sizeof(arr[0]) : 0))|???????? ^~~~~~~~~
In file included from C:/w64devkit/x86_64-w64-mingw32/include/minwindef.h:163,from C:/w64devkit/x86_64-w64-mingw32/include/windef.h:9,from C:/w64devkit/x86_64-w64-mingw32/include/windows.h:69,from D:/libusb/libusb.h:64,from D:/libuvc/include/libuvc/libuvc_internal.h:14:
C:/w64devkit/x86_64-w64-mingw32/include/winnt.h:681:
note: this is the location of the previous definition681 | #define ARRAYSIZE(A) RTL_NUMBER_OF_V2(A)
如果不想看到太多輸出警告信息,可以編輯D:\libuvc\include\libuvc\libuvc_internal.h, 在ARRAYSIZE外面加上#ifndef ARRAYSIZE 進行防御。
編譯成功:
D:\libuvc\build>make
[? 5%] Building C object CMakeFiles/uvc.dir/src/ctrl.c.obj
[ 10%] Building C object CMakeFiles/uvc.dir/src/ctrl-gen.c.obj
[ 15%] Building C object CMakeFiles/uvc.dir/src/device.c.obj
[ 20%] Building C object CMakeFiles/uvc.dir/src/diag.c.obj
[ 25%] Building C object CMakeFiles/uvc.dir/src/frame.c.obj
[ 30%] Building C object CMakeFiles/uvc.dir/src/init.c.obj
[ 35%] Building C object CMakeFiles/uvc.dir/src/stream.c.obj
[ 40%] Building C object CMakeFiles/uvc.dir/src/misc.c.obj
[ 45%] Linking C shared library libuvc.dll
[ 45%] Built target uvc
[ 50%] Building C object CMakeFiles/uvc_static.dir/src/ctrl.c.obj
[ 55%] Building C object CMakeFiles/uvc_static.dir/src/ctrl-gen.c.obj
[ 60%] Building C object CMakeFiles/uvc_static.dir/src/device.c.obj
[ 65%] Building C object CMakeFiles/uvc_static.dir/src/diag.c.obj
[ 70%] Building C object CMakeFiles/uvc_static.dir/src/frame.c.obj
[ 75%] Building C object CMakeFiles/uvc_static.dir/src/init.c.obj
[ 80%] Building C object CMakeFiles/uvc_static.dir/src/stream.c.obj
[ 85%] Building C object CMakeFiles/uvc_static.dir/src/misc.c.obj
[ 90%] Linking C static library libuvc.a
[ 90%] Built target uvc_static
[ 95%] Building C object CMakeFiles/example.dir/src/example.c.obj
[100%] Linking C executable example.exe
[100%] Built target example
然后安裝到install目錄,
D:\libuvc\build>make install
[ 45%] Built target uvc
[ 90%] Built target uvc_static
[100%] Built target example
Install the project...
-- Install configuration: "Release"
-- Installing: D:/libuvc/install/lib/libuvc.dll.a
-- Installing: D:/libuvc/install/bin/libuvc.dll
-- Installing: D:/libuvc/install/include/libuvc/libuvc.h
-- Installing: D:/libuvc/install/include/libuvc/libuvc_config.h
-- Installing: D:/libuvc/install/lib/libuvc.a
-- Up-to-date: D:/libuvc/install/include/libuvc/libuvc.h
-- Up-to-date: D:/libuvc/install/include/libuvc/libuvc_config.h
-- Installing: D:/libuvc/install/lib/cmake/libuvc/libuvcTargets.cmake
-- Installing: D:/libuvc/install/lib/cmake/libuvc/libuvcTargets-release.cmake
-- Installing: D:/libuvc/install/lib/cmake/libuvc/FindLibUSB.cmake
-- Installing: D:/libuvc/install/lib/cmake/libuvc/FindJpegPkg.cmake
-- Installing: D:/libuvc/install/lib/cmake/libuvc/libuvcConfigVersion.cmake
-- Installing: D:/libuvc/install/lib/pkgconfig/libuvc.pc
-- Installing: D:/libuvc/install/lib/cmake/libuvc/libuvcConfig.cmake
測試
以example.exe來進行測試。
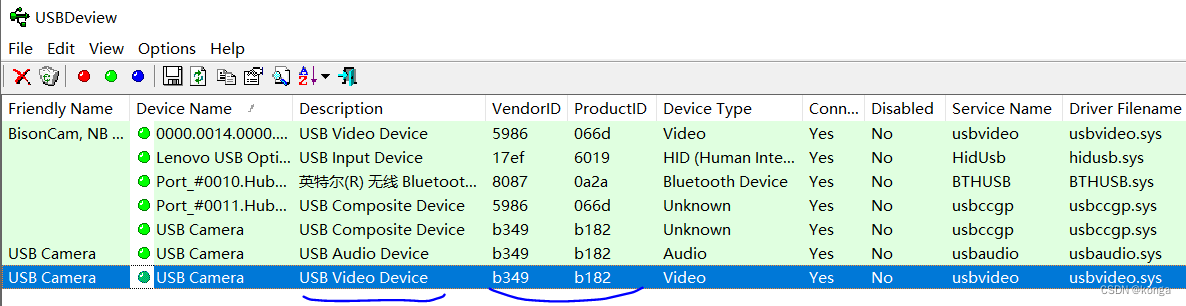
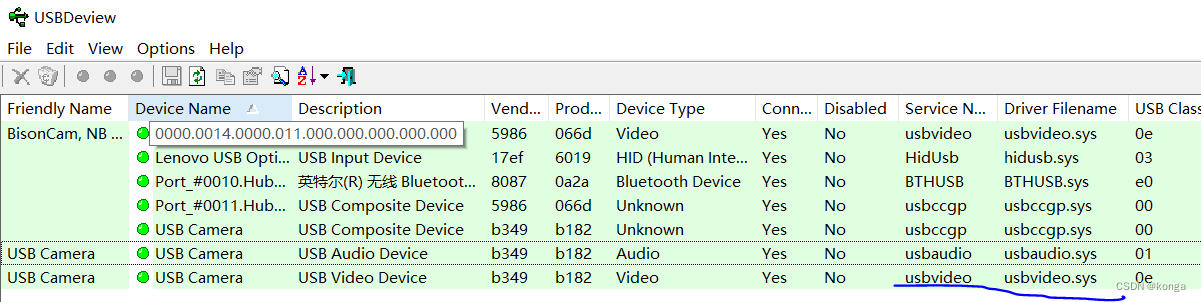
首先利用USBDeview (https://usbdeview.me)工具找到電腦上外置UVC攝像頭的VID和PID。
然后打開D:\libuvc\src\example.c, 修改其中的VID和PID:

重新在build目錄執行make,然后執行example.exe, 會提示找不到libusb-1.0.dll,可以將D:\libusb-1.0.dll復制一份放在example.exe同一個目錄。 或者一勞永逸的復制到C:\Windows\System32下。 如果給別人發編譯好的程序,需要帶上libusb-1.0.dll。若前面Cmake配置靜態鏈接libusb則沒有此麻煩。
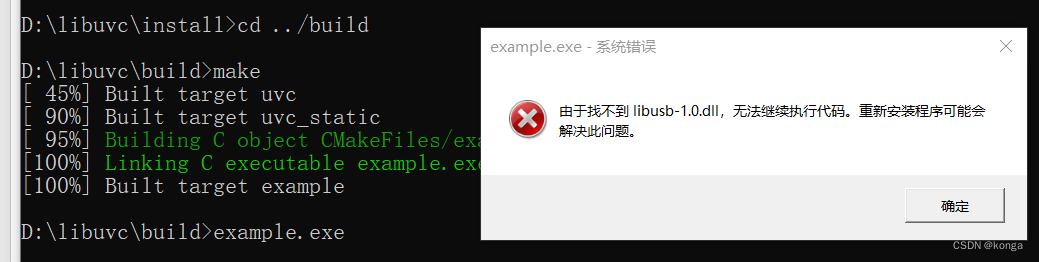
解決完dll問題后,example跑起來會報錯,找不到設備:
D:\libuvc\build>example.exe
UVC initialized
Device found
uvc_open: Not found (-5)
UVC exited
先用USBDeview查看驅動,此UVC設備使用了usbvideo驅動,需要安裝WinUSB驅動。
https://learn.microsoft.com/zh-cn/windows-hardware/drivers/usbcon/winusb-installation 面向開發人員的 WinUSB (Winusb.sys) 安裝 文檔中描述到:
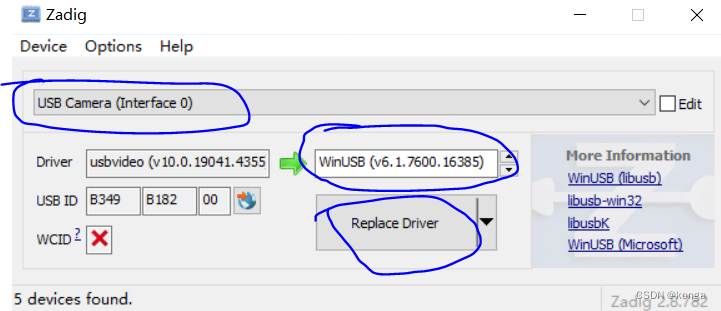
對于某些通用串行總線 (USB) 設備(例如僅由單個應用程序訪問的設備),可以在設備的內核模式堆棧中安裝 WinUSB (Winusb.sys) 作為 USB 設備的功能驅動程序,而不是實現驅動程序。libusb正是此種場景。可以認為WinUSB.sys驅動是一種低層次的驅動,libusb要跟低層的驅動打交道,usbvideo.sys驅動是高層次的驅動。可以31按鏈接中微軟官方的指導安裝WinUSB驅動,也可以用Zadig來安裝此驅動。
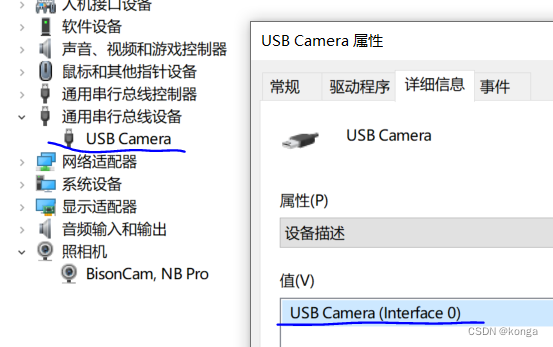
從 https://zadig.akeo.ie下載Zadig。由于在此電腦上,USB Camera(Interface 0)是Video類型,USB Camera(Interface 2)是Audio類型, 所以在從Options菜單中選擇List All Devices后選擇USB Camera(Interface 0),換用WinUSB驅動。
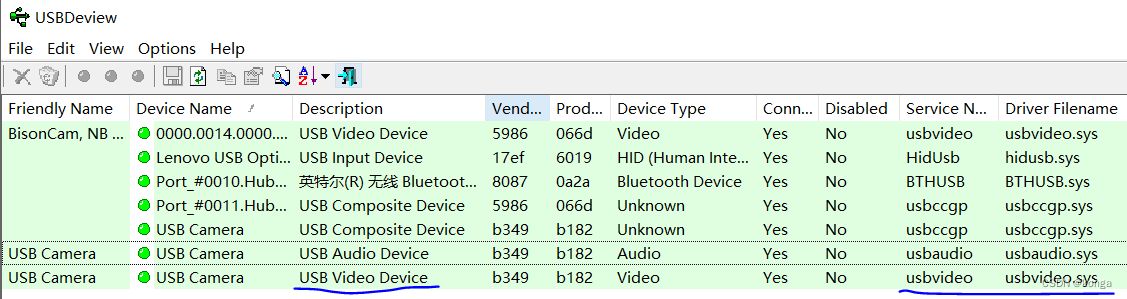
安裝WinUSB驅動后用USBDeview查看:

example跑成功的日志:
D:\libuvc\build>example.exeUVC initialized
Device found
Device openedDEVICE CONFIGURATION (b349:b182/[none]) ---
Status: idle
VideoControl:bcdUVC: 0x0100VideoStreaming(1):bEndpointAddress: 129Formats:UncompressedFormat(1)bits per pixel: 16GUID: 5955593200001000800000aa00389b71 (YUY2)default frame: 1aspect ratio: 0x0interlace flags: 00copy protect: 00FrameDescriptor(1)capabilities: 01size: 1600x1200bit rate: 153600000-153600000max frame size: 3840000default interval: 1/5interval[0]: 1/5FrameDescriptor(2)capabilities: 01size: 1280x720bit rate: 110592000-110592000max frame size: 1843200default interval: 1/7interval[0]: 1/7FrameDescriptor(3)capabilities: 01size: 640x480bit rate: 147456000-147456000max frame size: 614400default interval: 1/30interval[0]: 1/30MJPEGFormat(2)bits per pixel: 0GUID: 4d4a5047000000000000000000000000 (MJPG)default frame: 1aspect ratio: 0x0interlace flags: 00copy protect: 00FrameDescriptor(1)capabilities: 01size: 1600x1200bit rate: 921600000-921600000max frame size: 3840000default interval: 1/30interval[0]: 1/30FrameDescriptor(2)capabilities: 01size: 1280x720bit rate: 442368000-442368000max frame size: 1843200default interval: 1/30interval[0]: 1/30FrameDescriptor(3)capabilities: 01size: 640x480bit rate: 147456000-147456000max frame size: 614400default interval: 1/30interval[0]: 1/30
END DEVICE CONFIGURATION
First format: (YUY2) 1600x1200 5fps
bmHint: 0001
bFormatIndex: 1
bFrameIndex: 1
dwFrameInterval: 2000000
wKeyFrameRate: 0
wPFrameRate: 0
wCompQuality: 61
wCompWindowSize: 0
wDelay: 0
dwMaxVideoFrameSize: 3840000
dwMaxPayloadTransferSize: 3060
bInterfaceNumber: 1
Streaming...
Enabling auto exposure ...... full AE not supported, trying aperture priority mode... enabled aperture priority auto exposure mode
callback! frame_format = 3, width = 1600, height = 1200, length = 3840000, ptr = 0000000000003039
callback! frame_format = 3, width = 1600, height = 1200, length = 3840000, ptr = 0000000000003039
callback! frame_format = 3, width = 1600, height = 1200, length = 3840000, ptr = 0000000000003039
callback! frame_format = 3, width = 1600, height = 1200, length = 3840000, ptr = 0000000000003039
callback! frame_format = 3, width = 1600, height = 1200, length = 3840000, ptr = 0000000000003039
callback! frame_format = 3, width = 1600, height = 1200, length = 3840000, ptr = 0000000000003039
callback! frame_format = 3, width = 1600, height = 1200, length = 3840000, ptr = 0000000000003039
callback! frame_format = 3, width = 1600, height = 1200, length = 3840000, ptr = 0000000000003039
callback! frame_format = 3, width = 1600, height = 1200, length = 3840000, ptr = 0000000000003039
callback! frame_format = 3, width = 1600, height = 1200, length = 3840000, ptr = 0000000000003039
callback! frame_format = 3, width = 1600, height = 1200, length = 3840000, ptr = 0000000000003039
callback! frame_format = 3, width = 1600, height = 1200, length = 3840000, ptr = 0000000000003039
callback! frame_format = 3, width = 1600, height = 1200, length = 3840000, ptr = 0000000000003039
callback! frame_format = 3, width = 1600, height = 1200, length = 3840000, ptr = 0000000000003039
callback! frame_format = 3, width = 1600, height = 1200, length = 3840000, ptr = 0000000000003039
callback! frame_format = 3, width = 1600, height = 1200, length = 3840000, ptr = 0000000000003039
Done streaming.
Device closed
UVC exited
恢復驅動
安裝過WinUSB驅動的UVC設備,不會出現在設備管理器的照像機下面。 如果要恢復正常的UVC Camera功能,可以在設備管理器中卸載此設備的驅動。
??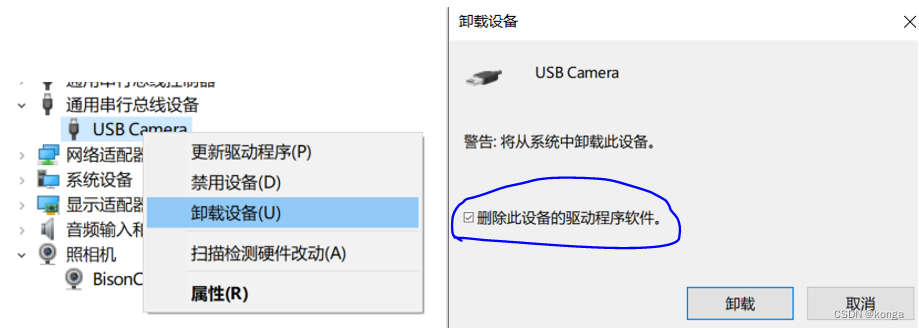
卸載驅動后在設備管理器中右擊鼠標,掃描檢測硬件改動,USB Camera可以自動識別出來。驅動也恢復為原來的usbvideo.sys。
 ?
?


![[激光原理與應用-94]:電控 - 低噪聲運放的原理](http://pic.xiahunao.cn/[激光原理與應用-94]:電控 - 低噪聲運放的原理)


