參考資料:https://blog.csdn.net/geyichongchujianghu/article/details/130045373
這個連接是Java的代碼,我根據它的鏈接寫了一個kotlin版本的。
AIDL(Android Interface Definition Language)是Android平臺上用于進程間通信(IPC)的一種接口定義語言。它允許不同進程中的組件(如服務和服務、服務和活動等)相互通信。
AIDL的主要特點包括:
- 跨進程通信:AIDL允許不同進程中的組件相互通信,這使得應用可以更好地利用設備的多核處理器,提高性能和響應速度。
- 接口定義:通過AIDL,開發者可以定義一個接口,并在這個接口中聲明需要跨進程傳遞的方法和數據類型。
- 自動生成代碼:Android SDK提供了一個編譯器,它可以根據AIDL接口定義自動生成Java代碼,這些代碼負責處理跨進程通信的細節。
- 支持多種數據類型:AIDL支持基本數據類型、字符串、列表、映射等多種數據類型,以及自定義的Parcelable對象。
- 安全性:AIDL通信是通過Binder機制實現的,Binder機制提供了進程間通信的安全性,確保只有授權的進程可以訪問服務。
使用AIDL的步驟通常包括:
- 定義AIDL接口(.aidl文件)。
- 實現AIDL接口的服務端。
- 在客戶端使用AIDL接口與服務端通信。
AIDL是Android平臺上實現跨進程通信的重要工具,它為開發者提供了一種方便、高效的方式來實現不同進程間的數據交換和方法調用。
下面介紹了AIDL的使用例子,創建了兩個App,一個是服務端的mainapp,一個是客戶端的otherapp,它們會被創建在一個工程里,這樣也會方便調試。
一、創建兩個App
新建一個mainapp,我新建了一個aidlTest,創建了一個mainapp,這個aidlTest文件夾并沒有什么用。
把MainActivity重命名成MainAppActivity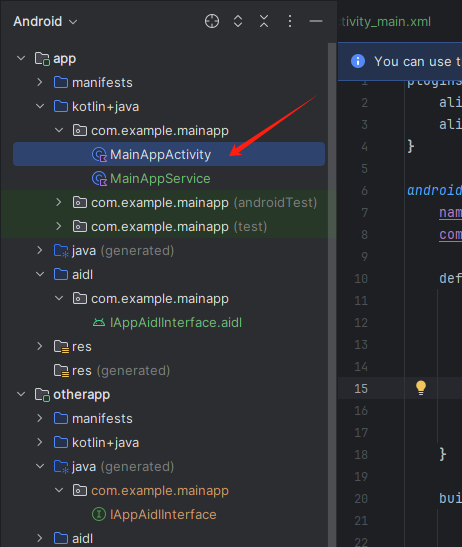
再添加一個otherapp的module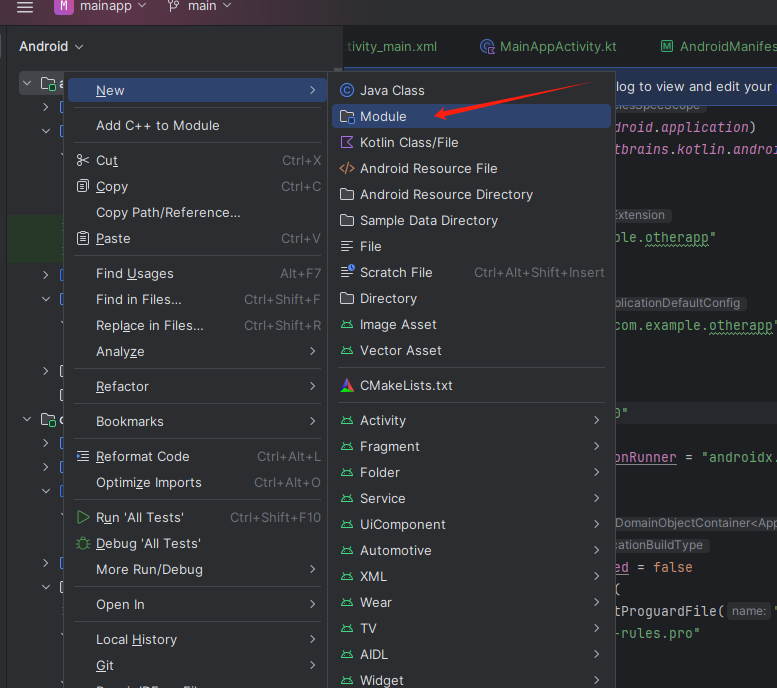
模塊名字為otherapp
二、在mainapp里創建一個service
先在mainapp中實現一個service,MainAppActivity類中創建了service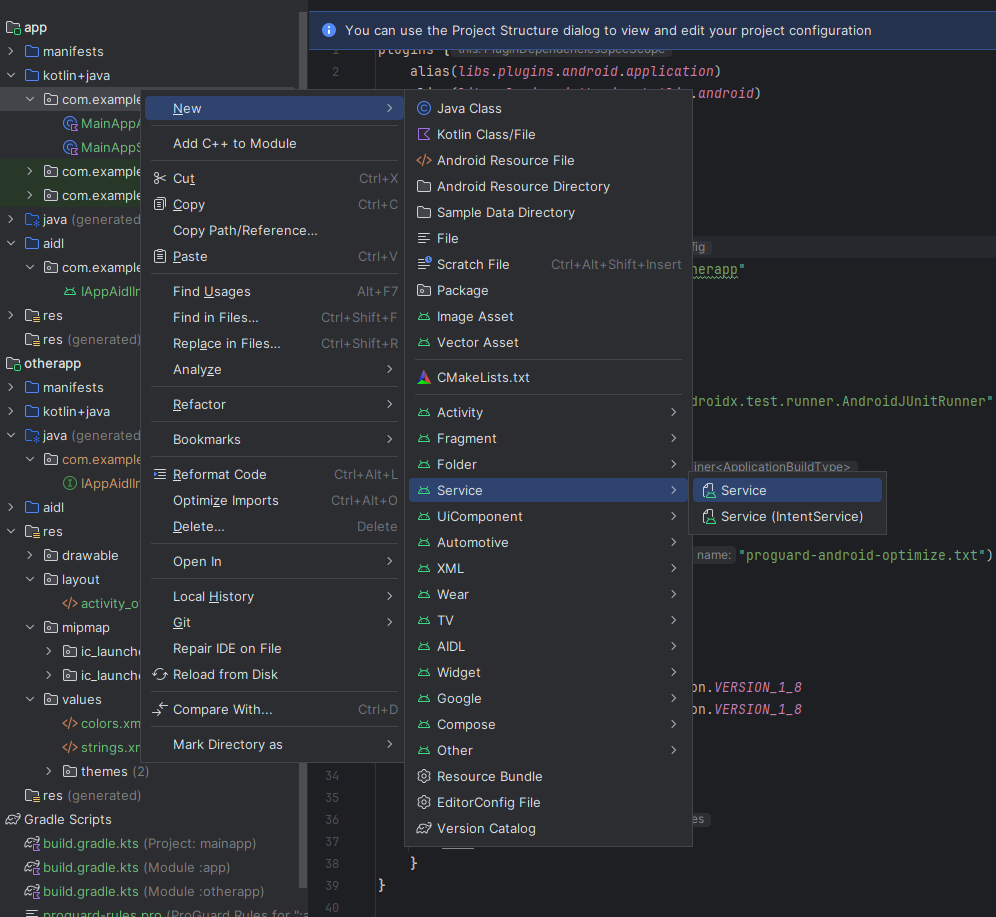
service名字為MainAppService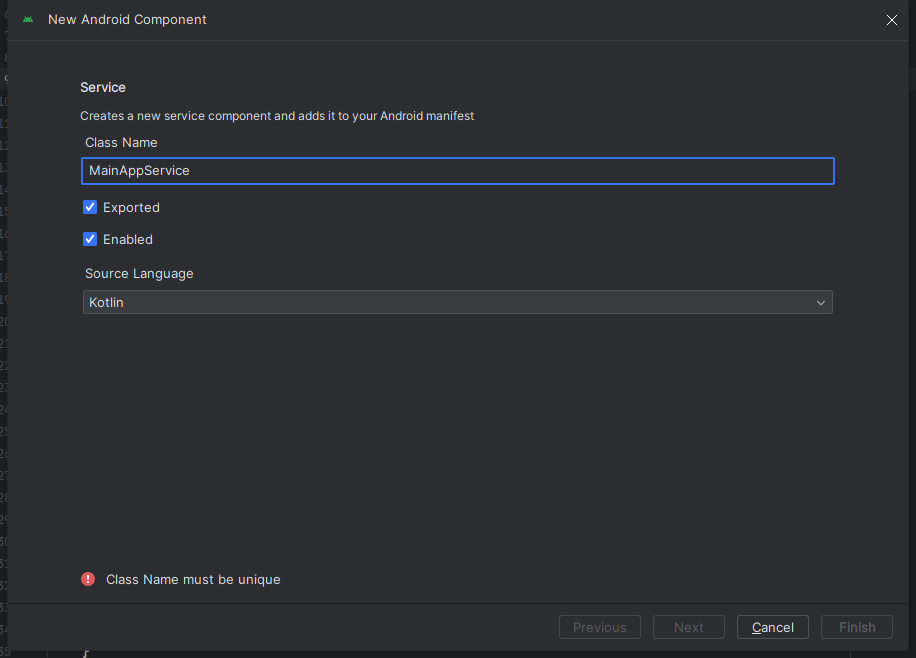
修改MainAppAcitvity里的代碼
class MainAppActivity : AppCompatActivity() {private val TAG = "AIDL-MainAppActivity"override fun onCreate(savedInstanceState: Bundle?) {super.onCreate(savedInstanceState)enableEdgeToEdge()setContentView(R.layout.activity_main)ViewCompat.setOnApplyWindowInsetsListener(findViewById(R.id.main)) { v, insets ->val systemBars = insets.getInsets(WindowInsetsCompat.Type.systemBars())v.setPadding(systemBars.left, systemBars.top, systemBars.right, systemBars.bottom)insets}Log.v(TAG, "onCreate()")}override fun onDestroy() {super.onDestroy()Log.v(TAG, "onDestroy()")}
}
MainAppService里的改動,我們又重寫了onCreate()、onStartCommand()和onDestroy()這3個方
法,它們是每個Service中最常用到的3個方法了。其中:
- onCreate()方法會在Service創建的時候調用
- onStartCommand()方法會在每次Service啟動的時候調用,
- onDestroy()方法會在Service銷毀的時候調用。
- onBind是被客戶端綁定時執行
- onUnbind(Intent intent):被客戶端解綁時執行
class MainAppService : Service() {private val TAG = "AIDL-MainAppService"override fun onCreate() {super.onCreate()}override fun onStartCommand(intent: Intent?, flags: Int, startId: Int): Int {return super.onStartCommand(intent, flags, startId)}override fun onBind(intent: Intent): IBinder {TODO("Return the communication channel to the service.")}override fun onUnbind(intent: Intent?): Boolean {Log.v(TAG, "onUnbind()")return super.onUnbind(intent)}override fun onDestroy() {super.onDestroy()Log.v(TAG, "onDestroy()")}
}
三、mainapp里實現AIDL
在創建aidl前,需要在mainapp的gradle里,配置打開aidl
buildFeatures {aidl = true
}
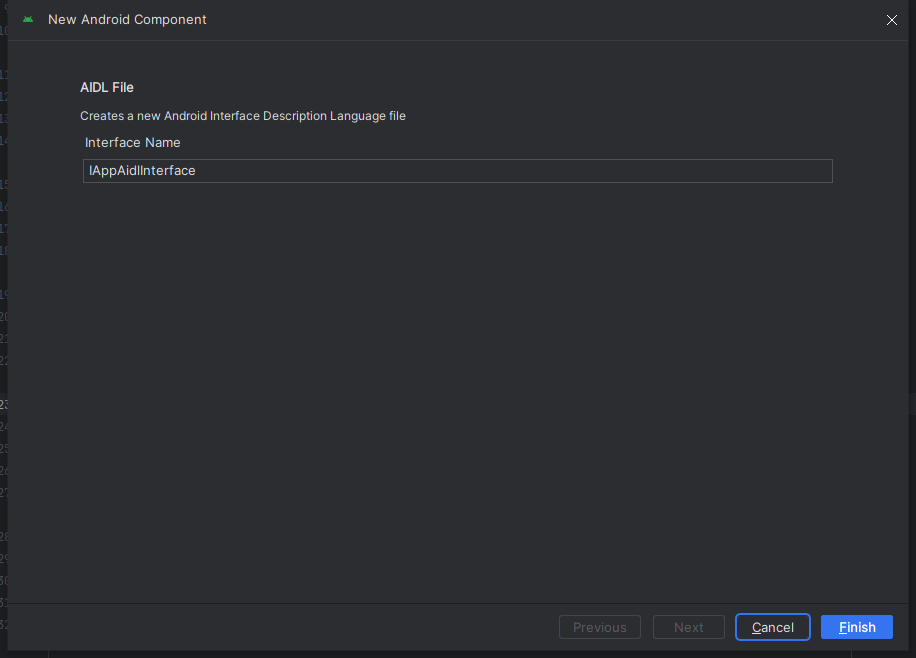
在mainapp的main目錄下創建一個名為IAppAidlInterface.aidl的文件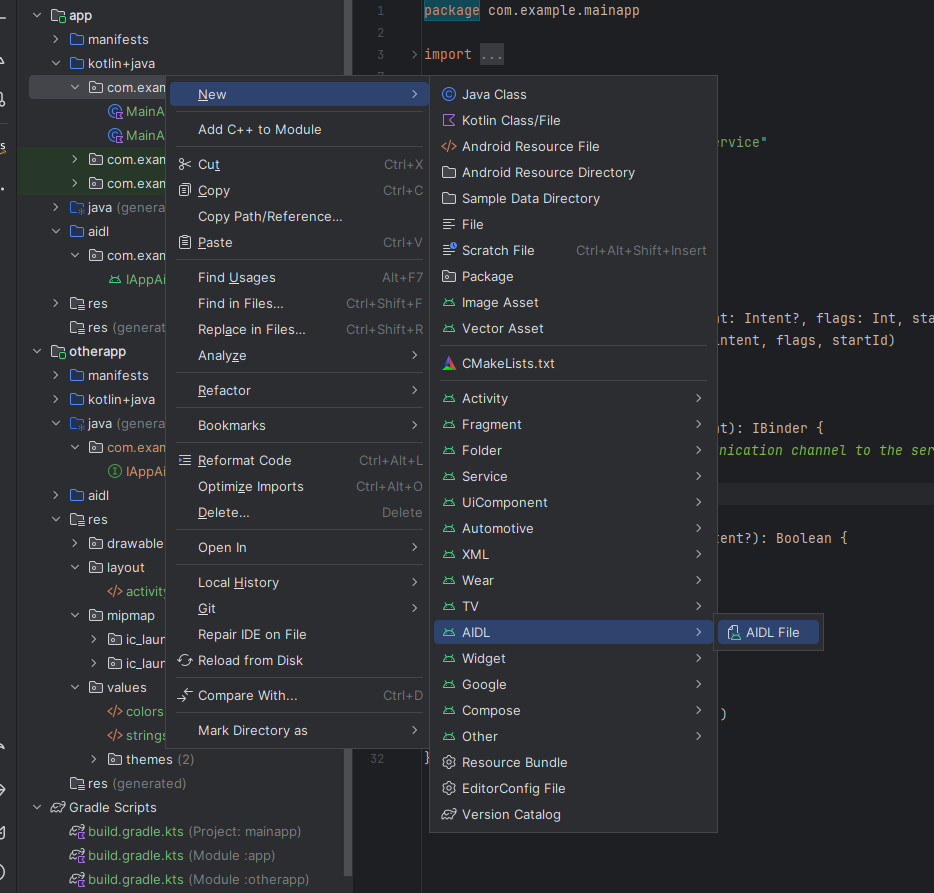
在IAppAidlInterface里添加setStringData這個AIDL接口定義了一個名為IAppAidlInterface的接口,它包含了兩個方法:basicTypes和setStringData。
basicTypes方法展示了在AIDL接口中可以使用的一些基本數據類型作為參數。這些基本數據類型包括整型(int)、長整型(long)、布爾型(boolean)、浮點型(float)、雙精度浮點型(double)和字符串型(String)。這個方法沒有返回值,它的目的是演示如何在AIDL接口中使用這些基本數據類型。setStringData方法接受一個字符串參數(String strData),并將其設置為某個值。這個方法也沒有返回值,它的目的是演示如何在AIDL接口中傳遞字符串數據。
這個AIDL接口定義了兩個沒有返回值的方法,它們可以用于跨進程通信。在實際應用中,你可以根據需要定義更多的方法和參數,以實現不同進程間的數據交換和方法調用。
interface IAppAidlInterface {/*** Demonstrates some basic types that you can use as parameters* and return values in AIDL.*/void basicTypes(int anInt, long aLong, boolean aBoolean, float aFloat,double aDouble, String aString);void setStringData(String strData);
}
在AIDL創建完成后,點擊重新編譯后就有生成的java類了。在Android中,當你定義了一個AIDL(Android Interface Definition Language)接口后,Android的編譯器會自動為你生成一個Java接口類。這個生成的接口類繼承自android.os.IInterface,并包含了你在AIDL文件中定義的方法。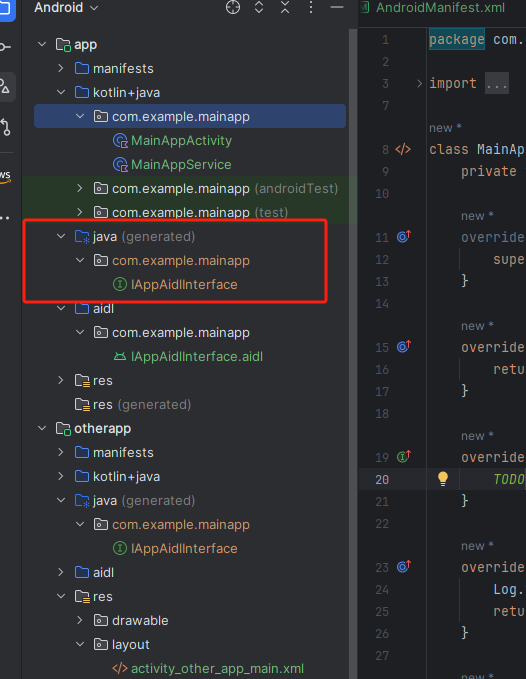
四.otherapp中也實現AIDL
把mainapp里的aidl文件復制到otherapp里,并開啟aidl后,就也能看到生成的aidl java文件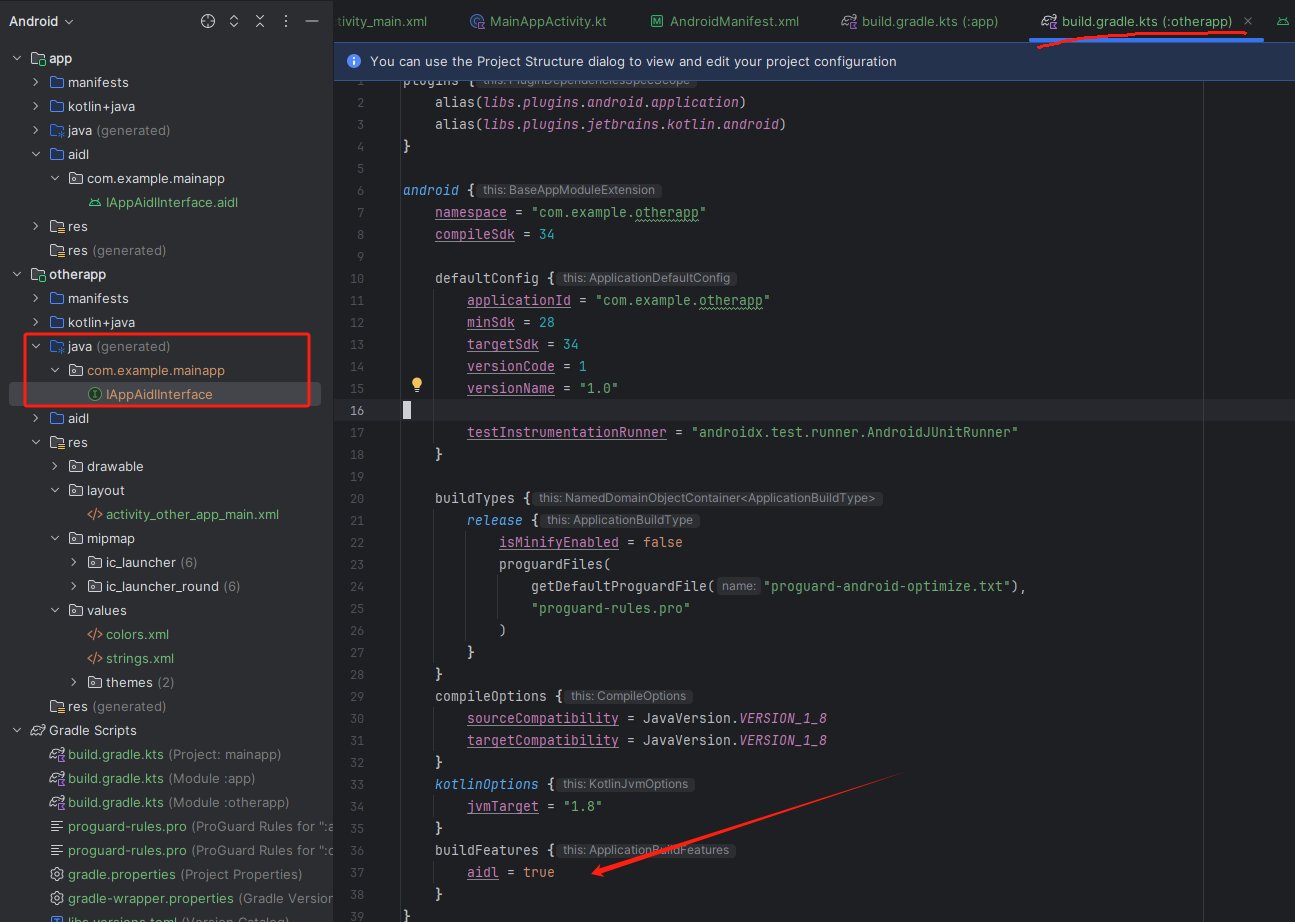
五、在mainapp中添加代碼
現在MainAppService中實例化Binder
package com.example.mainappimport android.app.Service
import android.content.Intent
import android.os.IBinder
import android.util.Logclass MainAppService : Service() {private val TAG = "AIDL-MainAppService"private val mStub = AppAidlInterfaceStub()/* * 實現IAppAidlInterface.Stub抽象類,* 用于實現IAppAidlInterface.aidl中的接口函數* onBinder()時返回匿名內部類實例*/inner class AppAidlInterfaceStub : IAppAidlInterface.Stub() {var mStrData = ""var mSetServiceRunning = trueoverride fun basicTypes(anInt: Int,aLong: Long,aBoolean: Boolean,aFloat: Float,aDouble: Double,aString: String?) {}override fun setStringData(strData: String?) {mStrData = strData.toString()}}override fun onCreate() {Log.v(TAG, "onCreate()")super.onCreate()}override fun onStartCommand(intent: Intent?, flags: Int, startId: Int): Int {Log.v(TAG, "onStartCommand()")return super.onStartCommand(intent, flags, startId)}//在onBinder()中啟動一個線程,每1秒輪詢接收客戶端發送過來的數據override fun onBind(intent: Intent): IBinder {mStub.mSetServiceRunning = trueThread {while(mStub.mSetServiceRunning) {try {Thread.sleep(1000);Log.v(TAG, "mStrData:${mStub.mStrData}")} catch (e: InterruptedException) {e.printStackTrace()}}}.start()return mStub		//返回AppAidlInterfaceStub實例}//在unBind里清除運行標志,讓線程能夠退出override fun onUnbind(intent: Intent?): Boolean {Log.v(TAG, "onUnbind()")mStub.mSetServiceRunning = falsereturn super.onUnbind(intent)}override fun onDestroy() {super.onDestroy()Log.v(TAG, "onDestroy()")}
}
需要確保mainappservice在AndroidMainfiest.xml里添加了Service標簽
<applicationandroid:allowBackup="true"android:dataExtractionRules="@xml/data_extraction_rules"android:fullBackupContent="@xml/backup_rules"android:icon="@mipmap/ic_launcher"android:label="@string/app_name"android:roundIcon="@mipmap/ic_launcher_round"android:supportsRtl="true"android:theme="@style/Theme.Mainapp"tools:targetApi="31"><serviceandroid:name=".MainAppService"android:enabled="true"android:exported="true"></service><!-- .... -->
</application>
六、OtherApp里OtherAppMainActivity添加代碼
package com.example.otherappimport ....class OtherAppMainActivity : AppCompatActivity() {private val TAG = "AIDL-OtherAppMainActivity"private lateinit var binding : ActivityOtherAppMainBindingprivate lateinit var mServiceIntent: Intentprivate var mBinder : IAppAidlInterface? = nullprivate var mICount = 0//創建Service連接和斷開的兩個基礎函數onServiceConnected()和onServiceDisconnected()private val connection = object : ServiceConnection {override fun onServiceConnected(name: ComponentName?, service: IBinder?) {if(mBinder == null) {mBinder = IAppAidlInterface.Stub.asInterface(service)mICount++Log.v(TAG, "onServiceConnected() the time $mICount")try {val strData = "第 $mICount 次連接service成功"mBinder!!.setStringData(strData)} catch (e: RemoteException) {e.printStackTrace()}} else {mICount++Log.v(TAG, "mBinder is not null")}}override fun onServiceDisconnected(name: ComponentName?) {Log.v(TAG, "onServiceDisconnected")}}override fun onCreate(savedInstanceState: Bundle?) {super.onCreate(savedInstanceState)enableEdgeToEdge()binding = ActivityOtherAppMainBinding.inflate(layoutInflater)setContentView(binding.root)ViewCompat.setOnApplyWindowInsetsListener(findViewById(R.id.main)) { v, insets ->val systemBars = insets.getInsets(WindowInsetsCompat.Type.systemBars())v.setPadding(systemBars.left, systemBars.top, systemBars.right, systemBars.bottom)insets}//新建intent來連接服務端mainapp,Intent的Component設置為Sevice的包名和類名mServiceIntent = Intent()mServiceIntent.component = ComponentName("com.example.mainapp", "com.example.mainapp.MainAppService")// 檢查服務是否存在val resolveInfo = packageManager.resolveService(mServiceIntent, PackageManager.MATCH_DEFAULT_ONLY)if (resolveInfo != null) {// 服務存在,Intent有效Log.v(TAG, "Intent is valid")} else {// 服務不存在,Intent無效Log.v(TAG, "Intent is not valid")}//點擊bind時與service綁定binding.bindServiceBtn.setOnClickListener {val bindResult = bindService(mServiceIntent, connection, Context.BIND_AUTO_CREATE)Log.v(TAG, "bindServiceBtn clicked bindResult:$bindResult")}//點擊unbindg時與service解綁binding.unbindServiceBtn.setOnClickListener {Log.v(TAG, "unbindServiceBtn clicked")unbindService(connection)mBinder = null //把mBinder清空}}}
在otherapp里新建兩個button用來控制bindService()和unbindService()
<?xml version="1.0" encoding="utf-8"?>
<LinearLayout xmlns:android="http://schemas.android.com/apk/res/android"xmlns:app="http://schemas.android.com/apk/res-auto"xmlns:tools="http://schemas.android.com/tools"android:id="@+id/main"android:layout_width="match_parent"android:layout_height="match_parent"android:orientation="vertical"tools:context=".OtherAppMainActivity"><Buttonandroid:id="@+id/bindService"android:layout_width="match_parent"android:layout_height="wrap_content"android:text="Bind Service" /><Buttonandroid:id="@+id/unbindService"android:layout_width="match_parent"android:layout_height="wrap_content"android:text="Unbind Service" /></LinearLayout>
七、驗證
把兩個apk安裝并啟動:
點擊bind會建立連接,點擊ubind斷開。再次點擊bind計數會增加
測試結果:
2024-05-28 17:25:31.545  2285-2285  AIDL-Other...inActivity com.example.otherapp                 V  Intent is valid
2024-05-28 17:25:34.879  2285-2285  AIDL-Other...inActivity com.example.otherapp                 V  bindServiceBtn clicked bindResult:true
2024-05-28 17:25:34.882  1505-1505  AIDL-MainAppService     com.example.mainapp                  V  onCreate()
2024-05-28 17:25:34.891  2285-2285  AIDL-Other...inActivity com.example.otherapp                 V  onServiceConnected() the time 1
2024-05-28 17:25:35.885  1505-2363  AIDL-MainAppService     com.example.mainapp                  V  mStrData:第 1 次連接service成功
2024-05-28 17:25:36.886  1505-2363  AIDL-MainAppService     com.example.mainapp                  V  mStrData:第 1 次連接service成功
2024-05-28 17:25:37.887  1505-2363  AIDL-MainAppService     com.example.mainapp                  V  mStrData:第 1 次連接service成功
2024-05-28 17:25:38.888  1505-2363  AIDL-MainAppService     com.example.mainapp                  V  mStrData:第 1 次連接service成功
2024-05-28 17:25:39.613  2285-2285  AIDL-Other...inActivity com.example.otherapp                 V  unbindServiceBtn clicked
2024-05-28 17:25:39.621  1505-1505  AIDL-MainAppService     com.example.mainapp                  V  onUnbind()
2024-05-28 17:25:39.623  1505-1505  AIDL-MainAppService     com.example.mainapp                  V  onDestroy()
2024-05-28 17:25:39.888  1505-2363  AIDL-MainAppService     com.example.mainapp                  V  mStrData:第 1 次連接service成功
2024-05-28 17:25:42.022  2285-2285  AIDL-Other...inActivity com.example.otherapp                 V  bindServiceBtn clicked bindResult:true
2024-05-28 17:25:42.024  1505-1505  AIDL-MainAppService     com.example.mainapp                  V  onCreate()
2024-05-28 17:25:42.037  2285-2285  AIDL-Other...inActivity com.example.otherapp                 V  onServiceConnected() the time 2
2024-05-28 17:25:43.037  1505-2399  AIDL-MainAppService     com.example.mainapp                  V  mStrData:第 2 次連接service成功
2024-05-28 17:25:44.038  1505-2399  AIDL-MainAppService     com.example.mainapp                  V  mStrData:第 2 次連接service成功
2024-05-28 17:25:45.039  1505-2399  AIDL-MainAppService     com.example.mainapp                  V  mStrData:第 2 次連接service成功
2024-05-28 17:25:45.692  2285-2285  AIDL-Other...inActivity com.example.otherapp                 V  unbindServiceBtn clicked
2024-05-28 17:25:45.701  1505-1505  AIDL-MainAppService     com.example.mainapp                  V  onUnbind()
2024-05-28 17:25:45.702  1505-1505  AIDL-MainAppService     com.example.mainapp                  V  onDestroy()
2024-05-28 17:25:46.040  1505-2399  AIDL-MainAppService     com.example.mainapp                  V  mStrData:第 2 次連接service成功

)

原創)


一個Agent的“旅行”)


