?路由的基本使用步驟分為以下4步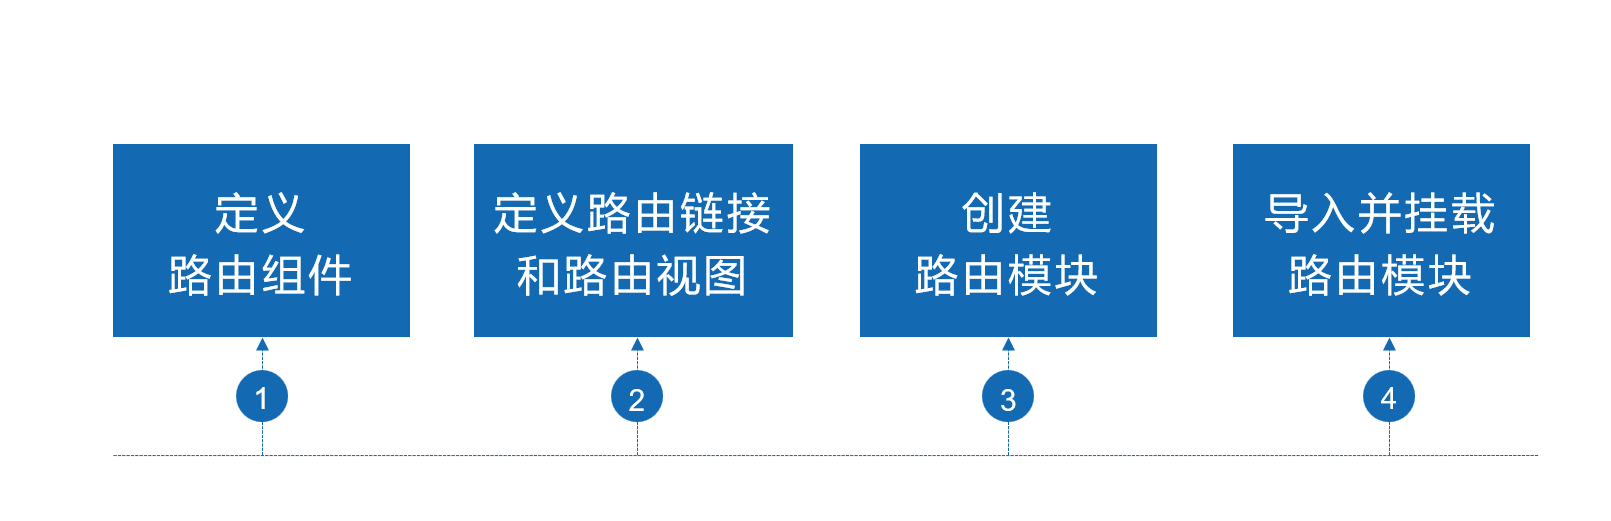
?第一步:定義路由組件:略
?第二步:定義路由鏈接和路由視圖:
<template><div class="app-container"><h1>App根組件</h1><router-link to="/home">首頁</router-link><router-link to="/about">關于</router-link><hr><router-view></router-view></div>
</template>
我們演示項目的定義路由鏈接與路由視圖如下:
<template><div class="home_container"><el-container><!--頭部 start-->	<el-header class="top-header"><el-text class="home_title">東軟云醫院HIS系統</el-text><div class="home_userinfoContainer" ><el-dropdown  @command="handleCommand"><el-button type="primary"><el-avatar size="small" style="margin-right:10px ;"src="https://cube.elemecdn.com/0/88/03b0d39583f48206768a7534e55bcpng.png" />{{userStore.getUserInfo.value.realName}}<el-icon class="el-icon--right"><arrow-down /></el-icon>				</el-button><template #dropdown><el-dropdown-menu><el-dropdown-item command="" >我的設置</el-dropdown-item><el-dropdown-item command="logout">退出登錄</el-dropdown-item></el-dropdown-menu></template></el-dropdown>  </div></el-header><!--頭部 end-->	<el-container><!--左側邊欄 start  -->  <el-aside width="200px" ><el-menudefault-active="2"class="el-menu-vertical-demo"router  @select="addTab" style="height: 700px"><el-menu-item><el-icon><document /></el-icon><el-text class="mx-1" size="large">{{menus.meta.title}}</el-text></el-menu-item><el-menu-item  v-for="(menu,index) in menus.children" :index="menu.path"  :key="menu.path" ><el-icon><document /></el-icon>{{menu.name}}</el-menu-item></el-menu></el-aside><!--左側邊欄 end  --> <el-container><el-main class="main"><el-tabs v-model="editableTabsValue" type="card" editable @edit="handleTabsEdit" @tab-click="clickTag" ><el-tab-panealign="center":key="item.name"v-for="(item, index) in editableTabs":label="item.title":name="item.name":route="item.route"><router-view></router-view> </el-tab-pane></el-tabs>	</el-main>	</el-container>	</el-container></el-container></div>
</template><script setup>
import {computed, ref} from 'vue'
import { useRouter } from 'vue-router'
import { postReq } from '../utils/api'
import { useUserStore } from '../store/user.js'
//路由
const router = useRouter()
//獲取用戶倉庫對象
const userStore=useUserStore()
const menus=router.options.routes.find(m=>m.role==userStore.getUserInfo.value.useType);
const editableTabsValue=ref('')
const editableTabs=ref([])
const tabIndex=ref(0)//查找路徑對應的路由
function findCompontByPath(path){let a=menus.children.find(m=>m.path==path);if (a) {return a;}return null;
}//打開新窗口
function clickTag(tag,e){//console.log(tag.paneName)router.push(tag.paneName)
}
function addTab(path){if(path){let componet=findCompontByPath(path)if (componet) {if (!editableTabs.value.find(t => t.name == componet.path)) {editableTabs.value.push({title: componet.name,name: componet.path,route: componet.path});}editableTabsValue.value = componet.path;router.push(componet.path);}}
}function handleTabsEdit(targetName, action) {if (action === 'remove') {let tabs = editableTabs.value;let activeName = editableTabsValue.value;if (activeName === targetName) {tabs.forEach((tab, index) => {// console.log(tab.name, targetName, tab.name === targetName);if (tab.name === targetName) {let nextTab = tabs[index + 1] || tabs[index - 1];if (nextTab) {activeName = nextTab.name;}}});}editableTabsValue.value = activeName;editableTabs.value = tabs.filter(tab => tab.name !== targetName);router.push(activeName);}
}function handleCommand(command){postReq("/user/logout").then(resp=>{if(resp.data.result){userStore.logOut();router.push("/login")}})}</script><style>
.home_container {height: 100%;position: absolute;top: 0px;left: 0px;width: 100%;
}
.top-header{background-color: #20a0ff;color: #333;text-align: center;display: flex;align-items: center;justify-content: space-between;
}
.left-aside{background-color: #ECECEC;
}.main{width: 100%;height: 100%;background-color: #fff;color: #000;text-align: left;
}
.home_title {color: #fff;font-size: 22px;display: inline;
}.home_userinfo {color: #fff;cursor: pointer;
}.home_userinfoContainer {display: inline;margin-right: 20px;text-align: right;
}
</style>
在 Vue Router 中,<router-view></router-view>?組件的內容變化是基于當前的路由匹配結果。
路由匹配與視圖渲染的工作原理
-
路由配置:Vue Router 的路由配置存儲在?
router.options.routes?中,您的代碼通過?menus=router.options.routes.find(m=>m.role==userStore.getUserInfo.value.useType)?來獲取當前用戶角色對應的路由配置。 -
動態路由切換:
- 當用戶點擊左側菜單的菜單項時,
addTab?方法會被觸發 - 該方法會根據路徑找到對應的路由組件
- 如果該路由尚未在標簽頁中打開,則添加一個新標簽頁
- 然后通過?
router.push(componet.path)?觸發路由切換
- 當用戶點擊左側菜單的菜單項時,
-
標簽頁點擊事件:
- 當用戶點擊標簽頁時,
clickTag?方法會被觸發 - 該方法同樣通過?
router.push(tag.paneName)?觸發路由切換
- 當用戶點擊標簽頁時,
-
標簽頁關閉事件:
- 當用戶關閉標簽頁時,
handleTabsEdit?方法會被觸發 - 如果關閉的是當前激活的標簽頁,會自動切換到下一個或上一個標簽頁
- 同樣通過?
router.push(activeName)?來更新當前路由
- 當用戶關閉標簽頁時,
-
視圖更新:
- 當路由發生變化時,Vue Router 會自動查找與當前路徑匹配的組件
- 然后將匹配到的組件渲染到?
<router-view></router-view>?組件所在的位置 - 這就是為什么您的代碼中,每個標簽頁的內容都是?
<router-view></router-view>,但顯示的內容卻不同
關鍵邏輯分析
在您的代碼中,路由切換的核心邏輯是通過以下幾個方法實現的:
addTab(path):當用戶點擊左側菜單時,添加標簽頁并切換路由clickTag(tag,e):當用戶點擊標簽頁時,切換到對應的路由handleTabsEdit(targetName, action):當用戶關閉標簽頁時,更新當前激活的標簽頁并切換路由
這些方法都通過?router.push()?來觸發路由切換,而?<router-view></router-view>?會根據當前的路由自動渲染匹配的組件。
第三步:創建路由模塊:
import {createRouter, createWebHistory, createWebHashHistory} from 'vue-router'
import { defineAsyncComponent } from 'vue'
import { useUserStore } from '../store/user.js'const router = createRouter({ history: createWebHistory(),  // history 模式routes: [{path: '/',name: 'Login',role:0,component: defineAsyncComponent(() => import(`../components/Login.vue`)),meta: {title: 'Login'}},{path: '/login',name: 'Login',role:0,component: defineAsyncComponent(() => import(`../components/Login.vue`)),meta: {title: 'Login'}},{path:'/home',name:'系統信息',component:defineAsyncComponent(() => import(`../components/home.vue`)),role:170,meta: {title: '系統信息'},children:[{path:'/constant',name:'常數類別管理',component:defineAsyncComponent(() => import(`../components/neusys/Constant.vue`)),},{path:'/constantitem',name:'常數項管理',component:defineAsyncComponent(() => import(`../components/neusys/ConstantItem.vue`)),},{path:'/department',name:'科室管理',component:defineAsyncComponent(() => import(`../components/neusys/Department.vue`)),},{path:'/user',name:'賬戶管理',component:defineAsyncComponent(() => import(`../components/neusys/User.vue`)),},{path:'/registlevel',name:'掛號級別管理',component:defineAsyncComponent(() => import(`../components/neusys/RegistLevel.vue`)),},{path:'/settlecategory',name:'結算級別管理',component:defineAsyncComponent(() => import(`../components/neusys/SettleCategory.vue`)),},{path:'/disecategory',name:'疾病分類管理',component:defineAsyncComponent(() => import(`../components/neusys/DiseCategory.vue`)),},{path:'/disease',name:'診斷目錄管理',component:defineAsyncComponent(() => import(`../components/neusys/Disease.vue`)),},{path:'/expense',name:'費用科目表',component:defineAsyncComponent(() => import(`../components/neusys/ExpenseClass.vue`)),},{path:'/fmeditem',name:'非藥品收費項目',component:defineAsyncComponent(() => import(`../components/neusys/Fmeditem.vue`)),},{path:'/rule',name:'排班規則',component:defineAsyncComponent(() => import(`../components/neusys/Rule.vue`)),},{path:'/scheduling',name:'排班計劃',component:defineAsyncComponent(() => import(`../components/neusys/Scheduling.vue`)),}]},{path: '/home',name: '掛號收費',role:171,component: defineAsyncComponent(() => import(`../components/home.vue`)),meta: {title: '掛號收費'},children:[{path:'/customer',name:'用戶管理',component:defineAsyncComponent(() => import(`../components/neureg/Customer.vue`)),},{path:'/medicalcard',name:'電子就診卡',component:defineAsyncComponent(() => import(`../components/neureg/MedicalCard.vue`)),},{path:'/register',name:'現場掛號',component:defineAsyncComponent(() => import(`../components/neureg/Register.vue`)),},{path:'/refund',name:'退號',component:defineAsyncComponent(() => import(`../components/neureg/Refund.vue`)),}]},{path: '/home',name: '門診醫生',role:172,component: defineAsyncComponent(() => import(`../components/home.vue`)),meta: {title: '門診醫生'},children:[{path:'/docHome',name:'門診病歷',component:defineAsyncComponent(() => import(`../components/neudoc/DocHome.vue`)),}]},]
})// 全局路由守衛
router.beforeEach((to, from, next) => {// let userLogin =  sessionStorage.getItem("userLogin");const userStore = useUserStore()// let isAuth=userStore.getUserInfo.value.isAuth;let isAuth=userStore.getUserInfo.value.isAuth;//判斷路由的別名不是登錄且未進行登錄認證,就跳轉去登錄if(to.name !== 'Login' && !isAuth){next({ name: 'Login' })}else if(to.name=="Login" && isAuth){//已登錄,不允許退回到登錄頁面next({ path: '/home' })}else{next()}
})router.afterEach((to, from)=>{// console.log(to, from)//console.log('afterEach')
})export default router
上面我們是用懶加載的方式喲:
{path: '/',name: 'Login',role:0,component: defineAsyncComponent(() => import(`../components/Login.vue`)),meta: {title: 'Login'}},命名路由
{ path: '路由路徑', name: '路由名稱', component: 組件 }
在定義路由匹配規則時,使用name屬性為路由匹配規則定義路由名稱,即可實現命名路由。當路由匹配規則有了路由名稱后,在定義路由鏈接或執行某些跳轉操作時,可以直接通過路由名稱表示相應的路由,不再需要通過路由路徑表示相應的路由。
我們通過如下方式使用它:
router.push(activeName); // activeName為路由名稱而且還有路由嵌套。
第四步:導入且掛載路由模塊:
import { createApp } from 'vue'
import { createPinia } from 'pinia'
import router from './router'
import ElementPlus from 'element-plus';
import 'element-plus/theme-chalk/index.css';
import App from './App.vue'
import Axios from 'axios'const app=createApp(App)
app.use(router)
app.use(createPinia())
app.use(ElementPlus)
app.mount('#app')
編程式導航
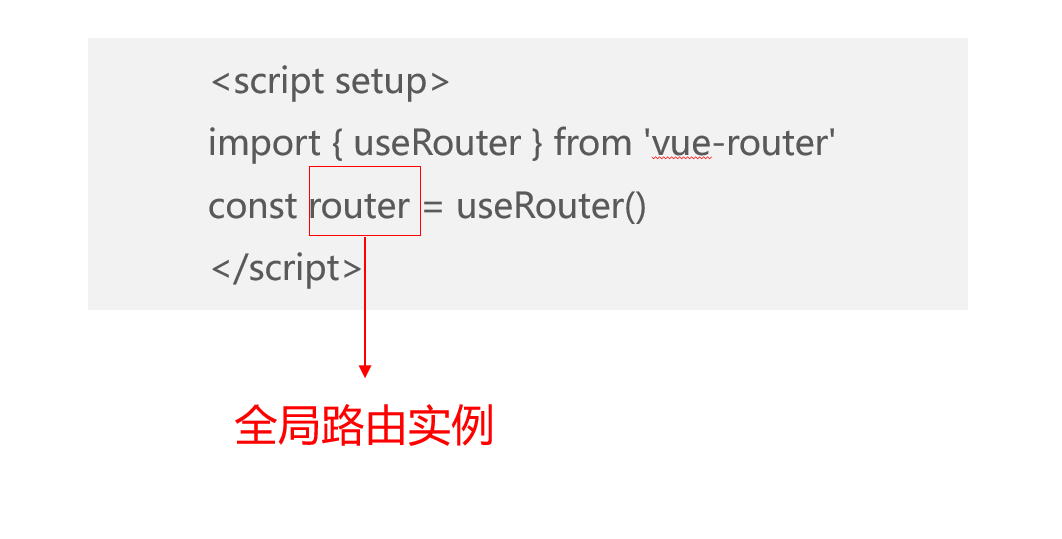
????????Vue Router提供了useRouter()函數,使用它可以獲取全局路由實例,該全局路由實例中提供了常用的push()方法、replace()方法和go()方法,獲取全局路由實例的示例代碼如下。
?push方法:
?????????push()方法會向歷史記錄中添加一個新的記錄,以編程方式導航到一個新的URL。當用戶單擊瀏覽器后退按鈕時,會回到之前的URL。push()方法的參數可以是一個字符串路徑,或者一個描述地址的對象,示例代碼如下。
router.push('/about/tab1')			// 字符串路徑
router.push({ path: '/about/tab1' })		// 帶有路徑的對象
router.push({ name: 'user', params: { userId: '123'} })	// 命名路由
router.push({ path: '/user', query: { id: '1' } })		// 帶查詢參數,如:/user?id=1
router.push({ path: '/user', hash: '#admin' })		// 帶有Hash值,如:/user#admin
我們項目中也用到的 push:
function addTab(path){if(path){let componet=findCompontByPath(path)if (componet) {if (!editableTabs.value.find(t => t.name == componet.path)) {editableTabs.value.push({title: componet.name,name: componet.path,route: componet.path});}editableTabsValue.value = componet.path;router.push(componet.path);}}
}導航守衛?
·導航守衛用于控制路由的訪問權限。例如,訪問后臺主頁時,需要用戶處于已登錄狀態,如果沒有登錄,則跳轉到登錄頁面。用戶在登錄頁面進行登錄操作,若登錄成功,則跳轉到后臺主頁;若登錄失敗,則返回登錄頁面。
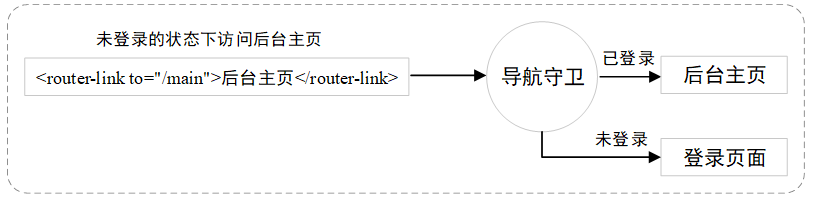
這里我們只介紹全局守衛,包括全局前置守衛beforeEach()和全局后置守衛afterEach(),在路由即將改變前和改變后進行觸發。
// 全局路由守衛
router.beforeEach((to, from, next) => {// let userLogin =  sessionStorage.getItem("userLogin");const userStore = useUserStore()// let isAuth=userStore.getUserInfo.value.isAuth;let isAuth=userStore.getUserInfo.value.isAuth;//判斷路由的別名不是登錄且未進行登錄認證,就跳轉去登錄if(to.name !== 'Login' && !isAuth){next({ name: 'Login' })}else if(to.name=="Login" && isAuth){//已登錄,不允許退回到登錄頁面next({ path: '/home' })}else{next()}
})
全局路由守衛 beforeEach 詳解
一、導航守衛的基本概念
在 Vue Router 中,導航守衛是一種攔截路由導航過程的機制,允許你在路由切換前后執行自定義邏輯。beforeEach是全局前置守衛,會在每次路由切換前被調用,是實現權限控制、登錄驗證等功能的核心機制。
二、beforeEach 守衛的參數解析
router.beforeEach((to, from, next) => {// 守衛邏輯
})
- to: 即將要進入的目標路由對象
- from: 當前導航正要離開的路由對象
- next: 導航控制函數,必須調用此函數才能繼續導航過程
三、next 函數的核心作用
next函數是導航守衛的關鍵控制接口,它的作用是決定路由導航的后續動作。必須調用 next () 才能讓路由導航繼續,否則導航會被阻塞。
根據調用方式的不同,next () 可以實現三種導航控制:
- next(): 允許導航繼續,進入目標路由
- next(false): 阻止導航,返回當前路由(如果是從其他路由導航過來)
- next({ path: '/new-path' }): 重定向到新路由,中斷當前導航并開始新的導航過程
四、代碼中的 next 函數應用場景
1. 未登錄時重定向到登錄頁
if (to.name !== 'Login' && !isAuth) {next({ name: 'Login' })  // 重定向到登錄頁
}
- 當目標路由不是登錄頁且用戶未認證時
- 通過
next({ name: 'Login' })重定向到登錄路由 - 這會中斷當前導航,開始向登錄頁的新導航
2. 已登錄時禁止訪問登錄頁
else if (to.name === 'Login' && isAuth) {next({ path: '/home' })  // 重定向到首頁
}
- 當用戶已登錄卻嘗試訪問登錄頁時
- 通過
next({ path: '/home' })重定向到首頁 - 確保已登錄用戶不會看到登錄界面
3. 允許正常導航
else {next()  // 允許導航繼續
}
- 當導航符合條件(如已登錄且訪問非登錄頁)時
- 調用
next()讓導航過程繼續,進入目標路由
五、next 函數的使用規則與注意事項
1. 必須調用 next ()
- 無論你想允許導航、阻止導航還是重定向,都必須調用 next ()
- 如果不調用 next (),導航將被永久阻塞,頁面不會有任何反應
2. next () 的參數類型
| 參數類型 | 示例 | 作用描述 |
|---|---|---|
| 無參數 | next() | 繼續導航到目標路由 |
| 布爾值 | next(false) | 阻止導航,返回原路由 |
| 路由對象 | next({ path: '/login' }) | 重定向到指定路由 |
| 錯誤對象 | next (new Error (' 導航錯誤 ')) | 導航失敗并觸發錯誤處理 |
3. 調用時機與順序
- 在守衛中可以有多個條件判斷,但最終必須有一個 next () 被調用
- 多個全局守衛會按照注冊順序依次執行,每個守衛都必須調用 next () 才能繼續
4. 異步場景處理
- 如果守衛中需要異步操作(如 API 請求驗證),必須在異步操作完成后調用 next ()
- 示例:
router.beforeEach(async (to, from, next) => {try {const userData = await fetchUserInfo()if (userData.isAuth) {next()} else {next({ name: 'Login' })}} catch (error) {next(error)}
})
六、實際開發中的最佳實踐
-
權限控制:
- 在 beforeEach 中校驗用戶權限
- 對未授權用戶重定向到登錄頁或提示錯誤
-
登錄狀態維護:
- 檢查用戶登錄狀態(如 token 有效性)
- 過期時強制重新登錄
-
頁面訪問記錄:
- 記錄用戶訪問路徑,用于歷史回溯或行為分析
-
資源預加載:
- 在導航前預加載目標頁面所需的數據或資源
next函數是 Vue Router 導航守衛的 "交通信號燈",通過控制它的調用方式,你可以精確管理路由導航的流程。

)


 2025年順德區中小學生程序設計展示活動(初中組C++) 換位(一))

)


