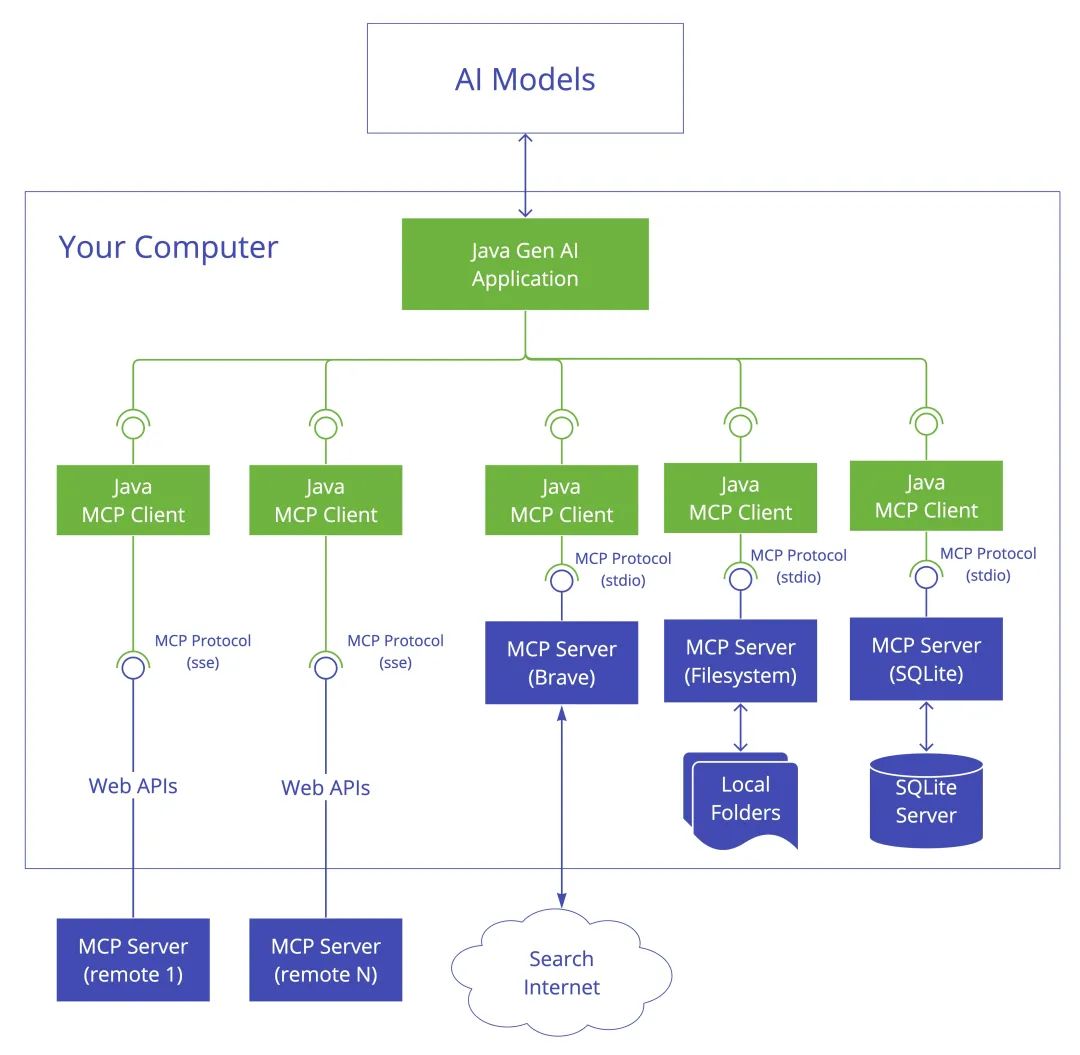
????????模型上下文協議(MCP)由Anthropic開源的開放協議,為AI模型與外部數據/工具提供了“標準化橋梁”,通過統一的接口規范,使模型能夠動態調用本地文件、數據庫、API等資源,實現“上下文感知”的智能交互。MCP的核心價值在于:
-
標準化集成:告別“一對一”定制開發,通過協議對接即可連接任意兼容MCP的數據源或工具,大幅降低生態構建成本。
-
安全與靈活性:支持本地部署,數據無需離境,兼顧隱私合規與實時訪問需求。
-
智能體賦能:為AI Agent提供“手腳”,使其能自主執行查詢、分析、操作等復雜任務流。
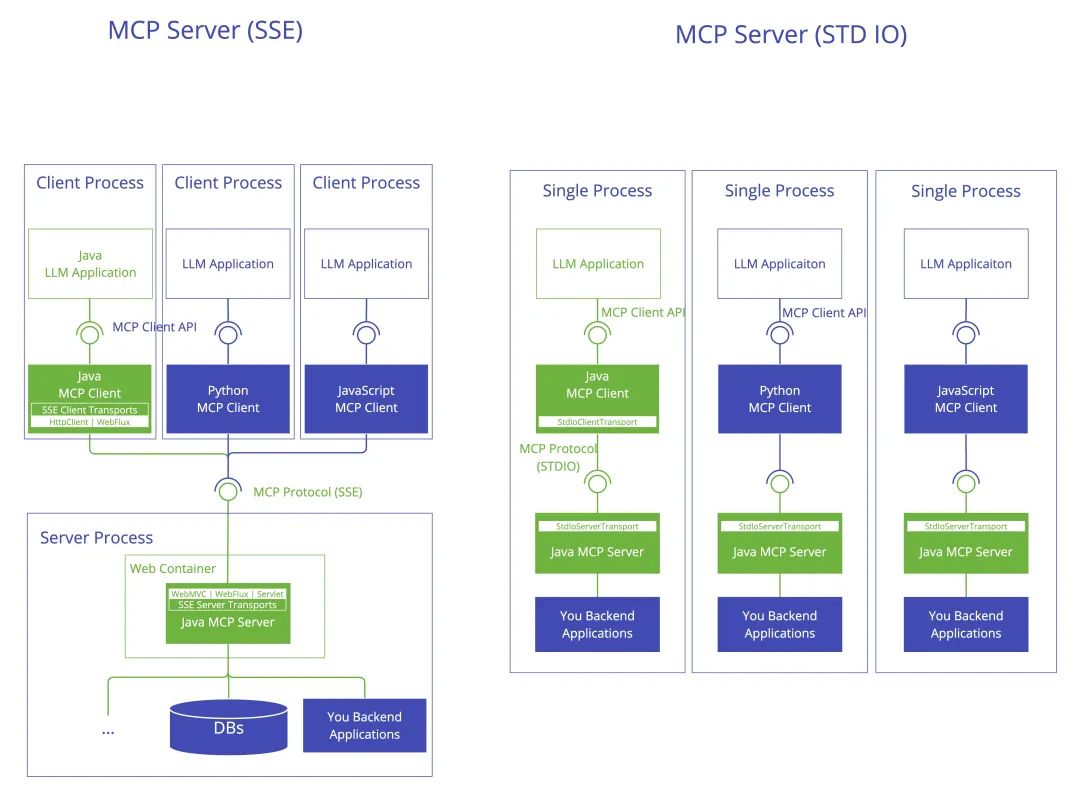
????????在 MCP)?的上下文中,STDIO?和?SSE?是兩種不同的通信方式,用于實現客戶端(如開發工具、IDE 等)與服務器(如語言模型、知識庫服務等)之間的交互。
??STDIO?是指通過標準輸入(stdin)和標準輸出(stdout)進行通信的方式。這是一種常見的進程間通信(IPC)機制,通常用于本地運行的 MCP 服務器與客戶端之間的交互。一般用于本地開發工具集成
? SSE(Server-Sent Events)是一種基于 HTTP 的服務器推送技術,用于實現服務器主動向客戶端推送數據的通信方式。與?STDIO?不同,SSE?是一種網絡通信機制,適用于客戶端和服務器分布在不同機器上的場景。
?????Spring AI作為Java生態中領先的AI開發框架,通過深度集成MCP協議,為開發者提供了企業級解決方案:其模塊化架構、對同步/異步通信的支持、以及與Spring Boot的無縫融合,使得構建本地MCP客戶端與服務端變得高效且可靠。無論是快速搭建文件系統的本地數據中臺,還是構建與業務系統(如CRM、ERP)的實時聯動,Spring AI的聲明式配置、注解驅動開發模式極大降低了技術門檻。
代碼(SSE模式)
mcp server
創建項目mcp-server,依賴如下:
<?xml version="1.0" encoding="UTF-8"?>
<project xmlns="http://maven.apache.org/POM/4.0.0" xmlns:xsi="http://www.w3.org/2001/XMLSchema-instance"xsi:schemaLocation="http://maven.apache.org/POM/4.0.0 https://maven.apache.org/xsd/maven-4.0.0.xsd"><modelVersion>4.0.0</modelVersion><parent><groupId>org.springframework.boot</groupId><artifactId>spring-boot-starter-parent</artifactId><version>3.5.0</version><relativePath/> <!-- lookup parent from repository --></parent><groupId>com.sqz</groupId><artifactId>mcp-server</artifactId><version>0.0.1-SNAPSHOT</version><name>mcp-server</name><description>mcp-server</description><url/><licenses><license/></licenses><developers><developer/></developers><scm><connection/><developerConnection/><tag/><url/></scm><properties><java.version>21</java.version></properties><dependencies><!-- 只支持 STDIO 傳輸,使用如下兩個依賴 --><!--        <dependency>--><!--            <groupId>org.springframework.ai</groupId>--><!--            <artifactId>spring-ai-starter-mcp-server</artifactId>--><!--        </dependency>--><!--        <dependency>--><!--            <groupId>org.springframework</groupId>--><!--            <artifactId>spring-web</artifactId>--><!--        </dependency>--><!-- 支持 SSE 傳輸,使用如下依賴 --><dependency><groupId>org.springframework.ai</groupId><artifactId>spring-ai-starter-mcp-server-webflux</artifactId></dependency><dependency><groupId>org.json</groupId><artifactId>json</artifactId><version>20210307</version></dependency><dependency><groupId>org.projectlombok</groupId><artifactId>lombok</artifactId></dependency></dependencies><dependencyManagement><dependencies><dependency><groupId>org.springframework.ai</groupId><artifactId>spring-ai-bom</artifactId><version>1.0.0-M7</version><type>pom</type><scope>import</scope></dependency></dependencies></dependencyManagement><repositories><repository><id>spring-milestones</id><name>Spring Milestones</name><url>https://repo.spring.io/milestone</url><snapshots><enabled>false</enabled></snapshots></repository><repository><id>spring-snapshots</id><name>Spring Snapshots</name><url>https://repo.spring.io/snapshot</url><releases><enabled>false</enabled></releases></repository><repository><id>aliyunmaven</id><name>aliyun</name><url>https://maven.aliyun.com/repository/public</url></repository></repositories><build><plugins><plugin><groupId>org.springframework.boot</groupId><artifactId>spring-boot-maven-plugin</artifactId></plugin></plugins></build></project>
?定義一個查詢天氣的工具:
package com.sqz.mcpserver.weather;import lombok.extern.slf4j.Slf4j;
import org.json.JSONArray;
import org.json.JSONObject;
import org.springframework.ai.tool.annotation.Tool;
import org.springframework.ai.tool.annotation.ToolParam;
import org.springframework.beans.factory.annotation.Value;
import org.springframework.http.ResponseEntity;
import org.springframework.stereotype.Service;
import org.springframework.web.client.RestTemplate;import java.io.UnsupportedEncodingException;
import java.net.URLEncoder;@Service
@Slf4j
public class WeatherService {private static final String BASE_URL = "http://api.openweathermap.org/data/2.5/weather";@Value("${OPEN_WEATHER_API_KEY}")private String OPEN_WEATHER_API_KEY;public RestTemplate restTemplate = new RestTemplate();@Tool(description = "獲取指定城市的當前天氣情況,返回格式化后的天氣報告")public String getWeather(@ToolParam(description = "城市名稱必須是英文,例如:London 或者 Beijing") String city) throws UnsupportedEncodingException {log.info("====調用了查詢天氣=====");String query = String.format("?q=%s&APPID=%s&units=metric&lang=zh_cn",URLEncoder.encode(city, "UTF-8"),URLEncoder.encode(OPEN_WEATHER_API_KEY, "UTF-8"));ResponseEntity<String> responseEntity = restTemplate.getForEntity(BASE_URL + query, String.class);if (responseEntity.getStatusCode().is2xxSuccessful()) {String body = responseEntity.getBody();JSONObject data = new JSONObject(body);JSONObject main = data.getJSONObject("main");JSONArray weatherArray = data.getJSONArray("weather");JSONObject weather = weatherArray.getJSONObject(0);JSONObject wind = data.getJSONObject("wind");String weatherDescription = weather.optString("description", "無描述");double temperature = main.optDouble("temp", Double.NaN);double feelsLike = main.optDouble("feels_like", Double.NaN);double tempMin = main.optDouble("temp_min", Double.NaN);double tempMax = main.optDouble("temp_max", Double.NaN);int pressure = main.optInt("pressure", 0);int humidity = main.optInt("humidity", 0);double windSpeed = wind.optDouble("speed", Double.NaN);return String.format("""城市: %s 天氣描述: %s 當前溫度: %.1f°C 體感溫度: %.1f°C 最低溫度: %.1f°C 最高溫度: %.1f°C 氣壓: %d hPa 濕度: %d%% 風速: %.1f m/s """, data.optString("name", city),weatherDescription,temperature,feelsLike,tempMin,tempMax,pressure,humidity,windSpeed);}return null;}}
在啟動類里面注冊工具:
package com.sqz.mcpserver;import com.sqz.mcpserver.weather.WeatherService;
import org.springframework.ai.tool.ToolCallbackProvider;
import org.springframework.ai.tool.method.MethodToolCallbackProvider;
import org.springframework.boot.SpringApplication;
import org.springframework.boot.autoconfigure.SpringBootApplication;
import org.springframework.context.annotation.Bean;
import org.springframework.web.reactive.config.EnableWebFlux;@SpringBootApplication
@EnableWebFlux
public class McpServerApplication {public static void main(String[] args) {SpringApplication.run(McpServerApplication.class, args);}@Beanpublic ToolCallbackProvider weatherTools(WeatherService weatherService) {return MethodToolCallbackProvider.builder().toolObjects(weatherService).build();}
}
配置文件:
spring.application.name=mcp-server
#指定 MCP 服務器的名稱為 spring-ai-mcp-weather
spring.ai.mcp.server.name=spring-ai-mcp-weather#配置應用監聽的端口為 8081
server.port=8081#禁用 Spring Boot 啟動時的橫幅(Banner)顯示,對于使用 STDIO 傳輸的 MCP 服務器,禁用橫幅有助于避免輸出干擾。
spring.main.banner-mode=off#如下參數啟用并設置為空,將禁用控制臺日志輸出格式,減少輸出干擾
logging.pattern.console=#配置日志文件的輸出路徑,將日志寫入指定的文件中
logging.file.name=D:/java-workspace/ai-learning-java-repository/mcp-server/mcp-weather-stdio-server.log#訪問 OpenWeather API 的密鑰,自己獲取每天可免費調用100次
OPEN_WEATHER_API_KEY=#設置日志的根級別為 INFO
logging.level.root=INFO
mcp client
創建項目mcp-server,依賴如下:
<?xml version="1.0" encoding="UTF-8"?>
<project xmlns="http://maven.apache.org/POM/4.0.0" xmlns:xsi="http://www.w3.org/2001/XMLSchema-instance"xsi:schemaLocation="http://maven.apache.org/POM/4.0.0 https://maven.apache.org/xsd/maven-4.0.0.xsd"><modelVersion>4.0.0</modelVersion><parent><groupId>org.springframework.boot</groupId><artifactId>spring-boot-starter-parent</artifactId><version>3.5.0</version><relativePath/> <!-- lookup parent from repository --></parent><groupId>com.sqz</groupId><artifactId>mcp-client</artifactId><version>0.0.1-SNAPSHOT</version><name>mcp-client</name><description>mcp-client</description><url/><licenses><license/></licenses><developers><developer/></developers><scm><connection/><developerConnection/><tag/><url/></scm><properties><java.version>17</java.version></properties><dependencies><dependency><groupId>org.springframework.boot</groupId><artifactId>spring-boot-starter-web</artifactId></dependency><dependency><groupId>org.springframework.boot</groupId><artifactId>spring-boot-starter-test</artifactId><scope>test</scope></dependency><dependency><groupId>org.springframework.ai</groupId><artifactId>spring-ai-starter-mcp-client</artifactId></dependency><!-- 導入 Spring AI - Anthropic 依賴--><!--        <dependency>--><!--            <groupId>org.springframework.ai</groupId>--><!--            <artifactId>spring-ai-starter-model-anthropic</artifactId>--><!--        </dependency>--><!-- 導入 Spring AI - OpenAI 依賴--><!--        <dependency>--><!--            <groupId>org.springframework.ai</groupId>--><!--            <artifactId>spring-ai-starter-model-openai</artifactId>--><!--        </dependency>--><!-- 導入Spring AI Alibaba - 通義千問依賴 --><dependency><groupId>com.alibaba.cloud.ai</groupId><artifactId>spring-ai-alibaba-starter</artifactId><version>1.0.0-M6.1</version></dependency></dependencies><dependencyManagement><dependencies><dependency><groupId>org.springframework.ai</groupId><artifactId>spring-ai-bom</artifactId><version>1.0.0-M7</version><type>pom</type><scope>import</scope></dependency></dependencies></dependencyManagement><build><plugins><plugin><groupId>org.springframework.boot</groupId><artifactId>spring-boot-maven-plugin</artifactId></plugin></plugins></build></project>
使用CommandLineRunner啟動聊天機器人,代碼:
package com.sqz.mcpclient;import io.modelcontextprotocol.client.McpSyncClient;
import org.springframework.ai.chat.client.ChatClient;
import org.springframework.ai.chat.client.advisor.MessageChatMemoryAdvisor;
import org.springframework.ai.chat.memory.InMemoryChatMemory;
import org.springframework.ai.mcp.SyncMcpToolCallbackProvider;
import org.springframework.boot.CommandLineRunner;
import org.springframework.boot.SpringApplication;
import org.springframework.boot.autoconfigure.SpringBootApplication;
import org.springframework.context.annotation.Bean;import java.util.List;
import java.util.Scanner;@SpringBootApplication
public class McpClientApplication {public static void main(String[] args) {SpringApplication.run(McpClientApplication.class, args);}/*** 啟動聊天機器人* CommandLineRunner 是 Spring Boot 提供的一個接口,用于在應用程序啟動完成后執行一些初始化任務或自定義邏輯。它非常適合用于演示、測試或預加載數據等場景。* 當 Spring Boot 應用程序啟動時,它會掃描應用程序中的 CommandLineRunner 實現類,并按照它們的順序執行它們的 run 方法。* 這樣,你可以在應用程序啟動時執行一些初始化操作,而不需要在代碼中顯式地調用這些操作。* 例如,你可以使用 CommandLineRunner 來加載數據庫數據、預加載緩存、執行一些一次性任務等。* 這使得應用程序的啟動過程更加簡潔和可維護,同時也方便了測試和調試。* @param chatClientBuilder 用于構建聊天客戶端的構建器**/@Beanpublic CommandLineRunner chatbot(ChatClient.Builder chatClientBuilder, List<McpSyncClient> mcpSyncClients) {return args -> {// 構建聊天客戶端ChatClient chatClient = chatClientBuilder//設置系統提示,引導 AI 的行為和角色.defaultSystem("你是一個可以查詢天氣的助手,可以調用工具回答用戶關于天氣相關問題。")//配置工具回調提供者,使 AI 能調用外部工具.defaultTools(new SyncMcpToolCallbackProvider(mcpSyncClients))//設置對話記憶,使用內存存儲對話歷史,保持上下文.defaultAdvisors(new MessageChatMemoryAdvisor(new InMemoryChatMemory())).build();// 開始聊天循環System.out.println("\n我是你的AI助手。\n");try (Scanner scanner = new Scanner(System.in)) {while (true) {System.out.print("\n用戶: ");String content = scanner.nextLine();System.out.println("\n助手: " +chatClient.prompt(content) // chatClient.prompt(...):將用戶輸入作為提示發送給 LLM.call().content());//.call().content():調用 LLM 模型并獲取響應內容}}};}}
配置:
spring.application.name=mcp-client#指定應用類型為非 Web 應用,適用于命令行工具、批處理任務或僅作為客戶端運行的場景
spring.main.web-application-type=none#使用 Claude LLM,需要在pom.xml中引入對應依賴
#spring.ai.anthropic.api-key=your_anthropic_api_key
#spring.ai.anthropic.chat.options.model=claude-3-haiku-20240307#使用 Deepseek LLM,需要在pom.xml中引入對應依賴
#spring.ai.openai.api-key=your_deepseek_api_key
#spring.ai.openai.base-url=https://api.deepseek.com
#spring.ai.openai.chat.options.model=deepseek-chat#使用 通義千問 LLM,需要在pom.xml中引入對應依賴
spring.ai.dashscope.api-key=sk-d7805feb808941c8a929b96414725274
spring.ai.dashscope.chat.options.model=qwen-plus#STDIO 模式,指定 MCP 客戶端的服務器配置文件路徑
#spring.ai.mcp.client.stdio.servers-configuration=classpath:/mcp-servers-config.json#SSE 模式,配置名為 server1 的 MCP 服務器連接,遠程連接到指定的服務器地址
spring.ai.mcp.client.sse.connections.server1=http://localhost:8081
啟動server再啟動client,在控制臺輸入指令測試:
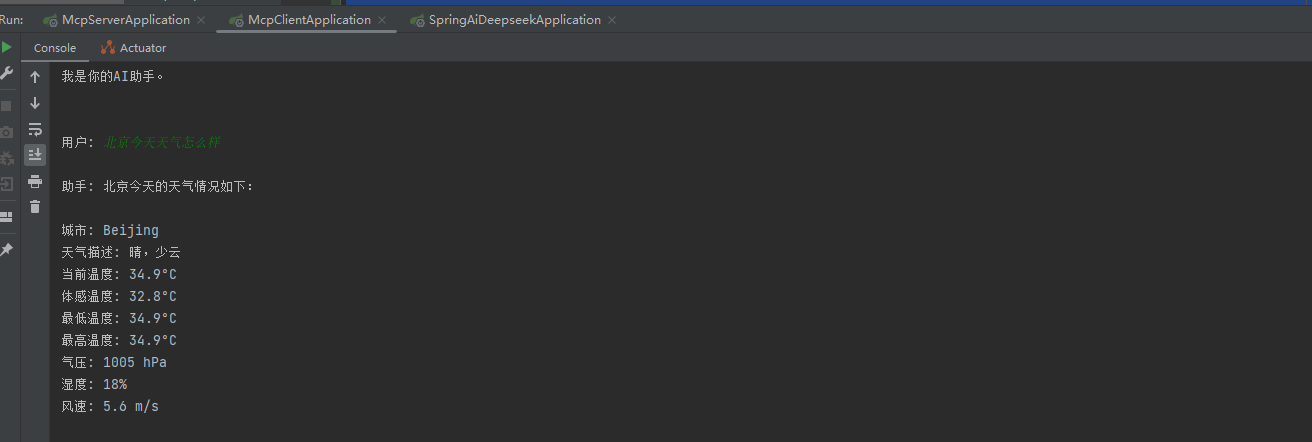
STDIO模式
在mcp-client項目執行打包mvn clean package -DskipTests,然后在resources下面新建文件mcp-servers-config.json:
{"mcpServers": {"spring-ai-mcp-weather": {
#java命令注意版本及以上"command": "C:\\Program Files\\Java\\jdk-21\\bin\\java.exe","args": ["-Dspring.ai.mcp.server.transport=STDIO","-jar",
#自己serverjar包"D:\\java-workspace\\ai-learning-java-repository\\mcp-server\\target\\mcp-server-0.0.1-SNAPSHOT.jar"]}}
}
修改mcp-client配置文件:
#指定應用類型為非 Web 應用,適用于命令行工具、批處理任務或僅作為客戶端運行的場景
spring.main.web-application-type=none#使用 Claude LLM,需要在pom.xml中引入對應依賴
#spring.ai.anthropic.api-key=your_anthropic_api_key
#spring.ai.anthropic.chat.options.model=claude-3-haiku-20240307#使用 Deepseek LLM,需要在pom.xml中引入對應依賴
#spring.ai.openai.api-key=your_deepseek_api_key
#spring.ai.openai.base-url=https://api.deepseek.com
#spring.ai.openai.chat.options.model=deepseek-chat#使用 通義千問 LLM,需要在pom.xml中引入對應依賴
spring.ai.dashscope.api-key=sk-d7805feb808941c8a929b96414725274
spring.ai.dashscope.chat.options.model=qwen-plus#STDIO 模式,指定 MCP 客戶端的服務器配置文件路徑
spring.ai.mcp.client.stdio.servers-configuration=classpath:/mcp-servers-config.json#SSE 模式,配置名為 server1 的 MCP 服務器連接,遠程連接到指定的服務器地址
#spring.ai.mcp.client.sse.connections.server1=http://localhost:8081
修改mcp-server依賴:
<!-- 只支持 STDIO 傳輸,使用如下兩個依賴 --><dependency><groupId>org.springframework.ai</groupId><artifactId>spring-ai-starter-mcp-server</artifactId></dependency><dependency><groupId>org.springframework</groupId><artifactId>spring-web</artifactId></dependency><!-- 支持 SSE 傳輸,使用如下依賴 --><!-- <dependency><groupId>org.springframework.ai</groupId><artifactId>spring-ai-starter-mcp-server-webflux</artifactId></dependency>-->mcp-server啟動類去掉webflux:
package com.sqz.mcpserver;import com.sqz.mcpserver.weather.WeatherService;
import org.springframework.ai.tool.ToolCallbackProvider;
import org.springframework.ai.tool.method.MethodToolCallbackProvider;
import org.springframework.boot.SpringApplication;
import org.springframework.boot.autoconfigure.SpringBootApplication;
import org.springframework.context.annotation.Bean;@SpringBootApplication
public class McpServerApplication {public static void main(String[] args) {SpringApplication.run(McpServerApplication.class, args);}@Beanpublic ToolCallbackProvider weatherTools(WeatherService weatherService) {return MethodToolCallbackProvider.builder().toolObjects(weatherService).build();}
}
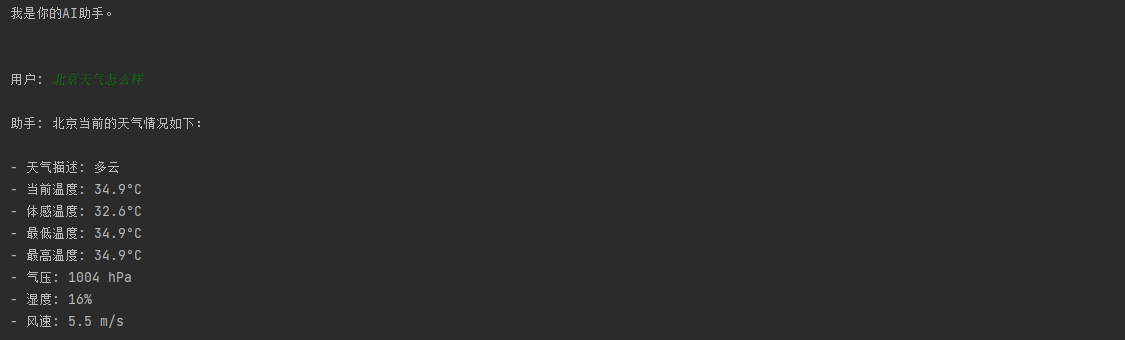
不用啟動mc-server,直接啟動mcp-client,mcp-client會自動啟動mcp-server測試如下:


)


:FBI樹)


rpicam-apps可用選項介紹之常用選項)
;大語言模型(LLM)詳解;Transformer 模型結構詳解;大模型三要素:T-P-G 原則)


:工作機制)