前后端交互過程中—各類文件/圖片的上傳、下載、顯示轉換
- 圖片
- 上傳下載常用函數:
- new Blob()
- **blobParts:(必傳)**
- **options:(可選)**
- blob的常見的MIME類型:
- URL.createObjectURL()
- 替代方案:FileReader.readAsDataURL()??
- FileReader 提供了幾種方法來讀取文件,
- 對比:
- 獲取tiff文件 轉 png
- TIFF庫
- TIFF轉換
- 通過url轉換tiff文件為png
- 通過文件選擇的方式轉換tiff文件為png
- 下載(導出)
- 普通圖片文件png,jpg,jpeg,gif
圖片
上傳下載常用函數:
new Blob()
Blob常用于處理二進制數據,比如
讀取文件內容或創建文件下載鏈接。
const blob = new Blob(blobParts, options);
blobParts:(必傳)
必須是一個??數組??,其中包含以下任意組合:
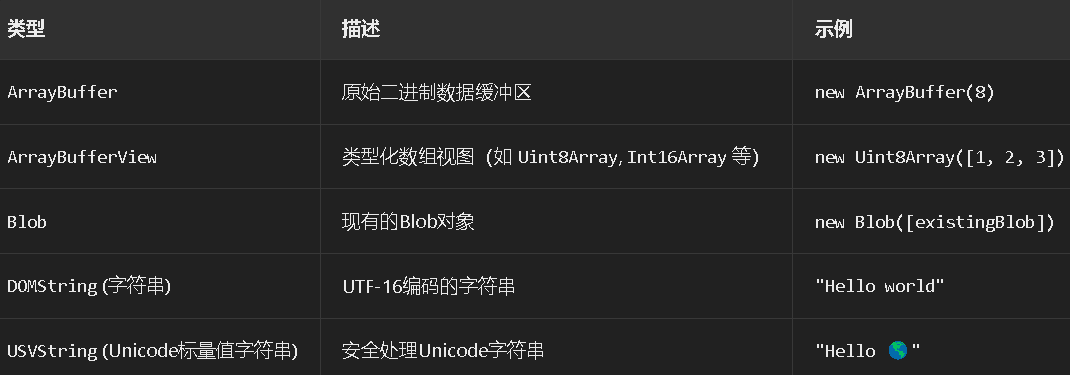
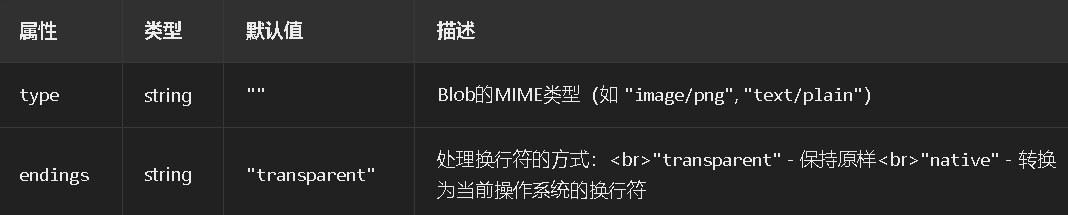
options:(可選)
包含以下可選屬性的對象:
blob的常見的MIME類型:
| 類型 | 子類型 | 典型文件擴展名 | 用途示例 |
|---|---|---|---|
| text | plain | .txt | 純文本文件 |
| html | .html, .htm | HTML文檔 | |
| css | .css | 層疊樣式表 | |
| csv | .csv | 逗號分隔值文件 | |
| javascript | .js | JavaScript文件 | |
| image | jpeg | .jpeg | JPEG圖像 |
| png | .png | PNG圖像 | |
| gif | .gif | GIF圖像 | |
| svg+xml | .svg | SVG矢量圖形 | |
| webp | .webp | WebP圖像 | |
| audio | mpeg | .mp3 | MP3音頻 |
| ogg | .ogg | OGG音頻 | |
| wav | .wav | WAV音頻 | |
| webm | .webm | WebM音頻 | |
| video | mp4 | .mp4 | MP4視頻 |
| ogg | .ogv | OGG視頻 | |
| webm | .webm | WebM視頻 | |
| application | octet-stream | 任意 | 任意二進制數據(默認) |
| json | .json | JSON數據 | |
| xml | .xml | XML數據 | |
| PDF文檔 | |||
| zip | .zip | ZIP壓縮文件 | |
| vnd.ms-excel | .xls | Excel 97-2003 工作簿 | |
| vnd.openxmlformats-officedocument.spreadsheetml.sheet | .xlsx | Excel 工作簿(2007+) | |
| msword | .doc | Word 97-2003 文檔 | |
| vnd.openxmlformats-officedocument.wordprocessingml.document | .docx | Word 文檔(2007+) |
示例:
// 創建文本Blob
const textBlob = new Blob(["Hello, world!"], {type: "text/plain"});// 創建JSON Blob
const data = {name: "Alice", age: 30};
const jsonBlob = new Blob([JSON.stringify(data)], {type: "application/json"});// 示例:默認類型(二進制流)
const defaultBlob = new Blob([anyData]); // 默認類型為 "application/octet-stream"// 創建圖像Blob(偽代碼)
const canvas = document.createElement('canvas');
// ... 在canvas上繪制 ...
canvas.toBlob((blob) => {// blob已準備好使用
}, "image/png");// 組合字符串、ArrayBuffer和現有Blob
const header = "FILE HEADER\n";
const binaryData = new Uint8Array([0x48, 0x65, 0x6c, 0x6c, 0x6f]); // "Hello"
const existingBlob = new Blob([" World!"], {type: "text/plain"});const combinedBlob = new Blob([header, binaryData, existingBlob], {type: "text/plain"}
);
URL.createObjectURL()
URL.createObjectURL() 是 Web API 中的一個方法,它可以將一個
Blob ——(二進制數據對象)、File ——用戶文件(繼承自 Blob)或MediaSource——(流媒體場景)對象轉換為一個唯一的 URL。
這個 URL 的生命周期與創建它的文檔綁定,并且通常用于在瀏覽器中臨時引用一個
本地文件或二進制數據。
基本用法:
- const objectURL = URL.createObjectURL(blob);
blob:一個 Blob、File 或 MediaSource 對象。
返回值:一個字符串,表示一個指向該對象的臨時 URL。(格式為 blob:origin/unique-id)
內存管理?? :生成的 URL 會一直存在于內存中,直到文檔被卸載(頁面關閉)或手動撤銷(URL.revokeObjectURL(objectURL))。
??URL 的生命周期??:這個 URL 只在當前文檔(document)中有效。如果導航到其他頁面,這個 URL 就會失效。
??安全性??:生成的 URL 是 blob: 協議,其內容只能由創建它的頁面訪問,具有一定的安全性。
應用場景:
預覽用戶選擇(上傳時)的圖片??:
當用戶通過 < input type=“file” > 選擇圖片后,可以用 createObjectURL 生成一個 URL 并賦給 < img > 的 src,從而在不將圖片上傳到服務器的情況下預覽圖片。
<input type="file" id="upload" accept="image/*">
<img id="preview" src="#" alt="預覽">
const upload = document.getElementById('upload');const preview = document.getElementById('preview');upload.addEventListener('change', function(e) {const file = e.target.files[0];if (file) {// 為選中的文件創建臨時URLconst objectURL = URL.createObjectURL(file);// 將img標簽的src指向這個URLpreview.src = objectURL;// 在圖片加載后(或者合適的時機)撤銷URL,這里我們等待圖片加載完成preview.onload = function() {URL.revokeObjectURL(objectURL);};}});
-
處理(下載)二進制數據??:
例如,下載由 JavaScript 生成的二進制數據(如 PDF、圖片等),或在不使用服務器的情況下在頁面中顯示這些數據。// 創建blob對象// 1.const response = await fetch('http://XXX');const blob = await response .blob();// 2.valueconst value= "Hello, world!";const blob2 = new Blob([value], {type: "text/plain"}); // image/png// 創建URL對象const url = URL.createObjectURL(blob);// 創建a標簽......點擊下載const a = document.createElement('a');a.href = url;a.download = 'example.txt'; // 設置下載文件名a.click(); // 觸發下載setTimeout(() => URL.revokeObjectURL(url), 100);// 立即釋放資源(不需要等待下載) -
??處理音視頻流??:(播放用戶上傳的視頻)
在 WebRTC 或媒體處理中,用于創建指向媒體流的 URL。<input type="file" accept="video/*" id="video-upload"><video controls id="player"></video><script>document.getElementById('video-upload').addEventListener('change', (e) => {const file = e.target.files[0];if (file) {const video = document.getElementById('player');video.src = URL.createObjectURL(file);video.onload = () => URL.revokeObjectURL(video.src); // 清理}});</script>
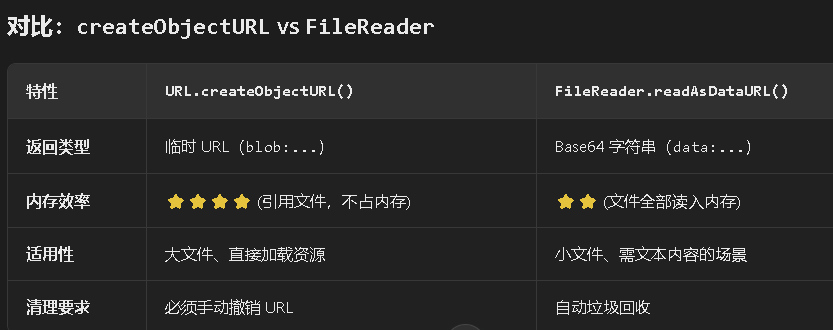
替代方案:FileReader.readAsDataURL()??
將文件轉為 Base64 字符串(格式 data:[mime];base64,…),但??不適合大文件??(內存占用更高)。
有時候,我們也可以用 FileReader 來讀取文件內容,例如:
const reader = new FileReader();
reader.onload = function(e) {preview.src = e.target.result;
};
reader.readAsDataURL(file);
readAsDataURL 會生成一個 Data URL(以 data: 開頭的字符串),它包含了文件的全部內容(base64編碼)。
這種方式不需要手動撤銷URL,但文件較大時可能會占用更多內存。
FileReader 提供了幾種方法來讀取文件,
每種方法適用于不同的文件類型或讀取方式:
readAsText(file, [encoding]) :
以文本形式讀取文件內容。
第二個參數是可選的,指定文本編碼(如 UTF-8)。
readAsDataURL(file):
將文件讀取為 Data URL,通常用于將圖像文件嵌入到網頁中。
readAsArrayBuffer(file):
將文件讀取為 ArrayBuffer,適合處理二進制數據,如音頻、視頻或圖像。
readAsBinaryString(file)(已廢棄):
將文件讀取為二進制字符串。不推薦使用,建議使用 ArrayBuffer 替代。
對比:
獲取tiff文件 轉 png
說明:
由于tiff格式在瀏覽器中并不常見,且瀏覽器默認不支持直接顯示tiff圖片。
tiff文件在前端中不可以直接通過image標簽顯示,
因此我們需要借助第三方庫來將tiff文件轉換成png。
TIFF庫
utif:一個輕量級的TIFF解析庫
tiff.js:一個將TIFF圖像轉換為可顯示格式的庫
utif庫輕量且簡單,以下以utif庫使用為例:
安裝:
npm install utifnpm install tiff.js
使用:
import * as UTIF from 'utif';import { Tiff } from 'tiff.js';
注意:由于utif庫處理的是TIFF文件的二進制數據,我們需要使用FileReader來讀取文件。
注意事項:
- 大文件處理??:
大尺寸 TIFF 文件可能導致內存問題
考慮添加文件大小限制和加載提示 - 服務器端替代方案??:
// 替代方案:使用服務器轉換(如Node.js+Sharp) async serverConversion(file) {const formData = new FormData();formData.append('tiff', file);const response = await fetch('/api/convert', {method: 'POST',body: formData});return URL.createObjectURL(await response.blob()); } - 瀏覽器兼容性??:
所有現代瀏覽器均支持
IE11 需要 polyfill(推薦使用現代瀏覽器) - 安全性??:
上傳時驗證文件頭確保是真實TIFF文件:const isValidTiff = buffer[0] === 0x49 && buffer[1] === 0x49;
此實現完全在客戶端完成轉換,無需服務器支持,適合中小型TIFF文件的轉換需求。對于專業級應用(如醫學影像),建議使用服務器端解決方案(如Python+pillow
或 Node.js+sharp)。
TIFF轉換
通過url轉換tiff文件為png
- 獲取在線的TIFF文件(通常是一個URL)??:使用 Fetch API 獲取遠程 TIFF 文件的 ArrayBuffer
- 解析TIFF??:使用 如tiff.js 庫解析二進制數據,獲取圖像信息
- 將圖像數據繪制到canvas上,Canvas轉換??:
創建臨時 Canvas 元素
使用 toRGBA8() 方法獲取像素數據
通過 putImageData 繪制到 Canvas - 轉換為PNG??,使用canvas的toDataURL方法將其轉換為PNG格式的數據URL:
使用 canvas.toDataURL(‘image/png’) 獲取 PNG 數據 URL - ??顯示和下載??:
通過 img 標簽展示
創建下載鏈接實現PNG下載
// 引入依賴
import * as UTIF from "utif";
// tiff文件URL轉換_方法封裝
const tiffUrlToPng = async (fileUrl) => {if (!fileUrl) {console.log("請輸入TIFF文件URL");return;}// 自定義初始化工作let result = "";// this.isLoading = true;// this.error = null;// this.pngImage = null;// 使用 Fetch API 獲取遠程 TIFF 文件的 ArrayBufferawait fetch(fileUrl).then((response) => {if (!response.ok) {throw new Error("Network response was not ok");}return response.arrayBuffer();}).then((buffer) => {// 解析tiff數據const uint8Array = new Uint8Array(buffer);const ifds = UTIF.decode(uint8Array);// 獲取第一幀(支持多幀TIFF)const firstPage = ifds[0];UTIF.decodeImage(uint8Array, ifds[0]);const rgba = UTIF.toRGBA8(firstPage);// 創建Canvasconst canvas = document.createElement("canvas");canvas.width = firstPage.width;canvas.height = firstPage.height;const ctx = canvas.getContext("2d");// 將圖像數據放入Canvasconst imageData = new ImageData(new Uint8ClampedArray(rgba),canvas.width,canvas.height);ctx.putImageData(imageData, 0, 0);// 轉換為PNG Data URL// resolve(canvas.toDataURL("image/png"));result = canvas.toDataURL("image/png");}).catch((error) => {console.error("Error:", error); // 處理錯誤});return result; //返回為promise對象。使用.then()方法獲取結果。
};
utff.js使用(通過URL獲取tiff文件轉換)
<template><div><input type="text" v-model="tiffUrl" placeholder="輸入TIFF文件URL"><button @click="convertToPng" :disabled="isLoading">轉換為PNG</button><div v-if="isLoading">轉換中...</div><img v-if="pngImage" :src="pngImage" alt="轉換后的PNG" style="max-width: 100%"><div v-if="error" class="error">{{ error }}</div><button v-if="pngImage" @click="downloadPng">下載PNG</button></div>
</template><script>
import { Tiff } from 'tiff.js';export default {data() {return {tiffUrl: '',      // 存儲輸入的TIFF URLpngImage: null,   // 轉換后的PNG數據URLisLoading: false, // 加載狀態error: null       // 錯誤信息};},methods: {async convertToPng() {if (!this.tiffUrl) {this.error = '請輸入TIFF文件URL';return;}this.isLoading = true;this.error = null;this.pngImage = null;try {// 1. 獲取TIFF文件數據const response = await fetch(this.tiffUrl);if (!response.ok) throw new Error(`文件加載失敗: ${response.status}`);const buffer = await response.arrayBuffer();// 2. 解析TIFFconst tiff = new Tiff({ buffer });const width = tiff.width();const height = tiff.height();// 3. 使用Canvas轉換const canvas = document.createElement('canvas');canvas.width = width;canvas.height = height;const ctx = canvas.getContext('2d');// 獲取TIFF像素數據并繪制到Canvasconst imageData = ctx.createImageData(width, height);imageData.data.set(tiff.toRGBA8()); // 轉換為RGBA格式ctx.putImageData(imageData, 0, 0);// 4. 轉換為PNGthis.pngImage = canvas.toDataURL('image/png');} catch (err) {console.error('轉換失敗:', err);this.error = `轉換失敗: ${err.message || '未知錯誤'}`;} finally {this.isLoading = false;}},// 下載轉換后的PNGdownloadPng() {if (!this.pngImage) return;const link = document.createElement('a');link.href = this.pngImage;link.download = 'converted_image.png';document.body.appendChild(link);link.click();document.body.removeChild(link);}}
};
</script><style>
.error {color: red;margin-top: 10px;
}
</style>
通過文件選擇的方式轉換tiff文件為png
實現說明:
??
- 文件選擇??:
- 使用 接受用戶上傳的 TIFF 文件
- 設置 accept=“.tif,.tiff” 限制文件類型
- ??TIFF 轉換核心流程??:
- 使用 FileReader 讀取文件為 ArrayBuffer;
- 通過 UTIF.decode() 解析 TIFF 文件結構;
- 使用 UTIF.toRGBA8() 將 TIFF 轉換為 RGBA 格式;
- 使用 Canvas 將圖像數據渲染為 PNG
- 多幀支持??:
- ifds 數組包含 TIFF 的所有幀;
- ifds[0] 獲取第一幀(可根據需要循環處理多幀)
- ??下載功能??:
- 將 Canvas 生成的 Data URL 轉換為可下載鏈接;
- 通過動態創建 a 標簽觸發下載
<template><div><input type="file" @change="handleFileUpload" accept=".tif,.tiff"><div v-if="previewUrl"><img :src="previewUrl" alt="Converted PNG" style="max-width: 100%"><button @click="downloadPNG">下載PNG</button></div></div>
</template><script>
import * as UTIF from 'utif';export default {data() {return {previewUrl: null,convertedImage: null};},methods: {async handleFileUpload(event) {const file = event.target.files[0];if (!file) return;try {const pngDataUrl = await this.convertTiffToPng(file);this.previewUrl = pngDataUrl;} catch (error) {console.error('轉換失敗:', error);alert('文件轉換失敗,請確保是有效的TIFF文件');}},async convertTiffToPng(tiffFile) {return new Promise((resolve, reject) => {const reader = new FileReader();reader.onload = (e) => {try {// 解析TIFF數據const buffer = new Uint8Array(e.target.result);const ifds = UTIF.decode(buffer);UTIF.decodeImages(buffer, ifds);// 獲取第一幀(支持多幀TIFF)const firstPage = ifds[0];const rgba = UTIF.toRGBA8(firstPage);// 創建Canvasconst canvas = document.createElement('canvas');canvas.width = firstPage.width;canvas.height = firstPage.height;const ctx = canvas.getContext('2d');// 將圖像數據放入Canvasconst imageData = new ImageData(new Uint8ClampedArray(rgba),canvas.width,canvas.height);ctx.putImageData(imageData, 0, 0);// 轉換為PNG Data URLresolve(canvas.toDataURL('image/png'));} catch (err) {reject(err);}};reader.onerror = reject;reader.readAsArrayBuffer(tiffFile);});},downloadPNG() {if (!this.previewUrl) return;const link = document.createElement('a');link.href = this.previewUrl;link.download = 'converted_image.png';document.body.appendChild(link);link.click();document.body.removeChild(link);}}
};
</script>
下載(導出)
function downloadFile(blob, fileName) {const url = URL.createObjectURL(blob);const a = document.createElement('a');a.href = url;a.download = fileName;document.body.appendChild(a);a.click();// 清理setTimeout(() => {document.body.removeChild(a);URL.revokeObjectURL(url);}, 100);
}
普通圖片文件png,jpg,jpeg,gif
上傳下載如上代碼
)


)

)


)


)
】使用UDTF時出現報錯“FlatEventUDTF cannot be resolved”)