
骨骼動畫基礎
骨骼動畫是 3D 計算機圖形中常用的技術,它通過以下兩個主要組件實現角色動畫。
- 骨骼系統 (Skeleton):由層級結構的骨頭組成,類似于人體骨骼
- 蒙皮 (Mesh Skinning):將模型網格頂點綁定到骨骼上,使骨骼移動時帶動網格變形
在 OSG 中,這些功能主要由osgAnimation庫提供支持。
當然可以!以下是 Day 16:骨骼動畫與蒙皮(osgAnimation) 中的“核心知識點”部分,以標準 Markdown (.md) 格式呈現:
核心知識點
| 類名 | 作用 |
|---|---|
osgAnimation::AnimationManagerBase | 動畫管理器接口,定義了動畫更新的基本行為 |
osgAnimation::BasicAnimationManager | 基礎動畫管理器實現類,用于管理和播放多個動畫 |
osgAnimation::RigGeometry | 蒙皮網格數據結構,支持骨骼影響頂點的變形計算 |
osgAnimation::AnimationPathCallback | 動畫路徑回調,可用于控制骨骼或模型沿特定路徑運動 |
osgDB::readNodeFile() | 加載模型文件(支持 OSGT 等格式),自動解析動畫和骨骼信息 |
OSGT 格式
| 格式 | 骨骼支持 | 動畫保留 | OSG 兼容性 |
|---|---|---|---|
.osgt | ? 完整 | ? 完整 | ?????(原生支持,推薦使用) |
.dae | ? 完整 | ? 完整 | ????(需 Collada 插件) |
.fbx | ? 不支持 | ? 不支持 | 不可直接讀取 |
.osgt:OSG 的二進制序列化格式,支持完整的骨骼與動畫數據,加載速度快,兼容性最好。.dae(Collada):開放的 XML 格式,廣泛用于三維模型交換,支持骨骼和動畫,但需要 OSG 的osgdb_collada插件。.fbx:Autodesk 的私有格式,功能強大,但 OpenSceneGraph 默認不支持 FBX,需要借助第三方插件(如OpenSceneGraph-FBX)才能加載。
實戰
實戰1
通過代碼自動生成動畫效果。
animation.cpp
#include <osgViewer/Viewer>
#include <osg/Group>
#include <osg/Geode>
#include <osg/ShapeDrawable>
#include <osg/MatrixTransform>
#include <osgAnimation/BasicAnimationManager>
#include <osgAnimation/UpdateMatrixTransform>
#include <osgAnimation/Animation>
#include <osgAnimation/Channel>
#include <osgGA/TrackballManipulator>
#include <osg/Material>
#include <osgDB/Registry>
#include <osg/Notify>
#include <iostream>// 創建骨骼節點
osg::MatrixTransform* createBone(const std::string& name, float length, const osg::Vec4& color) {osg::ref_ptr<osg::MatrixTransform> bone = new osg::MatrixTransform;bone->setName(name);// 創建骨骼可視化(圓柱體)osg::ref_ptr<osg::Cylinder> cylinder = new osg::Cylinder(osg::Vec3(0, 0, length/2), 0.1f, length);osg::ref_ptr<osg::ShapeDrawable> drawable = new osg::ShapeDrawable(cylinder);// 設置顏色osg::ref_ptr<osg::Material> material = new osg::Material;material->setDiffuse(osg::Material::FRONT, osg::Vec4(color));drawable->getOrCreateStateSet()->setAttributeAndModes(material.get());// 添加關節球osg::ref_ptr<osg::Sphere> jointSphere = new osg::Sphere(osg::Vec3(0, 0, 0), 0.15f);osg::ref_ptr<osg::ShapeDrawable> jointDrawable = new osg::ShapeDrawable(jointSphere);jointDrawable->setColor(osg::Vec4(1.0f, 1.0f, 0.0f, 1.0f));osg::ref_ptr<osg::Geode> geode = new osg::Geode;geode->addDrawable(drawable.get());geode->addDrawable(jointDrawable.get());bone->addChild(geode.get());return bone.release();
}// 在main函數中添加臨時測試動畫
class SimpleRotationCallback : public osg::NodeCallback {
public:virtual void operator()(osg::Node* node, osg::NodeVisitor* nv) {static double start = osg::Timer::instance()->time_s();double t = osg::Timer::instance()->time_s() - start;float angle = sin(t) * 1.0f; // 擺動幅度osg::MatrixTransform* mt = dynamic_cast<osg::MatrixTransform*>(node);if (mt) {mt->setMatrix(osg::Matrix::rotate(angle, osg::Vec3(0,1,0)));}traverse(node, nv);}
};// 創建動畫
osgAnimation::Animation* createArmAnimation() {osg::ref_ptr<osgAnimation::Animation> animation = new osgAnimation::Animation;animation->setName("ArmAnimation");// 創建肩關節動畫通道osg::ref_ptr<osgAnimation::QuatSphericalLinearChannel> shoulderChannel = new osgAnimation::QuatSphericalLinearChannel;shoulderChannel->setName("rotation");shoulderChannel->setTargetName("Shoulder");osgAnimation::QuatKeyframeContainer* shoulderKeyframes = shoulderChannel->getOrCreateSampler()->getOrCreateKeyframeContainer();shoulderKeyframes->push_back(osgAnimation::QuatKeyframe(0.0, osg::Quat(0, osg::Vec3(0,1,0))));shoulderKeyframes->push_back(osgAnimation::QuatKeyframe(2.0, osg::Quat(osg::PI/4, osg::Vec3(0,1,0))));shoulderKeyframes->push_back(osgAnimation::QuatKeyframe(4.0, osg::Quat(-osg::PI/4, osg::Vec3(0,1,0))));shoulderKeyframes->push_back(osgAnimation::QuatKeyframe(6.0, osg::Quat(0, osg::Vec3(0,1,0))));// 創建肘關節動畫通道osg::ref_ptr<osgAnimation::QuatSphericalLinearChannel> elbowChannel = new osgAnimation::QuatSphericalLinearChannel;elbowChannel->setName("rotation");elbowChannel->setTargetName("Elbow");osgAnimation::QuatKeyframeContainer* elbowKeyframes = elbowChannel->getOrCreateSampler()->getOrCreateKeyframeContainer();elbowKeyframes->push_back(osgAnimation::QuatKeyframe(0.0, osg::Quat(0, osg::Vec3(0,1,0))));elbowKeyframes->push_back(osgAnimation::QuatKeyframe(1.0, osg::Quat(osg::PI/2, osg::Vec3(0,1,0))));elbowKeyframes->push_back(osgAnimation::QuatKeyframe(2.0, osg::Quat(0, osg::Vec3(0,1,0))));elbowKeyframes->push_back(osgAnimation::QuatKeyframe(3.0, osg::Quat(osg::PI/2, osg::Vec3(0,1,0))));elbowKeyframes->push_back(osgAnimation::QuatKeyframe(4.0, osg::Quat(0, osg::Vec3(0,1,0))));elbowKeyframes->push_back(osgAnimation::QuatKeyframe(6.0, osg::Quat(0, osg::Vec3(0,1,0))));// 創建腕關節動畫通道osg::ref_ptr<osgAnimation::QuatSphericalLinearChannel> wristChannel = new osgAnimation::QuatSphericalLinearChannel;wristChannel->setName("rotation");wristChannel->setTargetName("Wrist");osgAnimation::QuatKeyframeContainer* wristKeyframes = wristChannel->getOrCreateSampler()->getOrCreateKeyframeContainer();wristKeyframes->push_back(osgAnimation::QuatKeyframe(0.0, osg::Quat(0, osg::Vec3(1,0,0))));wristKeyframes->push_back(osgAnimation::QuatKeyframe(1.5, osg::Quat(osg::PI/3, osg::Vec3(1,0,0))));wristKeyframes->push_back(osgAnimation::QuatKeyframe(3.0, osg::Quat(-osg::PI/3, osg::Vec3(1,0,0))));wristKeyframes->push_back(osgAnimation::QuatKeyframe(4.5, osg::Quat(osg::PI/3, osg::Vec3(1,0,0))));wristKeyframes->push_back(osgAnimation::QuatKeyframe(6.0, osg::Quat(0, osg::Vec3(1,0,0))));animation->addChannel(shoulderChannel.get());animation->addChannel(elbowChannel.get());animation->addChannel(wristChannel.get());animation->setPlayMode(osgAnimation::Animation::LOOP);animation->setDuration(6.0);return animation.release();
}// 創建手臂模型
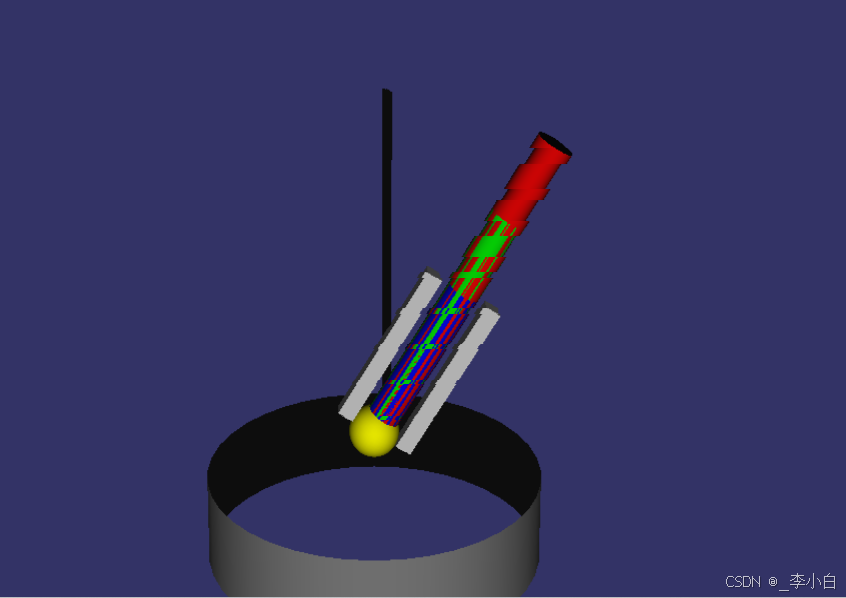
osg::Group* createArm() {osg::ref_ptr<osg::Group> root = new osg::Group;// 創建骨骼層級結構osg::ref_ptr<osg::MatrixTransform> shoulder = createBone("Shoulder", 2.0f, osg::Vec4(1.0f, 0.0f, 0.0f, 1.0f));osg::ref_ptr<osg::MatrixTransform> elbow = createBone("Elbow", 1.5f, osg::Vec4(0.0f, 1.0f, 0.0f, 1.0f));osg::ref_ptr<osg::MatrixTransform> wrist = createBone("Wrist", 1.0f, osg::Vec4(0.0f, 0.0f, 1.0f, 1.0f));// 設置骨骼初始位置shoulder->setMatrix(osg::Matrix::translate(0, 0, 0));elbow->setMatrix(osg::Matrix::translate(0, 0, 2.0f));wrist->setMatrix(osg::Matrix::translate(0, 0, 1.5f));// 構建層級關系shoulder->addChild(elbow);elbow->addChild(wrist);// 添加動畫更新回調shoulder->setUpdateCallback(new SimpleRotationCallback);elbow->setUpdateCallback(new osgAnimation::UpdateMatrixTransform("Elbow"));wrist->setUpdateCallback(new osgAnimation::UpdateMatrixTransform("Wrist"));// 創建手爪模型osg::ref_ptr<osg::Geode> handGeode = new osg::Geode;osg::ref_ptr<osg::Box> leftFinger = new osg::Box(osg::Vec3(-0.2f, 0, 0.5f), 0.1f, 0.1f, 1.0f);osg::ref_ptr<osg::Box> rightFinger = new osg::Box(osg::Vec3(0.2f, 0, 0.5f), 0.1f, 0.1f, 1.0f);osg::ref_ptr<osg::ShapeDrawable> leftDrawable = new osg::ShapeDrawable(leftFinger);osg::ref_ptr<osg::ShapeDrawable> rightDrawable = new osg::ShapeDrawable(rightFinger);leftDrawable->setColor(osg::Vec4(0.8f, 0.8f, 0.8f, 1.0f));rightDrawable->setColor(osg::Vec4(0.8f, 0.8f, 0.8f, 1.0f));handGeode->addDrawable(leftDrawable);handGeode->addDrawable(rightDrawable);wrist->addChild(handGeode);root->addChild(shoulder);// 創建底座osg::ref_ptr<osg::Geode> baseGeode = new osg::Geode;osg::ref_ptr<osg::Cylinder> baseCylinder = new osg::Cylinder(osg::Vec3(0,0,-0.5f), 1.0f, 0.5f);osg::ref_ptr<osg::ShapeDrawable> baseDrawable = new osg::ShapeDrawable(baseCylinder);baseDrawable->setColor(osg::Vec4(0.5f, 0.5f, 0.5f, 1.0f));baseGeode->addDrawable(baseDrawable);root->addChild(baseGeode);return root.release();
}int main() {// 設置調試輸出級別osg::setNotifyLevel(osg::NOTICE);// 創建ViewerosgViewer::Viewer viewer;// 創建主場景組osg::ref_ptr<osg::Group> root = new osg::Group;// 添加手臂模型root->addChild(createArm());// 創建動畫管理器osg::ref_ptr<osgAnimation::BasicAnimationManager> animManager = new osgAnimation::BasicAnimationManager;// 將動畫管理器作為場景圖的更新回調root->setUpdateCallback(animManager);// 添加動畫osgAnimation::Animation* anim = createArmAnimation();animManager->registerAnimation(anim);animManager->playAnimation(anim);// 輸出調試信息std::cout << "動畫管理器狀態: " << (animManager.valid() ? "有效" : "無效") << std::endl;std::cout << "已注冊動畫數量: " << animManager->getAnimationList().size() << std::endl;if (animManager->getAnimationList().size() > 0) {std::cout << "正在播放動畫: " << animManager->getAnimationList()[0]->getName() << std::endl;}viewer.setSceneData(root);viewer.setCameraManipulator(new osgGA::TrackballManipulator);// 設置初始視角viewer.getCameraManipulator()->setHomePosition(osg::Vec3(0, -10, 5), // 眼睛位置osg::Vec3(0, 0, 2), // 中心位置osg::Vec3(0, 0, 1) // 上方向);viewer.home(); // 應用初始視角設置return viewer.run();
}
運行效果
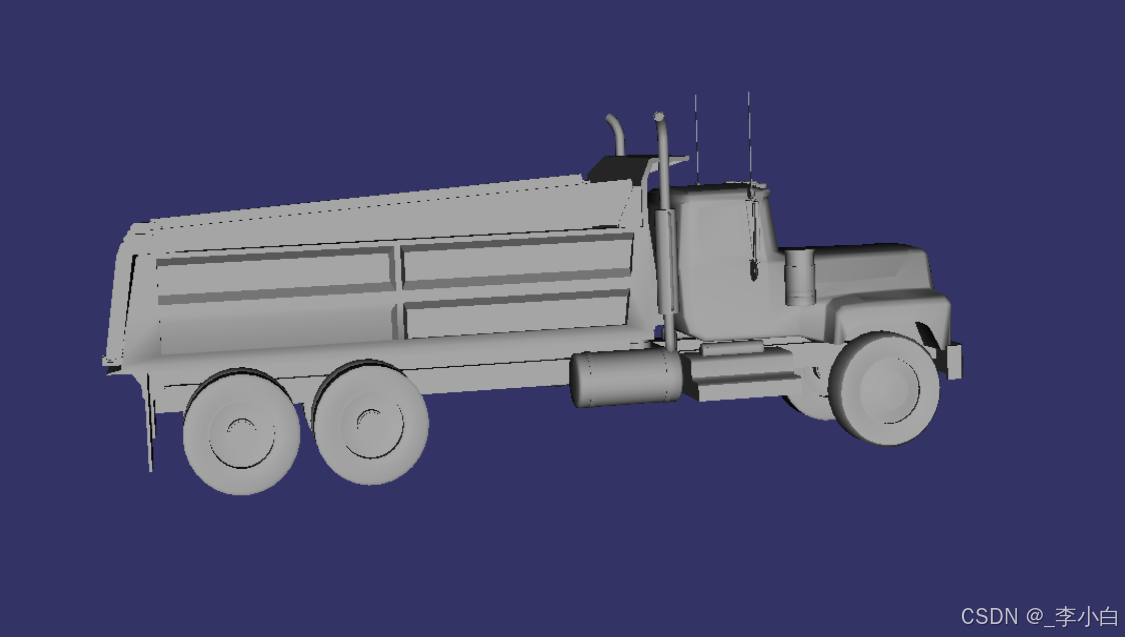
加載osgt文件
animationOsgt.cpp
#include <osgDB/ReadFile>
#include <osgViewer/Viewer>
#include <osgGA/TrackballManipulator>
#include <osgAnimation/BasicAnimationManager>int main() {// 1. 加載模型osg::ref_ptr<osg::Node> model = osgDB::readNodeFile("../dumptruck.osgt");if (!model) return 1;// 2. 獲取動畫管理器osgAnimation::BasicAnimationManager* animManager = dynamic_cast<osgAnimation::BasicAnimationManager*>(model->getUpdateCallback());if (animManager && !animManager->getAnimationList().empty()) {// 3. 正確播放動畫(兩種解決方案):if (animManager) {const osgAnimation::AnimationList& animList = animManager->getAnimationList();if (!animList.empty()) {// 打印所有動畫信息for (const auto& anim : animList) {std::cout << "Found animation: " << anim->getName() << " (" << anim->getDuration() << "s)\n";}// 播放第一個動畫animManager->playAnimation(animList[0]);} else {std::cerr << "Warning: No animations found in the model" << std::endl;}} else {std::cerr << "Error: No AnimationManager found" << std::endl;}}// 4. 設置查看器osgViewer::Viewer viewer;viewer.setSceneData(model);viewer.setCameraManipulator(new osgGA::TrackballManipulator());return viewer.run();
}
運行效果
本章可能會和自己的osg版本有關系,會有一些報錯。耐心解決。_


_csdn)

)


 ----- Python起源)


