版權歸作者所有,如有轉發,請注明文章出處:https://cyrus-studio.github.io/blog/
FART 脫殼
fartthread 方法在 app 啟動的時候(ActivityThread)開啟 fart 線程,休眠 60 秒,等待 app 啟動完成后自動開始遍歷 ClassLoader 的 類列表,發起主動調用。
FART 脫殼結束得到的文件列表(分 Execute 與 主動調用兩類):
-
Execute 脫殼點得到的 dex (*_dex_file_execute.dex)和 dex 中的所有類列表( txt 文件)
-
主動調用時 dump 得到的 dex (*_dex_file.dex)和此時 dex 中的所有類列表,以及該 dex 中所有函數的 CodeItem( bin 文件)
wayne:/data/data/com.cyrus.example/cyrus # ls
1321896_class_list.txt         1437648_dex_file_execute.dex   1488168_class_list_execute.txt 1605504_ins_4714.bin
1321896_class_list_execute.txt 1437648_ins_4714.bin           1488168_dex_file.dex           198768_class_list.txt
1321896_dex_file.dex           1448488_class_list.txt         1488168_dex_file_execute.dex   198768_class_list_execute.txt
1321896_dex_file_execute.dex   1448488_class_list_execute.txt 1488168_ins_4714.bin           198768_dex_file.dex
1321896_ins_4714.bin           1448488_dex_file.dex           1496608_class_list.txt         198768_dex_file_execute.dex
1351008_class_list.txt         1448488_dex_file_execute.dex   1496608_class_list_execute.txt 198768_ins_4714.bin
1351008_class_list_execute.txt 1448488_ins_4714.bin           1496608_dex_file.dex           3782924_class_list_execute.txt
1351008_dex_file.dex           1461504_class_list.txt         1496608_dex_file_execute.dex   3782924_dex_file_execute.dex
1351008_dex_file_execute.dex   1461504_class_list_execute.txt 1496608_ins_4714.bin           400440_class_list_execute.txt
1351008_ins_4714.bin           1461504_dex_file.dex           1537456_class_list.txt         400440_dex_file_execute.dex
1403328_class_list.txt         1461504_dex_file_execute.dex   1537456_class_list_execute.txt 4376620_class_list_execute.txt
1403328_class_list_execute.txt 1461504_ins_4714.bin           1537456_dex_file.dex           4376620_dex_file_execute.dex
1403328_dex_file.dex           1472352_class_list.txt         1537456_dex_file_execute.dex   590624_class_list.txt
1403328_dex_file_execute.dex   1472352_class_list_execute.txt 1537456_ins_4714.bin           590624_class_list_execute.txt
1403328_ins_4714.bin           1472352_dex_file.dex           1571616_class_list.txt         590624_dex_file.dex
1423432_class_list.txt         1472352_dex_file_execute.dex   1571616_class_list_execute.txt 590624_dex_file_execute.dex
1423432_class_list_execute.txt 1472352_ins_4714.bin           1571616_dex_file.dex           590624_ins_4714.bin
1423432_dex_file.dex           1481472_class_list.txt         1571616_dex_file_execute.dex   7387912_class_list_execute.txt
1423432_dex_file_execute.dex   1481472_class_list_execute.txt 1571616_ins_4714.bin           7387912_dex_file_execute.dex
1423432_ins_4714.bin           1481472_dex_file.dex           1605504_class_list.txt         8391596_class_list_execute.txt
1437648_class_list.txt         1481472_dex_file_execute.dex   1605504_class_list_execute.txt 8391596_dex_file_execute.dex
1437648_class_list_execute.txt 1481472_ins_4714.bin           1605504_dex_file.dex           9085048_class_list_execute.txt
1437648_dex_file.dex           1488168_class_list.txt         1605504_dex_file_execute.dex   9085048_dex_file_execute.dex
關于 FART 的詳細介紹參考下面的文章:
-
FART 自動化脫殼框架簡介與脫殼點的選擇
-
FART 主動調用組件設計和源碼分析
-
移植 FART 到 Android 10 實現自動化脫殼
-
FART 自動化脫殼框架一些 bug 修復記錄
-
使用 Frida 增強 FART:實現更強大的 Android 脫殼能力
-
攻防 FART 脫殼:特征檢測識別 + 對抗繞過全解析
-
FART 精準脫殼:通過配置文件控制脫殼節奏與范圍
FART 生成的 bin 文件(CodeItem)格式
5元組填充:
{name:函數名, method_idx:函數索引, offset:偏移, code_item_len:長度, ins:函數體CodeItem的base64字符串};
其中:method_idx 和 ins 是必須的,其他不是必要的,但是可以作為參考。即只需要 method_idx 進行區分函數以及該函數的 CodeItem 內容即可。
修復組件就是通過讀取 bin 文件的 method_idx 和 ins 進行 dex 的修復的。
只要符合 bin 文件 5 元組的規范都可以使用 FART 修復組件進行 dex 函數的修復。
某電商APP脫殼
1. 脫殼前準備
編寫一個 bat 實現如下功能:
-
禁止加載 cdex,清空 /data/app/com.shizhuang.duapp-fTxemmnM8l6298xbBELksQ==/oat/arm64 目錄下的所有文件
-
解決 frida 反調試,刪除 /data/app/com.shizhuang.duapp-fTxemmnM8l6298xbBELksQ==/lib/arm64/libmsaoaidsec.so
-
詢問是否清空 /data/data/com.shizhuang.duapp/cyrus 目錄下的所有文件?如果是就清空
-
最后 pause
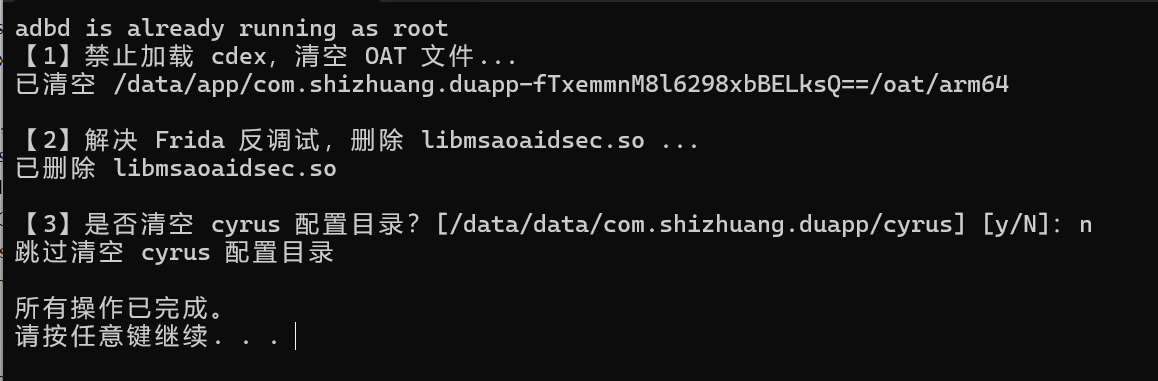
unpack_before.bat
@echo off:: 啟用超級管理員權限
adb root:: 設置變量
set PACKAGE_NAME=com.shizhuang.duapp
set APK_DIR=/data/app/com.shizhuang.duapp-fTxemmnM8l6298xbBELksQ==
set LIB_DIR=%APK_DIR%/lib/arm64
set OAT_DIR=%APK_DIR%/oat/arm64
set CYRUS_DIR=/data/data/%PACKAGE_NAME%/cyrus:: 步驟 1
echo 【1】禁止加載 cdex,清空 OAT 文件...
adb shell "rm -rf \"%OAT_DIR%\"/*"
echo 已清空 %OAT_DIR%
echo.:: 步驟 2
echo 【2】解決 Frida 反調試,刪除 libmsaoaidsec.so ...
adb shell "rm -f \"%LIB_DIR%/libmsaoaidsec.so\""
echo 已刪除 libmsaoaidsec.so
echo.:: 步驟 3
set /p INPUT=【3】是否清空 cyrus 配置目錄?[%CYRUS_DIR%] [y/N]:if /i "%INPUT%"=="y" (echo 正在清空 cyrus...adb shell "rm -rf \"%CYRUS_DIR%\"/*"echo 已清空 %CYRUS_DIR%
) else (echo 跳過清空 cyrus 配置目錄
)echo.
echo 所有操作已完成。
pause
執行腳本
2. 開始脫殼
通過 frida 腳本配合 FART 精準對目標類脫殼
// 前綴過濾邏輯
function shouldLoadClass(name) {return name.startsWith("ff.")
}function hookLoadClassAndInvoke() {const ActivityThread = Java.use('android.app.ActivityThread');if (ActivityThread.dispatchClassTask) {ActivityThread.dispatchClassTask.implementation = function (classloader, className, method) {if (shouldLoadClass(className)) {console.log('[load] dispatchClassTask: ' + className);return this.dispatchClassTask(classloader, className, method); // 正常調用}console.log('[skip] dispatchClassTask: ' + className);return; // 不調用原函數};} else {console.log('[-] ActivityThread.dispatchClassTask not found');}
}function fartOnDexclassloader() {var DexClassLoader = Java.use("dalvik.system.DexClassLoader");var ActivityThread = Java.use("android.app.ActivityThread");DexClassLoader.$init.overload('java.lang.String',     // dexPath'java.lang.String',     // optimizedDirectory'java.lang.String',     // librarySearchPath'java.lang.ClassLoader' // parent).implementation = function (dexPath, optimizedDirectory, libPath, parent) {console.log("[+] DexClassLoader created:");console.log("    |- dexPath: " + dexPath);console.log("    |- optimizedDirectory: " + optimizedDirectory);console.log("    |- libPath: " + libPath);var cl = this.$init(dexPath, optimizedDirectory, libPath, parent);// 調用 startCodeInspection 方法try {console.log("[*] Calling fartWithClassLoader...");ActivityThread.startCodeInspectionWithCL(this);console.log("[+] fartWithClassLoader finished.");} catch (e) {console.error("[-] Error calling fartWithClassLoader:", e);}return cl;};
}function invokeAllClassloaders() {try {// 獲取 ActivityThread 類var ActivityThread = Java.use("android.app.ActivityThread");Java.enumerateClassLoaders({onMatch: function (loader) {try {// 過濾掉 BootClassLoaderif (loader.toString().includes("BootClassLoader")) {console.log("[-] 跳過 BootClassLoader");return;}// 調用 fartWithClassLoaderconsole.log("[*] 調用 startCodeInspectionWithCL -> " + loader);ActivityThread.startCodeInspectionWithCL(loader);} catch (e) {console.error("[-] 調用失敗: " + e);}},onComplete: function () {console.log("[*] 枚舉并調用完畢");}});} catch (err) {console.error("[-] 腳本執行異常: " + err);}
}setImmediate(function () {Java.perform(function () {// 過濾需要主動調用的類hookLoadClassAndInvoke()// 解決局部變量的 ClassLoader 枚舉不出來問題fartOnDexclassloader()// 解決非雙親委派關系下動態加載的 dex 脫殼問題invokeAllClassloaders()})
})
源碼:https://github.com/CYRUS-STUDIO/frida_fart
執行 frida 腳本
frida -H 127.0.0.1:1234 -F -l fart_filter.js -o log.txt
參考:
-
移植 FART 到 Android 10 實現自動化脫殼
-
使用 Frida 增強 FART:實現更強大的 Android 脫殼能力
-
攻防 FART 脫殼:特征檢測識別 + 對抗繞過全解析
3. 脫殼完成
脫殼文件列表
1|wayne:/data/data/com.shizhuang.duapp/cyrus # ls
10637856_class_list_execute.txt 12300396_class_list_execute.txt 12888744_dex_file_execute.dex  8324572_class_list.txt
10637856_dex_file_execute.dex   12300396_dex_file_execute.dex   3273924_class_list_execute.txt 8324572_class_list_execute.txt
11125808_class_list_execute.txt 12319700_class_list_execute.txt 3273924_dex_file_execute.dex   8324572_dex_file.dex
11125808_dex_file_execute.dex   12319700_dex_file_execute.dex   3782924_class_list_execute.txt 8324572_dex_file_execute.dex
11994176_class_list.txt         12587972_class_list_execute.txt 3782924_dex_file_execute.dex   8324572_ins_8950.bin
11994176_class_list_execute.txt 12587972_dex_file_execute.dex   400440_class_list_execute.txt  8391604_class_list_execute.txt
11994176_dex_file.dex           12590752_class_list_execute.txt 400440_dex_file_execute.dex    8391604_dex_file_execute.dex
11994176_dex_file_execute.dex   12590752_dex_file_execute.dex   4376620_class_list_execute.txt 8681372_class_list_execute.txt
11994176_ins_8950.bin           12592256_class_list_execute.txt 4376620_dex_file_execute.dex   8681372_dex_file_execute.dex
12081268_class_list_execute.txt 12592256_dex_file_execute.dex   7387912_class_list_execute.txt 9085048_class_list_execute.txt
12081268_dex_file_execute.dex   1260244_class_list_execute.txt  7387912_dex_file_execute.dex   9085048_dex_file_execute.dex
12213596_class_list_execute.txt 1260244_dex_file_execute.dex    8183732_class_list_execute.txt
12213596_dex_file_execute.dex   12888744_class_list_execute.txt 8183732_dex_file_execute.dex
通過 grep -rl 命令查找目標類所在的 dex 是 11994176_ 開頭的 dex
wayne:/data/data/com.shizhuang.duapp/cyrus # grep -rl "ff.l0" *.txt
11994176_class_list.txt
11994176_class_list_execute.txt
所以,需要使用 11994176_ins_8950.bin 修復 11994176_dex_file.dex
wayne:/data/data/com.shizhuang.duapp/cyrus # ls -hl 11994176_*
-rw------- 1 u0_a139 u0_a139 612K 2025-06-04 09:55 11994176_class_list.txt
-rw------- 1 u0_a139 u0_a139 612K 2025-06-04 09:54 11994176_class_list_execute.txt
-rw------- 1 u0_a139 u0_a139  11M 2025-06-04 09:55 11994176_dex_file.dex
-rw------- 1 u0_a139 u0_a139  11M 2025-06-04 09:54 11994176_dex_file_execute.dex
-rw------- 1 u0_a139 u0_a139 114K 2025-06-04 09:55 11994176_ins_8950.bin
先把脫殼文件拉取到本地
adb pull /data/data/com.shizhuang.duapp/cyrus
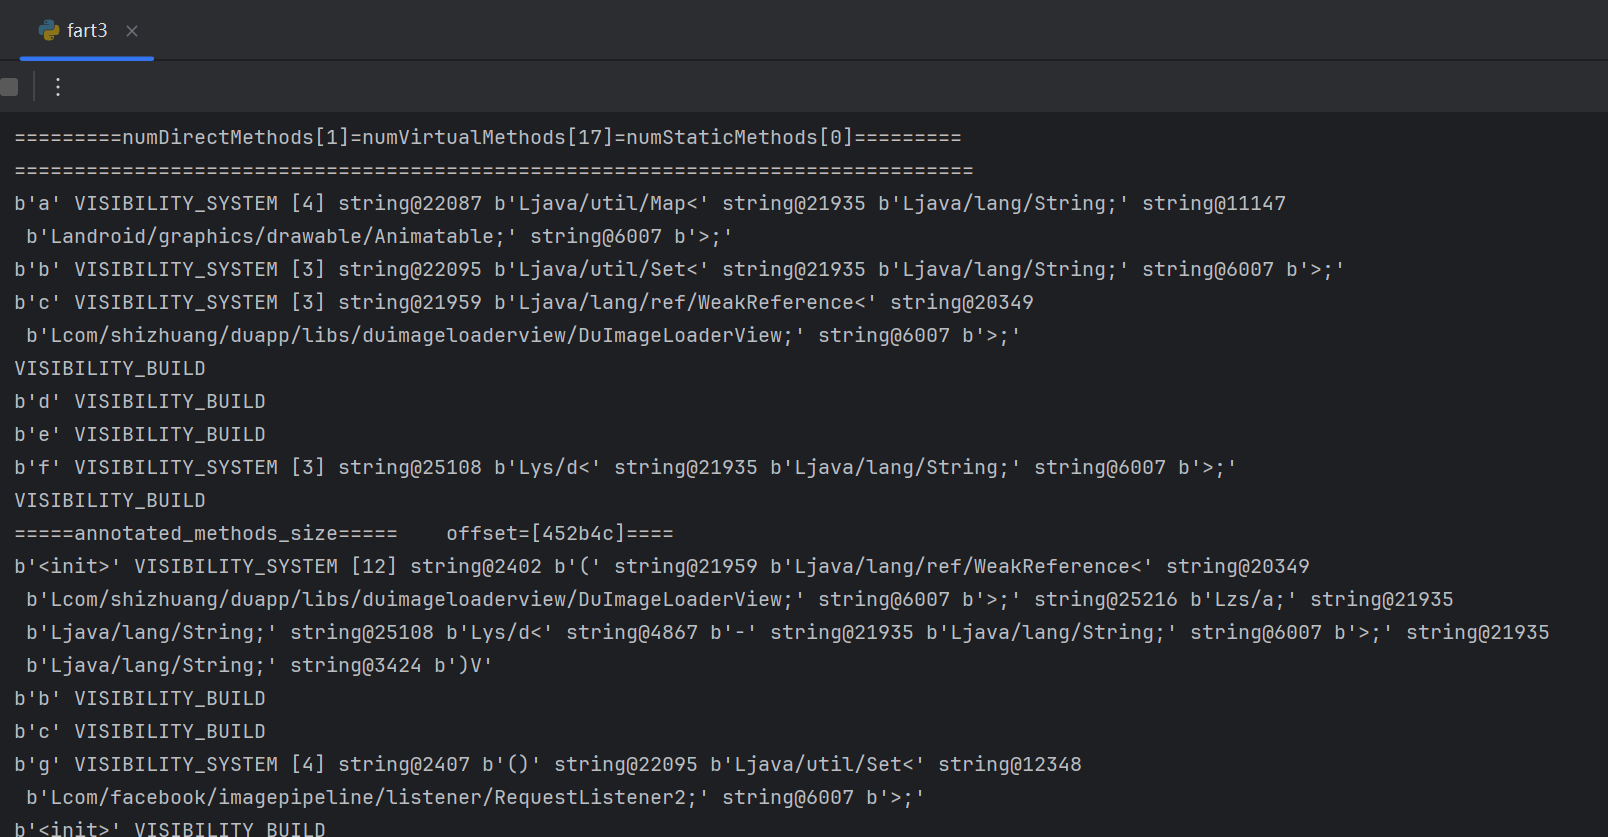
遷移 fart.py 到 python3
fart.py 是用于解析dex文件,將 bin 的 CodeItem 修復打印 的 python 腳本。但 fart.py 是基于 pythion2 的。
遷移到 python3,主要修改如下:
-
使用 range 替換 xrange
-
print 寫法變化
-
在 Python 3 中,訪問 bytes[i] 得到的是 int(不再是字符),所以不需要再用 ord()。
-
將所有 dict.has_key(key) 替換成 key in dict
-
把 ‘[’ in name 改成 b’[’ in name
源碼地址:https://github.com/CYRUS-STUDIO/FART/blob/master/fart3.py
但 fart.py 僅僅是打印,并沒有把 CodeItem 真正修復到 dex
使用 dexfixer 修復 dex
dexfixer 項目來源于 Youpk,支持對 fart 的脫殼結果進行修復合并到 dex。
開源地址:https://github.com/dqzg12300/dexfixer
使用 dexfixer 修復
java -jar ./dexfixer.jar dexpath binpath outpath
目前 dexfixer 項目是基于 eclipse 的,我把它遷移到了 IDEA。
開源地址:https://github.com/CYRUS-STUDIO/FartFixer
把源碼 clone 到本地后,導入到 IDEA,編輯運行配置,添加運行參數(添加 dex、bin、修復后的dex文件路徑)
D:\Python\anti-app\abc\cyrus\11994176_dex_file.dex
D:\Python\anti-app\abc\cyrus\11994176_ins_8950.bin
D:\Python\anti-app\abc\cyrus\11994176_dex_file_fix.dex
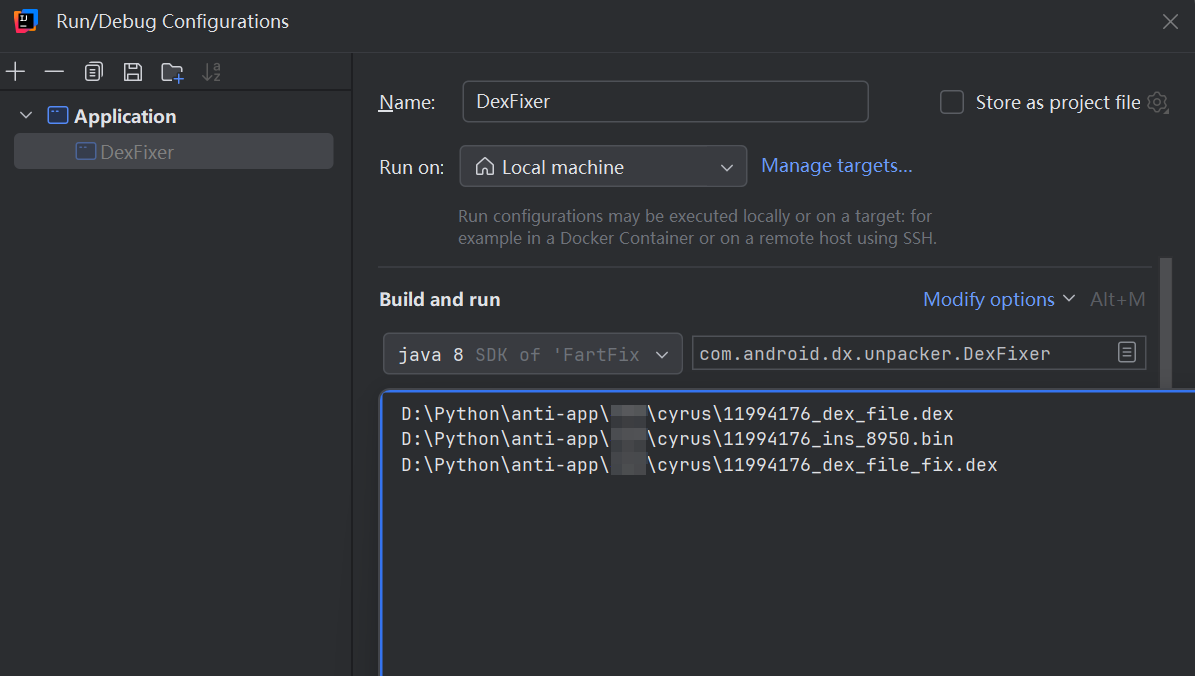
運行 com.android.dx.unpacker.DexFixer 的 main 函數
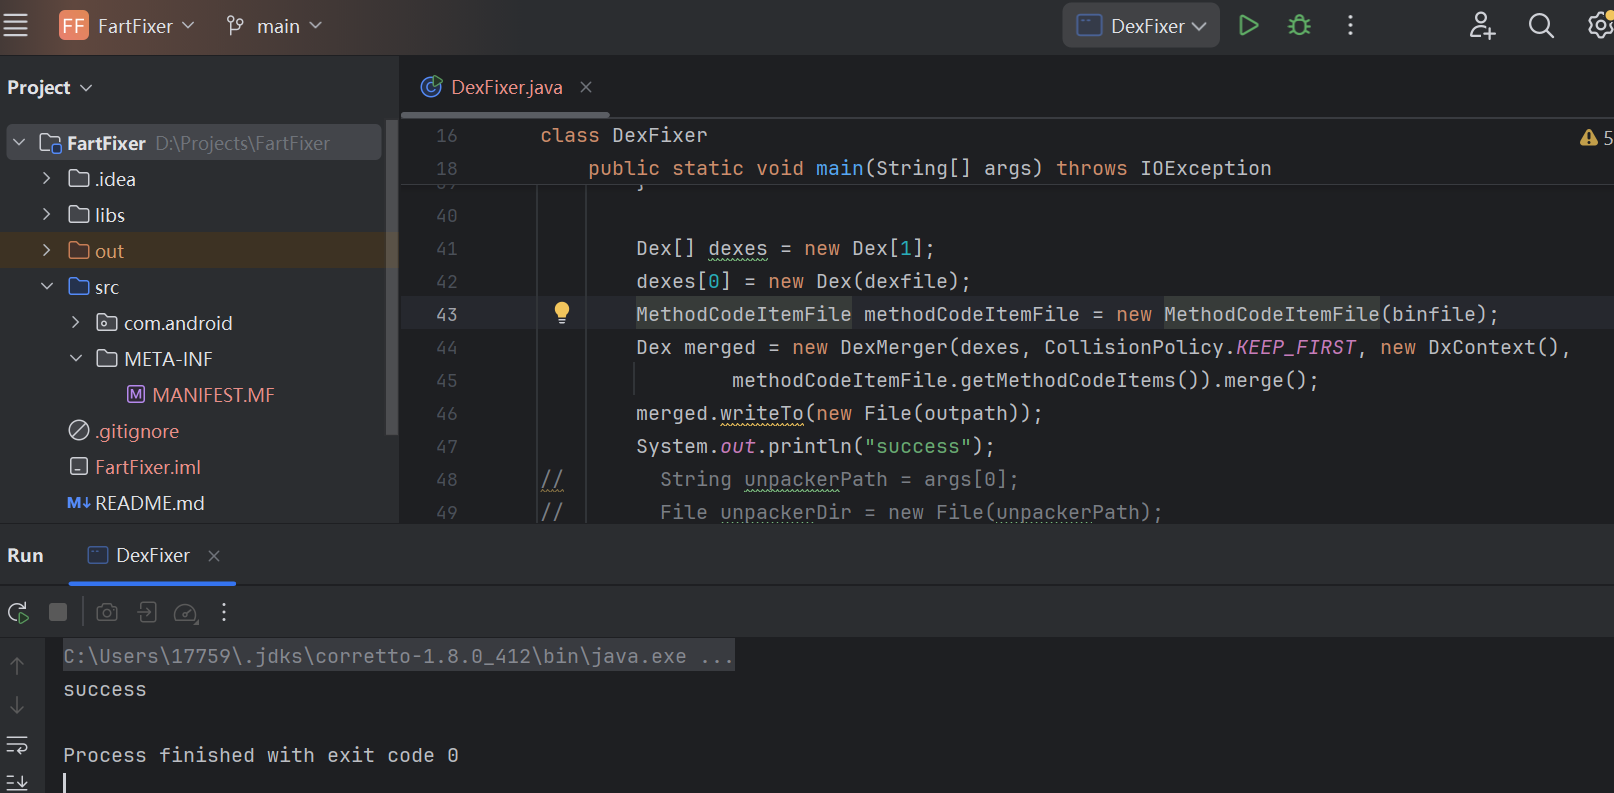
修復完成

使用 IntelliJ IDEA 導出 FartFixer.jar
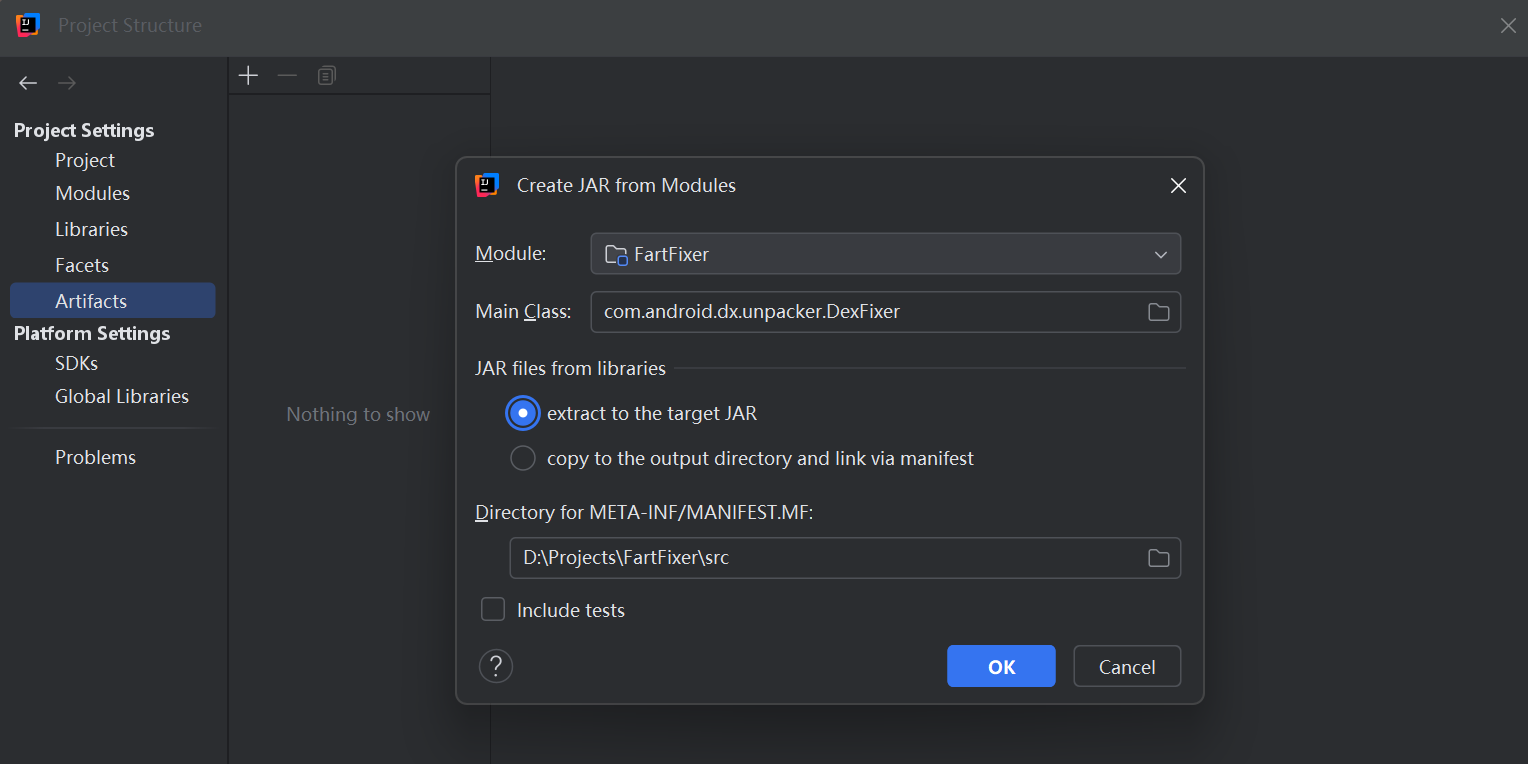
1. 配置 Artifacts
-
點擊菜單欄 File → Project Structure(或快捷鍵 Ctrl+Alt+Shift+S)。
-
在左側選擇 Artifacts,點擊右上角的 + → JAR → From modules with dependencies。
-
在彈出框中選擇主類(DexFixer),點擊 OK。
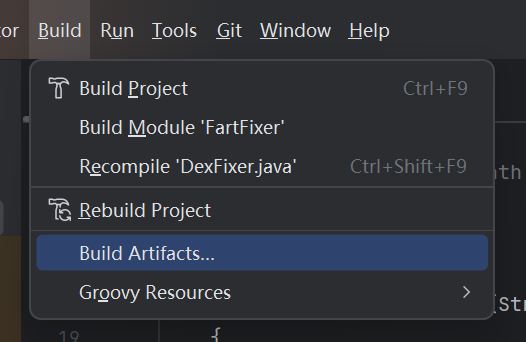
2. 構建 Artifact
-
點擊 Build → Build Artifacts…。
-
選擇你剛剛配置的 Artifact → Build。
-
構建完成后,在 out/artifacts/xxx.jar 目錄下可找到 JAR 文件。
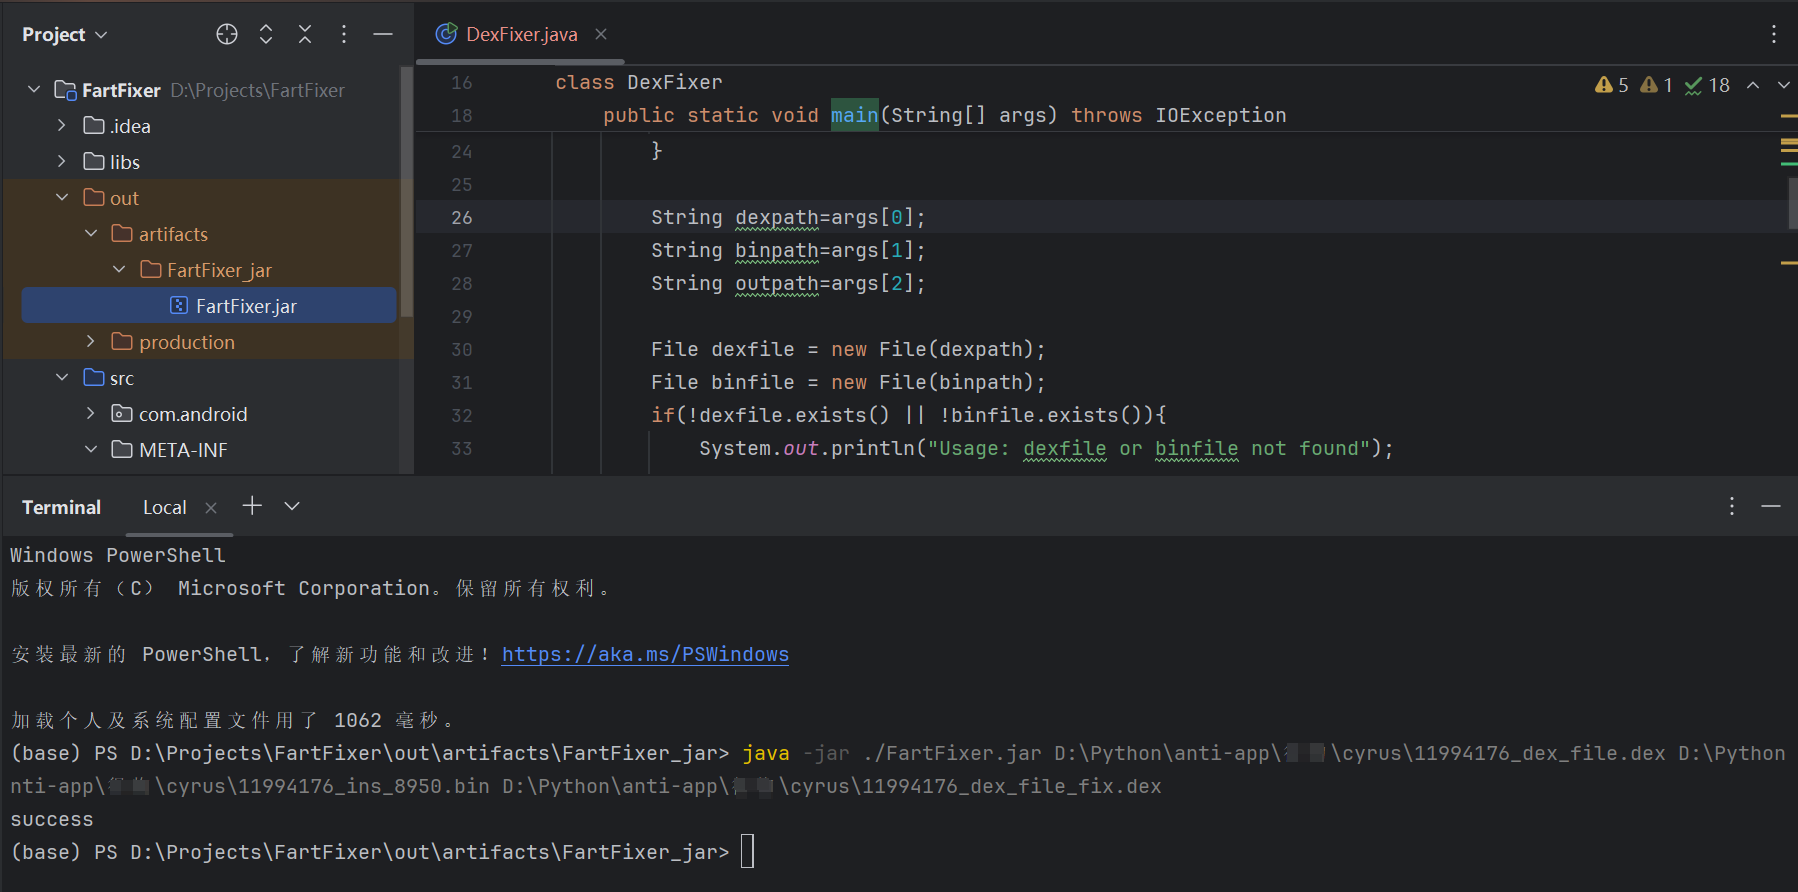
使用 FartFixer.jar 修復 dex
執行下面命令修復 dex
java -jar ./FartFixer.jar dexpath binpath outpath
效果如下:
批量自動修復 dex
編寫一個輔助腳本,實現批量自動修復 dex,功能如下:
-
提示用戶輸入一個 bin 文件所在目錄;
-
查找該目錄下所有以 .bin 結尾的文件(如 11994176_ins_8950.bin);
-
通過 bin 文件名前綴(如 11994176_)在同目錄中查找對應的 dex 文件(如 11994176_dex_file.dex);
-
在 dex 所在目錄下創建 fix 目錄;
-
調用 java -jar ./FartFixer.jar 修復 dex,輸出到 fix/ 目錄。
java -jar ./FartFixer.jar dexpath binpath outpath
FartFixer.bat(Windows)
@echo off
setlocal enabledelayedexpansion:: 輸入 bin 文件目錄
set /p BIN_DIR=請輸入 bin 文件所在目錄::: 判斷目錄是否存在
if not exist "%BIN_DIR%" (echo 錯誤:目錄 %BIN_DIR% 不存在pauseexit /b
):: 遍歷 bin 文件
for %%B in ("%BIN_DIR%\*.bin") do (set "BIN_FILE=%%~nxB"set "PREFIX="set "BIN_PATH=%%~fB":: 提取前綴,比如 11994176_for /f "tokens=1 delims=_" %%P in ("%%~nB") do (set "PREFIX=%%P_"):: 查找匹配的 dex 文件for %%D in ("%BIN_DIR%\!PREFIX!*.dex") do (set "DEX_FILE=%%~nxD"set "DEX_PATH=%%~fD":: 創建 fix 目錄set "FIX_DIR=%%~dpDfix"if not exist "!FIX_DIR!" (mkdir "!FIX_DIR!"):: 構造輸出路徑set "FIXED_DEX=!FIX_DIR!\!DEX_FILE:_file=_file_fix!"echo 修復 !DEX_FILE!,使用 !BIN_FILE! ...java -jar ./FartFixer.jar "!DEX_PATH!" "!BIN_PATH!" "!FIXED_DEX!")
)echo 全部修復完成。
pause
FartFixer.sh(Linux / macOS)
#!/bin/bashif [ $# -ne 1 ]; thenecho "Usage: $0 <bin_dir>"exit 1
fiBIN_DIR="$1"# 查找所有 .bin 文件
find "$BIN_DIR" -type f -name "*.bin" | while read BIN_PATH; doBIN_FILE=$(basename "$BIN_PATH")PREFIX="${BIN_FILE%%_*}_"  # 提取前綴,例如 11994176_# 查找對應的 dex 文件find "$BIN_DIR" -type f -name "${PREFIX}*.dex" | while read DEX_PATH; doDEX_FILE=$(basename "$DEX_PATH")DEX_DIR=$(dirname "$DEX_PATH")# 創建 fix 目錄FIX_DIR="$DEX_DIR/fix"mkdir -p "$FIX_DIR"# 構造輸出路徑FIXED_DEX="$FIX_DIR/${DEX_FILE/_file/_file_fix}"echo "修復 $DEX_FILE,使用 $BIN_FILE ..."java -jar ./FartFixer.jar "$DEX_PATH" "$BIN_PATH" "$FIXED_DEX"done
done
添加執行權限:
chmod +x FartFixer.sh
運行腳本,輸入 bin 文件目錄
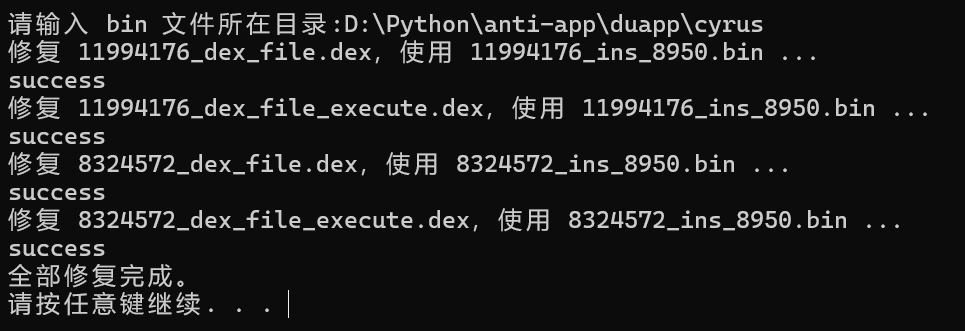
修復成功,修復后的 dex 在 fix 目錄下

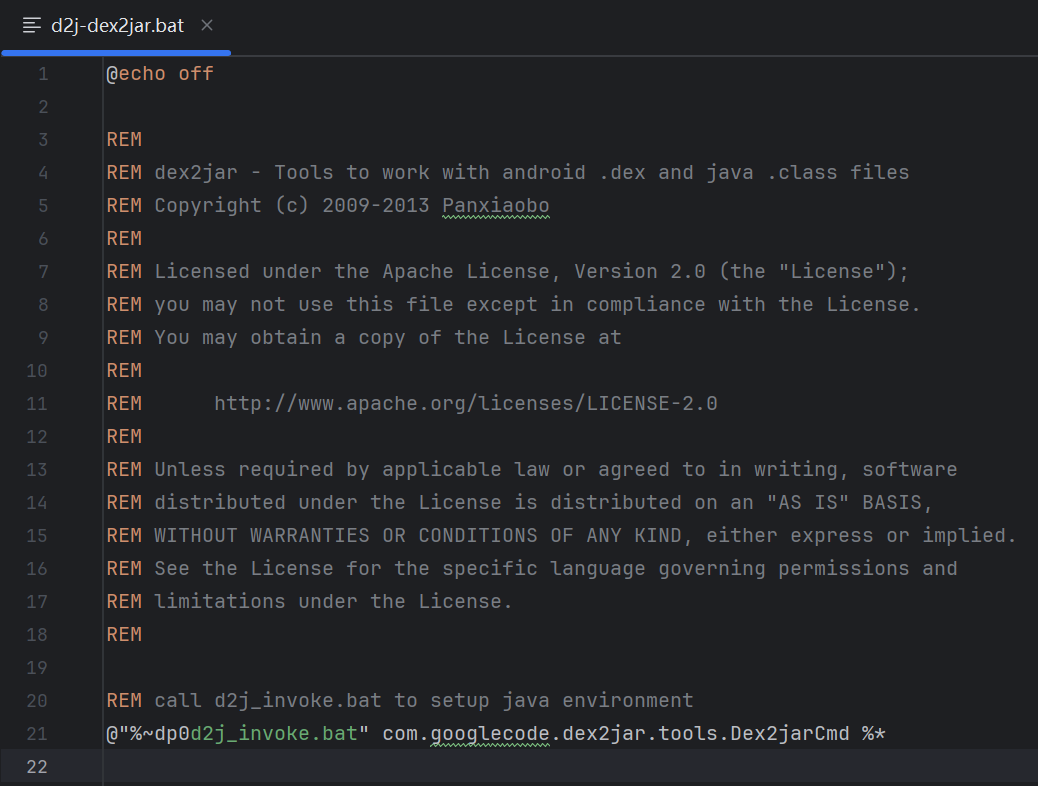
dex2jar
dex2jar 是一個將 Android 的 .dex 文件轉換為 Java 的 .jar 文件的工具,方便反編譯和分析 APK。
開源地址:https://github.com/pxb1988/dex2jar
下載 Release 版本 dex2jar:https://github.com/pxb1988/dex2jar/releases
通過 ./d2j-dex2jar.bat 或 ./d2j-dex2jar.sh 把 dex 文件轉換為 jar
(base) PS D:\Python\anti-app\dex2jar> ./d2j-dex2jar.bat -f D:\Python\anti-app\abc\cyrus\11994176_dex_file.dex
dex2jar D:\Python\anti-app\abc\cyrus\11994176_dex_file.dex -> .\11994176_dex_file-dex2jar.jar
腳本中實際調用的是 com.googlecode.dex2jar.tools.Dex2jarCmd
Dex2jarCmd 中各參數說明如下:
package com.googlecode.dex2jar.tools;import com.googlecode.d2j.dex.Dex2jar;
import com.googlecode.d2j.reader.BaseDexFileReader;
import com.googlecode.d2j.reader.DexFileReader;
import com.googlecode.d2j.reader.MultiDexFileReader;
import com.googlecode.dex2jar.ir.ET;import java.io.File;
import java.nio.file.Files;
import java.nio.file.Path;@BaseCmd.Syntax(cmd = "d2j-dex2jar", syntax = "[options] <file0> [file1 ... fileN]", desc = "convert dex to jar")
public class Dex2jarCmd extends BaseCmd {public static void main(String... args) {new Dex2jarCmd().doMain(args);}// 異常信息輸出文件路徑@Opt(opt = "e", longOpt = "exception-file", description = "detail exception file, default is $current_dir/[file-name]-error.zip", argName = "file")private Path exceptionFile;// 是否強制覆蓋已有文件@Opt(opt = "f", longOpt = "force", hasArg = false, description = "force overwrite")private boolean forceOverwrite = false;// 是否不處理異常@Opt(opt = "n", longOpt = "not-handle-exception", hasArg = false, description = "not handle any exceptions thrown by dex2jar")private boolean notHandleException = false;// jar 輸出路徑@Opt(opt = "o", longOpt = "output", description = "output .jar file, default is $current_dir/[file-name]-dex2jar.jar", argName = "out-jar-file")private Path output;// 是否復用寄存器(對可讀性有影響)@Opt(opt = "r", longOpt = "reuse-reg", hasArg = false, description = "reuse register while generate java .class file")private boolean reuseReg = false;// 是否按拓撲排序生成代碼(提高可讀性)@Opt(opt = "s", hasArg = false, description = "same with --topological-sort/-ts")private boolean topologicalSort1 = false;@Opt(opt = "ts", longOpt = "topological-sort", hasArg = false, description = "sort block by topological, that will generate more readable code, default enabled")private boolean topologicalSort = false;// 是否翻譯 debug 信息@Opt(opt = "d", longOpt = "debug-info", hasArg = false, description = "translate debug info")private boolean debugInfo = false;// 是否打印中間 IR(中間表示)@Opt(opt = "p", longOpt = "print-ir", hasArg = false, description = "print ir to System.out")private boolean printIR = false;// 是否優化 synchronized 塊@Opt(opt = "os", longOpt = "optmize-synchronized", hasArg = false, description = "optimize-synchronized")private boolean optmizeSynchronized = false;// 是否跳過異常塊@Opt(longOpt = "skip-exceptions", hasArg = false, description = "skip-exceptions")private boolean skipExceptions = false;// 不生成代碼(只提取結構)@Opt(opt = "nc", longOpt = "no-code", hasArg = false, description = "")private boolean noCode = false;@Overrideprotected void doCommandLine() throws Exception {if (remainingArgs.length == 0) {usage(); // 沒有參數則顯示用法return;}if ((exceptionFile != null || output != null) && remainingArgs.length != 1) {System.err.println("-e/-o can only used with one file");return;}if (debugInfo && reuseReg) {System.err.println("-d/-r can not use together");return;}Path currentDir = new File(".").toPath();// 如果指定了輸出文件且文件已存在,默認不覆蓋if (output != null) {if (Files.exists(output) && !forceOverwrite) {System.err.println(output + " exists, use --force to overwrite");return;}} else {for (String fileName : remainingArgs) {Path file = currentDir.resolve(getBaseName(new File(fileName).toPath()) + "-dex2jar.jar");if (Files.exists(file) && !forceOverwrite) {System.err.println(file + " exists, use --force to overwrite");return;}}}// 處理每個 dex 文件for (String fileName : remainingArgs) {String baseName = getBaseName(new File(fileName).toPath());Path file = output == null ? currentDir.resolve(baseName + "-dex2jar.jar") : output;System.err.println("dex2jar " + fileName + " -> " + file);// 打開 .dex 文件BaseDexFileReader reader = MultiDexFileReader.open(Files.readAllBytes(new File(fileName).toPath()));// 創建異常處理器(可選)BaksmaliBaseDexExceptionHandler handler = notHandleException ? null : new BaksmaliBaseDexExceptionHandler();// 執行 dex 到 jar 的轉換Dex2jar.from(reader).withExceptionHandler(handler).reUseReg(reuseReg).topoLogicalSort().skipDebug(!debugInfo).optimizeSynchronized(this.optmizeSynchronized).printIR(printIR).noCode(noCode).skipExceptions(skipExceptions).to(file);// 如果有異常,保存異常信息到文件if (!notHandleException && handler.hasException()) {Path errorFile = exceptionFile == null? currentDir.resolve(baseName + "-error.zip"): exceptionFile;System.err.println("Detail Error Information in File " + errorFile);System.err.println(BaksmaliBaseDexExceptionHandler.REPORT_MESSAGE);handler.dump(errorFile, originalArgs);}}}@Overrideprotected String getVersionString() {return "reader-" + DexFileReader.class.getPackage().getImplementationVersion() + ", translator-"+ Dex2jar.class.getPackage().getImplementationVersion() + ", ir-"+ ET.class.getPackage().getImplementationVersion();}
}
批量 dex2jar
編寫一個批處理腳本用于批量轉換 dex 文件,功能如下:
-
提示用戶輸入一個 .dex 文件目錄;
-
查找該目錄下的所有 .dex 文件(支持子目錄);
-
對每個 .dex 文件調用 ./d2j-dex2jar.bat 進行轉換;
-
輸出的 .jar 文件保存在 ${dex目錄}\jar 文件夾下。
dex2jar.bat(Windows)
@echo off
setlocal enabledelayedexpansion:: 提示輸入 dex 文件目錄
set /p dex_dir=請輸入 dex 文件所在的目錄(絕對路徑或相對路徑)::: 判斷目錄是否存在
if not exist "%dex_dir%" (echo 目錄不存在: %dex_dir%pauseexit /b
):: 創建輸出 jar 目錄
set "jar_dir=%dex_dir%\jar"
if not exist "%jar_dir%" (mkdir "%jar_dir%"
):: 查找所有 dex 文件
for /r "%dex_dir%" %%f in (*.dex) do (set "dex_file=%%f"set "file_name=%%~nf"echo 正在轉換: !dex_file!:: 構造輸出路徑set "out_jar=%jar_dir%\!file_name!.jar":: 調用 dex2jar 腳本call ./d2j-dex2jar.bat -f -o "!out_jar!" "!dex_file!"
)echo 所有 dex 文件已轉換完成,jar 輸出目錄: %jar_dir%
pause
dex2jar.sh(Linux / macOS)
#!/bin/bash# 讀取用戶輸入的 dex 文件目錄
read -p "請輸入 dex 文件所在目錄: " dex_dir# 判斷目錄是否存在
if [ ! -d "$dex_dir" ]; thenecho "目錄不存在: $dex_dir"exit 1
fi# 創建輸出 jar 目錄
jar_dir="$dex_dir/jar"
mkdir -p "$jar_dir"# 遍歷 dex 文件并轉換為 jar
find "$dex_dir" -type f -name "*.dex" | while read dex_file; dofile_name=$(basename "$dex_file" .dex)out_jar="$jar_dir/${file_name}.jar"echo "正在轉換: $dex_file"./d2j-dex2jar.sh -f -o "$out_jar" "$dex_file"
doneecho "所有 dex 文件已轉換完成,jar 輸出目錄: $jar_dir"
給腳本添加執行權限:
chmod +x dex2jar.sh
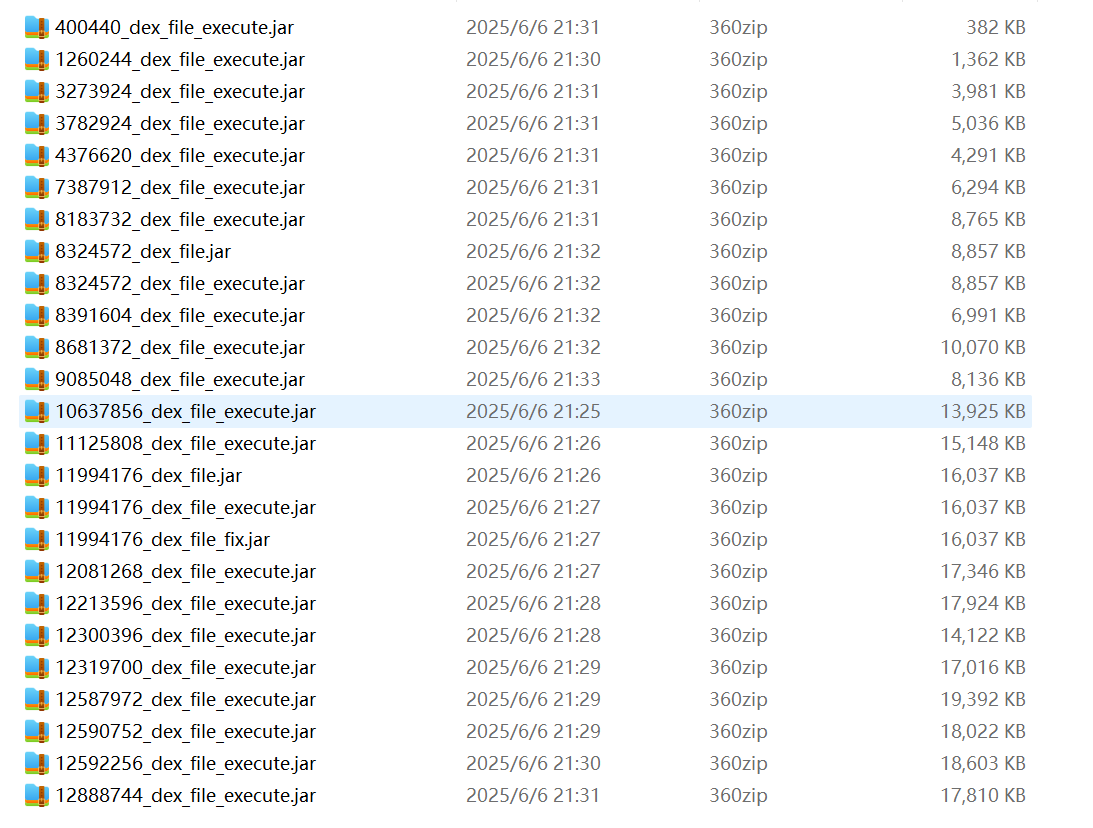
運行腳本,輸入 dex 目錄
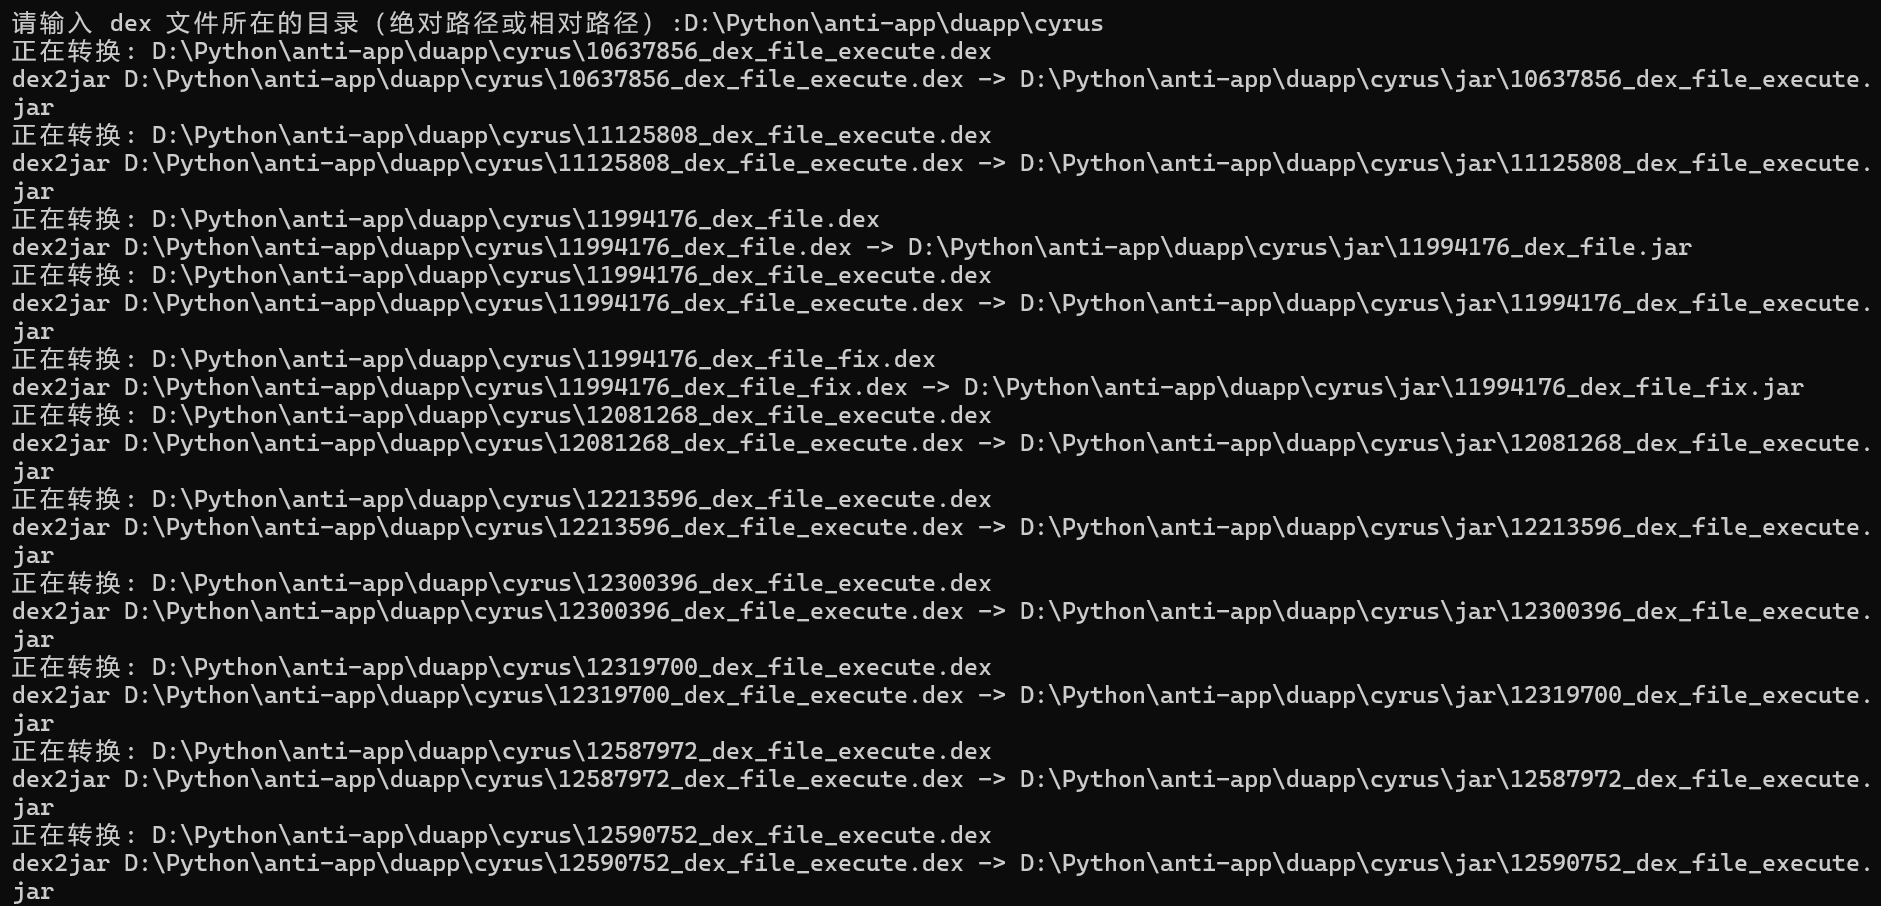
轉換完成
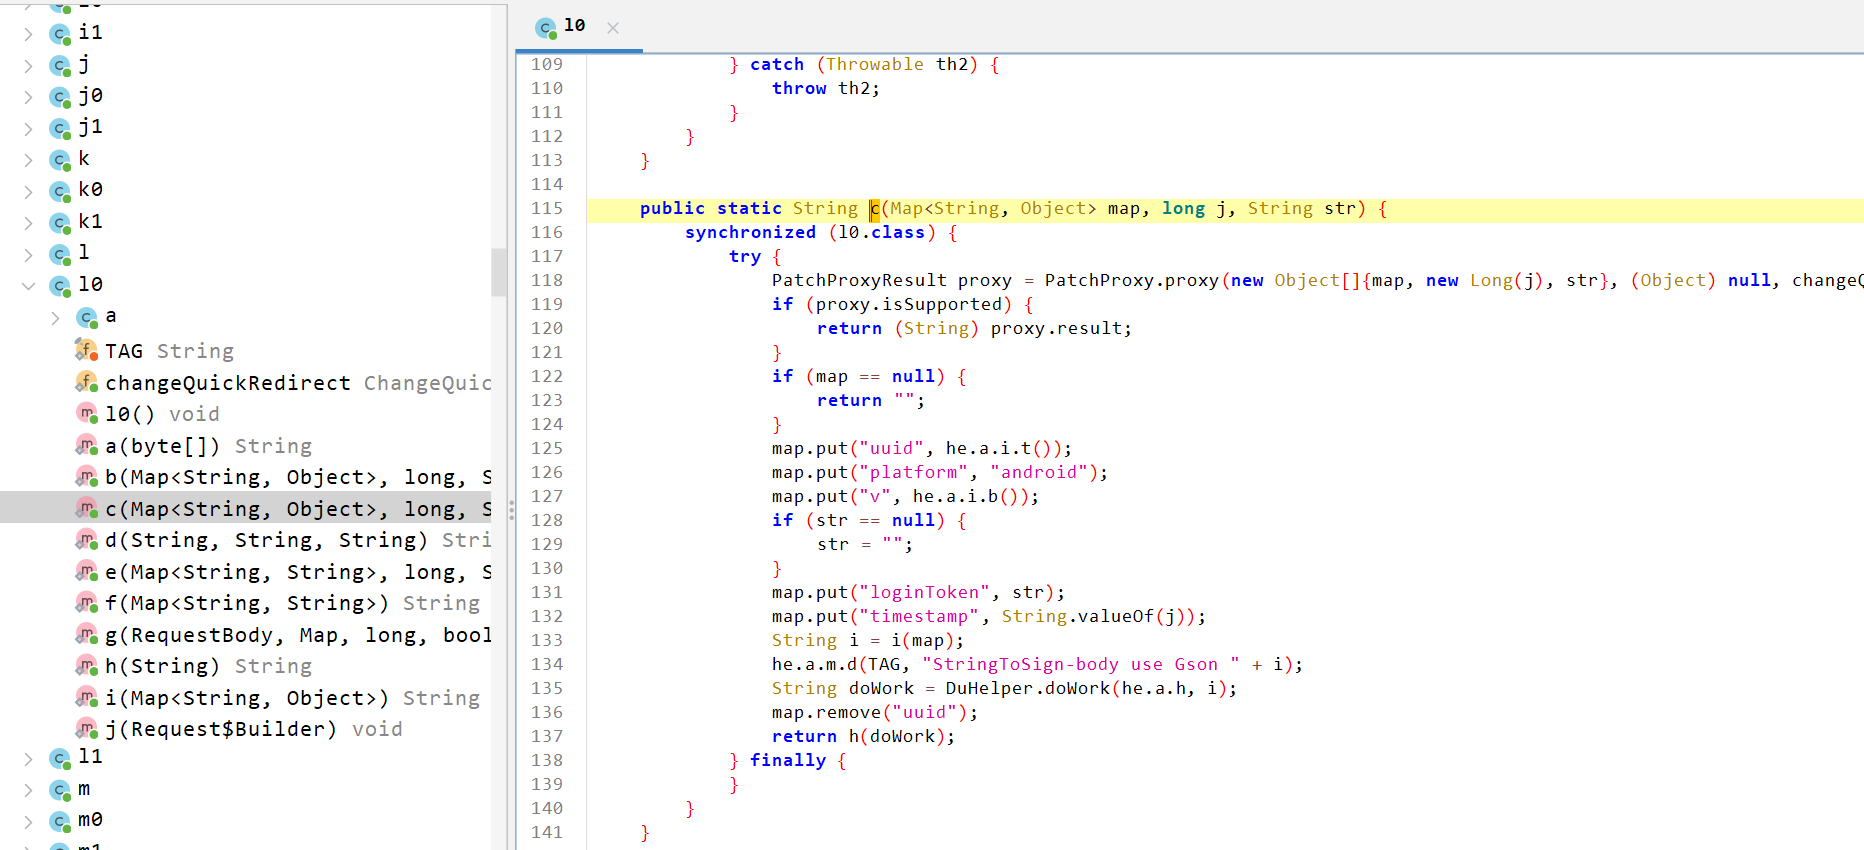
使用 jadx 反編譯 jar
直接把 jar 文件拖入 jadx 可以看到被抽取的類和函數都已經修復好了。
完整源碼
開源地址:
-
https://github.com/CYRUS-STUDIO/FartFixer
-
https://github.com/CYRUS-STUDIO/dex2jar


:mcp_chatbot_prompt_resource.py)


和JSON.parse()之間的轉換)

)

)


