文章目錄
- APP啟動優化概述
- APP啟動流程
- 點擊圖片啟動APP的過程
- 啟動觸發
- Zygote 與應用進程創建
- Zygote
- 進程的創建
- 應用進程初始化
- Application
- Activity 啟動與顯示
- 優化啟動時黑白屏現象
- 可優化的階段
- Application階段
- 相關優化
- Activity階段
- 數據加載階段
- Framework學習系列文章
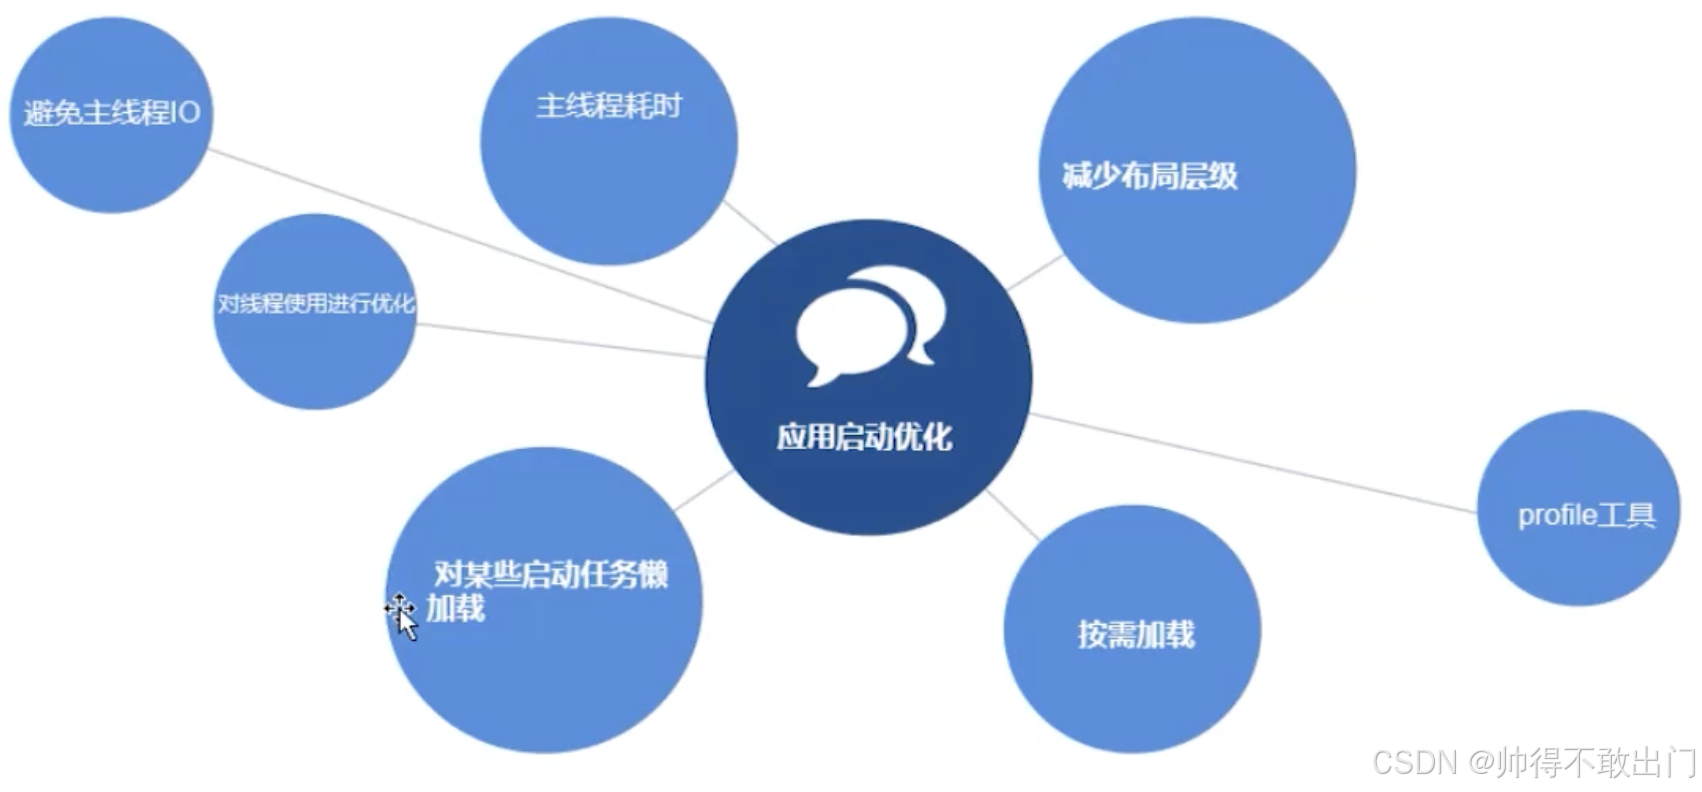
APP啟動優化概述
-
優化方向
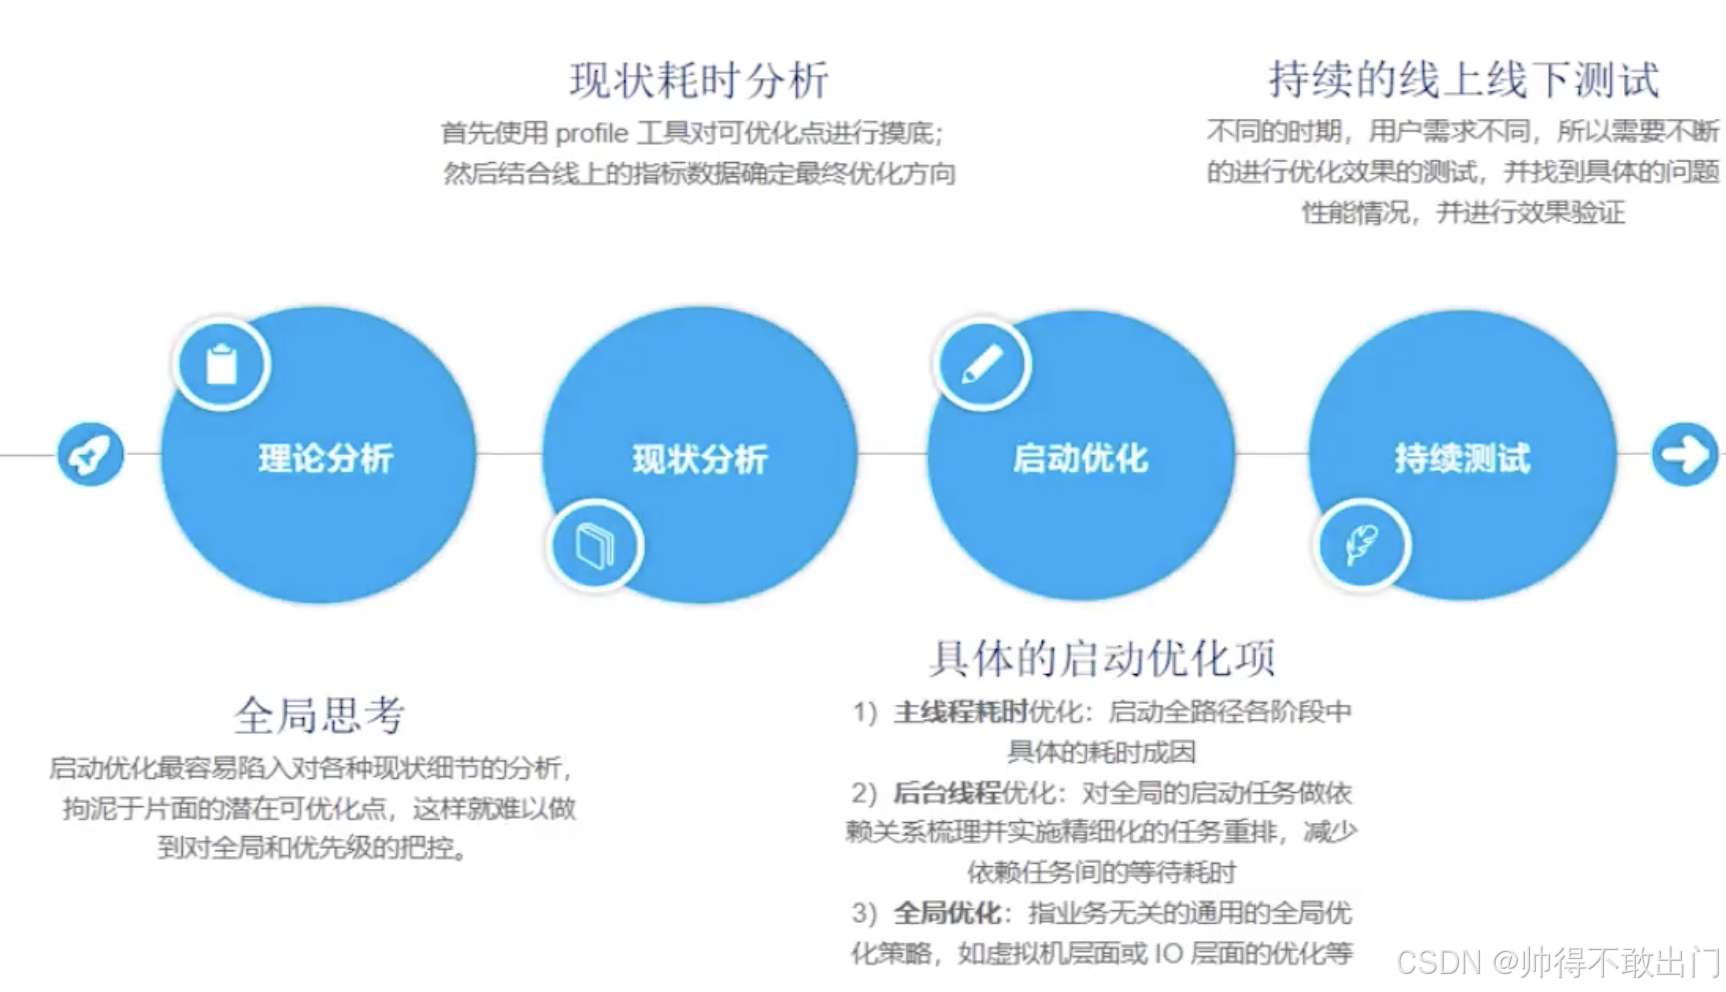
-
啟動優化流程
APP啟動流程
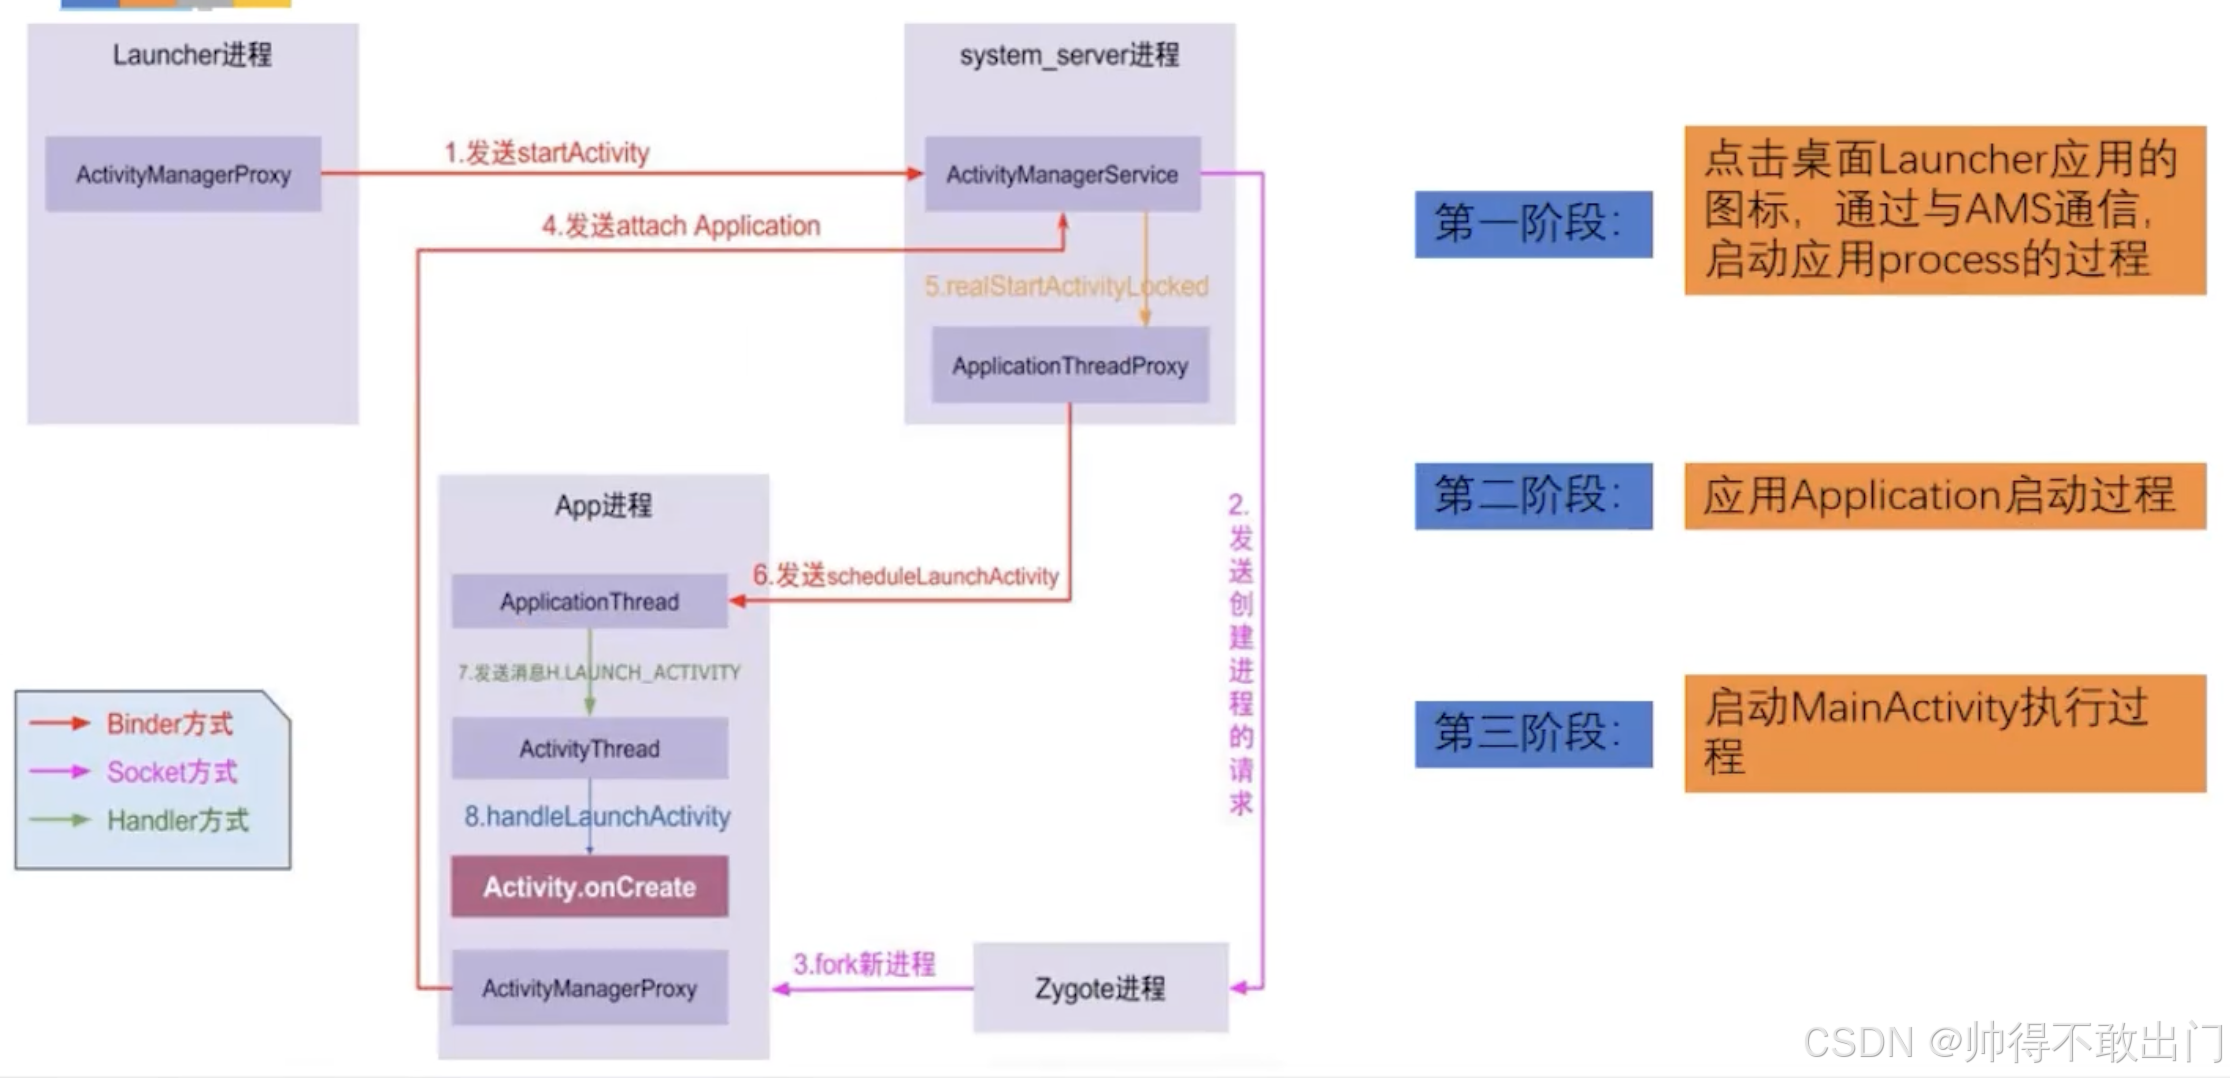
點擊圖片啟動APP的過程
這張圖展示了 Android 系統中應用程序(App)啟動的完整流程,涉及多個關鍵組件及其交互
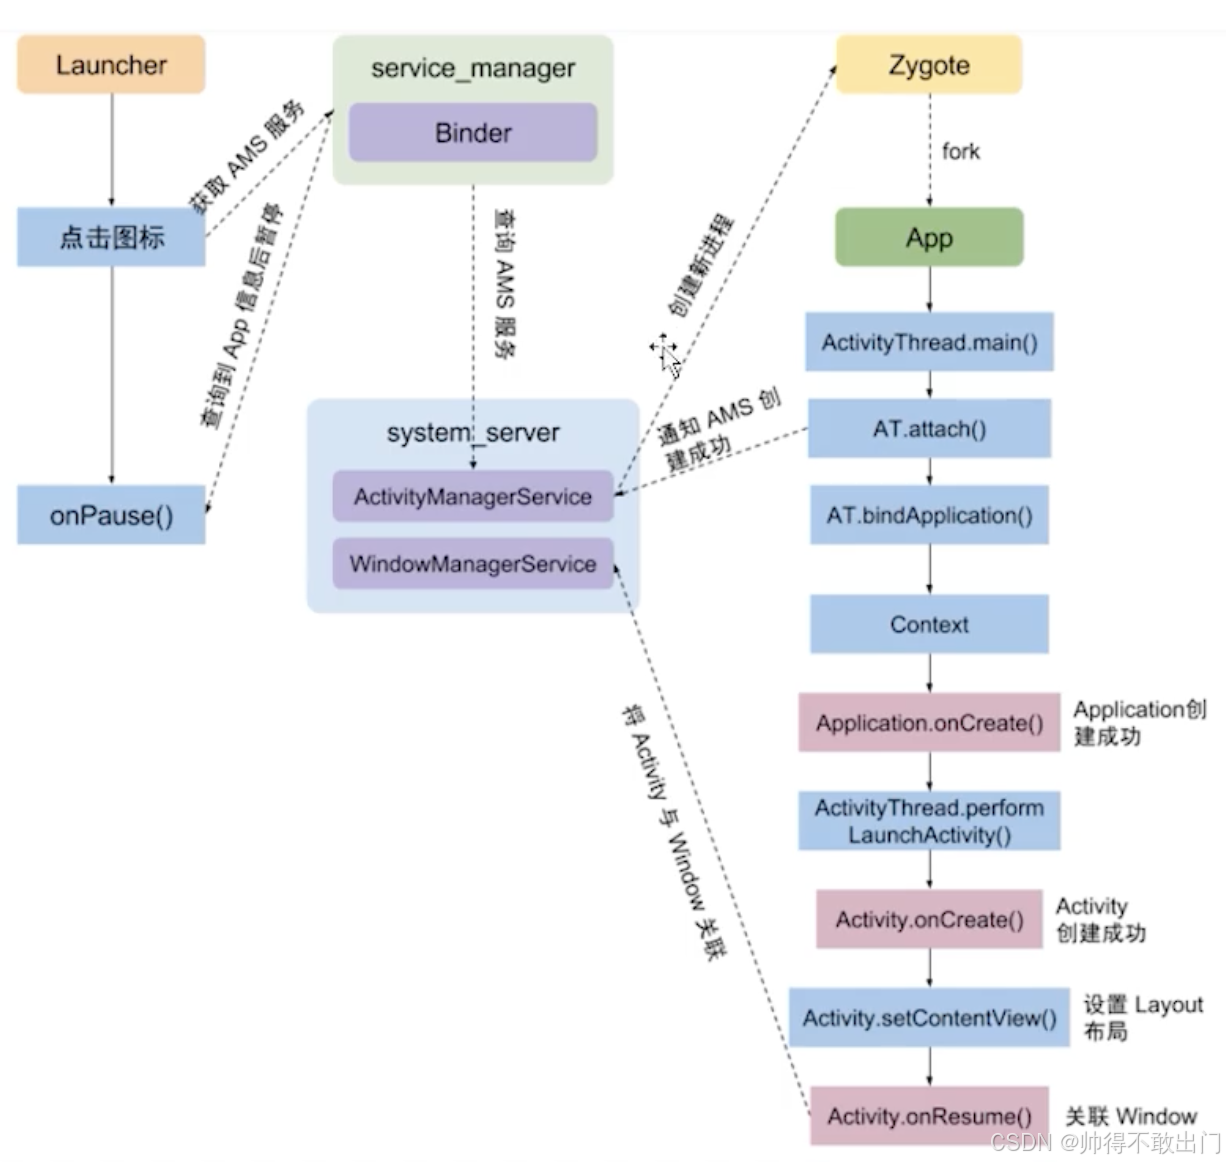
啟動觸發
- Launcher:用戶在手機桌面點擊應用圖標,Launcher(桌面啟動器)響應點擊事件。通過Binder機制向service_manager查詢ActivityTaskManagerService(ATMS,活動管理服務)服務。
- service_manager 和 Binder:service_manager是系統中管理服務的組件,通過Binder這種進程間通信機制,Launcher獲取到AMS服務的相關信息。Binder是 Android 系統中實現進程間通信的重要機制,提供高效穩定的通信能力。
- system_server:system_server進程是 Android 系統核心進程,包含ActivityManagerService和WindowManagerService等重要服務。AMS負責管理應用程序的生命周期、Activity 的啟動與切換等;WindowManagerService負責窗口的管理和顯示等。
具體代碼如下:
- Launcher調用Activity.startActivity啟動Activity
Activity.java
@Overridepublic void startActivity(Intent intent, @Nullable Bundle options) {...if (options != null) {startActivityForResult(intent, -1, options);} else {startActivityForResult(intent, -1);}}public void startActivityForResult(@RequiresPermission Intent intent, int requestCode,@Nullable Bundle options) {...Instrumentation.ActivityResult ar =mInstrumentation.execStartActivity(this, mMainThread.getApplicationThread(), mToken,this,intent, requestCode, options);...}
- Instrumentation.execStartActivity調用
Instrumentation.java
public ActivityResult execStartActivity(Context who, IBinder contextThread, IBinder token, Activity target,Intent intent, int requestCode, Bundle options) {...// ActivityTaskManagerServiceint result = ActivityTaskManager.getService().startActivity(whoThread,who.getBasePackageName(),who.getAttributionTag(),intent,intent.resolveTypeIfNeeded(who.getContentResolver()),token,target != null ? target.mEmbeddedID : null, requestCode, 0, null, options); ...
}
- ActivityTaskManagerService.startActivityAsUser
ActivityTaskManagerService::startActivity調用startActivityAsUser
ActivityTaskManager.getService()其實返回的是ATMS的binder
final IBinder b = ServiceManager.getService(Context.ACTIVITY_TASK_SERVICE);
return IActivityTaskManager.Stub.asInterface(b);
至此,startActivity 的工作重心成功地從 應用進程(app) 轉移到了系統進程(system_service) 的 ATMS 中。
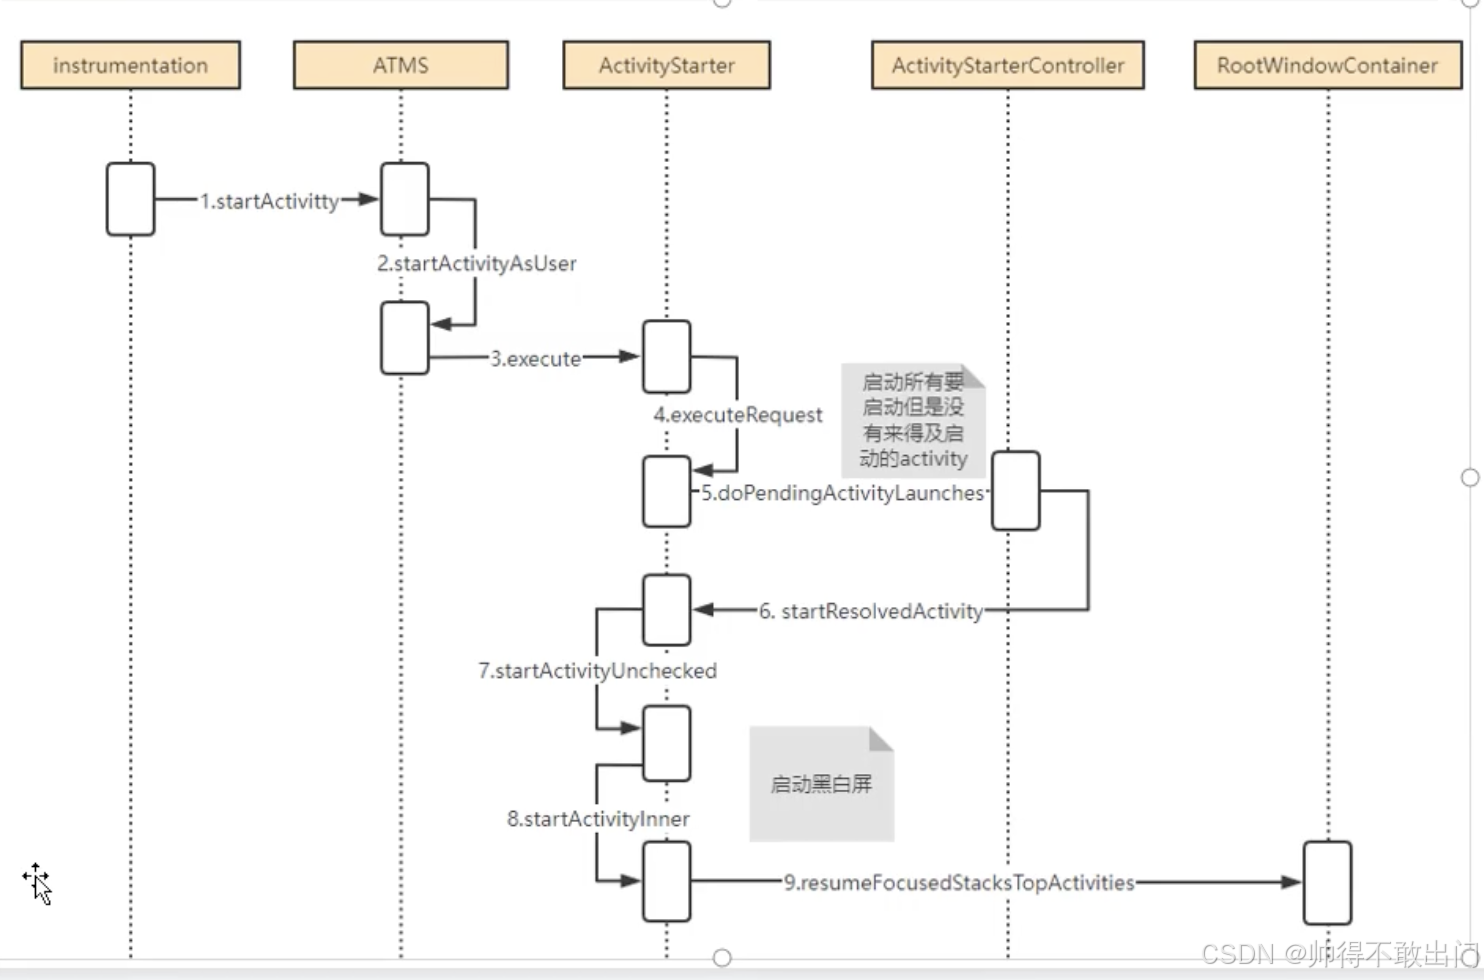
private int startActivityAsUser(IApplicationThread caller, String callingPackage,@Nullable String callingFeatureId, Intent intent, String resolvedType,IBinder resultTo, String resultWho, int requestCode, int startFlags,ProfilerInfo profilerInfo, Bundle bOptions, int userId, boolean validateIncomingUser) {assertPackageMatchesCallingUid(callingPackage);enforceNotIsolatedCaller("startActivityAsUser");userId = getActivityStartController().checkTargetUser(userId, validateIncomingUser,Binder.getCallingPid(), Binder.getCallingUid(), "startActivityAsUser");// getActivityStartController().obtainStarter是ActivityStarterreturn getActivityStartController().obtainStarter(intent, "startActivityAsUser").setCaller(caller).setCallingPackage(callingPackage).setCallingFeatureId(callingFeatureId).setResolvedType(resolvedType).setResultTo(resultTo).setResultWho(resultWho).setRequestCode(requestCode).setStartFlags(startFlags).setProfilerInfo(profilerInfo).setActivityOptions(bOptions).setUserId(userId).execute();}
- ActivityStarter.execute
ActivityStarter.java
int execute() {...res = executeRequest(mRequest);...}
private int executeRequest(Request request) {...ActivityRecord sourceRecord = null;ActivityRecord resultRecord = null;...mLastStartActivityResult = startActivityUnchecked(r, sourceRecord, voiceSession,request.voiceInteractor, startFlags, true /* doResume */, checkedOptions, inTask,restrictedBgActivity, intentGrants);...return mLastStartActivityResult;}
- ActivityStarter.startActivityUnchecked
private int startActivityUnchecked(final ActivityRecord r, ActivityRecord sourceRecord,IVoiceInteractionSession voiceSession, IVoiceInteractor voiceInteractor,int startFlags, boolean doResume, ActivityOptions options, Task inTask,boolean restrictedBgActivity, NeededUriGrants intentGrants) {....try {...result = startActivityInner(r, sourceRecord, voiceSession, voiceInteractor,startFlags, doResume, options, inTask, restrictedBgActivity, intentGrants);} finally {...}postStartActivityProcessing(r, result, startedActivityRootTask);return result;}
- ActivityStarter.startActivityInner
int startActivityInner(final ActivityRecord r, ActivityRecord sourceRecord,IVoiceInteractionSession voiceSession, IVoiceInteractor voiceInteractor,int startFlags, boolean doResume, ActivityOptions options, Task inTask,boolean restrictedBgActivity, NeededUriGrants intentGrants) {setInitialState(r, options, inTask, doResume, startFlags, sourceRecord, voiceSession,voiceInteractor, restrictedBgActivity);...// RootWindowContainermRootWindowContainer.resumeFocusedTasksTopActivities(mTargetRootTask, mStartActivity, mOptions, mTransientLaunch);...return START_SUCCESS;}
- RootWindowContainer.resumeFocusedTasksTopActivities
boolean resumeFocusedTasksTopActivities(Task targetRootTask, ActivityRecord target, ActivityOptions targetOptions,boolean deferPause) {...boolean result = false;if (targetRootTask != null && (targetRootTask.isTopRootTaskInDisplayArea()|| getTopDisplayFocusedRootTask() == targetRootTask)) {// Taskresult = targetRootTask.resumeTopActivityUncheckedLocked(target, targetOptions,deferPause);}...return result;}
- Task.resumeTopActivityInnerLocked
Task.java
private boolean resumeTopActivityInnerLocked(ActivityRecord prev, ActivityOptions options) {...if (mResumedActivity != null) {pausing |= startPausingLocked(userLeaving, false , next); // 這里會調用Launcher的pause}...// ActivityTaskSupervisormStackSupervisor.startSpecificActivity(next, true, false);...}
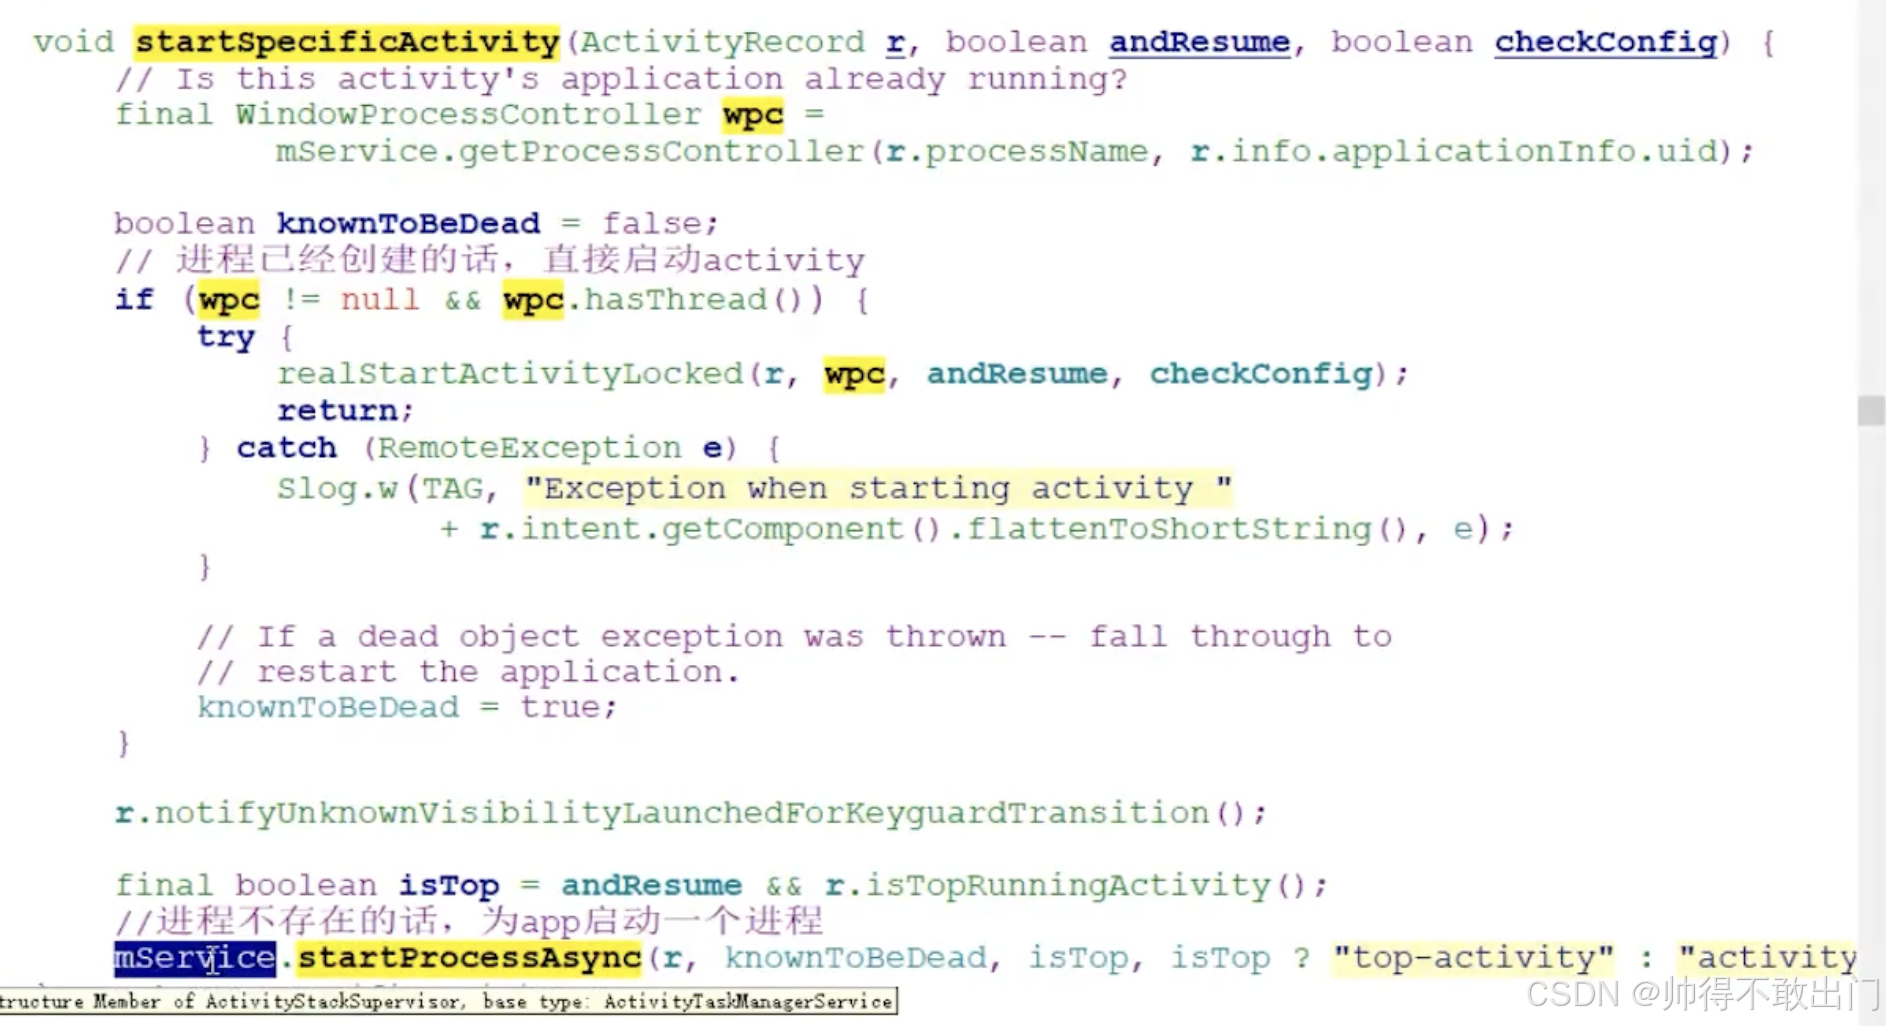
- ActivityStackSupervisor::startSpecificActivity
ActivityStackSupervisor會判斷進程是否存在,存在則調用realStartActivityLocked,不存在則調用startProcessAsync創建其實是通過Zygote來fork創建進程,進程創建后還是會調用realStartActivityLocked的。
Zygote 與應用進程創建
Zygote
Zygote:AMS通過Zygote進程來創建新的應用程序進程(App)。Zygote 是 Android 系統中一個特殊的進程,是所有 Java 應用程序進程的孵化器,它在系統啟動時就已啟動并處于就緒狀態。Zygote 通過fork系統調用創建新的應用進程,新進程會繼承 Zygote 進程的一些初始化狀態,提高應用啟動效率。
進程的創建
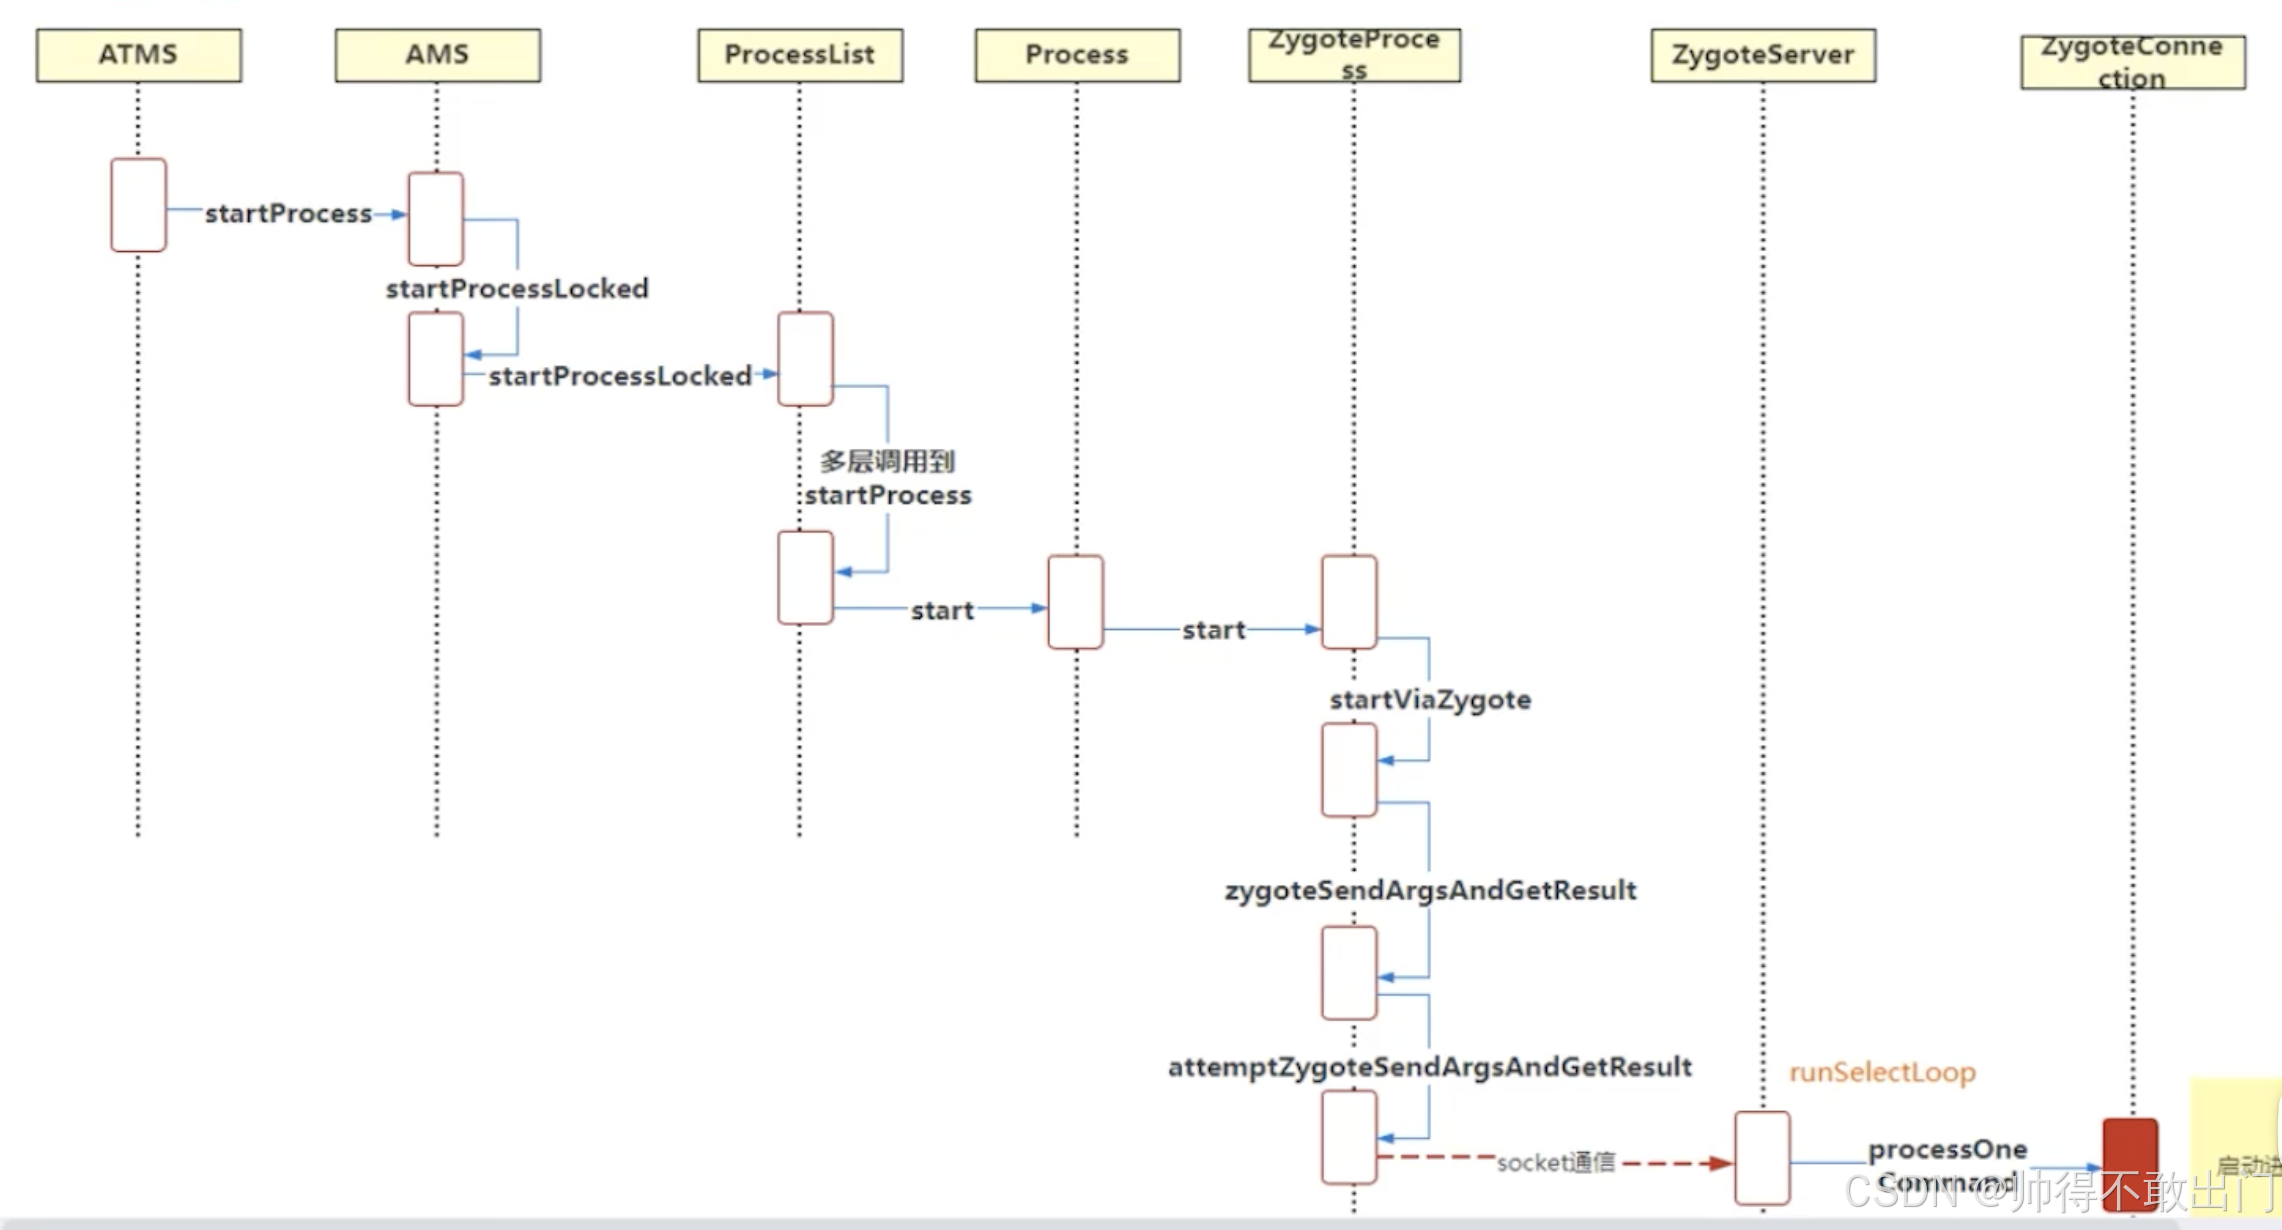
來看看mService.startProcessAsync
- ActivityManagerInternal.startProcess()
/*** Activity manager local system service interface.*/
public abstract class ActivityManagerInternal {/** Starts a given process. */// 調用的是ActivityManagerService.LocalService.startProcess()--》ActivityManagerService.startProcessLockedpublic abstract void startProcess(String processName, ApplicationInfo info,boolean knownToBeDead, boolean isTop, String hostingType, ComponentName hostingName);
}
- ActivityManagerService.startProcessLocked
/*** Process management.*/final ProcessList mProcessList;@GuardedBy("this")final ProcessRecord startProcessLocked(String processName,ApplicationInfo info, boolean knownToBeDead, int intentFlags,HostingRecord hostingRecord, int zygotePolicyFlags, boolean allowWhileBooting,boolean isolated, boolean keepIfLarge) {// ProcessList,最終調用的是ProcessList.startProcess()-->Process.startreturn mProcessList.startProcessLocked(processName, info, knownToBeDead, intentFlags,hostingRecord, zygotePolicyFlags, allowWhileBooting, isolated, 0 /* isolatedUid */,keepIfLarge, null /* ABI override */, null /* entryPoint */,null /* entryPointArgs */, null /* crashHandler */);}
- Process.start
/*** State associated with the zygote process.*/public static final ZygoteProcess ZYGOTE_PROCESS = new ZygoteProcess();public static ProcessStartResult start(@NonNull final String processClass,@Nullable final String niceName,int uid, int gid, @Nullable int[] gids,int runtimeFlags,int mountExternal,int targetSdkVersion,@Nullable String seInfo,@NonNull String abi,@Nullable String instructionSet,@Nullable String appDataDir,@Nullable String invokeWith,@Nullable String packageName,int zygotePolicyFlags,boolean isTopApp,@Nullable long[] disabledCompatChanges,@Nullable Map<String, Pair<String, Long>>pkgDataInfoMap,@Nullable Map<String, Pair<String, Long>>whitelistedDataInfoMap,boolean bindMountAppsData,boolean bindMountAppStorageDirs,@Nullable String[] zygoteArgs) {return ZYGOTE_PROCESS.start(processClass, niceName, uid, gid, gids,runtimeFlags, mountExternal, targetSdkVersion, seInfo,abi, instructionSet, appDataDir, invokeWith, packageName,zygotePolicyFlags, isTopApp, disabledCompatChanges,pkgDataInfoMap, whitelistedDataInfoMap, bindMountAppsData,bindMountAppStorageDirs, zygoteArgs);}
- ZygoteProcess.start
ZygoteProcess 最核心的作用是借助與 Zygote 進程的通信,創建新的應用進程
public final Process.ProcessStartResult start(...) {return startViaZygote(processClass, niceName, uid, gid, gids,runtimeFlags, mountExternal, targetSdkVersion, seInfo,abi, instructionSet, appDataDir, invokeWith, /*startChildZygote=*/ false,packageName, zygotePolicyFlags, isTopApp, disabledCompatChanges,pkgDataInfoMap, allowlistedDataInfoList, bindMountAppsData,bindMountAppStorageDirs, zygoteArgs);}
會通過LocalSocket與Zygote建立socket連接,溝通Zygote fork進程
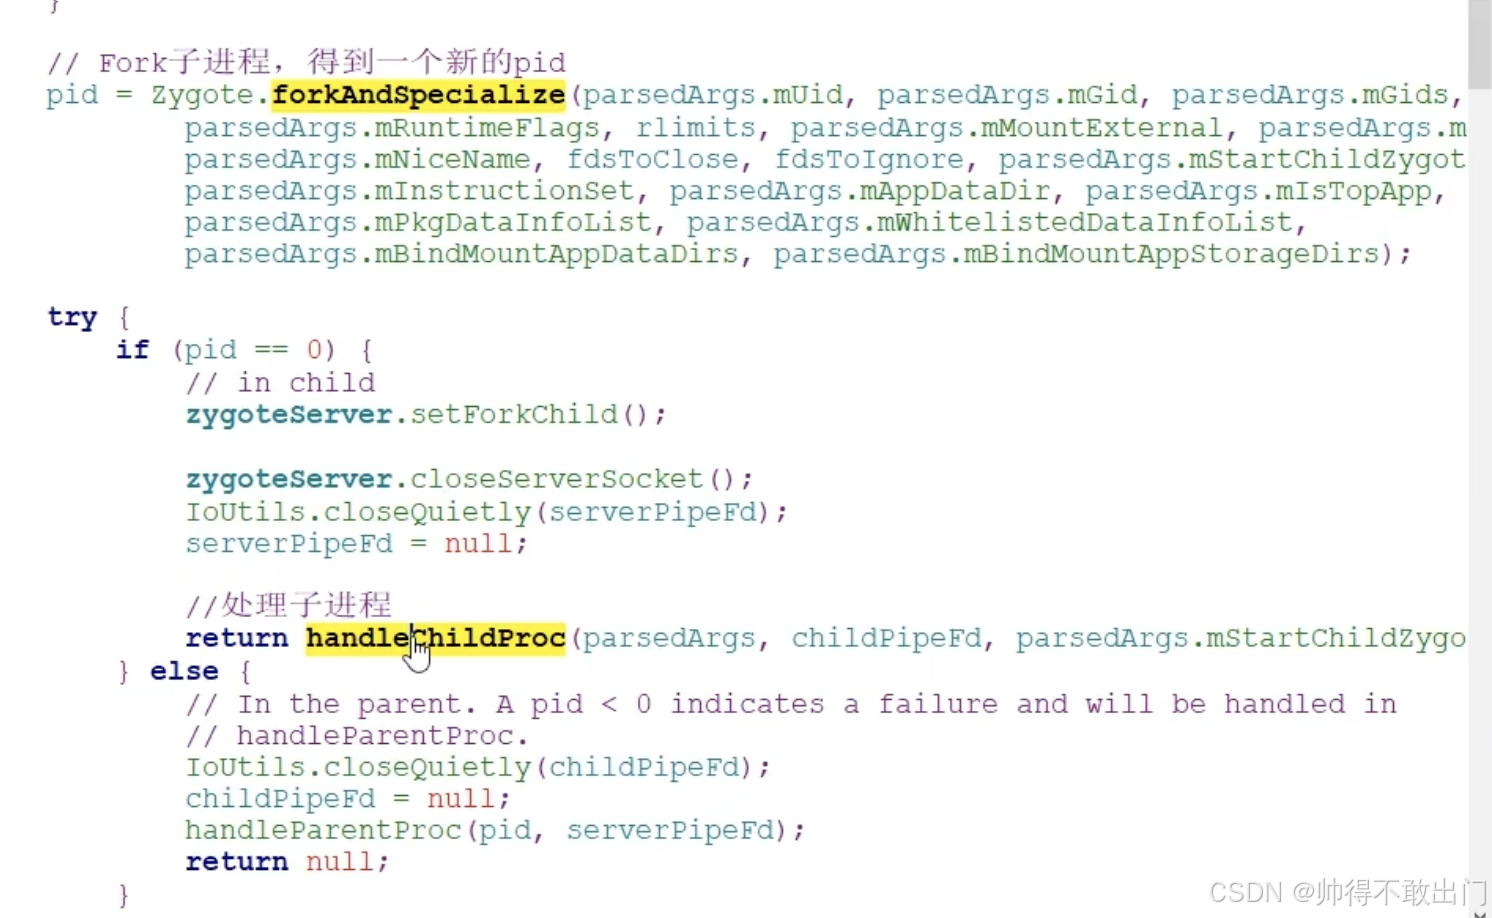
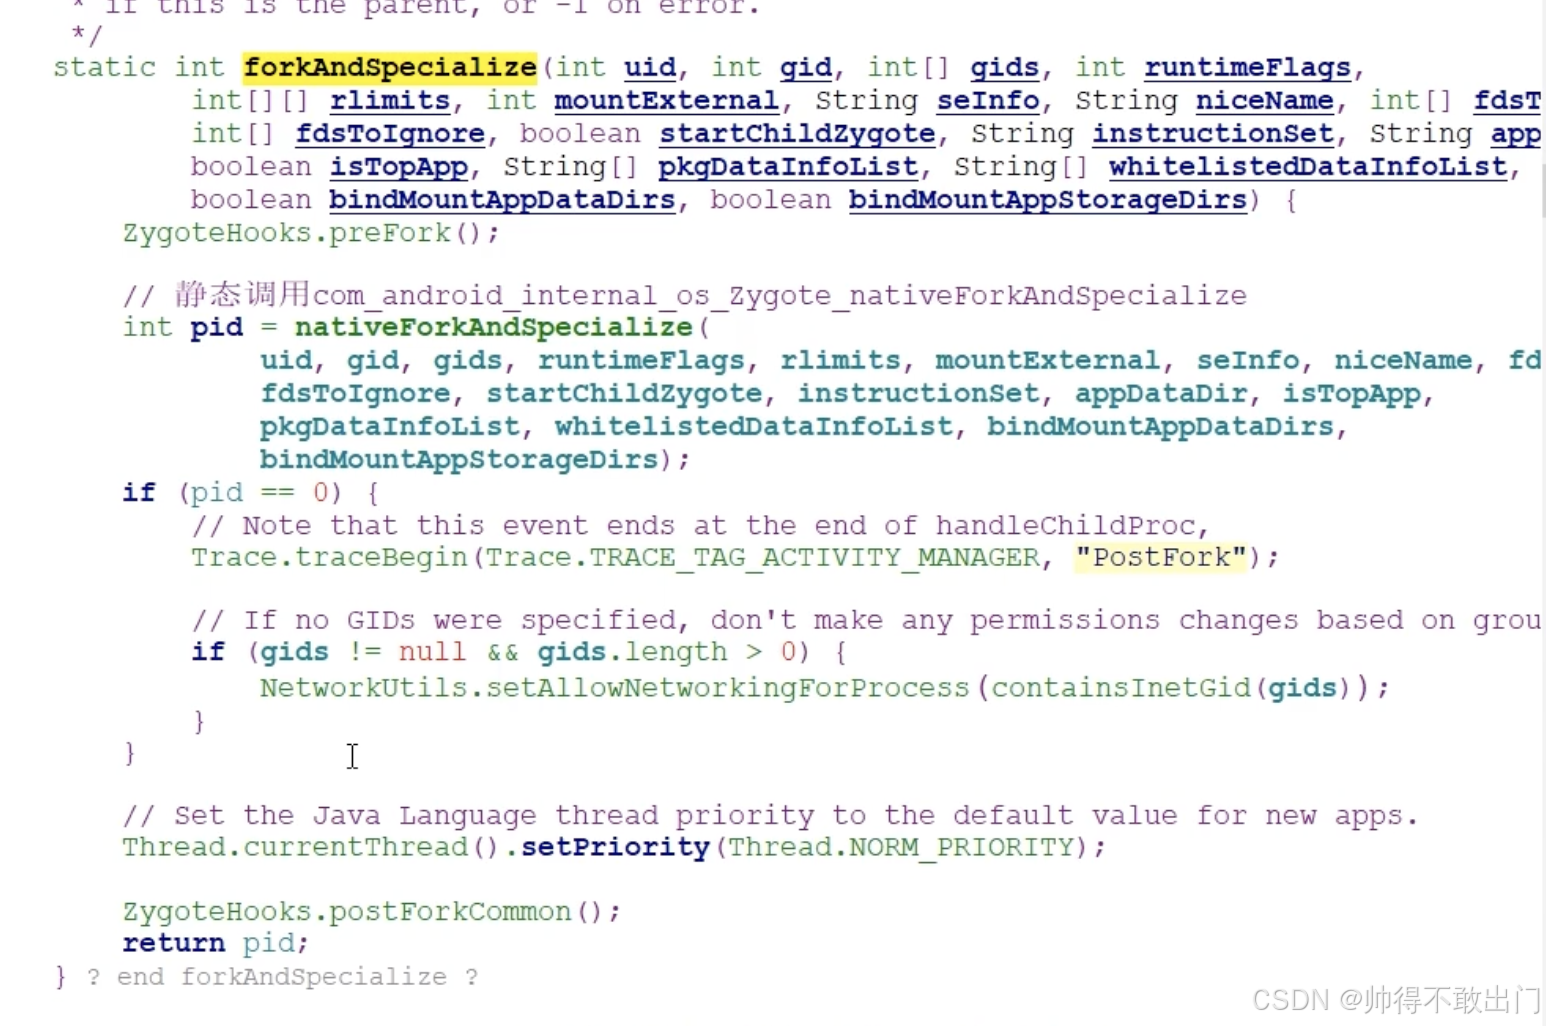
- ZygoteConnection.forkAndSpecialize
這個時候還是在.cpp中執行,fork子進程,native方法,內部實現就是c語言的fork函數調用。
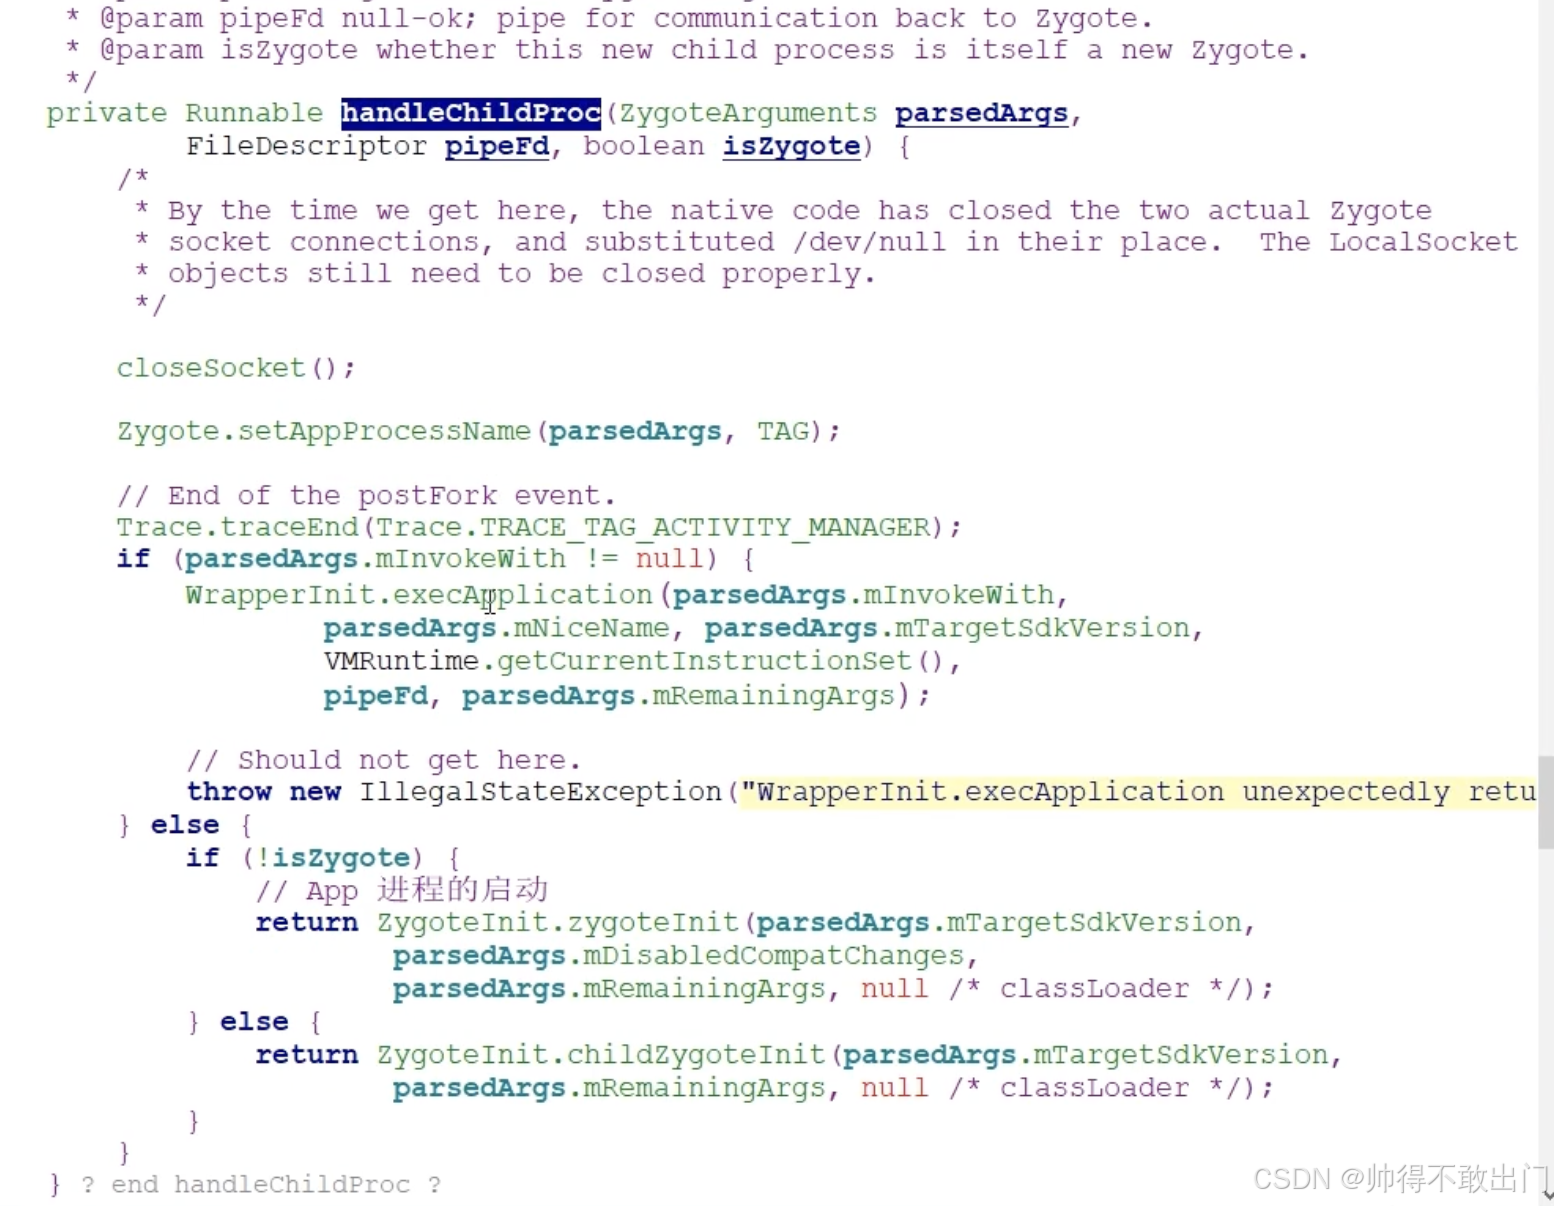
- ZygoteConnection.handleChildProc
ZygoteConnection.java這個時候跑到java,這里是子進程的代碼了,
在這個函數中會調用ZygoteInit
- ZygoteInit.ZygoteInit
ZygoteInit.java
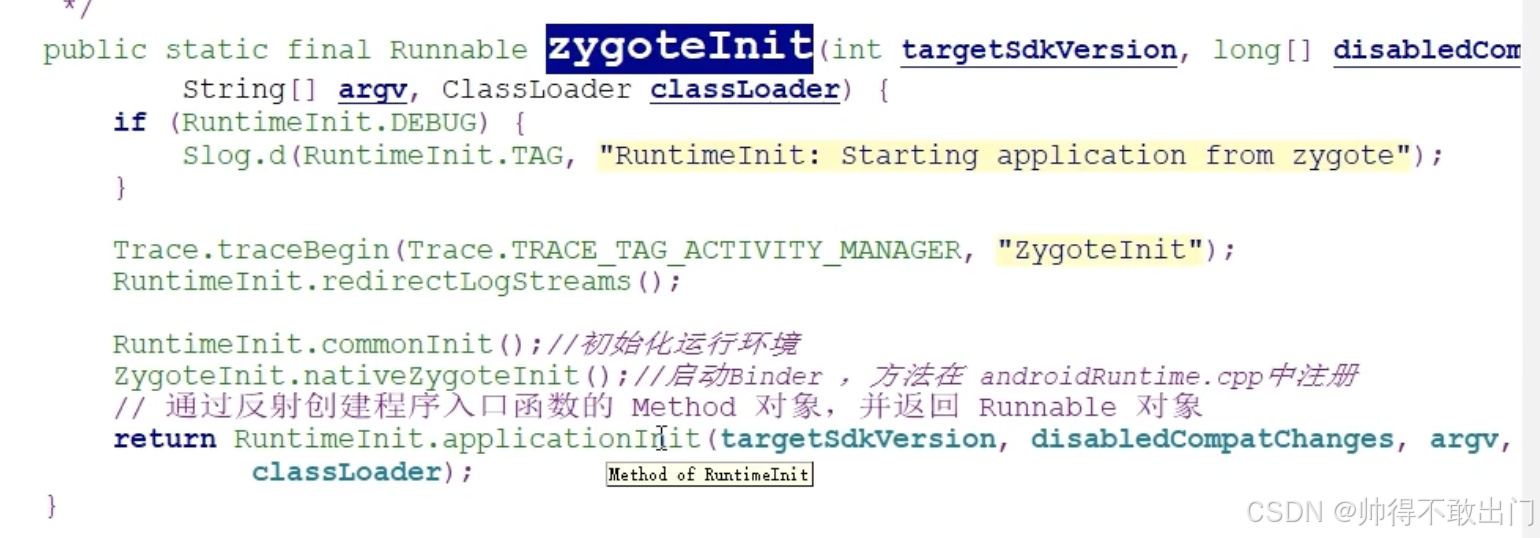
- nativeZygoteInit
AndroidRuntime.cpp

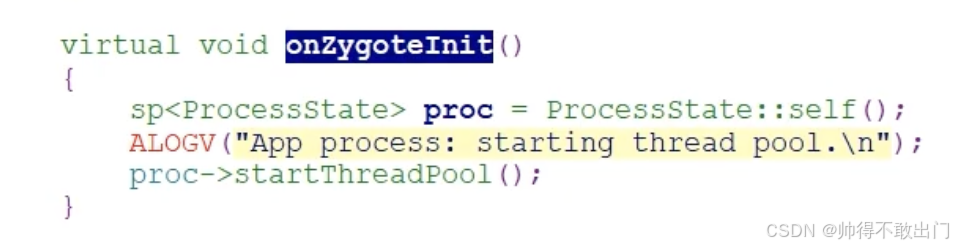
- ProcessState構造創建Binder
ProcessState.cpp
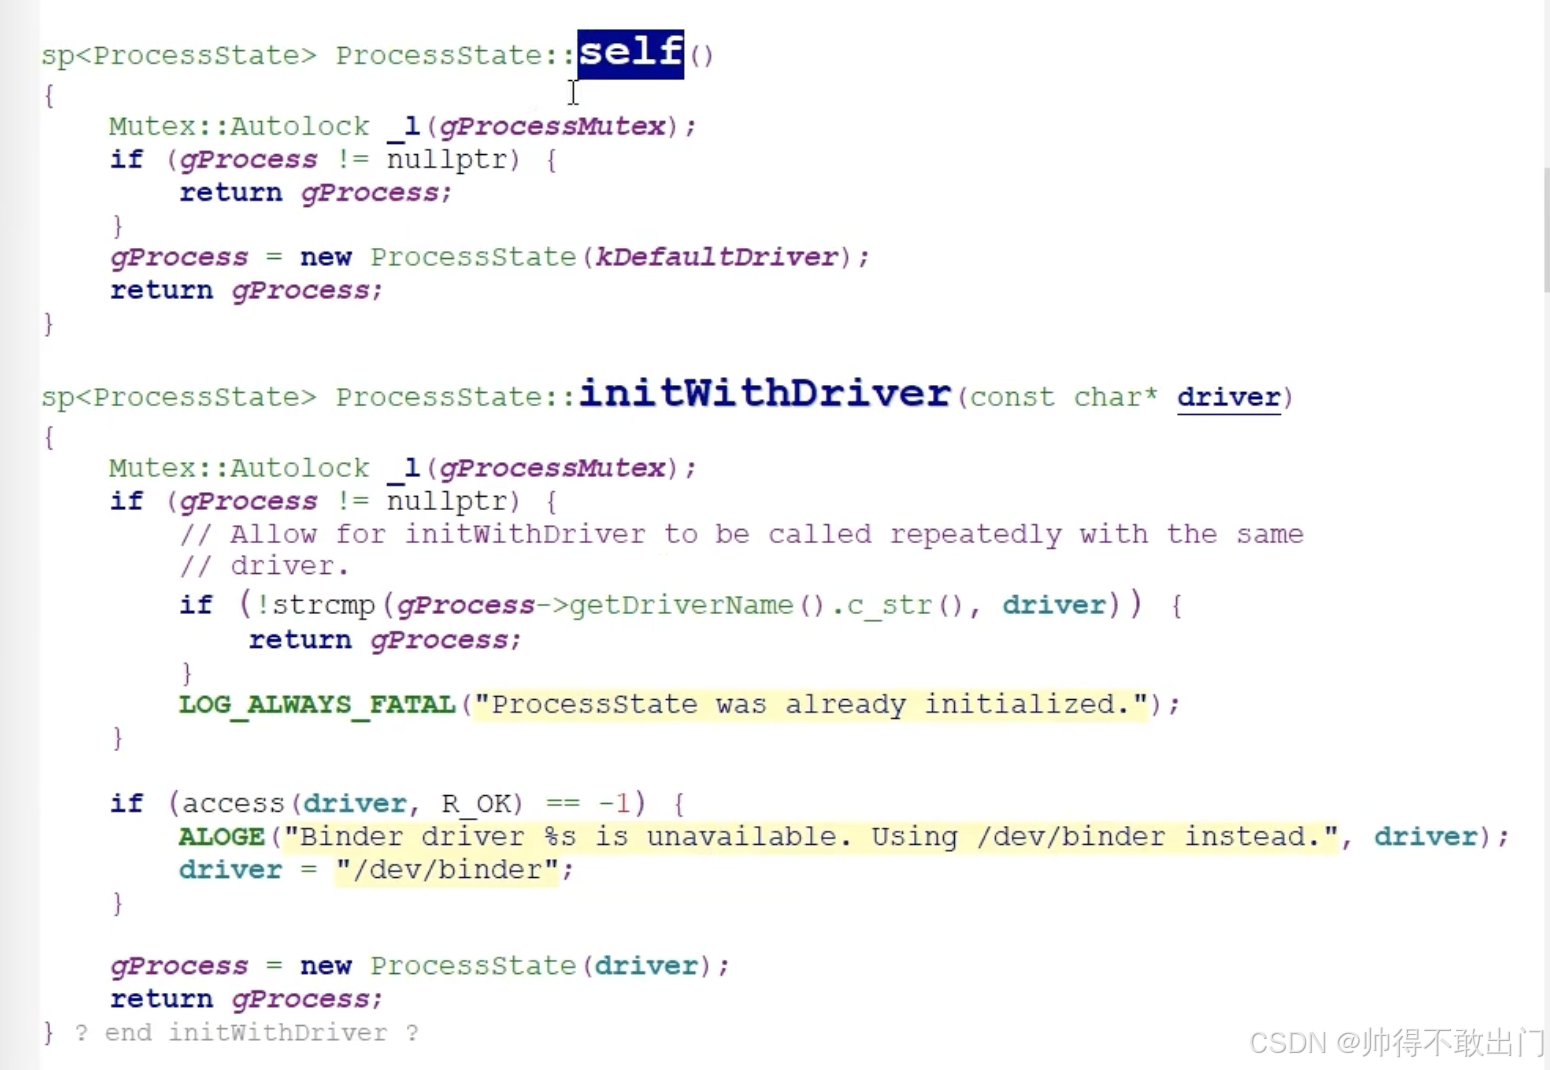 構造ProcessState時就會調用open_driver(“/dev/binder”),打開binder驅動設備,然后通過mmap向binder驅動申請空間。
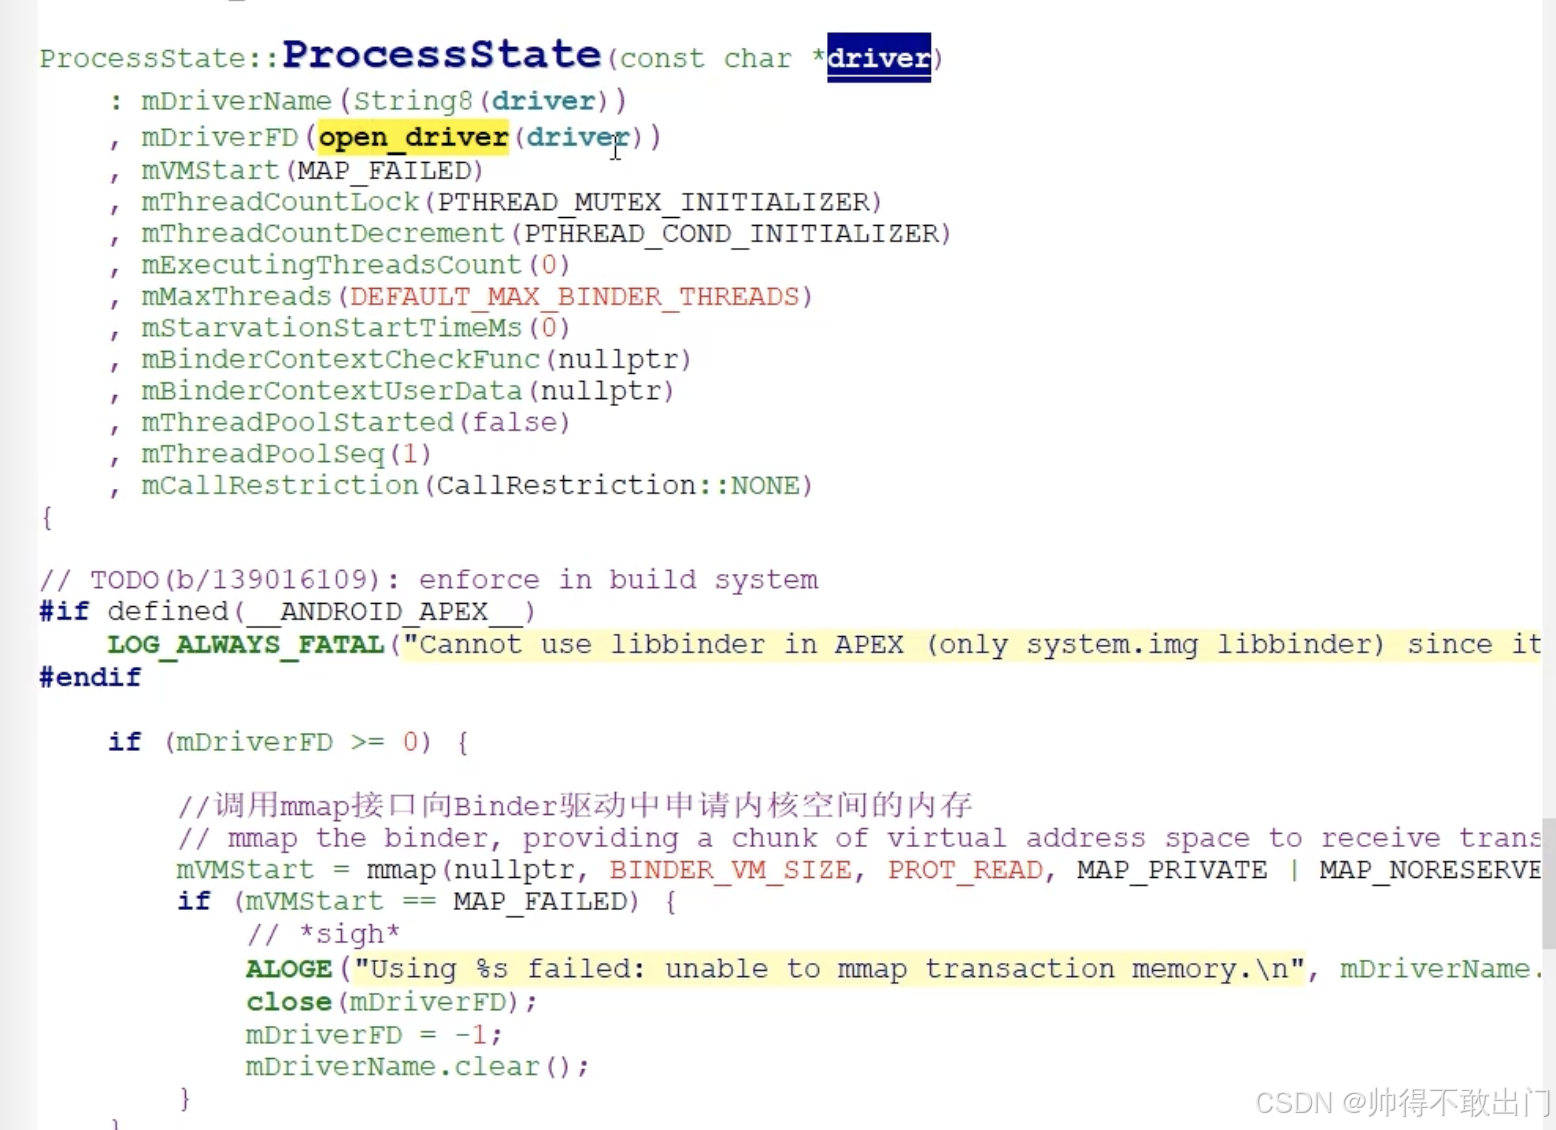
mmap時,會申請BINDER_VM_SIZE大小的空間,不到1M,1M減2個內存頁的大小。
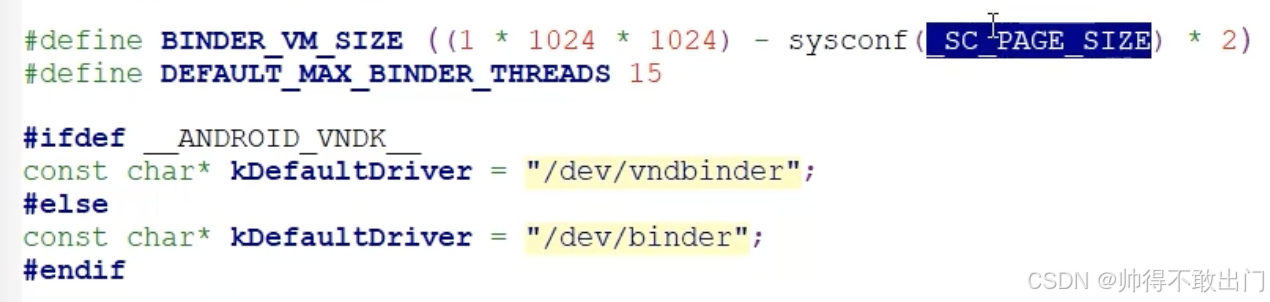
然后接著onZygoteInit會調用proc->processThreadPool()啟動binder線程池,默認最大線程數為15。 - RuntimeInit.findStaticMain
與Zygote通過socket通信時,會傳參數"android.app.ActivityThread"過來,通過findStaticMain定位到ActivityThread.main。
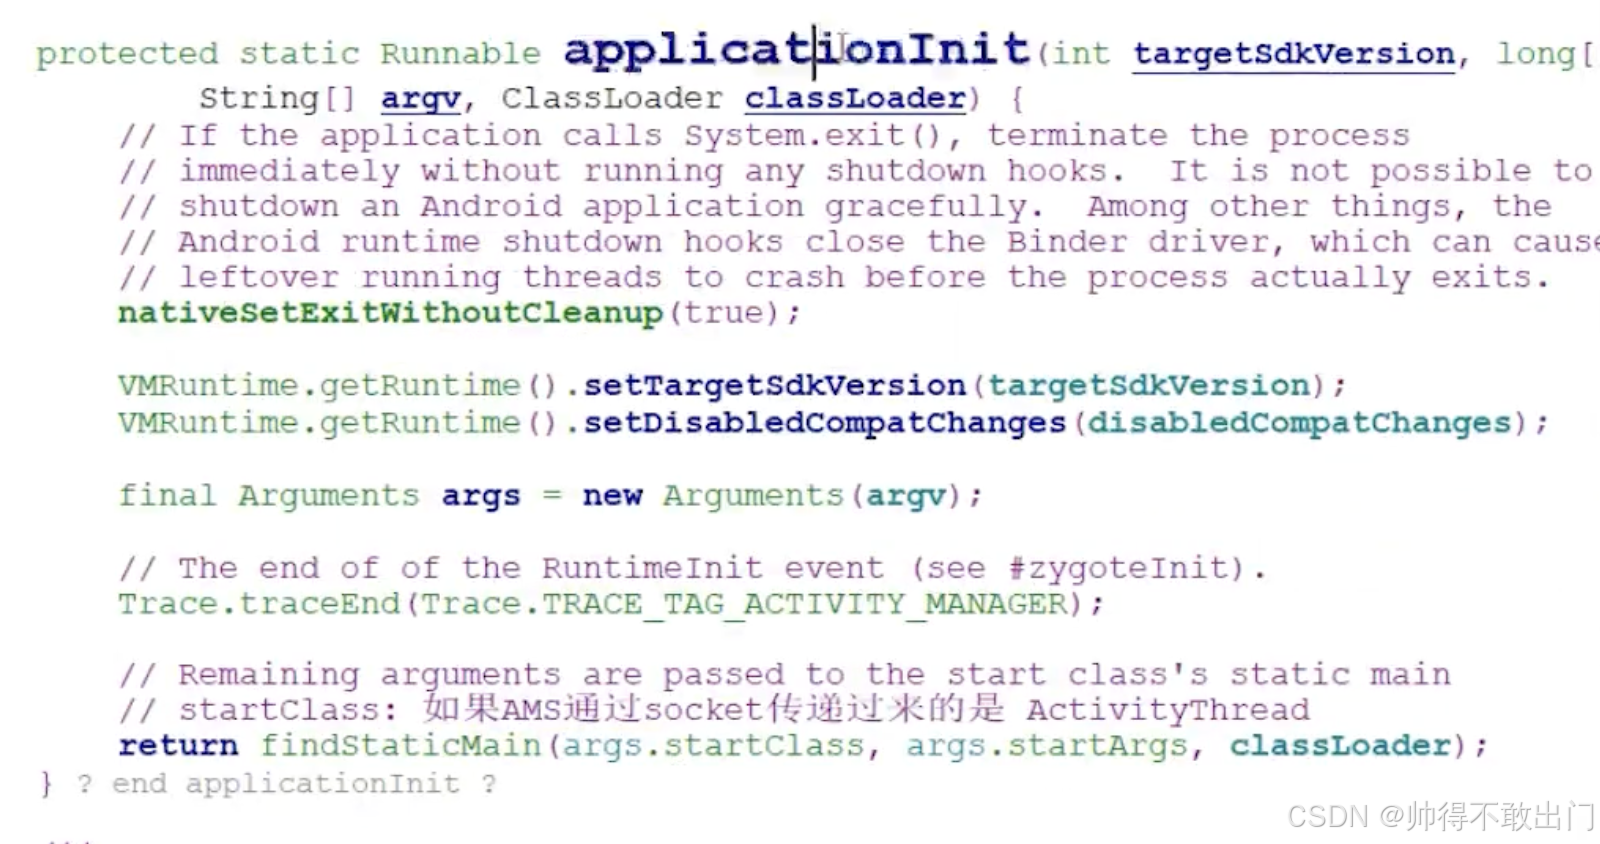
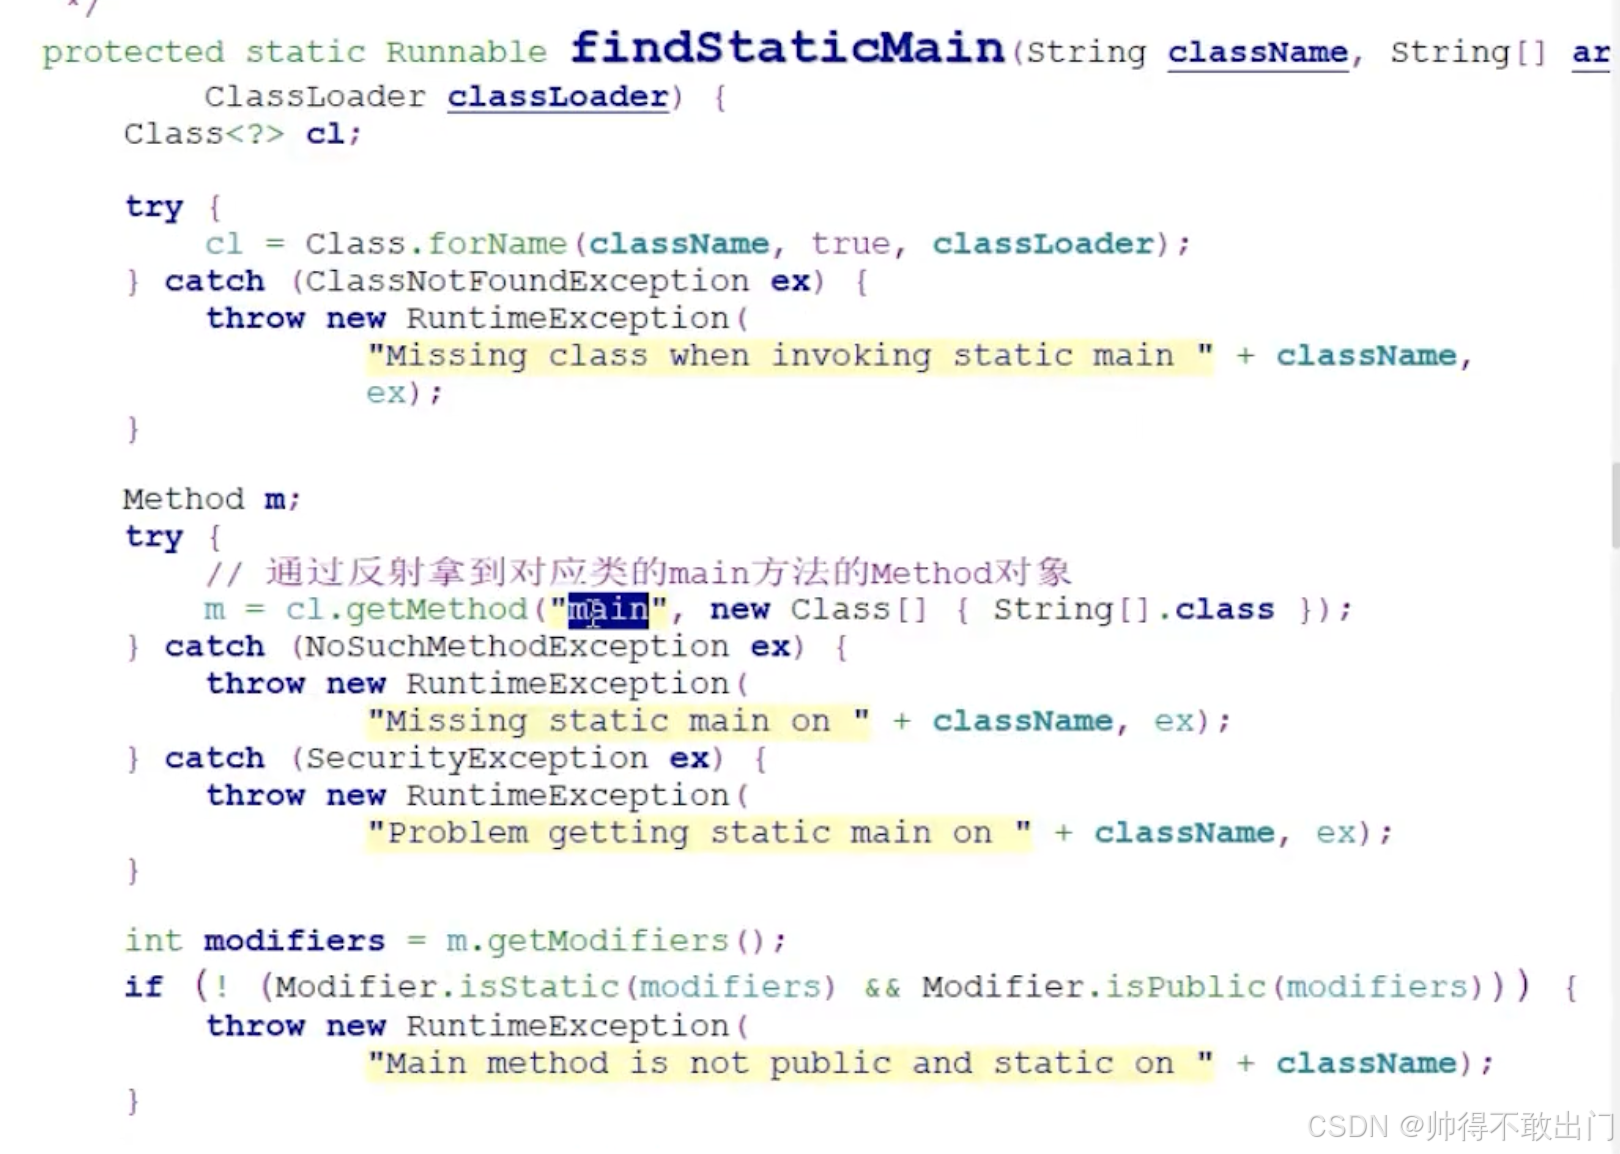
這樣fork進程后會跳轉到新進程的main入口,就是ActivityThread.main函數。
應用進程初始化
- ActivityThread:應用進程創建后,首先執行ActivityThread.main()方法,這是應用程序主線程(UI 線程)的入口。接著依次調用AT.attach()和AT.bindApplication()方法,完成主線程與系統的綁定以及應用程序的初始化相關操作 。
ActivityThread.javapublic static void main(String[] args) {...Looper.prepareMainLooper();...ActivityThread thread = new ActivityThread();thread.attach(false, startSeq);...Looper.loop();...}private void attach(boolean system, long startSeq) {final IActivityManager mgr = ActivityManager.getService();try {mgr.attachApplication(mAppThread, startSeq);} catch (RemoteException ex) {throw ex.rethrowFromSystemServer();}}
ActivityManagerService.java
private boolean attachApplicationLocked(@NonNull IApplicationThread thread,int pid, int callingUid, long startSeq) {...// 發送MH.BIND_APPLICATION的Message,在Handler中調用了Application的onCreatethread.bindApplication(processName, appInfo, providerList,instr2.mClass,profilerInfo, instr2.mArguments,instr2.mWatcher,instr2.mUiAutomationConnection, testMode,mBinderTransactionTrackingEnabled, enableTrackAllocation,isRestrictedBackupMode || !normalMode, app.isPersistent(),new Configuration(app.getWindowProcessController().getConfiguration()),app.compat, getCommonServicesLocked(app.isolated),mCoreSettingsObserver.getCoreSettingsLocked(),buildSerial, autofillOptions, contentCaptureOptions,app.mDisabledCompatChanges);...// 這里會最終調用到ActivityStackSupervisor.realStartActivityLockeddidSomething = mAtmInternal.attachApplication(app.getWindowProcessController());...}
- realStartActivityLocked會調用到ActivityThread.performLaunchActivity()
進程創建后,開始啟動Activity
ActivityThread.java
private Activity performLaunchActivity(ActivityClientRecord r, Intent customIntent) {// 創建Context,Context:初始化過程中會構建Context(上下文),它是應用程序環境的抽象類,提供了應用程序運行所需的各種信息和操作接口,如資源訪問、系統服務獲取等。ContextImpl appContext = createBaseContextForActivity(r);...//反射創建Activityjava.lang.ClassLoader cl = appContext.getClassLoader();activity = mInstrumentation.newActivity(cl, component.getClassName(), r.intent);...// AMS通過反射創建APP的Application對象,調用Application的attach函數,這個其實是Application.attachBaseContent(),然后才是調用Application.onCreate()方法,Application是應用程序全局的一個基類,可用于在應用生命周期內保存全局狀態和進行一些初始化操作Application app = r.packageInfo.makeApplication(false, mInstrumentation);...// 調用Activity.attachactivity.attach(appContext, this, getInstrumentation(), r.token,r.ident, app, r.intent, r.activityInfo, title, r.parent,r.embeddedID, r.lastNonConfigurationInstances, config,r.referrer, r.voiceInteractor, window, r.configCallback,r.assistToken);...activity.setTheme(theme);...// 調用Activity.onCreatemInstrumentation.callActivityOnCreate(activity, r.state, r.persistentState);
}
Application

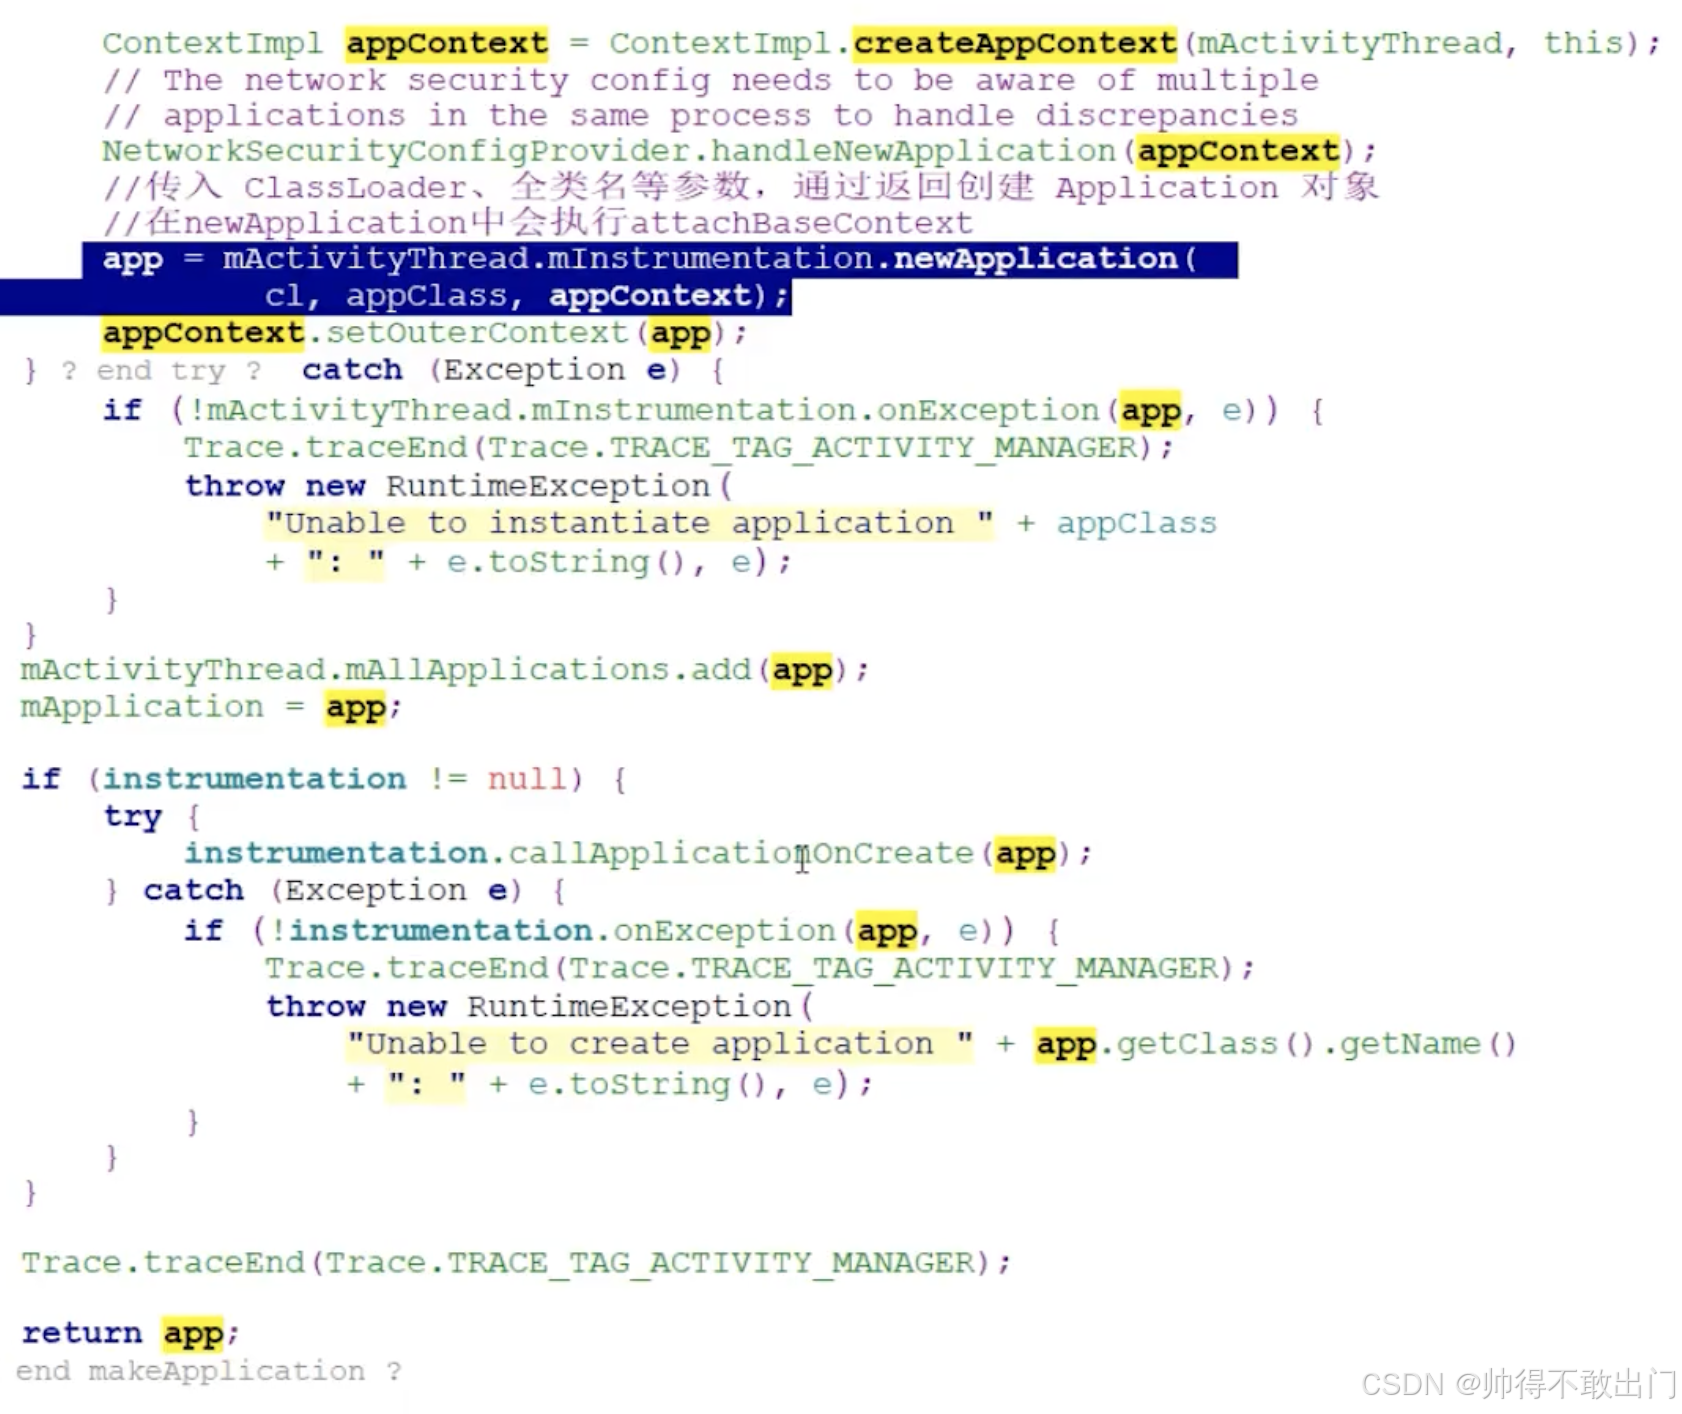
如圖:
createApplContext創建Context,
newApplication是通過反射創建Application對象app并會調用attachBaseContext,
callApplicationOnCreate則是調用onCreate,
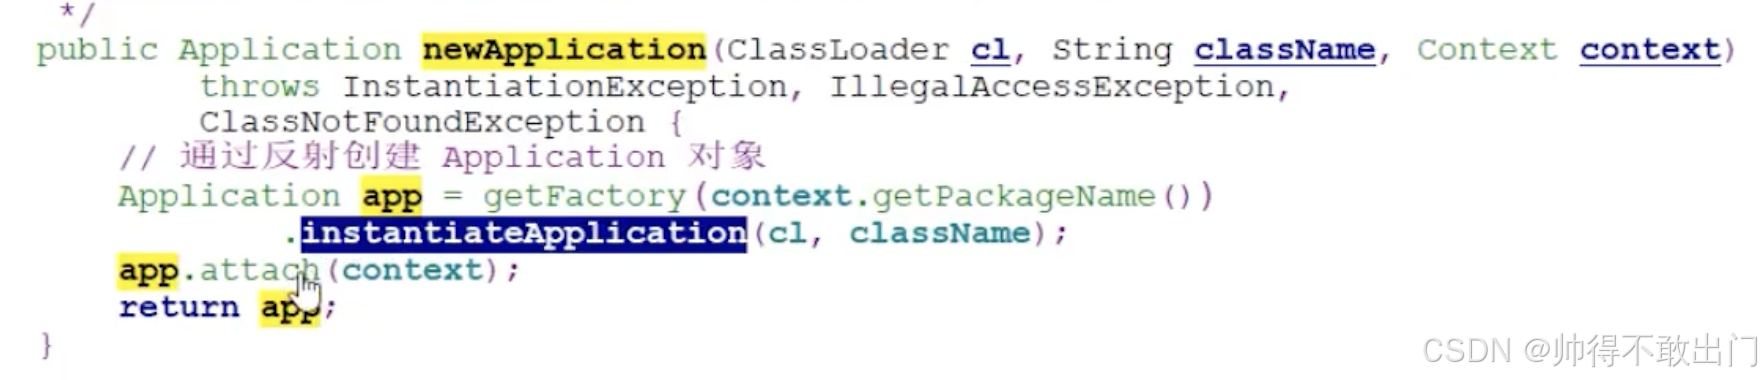
 如圖:
如圖:
newApplication中是調用的反射創建Application,然后調用attachBaseContext
ApplicationThread.scheduleTransaction,調用ActivityThread.handleLaunchActivity
Activity 啟動與顯示
- Activity 啟動:ActivityThread中performLaunchActivity()方法先創建Application后再啟動Activity。先調用Activity.onCreate()方法創建Activity實例,完成Activity的初始化工作,如設置布局等。
- 設置布局與關聯窗口:通過Activity.setContentView()設置Activity的布局文件。然后調用Activity.onResume()方法,此時AMS將Activity與WindowManagerService進行關聯,完成窗口的創建和顯示相關操作,最終將應用界面展示給用戶。
優化啟動時黑白屏現象
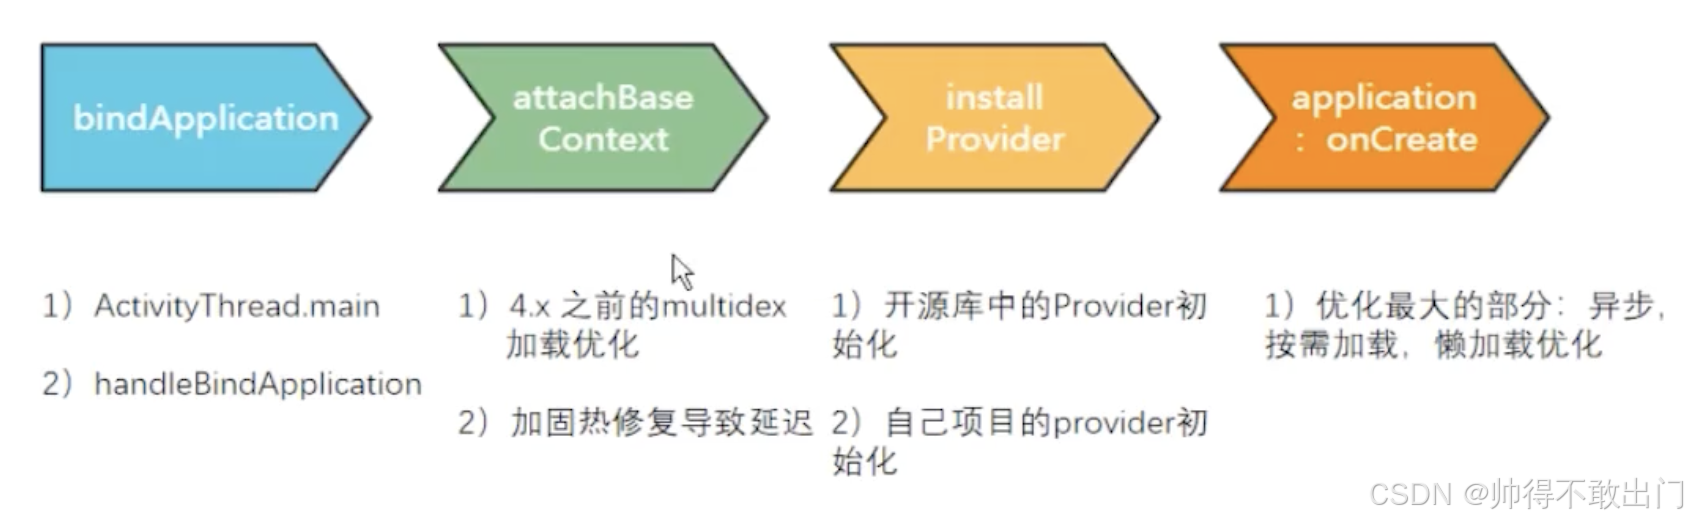
從啟動到顯示應用APP的首頁過程經歷如下過程:

這過程默認是顯示黑白屏或是背景圖的。
可優化的階段
Application階段
上面的階段中,從attachBaseContent開始都是可以優化的階段。
注意Provider是在onCreate之后,如下圖:
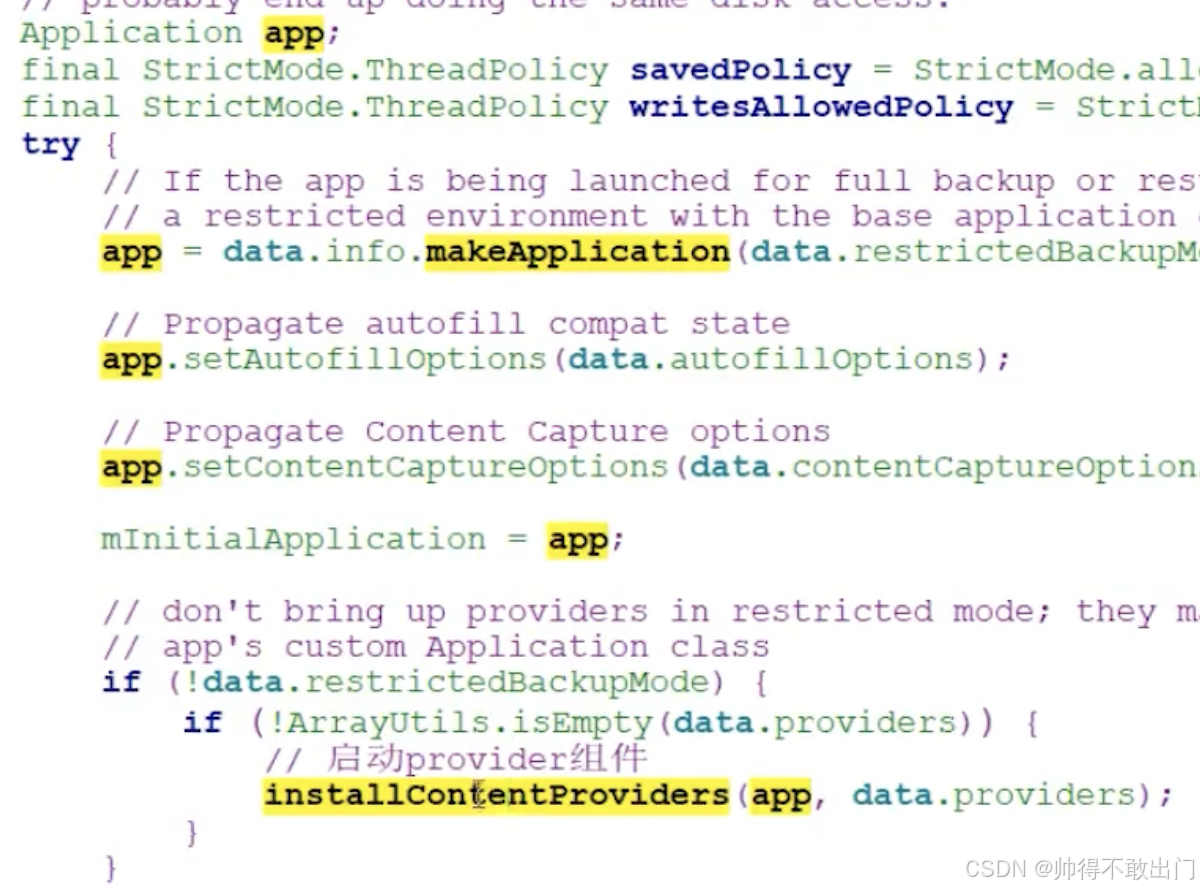
makeApplication中會調用Application的onCreate的,然后installContentProviders才會調用。
相關優化
- 4.x 之前的 multidex 加載優化:在早期 Android 版本(4.x 之前),應用如果包含多個 dex 文件(multidex),需要特殊的加載優化策略,因為當時系統對多 dex 支持不完善。
- 加固熱修復導致延遲:應用經過加固和熱修復處理后,在執行 attachBaseContext 時可能會出現延遲情況,這是因為加固和熱修復操作增加了額外的代碼加載和處理邏輯。
- 開源庫中的 Provider 初始化:很多開源庫會使用 Content Provider 來提供數據共享等功能,這里需要對其進行初始化。
- 自己項目的 provider 初始化:項目中自定義的 Content Provider 也需要在此步驟進行初始化,確保其能夠正常工作。
- Application::onCreate:優化最大的部分為異步、按需加載、懶加載優化。通過異步加載和按需、懶加載機制,可以避免在應用啟動時一次性加載過多資源,從而加快應用啟動速度,提升用戶體驗。
Activity階段
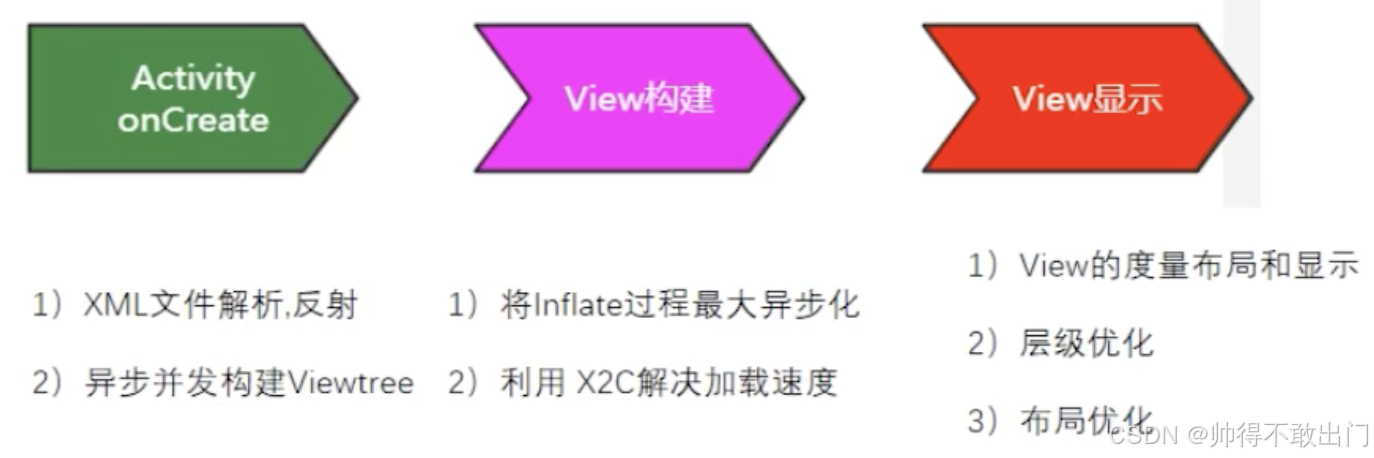
- Activity::onCreate
- XML 文件解析,反射:Android 通過解析布局的 XML 文件來創建 View,這個過程會用到反射機制實例化 XML 中定義的 View 對象。
- 異步并發構建 Viewtree:為加快構建速度,可采用異步并發方式構建 View 樹,避免主線程阻塞,提升用戶體驗。
- View構建
- 將 Inflate 過程最大異步化:布局填充(Inflate)是將 XML 布局文件轉化為 View 對象的過程,將其異步化,能減少主線程負載,防止 ANR(應用無響應)。
- 利用 X2C 解決加載速度:X2C(XML to Java Class)技術可將 XML 布局轉換為 Java 代碼,減少解析 XML 的開銷,加快 View 的加載速度。
- View顯示
- View 的度量布局和顯示:通過正確的測量(Measure)、布局(Layout)和繪制(Draw)流程,確保 View 能正確顯示在屏幕上。
- 層級優化:減少 View 層級嵌套,避免過度復雜的布局結構,降低繪制和渲染成本。
- 布局優化:精簡布局,合理使用布局容器,如用 ConstraintLayout 替代嵌套的 LinearLayout 等,提升布局渲染效率。
數據加載階段
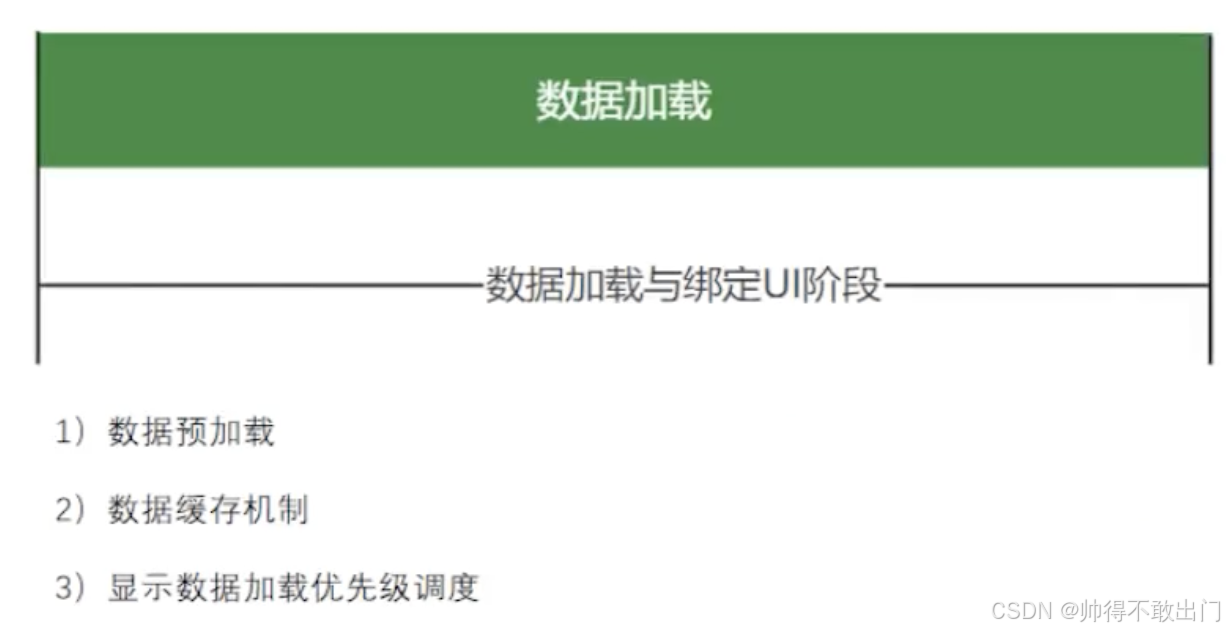
- 數據預加載:在用戶觸發數據展示操作前,提前加載數據。比如在應用啟動時或進入某個頁面之前,提前加載該頁面可能用到的數據,減少用戶等待時間,提升響應速度。
- 數據緩存機制:將已加載的數據存儲在緩存中(如內存緩存、磁盤緩存 ),當再次需要相同數據時,優先從緩存讀取,避免重復從原始數據源獲取,降低網絡請求或磁盤讀取開銷,加快數據展示速度。
- 顯示數據加載優先級調度:根據 UI 界面中不同數據展示區域的重要性,設置數據加載優先級。例如,先加載屏幕可見區域的數據,后加載不可見區域的數據;或者優先加載用戶更關注的關鍵信息數據,確保重要數據優先展示,提升用戶體驗。
Framework學習系列文章
Android Framework學習一:系統框架、啟動過程
Android Framework學習二:Activity創建及View繪制流程
Android Framework學習三:zygote
Android Framework學習四:APP速度優化
Android Framework學習五:APP啟動過程原理及速度優化
作者:帥得不敢出門
 深入解析)
什么是主鍵和外鍵?)


)


)

