虛幻5藍圖Editor Utility Widget
- 一、基礎框架搭建
- 背景:
- 1. 創建Editor Utility Widget
- 2.根控件選擇窗口
- 3.界面功能定位與階段
- 4.查看繼承樹
- 5.目標效果
- 二、模塊化設計流程
- 1.材質替換核心流程:
- 2.完整代碼如下
- 三、可視化界面UI布局
- 1. 添加標題欄
- 2. 構建滾動列表區域
- 3. 構建Apply按鈕
- 4. Apply按鈕點擊功能添加
- 5. 變量模塊分組
- 6. 新增變量`材質實例`
- 7.定義Python參數輸入元素
- 8.整體展示:
- 四、代碼的詳細解析
- 1. 材質路徑獲取模塊
- 2. 材質優先級配置模塊
- 3. 靜態網格材質處理模塊
- 4. 骨骼網格材質處理模塊
- 5. 批量處理主邏輯模塊
- 五、Unreal API 關鍵用途總結
- 六、學習資源鏈接
一、基礎框架搭建
背景:
在第一篇中【3DMax腳本MaxScript開發:創建高效模型虛擬體綁定和材質管理系統,從3DMax到Unreal和Unity引擎_系列第一篇】,設計了一個3Dmax模型虛擬體綁定和材質統一分配的插件,現在根據上一篇的工具設計,在UE5中用Editor Utility Widget來實現一個網格體材質自動匹配功能。
在UE5中,我將通過一個具體的邏輯結構和GUI設計示例,解決模型資產因多來源導致的材質命名混亂、手動分配效率低下等問題,對模型材質進行批量調控。
在UE5的Editor Utility Widget開發中設計一款網格體材質批量匹配工具。
通過可視化界面實現材質名稱與網格體邏輯的自動化映射,簡化美術流程并提升資源管理一致性。
1. 創建Editor Utility Widget
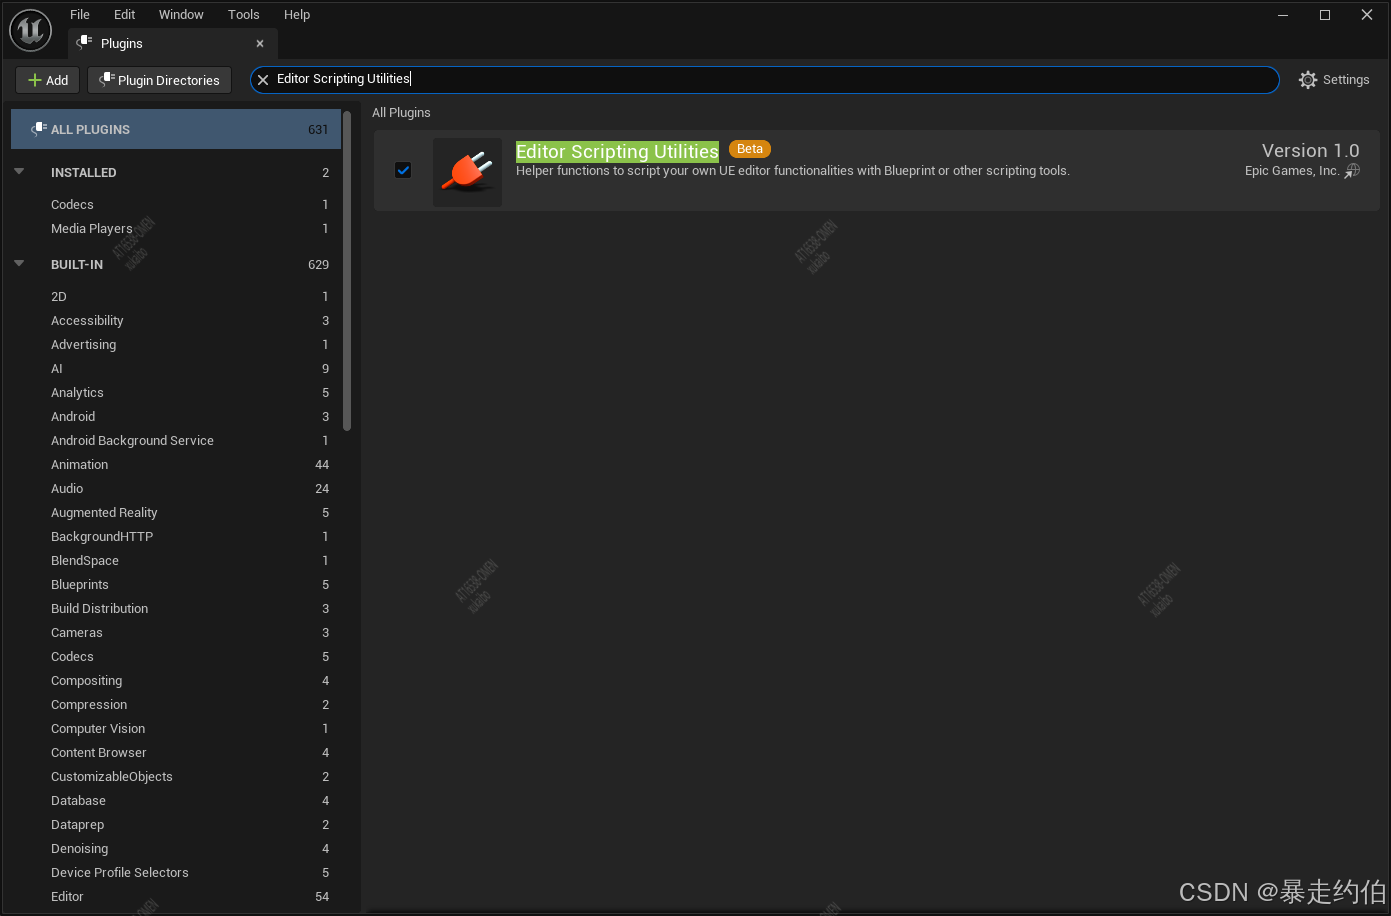
啟用必要插件:
- 打開 Edit > Plugins,搜索并啟用 “Editor Scripting Utilities”(這是創建Editor Utility Widget的必要前提)。
通過主工具欄的"Add"菜單創建:
- 選擇 Editor Utilities > Editor Utility Widget。
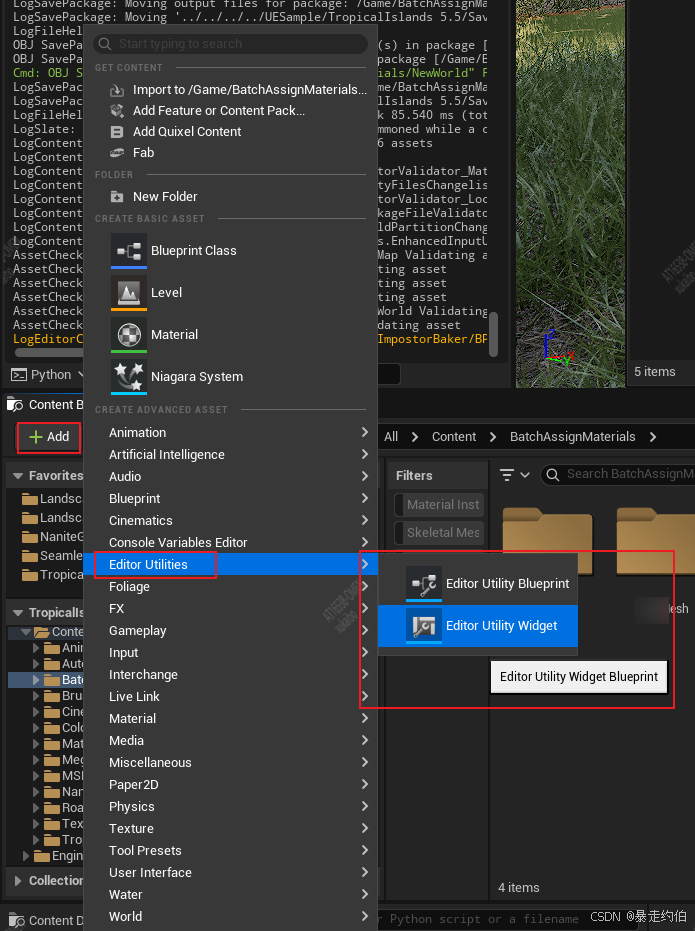
右鍵創建:
- 在內容瀏覽器(Content Browser)中,右鍵點擊目標文件夾的空白區域。
- 選擇
Editor Utilities>Editor Utility Widget。
這里我創建后命名為“BP_Widget_BatchAssignMaterials”,并將其保存至/Game/BatchAssignMaterials目錄下。接下來,我們將逐步實現UI布局、數據綁定和核心邏輯。
學習資源推薦
- Editor Utility Widgets 官方指南
- Editor Scripting 插件說明
- UMG UI設計教程
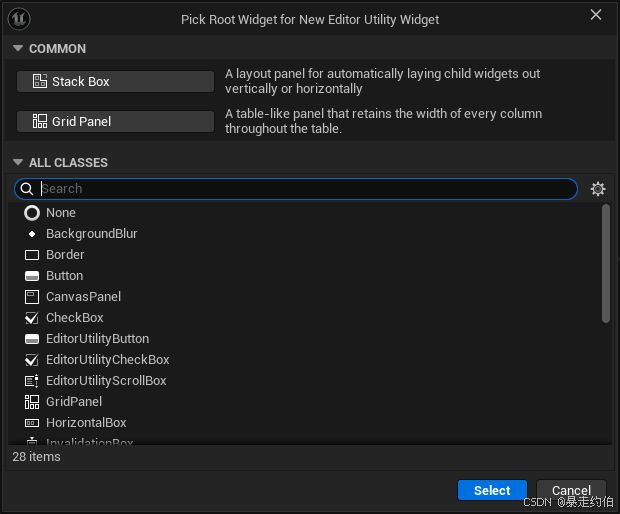
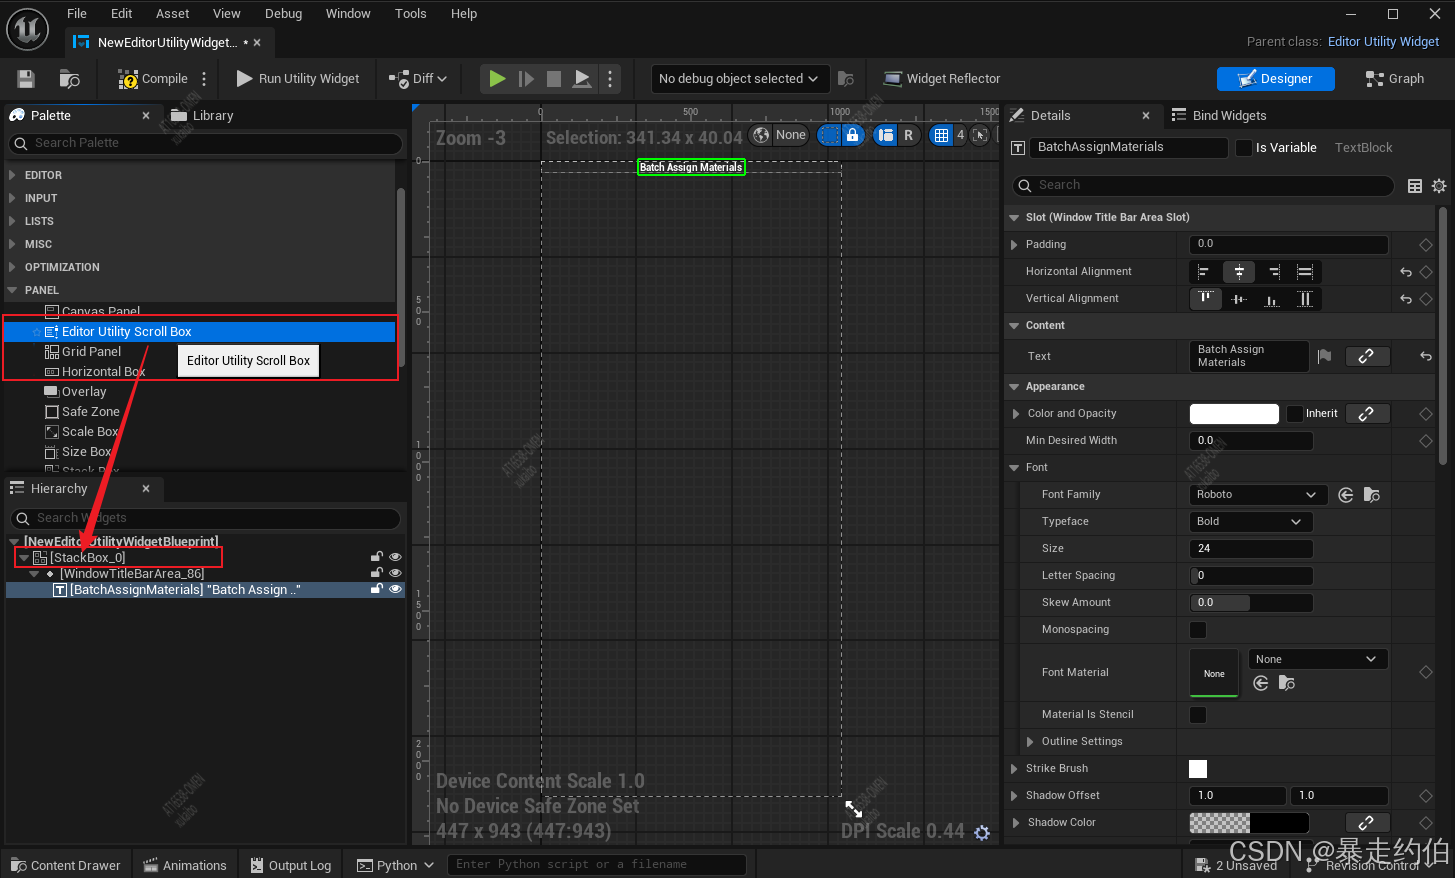
2.根控件選擇窗口
- 虛幻引擎創建Editor Utility Widget時的根控件選擇窗口,創建后彈出這個窗口,選擇一個根控件作為UI的基礎。
- 選擇一個合適的根控件,這里我選擇“
Stack Box”,點擊“Select”按鈕。
控件分類系統- COMMON區:推薦布局容器(Stack Box/Grid Panel),適合快速構建基礎界面框架
- ALL CLASSES區:提供完整控件庫(含20個可用項),支持EditorUtility系列專用組件
- Stack Box:支持垂直/水平自動排列(Orientation參數可配置)
- Grid Panel:表格布局容器(自動保持列寬一致性)
3.界面功能定位與階段
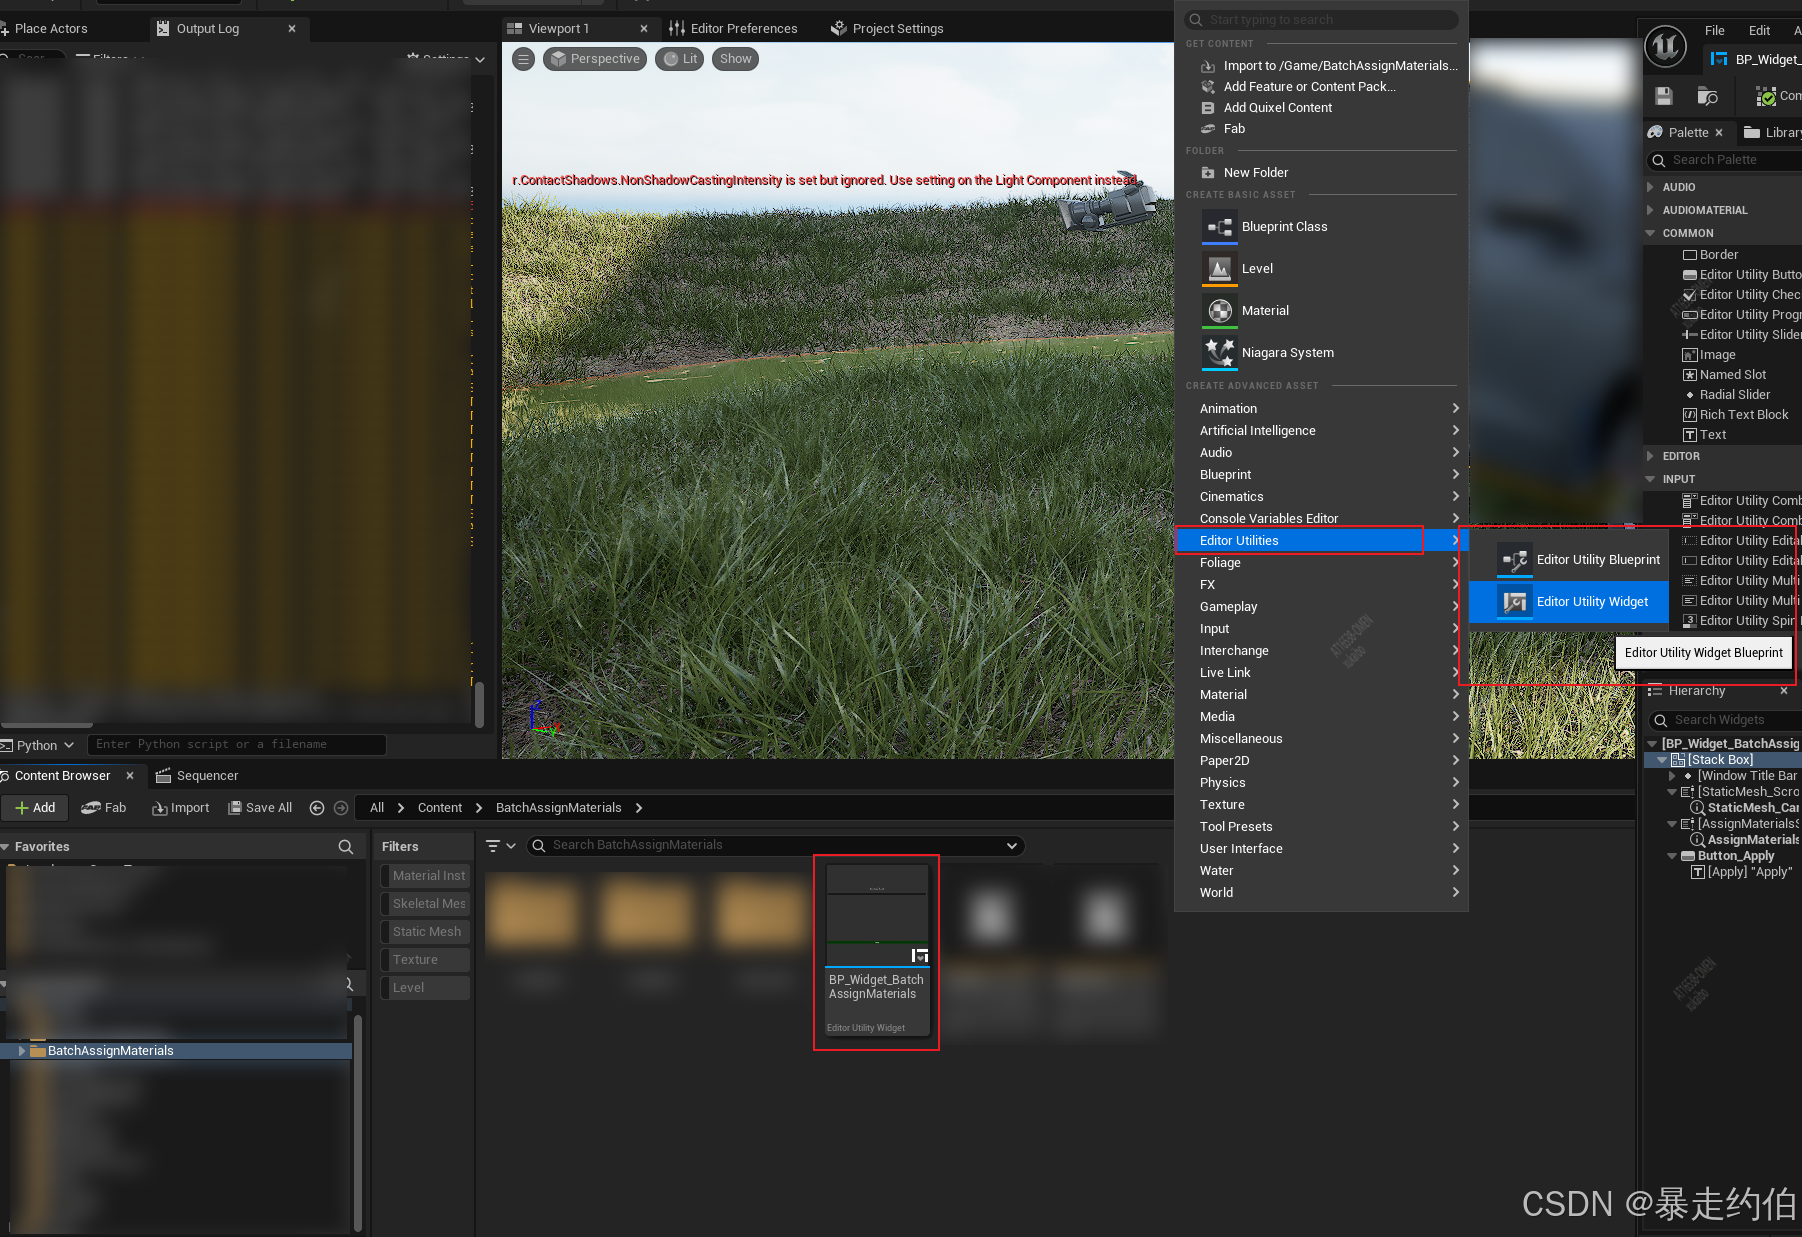
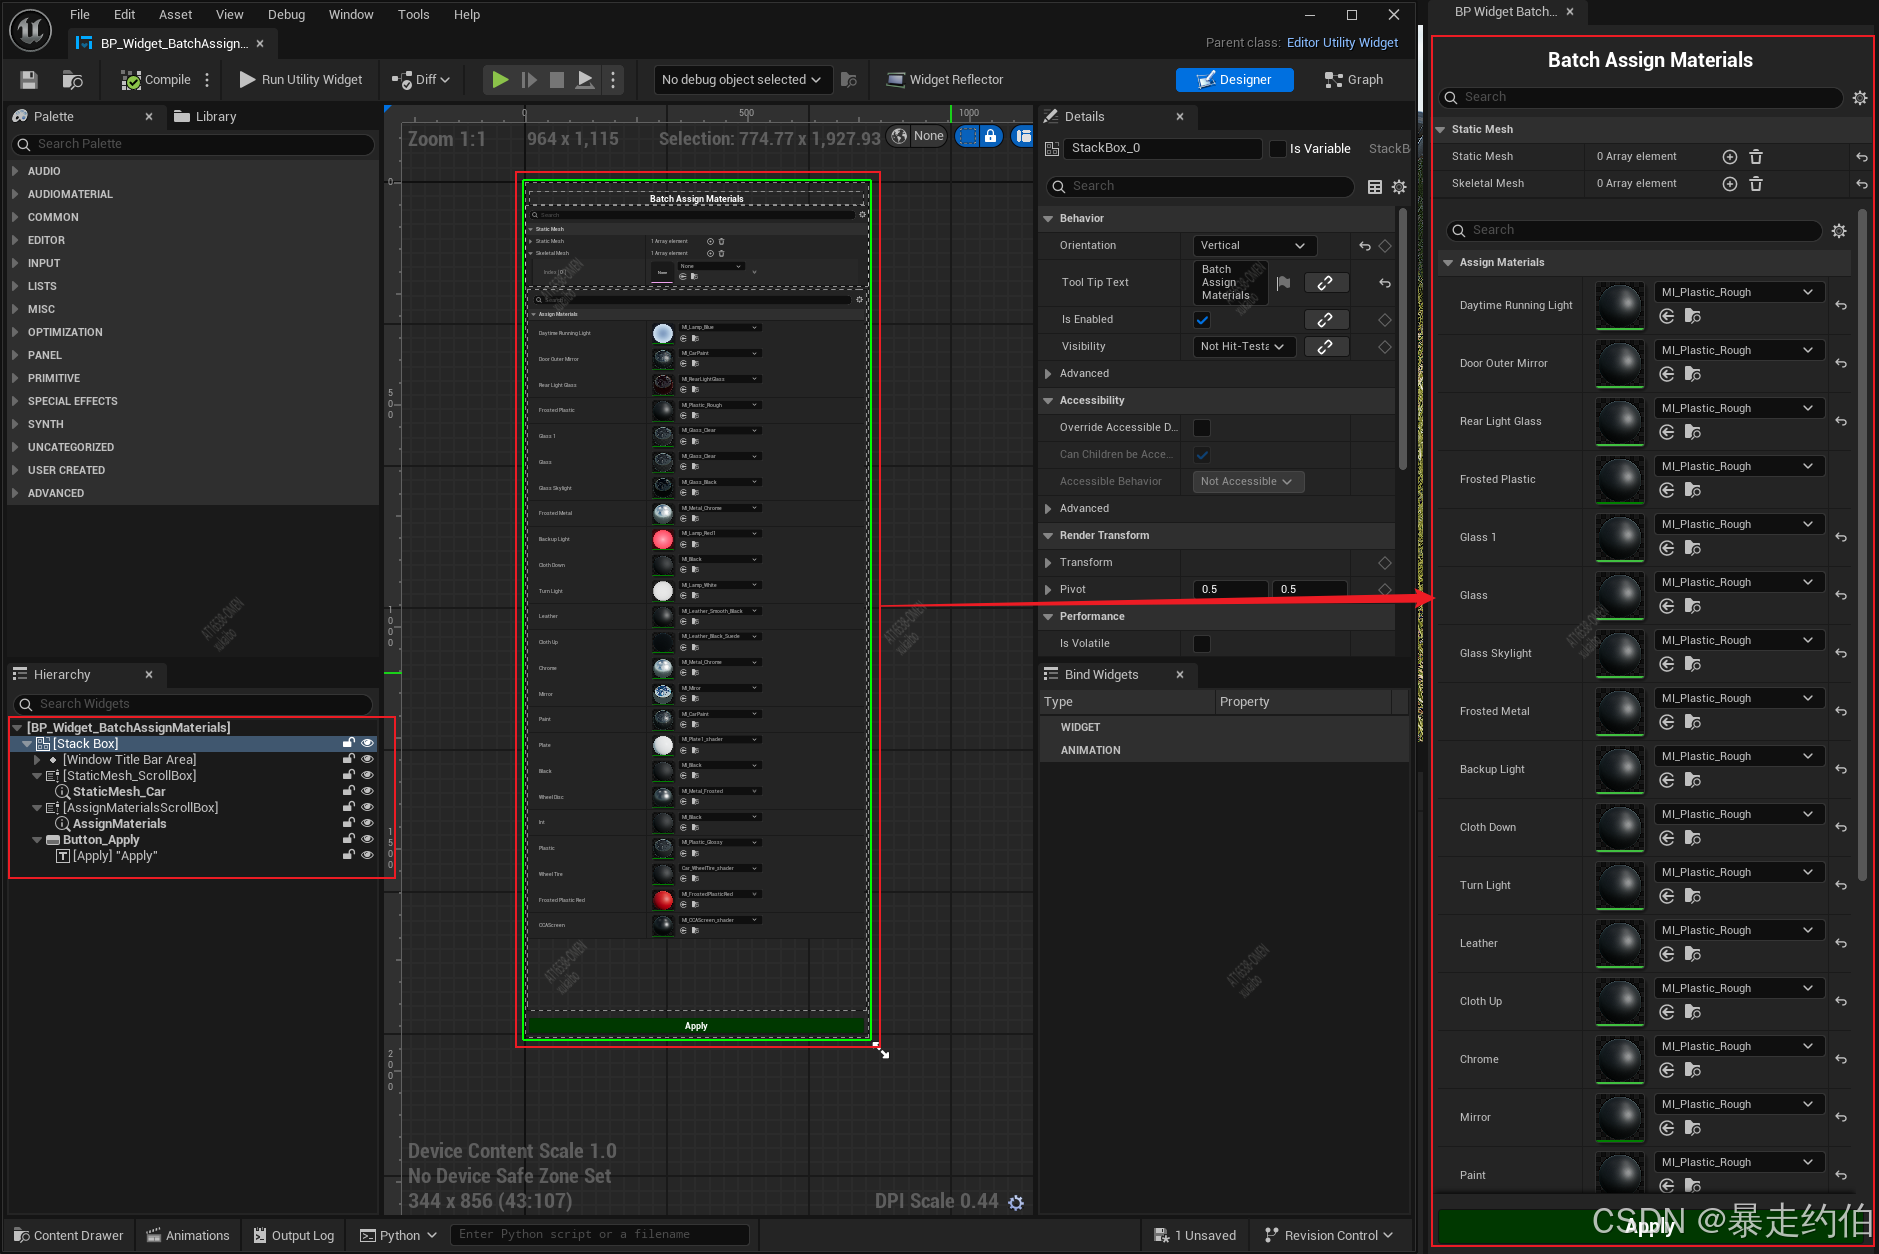
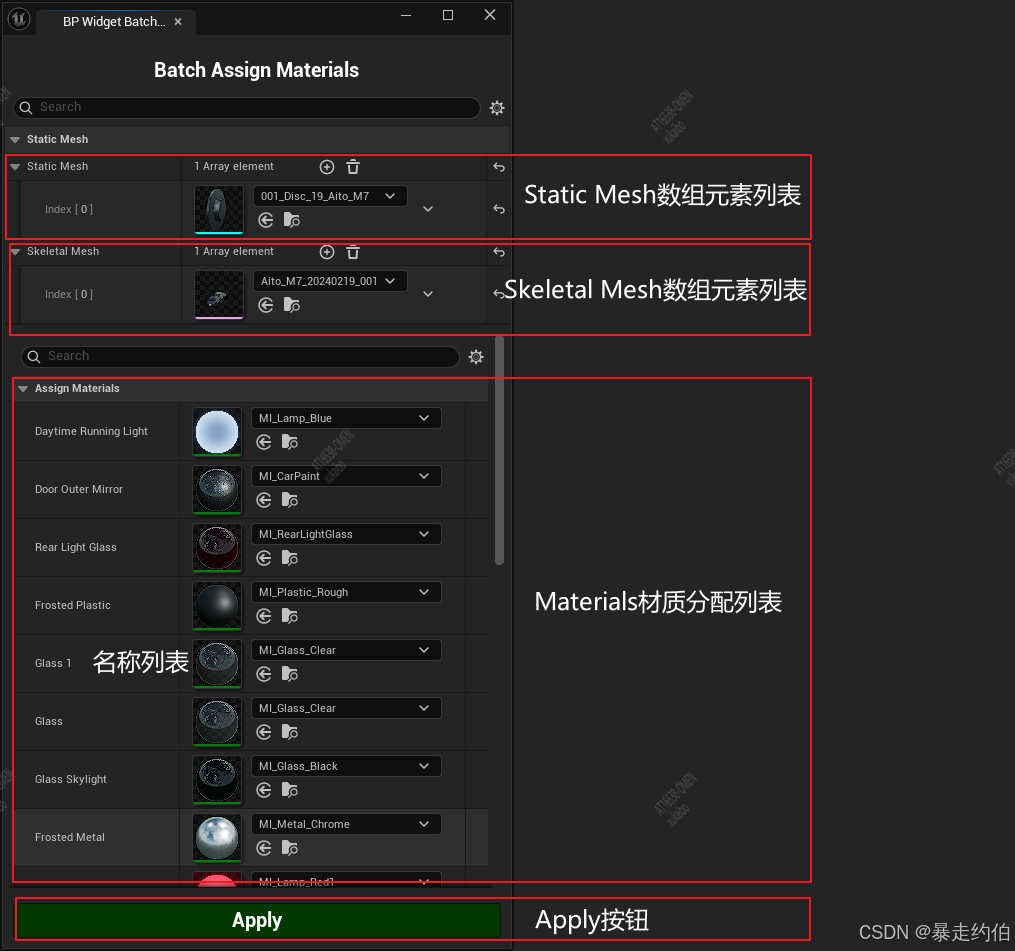
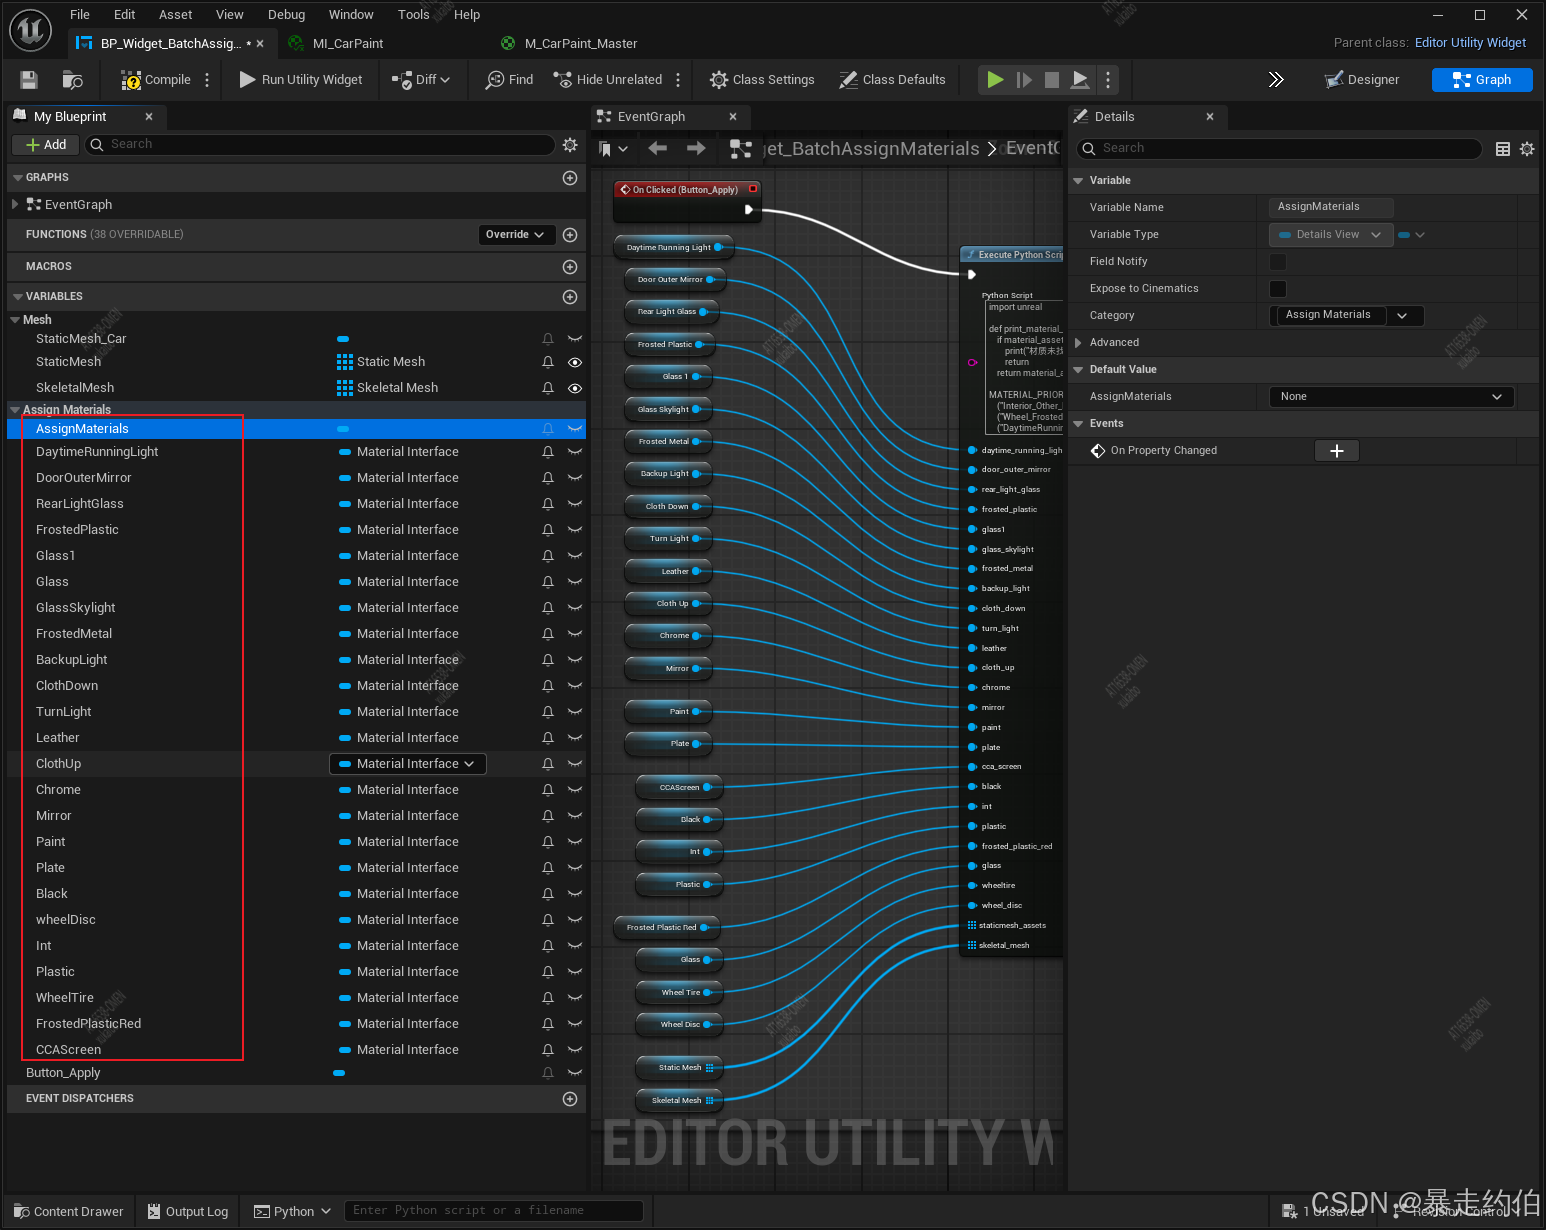
下圖里面展示了Unreal Engine的Editor Utility Widget設計界面。下圖
- 左側紅框內是UI設計時的控件列表,按鈕和布局組件,“
Tile Bar Area”等元素。
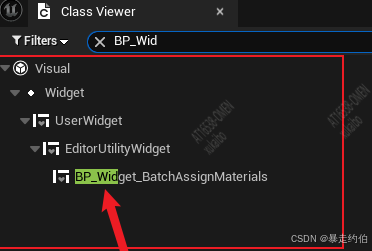
其中“BP_Widget_BatchAssignMaterial”的繼承關系如下:
- 中間是設計區域,顯示了具體的控件和屬性設置,可視化拖拽布局,屬性調試。
- 右側紅框則是“Batch Assign Materials”面板,列出了多種材質選項,這應該是運行時美術實際看到的界面。也是本次制作的目標效果。
| 區域 | 功能定位 | 對應階段 |
|---|---|---|
| 左側紅框區域 | UI設計面板(Editor Utility Widget 的控件庫與層級管理) | 設計階段 |
| 中間主區域 | UI編輯區(可視化拖拽布局,屬性調試) | 設計階段 |
| 右側紅框區域 | 運行時功能面板(用戶實際操作的批量材質分配界面) | 運行階段 |
Widget Blueprint學習資源推薦
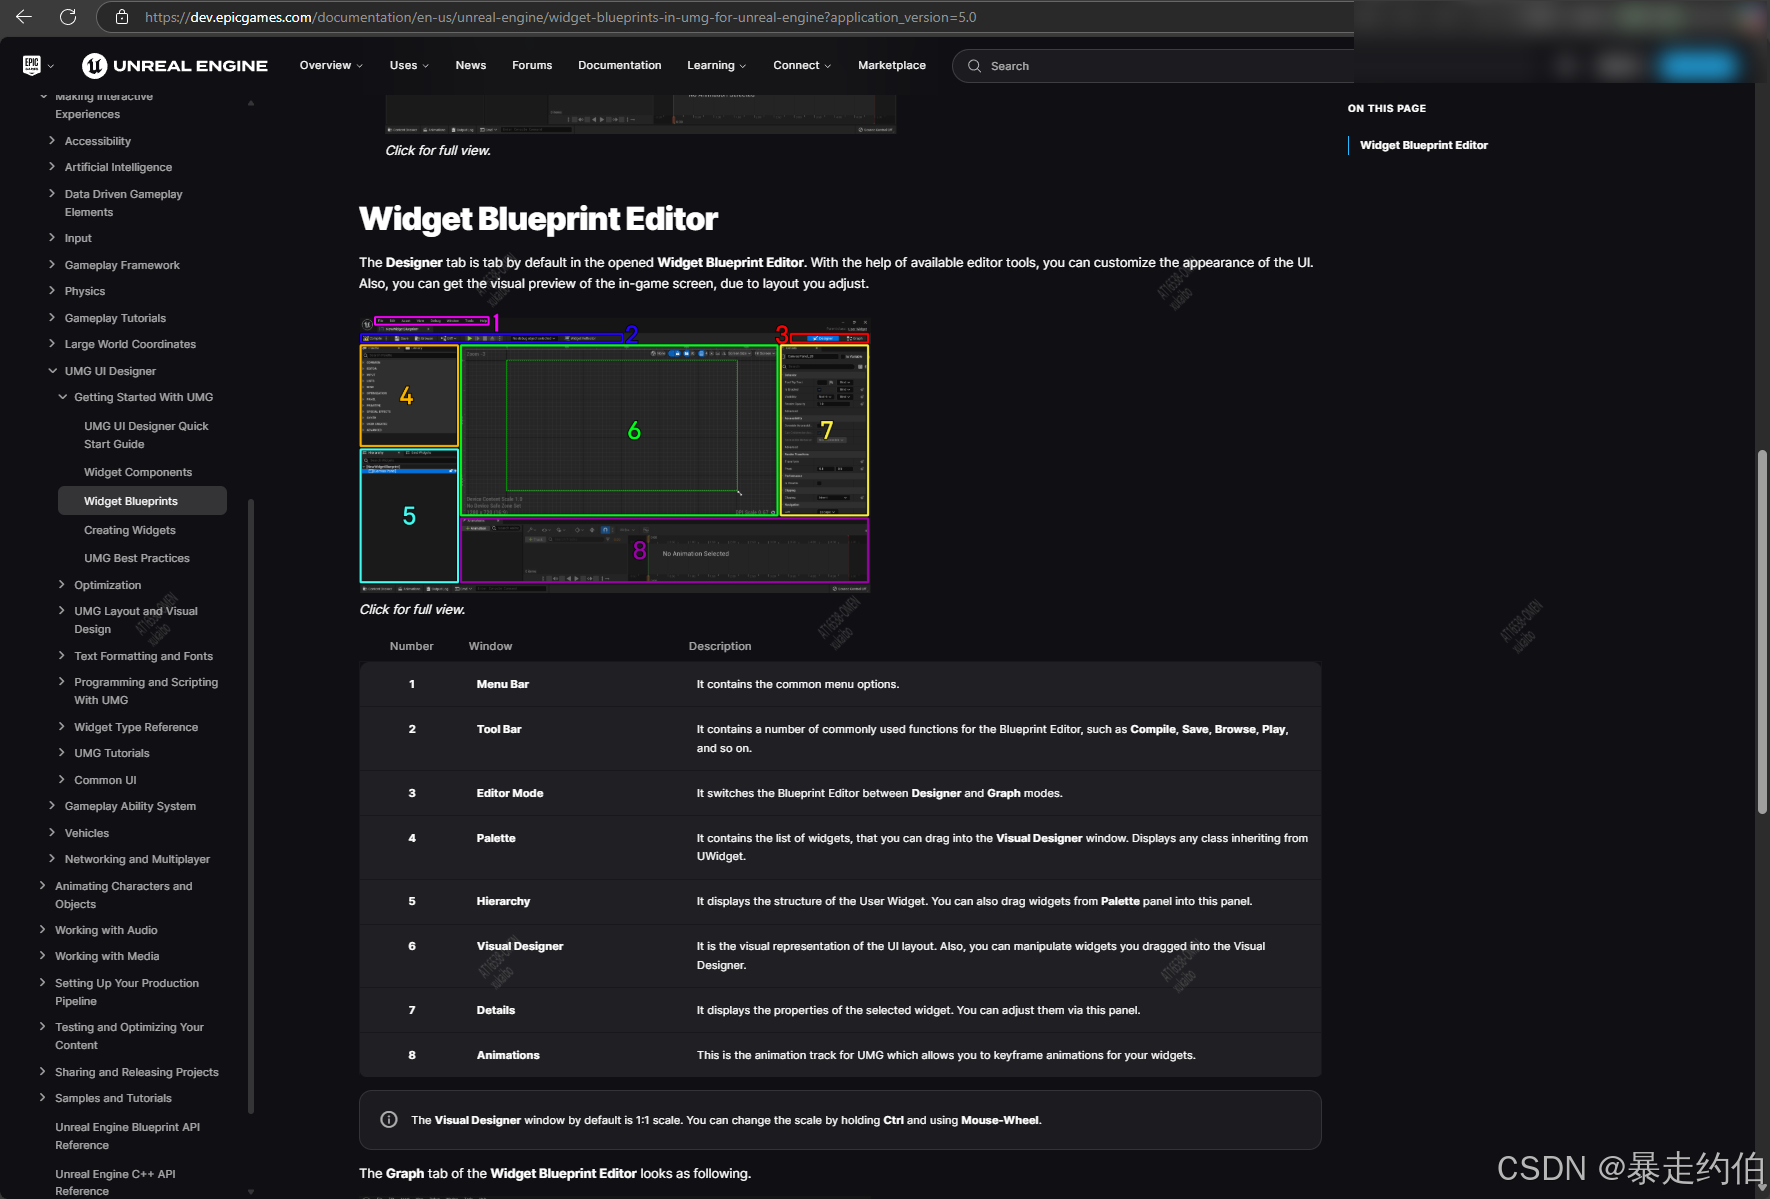
Editor Utility Widgets 指南
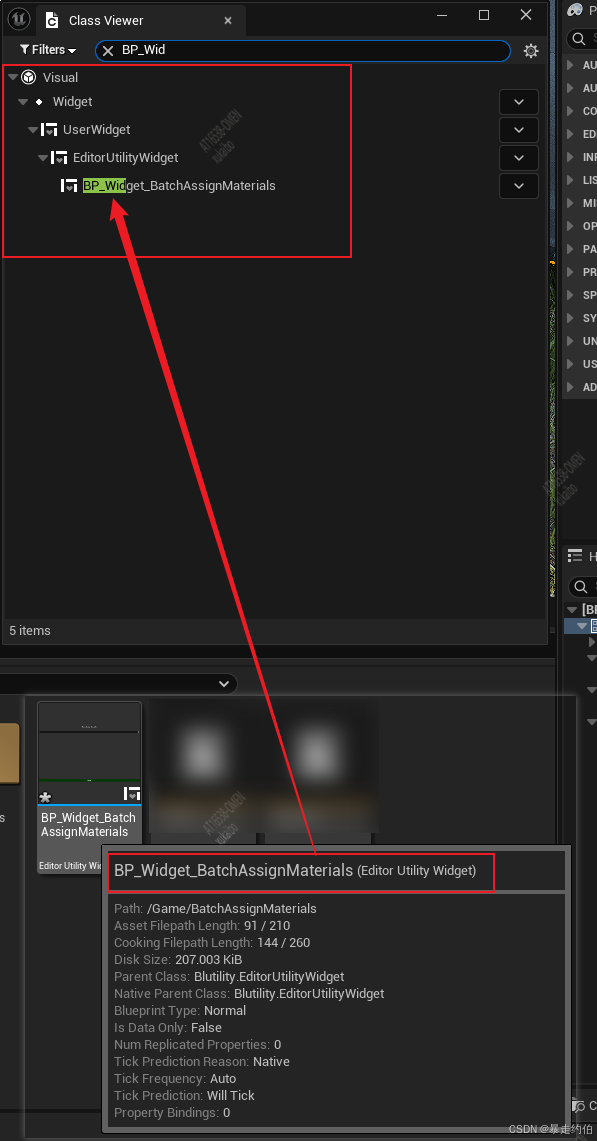
4.查看繼承樹
創建完**
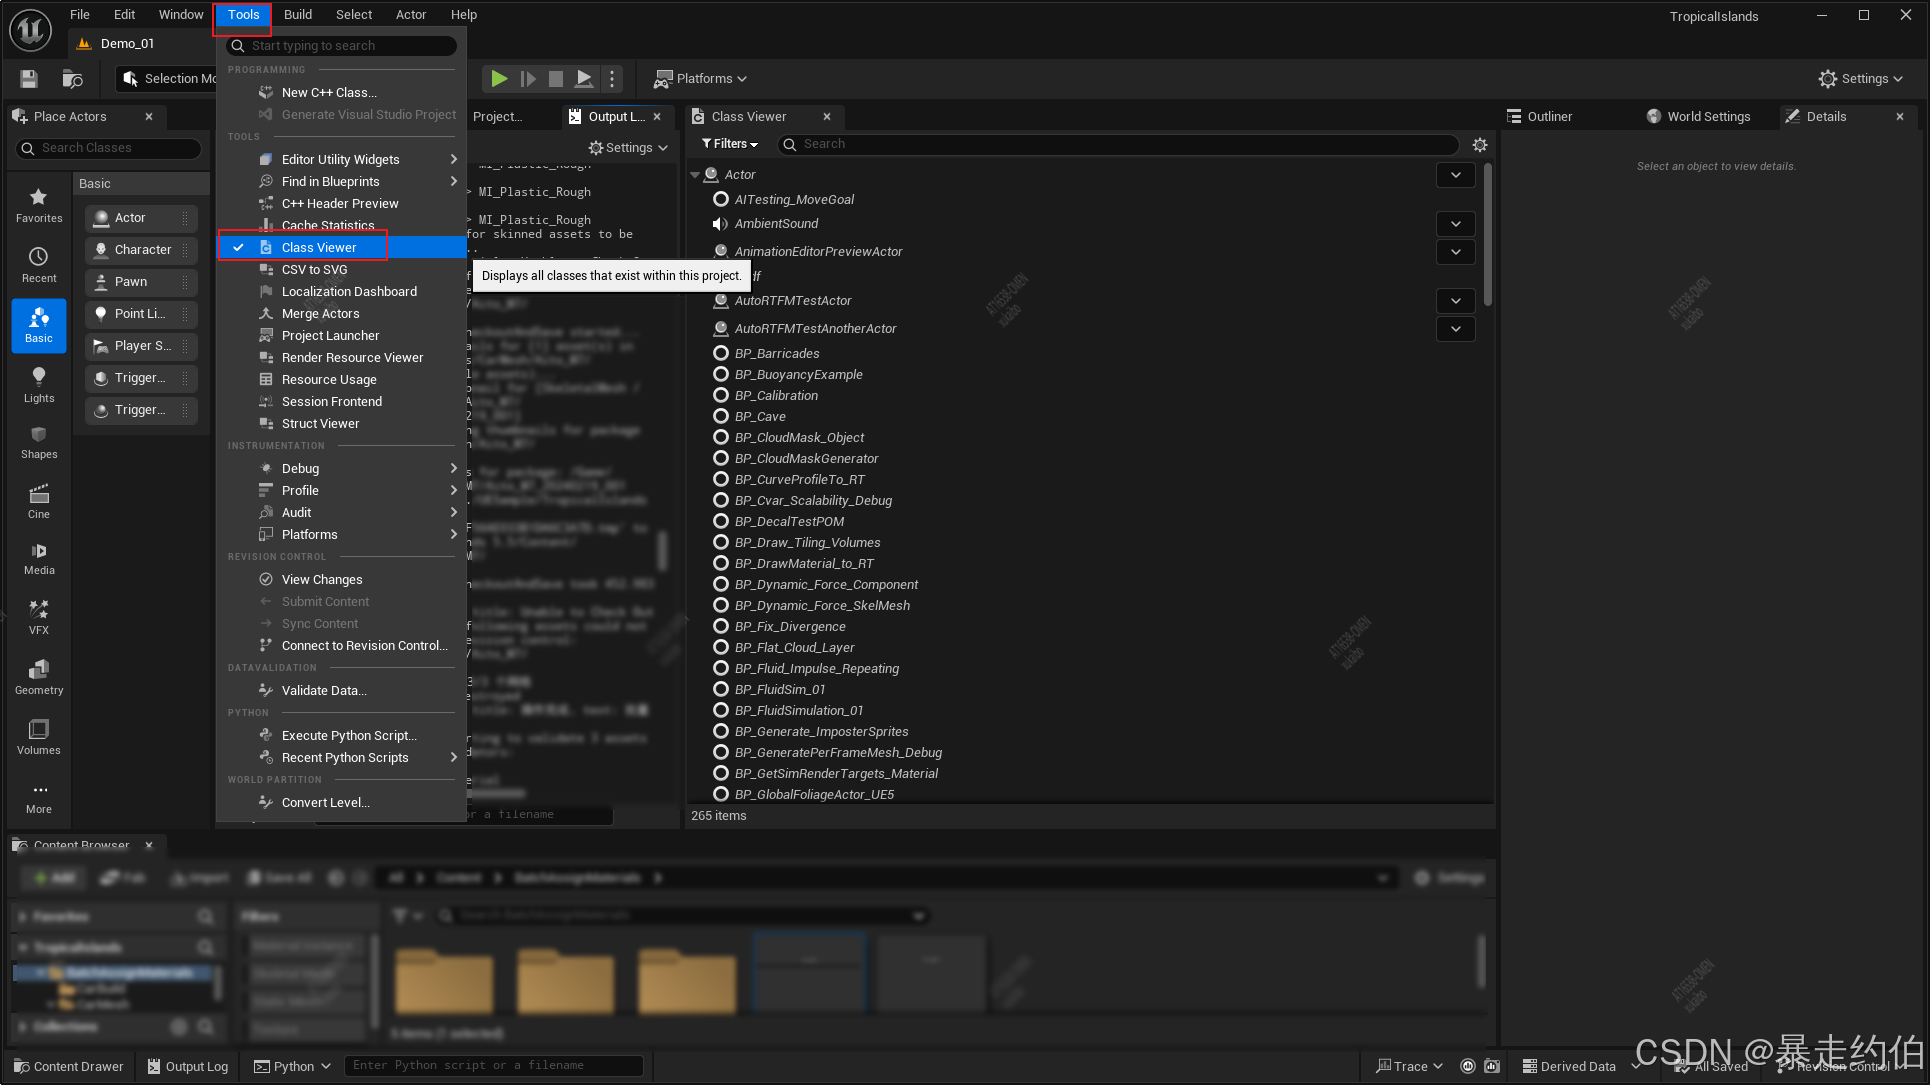
Editor Utility Widget** 后,可以在Class Viewer中查看和搜索相關類。
在?Unreal Engine上方菜單欄的 Tools > Class Viewer 打開窗口。如下圖所示:
開發中的典型應用場景
想了解某個類的屬性,可以在Class Viewer來查找或確認。
在開發過程中需要確認某個Widget的繼承關系或屬性是否正確設置,或者在處理資源路徑過長的問題。
比如這里我的命名是BP_Widget_BatchAssignMaterials,
那么可以在層級結構Widget繼承體系找到:Visual → Widget → UserWidget → EditorUtilityWidget → 當前類
| ?繼承關系節點 | 用途說明 |
|---|---|
| Visual | UI元素的基類,提供渲染能力。 |
| Widget | UMG控件的核心父類,包含布局、交互等通用功能。 |
| UserWidget | 用戶自定義控件的直接父類,支持藍圖邏輯綁定。 |
| EditorUtilityWidget | 專用于編輯器工具的子類,提供與Unreal編輯器交互的API(如菜單擴展、資產操作等)。 |
如需進一步擴展功能,可參考Unreal官方文檔中的Editor Scripting Utilities 。
5.目標效果
二、模塊化設計流程
1.材質替換核心流程:
思路如下:
2.完整代碼如下
import unrealdef print_material_path(material_asset):if material_asset is None:print("材質未找到!")returnreturn material_asset.get_outer().get_path_name()MATERIAL_PRIORITY_LIST = [("Interior_Other_FrostedPlastic", print_material_path(plastic)),("Wheel_FrostedMetal", print_material_path(plastic)),("DaytimeRunningLight", print_material_path(daytime_running_light)),("RearRunningLight", print_material_path(backup_light)),("DoorOuterMirror", print_material_path(door_outer_mirror)),("RearLightGlass", print_material_path(rear_light_glass)),("FrostedPlasticRed", print_material_path(frosted_plastic_red)),("FrostedPlastic", print_material_path(frosted_plastic)),("glass1", print_material_path(glass1)),("WheelDisc", print_material_path(wheel_disc)),("GlassSkylight", print_material_path(glass_skylight)),("FrostedMetal", print_material_path(frosted_metal)),("BrakeLight", print_material_path(backup_light)),("BackupLight", print_material_path(backup_light)),("ClothDown", print_material_path(cloth_down)),("TurnLight", print_material_path(turn_light)),("Leather", print_material_path(leather)),("ClothUp", print_material_path(cloth_up)),("Chrome", print_material_path(chrome)),("Mirror", print_material_path(mirror)),("Paint", print_material_path(paint)),("CCAScreen", print_material_path(cca_screen)),("Plate", print_material_path(plate)),("Black", print_material_path(black)),("Int", print_material_path(int)),("Plastic", print_material_path(plastic)),("Glass", print_material_path(glass)),("WheelTire", print_material_path(wheeltire)),
]def process_static_mesh(staticmesh_assets):modified = Falsematerial_slots = staticmesh_assets.static_materialsfor index, material_slot in enumerate(material_slots):slot_name = str(material_slot.material_slot_name)matched_material = Nonefor keyword, material_path in MATERIAL_PRIORITY_LIST:if keyword.lower() in slot_name.lower():material = unreal.load_asset(material_path)if material:matched_material = materialbreakif matched_material:current_material = material_slot.material_interfaceif current_material != matched_material:staticmesh_assets.set_material(index, matched_material)modified = Trueunreal.log(f"StaticMesh替換成功:{staticmesh_assets.get_name()} [{slot_name}] -> {matched_material.get_name()}")return modifieddef process_skeletal_mesh(skeletal_mesh):modified = Falsematerials = list(skeletal_mesh.get_editor_property('materials'))for mat_idx in range(len(materials)):original_slot = materials[mat_idx]slot_name = str(original_slot.material_slot_name)target_material = Nonefor keyword, material_path in MATERIAL_PRIORITY_LIST:if keyword.lower() in slot_name.lower():target_material = unreal.load_asset(material_path)if target_material:breakif target_material:new_slot = unreal.SkeletalMaterial()new_slot.material_slot_name = original_slot.material_slot_namenew_slot.material_interface = target_materialmaterials[mat_idx] = new_slotmodified = Trueunreal.log(f"SkeletalMesh替換成功:{slot_name} => {target_material.get_name()}")if modified:skeletal_mesh.set_editor_property('materials', materials)return modifieddef batch_assign_materials():# 獲取所有選中資產并過濾selected_assets = unreal.EditorUtilityLibrary.get_selected_assets()mesh_assets = [asset for asset in selected_assets if isinstance(asset, (unreal.StaticMesh, unreal.SkeletalMesh))]if not mesh_assets:unreal.log_warning("未選中有效的網格資產!如果Mesh插槽內已有資產,請查找資產后重新載入。")returntotal_meshes = len(mesh_assets)processed_meshes = 0with unreal.ScopedSlowTask(total_meshes, "批量替換材質中...") as slow_task:slow_task.make_dialog(True)for mesh_idx, mesh in enumerate(mesh_assets):if slow_task.should_cancel():breakprogress_percent = (mesh_idx + 1) / total_meshes * 100slow_task.enter_progress_frame(1, f"處理 {mesh.get_name()} ({progress_percent:.1f}%)")modified = Falseif isinstance(mesh, unreal.StaticMesh):modified = process_static_mesh(mesh)elif isinstance(mesh, unreal.SkeletalMesh):modified = process_skeletal_mesh(mesh)if modified:unreal.EditorAssetLibrary.save_loaded_asset(mesh)processed_meshes += 1result_msg = f"批量材質替換完成!成功處理 {processed_meshes}/{total_meshes} 個網格"unreal.log(result_msg)unreal.EditorDialog.show_message("操作完成", result_msg, unreal.AppMsgType.OK)if __name__ == "__main__":batch_assign_materials()
三、可視化界面UI布局
1. 添加標題欄
創建Window Title Bar Area
- 拖拽 Horizontal Box 到StackBox內,命名為
WindowTitleBarArea。- 調整字體大小和顏色。具體的屬性配置可以看著調整,不做詳細的提示。
- 添加標題文本
- 在
Window Title Bar Area內拖拽Text,命名為TitleText。

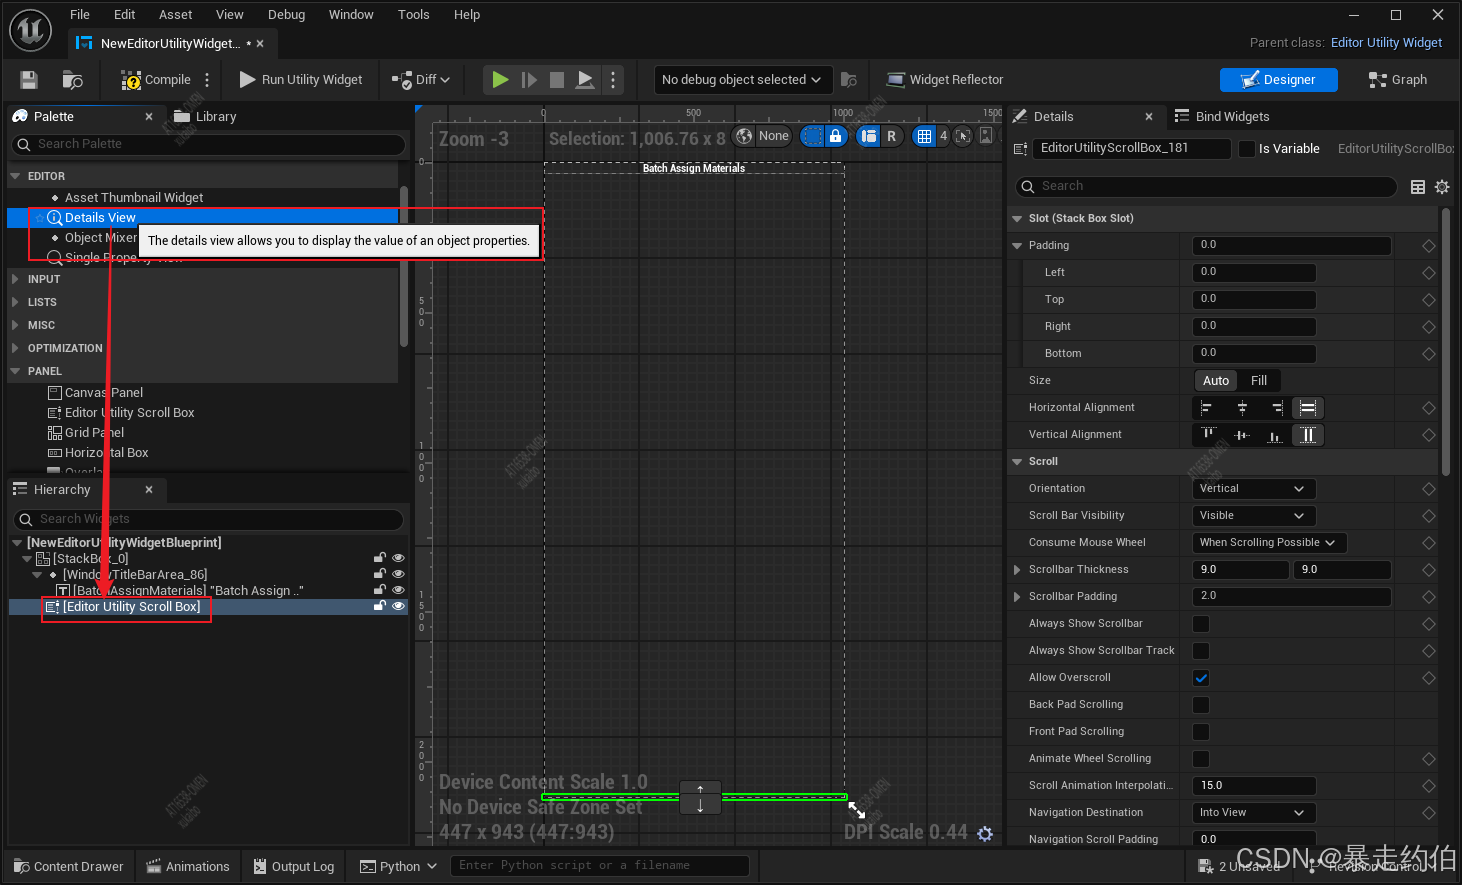
2. 構建滾動列表區域
靜態網格列表(左側)
- 拖拽
ScrollBox到StackBox內 → 命名為StaticMesh_ScrollBox。
- 在
ScrollBox內添加DetailsView作為列表項容器。
添加滾動列表(ScrollBox),具體的屬性配置可以看著調整,不做詳細的提示。
骨骼網格列表(左側)
可以直接復制上述操作完的結構,主要放置在**StackBox**內。也可以直接重新拖入,更新命名 。

3. 構建Apply按鈕
- 拖拽 Button 到StackBox內 → 命名為
Button_Apply;
- 拖拽 Text 到Button_Apply內 → 設置文本為 “Apply”,背景色為綠色。
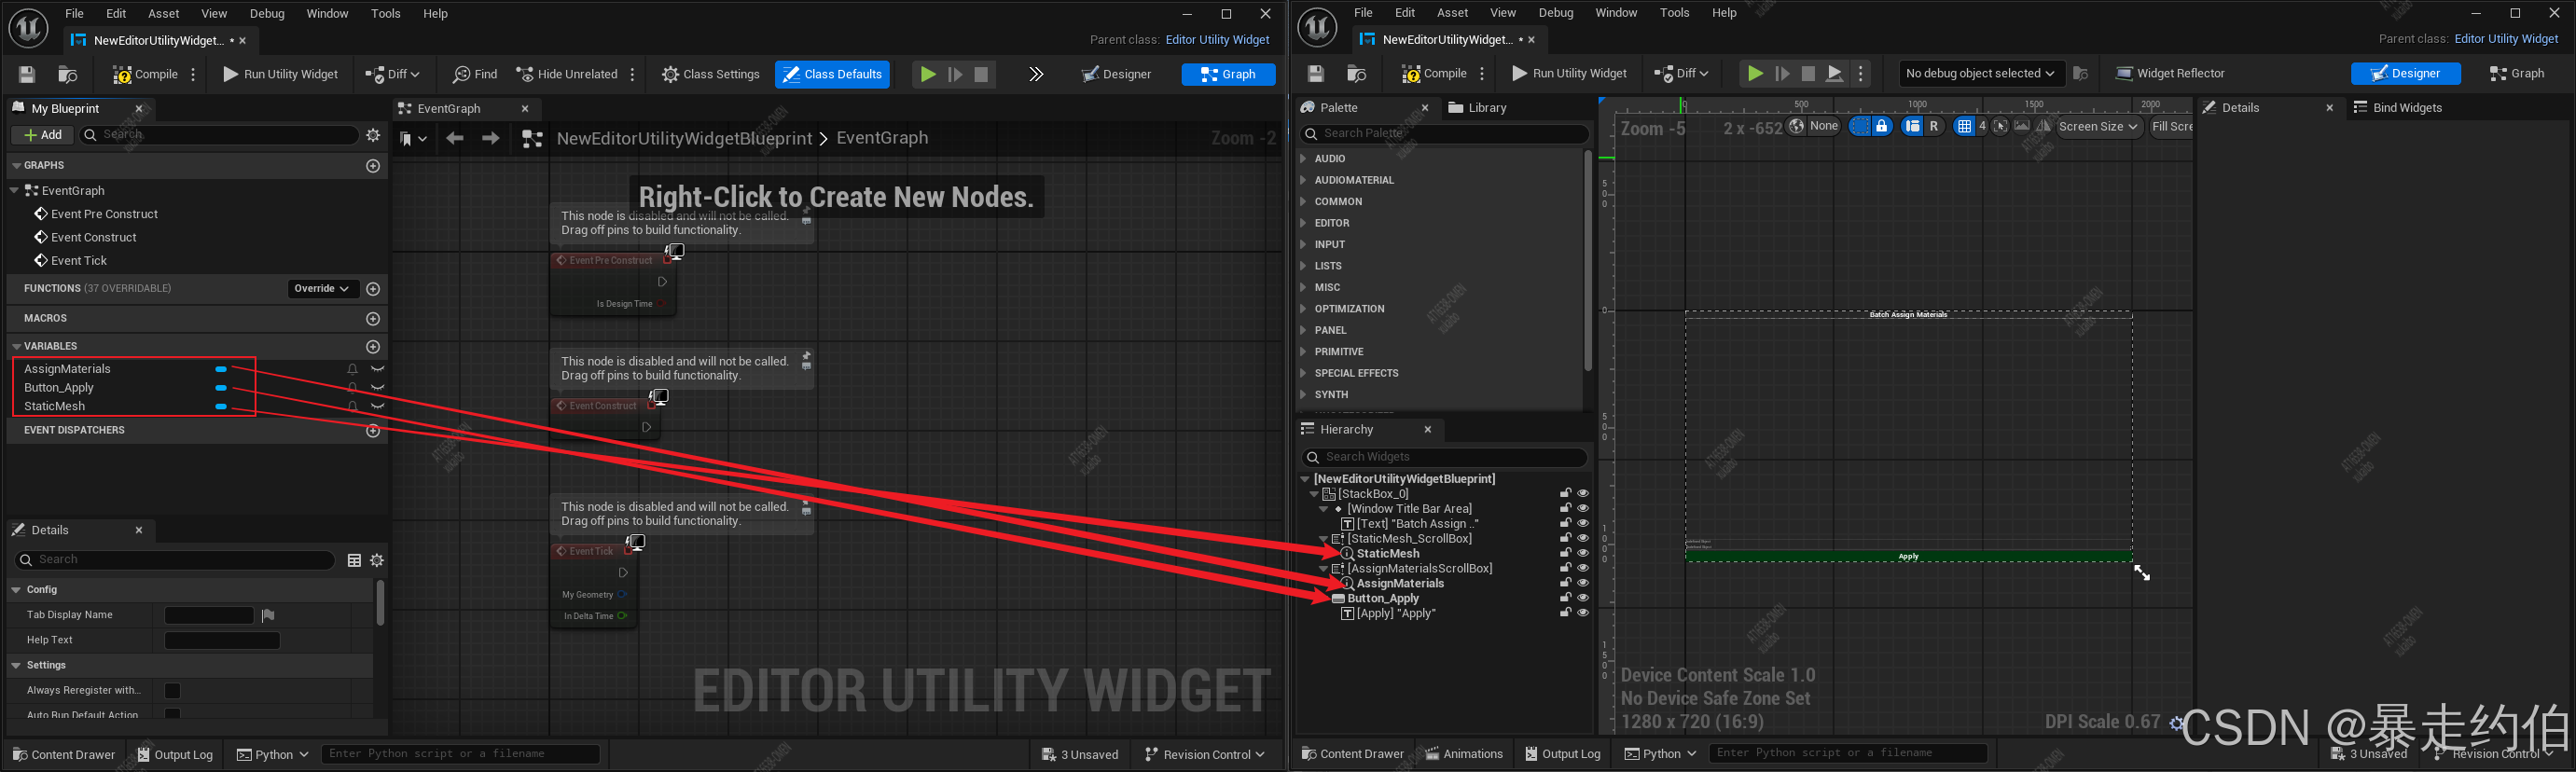
左側為 藍圖邏輯編輯區(節點圖表),右側為 GUI設計界面(UMG可視化布局),中間紅色箭頭指示二者的 動態綁定關系。
4. Apply按鈕點擊功能添加
進入藍圖邏輯編輯
- 在UMG編輯器中,點擊Button_Apply按鈕,在Details面板中找到 Events 部分,點擊On Clicked。這時界面自動跳轉到 圖表(Graph) 模式。
- 如果沒有跳轉可以在UMG編輯器頂部切換至 圖表(Graph) 模式(非設計模式)。
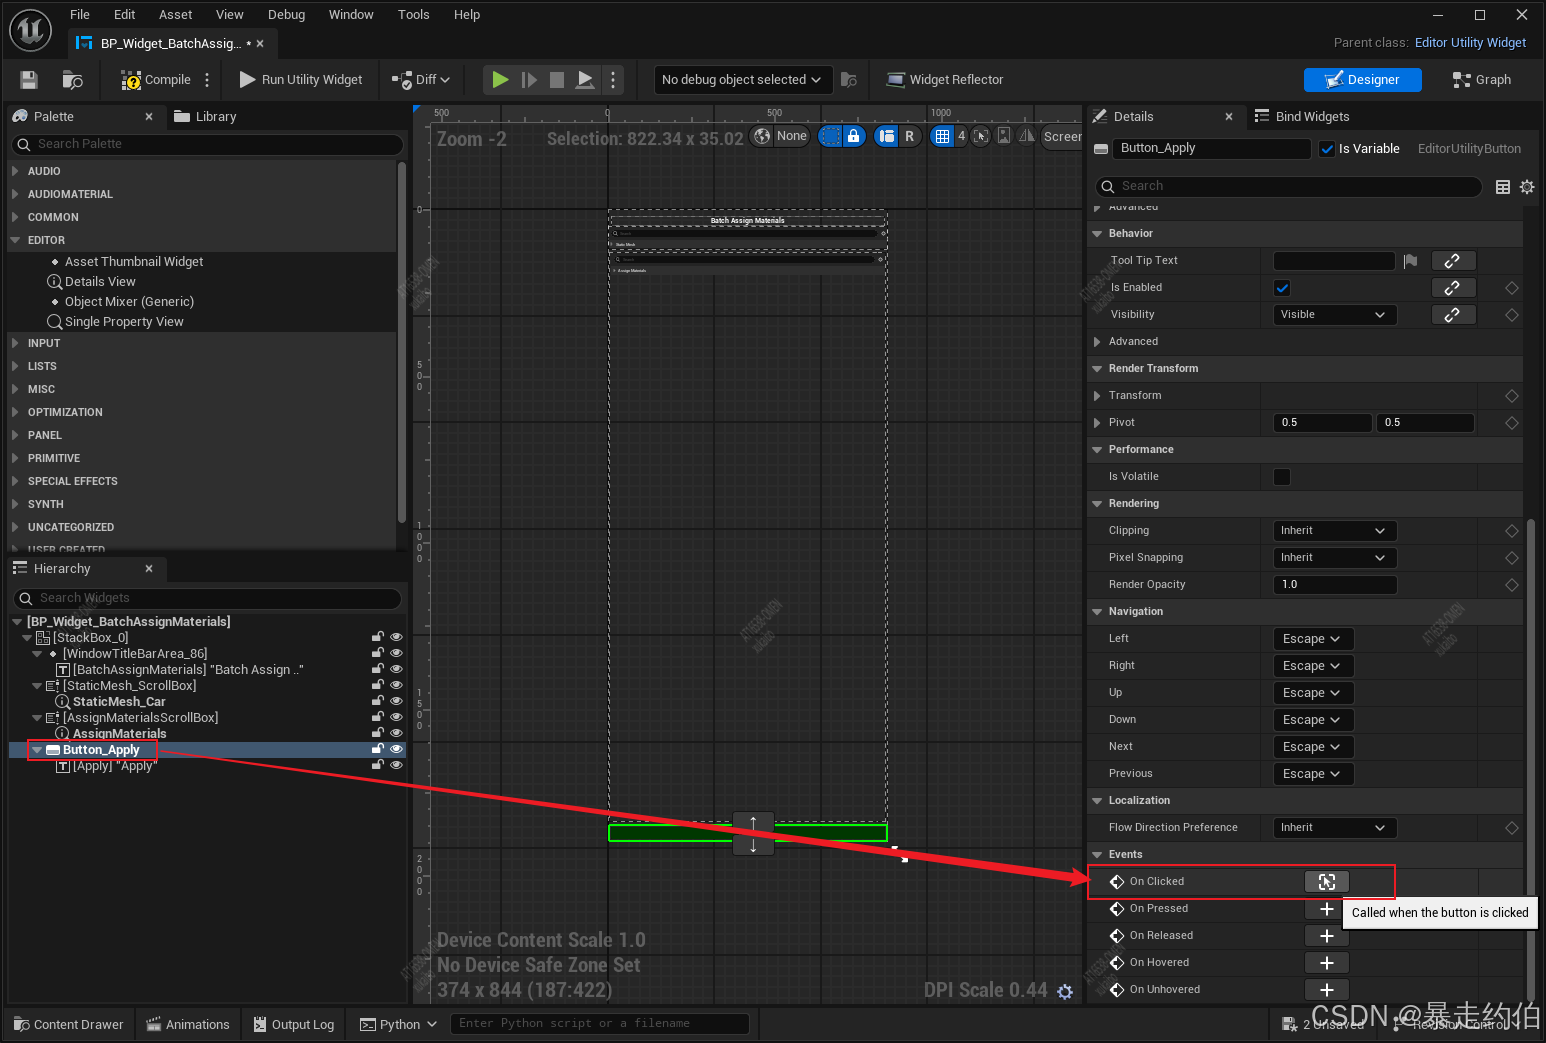
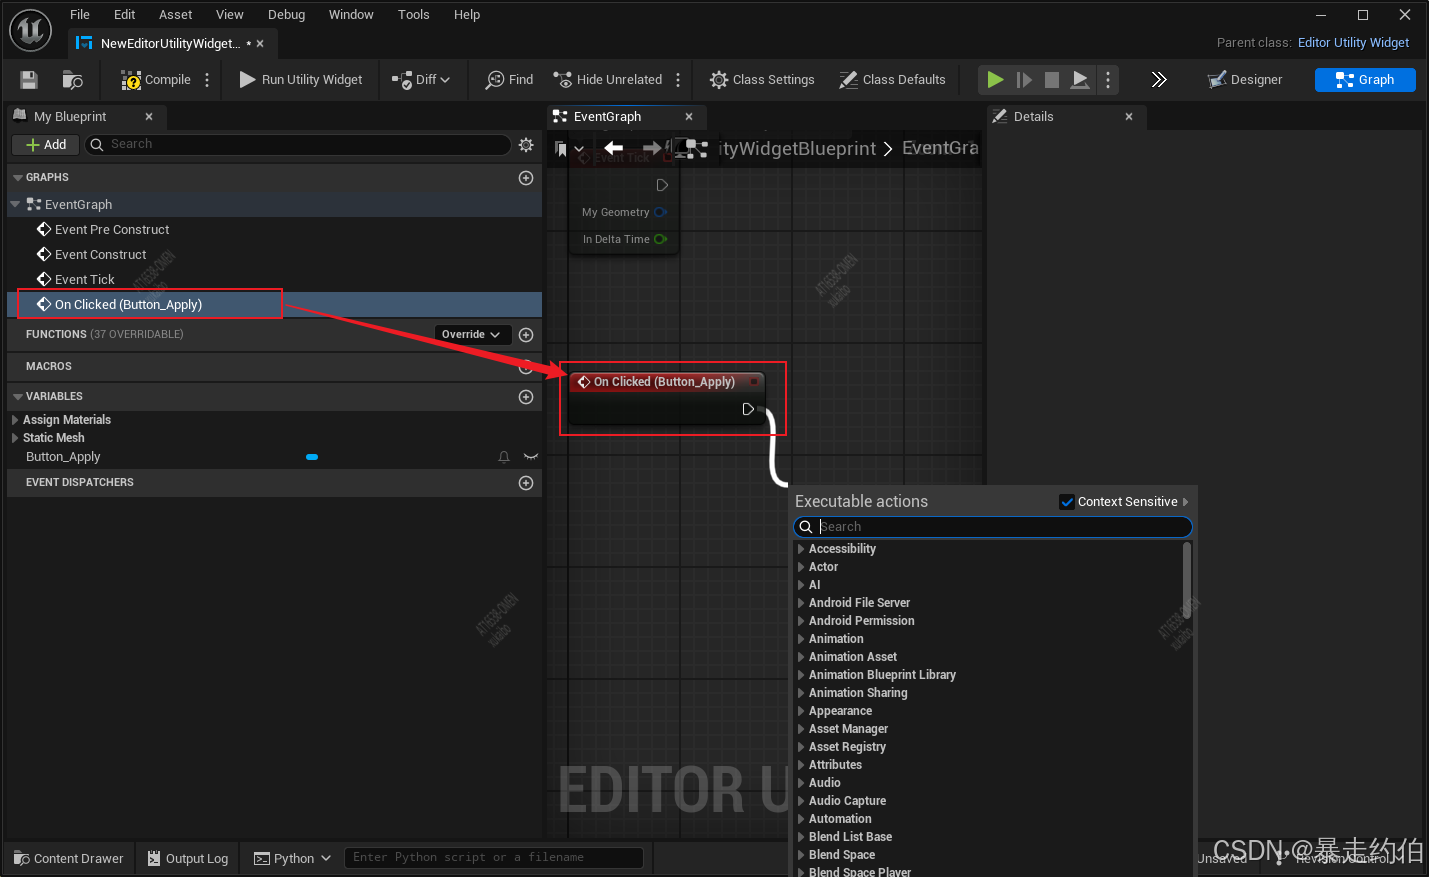
此時會自動在圖表中生成
OnClicked事件節點。
將OnClicked事件的輸出引腳(白色箭頭)連接到功能節點的輸入引腳。
拖拽
OnClicked(Button_Apply)事件的執行Exec引腳(白色箭頭),彈出檢索窗口搜索**Execute Python Script**功能,并鏈接節點的輸入引腳。
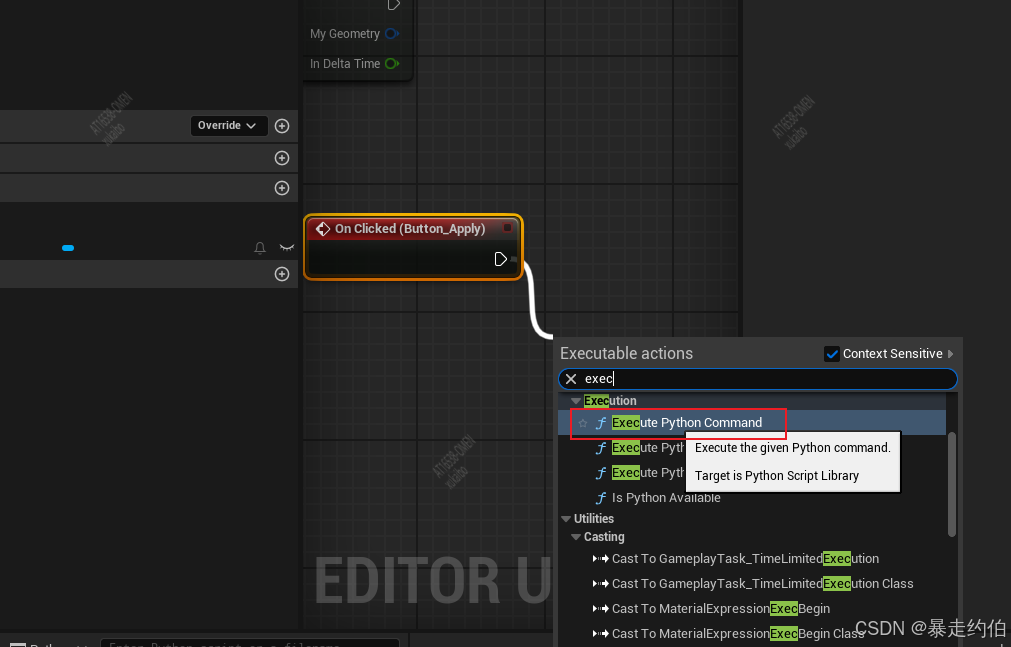
演示如下:
5. 變量模塊分組
- **
VARIABLES** 是藍圖編輯器中用于集中管理當前藍圖所有變量的區域。
在藍圖中,Category 用于將變量、函數等元素按功能模塊分組,提升可維護性。
在 Details 面板的Category字段輸入分類名稱(如StaticMesh)。
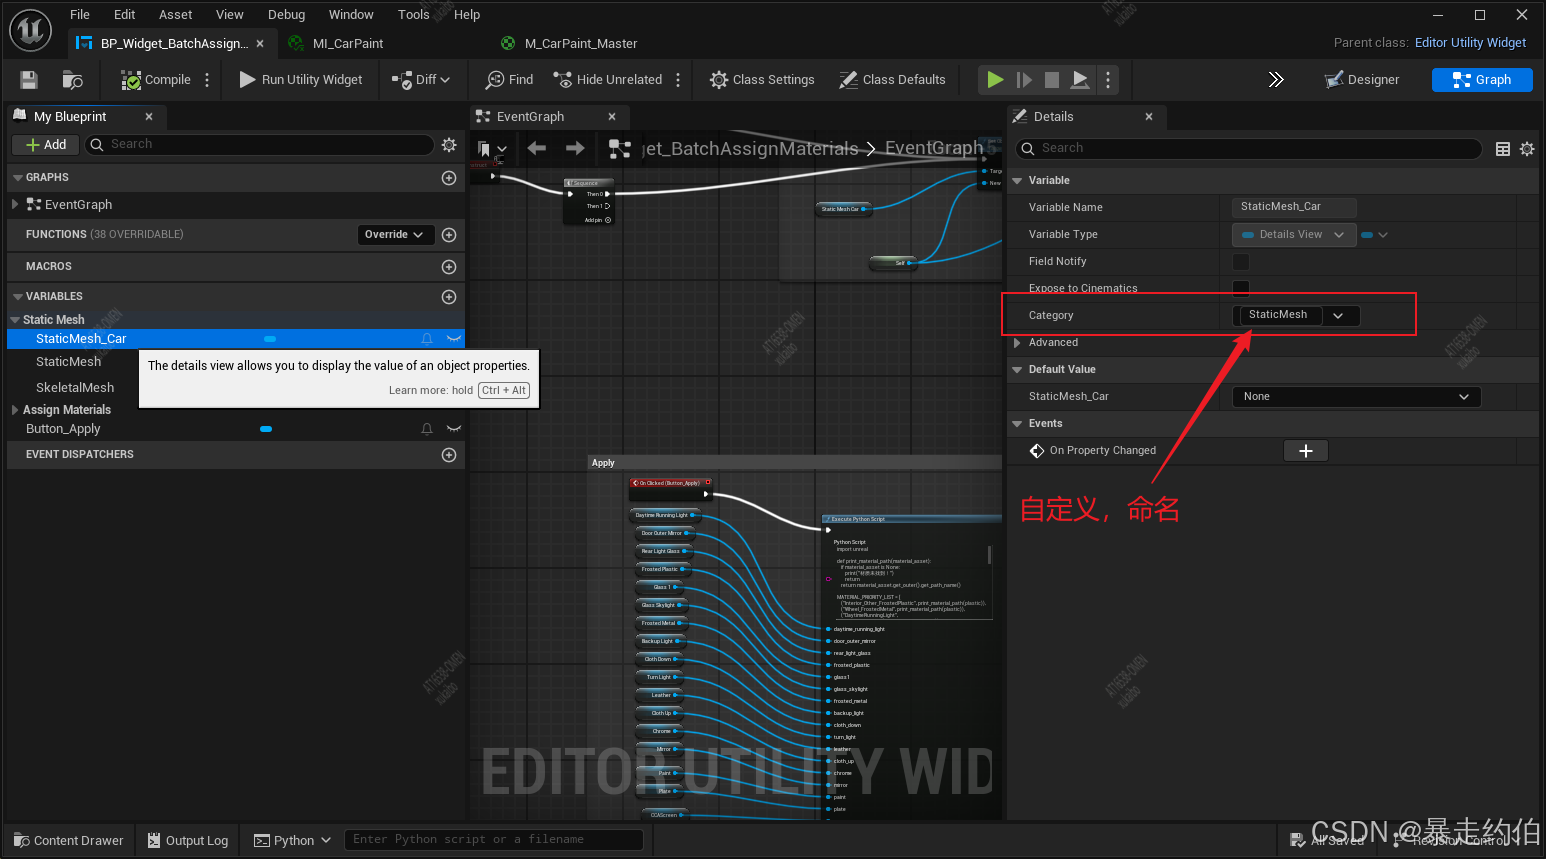
分組如下圖
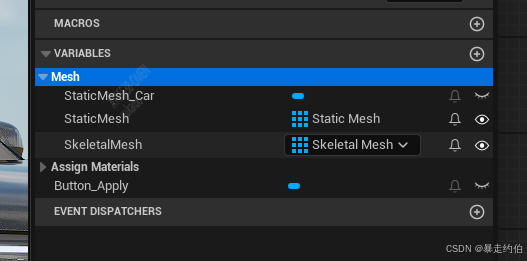
變量模塊分組演示如下:
6. 新增變量材質實例
點擊加號,新增變量
材質實例輸入接口,Assign Materials:MaterialInterface類型,存儲待批量分配的材質實例。
材質實例的配置,根據項目需求,可能會有所不同。以下是我的材質實例命名和分類;
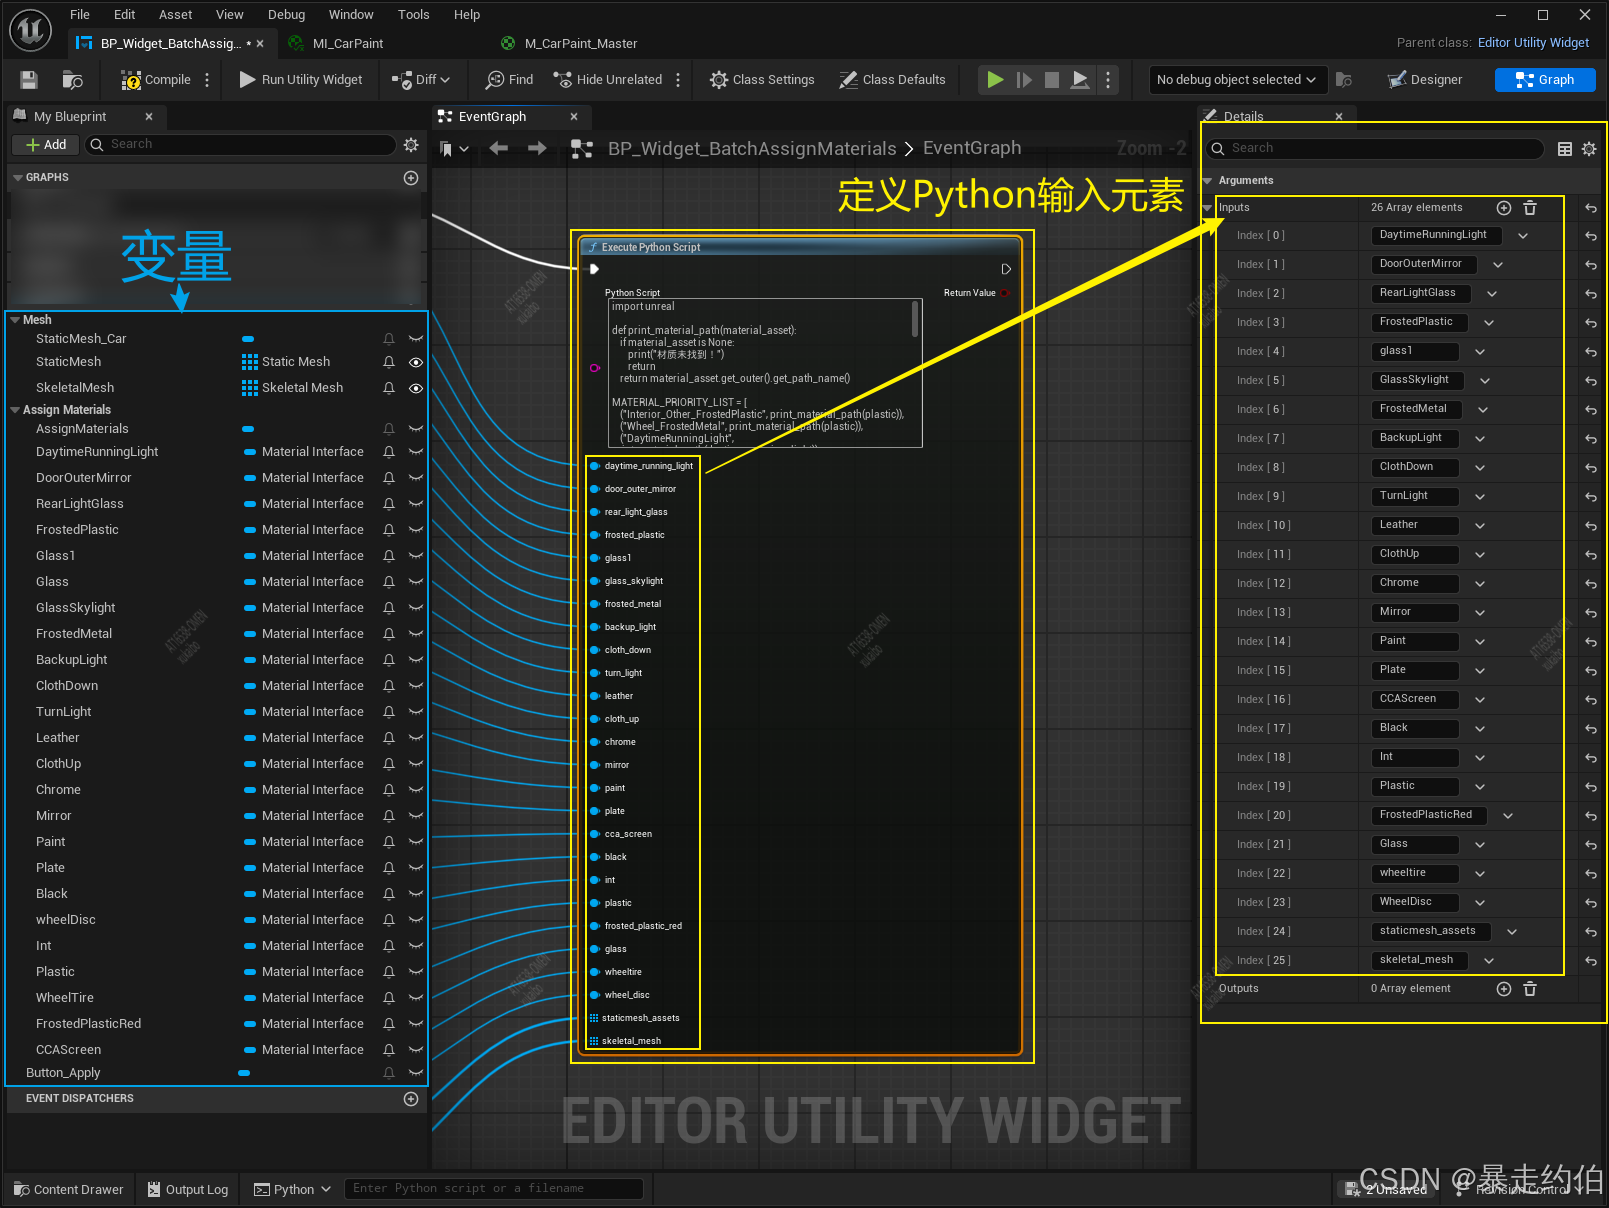
7.定義Python參數輸入元素
8.整體展示:
黃顏色的表示:執行Python腳本節點(也就是**
Execute Python Script**的藍圖節點),定義Python參數輸入元素。
藍色的表示:變量的節點展示。
整體展示如下:
四、代碼的詳細解析
1. 材質路徑獲取模塊
def print_material_path(material_asset):if material_asset is None:print("材質未找到!")returnreturn material_asset.get_outer().get_path_name()
- 功能:獲取材質資源的完整路徑。
- 核心Unreal API:
material_asset.get_outer(): 返回材質所屬的外部對象(如Package)。get_path_name(): 獲取對象在Unreal中的完整路徑(例如/Game/Materials/MyMaterial)。
- 問題說明:
- 在
MATERIAL_PRIORITY_LIST的print_material_path(plastic)存在未定義變量問題,需確保plastic等變量是已加載的材質實例。
- 在
2. 材質優先級配置模塊
MATERIAL_PRIORITY_LIST = [("Interior_Other_FrostedPlastic", print_material_path(plastic)),# ... 其他條目
]
- 功能:定義材質插槽名稱與目標材質的映射關系,按優先級匹配。
- 邏輯說明:
- 每個條目包含一個關鍵字(如
"FrostedPlastic")和材質路徑。 - 通過字符串匹配插槽名稱(不區分大小寫)來動態加載材質。
- 每個條目包含一個關鍵字(如
3. 靜態網格材質處理模塊
def process_static_mesh(staticmesh_assets):material_slots = staticmesh_assets.static_materialsstaticmesh_assets.set_material(index, matched_material)
- 功能:遍歷靜態網格的材質插槽,按優先級列表替換材質。
- 核心Unreal API:
static_materials: 獲取靜態網格的所有材質插槽(StaticMaterial列表)。set_material(index, material): 替換指定索引的材質。load_asset(material_path): 根據路徑加載材質資源。
- 關鍵操作:
- 通過插槽名稱匹配關鍵字,動態加載并替換材質。
4. 骨骼網格材質處理模塊
def process_skeletal_mesh(skeletal_mesh):materials = list(skeletal_mesh.get_editor_property('materials'))new_slot = unreal.SkeletalMaterial()skeletal_mesh.set_editor_property('materials', materials)
- 功能:處理骨骼網格材質,邏輯類似靜態網格。
- 核心Unreal API:
get_editor_property('materials'): 獲取骨骼網格的材質列表。unreal.SkeletalMaterial(): 創建新的骨骼網格材質插槽對象。set_editor_property(): 修改骨骼網格的材質屬性。
- 差異點:
- 骨骼網格材質需通過
SkeletalMaterial對象封裝。
- 骨骼網格材質需通過
5. 批量處理主邏輯模塊
def batch_assign_materials():selected_assets = unreal.EditorUtilityLibrary.get_selected_assets()with unreal.ScopedSlowTask(...):unreal.EditorAssetLibrary.save_loaded_asset(mesh)
- 功能:批量處理選中的網格資產,支持進度條和撤銷操作。
- 核心Unreal API:
EditorUtilityLibrary.get_selected_assets(): 獲取用戶在內容瀏覽器中選中的資產。ScopedSlowTask: 顯示進度條,防止編輯器卡死。EditorAssetLibrary.save_loaded_asset(): 保存修改后的資產。
- 流程控制:
- 過濾靜態/骨骼網格 → 遍歷處理 → 保存修改 → 反饋結果。
五、Unreal API 關鍵用途總結
| API/屬性 | 用途 |
|---|---|
load_asset() | 根據路徑加載資源(材質、網格等)。 |
set_material() | 替換靜態網格的材質插槽。 |
get_editor_property() | 獲取資產的編輯器屬性(如材質列表)。 |
EditorUtilityLibrary | 處理編輯器交互(選中資產、彈窗等)。 |
ScopedSlowTask | 執行長時間任務時顯示進度條。 |
六、學習資源鏈接
-
Unreal Python API 官方文檔
https://docs.unrealengine.com/5.0/en-US/PythonAPI/ -
Editor Scripting 教程
https://docs.unrealengine.com/5.0/en-US/editor-scripting-in-unreal-engine/ -
StaticMesh API 參考
StaticMesh Class -
材質系統文檔
Material System Overview
最終效果展示

)


——電子制造行業趨勢分析案例)
merge 操作有多種方法)


接入華為云iotDA平臺的路徑元素有哪些不同?)

-Redis 基本知識及五大數據類型)


