作者:來自 Elastic?Kofi Bartlett

探索增加 Elasticsearch 中 primary shard 數量的方法。
更多閱讀:
-
Elasticsearch:Split index API - 把一個大的索引分拆成更多分片
-
Elasticsearch:通過 shrink API 減少 shard 數量來縮小 Elasticsearch 索引
-
Elasticsearch: Reindex 接口
無法增加已有索引的 primary shard 數量,這意味著如果你想增加 primary shard 數量,必須重新創建索引。在這種情況下通常有兩種方法可用: _reindex API 和 _split API。
_split API 通常比 _reindex API 更快。在執行這兩種操作之前必須停止寫入索引,否則 source_index 和 target_index 的文檔數量會不一致。
方法 1?– 使用 split API
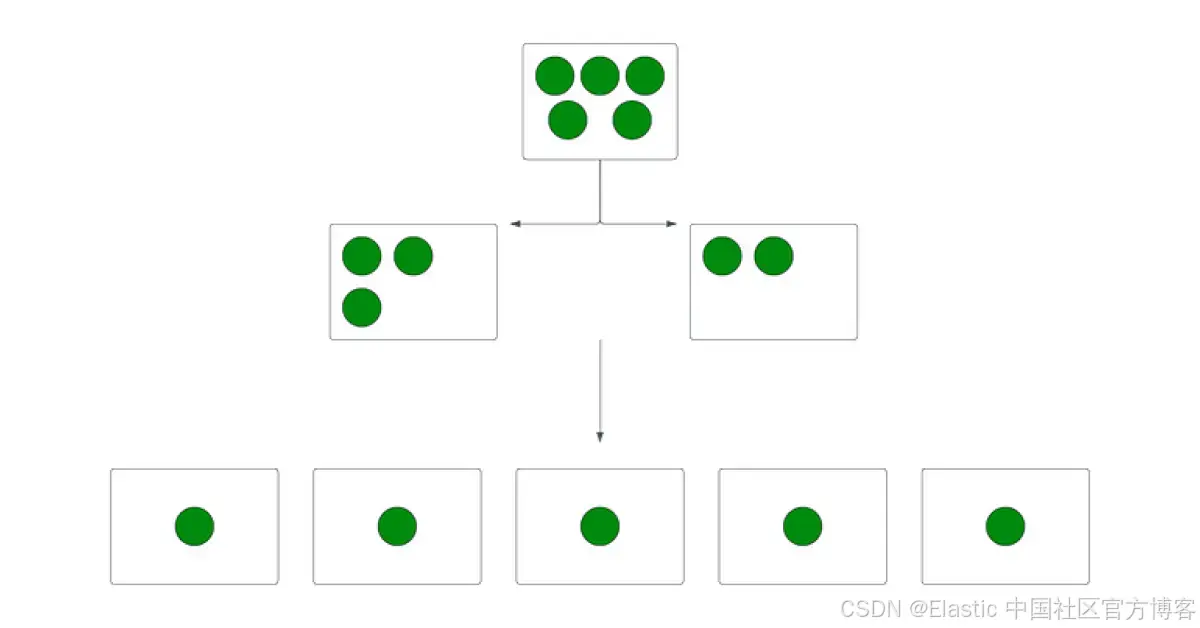
split API 用于通過復制現有索引的設置和映射,創建一個具有所需 primary shard 數量的新索引。可以在創建過程中設置所需的 primary shard 數量。在使用 split API 之前應檢查以下設置:
-
源索引必須是只讀的。這意味著需要停止寫入過程。
-
目標索引的 primary shard 數量必須是源索引 primary shard 數量的倍數。例如,如果源索引有 5 個 primary shard,目標索引可以設置為 10、15、20 等。
注意:如果只需要更改 primary shard 數量,建議使用 split API,因為它比 Reindex API 快得多。
實現 split API
創建一個測試索引:
POST test_split_source/_doc
{"test": "test"
}
我們可以使用如下的命令來查看這個索引的設置:
GET test_split_source/_settings{"test_split_source": {"settings": {"index": {"routing": {"allocation": {"include": {"_tier_preference": "data_content"}}},"number_of_shards": "1","provided_name": "test_split_source","creation_date": "1744934104333","number_of_replicas": "1","uuid": "Ixn7Y6gdTaOnuW9x9AbEjg","version": {"created": "9009000"}}}}
}我們可以看到 number_of_shards 為 1。
源索引必須是只讀的才能進行 split:
PUT test_split_source/_settings
{"index.blocks.write": true
}
設置和映射會自動從源索引復制:
POST /test_split_source/_split/test_split_target
{"settings": {"index.number_of_shards": 3}
}
在上面,我們可以看到 number_of_shards 是 3。它是我們之前的 1 的整數倍。
你可以使用以下命令檢查進度:
GET _cat/recovery/test_split_target?v&h=index,shard,time,stage,files_percent,files_total由于設置和映射是從源索引復制的,目標索引是只讀的。現在讓我們為目標索引啟用寫入操作:
PUT test_split_target/_settings
{"index.blocks.write": null
}
在刪除原始索引之前,檢查源索引和目標索引的 docs.count:
GET _cat/indices/test_split*?v&h=index,pri,rep,docs.count索引名稱和別名名稱不能相同。你需要刪除源索引,并將源索引名稱作為別名添加到目標索引:
DELETE test_split_source
PUT /test_split_target/_alias/test_split_source
在將 test_split_source 別名添加到 test_split_target 索引后,你應該使用以下命令進行測試:
GET test_split_source
POST test_split_source/_doc
{"test": "test"
}
方法 2?– 使用 reindex API
通過使用 Reindex API 創建新索引,可以設置任何數量的 primary shard 數量。在使用所需的 primary shard 數量創建新索引后,源索引中的所有數據可以重新索引到該新索引。
除了 split API 的功能外,還可以使用 reindex API 中的 ingest_pipeline 對數據進行處理。通過 ingest_pipeline,只有符合篩選條件的指定字段會使用查詢索引到目標索引中。數據內容可以通過 painless 腳本進行修改,并且可以將多個索引合并為一個索引。
實現 reindex API
創建一個測試 reindex:
POST test_reindex_source/_doc
{"test": "test"
}
從源索引復制設置和映射:
GET test_reindex_source使用設置、映射和所需的 shard 數量創建目標索引:
PUT test_reindex_target
{"mappings" : {},"settings": {"number_of_shards": 10,"number_of_replicas": 0,"refresh_interval": -1}
}
*注意:設置 number_of_replicas: 0 和 refresh_interval: -1 將提高 reindex 速度。
啟動 reindex 過程。設置 requests_per_second=-1 和 slices=auto 將調整 reindex 速度。
POST _reindex?requests_per_second=-1&slices=auto&wait_for_completion=false
{"source": {"index": "test_reindex_source"},"dest": {"index": "test_reindex_target"}
}
當你運行 reindex API 時,系統會顯示 task_id。復制該 task_id 并使用 _tasks API 檢查進度:
GET _tasks/<task_id>在 reindex 完成后,更新設置:
PUT test_reindex_target/_settings
{"number_of_replicas": 1,"refresh_interval": "1s"
}
在刪除原始索引之前,檢查源索引和目標索引的 docs.count,應該是相同的:
GET _cat/indices/test_reindex_*?v&h=index,pri,rep,docs.count索引名稱和別名名稱不能相同。刪除源索引,并將源索引名稱作為別名添加到目標索引:
DELETE test_reindex_source
PUT /test_reindex_target/_alias/test_reindex_source
在將 test_split_source 別名添加到 test_split_target 索引后,使用以下命令進行測試:
GET test_reindex_source總結
如果你想增加已有索引的 primary shard 數量,需要將設置和映射重新創建到一個新索引中。實現這一點有兩種主要方法:reindex API 和 split API。在使用這兩種方法之前,必須停止當前的索引操作。
想獲得 Elastic 認證嗎?了解下一期 Elasticsearch 工程師培訓的時間!
Elasticsearch 擁有許多新特性,幫助你為你的用例構建最佳的搜索解決方案。深入了解我們的示例筆記本,開始免費的云試用,或現在就嘗試在本地機器上使用 Elastic。
原文:How to increase primary shard count in Elasticsearch - Elasticsearch Labs


詳解:如何打通鏈上與現實世界的關鍵橋梁?)

)


自適應調整,附代碼下載鏈接)
)
簡易template)
