前言:
? ? ? ? 在上一章已經實現了SpringBoot單服務的鑒權,在導入SpringSecurity的相關依賴,以及使用JWT生成的accessToken和refreshToken能夠實現不同Controller乃至同一Controller中不同接口的權限單獨校驗。上一章鏈接如下:
從零搭建微服務項目Pro(第6-1章——Spring Security+JWT實現用戶鑒權訪問與token刷新)_微服務springboot+security+jwt實現刷新token-CSDN博客![]() https://blog.csdn.net/wlf2030/article/details/146316131?spm=1001.2014.3001.5501但在微服務架構中,如何實現各服務統一使用相同鑒權模塊、如何權衡網關和鑒權模塊的關系,如何確保Feign調用不被SpringSecurity攔截,如何使用對無狀態的JWT進行控制,這些問題仍需要解決。
https://blog.csdn.net/wlf2030/article/details/146316131?spm=1001.2014.3001.5501但在微服務架構中,如何實現各服務統一使用相同鑒權模塊、如何權衡網關和鑒權模塊的關系,如何確保Feign調用不被SpringSecurity攔截,如何使用對無狀態的JWT進行控制,這些問題仍需要解決。
本章針對這些問題給出了解答分析以及代碼示例。完整代碼鏈接如下:
(該鏈接為一個筆者正在開發的微服務商城項目,會逐漸整合本專欄所有功能,歡迎Star)
wlf728050719/BitGoPlus![]() https://github.com/wlf728050719/BitGoPlus
https://github.com/wlf728050719/BitGoPlus
以及本專欄會持續更新微服務項目,每一章的項目都會基于前一章項目進行功能的完善,歡迎小伙伴們關注!同時如果只是對單章感興趣也不用從頭看,只需下載前一章項目即可,每一章都會有前置項目準備部分,跟著操作就能實現上一章的最終效果,當然如果是一直跟著做可以直接跳過這一部分。專欄目錄鏈接如下,其中Base篇為基礎微服務搭建,Pro篇為復雜模塊實現。
從零搭建微服務項目(全)-CSDN博客![]() https://blog.csdn.net/wlf2030/article/details/145799620?spm=1001.2014.3001.5501
https://blog.csdn.net/wlf2030/article/details/145799620?spm=1001.2014.3001.5501

核心依賴:
<!-- security --><dependency><groupId>org.springframework.boot</groupId><artifactId>spring-boot-starter-security</artifactId></dependency><!-- web --><dependency><groupId>org.springframework.boot</groupId><artifactId>spring-boot-starter-web</artifactId></dependency><!-- jwt --><dependency><groupId>io.jsonwebtoken</groupId><artifactId>jjwt</artifactId></dependency><dependency><groupId>javax.xml.bind</groupId><artifactId>jaxb-api</artifactId></dependency><dependency><groupId>org.glassfish.jaxb</groupId><artifactId>jaxb-runtime</artifactId></dependency>權限實體:
package cn.bit.pojo.dto;import lombok.Getter;
import org.springframework.security.core.GrantedAuthority;
import org.springframework.security.core.userdetails.User;import java.util.Collection;@Getter
public class BitGoUser extends User {private final UserBaseInfo userBaseInfo;public BitGoUser(UserBaseInfo userBaseInfo, Collection<? extends GrantedAuthority> authorities) {super(userBaseInfo.getUsername(), userBaseInfo.getPassword(), authorities);this.userBaseInfo = userBaseInfo;}
}
先定義整個項目的鑒權實體類,當有請求訪問時,通過鑒權后會將這個實體類存儲在整個服務的鑒權上下文中,在加上注解進行aop操作即可實現單接口權限控制。這里是直接繼承spring.secutity定義好的user,user定義如下:
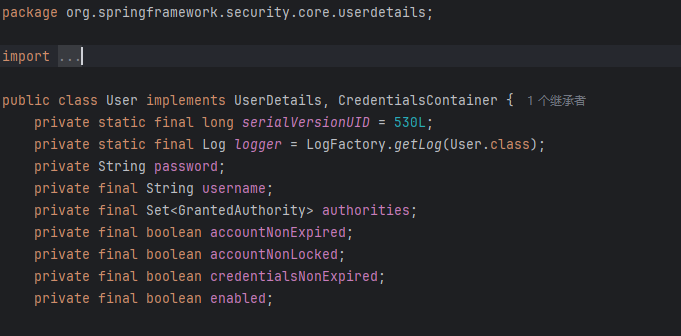
當然也可以不選擇繼承定義好的User,但必須實現UserDetails接口中的所有方法,UserDetails可以看作整個spring.security的核心。
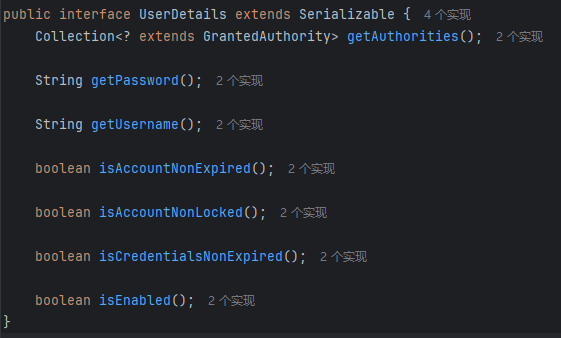
即主要實現用戶用戶名,密碼,權限,以及是否過期,是否上鎖,是否啟用,是否權限超時。
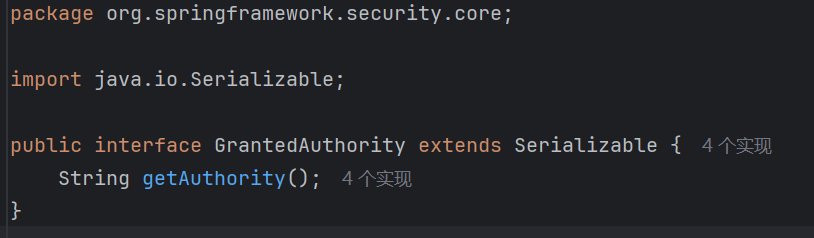
繼續深入查看權限接口是如何定義的,其實會發現spring.security鑒權的底層實際是鑒是否有字符串。
實體初始化:
在定義好權限實體類后,我們需要給一個service用來初始化權限。具體代碼如下:
package cn.bit.service.impl;import cn.bit.constant.SecurityConstant;
import cn.bit.pojo.dto.BitGoAuthorization;
import cn.bit.pojo.dto.UserBaseInfo;
import cn.bit.service.BitGoUserService;
import cn.bit.exception.BizException;
import cn.bit.exception.SysException;
import cn.bit.client.UserClient;
import cn.bit.pojo.dto.BitGoUser;
import cn.bit.pojo.vo.R;
import lombok.AllArgsConstructor;import org.springframework.security.core.GrantedAuthority;
import org.springframework.security.core.userdetails.UserDetails;
import org.springframework.stereotype.Service;import java.util.Collection;
import java.util.Set;@Service("BitGoUserService")
@AllArgsConstructor
public class BitGoUserServiceFeignImpl implements BitGoUserService {private final UserClient userClient;@Overridepublic UserDetails loadUserByUsername(String username) {return getBitGoUserFromRPC(username);}public BitGoUser getBitGoUserFromRPC(String username) {// 獲取用戶基本信息R<UserBaseInfo> userResponse = userClient.getInfoByUsername(username);if (userResponse == null) {throw new SysException("get response from user-service failed");}if (userResponse.getData() == null) {throw new BizException("用戶名不存在");}UserBaseInfo user = userResponse.getData();// 獲取用戶角色信息R<Set<BitGoAuthorization>> roleResponse = userClient.getBitGoAuthorizationByUserId(user.getUserId());if (roleResponse == null) {throw new SysException("get response from user-service failed");}// 構建BitGoUser對象return new BitGoUser(user, roleResponse.getData());}@Overridepublic boolean checkUser(BitGoUser user, Long userId) {if (user == null) {return false;}return user.getUserBaseInfo().getUserId().equals(userId);}@Overridepublic boolean checkAdmin(BitGoUser user) {return checkRoleAndTenantId(user, null, SecurityConstant.ROLE_ADMIN);}@Overridepublic boolean checkShopKeeper(BitGoUser user, Long tenantId) {return checkRoleAndTenantId(user, tenantId, SecurityConstant.ROLE_SHOPKEEPER);}@Overridepublic boolean checkClerk(BitGoUser user, Long tenantId) {return checkRoleAndTenantId(user, tenantId, SecurityConstant.ROLE_CLERK);}private boolean checkRoleAndTenantId(BitGoUser user, Long tenantId, String roleCode) {if (user == null) {return false;}// 獲取用戶的所有授權信息Collection<? extends GrantedAuthority> authorities = user.getAuthorities();// 檢查是否有匹配的角色return authorities.stream().filter(auth -> auth instanceof BitGoAuthorization).map(auth -> (BitGoAuthorization) auth).anyMatch(auth -> {// 1. 先檢查角色是否匹配boolean roleMatches = auth.getRoleCode().equals(roleCode);// 2. 如果角色不匹配,直接返回 falseif (!roleMatches) {return false;}// 3. 如果角色匹配,且不需要檢查租戶(tenantId == null),則直接返回 trueif (tenantId == null) {return true;}// 4. 如果需要檢查租戶,則檢查該角色的租戶是否匹配return tenantId.equals(auth.getTenantId());});}}
這里先是定義了一個服務接口方便后續拓展,接口如下:
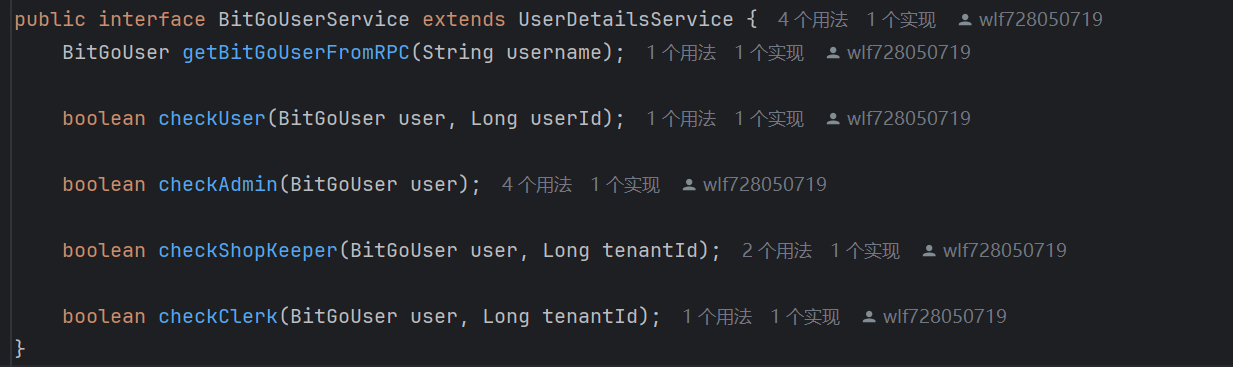
主要功能是加載用戶,以及判斷用戶的身份是否符合要求。加載用戶時遠程調用user-service從數據庫提取用戶權限并裝載實體類。主要核心是實現UserDetailService的方法。

實體類注入:
我們需要將實體類注入上下文中,方便每個接口進行鑒權。這里是在每次請求的過濾器進行注入:
package cn.bit.filter;import cn.bit.constant.RedisKey;
import cn.bit.pojo.dto.BitGoUser;
import cn.bit.pojo.dto.InternalServiceAuthentication;
import cn.bit.constant.SecurityConstant;
import cn.bit.util.JwtUtil;
import lombok.AllArgsConstructor;
import org.springframework.data.redis.core.RedisTemplate;
import org.springframework.security.authentication.UsernamePasswordAuthenticationToken;
import org.springframework.security.core.Authentication;
import org.springframework.security.core.context.SecurityContextHolder;
import org.springframework.security.core.userdetails.UserDetails;
import org.springframework.security.core.userdetails.UserDetailsService;
import org.springframework.security.web.authentication.WebAuthenticationDetailsSource;
import org.springframework.web.filter.OncePerRequestFilter;import javax.servlet.FilterChain;
import javax.servlet.ServletException;
import javax.servlet.http.HttpServletRequest;
import javax.servlet.http.HttpServletResponse;
import java.io.IOException;@AllArgsConstructor
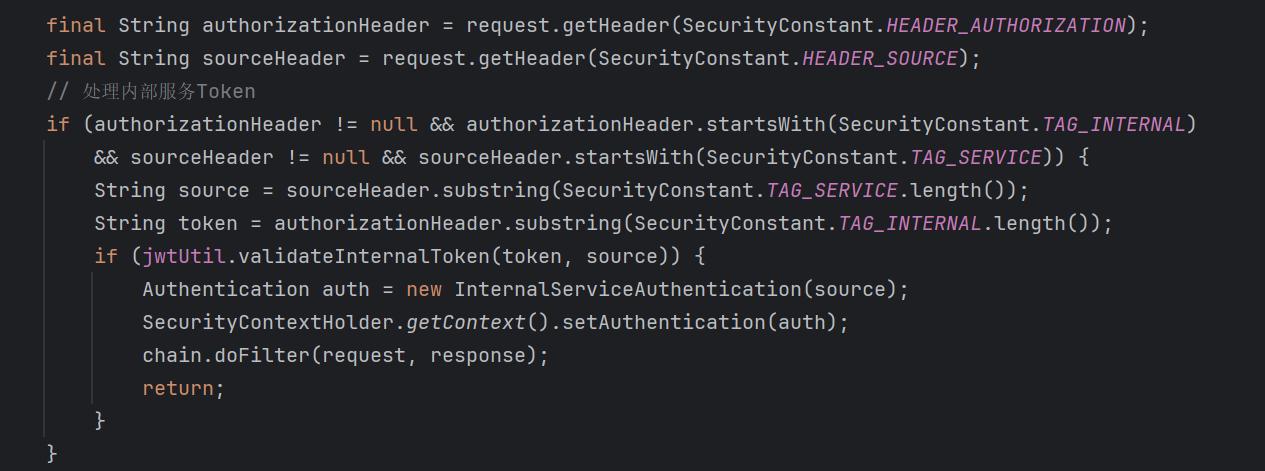
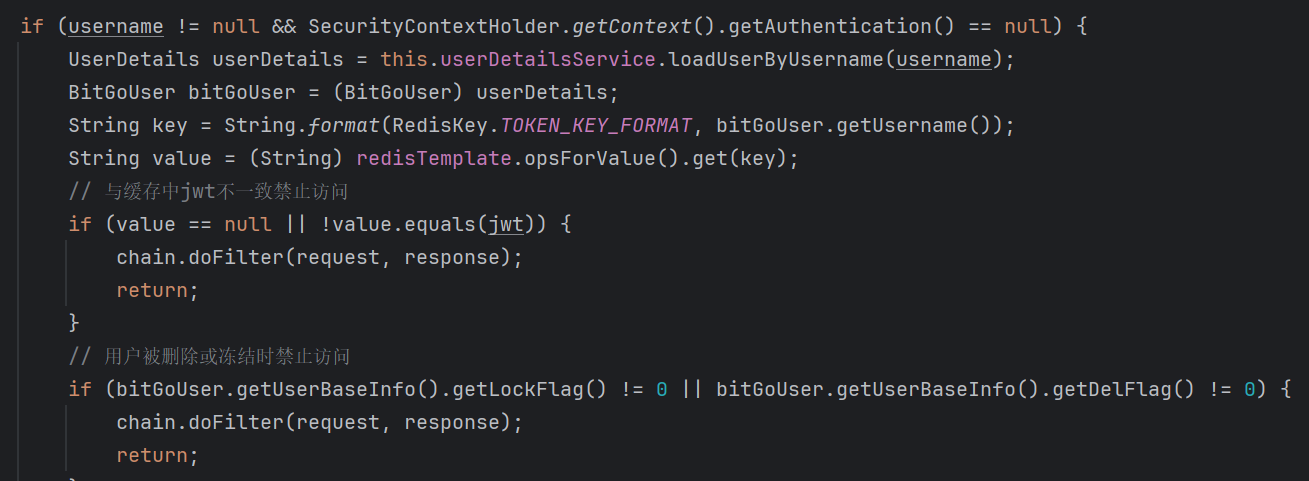
public class JwtAuthenticationFilter extends OncePerRequestFilter {private JwtUtil jwtUtil;private UserDetailsService userDetailsService;private RedisTemplate<String, Object> redisTemplate;@SuppressWarnings("checkstyle:ReturnCount")@Overrideprotected void doFilterInternal(HttpServletRequest request, HttpServletResponse response, FilterChain chain)throws ServletException, IOException {final String authorizationHeader = request.getHeader(SecurityConstant.HEADER_AUTHORIZATION);final String sourceHeader = request.getHeader(SecurityConstant.HEADER_SOURCE);// 處理內部服務Tokenif (authorizationHeader != null && authorizationHeader.startsWith(SecurityConstant.TAG_INTERNAL)&& sourceHeader != null && sourceHeader.startsWith(SecurityConstant.TAG_SERVICE)) {String source = sourceHeader.substring(SecurityConstant.TAG_SERVICE.length());String token = authorizationHeader.substring(SecurityConstant.TAG_INTERNAL.length());if (jwtUtil.validateInternalToken(token, source)) {Authentication auth = new InternalServiceAuthentication(source);SecurityContextHolder.getContext().setAuthentication(auth);chain.doFilter(request, response);return;}}// 處理外部請求TokenString username = null;String jwt = null;if (authorizationHeader != null && authorizationHeader.startsWith(SecurityConstant.TAG_BEARER)) {jwt = authorizationHeader.substring(7);username = jwtUtil.extractData(jwt);}if (username != null && SecurityContextHolder.getContext().getAuthentication() == null) {UserDetails userDetails = this.userDetailsService.loadUserByUsername(username);BitGoUser bitGoUser = (BitGoUser) userDetails;String key = String.format(RedisKey.TOKEN_KEY_FORMAT, bitGoUser.getUsername());String value = (String) redisTemplate.opsForValue().get(key);// 與緩存中jwt不一致禁止訪問if (value == null || !value.equals(jwt)) {chain.doFilter(request, response);return;}// 用戶被刪除或凍結時禁止訪問if (bitGoUser.getUserBaseInfo().getLockFlag() != 0 || bitGoUser.getUserBaseInfo().getDelFlag() != 0) {chain.doFilter(request, response);return;}if (jwtUtil.validateToken(jwt, userDetails)) {UsernamePasswordAuthenticationToken usernamePasswordAuthenticationToken =new UsernamePasswordAuthenticationToken(userDetails, null, userDetails.getAuthorities());usernamePasswordAuthenticationToken.setDetails(new WebAuthenticationDetailsSource().buildDetails(request));SecurityContextHolder.getContext().setAuthentication(usernamePasswordAuthenticationToken);}}chain.doFilter(request, response);}
}
即每次請求,從請求頭中取出jwt并進行解密,然后將解密出的用戶名通過之前定義的service完成權限實體的初始化并注入上下文中。
全局訪問規則配置:
在對接口進行精細化權限控制前,可對每個服務做全局規則配置。
package cn.bit.config;import cn.bit.constant.SecurityConstant;
import cn.bit.filter.JwtAuthenticationFilter;
import cn.bit.util.JwtUtil;
import org.springframework.context.annotation.Bean;
import org.springframework.context.annotation.Configuration;
import org.springframework.data.redis.core.RedisTemplate;
import org.springframework.security.config.annotation.method.configuration.EnableGlobalMethodSecurity;
import org.springframework.security.config.annotation.web.builders.HttpSecurity;
import org.springframework.security.config.annotation.web.configuration.EnableWebSecurity;
import org.springframework.security.config.annotation.web.configuration.WebSecurityConfigurerAdapter;
import org.springframework.security.config.http.SessionCreationPolicy;
import org.springframework.security.core.userdetails.UserDetailsService;
import org.springframework.security.web.authentication.UsernamePasswordAuthenticationFilter;@Configuration
@EnableWebSecurity
@EnableGlobalMethodSecurity(prePostEnabled = true)
public class MicroserviceSecurityConfig extends WebSecurityConfigurerAdapter {private final JwtUtil jwtUtil;private final UserDetailsService userDetailsService;private final RedisTemplate<String, Object> redisTemplate;// 推薦使用構造函數注入public MicroserviceSecurityConfig(JwtUtil jwtUtil, UserDetailsService userDetailsService,RedisTemplate<String, Object> redisTemplate) {this.jwtUtil = jwtUtil;this.userDetailsService = userDetailsService;this.redisTemplate = redisTemplate;}@Overrideprotected void configure(HttpSecurity http) throws Exception {http.csrf().disable().sessionManagement().sessionCreationPolicy(SessionCreationPolicy.STATELESS) // 無狀態會話.and()// 將JWT過濾器添加到UsernamePasswordAuthenticationFilter之前.addFilterBefore(jwtAuthenticationFilter(), UsernamePasswordAuthenticationFilter.class).authorizeRequests().antMatchers("/auth/**").permitAll().antMatchers("/user/open/**").permitAll().antMatchers("/api/**").hasRole(SecurityConstant.ROLE_INTERNAL_SERVICE)// 允許認證端點公開訪問.anyRequest().authenticated(); // 其他所有請求需要認證}@Beanpublic JwtAuthenticationFilter jwtAuthenticationFilter() {return new JwtAuthenticationFilter(jwtUtil, userDetailsService, redisTemplate);}
}
這里的config中即配置允許所有用戶訪問/auth路徑下接口和/user/open接口,同時只允許有內部服務權限的用戶訪問/api接口。
單接口注解配置:
package cn.bit.annotation;import org.springframework.security.access.prepost.PreAuthorize;import java.lang.annotation.ElementType;
import java.lang.annotation.Retention;
import java.lang.annotation.RetentionPolicy;
import java.lang.annotation.Target;@Target(ElementType.METHOD)
@Retention(RetentionPolicy.RUNTIME)
@PreAuthorize("@BitGoUserService.checkAdmin(authentication.principal)")
public @interface Admin {
}
定義注解Admin,當調用接口前會執行名稱為BitGoService的checkAdmin方法,方法實參為上下文中的實體,這樣當上下文中權限實體被判定為true時才允許通過。
同時每個接口還能隨時從上下文中取出權限實體類進行操作。下面接口為只有管理員用戶能夠訪問,且輸出訪問實體類的用戶id的示例。

使用工具類如下:
package cn.bit.util;import lombok.experimental.UtilityClass;
import org.springframework.security.core.Authentication;
import org.springframework.security.core.context.SecurityContextHolder;
import org.springframework.security.core.userdetails.User;/*** 安全工具類** @author L.cm*/
@UtilityClass
public class SecurityUtils {/*** 獲取Authentication*/public Authentication getAuthentication() {return SecurityContextHolder.getContext().getAuthentication();}/*** 獲取用戶*/public User getUser(Authentication authentication) {if (authentication == null || authentication.getPrincipal() == null) {return null;}Object principal = authentication.getPrincipal();if (principal instanceof User) {return (User) principal;}return null;}/*** 獲取用戶*/public User getUser() {Authentication authentication = getAuthentication();return getUser(authentication);}
}
內部服務鑒權:
在添加鑒權后,會發現原有的feign調用也一并被攔截。這里可以同樣為feign做配置。實現思路有三種,一種是使用固定的key,在jwt過濾器時提取到key后單獨設置,但key需要單獨配置,且泄露后會造成較大危害。一種是服務內部的api允許任何人訪問,內部服務通過自定義注解,當請求頭中不含有某個自定義header時視為非法訪問,網關對所有原始請求清洗對應header,同時feign調用時添加上對應請求頭。但當請求頭header內容泄露以及服務端口泄露,可直接不經過網關訪問從而造成攻擊。一種是同樣為feign調用添加jwt識別header,但設置jwt過期時間很短,這樣即使jwt意外泄漏也不會造成過大危害,只是稍微影響服務間調用的性能。很明細第三種最為安全,只有當jwt密鑰泄露,或持續抓取服務間調用請求內容并攻擊(這兩種情況無論哪種防護方法都無解)才會出現問題。具體配置如下:
package cn.bit.config;import cn.bit.constant.SecurityConstant;
import cn.bit.util.JwtUtil;
import feign.RequestInterceptor;
import org.springframework.boot.autoconfigure.condition.ConditionalOnMissingBean;
import org.springframework.context.annotation.Bean;
import org.springframework.context.annotation.Configuration;@Configuration
public class FeignSecurityConfiguration {@Bean@ConditionalOnMissingBeanpublic RequestInterceptor requestInterceptor(JwtUtil jwtUtil) {return template -> {// 從配置獲取服務名,而不是硬編碼String serviceName = template.feignTarget().name();String token = jwtUtil.generateInternalToken(serviceName);template.header(SecurityConstant.HEADER_AUTHORIZATION, SecurityConstant.TAG_INTERNAL + token);template.header(SecurityConstant.HEADER_SOURCE, SecurityConstant.TAG_SERVICE + serviceName);};}
}
對應前面filter內容
以及全局配置

JWT密鑰狀態管理:
盡管jwt無狀態管理能夠極大減小服務器存儲壓力,但試想下面案例,當用戶密碼泄露后,他人使用密碼獲取token,用戶修改密碼試圖減小損失,他人使用原有token仍然能夠訪問對應接口,即同一時間能有多個token對應同一用戶并同時操作,這顯然是存在問題的,因此需要引入緩存存儲每次頒發的token,當用戶的token與緩存中token不一致時,拒絕訪問。
對應過濾器內容
對應登錄內容:

各服務啟用鑒權:
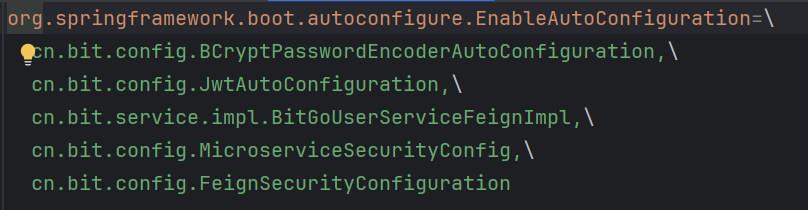
上述所有內容定義在common-security模塊中
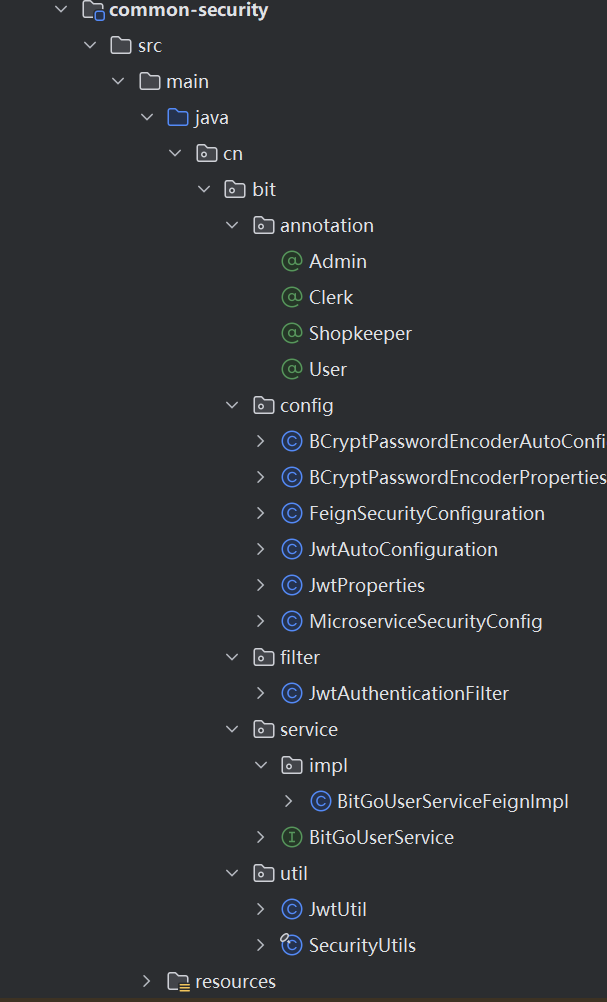
并將所有需要的bean導出給每個服務使用
各服務只需要在對應pom導入即可使用。
最后:
? ? ? ? spring.security其實的整體思路很清晰,但一定要搞清楚其和網關的關系,一開始我誤以為jwt過濾器設置在網關,對于每一個請求網關均提取token并調用auth服務獲取user后存取在上下文中,之后各服務直接從網關給的上下文拿取實體類,但實際上我犯了一個很嚴重的錯誤,spring cloud的每個服務都是獨立的上下文,存在網關中的上下文是不能傳遞給其他服務的,正確思路應該如下,網關只負載基本的header清洗以及路由轉發,jwt過濾器設置在每個服務上,有n個服務,則項目總共有n個jwt過濾器,同時有n個全局訪問規則配置在生效,但由于所有服務都裝填同一個配置類導致看起來像是在給網關配置訪問規則,各服務使用UserDetailService完成實體類初始化后注入自己的上下文,并通過注解完成權限控制。不知道上面解釋能否解答你的問題,如果仍不明白,強烈建議git上面代碼鏈接,并查看spring.security的源碼。


)


)


![OpenAI發布GPT-4.1:開發者專屬模型的深度解析 [特殊字符]](http://pic.xiahunao.cn/OpenAI發布GPT-4.1:開發者專屬模型的深度解析 [特殊字符])


![Muduo網絡庫實現 [十六] - HttpServer模塊](http://pic.xiahunao.cn/Muduo網絡庫實現 [十六] - HttpServer模塊)