目錄
- 概述
- 代碼實現
- 1、Mesh.createBox
- 2、createPyramid
- 3、Mesh.createSphere
- 4、Mesh.createCylinder
- 完整代碼
概述
對于三維場景而言,二位的點、線、面,三維的圓、立方體、圓柱等都是比較常見的三維對象,在ArcGIS For JavaScript中我們知道點、線、面可以直接通過Geometry的Point、Polyline和Polygon去繪制,而立方體的幾何繪制則需要通過Mesh對象提供的方法去繪制,這怕文章主要講解Mesh下的幾何體繪制。
代碼實現
1、Mesh.createBox
Box幾何體的繪制:
function createBox(center, width) {// Place of placementconst point = new Point({// x: center[0],// y: center[1],longitude: center[0],latitude: center[1],z: center[2],spatialReference: SpatialReference.WebMercator});// Boxconst boxMesh = Mesh.createBox(point, {size: { width: width, depth: width, height: width * 5 },material: {color: [58, 38, 0, 1]}});// Empty symbolconst emptyMeshSymbol = new MeshSymbol3D({symbolLayers: [new FillSymbol3DLayer({})]});const box = new Graphic({geometry: boxMesh,symbol: emptyMeshSymbol});view.graphics.add(box);return box;
}
結果:

2、createPyramid
金字塔幾何的繪制,其繪制相對復雜:
function createPyramid(center) {// Place of placementconst point = new Point({// x: center[0],// y: center[1],longitude: center[0],latitude: center[1],z: center[2],spatialReference: SpatialReference.WebMercator});// Pyramidfunction createPyramid(location, { material, size }) {const { height, width, depth } = size;const halfWidth = width / 2;const halfDepth = depth / 2;const origin = [location.x + 10, location.y, location.z]; // adding 10 to the placement position to create the pyramid next to the boxconst position = [0,0,height,-halfWidth,-halfDepth,0,halfWidth,-halfDepth,0,halfWidth,halfDepth,0,-halfWidth,halfDepth,0];const uv = [0.5, 0, 0, 1, 1, 1, 0, 1, 1, 1];const pyramid = new Mesh({vertexSpace: new MeshLocalVertexSpace({ origin }),vertexAttributes: { position, uv },components: [{ faces: [0, 1, 2], material },{ faces: [0, 2, 3], material },{ faces: [0, 3, 4], material },{ faces: [0, 4, 1], material }],spatialReference: location.spatialReference});return pyramid;}const pyramidMesh = createPyramid(point, {size: { width: 350, depth: 350, height: 300 },material: new MeshMaterial({color: [60, 87, 49, 1]})});// Empty symbolconst emptyMeshSymbol = new MeshSymbol3D({symbolLayers: [new FillSymbol3DLayer({})]});const pyramid = new Graphic({geometry: pyramidMesh,symbol: emptyMeshSymbol});view.graphics.add(pyramid);return pyramid;
}
結果:

3、Mesh.createSphere
球體的繪制:
function createShpere(centerPos, radius) {let viewPointHeight = centerPos[2];const snowManLocation = new Point({longitude: centerPos[0],latitude: centerPos[1],z: (radius * -1) + centerPos[2],spatialReference: SpatialReference.WebMercator,});point = snowManLocation;// const sphere = Mesh.createSphere(snowManLocation, {const sphere = Mesh.createSphere(snowManLocation, {size: radius * 2,material: { color: 'rgba(255,255,0,0.2)' },densificationFactor: 1,vertexSpace: 'local',});const symbol = {type: 'mesh-3d',symbolLayers: [{ type: 'fill' }],};// const graphic = new Graphic(sphere, symbol);const graphic = new Graphic({geometry: sphere,symbol: symbol});view.graphics.add(graphic);return graphic;}
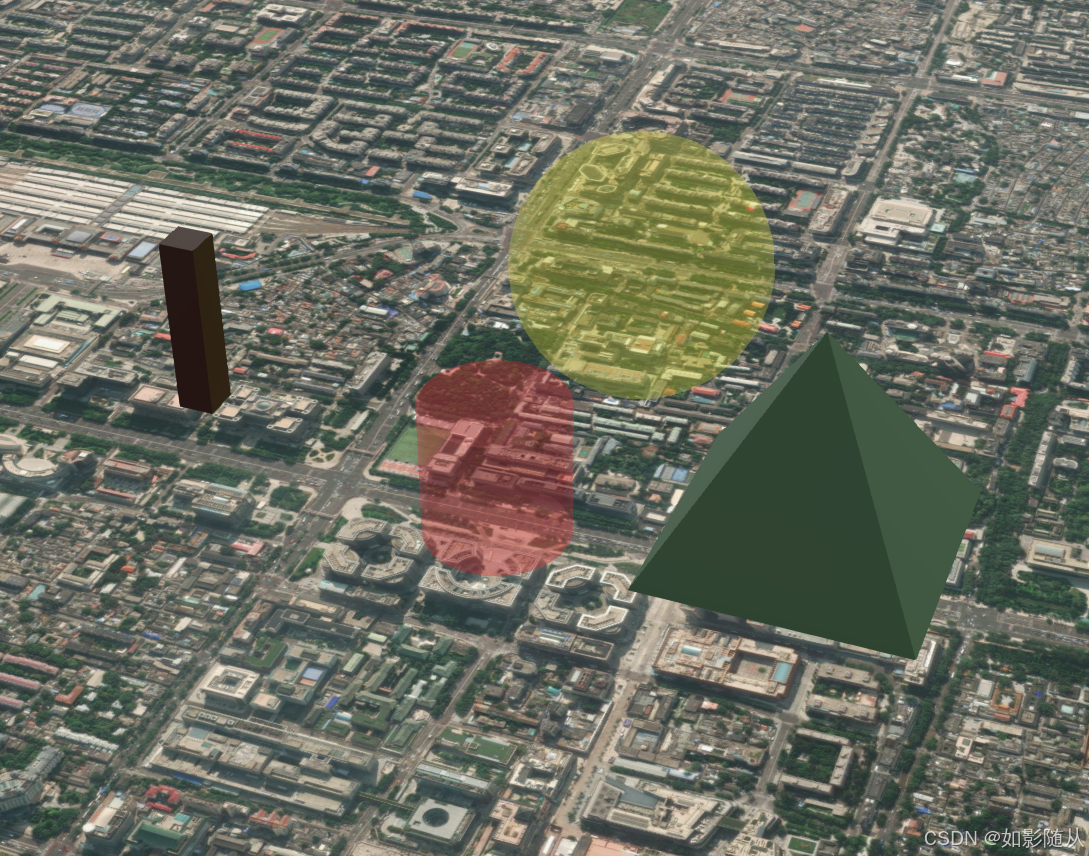
結果:

4、Mesh.createCylinder
圓柱體的繪制:
function createCylinder(centerPos, radius) {let viewPointHeight = centerPos[2];const snowManLocation = new Point({longitude: centerPos[0],latitude: centerPos[1],z: (radius * -1) + centerPos[2],spatialReference: SpatialReference.WebMercator,});point = snowManLocation;// const sphere = Mesh.createSphere(snowManLocation, {const sphere = Mesh.createCylinder(snowManLocation, {size: radius * 2,material: { color: 'rgba(255,0,0,0.2)' },densificationFactor: 1,vertexSpace: 'local',});const symbol = {type: 'mesh-3d',symbolLayers: [{ type: 'fill' }],};// const graphic = new Graphic(sphere, symbol);const graphic = new Graphic({geometry: sphere,symbol: symbol});view.graphics.add(graphic);return graphic;}
結果:

完整代碼
<!DOCTYPE html>
<html lang="en"><head><meta charset="UTF-8"><meta name="viewport" content="width=device-width, initial-scale=1.0"><title>Document</title><link rel="stylesheet" href="https://js.arcgis.com/4.30/esri/themes/light/main.css" /><script src="https://js.arcgis.com/4.30/"></script><style>html,body,#viewDiv {height: 100%;width: 100%;margin: 0;padding: 0;}</style><script>require(['esri/geometry/Point',"esri/geometry/SpatialReference","esri/geometry/Mesh","esri/views/SceneView","esri/Map","esri/Graphic","esri/symbols/FillSymbol3DLayer","esri/symbols/MeshSymbol3D","esri/geometry/support/MeshMaterial","esri/geometry/support/MeshLocalVertexSpace",], (Point, SpatialReference, Mesh, SceneView, Map,Graphic, FillSymbol3DLayer, MeshSymbol3D, MeshMaterial, MeshLocalVertexSpace) => {let map = new Map({basemap: 'satellite'})let center = [116.4074, 39.9042, 300];let view = new SceneView({container: 'viewDiv',map,camera: {position: {longitude: center[0],latitude: center[1],z: 1000,spatialReference: {wkid: 4326}}}})let point = null;function createShpere(centerPos, radius) {let viewPointHeight = centerPos[2];const snowManLocation = new Point({longitude: centerPos[0],latitude: centerPos[1],z: (radius * -1) + centerPos[2],spatialReference: SpatialReference.WebMercator,});point = snowManLocation;// const sphere = Mesh.createSphere(snowManLocation, {const sphere = Mesh.createSphere(snowManLocation, {size: radius * 2,material: { color: 'rgba(255,255,0,0.2)' },densificationFactor: 1,vertexSpace: 'local',});const symbol = {type: 'mesh-3d',symbolLayers: [{ type: 'fill' }],};// const graphic = new Graphic(sphere, symbol);const graphic = new Graphic({geometry: sphere,symbol: symbol});view.graphics.add(graphic);return graphic;}function createCylinder(centerPos, radius) {let viewPointHeight = centerPos[2];const snowManLocation = new Point({longitude: centerPos[0],latitude: centerPos[1],z: (radius * -1) + centerPos[2],spatialReference: SpatialReference.WebMercator,});point = snowManLocation;// const sphere = Mesh.createSphere(snowManLocation, {const sphere = Mesh.createCylinder(snowManLocation, {size: radius * 2,material: { color: 'rgba(255,0,0,0.2)' },densificationFactor: 1,vertexSpace: 'local',});const symbol = {type: 'mesh-3d',symbolLayers: [{ type: 'fill' }],};// const graphic = new Graphic(sphere, symbol);const graphic = new Graphic({geometry: sphere,symbol: symbol});view.graphics.add(graphic);return graphic;}function createBox(center, width) {// Place of placementconst point = new Point({// x: center[0],// y: center[1],longitude: center[0],latitude: center[1],z: center[2],spatialReference: SpatialReference.WebMercator});// Boxconst boxMesh = Mesh.createBox(point, {size: { width: width, depth: width, height: width * 5 },material: {color: [58, 38, 0, 1]}});// Empty symbolconst emptyMeshSymbol = new MeshSymbol3D({symbolLayers: [new FillSymbol3DLayer({})]});const box = new Graphic({geometry: boxMesh,symbol: emptyMeshSymbol});view.graphics.add(box);return box;}function createPyramid(center) {// Place of placementconst point = new Point({// x: center[0],// y: center[1],longitude: center[0],latitude: center[1],z: center[2],spatialReference: SpatialReference.WebMercator});// Pyramidfunction createPyramid(location, { material, size }) {const { height, width, depth } = size;const halfWidth = width / 2;const halfDepth = depth / 2;const origin = [location.x + 10, location.y, location.z]; // adding 10 to the placement position to create the pyramid next to the boxconst position = [0,0,height,-halfWidth,-halfDepth,0,halfWidth,-halfDepth,0,halfWidth,halfDepth,0,-halfWidth,halfDepth,0];const uv = [0.5, 0, 0, 1, 1, 1, 0, 1, 1, 1];const pyramid = new Mesh({vertexSpace: new MeshLocalVertexSpace({ origin }),vertexAttributes: { position, uv },components: [{ faces: [0, 1, 2], material },{ faces: [0, 2, 3], material },{ faces: [0, 3, 4], material },{ faces: [0, 4, 1], material }],spatialReference: location.spatialReference});return pyramid;}const pyramidMesh = createPyramid(point, {size: { width: 350, depth: 350, height: 300 },material: new MeshMaterial({color: [60, 87, 49, 1]})});// Empty symbolconst emptyMeshSymbol = new MeshSymbol3D({symbolLayers: [new FillSymbol3DLayer({})]});const pyramid = new Graphic({geometry: pyramidMesh,symbol: emptyMeshSymbol});view.graphics.add(pyramid);return pyramid;}let radius = 200;let graphic = createShpere(center, radius);let cylinderCenter = center;cylinderCenter[1] += 0.005;let cylinderRadius = 100;createCylinder(cylinderCenter, cylinderRadius);let boxCenter = center;boxCenter[0] += 0.005;createBox(boxCenter, 50);let pyramidCenter = center;pyramidCenter[0] -= 0.01;createPyramid(pyramidCenter);})</script>
</head><body><div id="viewDiv"></div>
</body></html>


:搭建客服系統智能體)


)
