在Spring框架中,XML配置是最傳統和最常見的方式之一,用于管理Bean的創建、依賴注入和生命周期等。這個在Spring中我們使用算是常用的,我們需要根據Spring的基于XML管理Bean了解相關Spring中常用的獲取bean的方式、依賴注入值的幾種方式等等。
基于XML方式管理bean的流程
- 創建XML配置文件:創建一個XML文件,用于定義Bean的配置信息和依賴關系。可以使用任何文本編輯器創建該文件,通常將其命名為"beans.xml"。
- 聲明XML命名空間和模式位置:在XML文件的根元素中,聲明Spring的命名空間和模式位置,以便正確解析和驗證XML配置。
<beans xmlns="http://www.springframework.org/schema/beans"xmlns:xsi="http://www.w3.org/2001/XMLSchema-instance"xsi:schemaLocation="http://www.springframework.org/schema/beanshttp://www.springframework.org/schema/beans/spring-beans.xsd"> - 定義Bean:使用元素來定義Bean,指定Bean的ID、類名和其他屬性。示例如下:
<bean id="userService" class="com.example.UserService"><property name="userDao" ref="userDao"/> </bean><bean id="userDao" class="com.example.UserDao"/> - 加載XML配置文件:在Java代碼中,使用ApplicationContext來加載XML配置文件。示例如下:
public class Main {public static void main(String[] args) {ApplicationContext context = new ClassPathXmlApplicationContext("beans.xml");} } - 獲取Bean:通過ApplicationContext的getBean()方法,從容器中獲取所需的Bean實例。示例如下:
UserService userService = (UserService) context.getBean("userService");
搭建Spring模塊結構
創建基本模塊并引入相關配置
創建Spring模塊
Spring 6 開始已經不在支持javaJDK 8了。
在pom.xml文件中引入相關依賴:
<dependency><groupId>junit</groupId><artifactId>junit</artifactId><version>4.11</version><scope>test</scope></dependency><!-- 引入Spring 依賴 5 的版本才支持 jdk8 , 6已經不在支持JDK8了--><dependency><groupId>org.springframework</groupId><artifactId>spring-context</artifactId><version>5.3.2</version></dependency><dependency><groupId>mysql</groupId><artifactId>mysql-connector-java</artifactId><version>8.0.28</version></dependency><!-- 引入阿里巴巴的數據庫鏈接池 --><dependency><groupId>com.alibaba</groupId><artifactId>druid</artifactId><version>1.2.5</version></dependency>
創建一個類HelloWorld
public class HelloWorld {public void sayHello(){System.out.println("Hello World!");}
}
創建一個Spring配置文件
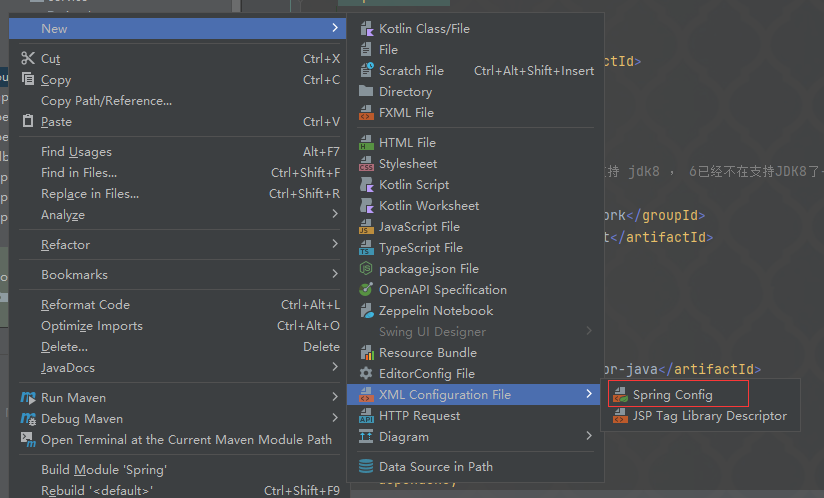
存放到resources目錄下
之后我們在創建的配置文件中配置Bean:
<!--配置HelloWorld所對應的bean,即將HelloWorld的對象交給Spring的IOC容器管理通過bean標簽配置IOC容器所管理的bean屬性:id:設置bean的唯一標識class:設置bean所對應類型的全類名
-->
<bean id="helloworld" class="com.miaow.spring.bean.HelloWorld"></bean>
接下來我們創建一個測試類
@Test
public void testHelloWorld(){ApplicationContext ac = newClassPathXmlApplicationContext("applicationContext.xml");HelloWorld helloworld = (HelloWorld) ac.getBean("helloworld");helloworld.sayHello();
}
然后我們測試看一下是否輸出正常。

大致流程
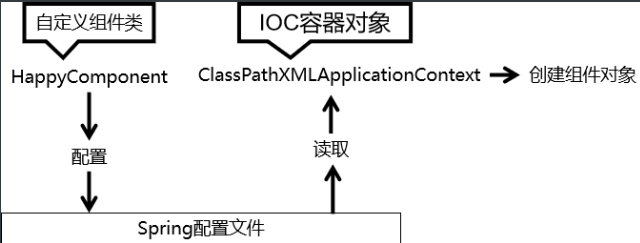
ps:Spring 底層默認通過反射技術調用組件類的無參構造器來創建組件對象,這一點需要注意。如果在需要無參構造器時,沒有無參構造器,則會拋出下面的異常:
org.springframework.beans.factory.BeanCreationException: Error creating bean with name ‘helloworld’ defined in class path resource [applicationContext.xml]: Instantiation of bean failed; nested exception is org.springframework.beans.BeanInstantiationException: Failed to instantiate [com.miaow.spring.bean.HelloWorld]: No default constructor found; nested exception is java.lang.NoSuchMethodException: com.miaow.spring.bean.HelloWorld.
獲取Bean
根據ID獲取
由于 id 屬性指定了 bean 的唯一標識,所以根據 bean 標簽的 id 屬性可以精確獲取到一個組件對象。
上述例子就是根據id獲取一個組件對象。
public void testHelloWorld(){ApplicationContext ac = newClassPathXmlApplicationContext("applicationContext.xml");//這個helloworld就是我們在xml配置文件設置的<bean id = "helloworld" >HelloWorld helloworld = (HelloWorld) ac.getBean("helloworld");helloworld.sayHello();
}
根據類型獲取
@Test
public void testHelloWorld(){ApplicationContext ac = new ClassPathXmlApplicationContext("applicationContext.xml");HelloWorld bean = ac.getBean(HelloWorld.class);bean.sayHello();
}
根據id和類型獲取
@Test
public void testHelloWorld(){ApplicationContext ac = newClassPathXmlApplicationContext("applicationContext.xml");HelloWorld bean = ac.getBean("helloworld", HelloWorld.class);bean.sayHello();
}
當根據類型獲取bean時,要求IOC容器中指定類型的bean有且只能有一個 。
例如:
<bean id="helloworldOne" class="com.miaow.spring.bean.HelloWorld"></bean>
<bean id="helloworldTwo" class="com.miaow.spring.bean.HelloWorld"></bean>
org.springframework.beans.factory.NoUniqueBeanDefinitionException: No qualifying bean of type ‘com.miaow.spring.bean.HelloWorld’ available: expected single matching bean but found 2: helloworldOne,helloworldTwo
- 如果組件類實現了接口,根據接口類型可以獲取 bean 嗎?
可以,前提是bean唯一
- 如果一個接口有多個實現類,這些實現類都配置了 bean,根據接口類型可以獲取 bean 嗎?
不行,因為bean不唯一
根據類型來獲取bean時,在滿足bean唯一性的前提下,其實只是看:『對象 instanceof 指定的類型』的返回結果,只要返回的是true就可以認定為和類型匹配,能夠獲取到。
Spring依賴注入的方式
Spring的IoC(控制反轉)容器通過依賴注入(DI)來管理應用程序中的組件之間的依賴關系。依賴注入是指將一個對象的依賴關系傳遞給另一個對象,而不是由被依賴對象自己創建或管理依賴對象。Spring框架提供了多種方式來實現依賴注入,包括構造器注入、Setter方法注入、字段注入、注解注入等。
至于字段注入和注解注入我們到Spring注解的時候再繼續講解,這里了解即可。
我們來創建一個學生實體類:
public class Student {private Integer id;private String name;private Integer age;private String sex;public Student() {}public Integer getId() {return id;}public void setId(Integer id) {this.id = id;}public String getName() {return name;}public void setName(String name) {this.name = name;}public Integer getAge() {return age;}public void setAge(Integer age) {this.age = age;}public String getSex() {return sex;}public void setSex(String sex) {this.sex = sex;}@Overridepublic String toString() {return "Student{" +"id=" + id +", name='" + name + '\'' +", age=" + age +", sex='" + sex + '\'' +'}';}
}
setter注入
我們通過Setter方式給上述的Student實體類注入相關值:
我們新建一個springdi.xml配置文件,然后在其中添加如下代碼:
<bean id="studentOne" class="com.miaow.spring.bean.Student"><!-- property標簽:通過組件類的setXxx()方法給組件對象設置屬性 --><!-- name屬性:指定屬性名(這個屬性名是getXxx()、setXxx()方法定義的,和成員變量無關)--><!-- value屬性:指定屬性值 --><property name="id" value="1001"></property><property name="name" value="張三"></property><property name="age" value="23"></property><property name="sex" value="男"></property>
</bean>
接下來我們在測試類方法中測試
@Test
public void testDIBySet(){ApplicationContext ac = new ClassPathXmlApplicationContext("springdi.xml");Student studentOne = ac.getBean("studentOne", Student.class);System.out.println(studentOne);
}
構造器注入
通過構造器注入將依賴項傳遞給bean
在實體類Student實體類中添加:
public Student(Integer id, String name, Integer age, String sex) {this.id = id;this.name = name;this.age = age;this.sex = sex;
}
之后我們在springdi.xml文件中配置:
<bean id="studentTwo" class="com.miaow.spring.bean.Student"><constructor-arg value="1002"></constructor-arg><constructor-arg value="李四"></constructor-arg><constructor-arg value="33"></constructor-arg><constructor-arg value="女"></constructor-arg>
</bean>
注意:
constructor-arg標簽還有兩個屬性可以進一步描述構造器參數:
- index屬性:指定參數所在位置的索引(從0開始)
- name屬性:指定參數名
測試類中進行測試:
@Test
public void testDIBySet(){ApplicationContext ac = new ClassPathXmlApplicationContext("springdi.xml");Student studentOne = ac.getBean("studentTwo", Student.class);System.out.println(studentOne);
}
特殊值處理賦值
字面符
關于特殊值處理賦值,我們需要事先了解字面符。
什么是字面符?
int a = 10;
聲明一個變量a,初始化為10,此時a就不代表字母a了,而是作為一個變量的名字。當我們引用a的時候,我們實際上拿到的值是10。
而如果a是帶引號的:‘a’,那么它現在不是一個變量,它就是代表a這個字母本身,這就是字面量。所以字面量沒有引申含義,就是我們看到的這個數據本身。
例如
<!-- 使用value屬性給bean的屬性賦值時,Spring會把value屬性的值看做字面量 -->
<property name="name" value="張三"/>
NULL
<!--表示name的值為空值-->
<property name="name"><null />
</property><!--寫法同-->
<property name="name" value="null"></property>
<(小于) — XML實體
由于在XML中無法直接使用,故而我們需要用XML實體來代替
<property name="expression" value="a < b"/>
CDARA節
<property name="expression"><!-- 解決方案二:使用CDATA節 --><!-- CDATA中的C代表Character,是文本、字符的含義,CDATA就表示純文本數據 --><!-- XML解析器看到CDATA節就知道這里是純文本,就不會當作XML標簽或屬性來解析 --><!-- 所以CDATA節中寫什么符號都隨意 --><value><![CDATA[a < b]]></value>
</property>


![[AI Google] 雙子座模型家族迎來新突破:更快的模型、更長的上下文、AI代理等更多功能](http://pic.xiahunao.cn/[AI Google] 雙子座模型家族迎來新突破:更快的模型、更長的上下文、AI代理等更多功能)


![[職場] 關于薪酬需要知道的兩個知識點 #知識分享#知識分享](http://pic.xiahunao.cn/[職場] 關于薪酬需要知道的兩個知識點 #知識分享#知識分享)
【圖文詳解】)