目錄
- 前言
- 一、基礎使用
- 二、動態添加Fragment
- 三、Fragment的生命周期
- 四、Fragment之間進行通信
- 五、Fragment兼容手機和平板示例
前言
Fragment基礎使用筆記
一、基礎使用
Activity布局和文件
<LinearLayout xmlns:android="http://schemas.android.com/apk/res/android"android:layout_width="match_parent"android:layout_height="match_parent"android:baselineAligned="false"><fragmentandroid:id="@+id/fragment1"android:name="com.henry.FragmentTest.test1.Fragment1"android:layout_width="0dip"android:layout_height="match_parent"android:layout_weight="1" /><fragmentandroid:id="@+id/fragment2"android:name="com.henry.FragmentTest.test1.Fragment2"android:layout_width="0dip"android:layout_height="match_parent"android:layout_weight="1" /></LinearLayout>
public class fragmentactivity extends AppCompatActivity {@Overrideprotected void onCreate(@Nullable Bundle savedInstanceState) {super.onCreate(savedInstanceState);setContentView(R.layout.activity_fragments);}
}
兩個Fragment布局文件
<LinearLayout xmlns:android="http://schemas.android.com/apk/res/android"android:layout_width="match_parent"android:layout_height="match_parent"android:background="#00ff00" ><TextViewandroid:layout_width="wrap_content"android:layout_height="wrap_content"android:text="This is fragment 1"android:textColor="#000000"android:textSize="25sp" /></LinearLayout>
<LinearLayout xmlns:android="http://schemas.android.com/apk/res/android"android:layout_width="match_parent"android:layout_height="match_parent"android:background="#ffff00" ><TextViewandroid:layout_width="wrap_content"android:layout_height="wrap_content"android:text="This is fragment 2"android:textColor="#000000"android:textSize="25sp" /></LinearLayout>
Fragment文件
public class Fragment1 extends Fragment {@Overridepublic View onCreateView(LayoutInflater inflater, ViewGroup container, Bundle savedInstanceState) {return inflater.inflate(R.layout.fragment1, container, false);}}
public class Fragment2 extends Fragment {@Overridepublic View onCreateView(LayoutInflater inflater, ViewGroup container, Bundle savedInstanceState) {return inflater.inflate(R.layout.fragment2, container, false);}}
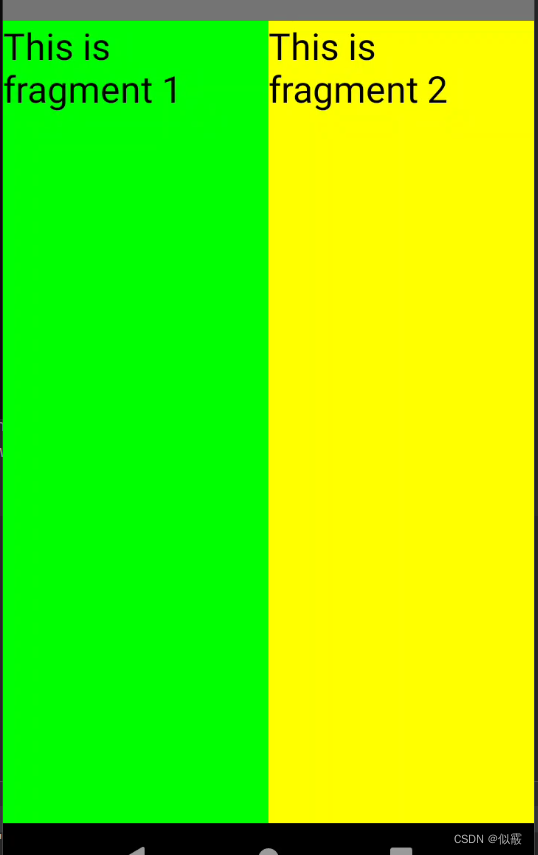
顯示:一個Activity很融洽地包含了兩個Fragment,這兩個Fragment平分了整個屏幕,效果如下:
二、動態添加Fragment
activity修改布局
<?xml version="1.0" encoding="utf-8"?>
<LinearLayout xmlns:android="http://schemas.android.com/apk/res/android"xmlns:tools="http://schemas.android.com/tools"android:id="@+id/main_layout"android:layout_width="match_parent"android:layout_height="match_parent"tools:context="com.henry.PreferenceTest.FragmentActivity"android:orientation="horizontal">
</LinearLayout>
activity動態獲取fragment
public class fragmentactivity extends AppCompatActivity {protected void onCreate(Bundle savedInstanceState) {super.onCreate(savedInstanceState);setContentView(R.layout.activity_fragments);Display display = getWindowManager().getDefaultDisplay();if (display.getWidth() > display.getHeight()) {Fragment1 fragment1 = new Fragment1();getFragmentManager().beginTransaction().replace(R.id.main_layout, fragment1).commit();} else {Fragment2 fragment2 = new Fragment2();getFragmentManager().beginTransaction().replace(R.id.main_layout, fragment2).commit();}}}
步驟如下:
獲取到FragmentManager,在Activity中可以直接通過getFragmentManager得到。
開啟一個事務,通過調用beginTransaction方法開啟。
向容器內加入Fragment,一般使用replace方法實現,需要傳入容器的id和Fragment的實例。
提交事務,調用commit方法提交。
三、Fragment的生命周期
Fragment 的生命周期包括以下方法:
onAttach(): 當 Fragment 與 Activity 關聯時調用。
onCreate(): 當 Fragment 創建時調用。
onCreateView(): 創建 Fragment 的視圖層次結構時調用。
onActivityCreated(): 當與 Fragment 相關聯的 Activity 完成 onCreate() 方法后調用。
onStart(): 當 Fragment 可見時調用。
onResume(): 當 Fragment 可交互時調用。
onPause(): 當 Fragment 失去焦點但仍可見時調用。
onStop(): 當 Fragment 不再可見時調用。
onDestroyView(): 當 Fragment 的視圖層次結構被銷毀時調用。
onDestroy(): 當 Fragment 被銷毀時調用。
onDetach(): 當 Fragment 與 Activity 解除關聯時調用。
下面是 Fragment 生命周期方法的執行順序:
當 Fragment 被添加到 Activity 時,依次執行 onAttach()、onCreate()、onCreateView()、onActivityCreated()、onStart()、onResume()。
當 Activity 進入后臺或另一個 Fragment 覆蓋當前 Fragment 時,依次執行 onPause()、onStop()。
當 Activity 回到前臺或當前 Fragment 重新獲得焦點時,依次執行 onStart()、onResume()。
當 Fragment 被移除或 Activity 被銷毀時,依次執行 onPause()、onStop()、onDestroyView()、onDestroy()、onDetach()。
四、Fragment之間進行通信
activity回到示例一中,包含兩個fragment。
修改fragment2.xml,添加一個按鈕:
<LinearLayout xmlns:android="http://schemas.android.com/apk/res/android"android:layout_width="match_parent"android:layout_height="match_parent"android:orientation="vertical"android:background="#ffff00" ><TextViewandroid:layout_width="wrap_content"android:layout_height="wrap_content"android:text="This is fragment 2"android:textColor="#000000"android:textSize="25sp" /><Buttonandroid:id="@+id/button"android:layout_width="wrap_content"android:layout_height="wrap_content"android:text="Get fragment1 text"/></LinearLayout>
fragment1.xml,為TextView添加一個id
<LinearLayout xmlns:android="http://schemas.android.com/apk/res/android"android:layout_width="match_parent"android:layout_height="match_parent"android:background="#00ff00" ><TextViewandroid:id="@+id/fragment1_text"android:layout_width="wrap_content"android:layout_height="wrap_content"android:text="This is fragment 1"android:textColor="#000000"android:textSize="25sp" /></LinearLayout>
修改Fragment2.java,添加onActivityCreated方法,并處理按鈕的點擊事件:
public class Fragment2 extends Fragment {@Overridepublic View onCreateView(LayoutInflater inflater, ViewGroup container, Bundle savedInstanceState) {return inflater.inflate(R.layout.fragment2, container, false);}@Overridepublic void onActivityCreated(Bundle savedInstanceState) {super.onActivityCreated(savedInstanceState);Button button = (Button) getActivity().findViewById(R.id.button);button.setOnClickListener(new View.OnClickListener() {@Overridepublic void onClick(View v) {TextView textView = (TextView) getActivity().findViewById(R.id.fragment1_text);Toast.makeText(getActivity(), textView.getText(), Toast.LENGTH_LONG).show();}});}
}
運行程序,點擊一下fragment2上的按鈕,效果如下
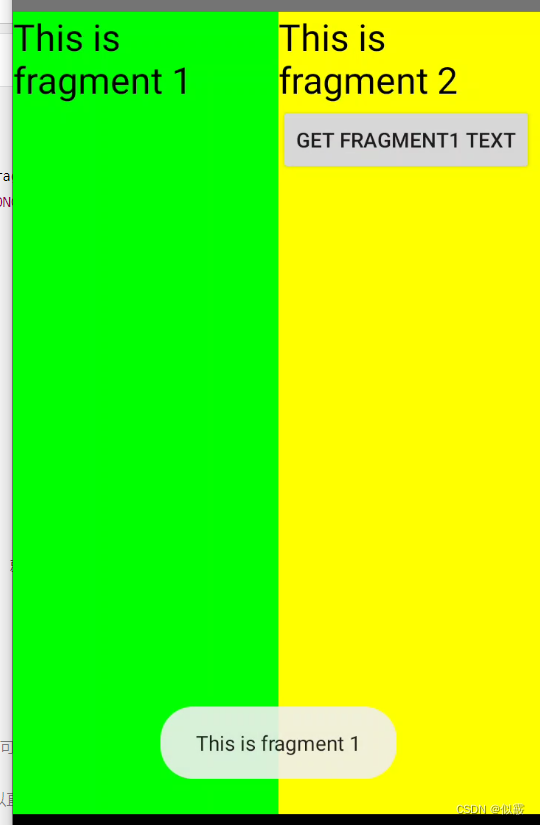
getActivity方法可以讓Fragment獲取到關聯的Activity,然后再調用Activity的findViewById方法,就可以獲取到和這個Activity關聯的其它Fragment的視圖了。
Fragment 之間還可以通過以下幾種方式進行通信:
- 通過 Activity:Fragment 可以通過與 Activity 通信來實現 Fragment 之間的通信。Fragment 可以通過 getActivity() 方法獲取關聯的 Activity,并通過 Activity 的方法或接口來傳遞數據或事件。
- 直接調用其他 Fragment 的方法:如果一個 Fragment 持有對另一個 Fragment 的引用,可以直接調用另一個 Fragment 的公共方法來進行通信。這種方式適用于兩個 Fragment 之間存在直接的關聯關系的情況。
- 使用 Bundle:可以通過設置 Fragment 的參數(通過 setArguments() 方法)來傳遞數據,在另一個 Fragment 中通過 getArguments() 方法獲取數據。這種方式適用于需要在 Fragment 創建時傳遞數據的情況。
- 使用接口回調:定義一個接口,在一個 Fragment 中實現該接口并在另一個 Fragment 中持有該接口的引用。通過接口回調的方式,一個 Fragment 可以調用另一個 Fragment 實現的接口方法來進行通信。
- 使用廣播:通過發送廣播來實現 Fragment 之間的通信。一個 Fragment 發送廣播,另一個 Fragment 注冊廣播接收器來接收廣播消息。這種方式適用于需要跨組件通信的情況。
- 使用共享 ViewModel:使用 Architecture Components 中的 ViewModel 來實現 Fragment 之間的通信。多個 Fragment 可以通過共享同一個 ViewModel 實例來共享數據和狀態。
五、Fragment兼容手機和平板示例
核心在于實現兩個activity_main布局文件,一個是res/layout,另一個在res/layout-land
Android系統又會根據當前的運行環境判斷程序是否運行在大屏幕設備上,如果運行在大屏幕設備上,就加載layout-land目錄下的activity_main.xml,否則就默認加載layout目錄下的activity_main.xml。
res/layout/activity_main.xml
<LinearLayout xmlns:android="http://schemas.android.com/apk/res/android"xmlns:tools="http://schemas.android.com/tools"android:layout_width="fill_parent"android:layout_height="fill_parent"android:orientation="horizontal"tools:context=".MainActivity"><fragmentandroid:id="@+id/menu_fragment"android:name="com.henry.FragmentTest.test1.MenuFragment"android:layout_width="fill_parent"android:layout_height="fill_parent" /></LinearLayout>
res/layout-land/activity_main.xml
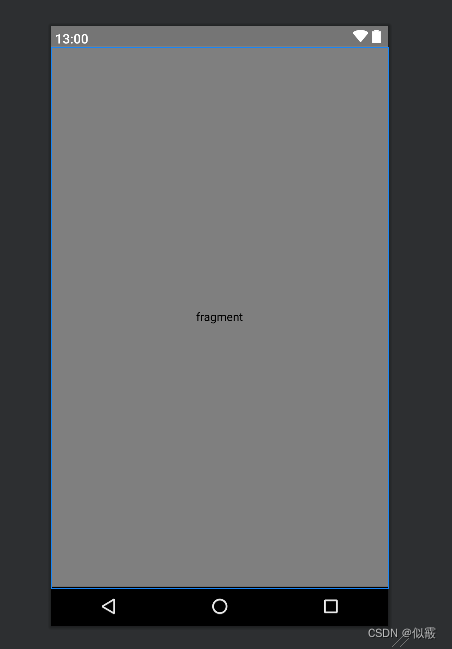
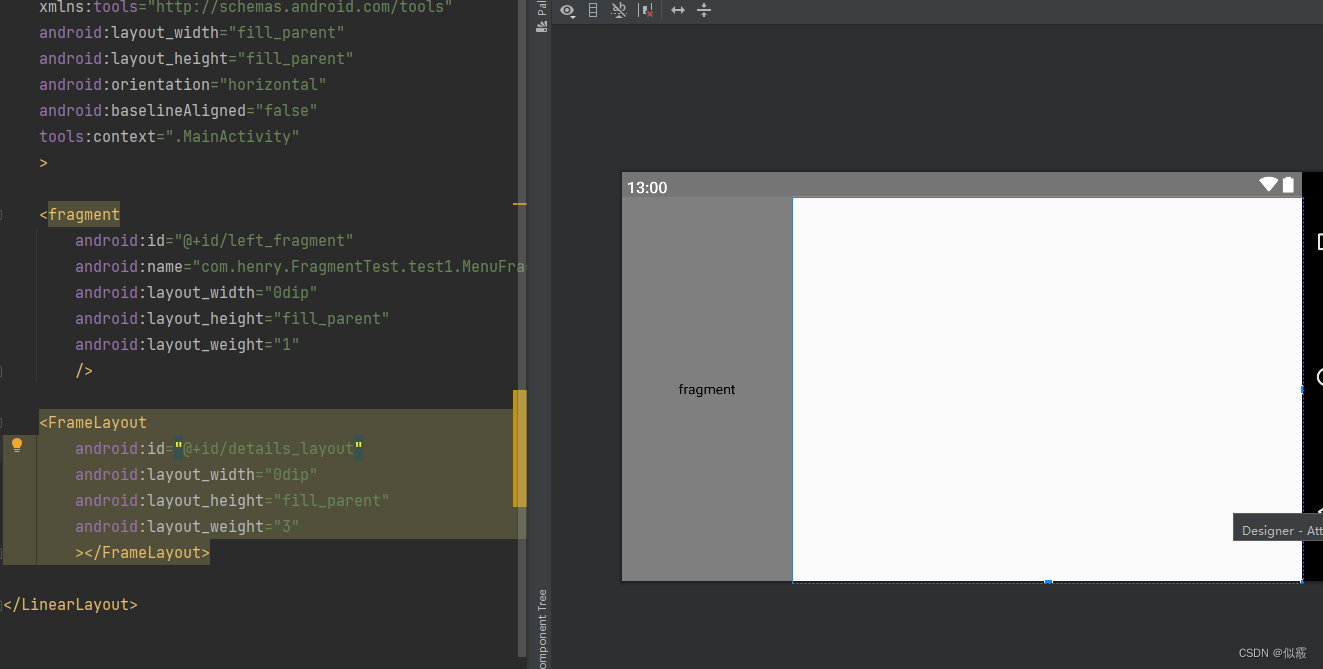
<LinearLayout xmlns:android="http://schemas.android.com/apk/res/android"xmlns:tools="http://schemas.android.com/tools"android:layout_width="fill_parent"android:layout_height="fill_parent"android:orientation="horizontal"android:baselineAligned="false"tools:context=".MainActivity"><fragmentandroid:id="@+id/left_fragment"android:name="com.henry.FragmentTest.test1.MenuFragment"android:layout_width="0dip"android:layout_height="fill_parent"android:layout_weight="1"/><FrameLayoutandroid:id="@+id/details_layout"android:layout_width="0dip"android:layout_height="fill_parent"android:layout_weight="3"></FrameLayout></LinearLayout>
fragmentactivity.java
public class fragmentactivity extends AppCompatActivity {protected void onCreate(Bundle savedInstanceState) {super.onCreate(savedInstanceState);setContentView(R.layout.activity_fragments);}}
MenuFragment.java
public class MenuFragment extends Fragment implements AdapterView.OnItemClickListener {/*** 菜單界面中只包含了一個ListView。*/private ListView menuList;/*** ListView的適配器。*/private ArrayAdapter<String> adapter;/*** 用于填充ListView的數據,這里就簡單只用了兩條數據。*/private String[] menuItems = {"Sound", "Display"};/*** 是否是雙頁模式。如果一個Activity中包含了兩個Fragment,就是雙頁模式。*/private boolean isTwoPane;/*** 當Activity和Fragment建立關聯時,初始化適配器中的數據。*/@Overridepublic void onAttach(Activity activity) {super.onAttach(activity);adapter = new ArrayAdapter<String>(activity, android.R.layout.simple_list_item_1, menuItems);}/*** 加載menu_fragment布局文件,為ListView綁定了適配器,并設置了監聽事件。*/@Overridepublic View onCreateView(LayoutInflater inflater, ViewGroup container, Bundle savedInstanceState) {View view = inflater.inflate(R.layout.menu_fragment, container, false);menuList = (ListView) view.findViewById(R.id.menu_list);menuList.setAdapter(adapter);menuList.setOnItemClickListener(this);return view;}/*** 當Activity創建完畢后,嘗試獲取一下布局文件中是否有details_layout這個元素,如果有說明當前* 是雙頁模式,如果沒有說明當前是單頁模式。*/@Overridepublic void onActivityCreated(Bundle savedInstanceState) {super.onActivityCreated(savedInstanceState);if (getActivity().findViewById(R.id.details_layout) != null) {isTwoPane = true;} else {isTwoPane = false;}}/*** 處理ListView的點擊事件,會根據當前是否是雙頁模式進行判斷。如果是雙頁模式,則會動態添加Fragment。* 如果不是雙頁模式,則會打開新的Activity。*/@Overridepublic void onItemClick(AdapterView<?> arg0, View view, int index, long arg3) {if (isTwoPane) {Fragment fragment = null;if (index == 0) {fragment = new SoundFragment();} else if (index == 1) {fragment = new DisplayFragment();}getFragmentManager().beginTransaction().replace(R.id.details_layout, fragment).commit();} else {Intent intent = null;if (index == 0) {intent = new Intent(getActivity(), SoundActivity.class);} else if (index == 1) {intent = new Intent(getActivity(), DisplayActivity.class);}startActivity(intent);}}}
使用了ArrayAdapter初始化ListView
menu_fragment.xml
<?xml version="1.0" encoding="UTF-8"?>
<LinearLayout xmlns:android="http://schemas.android.com/apk/res/android"android:layout_width="fill_parent"android:layout_height="fill_parent"><ListViewandroid:id="@+id/menu_list"android:layout_width="fill_parent"android:layout_height="fill_parent"></ListView></LinearLayout>
SoundFragment.java
public class SoundFragment extends Fragment {@Overridepublic View onCreateView(LayoutInflater inflater, ViewGroup container, Bundle savedInstanceState) {View view = inflater.inflate(R.layout.sound_fragment, container, false);return view;}}
對應的布局文件
<?xml version="1.0" encoding="utf-8"?>
<RelativeLayout xmlns:android="http://schemas.android.com/apk/res/android"android:layout_width="match_parent"android:layout_height="match_parent"android:background="#00ff00"android:orientation="vertical" ><TextViewandroid:layout_width="wrap_content"android:layout_height="wrap_content"android:layout_centerInParent="true"android:textSize="28sp"android:textColor="#000000"android:text="This is sound view"/></RelativeLayout>
DisplayFragment.java
public class DisplayFragment extends Fragment {public View onCreateView(LayoutInflater inflater, ViewGroup container, Bundle savedInstanceState) {View view = inflater.inflate(R.layout.display_fragment, container, false);return view;}
}
對應的布局文件
<?xml version="1.0" encoding="utf-8"?>
<RelativeLayout xmlns:android="http://schemas.android.com/apk/res/android"android:layout_width="match_parent"android:layout_height="match_parent"android:background="#0000ff"android:orientation="vertical" ><TextViewandroid:layout_width="wrap_content"android:layout_height="wrap_content"android:layout_centerInParent="true"android:textSize="28sp"android:textColor="#000000"android:text="This is display view"/>
</RelativeLayout>
SoundActivity.java
public class SoundActivity extends AppCompatActivity {@Overrideprotected void onCreate(Bundle savedInstanceState) {super.onCreate(savedInstanceState);setContentView(R.layout.sound_activity);}}
對應的布局,SoundFragment
<?xml version="1.0" encoding="utf-8"?>
<fragment xmlns:android="http://schemas.android.com/apk/res/android"android:id="@+id/sound_fragment"android:name="com.henry.FragmentTest.test1.SoundFragment"android:layout_width="match_parent"android:layout_height="match_parent" ></fragment>
DisplayFragment
public class DisplayFragment extends Fragment {public View onCreateView(LayoutInflater inflater, ViewGroup container, Bundle savedInstanceState) {View view = inflater.inflate(R.layout.display_fragment, container, false);return view;}
}
對應的布局,DisplayFragment
<?xml version="1.0" encoding="utf-8"?>
<RelativeLayout xmlns:android="http://schemas.android.com/apk/res/android"android:layout_width="match_parent"android:layout_height="match_parent"android:background="#0000ff"android:orientation="vertical" ><TextViewandroid:layout_width="wrap_content"android:layout_height="wrap_content"android:layout_centerInParent="true"android:textSize="28sp"android:textColor="#000000"android:text="This is display view"/></RelativeLayout>
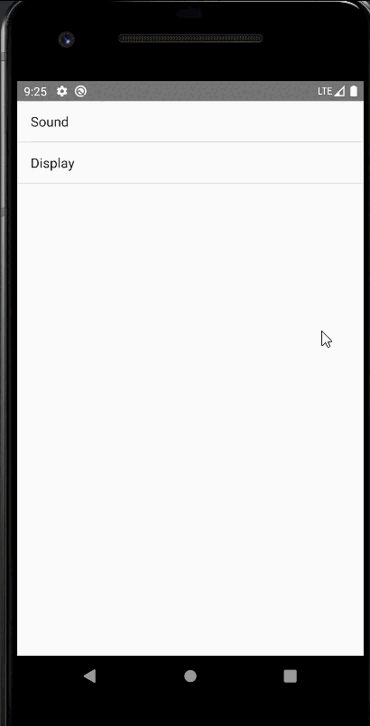
手機上顯示:
平板上顯示:


)


)
主備)
開發環節調取后端接口時跨域,解決辦法之反向代理)


