Frame 是幀的意思,buffer 是緩沖的意思,所以 Framebuffer 就是幀緩沖,這意味著 Framebuffer 就是一塊內存,里面保存著一幀圖像。
應用程序通過對 LCD 設備節點/dev/fb0(假設 LCD 對應的設備節點是/dev/fb0)進行 I/O 操作即可實現對 LCD 的顯示控制。
在應用程序中,操作/dev/fbX 的一般步驟如下:
①、首先打開/dev/fbX 設備文件。
②、使用 ioctl()函數獲取到當前顯示設備的參數信息,譬如屏幕的分辨率大小、像素格式,根據屏幕參數計算顯示緩沖區的大小。
③、通過存儲映射 I/O 方式將屏幕的顯示緩沖區映射到用戶空間(mmap)。
④、映射成功后就可以直接讀寫屏幕的顯示緩沖區,進行繪圖或圖片顯示等操作了。
⑤、完成顯示后,調用 munmap()取消映射、并調用 close()關閉設備文件。
1、獲取 LCD 屏幕的參數信息
#include <stdio.h>
#include <stdlib.h>
#include <sys/types.h>
#include <sys/stat.h>
#include <fcntl.h>
#include <unistd.h>
#include <sys/ioctl.h>
#include <linux/fb.h>
int main(int argc, char *argv[])
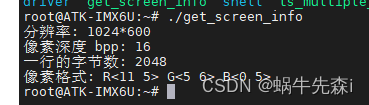
{struct fb_fix_screeninfo fb_fix;struct fb_var_screeninfo fb_var;int fd;// /* 打開 framebuffer 設備 if (0 > (fd = open("/dev/fb0", O_WRONLY))) {perror("open error");exit(-1);}// /* 獲取參數信息 ioctl(fd, FBIOGET_VSCREENINFO, &fb_var);ioctl(fd, FBIOGET_FSCREENINFO, &fb_fix);printf("分辨率: %d*%d\n""像素深度 bpp: %d\n""一行的字節數: %d\n""像素格式: R<%d %d> G<%d %d> B<%d %d>\n",fb_var.xres, fb_var.yres, fb_var.bits_per_pixel,fb_fix.line_length,fb_var.red.offset, fb_var.red.length,fb_var.green.offset, fb_var.green.length,fb_var.blue.offset, fb_var.blue.length);// /* 關閉設備文件退出程序 close(fd);exit(0);
}
可以看出fb_fix_screeninfo、fb_var_screeninfo結構體與FBIOGET_VSCREENINFO、FBIOGET_FSCREENINFO通過ioctl()函數顯示出設備參數信息。
開發板上使用的是7 寸 1024*600的顯示屏
2、LCD 基本操作
編寫應用程序,在 LCD 上實現畫點(俗稱打點)、畫線、畫矩形等基本 LCD 操作。
#include <stdio.h>
#include <stdlib.h>
#include <sys/types.h>
#include <sys/stat.h>
#include <fcntl.h>
#include <unistd.h>
#include <sys/ioctl.h>
#include <sys/mman.h>
#include <linux/fb.h>
#define argb8888_to_rgb565(color) ({ \unsigned int temp = (color); \((temp & 0xF80000UL) >> 8) | \((temp & 0xFC00UL) >> 5) | \((temp & 0xF8UL) >> 3); \})
static int width; //LCD X 分辨率
static int height; //LCD Y 分辨率
static unsigned short *screen_base = NULL; //映射后的顯存基地址
/********************************************************************
* 函數名稱: lcd_draw_point
* 功能描述: 打點
* 輸入參數: x, y, color
* 返 回 值: 無
********************************************************************/
static void lcd_draw_point(unsigned int x, unsigned int y, unsigned int color)
{unsigned short rgb565_color = argb8888_to_rgb565(color);//得到 RGB565 顏色值/* 對傳入參數的校驗 */if (x >= width)x = width - 1;if (y >= height)y = height - 1;/* 填充顏色 */screen_base[y * width + x] = rgb565_color;
}
/********************************************************************
* 函數名稱: lcd_draw_line
* 功能描述: 畫線(水平或垂直線)
* 輸入參數: x, y, dir, length, color
* 返 回 值: 無
********************************************************************/
static void lcd_draw_line(unsigned int x, unsigned int y, int dir,unsigned int length, unsigned int color)
{unsigned short rgb565_color = argb8888_to_rgb565(color);//得到 RGB565 顏色值unsigned int end;unsigned long temp;/* 對傳入參數的校驗 */if (x >= width)x = width - 1;if (y >= height)y = height - 1;/* 填充顏色 */temp = y * width + x;//定位到起點if (dir) { //水平線end = x + length - 1;if (end >= width)end = width - 1;for ( ; x <= end; x++, temp++)screen_base[temp] = rgb565_color;}else { //垂直線end = y + length - 1;if (end >= height)end = height - 1;for ( ; y <= end; y++, temp += width)screen_base[temp] = rgb565_color;}
}
/********************************************************************
* 函數名稱: lcd_draw_rectangle
* 功能描述: 畫矩形
* 輸入參數: start_x, end_x, start_y, end_y, color
* 返 回 值: 無
********************************************************************/
static void lcd_draw_rectangle(unsigned int start_x, unsigned int end_x,unsigned int start_y, unsigned int end_y,unsigned int color)
{int x_len = end_x - start_x + 1;int y_len = end_y - start_y - 1;lcd_draw_line(start_x, start_y, 1, x_len, color);//上邊lcd_draw_line(start_x, end_y, 1, x_len, color); //下邊lcd_draw_line(start_x, start_y + 1, 0, y_len, color);//左邊lcd_draw_line(end_x, start_y + 1, 0, y_len, color);//右邊
}
/********************************************************************
* 函數名稱: lcd_fill
* 功能描述: 將一個矩形區域填充為參數 color 所指定的顏色
* 輸入參數: start_x, end_x, start_y, end_y, color
* 返 回 值: 無
********************************************************************/
static void lcd_fill(unsigned int start_x, unsigned int end_x,unsigned int start_y, unsigned int end_y,unsigned int color)
{unsigned short rgb565_color = argb8888_to_rgb565(color);//得到 RGB565 顏色值unsigned long temp;unsigned int x;/* 對傳入參數的校驗 */if (end_x >= width)end_x = width - 1;if (end_y >= height)end_y = height - 1;/* 填充顏色 */temp = start_y * width; //定位到起點行首for ( ; start_y <= end_y; start_y++, temp+=width) {for (x = start_x; x <= end_x; x++)screen_base[temp + x] = rgb565_color;}
}
int main(int argc, char *argv[])
{struct fb_fix_screeninfo fb_fix;struct fb_var_screeninfo fb_var;unsigned int screen_size;int fd;/* 打開 framebuffer 設備 */if (0 > (fd = open("/dev/fb0", O_RDWR))) {perror("open error");exit(EXIT_FAILURE);}/* 獲取參數信息 */ioctl(fd, FBIOGET_VSCREENINFO, &fb_var);ioctl(fd, FBIOGET_FSCREENINFO, &fb_fix);screen_size = fb_fix.line_length * fb_var.yres;//一幀數據的數據量大小width = fb_var.xres;height = fb_var.yres;/* 將顯示緩沖區映射到進程地址空間 */screen_base = mmap(NULL, screen_size, PROT_WRITE, MAP_SHARED, fd, 0);if (MAP_FAILED == (void *)screen_base) {perror("mmap error");close(fd);exit(EXIT_FAILURE);}/* 畫正方形方塊 */int w = height * 0.25;//方塊的寬度為 1/4 屏幕高度lcd_fill(0, width-1, 0, height-1, 0x0); //清屏(屏幕顯示黑色)lcd_fill(0, w, 0, w, 0xFF0000); //紅色方塊lcd_fill(width-w, width-1, 0, w, 0xFF00); //綠色方塊lcd_fill(0, w, height-w, height-1, 0xFF); //藍色方塊lcd_fill(width-w, width-1, height-w, height-1, 0xFFFF00);//黃色方塊/* 畫線: 十字交叉線 */lcd_draw_line(0, height * 0.5, 1, width, 0xFFFFFF);//白色線lcd_draw_line(width * 0.5, 0, 0, height, 0xFFFFFF);//白色線/* 畫矩形 */unsigned int s_x, s_y, e_x, e_y;s_x = 0.25 * width;s_y = w;e_x = width - s_x;e_y = height - s_y;for ( ; (s_x <= e_x) && (s_y <= e_y);s_x+=5, s_y+=5, e_x-=5, e_y-=5)lcd_draw_rectangle(s_x, e_x, s_y, e_y, 0xFFFFFF);/* 退出 */munmap(screen_base, screen_size); //取消映射close(fd); //關閉文件exit(EXIT_SUCCESS); //退出進程
}
- 首先調用 open()打開 LCD 設備文件得到文件描述符 fd;
- 接著使用 ioctl 函數獲取 LCD 的可變參數信息和固定參數信息,通過得到的信息計算 LCD 顯存大小、得到 LCD 屏幕的分辨率,ALPHA I.MX6U 開發板出廠系統將 LCD 實現為一個 RGB565 顯示設備,所以程序中自定義的 4 個函數在操作 LCD 像素點時、都是以 RGB565的格式寫入顏色值。
- 接著使用 mmap 建立映射;
- 映射成功之后就可以在應用層直接操作 LCD 顯存了,調用自定義的函數在 LCD 上畫線、畫矩形、畫方塊;
- 操作完成之后,調用 munmap 取消映射,調用 close 關閉 LCD 設備文件,退出程序。
3、顯示 BMP 圖片
#include <stdio.h>
#include <stdlib.h>
#include <sys/types.h>
#include <sys/stat.h>
#include <fcntl.h>
#include <unistd.h>
#include <sys/ioctl.h>
#include <string.h>
#include <linux/fb.h>
#include <sys/mman.h>
/**** BMP 文件頭數據結構 ****/
typedef struct {unsigned char type[2]; //文件類型unsigned int size; //文件大小unsigned short reserved1; //保留字段 1unsigned short reserved2; //保留字段 2unsigned int offset; //到位圖數據的偏移量
} __attribute__ ((packed)) bmp_file_header;
/**** 位圖信息頭數據結構 ****/
typedef struct {unsigned int size; //位圖信息頭大小int width; //圖像寬度int height; //圖像高度unsigned short planes; //位面數unsigned short bpp; //像素深度unsigned int compression; //壓縮方式unsigned int image_size; //圖像大小int x_pels_per_meter; //像素/米int y_pels_per_meter; //像素/米unsigned int clr_used;unsigned int clr_omportant;
} __attribute__ ((packed)) bmp_info_header;
/**** 靜態全局變量 ****/
static int width; //LCD X 分辨率
static int height; //LCD Y 分辨率
static unsigned short *screen_base = NULL; //映射后的顯存基地址
static unsigned long line_length; //LCD 一行的長度(字節為單位)
/********************************************************************
* 函數名稱: show_bmp_image
* 功能描述: 在 LCD 上顯示指定的 BMP 圖片
* 輸入參數: 文件路徑
* 返 回 值: 成功返回 0, 失敗返回-1
********************************************************************/
static int show_bmp_image(const char *path)
{bmp_file_header file_h;bmp_info_header info_h;unsigned short *line_buf = NULL; //行緩沖區unsigned long line_bytes; //BMP 圖像一行的字節的大小unsigned int min_h, min_bytes;int fd = -1;int j;/* 打開文件 */if (0 > (fd = open(path, O_RDONLY))) {perror("open error");return -1;}/* 讀取 BMP 文件頭 */if (sizeof(bmp_file_header) != read(fd, &file_h, sizeof(bmp_file_header))) {perror("read error");close(fd);return -1;}if (0 != memcmp(file_h.type, "BM", 2)) {fprintf(stderr, "it's not a BMP file\n");close(fd);return -1;}/* 讀取位圖信息頭 */if (sizeof(bmp_info_header) != read(fd, &info_h, sizeof(bmp_info_header))) {perror("read error");close(fd);return -1;}/* 打印信息 */printf("文件大小: %d\n""位圖數據的偏移量: %d\n""位圖信息頭大小: %d\n""圖像分辨率: %d*%d\n""像素深度: %d\n", file_h.size, file_h.offset,info_h.size, info_h.width, info_h.height,info_h.bpp);/* 將文件讀寫位置移動到圖像數據開始處 */if (-1 == lseek(fd, file_h.offset, SEEK_SET)) {perror("lseek error");close(fd);return -1;}/* 申請一個 buf、暫存 bmp 圖像的一行數據 */line_bytes = info_h.width * info_h.bpp / 8;line_buf = malloc(line_bytes);if (NULL == line_buf) {fprintf(stderr, "malloc error\n");close(fd);return -1;}if (line_length > line_bytes)min_bytes = line_bytes;elsemin_bytes = line_length;/**** 讀取圖像數據顯示到 LCD ****//******************************************** 為了軟件處理上方便,這個示例代碼便不去做兼容性設計了* 如果你想做兼容, 可能需要判斷傳入的 BMP 圖像是 565 還是 888* 如何判斷呢?文檔里邊說的很清楚了* 我們默認傳入的 bmp 圖像是 RGB565 格式*******************************************/if (0 < info_h.height) {//倒向位圖if (info_h.height > height) {min_h = height;lseek(fd, (info_h.height - height) * line_bytes, SEEK_CUR);screen_base += width * (height - 1); //定位到屏幕左下角位置}else {min_h = info_h.height;screen_base += width * (info_h.height - 1); //定位到....不知怎么描述 懂的人自然懂!}for (j = min_h; j > 0; screen_base -= width, j--) {read(fd, line_buf, line_bytes); //讀取出圖像數據memcpy(screen_base, line_buf, min_bytes);//刷入 LCD 顯存}}else { //正向位圖int temp = 0 - info_h.height; //負數轉成正數if (temp > height)min_h = height;elsemin_h = temp;for (j = 0; j < min_h; j++, screen_base += width) {read(fd, line_buf, line_bytes);memcpy(screen_base, line_buf, min_bytes);}}/* 關閉文件、函數返回 */close(fd);free(line_buf);return 0;
}
int main(int argc, char *argv[])
{struct fb_fix_screeninfo fb_fix;struct fb_var_screeninfo fb_var;unsigned int screen_size;int fd;/* 傳參校驗 */if (2 != argc) {fprintf(stderr, "usage: %s <bmp_file>\n", argv[0]);exit(-1);}/* 打開 framebuffer 設備 */if (0 > (fd = open("/dev/fb0", O_RDWR))) {perror("open error");exit(EXIT_FAILURE);}/* 獲取參數信息 */ioctl(fd, FBIOGET_VSCREENINFO, &fb_var);ioctl(fd, FBIOGET_FSCREENINFO, &fb_fix);screen_size = fb_fix.line_length * fb_var.yres;line_length = fb_fix.line_length;width = fb_var.xres;height = fb_var.yres;/* 將顯示緩沖區映射到進程地址空間 */screen_base = mmap(NULL, screen_size, PROT_WRITE, MAP_SHARED, fd, 0);if (MAP_FAILED == (void *)screen_base) {perror("mmap error");close(fd);exit(EXIT_FAILURE);}/* 顯示 BMP 圖片 */memset(screen_base, 0xFF, screen_size);show_bmp_image(argv[1]);/* 退出 */munmap(screen_base, screen_size); //取消映射close(fd); //關閉文件exit(EXIT_SUCCESS); //退出進程
}


)


