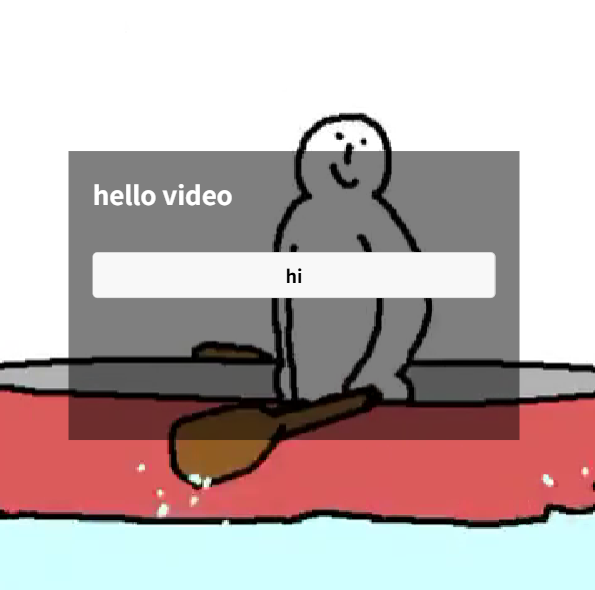
當我們想以視頻作為背景時,其他dom通過定位顯示在視頻上方,h5頁面上調試發現可以正常使用,效果如下:
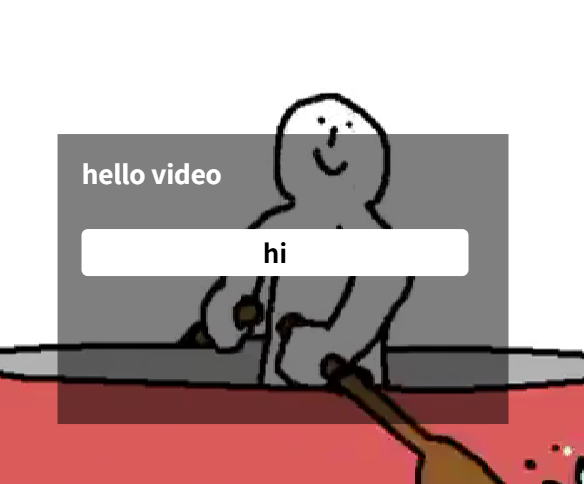
當放在手機上看,會發現,僅僅剩一個視頻,本應在視頻上層的元素不見了。

經過一番排查,發現是video的層級相當高,而嘗試改改zIndex的方法均失效了。因此針對這種特殊情況,總結了一下幾種方法可供嘗試:
start 👇
方法1(官網標簽):
用uniapp官方提供的cover-view、cover-image標簽實現效果:
<view class="outter"><video src="../../static/超小視頻.mp4" :autoplay="true" :loop="true" :muted="true" :controls="false" style="width: 100vw; height: 100vw"><cover-view class="video_menu"><cover-view>hello video</cover-view><cover-view style="margin-top: 50rpx;" class="button">hi</cover-view></cover-view></video>
</view>
.button {width: calc(100% - 60rpx);text-align: center;background-color: #fff;padding: 10rpx 20rpx;color: #000;border-radius: 8rpx;
}
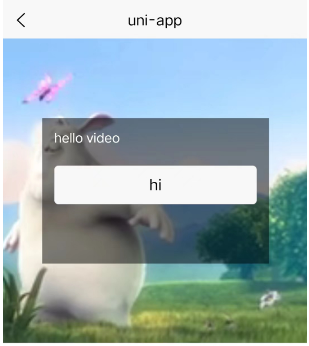
效果:
方法1局限性:只能使用cover-view與cover-image標簽,不適用于復雜的頁面結構。
方法2(subNVue):
使用subNVue 原生子窗體解決該問題:
官方參考:uni-app subNVue 原生子窗體開發指南 - DCloud問答
1.在當前頁面的同級創建subNVue目錄,目錄中添加nvue文件,用于書寫視頻上層的內容
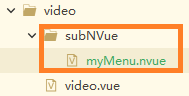
2.在pages.json文件中的頁面(本例子中的頁面名是video)的style中對subNVue進行注冊,參考如下,注意id要唯一,后面要使用:
{"path": "pages/video/video","style": {"navigationBarTitleText": "uni-app","app-plus": {  "subNVues":[{  "id": "myMenu", // 唯一標識  "path": "pages/video/subNVue/myMenu", // 頁面路徑  "style": {  "position": "absolute",  "dock": "right",  "width": "500rpx",  "height": "300rpx","left": "120rpx","top": "500rpx", "background": "transparent"}  }]  } }
}
3.在創建的nvue文件中,書寫要展示的內容,并在鉤子函數中調用展示的方法。
myMenu.nvue內容參考如下:
<template><view class="video_menu"><!-- 字體顏色nvue中無法繼承,需要單獨寫一下 --><text class="video_text">hello video</text><button style="margin-top: 50rpx;" class="button">hi</button></view>
</template>
<script>export default {onReady() {const subNVue = uni.getSubNVueById('myMenu');subNVue.show('slide-in-left', 300, function(){ // 可在打開后進行一些操作... // }); }}
</script>
<style>.video_menu {background-color: rgba(0, 0, 0, 0.5);font-size: 32rpx;font-weight: 600;padding: 30rpx;}.video_text {color: #ffffff;}
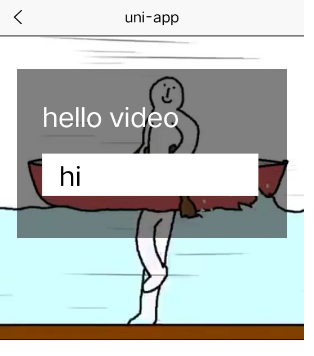
</style>4.進行好以上操作,無需在video.vue中做任何操作,該subNVue彈窗便可超過在頁面中展示出來,效果同上。
方法3(原生畫布):
plus.nativeObj.View()原生畫布:
(ps:這種方法不適用于pc端,因此需要手機進行調試,pc端會報 ReferenceError: plus is not defined)
此方法貌似適用于無交互的圖形、文字、圖片展示;相對較為局限。
這里tag對應的font為字體,img為圖片,rect為矩形。
詳細相關配置項可參考:HTML5+ API Reference
onLoad() {this.view = new plus.nativeObj.View('video_menu',{top: '120px', // 下面均可用變量控制left: '20px',width: '320px',height: '200px',backgroundColor: 'rgba(0, 0, 0, 0.5)',padding: '30px'},[{tag: 'font',text: 'hello video',position:{top:'30px',left:'30px',height:'50px',},textStyles: {color: '#fff',size: '32px',align: 'left'}},{tag:'rect',color:'#fff',position:{top:'100px',left:'30px',width:'80%',height:'50px',},},{tag: 'font',text: 'hi',position:{top:'100px',left:'50px',width:'90%',height:'50px',},textStyles: {color: '#000',size: '32px',align: 'left'}},]);setTimeout(() => {this.view.show();}, 300);this.view.addEventListener('click',e => {this.view.hide();},false);
}
效果:
方法4(三方庫):
最簡單粗暴的方法,使用現有的第三方庫dom-video-player:
鏈接:video-player 視頻播放器 html5視頻播放器-解決頻層級、覆蓋 - DCloud 插件市場
1.下載并引入
import DomVideoPlayer from '@/components/DomVideoPlayer/DomVideoPlayer';// 。。。export default {components: {DomVideoPlayer},// 。。。2.使用DomVideoPlayer,下方為參考:
<template><view class="outter"><!-- #ifdef H5 --><video src="https://www.runoob.com/try/demo_source/mov_bbb.mp4" :autoplay="true" :loop="true" :muted="true" :controls="false" style="width: 100vw; height: 100vw"></video><!-- #endif --><!-- #ifndef H5 --><DomVideoPlayer src="https://www.runoob.com/try/demo_source/mov_bbb.mp4"style="width: 100vw; height: 100vw":autoplay="true":controls="false":show-play-btn="false":enable-progress-gesture="false"object-fit="cover":muted="true"loop></DomVideoPlayer><!-- #endif --><view class="video_menu"><text>hello video</text><button style="margin-top: 50rpx;">hi</button></view></view>
</template>
效果:
ok!
目前了解這幾種方法,當然肯定還有其他方法,歡迎大家補充~
希望本文會對您有所幫助 ^_^ ~


頁表查找)