0.配置Autudl
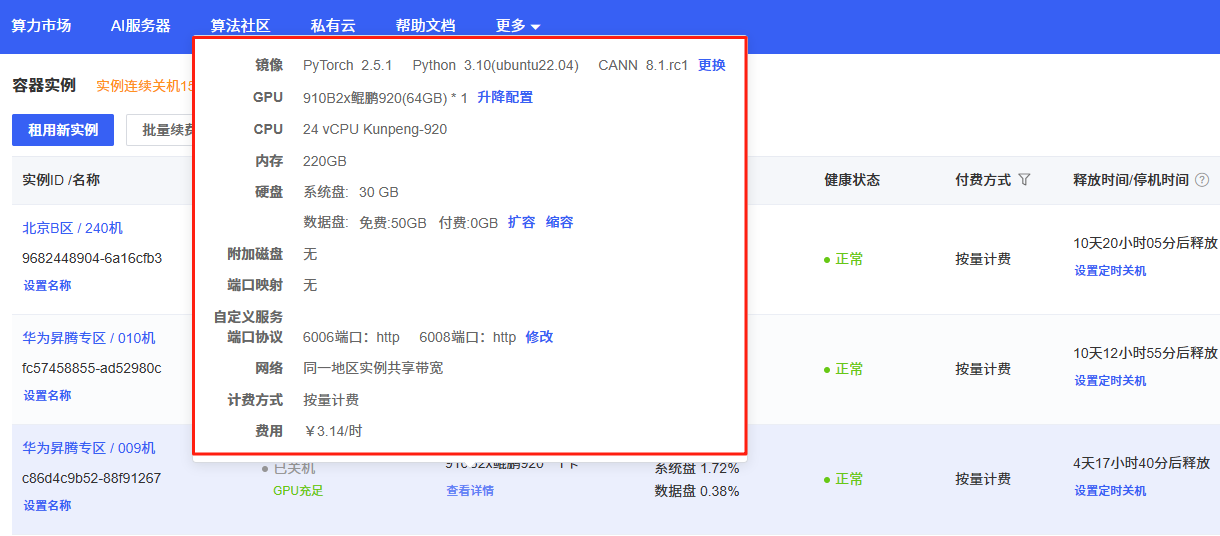
????????下面圖片是我所租的昇騰卡和具體環境版本,太具體的就不說了,有需要的話我單獨出一期Autudl租顯卡的教程,主要是為了學習昇騰環境如何運行Yolo系列模型。
0.1華為昇騰芯片(Ascend)簡介
1.Ascend 310(?邊緣推理 SoC)
? ? ?在僅 8?W 的功耗下,支持 FP16 達 8?TOPS,INT8 達 16?TOPS。
? ? ? 支持多通道高清視頻處理:最高可實現 16 路 1080p H.264/H.265 解碼、1 路 1080p 視頻編碼,以及 JPEG/PNG 編解碼功能。
? ? ? ? 內含 2 個 Da?Vinci Max AI 核心、8 個 ARM Cortex?A55 CPU 核心和 8?MB 片上緩存。
2.Ascend 910(數據中心級訓練 NPU)
? ? ? ? 于 2019 年發布,代號 Ascend?Max,基于 Da?Vinci 架構,擁有 32 個 Da?Vinci Max AI 核心,FP16 達 256?TFLOPS,INT8 達 512?TOPS。
? ? ? ? 配備高帶寬互聯(NoC Mesh 1024 位,HBM2E 帶寬 1.2?TB/s,350?W 功耗)
3.Ascend 910C(2025 年主打產品)
? ? ? ? 基于 SMIC 的 7?nm (N+2) 工藝,采用雙 910B Die 封裝設計,擁有約 53 億晶體管。
? ? ? ? 實現 FP16 約 800?TFLOPS 性能,搭載高達 128?GB 的 HBM3 存儲(領先于 NVIDIA H100 的 80?GB)。推測性能約為 NVIDIA H100 推理性能的 60%
0.2MindSpore框架
????????MindSpore 是華為自主研發的全場景 AI 計算框架,覆蓋云、邊、端多種部署環境。向上支持自然語言處理、計算機視覺、科學計算等多類 AI 應用,向下通過 CANN 對接昇騰 AI 處理器,實現軟硬件協同優化。
? ? ? ? ?提供端到端的模型開發能力,包括數據處理、模型構建、訓練、推理與部署,內置自動并行、算子融合、混合精度等優化機制,顯著提升性能與算力利用率。其功能定位類似于 TensorFlow 或 PyTorch,在昇騰生態中承擔核心 AI 框架的角色。
0.3CANN計算架構(Compute Architecture for Neural Networks)
????????華為面向AI場景推出的異構計算架構 CANN,作為昇騰AI處理器的軟件驅動與算子加速平臺,向上兼容多種主流AI框架(如 MindSpore、PyTorch、TensorFlow 等),向下對接昇騰系列AI處理器的算子庫、運行時與調度層,發揮承上啟下的關鍵作用。CANN 屏蔽了底層硬件差異,使開發者能夠在不關心硬件細節的情況下無縫使用主流深度學習框架進行模型開發與部署。
? ? ? ? 同時,CANN 針對多樣化的應用場景提供多層次編程接口(如算子級、圖級、應用級),支持用戶快速構建和優化基于昇騰平臺的AI應用與業務,顯著提升模型的執行效率與硬件算力利用率,其功能定位類似于 NVIDIA 的 CUDA 平臺。
總結:CANN用來屏蔽底層硬件差異,使得用戶能夠無縫使用Pytorch等主流深度學習框架進行開發
1配置環境
1.1創建一個yolo環境并進入
conda create -n yolo11 python=3.10
conda activate yolo11
?1.2安裝yolo所需要的庫
pip install ultralytics1.3安裝ais_bench推理工具,和aclruntime
根據自己使用的python、版本系統和架構選擇具體的whl文件
tools: Ascend tools - Gitee.com![]() https://gitee.com/ascend/tools/tree/master/ais-bench_workload/tool/ais_bench#%E4%B8%8B%E8%BD%BDwhl%E5%8C%85%E5%AE%89%E8%A3%85
https://gitee.com/ascend/tools/tree/master/ais-bench_workload/tool/ais_bench#%E4%B8%8B%E8%BD%BDwhl%E5%8C%85%E5%AE%89%E8%A3%85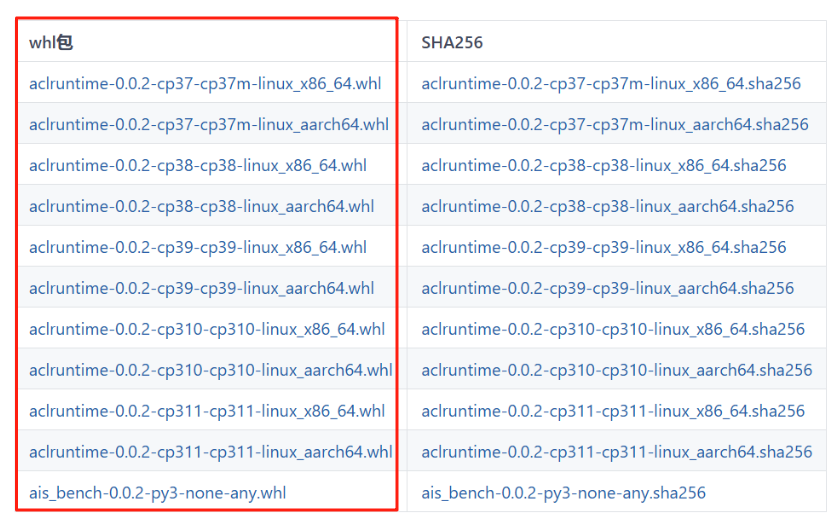
?下載到本地后,安裝兩個whl文件
1.3.1安裝ais_bench
pip install ais_bench-0.0.2-py3-none-any.whl -i https://mirrors.tuna.tsinghua.edu.cn/pypi/web/simple1.3.2安裝aclruntime
pip install aclruntime-0.0.2-cp310-cp310-linux_aarch64.whl后面啟動可能會報一些錯誤,讓ai解決一下,很好解決
NEW_LIB=~/autodl-tmp/libstdcpp_arm64/usr/lib/aarch64-linux-gnu/libstdc++.so.6ln -sf /usr/lib/aarch64-linux-gnu/libstdc++.so.6 /root/miniconda3/lib/libstdc++.so.62準備源碼和模型
模型可以是自己的,也可以從官網上下載
2.1下載源碼
https://github.com/ultralytics/ultralytics
2.2下載模型權重
Ultralytics YOLO11 - Ultralytics YOLO 文檔
3轉換模型
3.1將.pt格式轉換為.ONNX格式
from ultralytics import YOLO# Load a model
model = YOLO(r"/home/ultralytics-main/runs/train/yolo11n/weights/best.pt")# Export onnx,一定要設置opset=11 不然會報錯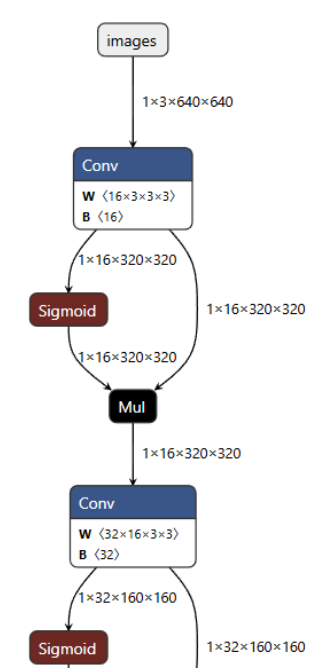
model.export(format="onnx",opset=11)3.1.1查看ONNX?絡結構和輸?輸出shape
Netron
進入網站后,上傳ONNX模型文件
3.2將.ONNX格式轉換為.om格式?
atc \--model=/root/autodl-tmp/ultralytics-main/runs/train/exp4/weights/best.onnx \--framework=5 \--output=yolo11s \--input_format=NCHW \--input_shape="images:1,3,640,640" \--soc_version=Ascend910B2參數分別是:
--model 需要轉換模型的路徑
--framework 框架,ONNX就用5
--output ?輸出.om文件的名字
--input_shape 模型的輸入shape,640 640是訓練時圖片的大小,根據需要修改
--soc_version NPU的型號
根據下面的指令查詢npu型號后,替換910B2
npu-smi info #用這個指令可以查詢npu型號4.推理源碼
在ultralytics路徑下創建run_seg.py
將下述代碼復制進去
import argparse
import time
import cv2
import numpy as np
import osfrom ais_bench.infer.interface import InferSessionclass YOLO:"""YOLO segmentation model class for handling inference"""def __init__(self, om_model, imgsz=(640, 640), device_id=0, model_ndtype=np.single, mode="static", postprocess_type="v8", aipp=False):"""Initialization.Args:om_model (str): Path to the om model."""# 構建ais_bench推理引擎self.session = InferSession(device_id=device_id, model_path=om_model)# Numpy dtype: support both FP32(np.single) and FP16(np.half) om modelself.ndtype = model_ndtypeself.mode = modeself.postprocess_type = postprocess_typeself.aipp = aipp self.model_height, self.model_width = imgsz[0], imgsz[1]  # 圖像resize大小def __call__(self, im0, conf_threshold=0.4, iou_threshold=0.45):"""The whole pipeline: pre-process -> inference -> post-process.Args:im0 (Numpy.ndarray): original input image.conf_threshold (float): confidence threshold for filtering predictions.iou_threshold (float): iou threshold for NMS.Returns:boxes (List): list of bounding boxes."""# 前處理Pre-processt1 = time.time()im, ratio, (pad_w, pad_h) = self.preprocess(im0)pre_time = round(time.time() - t1, 3)# 推理 inferencet2 = time.time()preds = self.session.infer([im], mode=self.mode)  # mode有動態"dymshape"和靜態"static"等det_time = round(time.time() - t2, 3)# 后處理Post-processt3 = time.time()if self.postprocess_type == "v5":boxes, segments, masks = self.postprocess_v5(preds,im0=im0,ratio=ratio,pad_w=pad_w,pad_h=pad_h,conf_threshold=conf_threshold,iou_threshold=iou_threshold,)elif self.postprocess_type == "v8":boxes, segments, masks = self.postprocess_v8(preds,im0=im0,ratio=ratio,pad_w=pad_w,pad_h=pad_h,conf_threshold=conf_threshold,iou_threshold=iou_threshold,)else:boxes=[], segments=[], masks=[]post_time = round(time.time() - t3, 3)return boxes, segments, masks, (pre_time, det_time, post_time)# 前處理,包括:resize, pad, 其中HWC to CHW,BGR to RGB,歸一化,增加維度CHW -> BCHW可選擇是否開啟AIPP加速處理def preprocess(self, img):"""Pre-processes the input image.Args:img (Numpy.ndarray): image about to be processed.Returns:img_process (Numpy.ndarray): image preprocessed for inference.ratio (tuple): width, height ratios in letterbox.pad_w (float): width padding in letterbox.pad_h (float): height padding in letterbox."""# Resize and pad input image using letterbox() (Borrowed from Ultralytics)shape = img.shape[:2]  # original image shapenew_shape = (self.model_height, self.model_width)r = min(new_shape[0] / shape[0], new_shape[1] / shape[1])ratio = r, rnew_unpad = int(round(shape[1] * r)), int(round(shape[0] * r))pad_w, pad_h = (new_shape[1] - new_unpad[0]) / 2, (new_shape[0] - new_unpad[1]) / 2  # wh paddingif shape[::-1] != new_unpad:  # resizeimg = cv2.resize(img, new_unpad, interpolation=cv2.INTER_LINEAR)top, bottom = int(round(pad_h - 0.1)), int(round(pad_h + 0.1))left, right = int(round(pad_w - 0.1)), int(round(pad_w + 0.1))img = cv2.copyMakeBorder(img, top, bottom, left, right, cv2.BORDER_CONSTANT, value=(114, 114, 114))  # 填充# 是否開啟aipp加速預處理,需atc中完成if self.aipp:return img, ratio, (pad_w, pad_h)# Transforms: HWC to CHW -> BGR to RGB -> div(255) -> contiguous -> add axis(optional)img = np.ascontiguousarray(np.einsum('HWC->CHW', img)[::-1], dtype=self.ndtype) / 255.0img_process = img[None] if len(img.shape) == 3 else imgreturn img_process, ratio, (pad_w, pad_h)# YOLOv5/6/7通用后處理,包括:閾值過濾與NMS+masks處理def postprocess_v5(self, preds, im0, ratio, pad_w, pad_h, conf_threshold, iou_threshold, nm=32):"""Post-process the prediction.Args:preds (Numpy.ndarray): predictions come from ort.session.run().im0 (Numpy.ndarray): [h, w, c] original input image.ratio (tuple): width, height ratios in letterbox.pad_w (float): width padding in letterbox.pad_h (float): height padding in letterbox.conf_threshold (float): conf threshold.iou_threshold (float): iou threshold.nm (int): the number of masks.Returns:boxes (List): list of bounding boxes.segments (List): list of segments.masks (np.ndarray): [N, H, W], output masks."""# (Batch_size, Num_anchors, xywh_score_conf_cls), v5和v6_1.0的[..., 4]是置信度分數,v8v9采用類別里面最大的概率作為置信度scorex, protos = preds[0], preds[1]  # 與bbox區別:Two outputs: 檢測頭的輸出(1, 8400*3, 117), 分割頭的輸出(1, 32, 160, 160)# Predictions filtering by conf-thresholdx = x[x[..., 4] > conf_threshold]# Create a new matrix which merge these(box, score, cls, nm) into one# For more details about `numpy.c_()`: https://numpy.org/doc/1.26/reference/generated/numpy.c_.htmlx = np.c_[x[..., :4], x[..., 4], np.argmax(x[..., 5:-nm], axis=-1), x[..., -nm:]]# NMS filtering# 經過NMS后的值, np.array([[x, y, w, h, conf, cls, nm], ...]), shape=(-1, 4 + 1 + 1 + 32)x = x[cv2.dnn.NMSBoxes(x[:, :4], x[:, 4], conf_threshold, iou_threshold)]# 重新縮放邊界框,為畫圖做準備if len(x) > 0:# Bounding boxes format change: cxcywh -> xyxyx[..., [0, 1]] -= x[..., [2, 3]] / 2x[..., [2, 3]] += x[..., [0, 1]]# Rescales bounding boxes from model shape(model_height, model_width) to the shape of original imagex[..., :4] -= [pad_w, pad_h, pad_w, pad_h]x[..., :4] /= min(ratio)# Bounding boxes boundary clampx[..., [0, 2]] = x[:, [0, 2]].clip(0, im0.shape[1])x[..., [1, 3]] = x[:, [1, 3]].clip(0, im0.shape[0])# 與bbox區別:增加masks處理# Process masksmasks = self.process_mask(protos[0], x[:, 6:], x[:, :4], im0.shape)# Masks -> Segments(contours)segments = self.masks2segments(masks)return x[..., :6], segments, masks  # boxes, segments, maskselse:return [], [], []def postprocess_v8(self, preds, im0, ratio, pad_w, pad_h, conf_threshold, iou_threshold):x, protos = preds[0], preds[1]  # x: (1, 37, 8400), protos: (1, 32, 160, 160)# 統一為 (8400, 37)if x.ndim == 3:if x.shape[1] < x.shape[2]:    # (1, 37, 8400)x = np.einsum('bcn->bnc', x)[0]  # -> (8400, 37)else:                          # (1, 8400, 37)x = x[0]else:raise ValueError(f'unexpected pred0 shape: {x.shape}')# 動態確定 nm(此模型就是 32)nm = protos.shape[1] if (protos.ndim == 4 and protos.shape[1] in (16, 32, 64)) else 32# 取類別分支并按需做 sigmoidcls_blob = x[:, 4:-nm]  # 維度應為 (8400, num_classes);你的模型 num_classes=1if cls_blob.size and (cls_blob.max() > 1 or cls_blob.min() < 0):cls_scores = 1.0 / (1.0 + np.exp(-cls_blob))else:cls_scores = cls_blobif cls_scores.size == 0:return [], [], []scores = cls_scores.max(axis=-1)clses  = cls_scores.argmax(axis=-1)keep = scores > conf_thresholdif not np.any(keep):return [], [], []# 拼接為統一數組x = np.c_[x[keep, :4], scores[keep], clses[keep], x[keep, -nm:]]  # [cx,cy,w,h,score,cls, 32-vec]# === NMS 前先把 cx,cy,w,h -> x,y,w,h(左上+寬高)===tlwh = np.c_[x[:, 0] - x[:, 2] / 2,x[:, 1] - x[:, 3] / 2,x[:, 2],x[:, 3]]idxs = cv2.dnn.NMSBoxes(tlwh.tolist(), x[:, 4].astype(float).tolist(),conf_threshold, iou_threshold)if len(idxs) == 0:return [], [], []idxs = np.array(idxs).reshape(-1)x = x[idxs]# 轉回 xyxy 并映射回原圖x[..., [0, 1]] -= x[..., [2, 3]] / 2x[..., [2, 3]] += x[..., [0, 1]]x[:, :4] -= [pad_w, pad_h, pad_w, pad_h]x[:, :4] /= min(ratio)x[:, [0, 2]] = x[:, [0, 2]].clip(0, im0.shape[1])x[:, [1, 3]] = x[:, [1, 3]].clip(0, im0.shape[0])# 處理 maskmasks = self.process_mask(protos[0], x[:, 6:], x[:, :4], im0.shape)segments = self.masks2segments(masks)return x[:, :6], segments, masks@staticmethoddef masks2segments(masks):"""It takes a list of masks(n,h,w) and returns a list of segments(n,xy) (Borrowed fromhttps://github.com/ultralytics/ultralytics/blob/465df3024f44fa97d4fad9986530d5a13cdabdca/ultralytics/utils/ops.py#L750)Args:masks (numpy.ndarray): the output of the model, which is a tensor of shape (batch_size, 160, 160).Returns:segments (List): list of segment masks."""segments = []for x in masks.astype('uint8'):c = cv2.findContours(x, cv2.RETR_EXTERNAL, cv2.CHAIN_APPROX_NONE)[0]  # CHAIN_APPROX_SIMPLE  該函數用于查找二值圖像中的輪廓。if c:# 這段代碼的目的是找到圖像x中的最外層輪廓,并從中選擇最長的輪廓,然后將其轉換為NumPy數組的形式。c = np.array(c[np.array([len(x) for x in c]).argmax()]).reshape(-1, 2)else:c = np.zeros((0, 2))  # no segments foundsegments.append(c.astype('float32'))return segmentsdef process_mask(self, protos, masks_in, bboxes, im0_shape):c, mh, mw = protos.shapemasks = np.matmul(masks_in, protos.reshape((c, -1))).reshape((-1, mh, mw))  # [n, mh, mw]# ★ 先 sigmoid,把線性疊加的 logits 轉成概率masks = 1.0 / (1.0 + np.exp(-masks))masks = np.transpose(masks, (1, 2, 0))                  # -> [mh, mw, n]masks = np.ascontiguousarray(masks)masks = self.scale_mask(masks, im0_shape)               # -> [H, W, n]masks = np.einsum('HWN -> NHW', masks)                  # -> [n, H, W]masks = self.crop_mask(masks, bboxes)                   # 裁剪到框內return masks > 0.5@staticmethoddef scale_mask(masks, im0_shape, ratio_pad=None):"""Takes a mask, and resizes it to the original image size. (Borrowed fromhttps://github.com/ultralytics/ultralytics/blob/465df3024f44fa97d4fad9986530d5a13cdabdca/ultralytics/utils/ops.py#L305)Args:masks (np.ndarray): resized and padded masks/images, [h, w, num]/[h, w, 3].im0_shape (tuple): the original image shape.ratio_pad (tuple): the ratio of the padding to the original image.Returns:masks (np.ndarray): The masks that are being returned."""im1_shape = masks.shape[:2]if ratio_pad is None:  # calculate from im0_shapegain = min(im1_shape[0] / im0_shape[0], im1_shape[1] / im0_shape[1])  # gain  = old / newpad = (im1_shape[1] - im0_shape[1] * gain) / 2, (im1_shape[0] - im0_shape[0] * gain) / 2  # wh paddingelse:pad = ratio_pad[1]# Calculate tlbr of masktop, left = int(round(pad[1] - 0.1)), int(round(pad[0] - 0.1))  # y, xbottom, right = int(round(im1_shape[0] - pad[1] + 0.1)), int(round(im1_shape[1] - pad[0] + 0.1))if len(masks.shape) < 2:raise ValueError(f'"len of masks shape" should be 2 or 3, but got {len(masks.shape)}')masks = masks[top:bottom, left:right]masks = cv2.resize(masks, (im0_shape[1], im0_shape[0]),interpolation=cv2.INTER_LINEAR)  # INTER_CUBIC would be betterif len(masks.shape) == 2:masks = masks[:, :, None]return masks@staticmethoddef crop_mask(masks, boxes):"""It takes a mask and a bounding box, and returns a mask that is cropped to the bounding box. (Borrowed fromhttps://github.com/ultralytics/ultralytics/blob/465df3024f44fa97d4fad9986530d5a13cdabdca/ultralytics/utils/ops.py#L599)Args:masks (Numpy.ndarray): [n, h, w] tensor of masks.boxes (Numpy.ndarray): [n, 4] tensor of bbox coordinates in relative point form.Returns:(Numpy.ndarray): The masks are being cropped to the bounding box."""n, h, w = masks.shapex1, y1, x2, y2 = np.split(boxes[:, :, None], 4, 1)r = np.arange(w, dtype=x1.dtype)[None, None, :]c = np.arange(h, dtype=x1.dtype)[None, :, None]return masks * ((r >= x1) * (r < x2) * (c >= y1) * (c < y2))if __name__ == '__main__':# Create an argument parser to handle command-line argumentsparser = argparse.ArgumentParser()parser.add_argument('--seg_model', type=str, default=r"yolov8s-seg.om", help='Path to OM model')parser.add_argument('--source', type=str, default=r'images', help='Path to input image')parser.add_argument('--out_path', type=str, default=r'results', help='結果保存文件夾')parser.add_argument('--imgsz_seg', type=tuple, default=(640, 640), help='Image input size')parser.add_argument('--classes', type=list, default=['person', 'bicycle', 'car', 'motorcycle', 'airplane', 'bus', 'train', 'truck', 'boat', 'traffic light','fire hydrant', 'stop sign', 'parking meter', 'bench', 'bird', 'cat', 'dog', 'horse', 'sheep', 'cow','elephant', 'bear', 'zebra', 'giraffe', 'backpack', 'umbrella', 'handbag', 'tie', 'suitcase', 'frisbee','skis', 'snowboard', 'sports ball', 'kite', 'baseball bat', 'baseball glove', 'skateboard', 'surfboard','tennis racket', 'bottle', 'wine glass', 'cup', 'fork', 'knife', 'spoon', 'bowl', 'banana', 'apple', 'sandwich','orange', 'broccoli', 'carrot', 'hot dog', 'pizza', 'donut', 'cake', 'chair', 'couch', 'potted plant', 'bed','dining table', 'toilet', 'tv', 'laptop', 'mouse', 'remote', 'keyboard', 'cell phone', 'microwave', 'oven','toaster', 'sink', 'refrigerator', 'book', 'clock', 'vase', 'scissors', 'teddy bear', 'hair drier', 'toothbrush'], help='類別')parser.add_argument('--conf', type=float, default=0.7, help='Confidence threshold')parser.add_argument('--iou', type=float, default=0.7, help='NMS IoU threshold')parser.add_argument('--device_id', type=int, default=0, help='device id')parser.add_argument('--mode', default='static', help='om是動態dymshape或靜態static')parser.add_argument('--model_ndtype', default=np.single, help='om是fp32或fp16')parser.add_argument('--postprocess_type', type=str, default='v8', help='后處理方式, 對應v5/v8兩種后處理')parser.add_argument('--aipp', default=False, action='store_true', help='是否開啟aipp加速YOLO預處理, 需atc中完成om集成')args = parser.parse_args()# 創建結果保存文件夾if not os.path.exists(args.out_path):os.mkdir(args.out_path)print('開始運行:')# Build modelseg_model = YOLO(args.seg_model, args.imgsz_seg, args.device_id, args.model_ndtype, args.mode, args.postprocess_type, args.aipp)color_palette = np.random.uniform(0, 255, size=(len(args.classes), 3))  # 為每個類別生成調色板for i, img_name in enumerate(os.listdir(args.source)):try:t1 = time.time()# Read image by OpenCVimg = cv2.imread(os.path.join(args.source, img_name))# 檢測Inferenceboxes, segments, _ , (pre_time, det_time, post_time) = seg_model(img, conf_threshold=args.conf, iou_threshold=args.iou)print('{}/{} ==>總耗時間: {:.3f}s, 其中, 預處理: {:.3f}s, 推理: {:.3f}s, 后處理: {:.3f}s, 識別{}個目標'.format(i+1, len(os.listdir(args.source)), time.time() - t1, pre_time, det_time, post_time, len(boxes)))# Draw rectangles and polygonsim_canvas = img.copy()# 在繪制循環里加健壯性判斷for (*box, conf, cls_), segment in zip(boxes, segments):# segment 可能為空或很短;也可能是 float,需要轉 int32if segment is None or len(segment) < 3:continueseg = np.round(segment).astype(np.int32).reshape(-1, 1, 2)  # -> Nx1x2, int32# 先畫邊,再填充cv2.polylines(img, [seg], True, (255, 255, 255), 2)cv2.fillPoly(im_canvas, [seg], (255, 0, 0))# 畫 bbox 和標簽x1, y1, x2, y2 = map(int, box[:4])cls_i = int(cls_)cv2.rectangle(img, (x1, y1), (x2, y2), color_palette[cls_i], 1, cv2.LINE_AA)label = args.classes[cls_i] if 0 <= cls_i < len(args.classes) else f'cls{cls_i}'cv2.putText(img, f'{label}: {conf:.3f}', (x1, max(0, y1 - 9)),cv2.FONT_HERSHEY_SIMPLEX, 0.7, color_palette[cls_i], 2, cv2.LINE_AA)# Mix imageimg = cv2.addWeighted(im_canvas, 0.3, img, 0.7, 0)cv2.imwrite(os.path.join(args.out_path, img_name), img)except Exception as e:print(e)
5.啟動命令?
python ~/autodl-tmp/ultralytics-main/run_seg.py   \
--seg_model /root/autodl-tmp/ultralytics-main/yolo11n-seg1.om   \
--source /root/autodl-tmp/ultralytics-main/test   \
--classes [person]  \
--postprocess_type v8
--classes 是模型檢測標簽名
--source 推理文件所在文件夾
--det_model om模型參數路徑
--postprocess_type yolov8 v9 v11都用v8,使用的yolov5的話改為yolov5


詳解)


——文本、按鈕、多選框和單選框、輸入框和拖動條、圖片繪制和框繪制)