1 邏輯備份定義
? ? ?邏輯備份是指與業務有關的對象進行備份,這個對象包括表、表的數據、視圖、索引、過程、函數等等。GaussDB支持邏輯備份的工具為gs_dump、gs_restore,以下舉例說明。
2 創建舉例數據
以下創建testdb庫,創建test1模式,創建test表作為舉例數據,并初始化數據:
gaussdb=> create database testdb encoding 'UTF8' dbcompatibility='A';
CREATE DATABASE
gaussdb=> \c testdb
Password for user root:
Non-SSL connection (SSL connection is recommended when requiring high-security)
You are now connected to database "testdb" as user "root".
testdb=> create schema test1;
CREATE SCHEMA
testdb=> create table test1.test(id int);
CREATE TABLE
testdb=> insert into test1.test values(1),(2),(3);
INSERT 0 3
testdb=>
csdn=> create schema test2;
CREATE SCHEMA
csdn=> create table test2.t2(id int);
CREATE TABLE
csdn=>
csdn=> insert into test2.t2 values(100),(200);
INSERT 0 2
3 gs_dump工具
- GaussDB提供服務器端工具gs_dump,在線導出數據庫的數據,這些數據包括整個數據庫或數據庫 中指定的對象(如:模式、表、視圖等),并且支持導出完整一致的數據。
- gs_dump可以創建四種不同的導出文件格式,通過[-F或者--format=]選項指定。
| 格式名稱 | -F的參數值 | 說明 | 建議 | 對應導入工具 |
|---|---|---|---|---|
| 純文本格式 | p | 純文本腳本文件包含SQL語句和命令。命令可以由gsql命令行終端程序執行,用于重新創建數據庫對象并加載表數據。 | 小型數據庫,一般推薦純文本格式。 | 使用gsql工具恢復數據庫對象前,可根據需要使用文本編輯器編輯純文本導出文件。 |
| 自定義歸檔格式 | c | 一種二進制文件。支持從導出文件中恢復所有或所選的數據庫對象。 | 中型或大型數據庫,推薦自定義歸檔格式。 | 使用gs_restore可以選擇要從自定義歸檔/目錄歸檔/tar歸檔導出文件中導入相應的數據庫對象。 |
| 目錄歸檔格式 | d | 該格式會創建一個目錄,該目錄包含兩類文件,一類是目錄文件,另一類是每個表和blob對象對應的數據文件。 | - | |
| tar歸檔格式 | t | tar歸檔文件支持從導出文件中恢復所有或所選的數據庫對象。tar歸檔格式不支持壓縮且對于單獨表大小應小于8GB。 |
- gs_dump 常用的參數
-U:指定所連接主機的用戶名。
-f:將輸出發送至指定文件或目錄。
-p:指定主機端口。
-F:選擇輸出格式。
-s:僅導出定義。
-a:僅備份數據。
-Z:指定使用的壓縮比級別。
? ? ?取值范圍:0~9
? ? ?針對自定義歸檔格式,該選項指定單個表數據片段的壓縮,默認方式是以中等級別進行壓縮。tar歸檔格式和純文本格式目前不支持壓縮。
? ? ?0表示無壓縮。
? ? 1表示壓縮比最小,處理速度最快。
? ? 9表示壓縮比最大,處理速度最慢。
-n:多指模式名,如果多個模式名的話,分別指定
-N:排除哪些模式不用備份
-t:指定表名稱
-T:排除要導出的表名稱
4 gs_dump使用舉例
1)備份整個庫
導出純文本格式
gs_dump -h xxx.xx.0.71 -p 8000 -U root -W xxxx testdb -f /home/Ruby/gs_dump/testdb_bak0725.sql -F p結果:

導出tar格式
gs_dump -h xxx.xxx.0.71 -p 8000 -U xxx -W xxxx testdb -f /home/Ruby/gs_dump/testdb_bak0725.tar -F t結果:

導出自定義歸檔模式
gs_dump -h xxx.xxx.0.71 -p 8000 -U xxxx -W ****xx testdb -f /home/Ruby/gs_dump/testdb_bak0725.dmp -F c結果:

僅備份定義
gs_dump -h xxx.xxx.0.71 -p 8000 -U root -W h****xxx testdb -f /home/Ruby/gs_dump/testdb_define_bak0725.sql -s -F -c結果:

僅導出數據
gs_dump -h xxx.xxx.0.71 -p 8000 -U root -W h******@1Pwd testdb -f /home/Ruby/gs_dump/testdb_data_bak0725.dmp -a -F c結果:

2)? 備份schema
壓縮導出schema:test1、test2
gs_dump -h xxx.xxx.0.71 -p 8000 -U root -W xxx**** testdb -n test1 -n test2 -Z 9 -f /home/Ruby/gs_dump/schema_bak.tar.gz -a -F c
結果:

壓縮導出testdb但是排除test2模式
gs_dump -h xxx.xxx.0.71 -p 8000 -U root -W h***sxxx testdb -n test1 -N test2 -Z 9 -f /home/Ruby/gs_dump/schema_bak2.tar.gz -a -F c
?結果:

3)備份表
導出表test,包含表定義與數據
gs_dump -h xxx.xxx.0.71 -p 8000 -U root -W h*****Pwd testdb -t test1.test -f /home/Ruby/gs_dump/test1_test1_tab.sql -F p結果:

5 gs_resore工具
?gs_restore是GaussDB提供的針對gs_dump導出數據的導入工具,通過此工具可將gs_dump 導出生成的文件進行導入。
?1)主要功能:
- ?導入到數據庫:如果連接參數中指定了數據庫,則數據將被導入到指定的數據庫中。其中,并行導入必須指定連接的密碼。導入時生成列會自動更新,并像普通列一樣保存。
- ?導入到腳本文件:如果未指定導入數據庫,則創建包含重建數據庫所必須的SQL語句腳本并寫 入到文件或者標準輸出。等效于直接使用gs_dump導出為純文本格式。
2)常見參數:
-p:指定服務器所偵聽的TCP端口或本地Unix域套接字后綴。
-d:指定連接數據庫的dbname并直接導入到該數據庫中。
6 gs_restore使用舉例
1)恢復數據庫
將testdb庫的數據恢復到test_db1;
首先:創建test_db1庫
[Ruby@dtest1 gs_dump]$ gsql -dpostgres -p8000 -Uroot -Wxxxx** -ar
gsql ((GaussDB Kernel 505.2.1 build 159cea95) compiled at 2024-12-27 09:22:44 commit 10161 last mr 21504 release)
Non-SSL connection (SSL connection is recommended when requiring high-security)
Type "help" for help.gaussdb=> create database test_db1 encoding 'UTF8' dbcompatibility='A';
CREATE DATABASE
gaussdb=>
再次:執行恢復
?gs_restore -h 192.168.0.71 -p 8000 -U root -W huawei@1Pwd /home/Ruby/gs_dump/testdb_bak0725.tar -d test_db1執行結果:

驗證數據:
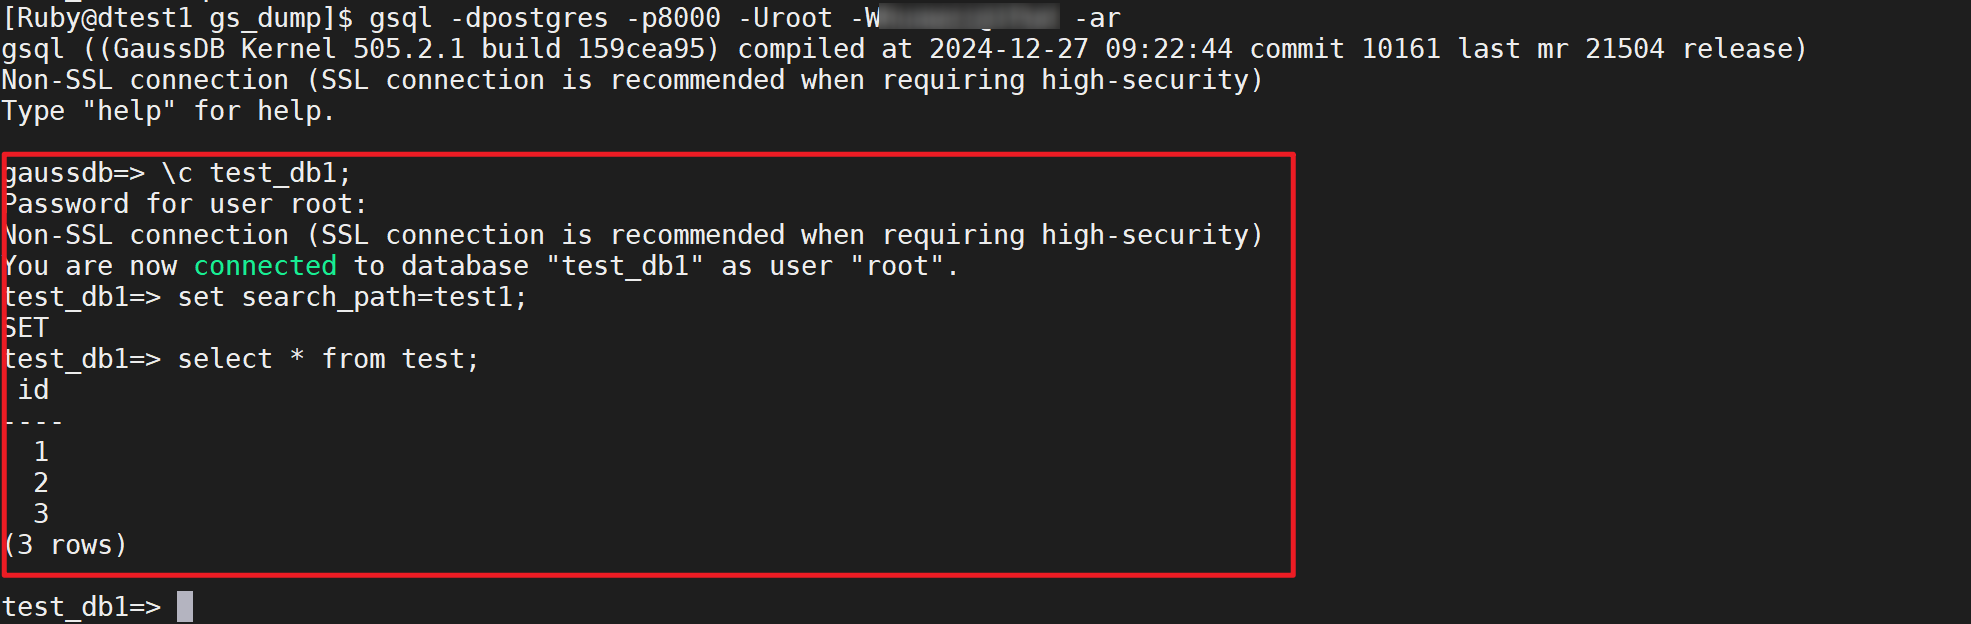
將testdb庫恢復到test_db1
2)恢復schema
步驟1:刪除schema
[Ruby@dtest1 gs_dump]$ gsql -dpostgres -p8000 -Uroot -W*****1Pwd -ar
gsql ((GaussDB Kernel 505.2.1 build 159cea95) compiled at 2024-12-27 09:22:44 commit 10161 last mr 21504 release)
Non-SSL connection (SSL connection is recommended when requiring high-security)
Type "help" for help.gaussdb=> \c testdb
Password for user root:
Non-SSL connection (SSL connection is recommended when requiring high-security)
You are now connected to database "testdb" as user "root".
testdb=>
testdb=>
testdb=>
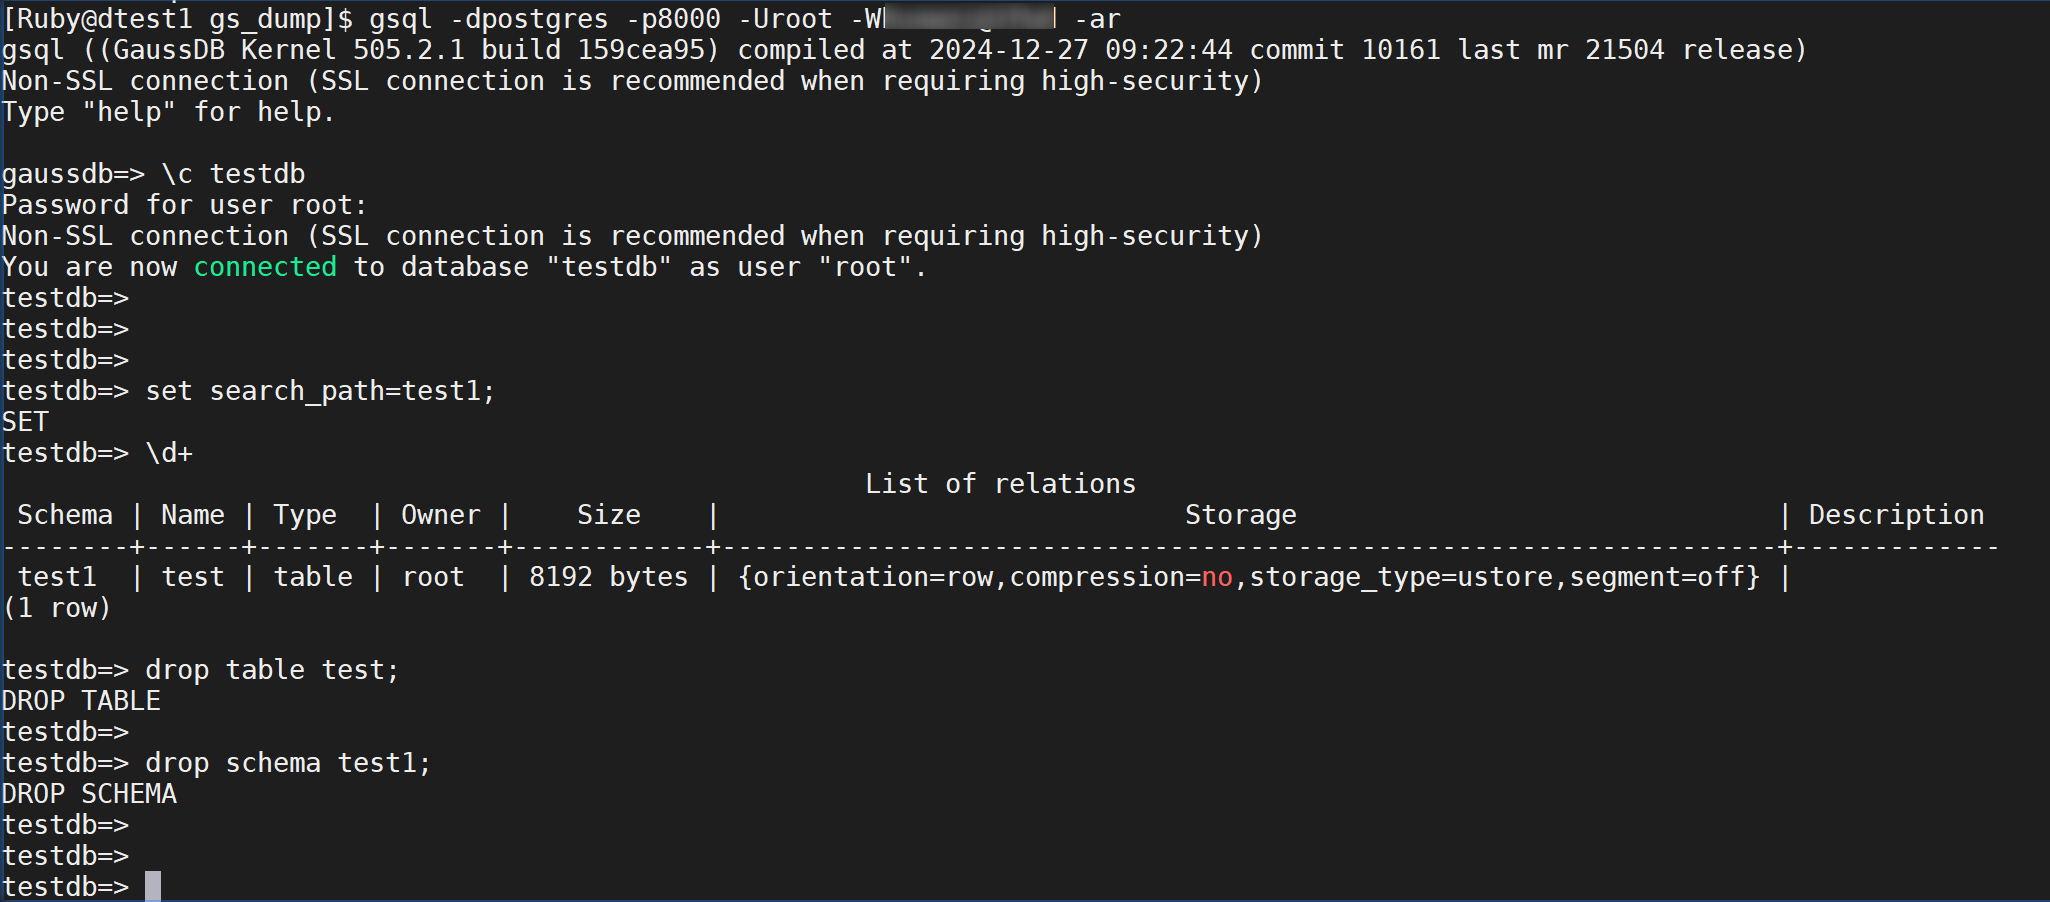
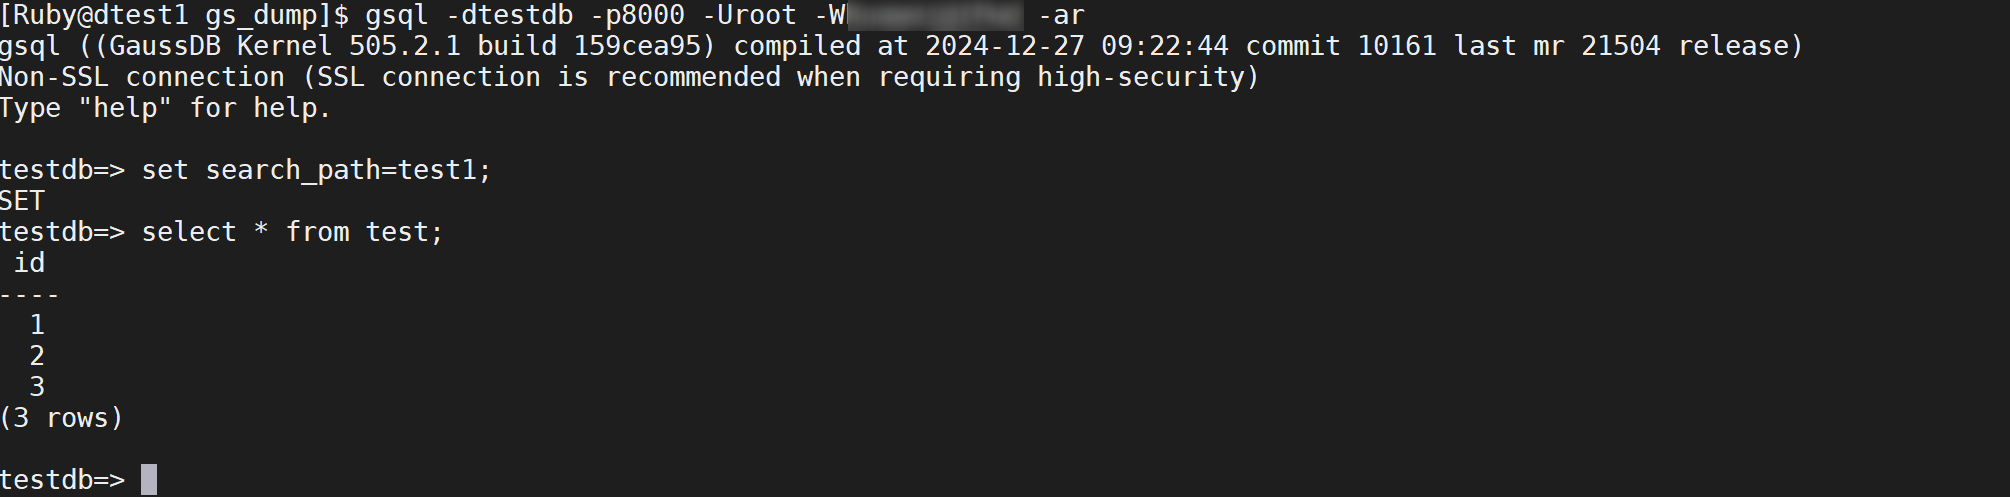
testdb=> set search_path=test1;
SET
testdb=> \d+List of relationsSchema | Name | Type | Owner | Size | Storage | Description
--------+------+-------+-------+------------+------------------------------------------------------------------+-------------test1 | test | table | root | 8192 bytes | {orientation=row,compression=no,storage_type=ustore,segment=off} |
(1 row)testdb=> drop table test;
DROP TABLE
testdb=>
testdb=> drop schema test1;
DROP SCHEMA
testdb=>
testdb=>
testdb=>
步驟2:恢復schema
gs_restore -h xxx.xxx.0.71 -p 8000 -U root -W xxxxx -d testdb -F c /home/Ruby/gs_dump/testdb_bak0725.dmp 結果:

步驟3:驗證數據:
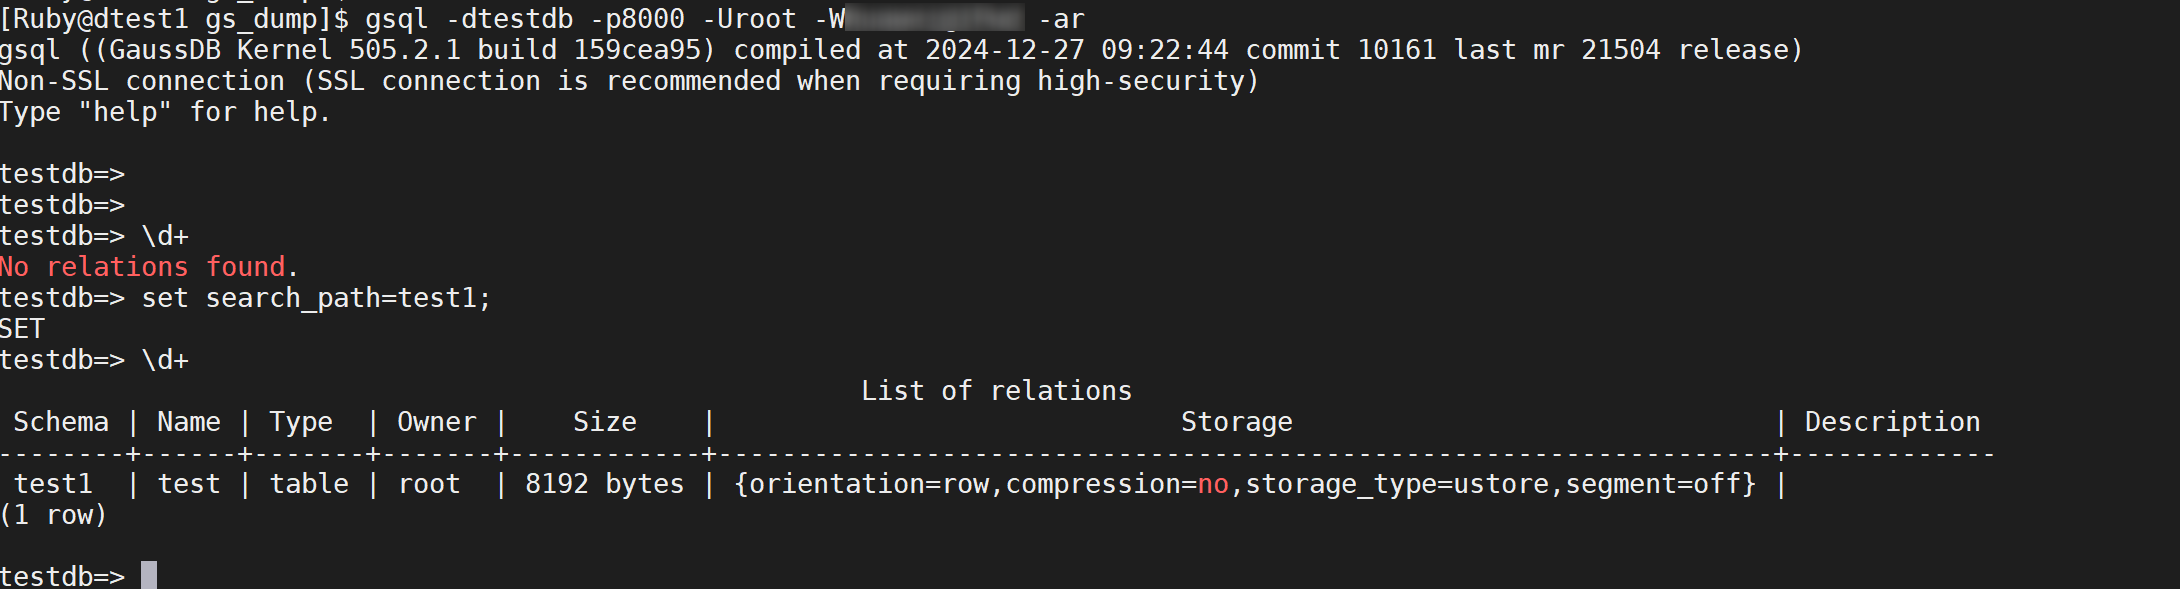
原來test1模式下面的對象導入。
3)恢復表定義
步驟1:刪除表test

步驟2:恢復表定義
gs_restore -h xxx.xxx.0.71 -p 8000 -U root -W h******Pwd -d testdb -n test1 -t test -e -c -s /home/Ruby/gs_dump/testdb_bak0725.dmp執行結果:

步驟3:驗證
原來表結構已導入
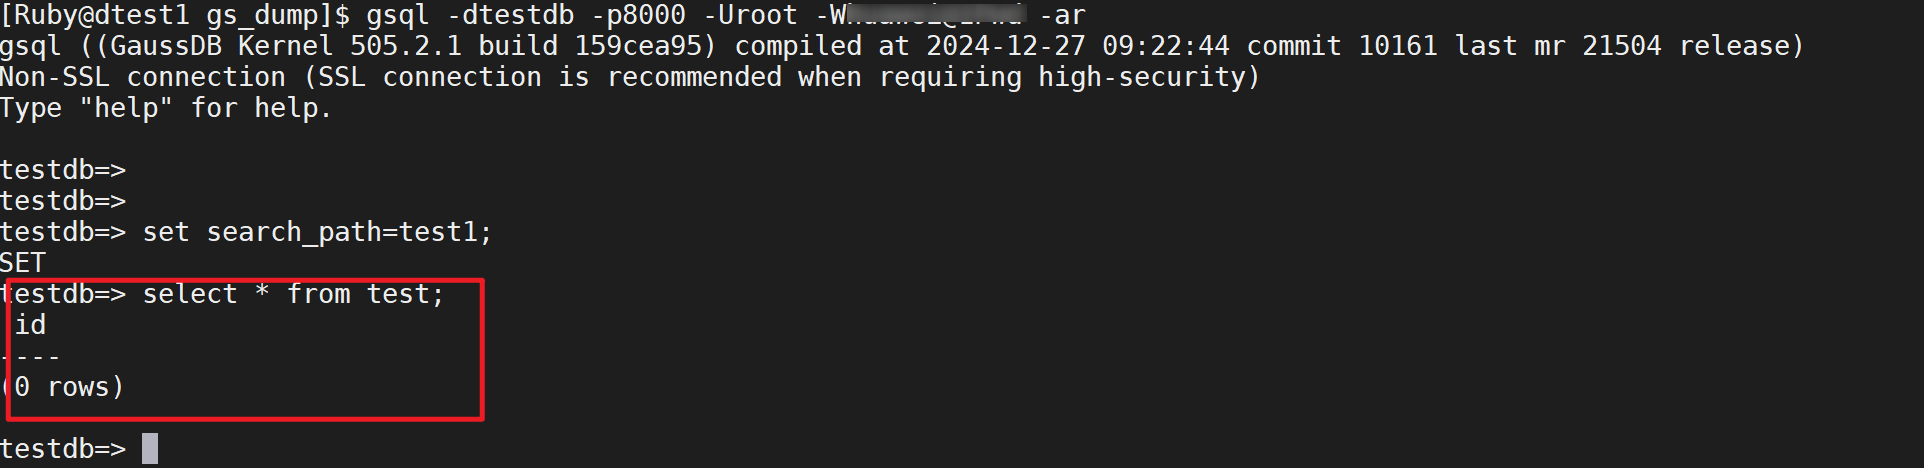
4)恢復表數據
步驟1:執行恢復命令
gs_restore -h xxx.xxx.0.71 -p 8000 -U root -W h******1Pwd -d testdb -n test1 -t test -e -a /home/Ruby/gs_dump/testdb_bak0725.dmp
步驟2:執行驗證
原來表的3個記錄已恢復
7 批注
GaussDB邏輯備份在一定的場景下非常的有用,如開發有SQL腳本與數據遷移到測試庫,還有分布式環境下分布鍵重新定義的場景。

 運行HelloWorld)
區別)

)


常用類)


主頻和時鐘配置實驗(1))
創建型:生成器模式詳解)